Ceiling and wall cladding using PVC panels is becoming increasingly widespread and popular. It's simple, affordable and aesthetic option. In most cases, when installing such panels, a frame and lathing are used, but in some situations this can be avoided. If the panels are installed without lathing, a special glue comes to the rescue, which will act as a fastener between the wall and the panel.
How to attach PVC panels to a wall without lathing
Fastening PVC panels to the surface without using lathing is a process with correctly completed work steps, smart choice glue.
In the process under consideration, glue plays a vital role, and therefore its characteristics and properties will determine the quality of the repair as a whole.
When is it possible to install it yourself without lathing?
Attaching PVC panels to a wall or ceiling without lathing is quite simple, and it is quite possible to handle such a task with your own hands. This option requires the use of a minimum of tools, knowledge and effort. Among the main requirements are criteria for the condition of the wall, which must be dry and even, as well as the choice of adhesive composition. It is not recommended to use this option for specific rooms with temperature differences and non-standard operating conditions.
When fastening without a frame is impossible
 There are a number of cases when certain restrictions are imposed due to which it is simply impossible to attach plastic panels without a frame.
Among the main such cases are:
- the wall has significant defects or unevenness;
- the old coating is not removed or is partially removed;
- the wall surface does not dry out.
Of course, this is not a complete list, since in each individual situation and room the conditions may be different.
How to attach plastic wall panels simply to a wall without a frame: options
In the case where wall panels are attached directly to a bare wall, the only option for attaching them without additional devices and damaging the wall is gluing. The choice of glue, as well as the preparation of the surface, should be taken responsibly. Depending on the quality of the materials used, as well as the thoroughness of the preparatory work, the final result will depend. Additionally, the reliability and durability of the fastening may also vary depending on these aspects.
What acts as a wall mount
In the case when PVC panels are installed without lathing, a special glue acts as a fastening to the wall. Assortment of glue on modern market represented by a variety of brands and varieties. It is recommended to refer to the ratings of individual brands and their manufacturers, choosing only the best products.

Among all the options offered for sale, it is recommended to pay special attention to glue for gluing plastic.
 When choosing a glue, you should pay attention to some features:
- After drying, it should acquire transparency and form a film layer;
- the glue must be resistant to moisture, frost and any temperature changes;
- must provide long-term and reliable fixation;
- should bond surfaces for a long period and harden quickly.
It is not recommended to use hot melt adhesive to attach the panels. When temperatures fluctuate, it can expand, up to the complete separation of the fragment from the wall surface. Liquid nails and polyurethane sealant are more effective.
What materials are used for mounting on a wall?
In the case where installation is carried out directly on a bare, pre-prepared wall, the workflow will require:
- plastic PVC panels;
- specially selected glue;
- building level;
- grinder for cutting plastic panels;
- devices for marking.
In addition, do not forget about the materials that will be used for preliminary leveling, coating and degreasing the surface.
How to attach PVC wall panels
The fastening of PVC wall panels is carried out according to a certain algorithm. Mounting to a wall without battens is a simple process that anyone can do.
Before you begin installing the panels, you should first prepare the surface. To do this, the wall is initially leveled, cleaned and degreased.
 The further order of work will be as follows:
- Take a separate panel and wipe it with a damp cloth from the back.
- Next, glue is applied to the same surface in a dotted manner, with a gap of a couple of decimeters between individual drops.
- After these steps, the panel is applied to the wall.
- After applying the fragment to the wall, it is pressed for a few seconds.
If liquid nails acted as fastening to the wall, then after gluing it is recommended to tap the fragment evenly and tear it off. This is due to the fact that this type of glue requires five minutes of ventilation to acquire the necessary rigidity.
Is it possible to install PVC panels without lathing on the ceiling?
 Before you start attaching plastic panels to the ceiling without lathing, you should first determine the distance between the panels and the ceiling. The mentioned interval depends on the type of lighting used or planned.
In the case when lighting is provided by built-in lamps, the gap should be at least ten to fifteen centimeters. This is necessary in order to completely and completely hide the wiring. It is recommended to outline the locations of the lamps in advance, cut holes for them and install the bases of the lighting fixtures.
In addition to the above preliminary steps, in the case of the ceiling, as well as with the walls, it is necessary to level it and clean it. In most cases, you can do without lathing, and the stages of work will coincide with the installation of panels on the walls. The only difference is that before attaching the fragments to the ceiling, you must immediately install ceiling plinths on three walls. During the work process, it is recommended to regularly use a building level.
If installation work are carried out in a bathroom or other room with high humidity, then the gaps formed in the wall decoration should be filled silicone sealant. This will ensure waterproofness and durability ceiling decoration.
The article examined the features and varieties of such a process as attaching PVC panels to a surface without sheathing. Overall, this is an unusual but common method of installation, which in many ways is not inferior to the process using frames.
Useful video
PVC panels are a popular finishing material that is durable, practical and affordable. Such coatings can be used for cladding walls and for decorating ceilings. Installed plastic panels quite simple and fast. It is quite possible to cope with such work on your own. Today we will talk in more detail about how to attach PVC panels to walls.

Advantages and disadvantages
Plastic panels are a popular and common wall covering. They can be found in many stores specializing in the sale of finishing materials.
Wide sheets and linings made of plastic are in great demand because they have many positive qualities.
- First of all, it should be noted the durability of such finishing materials. In our climate, their service life can be more than 20 years.
- Such materials are wear-resistant. They are not afraid of dampness and moisture. In addition, they are not susceptible to rotting, like natural wood.
- Plastic panels do not require complex and regular care. Dust and dirt do not accumulate on their surface. If the finish gets dirty, it can be cleaned with a regular damp cloth.
- PVC panels have soundproofing properties, making them ideal for wall cladding.

- Using plastic panels, you can divide the space into functional zones.
- Plastic panels are lightweight materials, which makes them quite easy to work with. All processes can be handled without the involvement of assistants.
- Plastic is a very malleable material - it can easily be processed through various types of processing. Therefore, in stores you can find PVC panels that have the most different colors, textures, prints and ornaments.


- These finishing materials can be used in the interiors of the most different styles. The only exception would be elaborate and pompous ensembles, which should contain exclusively expensive and natural elements.
- You can install plastic sheets both in a city apartment and in a private house.
- Behind the panels you can hide various communications, for example, electrical wiring.
- It is quite possible to install PVC panels on walls with your own hands, since this process is not complicated and inaccessible. To do this, you do not need to stock up on expensive tools.


Of course, PVC wall panels are not ideal finishing materials. They also have their own weaknesses.


Knowing all the advantages and disadvantages of PVC panels, it will be easier to work with them. You can avoid many mistakes during the installation process.

Criterias of choice
Polyvinyl chloride sheets produced by various manufacturers have different properties And performance characteristics. When purchasing a suitable material, you need to pay attention to its quality - this is the main criterion on which you should rely.
- their stiffeners have damage (even barely noticeable) or are completely deformed;
- the stiffeners protrude too much;
- if the lines of the design on the front half are poorly defined, and there is also blurring of the edges;


- scratches and other minor damage are visible on the surface of the panels;
- lamellas from one set differ from each other in shade and brightness (such a finish will look inharmonious and awkward on the walls);
- panels from one set have various sizes(in this case, the finishing installation technology will be noticeably more complicated, since elements of different sizes will not be fixed properly).


Pay attention to the decorative layer of the panels. Any drawings, prints and paints should not be blurry or too dull. These features may indicate low quality material. Such coatings will quickly lose their original appearance.
Currently, in stores you can find polyvinyl chloride panels made in China and Europe. European products are considered to be of higher quality.

When choosing a suitable material, you need to pay attention to its density. It is this parameter that determines how durable and wear-resistant the panel is. This indicator is influenced by the number of rigid ribs that are located in the inner part of the sheets.
The optimal indicators are:
- thickness of the front side – 2-1.5 mm;
- number of stiffeners – 20-30;
- total weight of the part is 2-1.7 kg/m2.


To make sure the material is reliable and durable, press it with your finger. The front side of the panel should bend slightly under its pressure, and then quickly return to its original state. If the lamella is severely deformed, this indicates that it contains a large amount of chalk - such materials do not last long and are very fragile.


Preparatory stage
If you decide to install PVC panels yourself, then you should adhere to a specific work plan. If you do everything correctly at each stage, the result will not disappoint you.
First you need to prepare the wall base for future cladding with plastic. this work is especially important if you plan to attach PVC panels in a frameless manner.

Work algorithm.
- First you need to delete the old ones finishing coatings and any elements that may fall off the wall.
- It is also necessary to get rid of all floor defects. If there are noticeable potholes or cracks on their surface, then they should be repaired with a suitable solution.
- Areas that are too protruding need to be trimmed down.
- When the wall is leveled and all defects have been eliminated, it must be processed high-quality primer with antibacterial components. Such coatings are necessary to ensure that the base is protected from the formation of mold or mildew.


Only after all the work has been done to prepare the walls can you proceed to constructing the sheathing (if you are using frame method material installation).

Tools and accessories
For the installation of polyvinyl chloride panels, it is necessary to properly prepare and stock up on everything necessary tools and components.
You will need these tools:
- tape measure with a pencil or marker (indelible) to mark;
- a hacksaw with small teeth for cutting sheet panels;
- building level and plumb line so as not to encounter distortions and unevenness;
- triangle;
- plastic profile, slats for decorating the corners of the structure;

- self-tapping screws, dowel-nails, clamps for fixing different elements based;
- screwdriver and hammer drill;
- sealing compound;
- glue;
- antiseptic.


Also in the process you will need special accessories:
- external and internal corners;
- docking profiles;
- starting profiles;
- F-shaped profiles;
- ceiling and floor plinths.


All tools and accessories must be of high quality and reliable.
Calculation
It is recommended to proceed to finishing work only after all the necessary calculations have been made. This stage needed to find out exact amount PVC panels that you will need for wall cladding. Thanks to accurate calculations, you can avoid unnecessary overpayments due to the purchase of material with a large supply.
Fastening PVC sheets involves their horizontal or vertical arrangement. In this case, the choice remains only with the owners.


- first you need to measure the entire room (that is, find out the length around the perimeter);
- then you should subtract the width of window and door openings;
- Now the remainder must be divided by the width of one PVC panel.

As a result of such simple calculations, you will get the number of panels needed to finish the room. It is recommended to add a couple of additional units to the resulting value. This is necessary so that you have a reserve in case some parts are damaged.

As for calculating the amount of material horizontally, it is carried out as follows:
- first you need to measure the area of the room;
- then the area of door and window openings should be subtracted from it;
- the resulting number must be divided by the area of one panel from the kit.
Add 10% to the final figure - this will be a reserve. It is worth considering that when laying horizontally, plastic panels will have to be cut, so you will have leftovers in the form of PVC scraps.


Installation methods
Installation of plastic panels cannot be called too complicated. According to experts, it is quite possible to cope with such work alone, since PVC sheets do not have much weight.
There are two main methods for installing such facing materials. The first of them is frame. When choosing this installation option, you must be prepared to manufacture a reliable and high-quality sheathing to which the plastic sheets will be attached. The second installation method is frameless. With this option, you do not have to make a separate frame, but you will need to carefully prepare the wall base for the future application of finishing materials. Otherwise, the PVC panels will not adhere tightly and reliably to the floors.
It is worth considering in more detail how the installation of PVC sheets occurs in both cases.

On the frame
When you have completed the preparation of the rough floor, you can begin preparing quality frame. It can be made of metal profiles or wood. Both options are quite reliable and durable. However, if you want to build a structure from wood, then it must be additionally treated with antiseptic agents to protect it from rotting and drying out.
The guide battens must be installed perpendicular to the PVC panels. Simply put, if you are going to attach the sheets horizontally, then the sheathing should be vertical and vice versa.
The frame strips should be mounted at a distance of 30 cm - given value is optimal in this case. These parts must be attached at the beginning and end of the wall, as well as around door and window openings.


It is recommended to fasten the frame structure for plastic panels to the bases with dowels. IN concrete floor 6x40 mm fasteners are inserted (this is necessary so that a piece does not fall off on the other side of the concrete base), and 6x60 mm into the brick one. It is recommended to install fasteners keeping a distance of 50-60 cm.

The sheathing must be placed in one plane– this way the plastic covering will turn out smooth and neat. To achieve this effect, you can use small wooden pads or regular pieces of plywood and install them under the frame strips. Do not forget that these elements also need to be treated with antiseptics.
It is also permissible to use special perforated hangers, which are usually used for plasterboard ceiling structures. Such elements are necessary for placing metal profiles in one plane, but they can also be used in the case of wood frames.


If you plan to use it to build a frame plastic profiles, then you should consider one important nuance: these elements should only be located perpendicular to the polyvinyl chloride panels. The slightest deviation can lead to many problems, for example, the clamps may not close and will not perform their main function. To avoid such errors, you should constantly check the verticals and horizontals.
Experts also advise installing wooden frame elements around the perimeter of the room. the same thickness as PVC profiles, since the starting panels will be attached to these bases.
Next, at the floor and ceiling level, a starting or ceiling plinth should be used. The starting element is a narrow plastic strip. Ceiling plinth is a shaped part with a special cutout.


Laying of PVC profiles should begin in one of the corners(at the top or bottom). The finishing should be fastened to the frame strips. Fasteners are selected depending on the material you used to construct the sheathing. The result is a structure that resembles a frame. It is into this that the PVC panels will be inserted.
Next, you need to trim the starting lamella in accordance with the length and height of the wall. To cut off excess pieces, you should use a hacksaw or a special metal saw. When cutting the panel, do not press too hard on it with your foot or hand - you will push it or break it. In order for the first part to fit correctly in the right place, you need to measure its length again. Subtract 4-5 cm from it and cut it off.


It is necessary to cut off the protruding spike at the starting strip. After this, the cut side of this part must be inserted into the corner profile, tucking the edges into the upper and lower profiles. It is worth tapping lightly with your palm to drive the bar as deep as possible.
Be sure to place a level against the edge of the installed element to check its levelness. If the part is positioned correctly, then you can safely fix it to each lathing strip.


When you install the launch panel, you should cut the second one, join it to the first one and secure it. Further actions are very simple and uniform. Problems often arise only with the installation of the last lamella on the ceiling. Most often, this part has to be cut to width, after which you need to try to tuck it into both the groove and the profile (starting or corner) at the same time. This is not always possible to do carefully, since the plastic wrinkles easily. To avoid such a problem, you should not install a second corner profile. In this case, this part is put on a finishing panel adjusted to size. These assembled elements are then joined to the previous lamella. The profile is assigned only after these actions.

Further covering of the floors with PVC panels occurs in exactly the same way.
According to experienced finishers, the frame method of installing plastic panels is reliable, but more complex than frameless.
Frameless
In cases where the floors are smooth, plastered or covered with plasterboard, they do not require the installation of lathing for plastic finishing. In this case, it will only take away the free space in the room. PVC panels are attached to such bases using silicone, liquid nails or polyurethane foam.


However, in this case, the starting panels will still have to be fixed to the walls using dowels.
After this, the following is applied to the back half of the sheets:
- foam (it is better to lay it on PVC sheets in a zigzag pattern);
- silicone (it is recommended to apply it to the panels in small portions at intervals of 10-15 cm).
Then the bar is inserted into the profiles and pressed tightly. After this, it is fixed using fasteners. Further installation of plastic panels should continue according to the same principle.


The main advantage of this installation method is that it takes minimal free time. However, you can only use it if the walls in your home are perfectly flat surface without serious flaws. It is worth considering that in the future it will hardly be possible to remove such finishing without damaging the plastic.

Wall cladding with plastic is not the best hard work. The main thing is to follow the instructions provided and use high-quality materials/tools.
If you decide to make these yourself Finishing work, you should consider some recommendations from experts.
- It is not recommended to combine PVC panels with more expensive materials. For example, a combination of luxurious marble and polyvinyl chloride will look ridiculous and disharmonious.
- According to experienced craftsmen, hot melt adhesive cannot be used for PVC.
- To carry out proper installation of panels around sockets, you should make all the necessary holes for them in the material in advance. Be sure to turn off the electricity before doing this.


- If you have constructed a wooden sheathing in the bathroom or kitchen, then you need to add a couple more millimeters to the resulting indentation, since wood is subject to deformation under the influence of dampness, moisture and temperature changes.
- PVC panels are a popular and in demand material, but they are not recommended for installation in the bedroom (both children's and adults). For such rooms it is better to choose more “breathable” materials.
- It is not recommended to cover walls with PVC panels immediately after purchase. They must rest in a dry and warm room for at least 2 hours.
- Wall finishing should begin only after the floor and ceiling are ready.
- The advantages of polyvinyl chloride panels include their ability to hide various communications. However, these elements must still be accessible to the owners. To do this, use removable inserts.


- If you use liquid nails to fasten PVC sheets, then you should not delay removing their sagging - these compounds dry out very quickly.
- Wall finishing materials should not have different openings at the junction points. This must be monitored when selecting plastic panels.
- At each stage of laying PVC panels, it is necessary to check the evenness of the structure using a level. This device will help avoid bevels and curvature of the finish.
- Experts recommend purchasing high-quality polyvinyl chloride panels. Don’t look for too cheap coatings - such materials are already available. Ask the seller for quality certificates for the canvas. Study them carefully. Such finishing materials should not contain toxic compounds.


Design options
Polyvinyl chloride panels look organic in many settings. Designers do not recommend combining such coatings in one ensemble with very expensive and pompous coatings (for example, natural stone). Compared to such finishing materials, PVC sheets may seem too modest and even “poor”.
Plastic panels can enliven the interior of the hallway, corridor, living room, bathroom and kitchen. The main thing is to choose coatings of suitable color and texture.
In a small loft-style kitchen, the dining area can be highlighted with polyvinyl chloride panels, imitating dark red brickwork. Against such a background, a laconic white table And metal chairs with dark wooden backs and armrests. The dining nook will look complete if you hang a large dark clock above the table.


PVC panels can be used to decorate a kitchen backsplash. For example, in a room with burgundy walls, a white floor and the same white furniture, an apron trimmed with a wide plastic sheet with a picture of coffee beans will look impressive.

In the hallway, PVC panels are most often used. In such rooms, coatings that imitate brick and stone look especially attractive. As a rule, they are adjacent to regular wallpaper neutral colors. For example, canvases imitated with light brown stone will look harmonious in tandem with yellow wallpaper and a wooden entrance door.

Also, PVC panels with a silk-screen printing effect look good in a hallway or corridor. Against the background of such light canvases, both the entrance and interior doors dark shades. Such coverings look attractive next to wooden furniture and decorative items.
With the help of polyvinyl chloride panels you can enliven the interior of the living room. In such environments, 3D coatings with relief surfaces look especially original and stylish. For example, you can use spectacular textured black canvases to decorate an accent wall with a TV, and place a dark chocolate woven sofa opposite it. To prevent the ensemble from seeming too dark and oppressive, light laminate should be placed on the floor.


Plastic wall panels are a low-budget way to beautify and improve residential, office and public premises. Caring for the coating is not difficult: the coating can be washed with water and powders, is chemically resistant, belongs to the group of materials with a medium fire hazard, and does not create an environment for the development of mold, bedbugs, cockroaches and bark beetles. High moisture resistance allows the panels to be used in showers, bathrooms, kitchens and public places. The main advantage of plastic wall panels- they are attached even to crooked walls. Covering this material transforms a room, adds aesthetics and is in keeping with modern fashion influences.
Types of plastic, decorative, wall panels

- There are two types of panels: for internal and external needs. The external difference between the species is barely noticeable. The main difference is the composition and quality of the material.
- Panels for external use have a more durable structure and are resistant to UV rays and temperature changes.
- Panels for interior work- have a high level of environmental friendliness and thermal conductivity.
Both types of material are used to protect against noise and cold. Color solution has the entire gamut of the spectrum, choosing a color scheme for the interior is not difficult.
The price of plastic wall panels is from $3 per m2. The cost of finishing plastic panels starts from $1 per meter.
Installation options for plastic wall panels
Installation of wall panels does not require many working hours. They are quickly placed on the prepared crate. A room with a total wall area of 40 m2 is completed in 3-4 hours. The main time expenditure is on the manufacture of the sheathing, up to 10-20 hours.
Manufacturing of sheathing:
Lathing is a special foundation; the strength and quality of its base affects the service life of the coating. The method is used for walls with a curvature surface, bad plaster, an ugly base. In cases where it is necessary to lay wiring between the wall and the finishing. Communications or finishing with soundproofing material.

The lathing is made from wooden blocks 40x40 mm:
- Attaching the sheathing for vertical wall panels is done at a horizontal level. The basic rule for installing sheathing is to maintain perpendicularity to the finish being installed.
- To avoid deformation of the panels for any objective reasons, maintain a distance between the bars of up to 500 mm.
- The beams are attached to the base with screws.
- To extend durability, the attached sheathing is coated with a moisture-proof and fire-retardant mixture.
Fastening plastic wall panels to the sheathing:
- The panels are installed from the corner of the room.
- The first panel is installed with a “ridge” in the corner.
- Holes for self-tapping screws are drilled in the grooves.
- Fasten the panel to the sheathing with self-tapping screws.
- Install the second panel. The ridge of the panel covers the groove first, masking the screws for fastening to the sheathing.
- The final interior design is completed with skirting boards, fillets, and corner strips.
- They are attached to wall panels with screws or liquid nails.

Professional method of fixing plastic wall panels
This method is used by installers for installation in public or office premises. The essence of the method:
- The final decorative elements are being installed to the sheathing. They are secured with self-tapping screws.
- The panels are bent in an arc and inserted into the grooves of the elements.
- The panels are held at the top and bottom, leaving the rest of the area unattached.
The quick installation method allows you to complete the work in 1-2 hours in a room with a total wall area of 45 m2. This method is used only for plastic wall panels that have high elasticity and bending strength.
Installation of plastic wall panels with construction staples
Method for flat, smooth surfaces. The construction bracket fits easily into the wall material and does not require much force.
- The level marks the exact position of the panel along the coordinate axis. The corner from which the installation will go is marked.
- Staples are driven in along the line, with a quantity of at least 4 units. For high walls, the recommended number is 6-9 pieces.
- The staples are secured with nails. The marking of nails is selected according to the size and protruding part of the staple.
- The ridge of the first panel should fit into the brackets.
- The second panel fits into the groove of the first.
- A line is drawn for installing brackets for the third panel.
- Further installation proceeds according to the scheme described above.

How to install plastic wall panels using adhesives
The method is used for smooth walls, in the absence of special tools. The adhesive composition is used for application to the wall surface.
- The wall is first puttied, the surface is degreased and allowed to dry.
- For walls that absorb solution and moisture, they are treated with a primer for the appropriate purpose.
- Dilute the adhesive according to the instructions on the package.
- Apply to the wall surface with a roller, brush or spray gun.
- Make vertical and horizontal markings on a clean surface.
- Cover the area with liquid glue.
- The panel is attached to the layer of glue, pressed for the time indicated on the packaging for setting with the base.
- Coat the next area, under the second panel.
- The panels are connected with a groove into the ridge.

The method allows you to do without fastening the panels with self-tapping screws.
To place decorative and functional shelves and hangers on a wall with plastic panels, sockets for fastenings are made in advance in the rough wall, and not on the finish. The holes are made as deep as possible. Then the dowel or screw is driven in. On the plastic surface, a small core is used to mark the place for removing the fasteners.
How to attach plastic wall panels to a metal profile
The advantage of installing on a metal profile:
- The profile lathing is not subject to deformation, unlike wooden beams.
- The cost of a metal profile is lower than the price of high-quality wooden material.
- A structure with high rigidity parameters is made from the profile.
- Metal lathing can withstand heavy vertical and horizontal loads.
Metal profiles are produced different sizes for vertical and horizontal use.
Calculation of profiles for sheathing
One specific type of profile is selected from the assortment, and after that its quantity is calculated.
Calculation example for a wall 2.75x6.0 m:
- The distance between the posts is assumed to be 50 cm.
- For installation you will need the following quantity: 600/50 + 1 pc. = 13 units.
- The length of the standard profile is three meters. For blanks, 25 cm are cut from the standard length to obtain slats 275 cm long.
- Professional trimming of the profile is carried out after setting the zero level and determining the height difference on each surface.

To save money, you should not make the distance between the guides 1 meter. The larger the gap between the gratings, the lower the rigidity parameter of the structure as a whole. For walls in residential and frequently visited official spaces, the ideal, time-tested distance is 500 mm. A greater distance is maintained for utility and outbuildings.
- The calculation of the horizontal components is carried out similarly, only the height of 275 cm is replaced by the standard profile length - 300 cm: 2 x (300 /50 + 1) = 14 units.
- A distance of 50 cm is maintained from the floor for horizontal guides. A distance of 25 - 30 cm is maintained from the middle of the wall to the ceiling.
You should not immediately cut the estimated number of guides. It is worth cutting as the work progresses. It will not be possible to adjust the workpieces by 2.75 m if there are differences in height in the room.
Packing sheathing from a profile
- A guide ceiling profile is installed.
- The profile is attached to the concrete surface with dowels in at least four places. The second profile is installed end-to-end with the first. Reminder: wall length is 6 m, standard profile length is 3 meters. For the ceiling you will need 2 units.
- Profiles are aligned with high precision. The aesthetic design of the future wall depends on their installation.
- A plumb line is suspended from the attached ceiling guides. Vertical tapping is carried out at least according to three marks.
- Guides are installed on the floor surface according to the marks.
- The profile is nailed onto a wooden floor using self-tapping screws or dowels. TO concrete floor regardless of the top covering: linoleum, laminite, tiles, the PVC profile is attached in the same way as ceiling mounting.
- As a result of the work, two gutters are obtained: one at the top, the second at the bottom. The estimated 13 units of racks are inserted into these gutters.
Installation of racks:
- Markings are made with chalk.
- A plumb line is hung at the installation point. The length of the stand is measured.
- Using metal scissors, a piece of measured length is cut from a standard profile.
- Slightly tilting the profile, place the segment in the guides, visually aligning the vertical. More precise adjustments are made with a level.
- Self-tapping screws are used for fastening. A screwdriver is used to fasten it. Each guide uses 2-3 units of fasteners.
Manufacturing and installation of stiffeners
The additional stiffening ribs on which the wall panels are installed are cut off as the work progresses and at the location where it is performed. Installation starts from the wall. The first vertical post has a groove, but the second does not due to the orientation of all posts in the same direction. According to classical technology, it is necessary to install two vertical posts so that the section looks like two letters “P” connected and turned oppositely. Two units of profile significantly increase the cost of the sheathing and do not have a significant effect on increasing the rigidity of the structure. With one profile, a stable and optimally rigid lathing is formed.
An alternative to the second guide is a corner or section of a profile of 70-100 mm.
- Screw a corner or piece to the back side vertical stand. Place the mating part under the stiffening rib.
- Perform similar steps for all sheathing elements.
The technique has been tested and shown to be effective in creating low-cost, durable sheathing.
Horizontal guide sections are installed visually, without a level. The main thing is to correctly install the vertical guides. The position of the stiffeners does not play a special role.

Installation of wall panels on a profile
Calculation of wall plastic panels is carried out. The size of the standard sheet is 122x244 cm. The dimensions of the typesetting panels are more suitable for the example described. Choose a sheet with a width of 300 mm and a length of 3000 mm. The excess length is cut off with a hacksaw with a fine blade. Length measurements are carried out for each section to make it possible to correct unevenness and differences in height of the room.
- The panel is installed from the wall.
- The first panel is leveled with pedantic precision. If you carelessly install the initial plate to the end of the wall, a huge run-up is formed, forcing you to dismantle the entire section done and redo it.
- The exposed panel is secured with self-tapping screws to a stiffener or vertical post.
- Insert the second panel into the groove of the initial sheet. Attached.
- Further actions are repeated according to the scheme described above.
- Near the end of the wall, a narrow gap is usually formed for the whole sheet. Measure the width of the strip near the ceiling, floor and in the middle of the height. A pattern is cut out of thick cardboard. Apply it to the gap and check that the size is correct. Cut the panel in half and insert it into the slot.
- Having finished installing one wall, install the panels on the following surfaces.
Unsightly narrow crevices at the junction of panels with the ceiling, corners and floor are masked with plastic decorative strips, baseboards and corners. Installation and fastening is carried out using special latches. This method allows you to quickly and easily dismantle elements.
Plastic wall panels, photos of rooms with interesting solution interior decoration will be a guide when choosing your own project.
If you have started renovating your bathroom or loggia, but don’t know how to install plastic panels on the wall, you need to thoroughly understand this issue. Study the subtleties and nuances of this process so that home renovation will be a joy and will not bring unnecessary trouble. The cost of such an interior is many times lower, and there are countless design options.
What are plastic panels attached to?
Plastic sheathing is an excellent way to solve several problems at once: the parts are easy to mount on the wall, and they do not require much maintenance. However, to complete the task, it is important to know how to attach plastic panels to the wall correctly. Here important points regarding the installation of such cladding:
- PVC panels can be fastened to the wall using nails, self-tapping screws, or use special “Liquid Nails” glue.
- If the walls are smooth, then you can install fasteners directly to them: in the case of a wooden or soft surface, self-tapping screws are suitable, but for concrete you need to use dowel nails.
- If the walls are difficult to level, first install a special wooden or metal lattice frame.
Each fastening method has its own nuances:
- If nails are used, it will not be possible to remove the slabs to use them in another place: during dismantling, the parts will simply break into several parts.
- Clamps or staples driven in with a special stapler work best.
How to properly attach PVC panels to the wall
To understand how to attach plastic panels to the wall, remember a few useful tips:
- Cut the elements themselves, placing them face up.
- To protect your eyes, be sure to wear construction glasses while cutting parts.
- When driving nails, it is important to hit the nail head clearly, otherwise dents will remain. It will be impossible to correct such a defect.
- Do not remove until the installation process is complete. protective film so as not to leave dirty marks on the casing.
- After installation, wash the walls only with soapy water so as not to spoil the structure or design.
On a wooden sheathing
The question of how to attach plastic panels to the wall can be solved by lathing made of wood. The slats must be screwed at a distance of about fifty centimeters. Wooden beams must be perpendicular to the direction of the PVC: if the details of the future interior are located vertically, then wooden structure It is best to nail it horizontally.
- First of all, install the fittings. Attach the outer and internal corners, then the final element - the ceiling plinth, and at the end - molding with lamellas.
- Next, install the first part connecting the fastening elements. Secure with nails or staples from the side of the wide mounting flange.
- To ensure that the entire structure does not turn out crooked, check the first before attaching the next part. It should stand straight.
- Mount the narrow shelf of the second element to the first, leaving no gaps.
- So sequentially attach all the PVC panels. Only the very last element differs: it must be inserted with force to fix the entire structure. If the size does not fit the remaining space, trim the piece along the trim with a knife.

Using a metal frame
If there is always high humidity in the room, for example, in a sauna or bathroom, then the wood will quickly swell and you will have to do the repairs again. How to attach plastic panels to the wall in this case? Metal mounting structures are suitable. To simplify the installation process of the cladding, special clips are used. Thanks to them, you can easily remove interior elements and attach others.
When installing sheathing, be aware that the material may expand as temperatures change. When using a wide beam, sound insulation or insulation can be added to the free space. So simple plastic panels will help solve several problems at once: create a tasteful interior and retain heat inside the room.
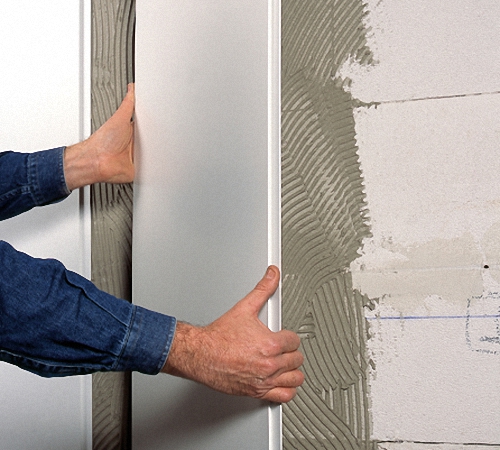
Installation of PVC panels without lathing using liquid nails
For smooth walls, use construction adhesive, but during such repairs, wear a respirator and ventilate the room. The benefits will outweigh all temporary inconveniences. “Liquid nails” do not affect plastic and dry quickly, which makes it possible to correct details on the wall. This glue is environmentally friendly and does not depend on changes climatic conditions(temperature and humidity changes).
- Before gluing the panels, it is necessary to prepare the walls: remove old wallpaper, tiles and plaster, smooth out any inaccuracies and prime the surface.
- At the very beginning, remove the slabs from the packaging for thirty minutes to allow adaptation to the humidity in the air.
- Prepare the glue itself: cut off the tip, put on the cap, open it and install the product in the construction gun.
- Draw dots, a lattice, or a zigzag pattern on the wall.
- At the time of gluing, press the part against the wall so that the glue will better adhere to the entire element evenly. You can use rubber roller. The first couple of minutes it is easy to adjust the position of the structure, and after 20 minutes the glue will set.
- The final step is to “seal” the seams between the PVC parts and other elements of the bathroom with sealant. The wall profile is ready.

When designing interior finishing work, the question of choosing a material for such work often arises. Today, the construction market offers a large selection of finishing materials. But it is worth remembering that the material for such work is selected based on the use of the room, and using the wrong type can lead to destruction or rapid deterioration of the appearance of the entire finish as a whole. One of the universal finishing materials is PVC panels. Since the appearance of this material, this finish has been quite popular for a number of reasons.
Polyvinyl chloride (PVC) panels are a type of finishing material made on the basis of polyvinyl chloride with the addition of various kinds additives IN construction stores these plastic panels are called lining. It is used for finishing any building elements, as well as premises in general. The use of PVC panels is mainly used in places where dry finishing is required; this material can also be used for both interior and exterior work.
Plastic PVC panels
Types of PVC panels
This finishing material can be divided into two types:
- Ceiling panels;
- Wall panels;
Their difference is that Shelf panels are thinner . This is explained by the fact that when mounted on the ceiling, the lining will not bear any loads, so the production of panels with a large thickness will not be required for ceiling decoration. Also, the ceiling lining is significantly lighter in weight, and this greatly simplifies the installation process, and at the same time reduces the weight of the entire suspended structure.

Also, PVC panels can be divided according to the method of connecting the lamellas:
- Seamless;
- Embossed;
- Lamels with chamfer;
Pros and cons of PVC panels
When choosing a finishing material, you should know and take into account all the positive and negative qualities. For PVC panels the following can be noted: positive traits :
- Easy installation;
- Long service life;
- Availability;
- Large selection of colors;
- Does not require special care;
- This material is suitable for finishing any room;
Along with positive qualities there is also a number of disadvantages , which you should pay attention to when choosing it:
- Low impact resistance;
- This material is not resistant to ultraviolet radiation. That is, it is not advisable to install the lining in places that are constantly exposed to the sun;
It is worth noting that such shortcomings can be removed depending on the pricing policy. Therefore, when choosing PVC panels, great attention should be paid to these parameters.
Surface mounting methods
Before installing PVC panels indoors, you need to decide on the mounting method. Here you should know that the panels can be attached in three ways.
- Vertical mount;
- Horizontal mount;
- Diagonal fastening (rare);

The method of fastening must be determined in advance based on the design features of the room. This is necessary in order to properly mount the frame. In some cases, if it is necessary to sheathe a column, then only diagonal fastening is used. In most cases, when installing lining, the method of fastening depends only on the wishes of the customer.
Panel Fastening Tools
At self-mounting PVC panels will require a tool that needs to be prepared in advance so as not to interrupt the sequence of work for a long period. To complete the work you will need:
- Hammer or drill;
- Bulgarian (angle grinder);
- Rule;
- Level;
- Roulette;
- Stapler;
Any of these tools is necessary, since when performing some tasks manually, the quality of the entire finish as a whole can seriously suffer, which will entail additional costs for the purchase of material. Therefore, you should not neglect such nuances.
Choosing a frame for PVC panels
In order to carry out all installation work efficiently, you should first familiarize yourself with preparatory work. Installation of wall or ceiling panels 90% depends on a high-quality frame for them. It is intended for fastening panels, since such material is not used on the main surface. In some cases, it also performs the function of leveling the main surface.
The frame can be made from wooden slats or from a metal profile. This profile is used for plasterboard works. The difference between these materials lies primarily in pricing policy. But it is also worth noting other nuances.

Wooden frame It is made faster and will cost a little less, but before installing it, additional costs and time will be required for fire-prevention wood treatment. Also, if the rail was purchased raw, after its installation it may change shape. As a result, more dowels will be required to secure it.
Main advantage metal frame is its durability and ease of operation. He doesn't require any additional work with him.
It is also worth noting that if the walls are uneven, the wooden slats will require more than the metal profile. A metal frame is simply necessary in places with high humidity, since under such conditions the wood can be affected by fungus and the entire frame can collapse in a short period.
To choose the right material for the frame, you will also need to take into account the location and type of wiring if the work is carried out indoors.
To properly install PVC panels, you initially need to make a lathing (frame). This is done as follows. First, a visual inspection of the surface where the panels will be installed is carried out. At this stage, it is necessary to identify defects in the wall and, if any, they need to be eliminated. Afterwards a check for irregularities is carried out. This will require a rule and a level. To determine the inclination of the sheathed surface, you can also use a plumb line.

Checking the unevenness of the wall
At the next stage, you need to decide on the method of fastening the lining sheets. If it was selected horizontal mount panels, frame slats must be installed vertically. When the panels are mounted vertically, the slats are mounted horizontally. Marking is also carried out to determine how many slats are required for the sheathed surface. The slats should be placed at a distance of no more than 50 cm from each other. A necessary condition is that the first and last slats must be placed in the corners of the sheathed surface.
When all the nuances have been determined, you can begin the actual work. The first rail is installed from the corner and secured to the wall using dowels. During installation, it is necessary to strictly control the evenness of the installation using a level. The next rail is mounted in the opposite corner. After which, a thread is stretched between them, and all subsequent slats are installed along it. The end result will be a frame onto which PVC panels can be attached.
Before installing the panel sheets, corner moldings are initially installed and stapled to the frame. In another embodiment, starting moldings can be attached along the perimeter of the sheathed surface if the sheathed area does not have corners.

PVC panels are mounted using a stapler. They are connected to each other using side slats.
You can also watch video instructions for installing lathing and fastening PVC panels in the video:
Installation of PVC panels on the ceiling is carried out in the same way as on the walls. A significant difference is that all work is carried out above head level. On initial stage it is necessary to assemble a frame for the ceiling decoration. In such cases, it is more appropriate to use wooden slats, since it will be a little easier to work with them, but do not forget that the metal sheathing will still last longer, so you can choose it. Also, before starting work, the method of fastening the sheets is determined. For such work, any fastening method can be suitable. This parameter depends more on the design of PVC panels.
The frame for the ceiling cladding is made in the same way as for the walls. When constructing the ceiling sheathing, consideration should be given to the gasket electrical wires. Since PVC ceiling sheets are thinner than wall sheets, it is necessary to provide in the frame additional elements for a chandelier or spotlights.

Just like in the wall version, moldings (ceiling plinths) are attached along the perimeter of the ceiling.

Installation ceiling skirting boards on the sheathing
Fastening is done to staples using a stapler for wooden sheathing and to self-tapping screws for metal sheathing.

You can also watch several videos with instructions on how to PVC installation ceiling panels:
Fastening PVC panels to columns
Sometimes there is a need to sheathe a column PVC panels. This is a rather labor-intensive task if the column has round shape. But such work can also be done independently. To cover the column, you will need to calculate the required amount of metal profile, since a wooden frame cannot be used. The whole point of column cladding is the correct installation of the frame.
The metal profile has a U-shape. You need to cut triangles along its edges on both sides. This can be done using a grinder or metal scissors. This way the profile can be bent into a perfect circle. Its fastening is carried out using special metal plates, which are initially attached along the entire circumference. Then the profile is mounted on these plates.
Fastening the lining in such cases is usually used diagonally, since the sheets of panels are rectangular in shape and can be easily attached to a round surface.
You can also watch a video on this topic:
Fastening PVC panels to a metal profile
To install PVC panels on a metal frame, the first thing you need is to correctly calculate the required amount of profile. To begin with, you need to secure profile guides (UD) along the entire perimeter of the sheathed surface. Their installation is carried out along a pre-marked line. If you have a laser level, this work can be completed much easier and faster.
The next step will be the installation of wall profiles (CD), they are located at a distance of 50 cm from each other along the guide profiles. When the installation of wall profiles is completed, they are secured using fastening plates every 30 - 40 cm. Such a frame is in many ways reminiscent of sheathing for plasterboard.

Installation of metal lathing under PVC panels
At the next stage, PVC panels are cut and installation is carried out. They are fastened using self-tapping screws to the profile. It is important not to forget that when assembling the sheathing, the wall profiles should always be mounted perpendicular to the direction of fastening the panels.
As with wooden frame, installation of starter moldings is also required if the surface does not have corners or turns.

Fastening PVC panels to metal sheathing
An unpleasant moment when working with metal profiles is the fastening of the panels to them. This process is very labor-intensive and time-consuming.
How to attach PVC panels without lathing
Sometimes there are cases when PVC panels are mounted without a frame. But such fastening is not very popular since the lining sheets will repeat all the unevenness of the sheathed surface. But for decoration the following method is used. A sheet of plywood, chipboard or particle board is initially attached to the surface to be sheathed. This is necessary in order to level and strengthen the entire sheathed surface. Next, a sheet of lining is cut to the specified dimensions and attached to a wooden base using a stapler or self-tapping screws.


