When a kitchen renovation begins, the question of ceiling equipment also arises. Many people prefer to trim it with plastic. Let's look at the advantages and disadvantages of a plastic ceiling, and whether it is possible to install it yourself without involving specialists.
The ceiling made of plastic panels in the kitchen looks quite aesthetically pleasing
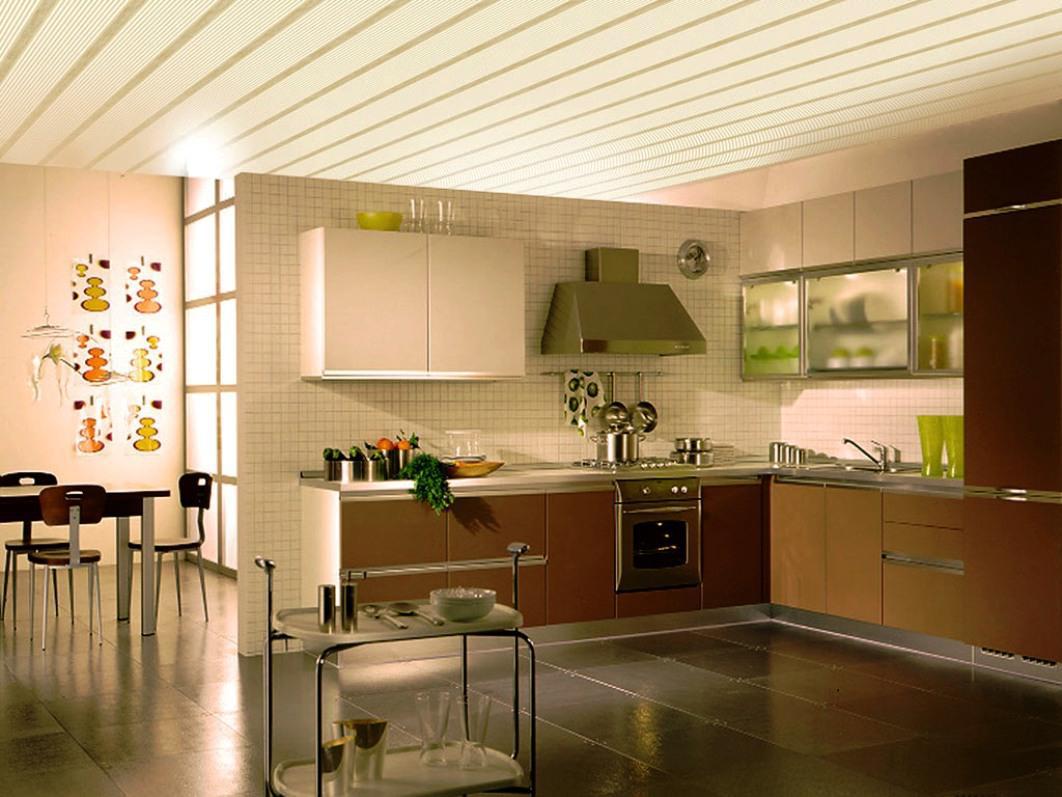
Plastic ceiling white looks unobtrusive, without attracting unnecessary attention
- 1 Features of plastic panels
- 1.1 Advantages of panels
- 1.2 Disadvantages of the material
- 2 How to choose panels
- 2.1 Quality comes first!
- 2.2 Calculation required quantity material
- 3 How to do correct finishing ceiling with plastic panels
- 4 Photos and videos of kitchens with ceilings made of plastic panels
- 4.1 Photo gallery
- 4.2 How to make a ceiling from PVC panels
Features of plastic panels
Plastic panels are a specific material that has many advantages, but also has a number of significant shortcomings. That is why it causes so many reviews that are completely opposite to each other.

This is what standard PVC panels look like

An example of finishing a ceiling with plastic panels
Advantages of panels
The advantages of plastic panels include:
- low price. Finishing the ceiling with plastic panels will cost much less than tiled or tensioned analogues. But cheapness does not mean that the panels are cheap appearance. By choosing the right panels, you can decorate any kitchen;
- ease of installation. To install panels in the kitchen of a small house with an area of 6 m2, a professional needs no more than 3 hours. Of course, if you are new to the construction industry, it will take more time, but in any case you will have time to complete the installation in 1 day;
- moisture resistance. Plastic is not afraid of water, so this material is ideal for installation in places where air humidity is constantly high: in the kitchen, in the bathroom;
- ease of care. The plastic can be wiped with a regular damp cloth. True, soot quickly accumulates on the surface, so cleaning should be done constantly.

For better protection install a high-quality hood to remove soot and grease from the ceiling

Modern market building materials offers a wide selection of ceiling panels
Disadvantages of the material
As for the disadvantages, they are also present:
- not very cozy appearance. Plastic is usually used to cover offices, so it is associated with the office nature of the room;
- Over time, colored panels fade, and white ones turn yellow. The ceiling will need to be replaced after about 5 years;
- after a few years, seams appear on the surface of the ceiling. This is due to constant changes in temperature and humidity, from which the plastic gradually deforms.

Over the years, the ceiling may turn a little yellow
So, there may be plastic on the ceiling, but how much? a budget option.
How to choose panels
Not all plastic panels are the same. They differ not only in color, but also in quality, so when making a purchase, it is important not to make a mistake.

The range of plastic panels is quite wide
Quality comes first!
Low-quality panels will not only last much less, but will also delay the installation process. Choosing panels:

Select quality materials– and the ceiling will serve you for many years
When choosing panels, keep in mind that they differ in production technology:
- most simple option is a pure white material;
- the most popular are panels on which the image is applied using thermal film;
- the presence of complex ornaments indicates that it was not applied on a special machine using direct printing. This option is the most expensive.
Calculation of the required amount of material
Before starting work, it is necessary not only to select the material, but also to decide on its quantity. Typically the panels have following parameters:
- width 25-59 cm;
- length 2.7 – 3 m;
- thickness – up to 1 cm.
As for the quality of the profile, a more reliable UD profile is needed around the perimeter; the rest of the profile can be CD grade.

UD profile is more powerful and reliable than CD profile
Now count the total number of screws and add 10% for the reserve.
The plinth is 3 m long. For the quantity of plinth, measure the perimeter of the ceiling and divide it by 3. As a result, you will get the required quantity.
Sometimes, in order to speed up the process of assembling a structure, some builders use staples instead of screws and replace the profile with bars. Keep in mind that wood reduces the quality of the structure; in addition, it must be treated with a special antiseptic.

Calculate the quantity in advance necessary materials
How to properly finish the ceiling with plastic panels
The technology for finishing the ceiling with plastic panels includes six main stages:

First you need to make a frame onto which the panels will subsequently be attached.

Wiring for future fixtures must be installed before the ceiling installation begins.

Attach one panel to another as tightly as possible and very carefully so as not to damage the material

The baseboard should be cut evenly

After finishing work, remove any remaining adhesive residue.
So, plastic ceilings are quite often used to decorate the ceiling in the kitchen. They are very easy to install, and therefore anyone can carry out the work of installing them. When correct installation, they will serve you for many years. In addition, if it is necessary to restore individual parts, replacing individual panels will be quite simple.
Photos and videos of kitchens with ceilings made of plastic panels
Photo gallery

Painting the panels makes the seams on the ceiling almost invisible

Using multi-colored panels you can create a unique ceiling design

With a little imagination, you can create interesting design

It may seem that we have a suspended ceiling, since the seams between the panels are almost invisible

Seams become more noticeable if they are perpendicular to the window
How to make a ceiling from PVC panels
http://dachaprosto.com/wp-content/uploads/2015/11/Kak-sdelat-potolok-iz-PVH-panelej.mp4The popular polymer became known in the middle of the last century. It is now difficult to imagine a field of activity where polyvinyl chloride is not used. Finishing materials are no exception. PVC products are used everywhere: in offices, social and medical institutions, residential buildings. Today, high-quality plastic meets all EU and Russian standards regarding environmental friendliness and safety. Its ability to withstand moisture, ultraviolet radiation and other external influences is unique. It can withstand heating and cooling up to +- 50 degrees without consequences.
Kitchen ceiling design made of plastic panels.
As for the design potential, PVC leaves behind plasterboard, MDF, and other well-known types of finishes. In the kitchen, a plastic ceiling demonstrates the wonders of transformation into wood, stone or expensive fabric.
Types and properties of PVC panels
Externally, the standard panel consists of two sheets of plastic connected by stiffening ribs. Due to its “airiness” it is much lighter than most of its “brothers”.

PVC ceilings can be combined with any interior design.
Important: The more stiffening ribs, the stronger the product. For a panel 3 m long and 0.25 m wide there should be at least 27-29.

There is a wide variety of PVC ceilings.
The variety of products on the market is off the charts – the color range alone includes hundreds of shades. However, they can be divided according to the following characteristics.
Connection types:
- Seamless, where there is no connection of a certain type. The ends of the panels are adjusted to each other so that on a smooth, flat surface the joints are almost invisible. Seamless plastic ceilings in the kitchen photo fit perfectly into any interior.
- Suture. They are connected using grooves and tenons. The mounted panels have a visible joint, reminiscent of a “lining”.

Unlike other PVC designs, PVC ceilings are affordable.
Shape and dimensions:
- Tile panels are available in sizes from 300x300 mm to 100x100 mm, with a width of 1.5 mm. Indispensable for creating original ceiling compositions with alternating smooth and textured tiles imitating wood and stone. Convenient and easy to install.
- Rack and pinion. Elements vary in length from 900 to 3000 mm, width from 100 to 300 mm, thickness from 4 to 8 mm. Mounted like a lining.
- Sheet plastic. Big sizes the products cover a significant area of the ceiling. They are distinguished by flexibility and integrity of the structure. As a rule, they are mounted on a leveled surface without a frame. Standard sizes sheets range from 900 to 3000 mm in length and from 900 to 1500 mm in width.

Rack ceiling structures made of PVC panels.
Note! Optimal thickness panel ceiling in the kitchen should be at least 7-8 mm. A smaller size may lead to deflections during or after installation.
- Glossy or matte. The gloss is applied with a layer of varnish after extrusion. Matte surfaces are not processed further.
- Smooth or structured. Textured panels are being produced today natural materials– for example, wood or stone.

Glossy ceiling made of plastic panels.
Advantages and disadvantages
It is no coincidence that PVC panels have gained such popularity. They are characterized by whole line valuable benefits.
- The ceiling in the kitchen made of plastic panels photo always has a modern aesthetic appearance, which is achieved with relatively little money and effort.
- Plastic is not afraid of water, which immediately solves problems with flooding from carelessly closed taps on the floor above, as well as with mold and mildew, which this material is simply too tough for.
- It is easy to care for. For a ceiling made of plastic panels in your kitchen, a rag and soap suds once every two to three months is enough.
- Fire resistance is one of the most important properties of polyvinyl chloride, confirmed by numerous studies. For example, in France, PVC items are included in the category of flame-retardant and non-flammable products
- Environmental friendliness. The polymer itself, which has a long service life, does not decompose and does not emit harmful substances. U quality products There must be sanitary and hygienic certificates, which are issued to the consumer upon request.
- Simple installation, accessible even to a person without experience. The panels are fixed to a smooth ceiling using " liquid nails" For uneven surfaces, a frame (sheathing) is first installed, onto which the plastic is attached. Very convenient if you need to cover pipes and electrical wiring.
- Light weight, which is especially valuable when transporting and delivering cargo to an apartment.
- Availability. A kitchen ceiling made of inexpensive PVC panels is a completely budget-friendly endeavor.
- Wide possibilities in decoration. With the help of plastic you can realize any design project.

PVC does not emit harmful substances, is an environmentally friendly material.
The list of shortcomings is much more modest:
- The relative fragility of the material due to its hollow structure. Reliable dent prevention – careful installation. When purchasing, pay attention to the composition: a high chalk content is a sign of a low-quality product that is prone to deformation.
- “Chemical” smell that disappears a few days after installation
- Dark shades may fade in the sun.

Installation of a ceiling made of plastic panels.
Important: When choosing panels for the ceiling in the kitchen, you should definitely conduct a strength test. To do this, you need to press on the surface so that it bends by an average of a third and then release. A low-quality product will leave dents.
Design features
The unique properties of the material provide a variety of designs for finished products.
PVC panels come in glossy and matte finishes, successfully imitating wood, fabrics, and natural stone. Traditional white ceilings have been replaced by panels of all colors of the rainbow, with patterns, drawings, including those made using 3D technology.

3D ceiling in the kitchen.
Glossy or matte
This is one of the questions that the consumer decides for himself. The difference between them is thin layer varnish on glossy. Both have their merits. Gloss will visually expand small kitchen, will emphasize sophistication. Matteness will add comfort and warmth.

Matte PVC ceiling with wood effect.
Colored panels
They provide ample opportunities for interesting combinations. Moreover, each will be original and will emphasize the individuality of the room. You just need to select compatible colors, and also take into account the tonality of the walls and furniture.

White and pink ceiling made of plastic panels.
Patterns
Can be any: floral, geometric, oriental, marble-like. Used in accordance with the chosen decor style. They look good in a separate segment of the ceiling, especially if they complement the pattern on the wall.

The ceiling is made of plastic panels with patterns.
Imitation of natural material
This is done by applying a colored and textured film to the panel. You can imitate everything - from velvet to amber. Plastic that is almost indistinguishable from natural stone or wood, it looks impressive and presentable.

Glossy wood-look ceiling.
3D drawing
A real breakthrough in kitchen decoration was made by panels with 3D patterns. Three-dimensional pictures create the complete illusion of “living” ceilings. Particularly good in spacious kitchens with little furniture.
Plastic without borders
Ceiling made of pvc panels in the kitchen photo design shows the limitless possibilities of plastic. It will satisfy the needs of high-tech fans, fit organically into country, connect the disparate details of the currently fashionable eclecticism, and create neoclassical multi-level designs. Most ordinary interior kitchens can look modern and stylish with it.

Original ceiling made of plastic panels.
A plastic ceiling may well claim to be ideal. It is distinguished by unique performance characteristics, wide variability of texture and color, affordable price.

Multi-level slatted ceiling in the kitchen.
Finishing the ceiling in the kitchen from PVC panels
50 photo ideas for ceilings made of plastic panels
To the choice of finish kitchen ceiling It is worth approaching with special care, because the coating should not only be beautiful, but also practical. The ceiling surface in the kitchen is often contaminated with grease and soot, subject to temperature changes and negative impact moisture. Plastic cladding materials are suitable for finishing ceilings because they are moisture resistant, easy to clean, beautiful, inexpensive and durable.
If you decide to install PVC panels on the ceiling in the kitchen with your own hands, then the installation sequence given in our article will help you make an attractive and durable ceiling covering.
Which ceiling is better for the kitchen, slatted or panel?
When choosing ceiling decoration for the kitchen, owners of houses and apartments often find it difficult to choose between slatted and panel structures. To understand which better ceiling for the kitchen, slatted or panel, it is worth considering the features and advantages of each material.
The slatted ceiling finish is made from aluminum panels. The material is highly durable and reliable. There are mirror, chrome, gold and silver, matte and glossy products on sale. There are also panels imitating marble and malachite. The main advantage of such structures is that there are many options for joining them, which allows you to create unique artistic compositions on the ceiling and complex multi-level structures with clear and smooth outlines.
Important! Main advantages slatted ceilings– beauty, strength, fire resistance and durability, ease of maintenance. But due to the high cost of the material, this finishing option is not often used.
The plastic ceiling in the kitchen can withstand high humidity conditions and is easy to clean, like aluminum slats, but its durability and strength are somewhat lower. Plastic panels cannot be bent to create curved surfaces and transitions between levels. However, their main advantage over aluminum slats is their reasonable price.
The common thing between slatted and ceiling systems is that they are all mounted on a wooden ceiling lathing. To install the structure, you do not need to carefully prepare and level the base ceiling surface. You can carry out local repairs and replace one panel or dismantle and reassemble the covering in another room. Using suspended panel and slatted ceilings, you can level the base surface, hide its defects and engineering Communication.
Important! The disadvantage of any suspended ceiling system is that it lowers the height of the room by several centimeters, which is not suitable for low kitchens.
Advantages of a ceiling made of PVC panels in the kitchen
The main advantage of these ceiling structures is the beauty of the plastic ceiling in the kitchen, which is confirmed by photos on the Internet.
Other advantages of these ceiling coverings include the following:
- The reasonable price of the material forces many consumers to choose it. At the same time, both the panels themselves and the materials for making the frame are inexpensive. Some people are hesitant to cover the ceiling in the kitchen with plastic because of the prejudice that PVC panels are a budget option for cheap finishing. But in fact, there are both inexpensive and not very expensive ones on sale beautiful panels, as well as higher quality beautiful products that will give the kitchen a respectable look.
- Attaching a plastic suspended ceiling is quite simple, so even a person without experience can handle the job. The time spent on installing the ceiling is also small. This usually takes from several hours to one day.
- Plastic is resistant to moisture, it is easy to clean, so the ceiling is not at risk of increased humidity and dirt in the kitchen.
- The material will last a long time while maintaining all its performance characteristics.
- It is convenient to hide utility lines behind a suspended structure - ventilation ducts, wiring and even protruding building construction (ceiling beams, crossbars and purlins).
- The base ceiling surface does not require special preparation or leveling. Moreover suspended ceiling will hide all the shortcomings and defects of the base.
- On sale there are white and multi-colored panels, products imitating stone, marble, wood, textiles and other surfaces. This allows each consumer to choose a material that matches the style and color of the interior.
- You can install built-in lights in the suspended ceiling, which will provide additional illumination for the work or dining area.
The disadvantage of the material is that over time, colored products fade, and white ones turn yellow. In addition, the downside is that due to temperature changes in the kitchen, the seams between the panels often expand. But this usually only applies to low-quality cheap material.
Calculation of material and selection of panels
Today, the range of plastic panels has expanded significantly. There are white and colored products, elements with a pattern, a pattern, a relief surface, gold, silver, with a matte and glossy finish, with imitation of other materials.

The width of the slabs also differs. Standard products have a width of 25-30 cm, but there are coatings with a width of 37, 60 cm. The length usually fluctuates around 2.7-3 m. Thicker slabs are usually chosen for wall finishing, and finishing material of a smaller thickness (lighter) is suitable for cladding ceiling surface. The thickness ranges from 5-10 mm.
To calculate the required number of panels, the ceiling area is divided by the area of one product. To the resulting number add 15% for trimming the material and round up.
In addition to the planks, you will need materials to make the frame. It is usually made from metal profiles or wooden blocks. To count the components for assembling the sheathing, draw a diagram on a sheet of paper suspended structure. We consider wooden slats or profiles on the basis that they are mounted over the entire ceiling area in increments of 600 mm. Also, along the perimeter of the room you need to install a guide profile to fix the transverse slats or an additional beam.
In addition, you will need plastic skirting boards or PVC guide profiles to secure the edges of the panels and hide the junction with the walls. To calculate their number, you need to know the perimeter of the room.
Attention! Don't forget to stock up on hangers that secure the entire structure to the base ceiling. Their consumption is calculated as follows: for every half meter of sheathing, take one hanger.
PVC panel installation technology
Since no special preparation of the base surface is required, installation begins after removing the previous finish, which does not adhere well and can fall onto the suspended ceiling. If there are areas with mold on the base surface, then they should be treated with special antifungal compounds. Before installing the suspended structure, it is advisable to lay all communications and wiring under the ceiling, as well as prepare bases for lighting fixtures.
Tools and materials for work

If you decide to install a ceiling made of PVC panels in the kitchen with your own hands, then stock up on the following tools and materials:
- PVC panels;
- plastic baguette;
- profiles for frame or wooden slats for lathing with a section of 5x2.5 cm or 4x2 cm;
- mounting angle;
- pendants;
- dowels and screws;
- construction stapler and staples for it (if wooden sheathing is installed);
- short self-tapping screws for working on metal (if a metal frame is used);
- hammer drill, drill, screwdriver;
- hammer;
- pliers;
- tape measure, ruler, square, pencil;
- construction and laser level;
- wood hacksaw;
- metal scissors;
- stationery knife;
- ladder.
Installation of wooden sheathing
First, the ceiling sheathing for the plastic panels is made.

Follow the following sequence for assembling the sheathing:
- First, we find the lowest corner in the kitchen. From it we measure down the distance by which our entire ceiling structure is lowered. When calculating this distance, take into account the presence of built-in lighting fixtures. If there are any, then the height of the ceiling lowering is equal to the height of the device base plus 1 cm.
- Using a laser level, we transfer the resulting mark to other corners of the room. We connect all the marks in the corners with horizontal lines on the wall.
- We fix it according to the markings on the walls wooden beam or guide profile. For fixation, we use self-tapping screws with dowels, which we install in increments of 30-50 cm.
- On the ceiling we apply markings for the longitudinal profiles of the frame. We attach the hangers according to the markings in 500 mm increments. If the kitchen area is small or the frame is made of wood, then hangers may not be used at all.
- Next, we install longitudinal profiles or slats with a pitch of 600 mm and attach them to the hangers and guides on the walls.
Installation of PVC panels on the ceiling
To fix the panels around the perimeter of the room, we attach plastic skirting boards with a groove for finishing close to the frame. For fixation we use screws or staples. After this, we cut the finishing material to the required length so that it is half a centimeter less than the width of the room.

We begin installation from the window. We turn the first panel with the tenon away from us and insert its short ends into the groove plastic skirting board. We move the slab up to the wall so that its tongue fits into the groove of the PVC baguette on the wall. We securely attach the panel groove shelf to the sheathing.
We similarly insert the next element with its short ends into the grooves of the plinth and move it to the previous panel so that the tenon fits into the groove. We also attach the element to the sheathing. We cut the last slab to the required width from the groove side and also fix it to the frame, inserting the tenon into the groove of the previous product.
Attention! If necessary, during the installation process we cut out facing material holes for built-in lighting fixtures, heating pipes or ventilation grilles.
The kitchen area is constantly exposed to high humidity and temperature changes. This most strongly affects the ceiling, since vapors, soot, and hot air rise upward. In order not to have to deal with repairs every year, you need to make the ceiling in the kitchen with your own hands, taking into account these factors, choosing the appropriate materials.
What ceilings are suitable for the kitchen?
The ceiling in the kitchen must withstand high and low temperatures, have water-repellent properties, and can be washed easily. Do not use flammable materials or materials with a porous surface. Additionally, you should take into account the possibility of flooding from above and choose a structure that can retain a large volume of water. Or vice versa, choose the type of ceiling that is easiest to restore.

The easiest way is plastering and painting. and the painted ceiling does not fade for a long time original appearance, does not warp when exposed to moisture, is not afraid of temperature fluctuations and is easy to clean. If water leaks from above, the damaged area can be restored in a matter of hours. Both paint and putty are quite affordable, and you can do all the finishing yourself.

Plastic panels are considered an acceptable option for kitchen ceilings. They do not burn, have very low hygroscopicity, and are easy to clean. To avoid deformation from high temperatures, the panels should be fixed with movable fasteners - clamps. It is better to give preference to seamless panels with a glossy finish, on which less soot and dust accumulate. In addition, the plastic ceiling is not afraid of flooding: water almost does not pass through the tight joints and flows out at the corners of the structure.

Stretch ceiling PVC films are also good for kitchens. They look great, are not afraid of moisture and heat, are easy to clean, and most importantly, retain water when flooded. This coating also has its disadvantages: the film can be easily damaged by any sharp object, the cost of the canvas is quite high, and it will not be possible to install it yourself.


The methods described are the most practical and easy to implement. Such ceilings are easy to care for and retain their attractive appearance for a long time. Of course, a lot depends on the intensity of use of the kitchen and quality. The less evaporation, the less impact on the ceiling covering, and vice versa.
Video - DIY kitchen ceiling
A plastic ceiling in the kitchen is not uncommon these days, because plastic lining or PVC panels are effective finishing materials. At the same time, you will not only get a beautiful ceiling covering, but you will also be able to save a lot of money, since the price of such repairs will definitely please you. In addition, plastic panels are very easy to clean; any detergent can be used to wipe them.
Another advantage of this material is the ability to install it yourself, which will certainly interest home craftsmen. Let's consider what features installation work inherent in PVC panels.
Carrying out installation work
The question “how to make a plastic ceiling?” is of interest to many home craftsmen at the moment, since everyone who does not classify themselves as oligarchs wants to save on repairs. Naturally, installing this ceiling structure yourself will be much more profitable than entrusting such work to specialists. In addition, PVC panels are not particularly difficult to install, and anyone can handle their installation.
List of required materials
So, to carry out installation work you will need the following:
- Polyvinyl chloride glossy panels. Their dimensions are standard: 250 mm wide, 600 cm long. The thickness of the material can vary between 5-8 mm. If you do not plan to decorate the ceiling with large and heavy elements, then you can choose the thinnest panels.
- Profiles for fastening the ceiling structure. L-shaped profile, PVC molding plinth, internal and/or outside corner(depending on what ceiling structure you have in mind). Ceilings made of plastic panels in the kitchen are most often installed without lathing, and the junction of the wall and the panel is covered with a foam molding.

- Wood slats, measuring 40-50 mm wide and 20-25 mm thick. The length of the slats is determined by the size of the room. It is advisable to use materials from coniferous species wood Instead of slats, you can use CD and UD profiles, which are used when installing drywall, however, in in this case you will have to attach the panels with screws.
Advice! It is not advisable to use wooden frame in rooms with high humidity, since there is a high risk that the slats will move over time. If you decide to install wooden sheathing, treat the frame with a special protective solution that will protect the structure from both moisture and insects.
- U-shaped metal mount , which is used for drywall profiles. In this case, we will use it to attach wooden slats.
- Plastic dowels and various screws, as well as metal staples for the stapler.
- Electric drill or screwdriver.
- Bench hammer, pliers, stapler.
- Metal scissors, if you will use them during installation metal profiles.
- Construction level, wood saw, tape measure.
- Construction knife, construction corner, marker or pencil.
Tools required for installation
Preparation for installation
Before installing a plastic ceiling in the kitchen with your own hands, you need to carry out certain preparatory work. This applies to the main ceiling on which the wooden frame will be attached.
On at this stage You should knock off any falling plaster or putty from the main ceiling. Remove stains of dampness, mold, and their sources. If you are going to mount a metal frame, then around the perimeter suspended ceiling the bevel (rounding) that connects the wall to the ceiling should be removed.
Frame installation

So, the installation instructions are as follows:
- When installing a panel ceiling in the kitchen, mark the position of the bottom of the frame using a tubular water level. Place marks in the corners of the room, as well as in the middle, using a rope rolled in blue or chockline.
- Using a metal frame, first screw UD profiles to the wall, the lower part of which is installed along the marked line.
Advice! Minimum distance There must be at least 2.5 cm between the main ceiling and the lower level of the frame, otherwise the profiles will not fit and you will have to cut the ceiling.
- After installing the UD profiles, mount the main ones - metal or wooden profiles. They should be mounted on U-shaped mounts to the ceiling. The distance between these fasteners should not be more than 70 cm. Remember, the smaller the step, the stronger and more reliable the structure.
In this case, wooden slats should be fastened with wood screws (25 mm long), and metal profiles with special metal screws called “fleas”.

- Both metal and wooden profiles are leveled using a thread that is pulled between them.
Advice! When installing the ceiling frame, make sure that the distance between the profiles does not exceed 50 cm. Otherwise, sagging of the lining may occur.
- The ceiling made of PVC panels in the kitchen may not be level if there are heating pipes. In this case, you just need to go around them, thus creating a box for them. The most important thing is not to place the plastic panels too close to the heating pipes, because with strong heating this material subject to deformation.
Panel installation
Plastic panels on the ceiling in the kitchen should be 0.5 cm in length less than the distance between the walls. The first panel is fastened with screws. And these screws must be screwed in in such a way that they can be covered with foam molding.
The ceiling in a room does not always have an ideal rectangular shape, and in some cases, in order to install ceiling panels in the kitchen, you will have to “go around” various protrusions, for example, all kinds of cabinets, as in the photo below. To do this, just make a cutout in the panel, there is nothing military about it.

To install the last panel you should do the following:
- Measure the distance between the wall and the second to last panel. Take several measurements, because most walls are not perfectly even around the entire perimeter.
- After transferring the results to the panel, trim it using a construction knife.
- We fasten the last panel using screws, exactly like the first. After this, a baguette should be glued around the perimeter of the panel.
Installation of panels using the frameless method
The panel ceiling in the kitchen can be fixed frameless method in the event that the ceiling base is a flat and durable surface. Indeed, there is no need for lathing here, and the panels can be attached directly to the ceiling.
To do this, you should use adhesive mixtures or liquid nails. Before carrying out work, the air in the room should be relatively dry.
Apply the adhesive mixture using a notched trowel, which is used when laying tiles. Do not spare the mixture - its layer should cover the entire surface of the ceiling. And if there are minor potholes on the ceiling, put more putty in them to even out the surface.
Naturally, this method will significantly save you both time and money. However, in this case, you will have to spend money on buying liquid nails, as well as adhesive mixtures.
Disadvantages of the frameless method:
- It is not possible to install recessed ceiling lights.
- Installation on uneven surfaces is not permitted.
- Plastic panels can only be glued to completely dry surfaces, therefore, in rooms with high humidity you should not resort to this method.
Conclusion

Plastic ceiling panels for the kitchen they are used quite often, especially in small rooms where their installation does not cause any problems. They are extremely easy to use, since this material does not absorb soot and grease. And this quality is very important, especially for those kitchens where there is no hood. But, despite such resistance to soot and ease of cleaning, installing a hood is still desirable, in particular for your health.
If the need arises to restore such ceilings, then you will only have to replace the panels; moreover, if you wish, you can install a plasterboard structure on the same frame.
If you want to get more information, watch the video located on our website. Thus, the various nuances that arise during this work will become clear to you, and you will be able to avoid a lot of serious mistakes, which can lie in wait for a beginner at any stage of installation.