Wallpapering walls is a job that does not cause any particular difficulties. Such repairs have long become commonplace for many owners of houses and apartments. The most important thing is to glue the first strip of canvas correctly and evenly, and then stripe to stripe and the wall is ready. Difficulties during repairs arise only when gluing corners. Let's talk about the rules and features of gluing non-woven wallpaper in problem areas.
Types of corners in an apartment and house
Before, you need to explore the room. There are two types of corners, each of which requires an individual approach when facing interior spaces:
- 1. Internal. There are such corners in every room; it is with them that you usually have to work when decorating interior spaces.
- 2. External. Most often they are found in corridors, and sometimes in living areas of houses and apartments. If there is such a corner in the room, it is with it that the greatest number of difficulties can arise.
Once the room has been examined, you can begin preparing for the renovation. In this article we will look at wallpapering non-woven fabrics. Currently, they are the most popular finishing material for interior walls. Non-woven wallpaper is a paper lining that contains non-woven material that strengthens paper base, making the finish more reliable, attractive and durable.
There are also vinyl facing materials on a non-woven base. They are more resistant to external negative impacts, they can be used in rooms characterized by high humidity. Meter and regular vinyl wallpapers on a non-woven base are glued in the corners according to the same pattern, so the instructions below are suitable for different options finishing.
When preparing for interior cladding, special attention must be paid to the choice of adhesive. Often they use universal glue, which is suitable for all types of surfaces to be treated and for various wallpapers. But professionals recommend using adhesives specially designed for this purpose for non-woven wallpaper. The following brands of glue are well suited for non-woven fabrics:
- Quelyd;
- KLEO Line Optima;
- Emcol Universal;
- Metylan Non-woven fabric.
For repairs you will also need rollers. It is best to purchase several rollers in advance: for applying glue to the wall, for smoothing the finish on the surface, and also for working on joints and corners. It is unlikely that you will be able to use one roller for different purposes, especially if it gets smeared with glue during the process.
To glue corners and vertical surfaces, tools such as a level, ruler, plumb line, scissors, trowel, trowel and others will be useful. It is recommended to prepare them in advance so that you do not have to be distracted from the repairs being performed and do not waste time.
Where to start wallpapering a room?
Angles are considered the most difficult places for pasting not only because of their shape, but also because they are rarely perfectly even. If you paste the walls joint to joint, then when you start pasting from the corner, a strong vertical distortion may appear. Many are sure that warping can be avoided if you start gluing from the window and doorway, mistakenly believing that in these places the walls are as smooth as possible and perpendicular to the floor.
Before you start gluing, you need to confirm that the window or door has no defects. This can be done using a simple plumb line. Very often, even such a simple study shows that the wall surface has significant shortcomings, which can have an extremely negative impact on the quality of the cladding and visual characteristics of the entire room after completion of the repair work.
The method of window covering itself appeared due to traditions of use. paper wallpaper. Starting from the window with an overlap and continuing to mount the panels clockwise, you can achieve maximum inconspicuousness of the joints. However, when using non-woven or vinyl facing materials, such an installation system is not at all necessary.

Professionals recommend starting pasting the wall from the corner, if at least one wall joint is fairly even. Therefore, you need to research first problem areas slope and start work from the angle that has the least disadvantages. A preliminary study makes it possible to find out in advance the actual evenness of the walls and choose the most suitable method of installing the cladding.
Pasting the internal corners of the room
Before starting work on cladding a room, you should decide on the need to pre-level the walls. If the surfaces have many defects and a strong vertical deviation, they are first leveled with plaster or putty. This method of preparing for installation is especially relevant if you plan to cover a room with expensive wallpaper with silk-screen printing. If preliminary preparation not to do so, during the work there may be a significant overconsumption of facing materials.

If the deviations in the corner are insignificant, you can hide the defects by overlapping pasting. This method is most often used when decorating rooms, since owners usually do not want to spend time and money preparing the surfaces to be decorated. This method involves gluing the first strip of canvas so that it extends 3-4 cm onto the adjacent plane. You can achieve perfectly high-quality wall decoration by using high-quality adhesive, which must be used to coat the corner and adjacent planes as thoroughly as possible.
Pre-made on the wall vertical mark, along which one side of the glued segment is adjusted. A piece is applied to it and smoothed to the corner. Next, use the blunt side of a knife or a spatula to press the canvas along the corner. This must be done as carefully as possible so as not to damage expensive facing materials. Next, part of the segment is glued to the adjacent wall and, using a rubber roller, air bubbles are removed from under the material.
Next, new sections are glued to this strip on both sides. Moreover, on the wall on which most of the pasted strip is located, the next section is attached end-to-end, and on the adjacent wall, on which the strip has extended by several centimeters, the new strip is attached overlapping. Now all that remains is to use a plumb line to draw a vertical line at the intersection of the wallpaper strips, after which a sharp knife is drawn along the entire height of the wall and two sections of wallpaper are removed, resulting in an end-to-end fastening.
How to properly cover an outer corner?
The repair procedure described above is almost repeated when gluing external corners. The first strip of material is glued in such a way that several centimeters of the segment are wrapped around the corner. Most often, to ensure high-quality fastening, you have to make several cuts along the segment, at the corner. The cuts will help avoid wrinkles and remove excess adhesive from the wallpaper. Using a sponge or roller, press the strip as carefully as possible onto the surface, after which the strip is cut vertically with a knife so that no more than 1 cm of wallpaper remains on the adjacent wall.

The next strip of wallpaper is attached to the wall, where there is 1 cm of wallpaper. The section is mounted in exactly the same way as the first strip; no more than 5 mm of wallpaper should extend onto the adjacent wall. At correct installation The attachment point will be completely invisible.
Decorating corners in a room is not only the most difficult task when tiling surfaces, but also the most important. The overall visual characteristics of the room’s interior depend on how the cladding will look in these places. Therefore, carry out renovation work you need to be very careful, carefully and slowly. If you do not have much experience in cladding, it is recommended to start with areas of the room that are least noticeable and where defects in the installation of cladding will not adversely affect the beauty of the room.
At first glance, wallpapering seems to be a simple and even interesting task: what could be simpler than spreading a piece of roll with ready-made glue and carefully pressing it against the wall?
However, during work, surprises appear in the form uneven walls, bubbles, tears and stains. One of these surprises is the problem with wallpapering in the corners. This is the most difficult thing in a labor-intensive task. Later in the article we will tell you where to start gluing wallpaper, and also share secrets when working in uneven places.
Attention
Choosing an “opening” corner is not the first place to start a renovation. Usually between a firm decision to update appearance apartment or room and the purchase of materials takes at least a week, during which you need to get rid of the old covering, level the walls, and prepare them for repairs. Only after this the direction of gluing is determined.
Why can't you start from any convenient place? It is possible if the walls are perfect condition, and the repairs are carried out by a professional with experience. In other cases you need to start strictly with specific place, because the first canvas sets the direction for all the others: if you make a mistake with him, then everything will go awry.
Hobbyists and beginners can start with doorway or windows. The materials are glued in a circle. Even if as a result the last canvas is wider than necessary, it will not be noticeable. This method of gluing will save you if you need to match a pattern (find out how to select a pattern and cut wallpaper in difficult places).
For the first canvas you need to make a vertical marking using a plumb line. If the option from a window or doorway is not suitable due to their absence or unevenness, they start from the most inconspicuous corner: for example, where the cabinet will stand in the future. The angle cannot be considered a reliable guide, but in the absence of other options, it is better to be safe.
A vertical line must be drawn. They draw it on the wall at a distance equal to the width of the roll minus 2-3 cm. Then the first canvas is glued exactly along the line, and the remaining 2-3 cm cover the perpendicular wall.
Procedure
The first 2-3 glued canvases help you get used to the process and understand the technique. Then the work goes faster, easier, until it comes to the next corner.
External
On the outer corners (these are the ones that are “convex”) you will have to slow down. The process of gluing external corners is very painstaking and takes place in several stages..
- First you need to measure the distance from the corner to the last glued strip and add 2.5 cm to the resulting value. For accuracy, it is better to measure both from above and from below, since perfectly even corners are very rare.
- After taking the measurements, you need to cut a strip of wallpaper of the required width and glue it.
First you need to carefully press the wide part of the canvas, and the remaining 2.5 cm overlap - this part is pressed last.
- The next strip will be glued strictly from the corner, and the existing 2.5 cm from the previous strip will be “hidden” under it: this way you can hide the unevenness.
Domestic
Interior angles are tricky because If the technique is incorrect, instead of a smooth transition you get a curved line, full of bubbles, dents, crooked creases. Therefore, they are pasted over like this:

- The distance from the last canvas to the corner is measured. 1-2 cm is added to the obtained value.
- The next canvas is measured in accordance with the resulting width and carefully cut along a pre-drawn vertical line on the reverse side.
- The canvas is carefully applied to the wall, carefully greased with glue. It must be pressed well with a roller, spatula or improvised means so that no bubbles (?) form.
The 1-2 cm added during measurements will appear on the adjacent wall. They need to be cut off slowly and very carefully with a sharp construction knife, holding the fresh canvas with a spatula. The main thing in this matter is not to rush.
The nuances of working with certain types of materials
Meter
The main rule of gluing wide wallpaper in the corners it is as follows: the width of the entry should not exceed 5 cm. There is no need to save money and glue the entire canvas, otherwise the result will be unsatisfactory.
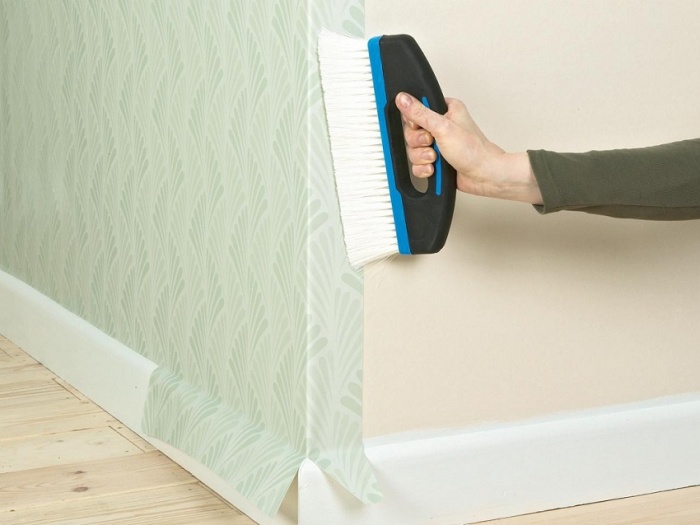
- The corner is leveled with a plastic spatula or a clean, dry cheek with coarse bristles.
- At the narrowest point of the overlap, at a distance of 1 cm from the edge of the wallpaper, a mark is placed along which a vertical line is drawn.
- The next canvas is glued with a guide to this line.
- The excess is cut off according to the already known pattern with a construction knife.
Vinyl
Vinyl wallpaper, unlike non-woven wallpaper, must first be coated with glue. The procedure for pasting corners is simple and clear. How to properly glue vinyl material:

- The size of the canvas should take into account a 5-centimeter overlap on the adjacent wall.
- A canvas of the required width is coated well with glue and left for 10-15 minutes.
- The corner must be pressed, all excess glue and air must be removed, and a roller or spatula must be applied from top to bottom.
- The next canvas is glued overlapping and also pressed firmly against the wall.
- Then you need to take a construction knife and draw an even line along a steel ruler, preferably from the bottom up, along two layers of wallpaper.
- The top layer of wallpaper is carefully pushed aside, and the allowances of the previous sheet (5 cm) are removed.
The canvas is returned to its place, it is carefully ironed with a dry cloth or rubber roller top down. There should be an even joint.
Non-woven meter
- A single piece of non-woven material cannot be used to cover entire corners. This will negate all previous and subsequent efforts, so they will also have to be trimmed. This is done according to a well-known scheme: measure the distance from the edge of the last pasted canvas, add 5 cm. Non-woven wallpaper, so measurements need to be taken at the top, bottom and in the middle. Read about how to properly glue non-woven wallpaper.
- Then the wall is coated with glue, and only after that the canvas is applied to the wall and pressed with a dry cloth or rubber roller. You can’t rush in this matter: it’s better to carefully and thoroughly in the corner so that the walls don’t look ridiculous.
- Despite careful measurement, it is likely that adjacent wall The width of the overlap will vary. You need to find the narrowest place, measure 1 cm from the edge, put a point and draw an even vertical line using a plumb line. From this line to the side, a value equal to the width of the roll is measured. A vertical line is drawn again.
- The next canvas will be glued from the last drawn vertical line. Then you need to make a cut on both layers of wallpaper, carefully bend the top part and take out the “excess”.
- The joint is carefully aligned.
How to work in uneven places?
 Most of the corners in the rooms are unfortunately uneven. Care should be taken to align them at the renovation planning stage, but people do not always think about this problem.
There are several secrets to hide uneven corners:
- The choice of non-woven wallpaper is the most flexible option.
- Coverings with a neutral pattern that does not need to be joined.
When hanging wallpaper in the corners you need to make at least two layers: This is why they make those same 5 cm overlaps. Sometimes experts advise first gluing the corner with a narrow strip, and only then gluing the wide overlapping sheets. To do this, use a painting mesh.
Another trick is to make small herringbone-shaped cuts at a distance of 5-10 cm from each other on the spade.
To ensure that the renovation is successful and the appearance of the room is not spoiled by uneven corners, you can use simple useful recommendations:
- If possible, it is better to entrust wallpapering to professionals who will definitely cope with the task.
- Before you start finishing the walls, they need to be leveled in order to avoid difficulties during repairs and troubles in the form of uneven joints (how to properly join wallpaper, read how to repair wallpaper and joints if they are separated, find out).
- If you don’t want to level the walls or this is not possible, select materials with a pattern that does not need to be adjusted (?). It can be a single-color coating or an abstract, contrasting one, with a small print, which even helps to disguise unevenness.
- You can’t rush during repairs or try to complete the gluing in one day: if nothing happens due to fatigue, it’s better to postpone the work until tomorrow.
- The windows must be tightly closed during pasting.
- At the junction of the walls, there is no need to try to glue a whole wide canvas, even if you have to cut off a strip of considerable thickness. This strip may be useful in another place, but the probability of getting beautiful walls increases.
- Cuts should only be made sharp blades construction knife, and remove dull ones more often.
- It is better to plan the interior so that difficult and unsuccessful places are hidden by furniture or large furnishings.
- If possible, it is better to start gluing from doorways or windows.
Gluing wallpaper is always interesting and entertaining, so you shouldn’t give up this experience and skill in favor of painting walls or other coverings. always in fashion, especially considering the modern range. Subject to correct technique Once glued, the corners will turn out smooth, beautiful, and you won’t have to be ashamed of them.
In contact with
Non-woven wallpaper is an excellent finishing option building material, combining practicality, convenience and beauty. In the process of sticking such wallpaper Special attention You should pay attention to how to glue non-woven wallpaper in the corners evenly. Pasting with such material has a number of features that must be taken into account when working. For example, in order to glue non-woven decorations, a special glue based on non-woven material is used. Also, non-woven wallpaper does not require applying glue to the canvas itself, in addition, this type finishing material does not shrink during operation. Basically, they are glued end-to-end (with the exception of external ones).
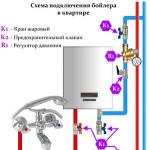
Scheme for gluing wallpaper in the corners.
Tools and materials
So, in order to glue non-woven decorations, you need the following tools and materials:
- non-woven wallpaper;
- special glue;
- construction tape;
- building level;
- a simple pencil;
- metal spatula 350 mm;
- metal spatula 150 mm;
- stitching roller;
- containers for preparing glue and solutions;
- cutting knife;
- roller or brush for applying glue;
- plastic spatula.
How to glue inner corners with non-woven wallpaper?

Sequence diagram for gluing non-woven wallpaper.
It should be noted that there is one optimal and correct method that tells you how to glue the corners with non-woven wallpaper. Before pasting, the walls of the inner corner must be properly prepared: the old coating is removed, plastering work(if necessary), the walls are leveled, a primer is applied, etc. The adhesive must be prepared according to the instructions immediately before use.
In addition, the wall must be marked: using a building level from the edge internal joint a straight vertical line is marked at a distance equal to the width with a deduction of 1-1.5 cm. If the pasting does not start from the edge of the internal joint, then the canvas is cut off, the width of which is equal to the distance from the joint to the edge with the addition of 1-1.5 cm. It should be noted , What best option- This is a method in which each side of the inner corner is covered with a separate panel. To do this, apply glue with a roller to the marked part of the wall. The application area must correspond to the area of the canvas that will be glued.
Reading time ≈ 8 minutes
- the most common type decorative finishing walls The technology of the process does not seem complicated from the outside, because even a beginner can apply glue to the wallpaper and stick it to the wall. Therefore, many owners decide to do this work themselves.
A beginner can easily handle wallpapering if the wall surface is fairly smooth and without obvious defects. However, the surface is not always properly prepared and leveled for finishing works. And also, amateurs often face the question of how to properly glue wallpaper in the corners. Here it is important to ensure that the selected pattern matches, if present. Therefore, in this article we will talk about a special technique for gluing wallpaper in corners.

Material selection
Wallpaper remains the most popular material for decorating walls in an apartment or office premises. They are able to transform a room beyond recognition, hide interior imperfections and highlight advantages. What you need to know when choosing wallpaper for your apartment:

In the shop modern wallpaper are presented in a wide range of models, differing in texture, color scheme and composition. The rarest type is liquid wallpaper, sold in the form ready solution V plastic buckets. However, we will look at the more common roll type. There are several varieties wall coverings, the most popular of them:

Each profession has its own tricks, if followed, you can achieve the fastest and highest quality results. Pasting wallpaper in the corners is a labor-intensive process that requires compliance with some nuances:
- The corners in the room should ideally be straight and located strictly in a vertical line. However, often rooms do not have the correct geometric parameters, so the corners must be aligned.

- For curved corners and walls, it is better to choose voluminous canvases made of vinyl or non-woven fabric. The pattern should be simple and the shade should be matte. You need to glue such wallpaper in the corners of the room to mask all the imperfections.

- If you have uneven corners, thin paper sheets, or 3D coatings with large intricate patterns that need to be adjusted all the time, will not suit you.

- It is best to start gluing from the window, gluing the very first sheet strictly vertically.

- If your room has smooth corners, it will be enough for you to treat them with putty, masking minor minor irregularities.

- The corners should be aligned using special plastic corners, which are easy to find in any hardware store. They are securely attached to the wall using putty.

- You need to align the corners at the stage finishing putty walls

- If you decide to glue paper sheets without using an additional layer, you should take into account the capriciousness of this material. Gluing must be done promptly so that the paper does not have time to absorb moisture from the glue.

- If there are sockets or switches in the gluing area, you should turn off the electricity in the apartment during the work. This way you will avoid unpleasant situations and undesirable consequences.

- Do not cover the corners with solid canvas. Before starting work, you need to take accurate measurements and cut the wallpaper into strips so that one sheet extends at least 20 centimeters onto the next surface. For example, gluing non-woven wallpaper even in even corners with a solid sheet is quite difficult.

- Don’t forget to coat all walls and corners with glue before you start gluing. The glue must be distributed over the entire surface, and in the corners with special care. It is believed that it is in the corners that wallpaper most often begins to peel off and come off. Using a roller, the glue can be easily distributed over the entire area and perfectly prepare the surface for further finishing.

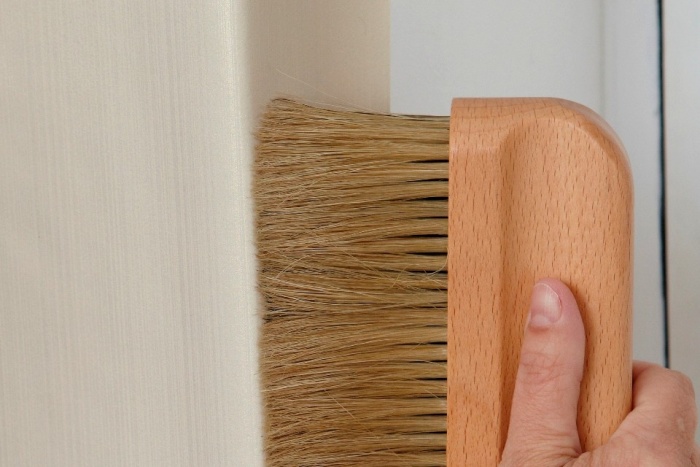
- IN hard to reach places Apply glue with a special brush.
Gluing modern wallpaper is not a difficult task. Even a novice repairman can handle this. But, if installing canvases on smooth walls is easy and simple, then you will have to tinker with the corners. It is the corners that become the stumbling block that slows down the entire process and requires a lot of effort. More often than others, non-woven wallpaper or vinyl sheets on a non-woven basis.
Features of the material
Wallpaper consisting entirely of non-woven fabric is easy to install and durable. They are made of non-woven cellulose with the addition of synthetic components. The cellulose component gives the wallpaper elasticity and breathability, while synthetics add strength. Such wallpaper is much more difficult to tear than paper-based vinyl, for example. In addition, they do not wrinkle at all and there are no folds left on the surface.
Non-woven vinyl wallpaper has the same properties. The only difference is that the canvases do not “breathe”, since vinyl does not allow air to pass through. Therefore, before gluing them to the walls, it is necessary to treat the surfaces with antibacterial primer or use glue with fungicidal additives. These measures will prevent the appearance of mold and mildew.
Non-woven wallpaper has a number of advantages over other coatings:
- Their feature is good adhesion to glue and to any wall material. Such canvases do not need to be treated with an adhesive; it is applied only to the walls. The same applies to non-woven vinyl.
- A useful quality of non-woven fabric is its tensile strength. The material does not shrink after the glue dries, and the dimensions of the canvas do not change. Thanks to this, the joints do not diverge, and the seams between the strips remain invisible. This feature is especially useful for wallpaper intended for painting, since painting makes all wall defects even more noticeable.
- Non-woven fabric cannot be washed, but can be dyed. But cellulose-based vinyl can even be cleaned detergents, it also lends itself well to coloring.
- Due to the bulk of cellulose fibers, such wallpapers level the walls and hide small unevenness. Durable synthetic components are resistant to tearing, which allows non-woven wallpaper to reinforce walls. They prevent cracking by holding the plaster in place.
- Non-woven wallpaper is easy to remove; its two-layer nature allows you to leave the backing on the surface and use it as a base for new coatings.
Installation of wallpaper on walls
There are several ways to glue wallpaper (you can easily see them from photos or videos). One of them involves initially gluing all smooth walls, and then the corners. Other artists advise starting from the most visible corner in the room. There is no consensus on this issue - everyone can glue at their own discretion.
Wall preparation is mandatory for any method. The old coating must be carefully removed and cracks filled with putty. Then the walls are covered with a special primer or wallpaper glue. Only after the primers have completely dried do they proceed to pasting the walls.


Draw a vertical line in place of the reference point; this should be done with a plumb line or building level. The first strip is cut from the roll, the length of which is equal to the height of the wall plus 5-7 cm. The wall is carefully coated with glue and wallpaper is applied. Level the canvas with a plastic spatula or wallpaper roller, focusing on the vertical.
Advice! It is better to use a special glue with a color indicator - in liquid form this composition has a pink tint, and after drying it becomes colorless. This allows the adhesive to be applied evenly to the wall without leaving any “gaps.”

At the baseboard and under the ceiling, the wallpaper is cut with sharp scissors or a construction knife. Move on to the next lane.

How to glue wallpaper in corners
In order to properly cover corners, you first need to understand their types. The angles are:
- Internal - each room has at least several such corners (in the standard layout there are four). Very important factor is the correctness of these areas. If the angle is uneven, has differences, or “sinks,” the wallpapering method will differ from the standard one.
- External corners in apartments began to appear more often with the advent of drywall - these are various niches, arches, columns and others decorative elements. This also includes door and window slopes, if, of course, it is planned to apply wallpaper to these areas.
Easy way
It is easiest to paste over absolutely flat angle. Unfortunately, these are quite rare. These are either plasterboard structures or walls prepared for painting (plastered perfectly smooth and even).
In this case, both in internal and in external corners The wallpaper is glued in the same way - they are simply wrapped in a single piece of wallpaper. The main thing is not to stretch the coating; after drying, it can return to its original size and shape. If there are small wrinkles on the wallpaper, you can make several horizontal cuts in the corner. This will help to even out the coating, and the cuts will not be noticeable after drying.
Important! No matter how even the corner is, it is better not to use the method of covering it with a solid canvas if it is joined to external wall. In corners located near external walls, condensation appears more often - the wallpaper can peel off and become deformed.

Standard method for gluing corners
It is safer to glue wallpaper in the corners using the “overlapping” method. Its essence is as follows:
- After pasting the adjacent wall, measure the distance to the corner at three points.
- Based on the largest of the three values obtained, the strip is cut off - its width is equal to the largest number plus 2-3 cm for overlap.
- The wall is coated well with glue, especially paying attention to the corner (it is better to use a brush).
- The prepared piece of wallpaper is applied to the corner, aligning the joint with the previous sheet.
- The overlap formed on the adjacent wall is carefully pressed, tucking the wallpaper into the corner with a plastic spatula.
- For a tighter fit, the edge of the wallpaper can be trimmed - make short horizontal cuts every 5 cm.
- Trim the bottom and top edges of the wallpaper using a metal spatula and sharp knife.
- From the narrowest point of the overlap, retreat about one centimeter towards the corner and make a mark.
- Focusing on the mark, draw a vertical line in this place using a plumb line or level.
- Prepare the next strip (if necessary, select a pattern).
- A strip is applied to the wall coated with glue, aligning its edge with the previously drawn line in the corner.
- Level the strip, expelling air and excess glue. Cut under the ceiling and near the floor.

Corner processed! Proceed to gluing a flat wall until next corner- the procedure is repeated. In this way you can glue external corners with different types of wallpaper.
Advice! Considering the considerable thickness of non-woven wallpaper, the overlap may be too noticeable.
In this way, you can paste over those corners that will be hidden by furniture or curtains, and choose another method for finishing the rest. You can also try cutting only upper layer wallpaper

It is not necessary to glue the slopes with wallpaper; the video shows how they can be beautifully trimmed at the corners:

Corner cutting method
If the walls are to be painted, there should be no overlaps on them. Paint will make the thickening of the wallpaper too noticeable; another method will be needed here. This method is suitable for both internal and external corners.
The work is performed in the following sequence:
- Repeat the first seven points from the previous instructions - the strip is glued with an overlap to the next wall. Only in this case the overlap is made larger - 5-7 cm.
- A distance equal to the width of the roll minus one centimeter is retreated from the corner.
- Using a plumb line or level, draw a vertical line at this point.
- Cut a strip from the roll and apply it to the wall coated with glue, aligning the edge with the drawn strip.
- The second edge is placed on the previous strip with an overlap, the wallpaper is pressed and leveled.
- Carefully push the wallpaper into the corner with a spatula, leveling everything again.
- In the middle of the overlap, apply a metal ruler vertically, take a very sharp knife and, without breaking it, draw a line along the edge of the ruler. It is very important that the line is drawn in one motion.
- Remove a piece of the upper fabric, bend the edge of the lower one and also remove the excess.
- Both edges are coated with glue and folded end to end. You can pull the canvas a little in the right direction so that there is no gap or overlap.
- Roll with a roller for joints.

This method helps to make the connection of the canvases invisible. It also works well on external corners, in niches and on slopes.
Advice! It is better to use a small metal spatula 10-15 cm instead of a ruler
Due to the unevenness of the corners, the ruler may not fit tightly to the wall, and the cut will turn out crooked. The spatula must be moved along with the knife, avoiding breaks in the cutting line. How to properly trim wallpaper in the corners can be seen in the video: