A creative person can easily come up with and build a craft with his own hands from any available materials. Ordinary people can also easily make a masterpiece of their own if they wish, using certain Internet sites or master classes.
In our article today we will talk about crafts from cardboard boxes that you can make yourself or together with the kids.

Such games develop children's imagination, and the result will delight everyone.

For crafts, boxes of various sizes are suitable, from which it is easy to construct different objects: from large boxes - household items in the form of furniture, cars, airplanes, etc., from small boxes - photo frames, boxes, pencil utensils, etc.

Options for various crafts made from cardboard boxes are presented in the photo.
Original ideas
By making various crafts from boxes with their own hands, children develop fine motor skills, attention and imagination. If it is necessary to use cutting objects, adult assistance is required to avoid injury.

It is better to immediately distribute the responsibilities before work, the child does the simpler work, and you do the remaining, more complex work.

For crafts, you can take any cardboard boxes.

Egg trays were no exception. This is an ideal option for creativity. They make excellent animals, birds and inflorescences. The easiest way to make a chicken is in the form of a package for an egg.
Cockerel
To make them, take: an egg tray, paper scissors, acrylic paint, a brush, glue, felt cloth or multi-colored paper.

The work process is not complicated, you should do everything in order:
- cut out part of the tray (the cell with the protruding part);
- cut a cell in the shape of a rooster with a huge tail;
- paint it with acrylic colored paint, drawing the bird’s feathers, and leave to dry;
- cut out blanks from felt material or paper for a beard, comb and beak;
- fix these blanks with glue;
- make eyes, decorate with feathers.

The cockerel is ready!

Flower
Making a flower craft is a little more difficult. Materials needed: egg tray, PVA, paint, wire and scissors. These crafts can be made in different ways.

For example, cut a cell and along the folds inside the cell, cut out the petals that need to be twisted and inserted into each other; if you want, add additional petals.

The resulting inflorescences are attached to a wire or fixed near the surface to make a flower arrangement. A milk carton can also be used. For example, in the form of a bird feeder, well, toys or houses.
Cubes
Cubes are a favorite pastime for all children. It’s very easy to build it yourself. You will need: 1 liter milk bags with a square base, a paper knife, a measuring ruler, a colored marker, double-sided tape, pictures.

Let's start making cubes:
Note!

- wash and dry milk cartons;
- set aside 7 cm twice from the bottom of the bag along the edges and make marking lines with a marker;
- on one side, set aside another 1.5-2 cm from the mark upwards and cut off the entire remaining top;
- cut along the ribs to the mark at the bottom and assemble the cube like a simple box, the long side will be the lid;
- Stick various funny images, letters or photographs on the side faces.
- fold the cube in the usual way.

To attach images to the side faces of the cube, before gluing the main image, cover the cube with pieces of newspaper soaked in glue. Next, coat the finished craft with colorless acrylic varnish. If you place small objects inside the cube, you get a rattle.

Frame
A candy box makes a great photo frame, decorative box, etc. They are very sturdy and well shaped, sometimes with a hinged lid.

Cover the box with gift wrapping paper, lace or satin fabric, decorate with a composition using various little things, pins, bows, etc. and the box is ready.
Postcard
A flat box will be useful for creating a greeting card with a frame. To do this, in addition to the box itself, you will need:
- Greeting Cards,
- paper in bright or pastel colors,
- PVA glue,
- corrugated cardboard,
- stationery,
- ribbons, bows and other decorative things.

Trace the outline of the card over the lid of the box. Then step back 1-2 cm from the sides to the center of the outline, trace the resulting outline with a pencil and cut a window.

Note!

From corrugated cardboard paper, cut out pieces for finishing the interior and exterior. Secure the postcard on the opposite side of the hinged lid with tape so that it can be seen through the made window.

Attach a ribbon to it and the side and disguise the places where they are attached with corrugated cardboard parts on the side and a corresponding postcard on the inside of the lid.

Complete the design with various decorative elements. Place congratulatory words and a small present in the inside of the box.

Other crafts
You can also create crafts from matchboxes. Most often they make doll furniture, vehicles, boxes, etc.

Large cardboard boxes intended for household appliances easily make crafts in the form of children's household appliances, vehicles and forts.

Note!

Become a real architect and delight your child with a real castle or their own house. Moreover, your child will be proud of such a creation made by his beloved mom and dad.

The child himself will be able to invest a piece of his labor into the production process. Girls will be delighted to have their own miniature kitchen or dollhouse.

Crafts from boxes for children, made with love by parents, will leave unforgettable, vivid memories for the child for life.

Photos of crafts from boxes


Children are creative and inquisitive people. They constantly fantasize and come up with new games. And we, loving parents, of course, want to help them make their fantasies come true. To do this, you don’t need to run to the store for expensive toys. Children very often prefer, for example, a table covered with a blanket to store-bought toys. To make a cool toy for a child, all you need is to have cardboard boxes at home. We think everyone has enough of this goodness. A couple of hours of free time and a little imagination - and the child will be delighted! And if this is your joint work with him, then the toy will become your favorite.
And we will share with you amazing ideas for toys that can be made from cardboard boxes.
40 ideas for toys made from cardboard boxes
1. Cardboard boxes can be used to make wonderful toys for little ones.
2.

3. Or these wonderful labyrinths.

4.

5. The child will be a real driver.

6.

7. A sorter for a baby and a crib for your favorite doll.

8.

9. Telephone

10. Camera

11. A washing machine is simply necessary for a girl’s household.

12. If a child dreams of being a screen star.

13. House for dolls.

14.

15. Or you can play horses.

Making toys with your own hands is not only exciting, but also useful. It develops thinking, fine motor skills, perseverance, as well as imagination and creativity. The child will be happy to remember the time spent with his parents during the joint creative process. Do-it-yourself cardboard toys are made using available materials, on which you practically don’t need to spend money. Therefore, this kind of hobby does not harm the family budget.
There is no limit to the limitless flight of imagination of home craftsmen. They learned how to make a large number of different interesting things, including toys, from ordinary cardboard or unnecessary cardboard boxes. If you decorate a craft in an original way, then by its appearance it will be impossible to determine what material it is made of. All available means are good for this: pieces of fabric, colored and wrapping paper, foil, beads, glitter, paints, pencils, colored tape, feathers, etc.

What toys can be made from cardboard:
- Doll's houses and castles;
- Cars, planes, rockets;
- Dolls;
- Furniture and interior items;
- "Twitchers";
- Christmas decorations;
- Decorations for puppet theater;
- Educational games;
- Volumetric constructors;
- Various buildings;
- Telephones;
- And many others.
For young children, you can make educational toys with which they will explore the world around them. These can be animals, geometric shapes of different colors and sizes, lacing.
Older children will be interested in houses, furniture, vehicles and other crafts, which they can take part in making and then use for games. A toy kitchen, bathroom or bedroom can be fully equipped with cardboard furniture made by the child himself. A toy house made by yourself will become a child’s favorite toy for a long time.
It is not recommended to let children under two years old play with cardboard toys.
What are movable toys made of cardboard with your own hands?
Funny toys with movable legs, paws, tails or other parts of the body are popularly called “twitchers”. They are a lot of fun to play with, and it won't take much time to make a funny dog, a wise owl or a cute dinosaur. A moving bright figure can be shown to very young children to attract their attention.

To work you will need:
- Thick cardboard;
- Templates for all parts of the toy;
- Paints or pencils;
- Scissors;
- Colored paper;
- PVA glue for stationery (construction);
- A piece of wire or special fasteners;
- Buttons;
- Threads;
- Rubber;
- Thin stick.
Also, educational dynamic toys are made from cardboard, which move using various mechanisms. These, for example, include two birds, alternately pecking at grain, moving with the help of a bar attached to the bottom. To make such a craft, you will need approximately the same tools and materials as for the jerk.
If a child is making a toy, it is better for him to buy special children's scissors with rounded ends that meet all safety requirements.
Practical tips: cardboard toy with moving parts
Not only twitches and dynamic toys have moving parts. They are also found in cabinets, refrigerators, stoves, washing machines and other toy cardboard furniture or puppets for puppet theaters.

A retractable cabinet drawer can be made from a matchbox. An oven, microwave or refrigerator has an opening door secured with wire or a piece of cardboard. The telephone has a dial, secured with wire.
Tips from the experts:
- It is best to pierce parts with an awl.
- Instead of homemade wire fasteners, it is recommended to use brad nails, sold in craft stores.
- PVA glue should be used for construction, since it is much thicker than stationery glue and dries faster.
- If the cardboard is covered with colored paper, then while it dries, it must be pressed down with something hard so that the part does not deform.
Children of preschool and primary school age are not trusted to work with an awl or other sharp instruments. It is better if this stage of making the craft is carried out by adults.
How to make a twitch toy from cardboard: master class
In the form of a jerk you can make absolutely any animal, a colorful bird, a cheerful clown. Puppets for puppet theater made using this technique are also especially popular. A detailed master class will be given using the example of a wise owl, which children aged five years and older can easily make, with a little help from their parents.

Step by step guide:
- We make a template and draw the outlines of all the details onto the cardboard with a simple pencil.
- Carefully cut out all parts with scissors.
- We cover the workpiece with brown paper and dry it under a press.
- Glue on the details of the eyes, head and wings, made of colored paper or thin colored cardboard.
- Prick the holes in the top of both wings.
- We stretch the threads through the pierced holes and secure them on the back side with an elastic band, and on the front side with buttons or brads.
- We connect all the ends of the threads and attach a weight at the bottom (a ball, a large bead, a wooden ring).
- The wonderful owl is ready to fly.
Small details do not need to be glued on, but can be completed with felt-tip pens.
Master class: DIY cardboard toys (video)
All participants will greatly enjoy the exciting creative process. Every day you can make one interesting toy, especially since children will be an inexhaustible source of inspiration. Every time they will want to do something new and unusual, as well as decorate the craft themselves. In order not to waste time drawing templates, it is recommended to download ready-made diagrams from various thematic sites and enjoy doing what you love.
The creation of toys has a long history, since almost anything can be made from such material: from animals to furniture. Children love to play with such toys, as they are bright and interesting. This article provides the best ideas for creating toys from cardboard with your own hands.
Simple toys
Let's first learn how to make simple toys with your own hands. An example would be a polar fairy tale, but you can come up with something else. We will make several toys connected by one story.
In order to make such toys, we will need:
- cardboard;
- scissors;
- glue;
- colored paper;
- threads;
- black felt-tip pen (to draw eyes, mouth, nose).
In order to get started, you need to transfer the stencils, which are shown in the photo below, onto cardboard. Or you can draw what you want to do yourself.
For the Christmas tree we use this template.

And these templates are suitable for making a dog and a polar bear.

And of course, you can’t do without reindeer and sleighs.

Now all that remains is to cut out all the parts, stick white paper where necessary and connect all the parts together.

Our fairy tale is ready!

Options with threads
Another interesting use of cardboard and thread can be in making various toys that can be used both for playing with children and for decorating a New Year tree.
One of these toys could be a hedgehog with a pompom.

To make such a hedgehog, we will need cardboard, pencil, glue, scissors and knitting thread.

Next, take a pencil and draw the shape of our hedgehog on cardboard. We attach another sheet of cardboard to the cardboard on which the hedgehog is drawn and cut it together along the contour. Where the paws and head are located, you need to glue them together.
We will make a hole in the middle of the circle and begin to wind the threads as for making a pompom, but not to the end of the circle.

Then we cut the threads along the outer edge.

Now let’s draw an eye and a nose for the hedgehog, and then attach a rope to it so that it can be hung on the Christmas tree.
You can also use cardboard and thread to wrap around the cut out shapes, which looks amazing.


Teddy bear and dog
The most interesting cardboard toys for children are moving toys. Making them is a little more difficult than the previous ones, but they are still easy.
To make a moving teddy bear, we will need:
- cardboard;
- colored paper;
- glue;
- scissors;
- a simple pencil;
- wire with a diameter of 0.45 mm;
- awl;
- threads;
- black marker or felt-tip pen.

First, we need to draw the parts of our teddy bear on cardboard and carefully cut them out. In total there should be: a head, a torso, two front legs and two hind legs, buttons for securing the wire.

Using a cut-out template on colored paper, we draw clothes for our teddy bear so that the toy looks bright and attractive to the child. We also draw a bear’s nose on paper so that we can glue it onto the template.

Cut out all the details of the clothing and glue them to the template.


Now we need thread. You need to cut four pieces up to 20 cm long and fold them in half for strength. Then thread each thread through the holes in the arms and legs, tying them.

To fasten the parts, we need wire, an awl and scissors. When cutting off parts of the wire, we thread it in this order: button, body, button, foot, button. We twist the ends of the wire using an awl.

In this way we attach all the legs to the body.

On the back side of the teddy bear we tie the threads at the top and bottom. Next, we use a thread to connect the connecting upper and lower threads to each other in order to make movements for the toy.

That's all, the toy is ready! Let's start playing!

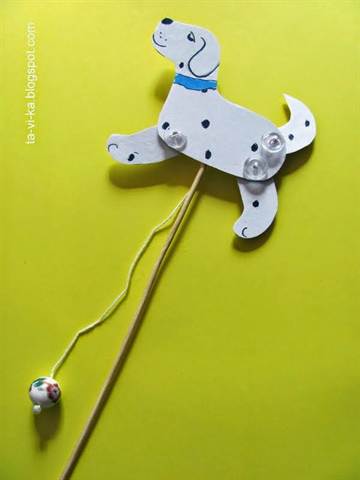
Now let's make a dog.
For this we need: cardboard, scissors, glue, tape, wire, three small buttons, thread or rope, wooden skewer.
First, we need to draw our dog - she will run around. To avoid drawing, you can print and use the template.

- First we need to cut out all the parts of the dog from cardboard. We put dots in the right places and pierce them with an awl.
- Using buttons and wire we make fastenings for the legs and tail.
- We begin to string the parts onto the fastenings: body - limbs (we use those holes that are marked with a circle).
- We tie the limbs to each other with a thread, threading the remaining holes in this way: the tail with the hind paw, and the back paw with the front. You need to tie another long thread to the middle of the thread between the paws, so that later, by pulling it, you can move the toy.
- After this, use tape to attach the toy to a wooden skewer.
You can draw eyes, a mouth, a nose on the front side, and decorate it as desired. Now you can start playing, because everything is ready!
Video on the topic of the article
You can see even more interesting ideas for making toys from cardboard in the video:
What can be made from cardboard boxes for children: a house, a car, a garage, a laptop and even a vegetable garden. See for yourself! It's amazing how many wonderful toys and crafts for kids you can make from boxes, and they're practically free.
You can make a great house out of old boxes, for example from household appliances. You will need:
- it's all just scissors
- and bright tape.
IMPORTANT: The most practical thing is that such a house can be easily folded and unfolded, and will not take up much space!


Well, if you put in more effort, you can build a whole castle out of cardboard and it will be an excellent and amazing gift!


TV

What if, instead of watching TV, you invite your child to get into it? Who wouldn’t want to turn into actors or presenters for a while! The child will be able to play on his own or sing for you from the screen. Or you yourself (as far as you can fit) can fit into the box and tell a bedtime story from it.
IMPORTANT: To create this cardboard TV, you only need a large cardboard box, a utility knife and a marker.
Kitchen made from boxes

Children very often want to become adults and, accordingly, they love games where they can fulfill this role. By making such a stove, you will give your child the opportunity to cook “food” and feed you at dinner parties and tea parties (in addition to the stove, you will need a toy set of dishes). And here the child will be able to make a wide variety of dishes, and not just the healthy ones that he is fed.
To make it you will need a cardboard box, a stationery knife, black paper and glue.
Laptop

If your child really wants to imitate you and have his own laptop, then provide it in this safe form.
- To make it functional to some extent, to create a “screen” use paint
- Thus, the child will be able to change the screen images by drawing them with chalk, wiping them, and drawing new ones again.
ADVICE: You can also sew a laptop case so that your child can take it with him to kindergarten or to visit his grandmother, because the laptop folds up like a real one.
Cars from boxes

In such cars you can “drive” both around the house and in the park. You can also organize competitions between children at some children's party. To make it you will need a cardboard box, blue paper for windows, glue, and disposable cardboard plates for the wheels. And let's go!

Noah's ark or ship
Sometimes it is difficult to teach a child to put toys in their place and not leave them scattered around the apartment. Such an ark will help turn the process of collecting toys into real entertainment, because you need to save animals from the flood. This is a little trick to ensure order in the house and instill in a child a love for animals.

Necessary materials:

- Strong cardboard box
- Sturdy cardboard tube (the one here is from a large roll of gift wrapping paper)
- Sail fabric (the size you need depends on the size of your cardboard tube and box)
- Empty round plastic container (ice cream, for example)
- Pencil
- Thick thread
- Pins
- A small piece of colored paper for the flag
- Scotch
- Scissors and stationery knife
Step-by-step instruction:
Step 1: Cut out the windows

Trace something round with a pencil (such as a glass) and cut the circle along the marked line with a utility knife (or a small sharp knife). There are three windows on both sides of the box.
Step 2: Making the Sail

- Cut two triangular sails from white fabric. To keep them in shape, glue a small stick, such as an ice cream stick, to the bottom.
- One sail should reach in height from the top of the mast (cardboard tube) to the top of the box, and the second one should be slightly smaller.
Step 3: Attach the sail to the mast

To attach the sails to the mast, wrap a thick thread around it and attach pins. That is, the threads should be in three places: for the upper fastening of a large sail, the upper fastening of a small sail and the lower fastening of the sails (common for both).

Then thread the pin through the fabric of the sails, and there you have them attached to the mast.
Step 4: Attach the mast to the ship

In the middle of the container you need to cut a round hole equal in diameter to the mast so that you can insert it inside without it dangling. After this, attach the mast and the container that holds it to the box with tape or super glue.
Step 5: Making the Door

Our ship needs a door so the animals can get inside. You can cut a folding door that will be closed using a rope glued to it.

Here's what we ended up with:


You can also add a small flag made from double-sided colored paper.

Now the animals are in a safe place, and you can walk around the apartment without tripping over toys.
Doll house

- You can make a miniature imitation of your apartment or a separate room, a school classroom, or some other room. And all these.
- For this cut out windows and doors with a stationery knife, stick on frames made of white paper (or another color of your choice) or adhesive tape, place toy furniture in the middle,
- decorate the walls with poster stickers, and place small figures of people and pets.
ADVICE: You can do the part where you need to cut it out with a knife yourself, and entrust the decor to the child himself, or do it together.
Table soccer

Pass, kick, and...goal! Table football delights children, so why not make it at home. Moreover, the phrase “everything basic is simple!” fits perfectly here. For the field, you need to take a shoebox and cut holes on both sides - gates, and the role of football players will be played by clothespins. Throw a small ball onto the field and the game begins.
Cardboard cubes


Such cubes help a child learn to put together a picture from parts, a kind of puzzle, only for the little ones. In this case you will need:
- wooden cubes,
- a picture (which will be one cube wide and three cubes long) and glue.
- You need six pictures, each of which is cut into three parts.
- For example, here are pictures of six people (divided into head, body and legs).
The child can combine cubes at your discretion, creating new characters.
Cardboard City

A whole toy city! There are interesting houses with colorful window shutters (that open and close), a town hall with a clock, a cafe with a summer terrace, trees and benches. You can also cut out small animals and people. Of course, this is already quite painstaking work, and creation will require hours of free time. But it’s worth it, because the child will be delighted (and I assume you will too)!
Car track and garage


Racing cars across the floor is certainly interesting, but such a drawn track will take this game to a whole new level. Make street markings on a large thick piece of whatman paper, put up imitations of houses, allocate a parking space, and the child will play with cars longer and with great interest! And at this time you can go about your business, or join him and compete in driving along the city streets.
Labyrinth
If you have more than 10 boxes, you can connect them together with tape and make a labyrinth like this. Of course, this takes up a lot of space in the apartment - but you will see how much joy the child will have!


Garden


Many children grow up in apartments and have no idea what a garden is, but they see vegetables already prepared at home. Such a toy vegetable garden will help explain to your child how vegetables and flowers grow and learn their names.
It is also useful for educating a child to understand that various plants go a long way before ending up in the store, and that we need to respect what nature gives us.
And such cute plants are fun to play with! To make it you will need multi-colored felt for vegetables and a cardboard box (painted) for the garden bed.