For people involved in carpentry activities, a router table is an indispensable assistant. It will help improve the quality of work performed and their efficiency.
The industry offers such tables in a factory-made version, but their price is not suitable for everyone. We suggest considering a do-it-yourself milling table without expensive components.
Definition of a milling table, its design
A device that can be used to: grooves in the workpiece, grooves, do tenon joints, processing the edges of products is called a milling table. It is inconvenient to use a router separately; the master will have to concentrate on the workpiece and at the same time on processing. Milling table, assembled with your own hands, facilitates the work process; it can be mounted on a workbench or a special design can be made for it.
Important! When carrying out work on the manufacture of a specialized table, you must remember that the router is installed from below, and free space must be allocated for it. The stationary part of any table is the frame; it is a strong frame with a table top.
Material for the frame milling table can be:
- Wooden beam.
- Metal squares.
- Plates: MDF, chipboard.
The requirement for the frame is to create stability for the tabletop and rigidity of the structure. When you make a milling table with your own hands, the overall parameters of the frame are determined from the materials that require processing.
How to make a bed for a milling machine
Despite the ease of making a tabletop frame, homemade milling machine must for proper operation Meet requirements:
The table design includes mounting plate, it is needed to mount the router.
How to make a mounting plate correctly
Place the mounting plate at the location where the router sole is attached. For its manufacture, a material is selected that meets the following criteria:
- Strength.
- Thickness - the thinner the better.
Recommended by experts for self-made For the mounting plate of a milling machine, use sheet metal, fiberglass or textolite can be used. Overall dimensions are rectangular, thickness within from 4 millimeters to 8 millimeters. It is necessary to make a hole in the center of the plate, the diameter of which matches the hole on the sole hand router.
The router is equipped with a plastic pad that is attached to threaded holes on the base; these holes are used to attach it to the mounting plate. If there are no such holes, they must be made in the sole of the router. Another method of attaching the router is proposed, using metal spring brackets. Mounting plate attaches to the tabletop at the corners.
DIY assembly instructions for a milling table

To assemble the clamping device, rollers or a ball bearing are used required diameter. It is mounted in a holding device, which is rigidly fixed at the required distance from the plane of the tabletop.
This device ensures that the dimensional workpiece is tightly pressed against the plane of the tabletop as it passes under the roller. This simple addition increases the accuracy of the work performed and improves labor safety.
You can assemble a functional milling table with your own hands when the master has information about the electric drive that will be used in the work. Let's consider the power parameter to select electric drive:

Important! Experts recommend that before assembling a milling machine, determine the power of the milling machine, it should not be less than 2 kW. This power allows the master to work with any wood. It is recommended to choose milling cutter models with variable speed control. The rotation speed of the router is very important for obtaining an even cut on the workpiece. If this parameter is high, the cut will be clean.
Safe use of the router table
When the milling table is assembled and installed electric drive do not rush to immediately check its operation, make sure that the work performed is correct. What experts recommend doing for safe work on the milling table:
- It is advisable to install a protective screen on the countertop; it can be of your own design or an industrial design.
- Be sure to check for an emergency stop button electrical equipment, it should be in the shape of a “fungus” and located in the master’s area so that it can be pressed with the body’s body.
- Equip work area light illumination.
- When the router table is used to frequently change cutters for work, it is recommended to equip it with automatic device lifting the cutter.
Equipped with a homemade milling table no restrictions, there is only one requirement for them: increasing the safety and efficiency of the work performed.
A milling cutter is the most frequently used tool of a self-respecting craftsman. Thanks to it, we can make things we know with incredible ease. There are operations in carpentry, which cannot be performed without this tool.
The milling cutter consists of a motor, a collet for attaching interchangeable cutters, a speed controller, and a vertical rod. IN model range From any manufacturer there are many models with different capacities. Hand router - quite versatile electrical appliance, which has wide potential and opportunities. It becomes possible to improve the router by installing it on a horizontal surface, which will allow you to process fairly large workpieces with minimal effort.
Purpose of the milling table
Installing a router in a table or workbench allows you to achieve good results in the manufacture of many products. This is an indispensable tool in furniture production. Since this process often requires trimming the edges of the canvases, making shaped grooves and recesses.
Such tables can be found in large stores that sell tools. The cost of such equipment directly depends on the functionality and material from which they are made. But even with the most minimum set functions, but with high-quality coating, the price for such a product is quite high. For a simple amateur, who works out for his own pleasure in the garage, the price is unaffordable. The solution is homemade table for the router.
Before you start purchasing material for your future table, you should decide on its functionality. Let's consider the main capabilities of a manual milling cutter and its machine version.
Operations with a hand router
- Figured or straight processing of the ends or edges of workpieces.
- Drilling holes of various shapes for installing furniture fittings.
- Removing a quarter of the thickness.
- Grinding and cutting of workpieces.
- Drilling.
- Finishing the cut area.
- Removing grooves for splines and grooves.
Milling table operations
A DIY router table allows you to perform operations such as:
- parallel finishing cutting;
- trimming surfaces and long edges;
- quarter sample;
- finishing edges.

From the list it becomes clear that all the same operations are performed on a milling table as with a conventional manual router, but only with greater accuracy and quality. In addition, the dimensions of the workpieces are already many times larger.
Choosing a hand router
For a tiny workshop, purchasing a separate router is an unaffordable luxury. Therefore, a router table will be required with a quick release router design. This means that it will work in two versions, both on the table and in manual mode. To do this you will need a quality power tool.
There are two types of hand router:
- submersible;
- cross-cutting
Their names speak volumes about their functionality. Since the cross-cut milling machine is highly specialized, its further consideration will not be of interest to the reader.
According to power, electric tools are classified into:
- low power- from 500 to 1100 Watt;
- average power - from 1200 to 1800 Watts;
- high power - from 1900 to 2500 watts.
Professionals advise using low-power milling cutters to process small workpieces; this allows for maximum ease of use. In this case, you will have to make passes in several approaches, removing a small thickness, layer by layer. However, such routers cannot be installed on a special table. For these purposes, milling cutters with a power of about 2000 watts are suitable.
Also, when choosing, you should pay attention to the following capabilities of the tool:
- maximum depth of lowering the stand;
- smooth start;
- availability of spindle speed adjustment;
- dynamic brake;
- maintaining the number of revolutions under load.
- chip removal system.
All these parameters determine the quality of a manual router, which will be useful both in manual mode and in machine mode.
Milling table device

Any milling table consists of the following elements:
- directly from the router itself;
- countertops;
- rip fence;
- chip removal systems;
- boxes for storing spare parts and various cutters;
- horizontal clamp.
Depending on the functional tasks of the milling table, it can be manufactured in the following options:
- side table top with router;
- stationary tabletop;
- stationary tabletop with parallel support;
- stationary tabletop with parallel stop, with vertical router lift, cross feed of the router.
Materials
How to make a table for a router? What should a person who decides to do this business have in his arsenal? First, we need a drawing of a table for a manual router. It's not difficult to find. Therefore, making a table for a manual router is quite possible. There are also plenty of detailed tutorials and videos of local craftsmen showing off their creations. There are models that are so multifunctional that they combine, in addition to a milling table, a drilling, grinding and cutting table.

Almost any material is suitable for production. They mainly use sheets of chipboard, laminated plywood or ordinary plywood with a thickness of at least 8 millimeters. You will also need wood screws with a countersunk head, aluminum corners(furniture), PVA glue.
Assembly
Let's look at how to assemble the simplest table for a router with your own hands. We will make it from laminated plywood. Let's take the tabletop size to be 400 millimeters wide and 400 millimeters long. A laminated board is perfect for the countertop. It has a number of advantages compared to plywood:
- wear-resistant surface;
- low cost;
- quick replacement.

However, we decided to make the table for the hand router from laminated plywood. Carefully cut it to the intended size. The legs will be made of the same material. It retreats 20-30 centimeters from the edges and fastens the legs to the tabletop, pre-coats the joints with glue and makes two or three holes for tightening the screws.
We make the following technological holes in the tabletop:
- large round for exiting the collet with the cutter;
- parallel groove for fastening the guide;
- You can make a small groove for attaching a ruler.
The rip fence can be made from the same materials as the table top. The stop consists of two parts, the interface runs exactly in the center of the installed cutter. They must move independently of each other. To increase milling capabilities, it is desirable that the rip fence has two degrees of freedom. That is, it could tilt relative to the tabletop and turn parallel to it. This will allow you to make products with complex shapes.

Among other things, a recess with a cover is made on the reverse side of the rip fence square shape, a vacuum cleaner pipe is inserted into one end. As a rule, the chip removal system is made on two sides, one on top behind the stop, the second directly next to the router collet.
This is the simplest DIY router table. In the future, you can modify and install a lift for convenient adjustment of the height and horizontal reach of the cutter.
Additional accessories
Since a manual router installed in a table is electric tool, then for safety you can install an external switch in the table. This will allow you to conveniently and safely turn the device on and off when necessary. Here you can install additional sockets for connecting a portable lamp or hand drill.

If there is sufficient free space, milling tables measuring 1500 by 1500 millimeters and a height of one and a half meters are made. You get full-fledged workbenches. At the same time, they make pull-out shelves, in which it is convenient to store various cutters and a key for changing the spindle. Big table allows you to process large sheets plywood or other material so often used in the manufacture of furniture or doors. Such a table increases the accuracy of processed parts and reduces the percentage of defects during manufacturing.
Safety
It is worth remembering that tables for wood routers are sources increased danger. The rotation speed of the cutter reaches 25,000 rpm. Any awkward movement will lead to irreparable consequences. Hands should be kept at the maximum safe distance from the rotating head; the cutter should be changed with the machine stopped and de-energized.
When working, you need to wear special glasses that will protect your eyes from small chips. The noise level during operation is quite high; appropriate precautions should be taken. Keep children away from the router.
Professional woodworkers treat their router table with great respect. And not by chance. After all, a convenient and properly arranged workbench is the key to high productivity and increased efficiency of the work process. On sale you can find models of tables for every taste, but often their cost is so high that not every craftsman can afford such a purchase.
However, everyone can make a suitable milling table on their own, adjusting it to their personal needs and habits. And it is not necessary to buy expensive branded products or their Chinese analogues. With a little work, you will not only save a lot, but most importantly, in the end you will get your own table, working at which you will be able to produce exactly the carpentry that you require faster and with much better quality.
The manufacturer cannot predict the needs of each potential buyer and builds basic capabilities into its products. You may simply never need many of them, and some that you need may not be included in the design of the table.
To make your own milling table, you don’t need anything fancy or too expensive. All you need is an electric motor, a guide structure and the table itself, a stable frame on which the equipment and additional accessories will be fixed. And, of course, your own drawing of a milling table.
Why do you need a milling machine and what is its purpose?
The principle of working with a hand-held milling tool is that the milling cutter moves along the surface of a securely fixed workpiece that needs to be processed in a certain way. The problem is that this is often not very convenient. Therefore, they resort to a trick: they attach the router itself and move the part. The resulting design is called a “milling table”.

Using milling tables, you can easily make shaped holes, cut grooves, securely connect parts, for example, the walls of drawers, etc., perform edge profiling and many other operations that are only available in specialized carpentry workshops that have milling machines.
Using milling tables for a manual router, you get the opportunity to process not only wooden crafts, but also chipboard, plastic, MDF, make joints on tenons and tongues, make grooves and splines, chamfer and decorate profiles.
In addition, milling tables can be used as woodworking machines. To do this, a tool is fixed in the drill stand or on a workbench - and the machine is ready. Therefore, many companies began to produce milling tables in a wide range with a lot of additional accessories for them. However, a competently made table for a router with your own hands is in no way inferior to branded ones, and sometimes even surpasses them.
How do milling tables work?
To work with a hand router on a table, you can use a regular workbench or build a special table. This table is distinguished by a rigid design with good stability. This is necessary given the strong vibrations caused by the operating router. Since the tool is attached from below, there should be nothing under the tabletop that interferes with the work. Only the router itself for the milling table and, if necessary, a lift device that ensures accurate and smooth adjustment lifting the cutter.

The router is attached to the table using a mounting plate. The material for it must be of high quality and durable. It is best to use textolite, metal or plywood. The plastic trim mounts on the router base usually have threaded connections that can be used to secure the router to the router table top. On the surface of the future table, you should select a groove for the mounting plate so that the base of the router is flush. The plate must be secured with self-tapping screws with countersunk heads so that they do not interfere with the future movement of the workpieces being processed.
The router itself is also attached to the table using countersunk screws, attaching it to the mounting plate. If there are no such holes in the base of the tool, you must drill them yourself. As an alternative, it is possible to use clamping devices if there is no desire to drill into the base of the router.
On the milling table, be sure to install a button to turn the router on and off. It is also highly advisable to equip the table with an emergency mushroom button for the safety of the person working at it. To ensure reliable fastening of the workpieces, clamping devices are installed. Convenient to use milling Rotary table. To measure, a ruler is usually built into the surface of the table.
Types of milling tables
When starting to make a milling table, you should first of all decide on a place for it in your workshop. It depends on what features you plan to use. This could be a side extension of the sawing machine, that is, an aggregate table.
If you only plan to work on the router table occasionally and use it outside the workshop, build a portable table. It can always be removed or hung on the wall, thereby saving space.
If there is enough space in the workshop, then a stationary table for a milling machine will be most convenient. It can be equipped with wheels and moved as needed.

Both portable and stationary desks can be stowed away for periods of time, but still remain ready for specific tasks at all times. To do this, they are configured in advance.
Simple table design
If you want a device of a simple design, you can make it of small height and then attach it to an ordinary table. To do this, take a sheet of chipboard and simple board, which should be fixed on the sheet as a guide. The board should be thin and fastened with bolts.
After this you need to make a hole for the cutter. IN simple design You can finish here - the resulting design will allow you to perform simple milling operations. However, if you want to make a milling table for more thorough work, you will have to spend a little more time and effort.
Manufacturing of the bed
For any milling machine, the bed is its frame, onto which the tabletop is attached on top. The base can be made of any material, the main thing is that it is strong and stable. The size of the bed is selected individually, based on the dimensions of the parts that are planned to be processed on the machine.
When making a machine, it is advisable to make its lower part in such a way that the person standing in front of it does not rest his feet on the frame. To do this, the lowest part of the bed is deepened (like ordinary furniture) by about 10-20 centimeters.

If you plan to process door trims, then it would be appropriate to make a table 85-90 cm high, 50-55 cm deep and 150 cm wide.
For convenience when working while standing, the height of the table is taken to be about 85-90 cm. In this case, it is advisable to use adjustable supports in the table design, which allow you to level milling tables for a manual router in the presence of uneven floors or, if necessary, change the height.
Table top for a homemade table
Since the workpieces slide well on plastic, a good option will use a kitchen panel made of chipboard 26-26 cm thick as a tabletop for a milling table. Its depth of 60 cm will also be convenient for use, and chipboard material will perfectly dampen the vibrations produced by the router during operation.
As a last resort, when making milling machine tables, you can use laminated chipboards or MDF with a thickness of 1.6 cm.
Mounting plate
Because kitchen countertop It is quite thick; to maintain the amplitude of the cutter's reach, the router should be attached to the table using a mounting plate. Despite its small thickness, it is highly durable and will reliably hold the tool without losing the working stroke of the cutter.

Using a mounting plate made of textolite (fiberglass), you should cut out a rectangular blank 5-8 mm thick and sides from 15 to 30 cm. In the center of the plate, cut a hole corresponding to the hole in the base of the milling tool. The plate is attached to the surface of the table, and a router is installed on it.
Assembling the table for the router
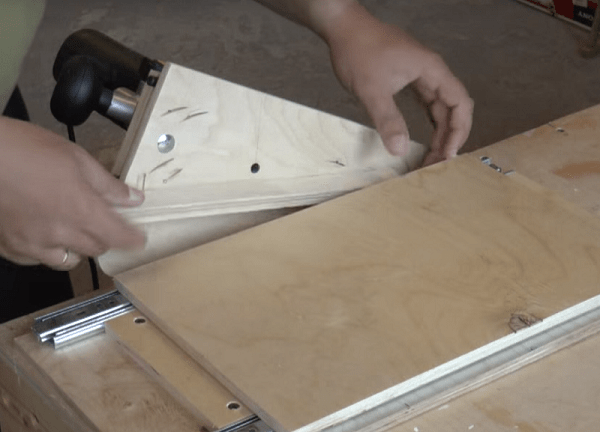
After the frame is made, the tabletop is temporarily attached to it. A mounting plate is installed on a previously prepared place and its outline is traced with a pencil. Then, using a hand router with a cutter with a diameter of 5-9 mm, you should select a seat for it in the tabletop. The plate should fit flush into it and without distortion.
Angles seat must be rounded with a file. The same operation must be carried out with the mounting plate - process its corners with the same radius as in the seat.
After this, you should carry out through milling of the tabletop along the contours of the router sole. This does not require special precision, but you will probably still need to select additional material from the bottom of the tabletop for a dust collector and some other additional devices.

All that remains is to connect all the parts together. Having started the router from below, we fix it on the mounting plate, then we fasten the plate to the tabletop. We finally screw the tabletop to the frame.
We arrange the upper pressure
As additional measure For safety and convenience, the milling table is equipped with an upper clamp - a roller-based device made according to the drawings. This is especially true when working with door trims, as well as when making dimensional parts. The design of the upper clamp is simple.
A ball bearing of suitable size will perform the task of the roller. The bearing must be rigidly fixed at a certain distance from the tabletop so that it provides reliable clamping of the workpiece from above.
Milling machine drive
If your choice is to manufacture simple machine, pay attention to the electric motor for it. Power is the main factor of choice. If the tree sampling is planned to be shallow, then a power of 500 W will be enough for you. To ensure that the machine does not stop constantly and meets your expectations, choose a motor with a power of 1100 W or more. Such a drive will allow you not only to safely process any wood, but also to use various cutters.
A homemade milling table can be improved indefinitely, depending on your requirements and desires. But the most important thing is not to forget about safety and be sure to equip your machine with the means to ensure it.
In search of a worthy answer to the discomfort that arises when working with hand-held milling tools, owners of home carpentry eventually come to the need to purchase a convenient milling table.
VovroKsyu User FORUMHOUSE
I've been thinking about the table for a long time. Especially after manually performing the reservation 22 m of fence.
The purchase option may be expensive; the dimensions of the machine assembled in production conditions, do not correspond to the size of a small home workshop. The optimal solution V in this case will self-assembly milling table.
Those who want to make a homemade milling machine will find it in the corresponding section of FORUMHOUSE.
How to make a milling table

A homemade milling table is the simplest. The main working unit in it is a manual milling machine. Work with hand power tools involves moving the working cutter along the surface of a stationary workpiece (which is not always convenient). Milling table for hand tools allows you to change the processing method and mill in a lightweight way: the hand tool is fixed on the work table, and the workpiece is easily fed to the cutter by hand.

A homemade milling table is simplest processing wood The main working unit in it is a manual milling machine. Working with hand-held power tools involves moving the working cutter along the surface of a stationary workpiece (which is not always convenient). A milling table for hand tools allows you to change the processing method and mill in a lightweight way: the hand tool is fixed on the work table, and the workpiece is easily fed to the cutter by hand.
A milling table for a manual router consists of basic and additional elements. Additional items are not required, but their use makes it possible to make the master’s heavy work as easy as possible, make the design of the device safer, and make the functionality closer to the capabilities of serial installations.
Universal milling table:main structural elements
The main elements of the milling table are indicated in the figure.
Aib User FORUMHOUSE, Moscow.
I really needed a mobile milling table. I welded the frame, painted and assembled the structure.


The dimensions of the milling table depend on the dimensions of the parts being processed, as well as on the height of the craftsman himself. The length and width should be slightly less than the tabletop, and the height of the bed is 850...900 mm, which corresponds to the most comfortable conditions for working while standing. The homemade legs can be made adjustable, which will allow you to compensate for uneven floors or change the height of the bed.

Tabletop for router
The dimensions of the tabletop depend on the size of the parts being processed.

dauto User FORUMHOUSE
In a home workshop, a small table of 500x500 mm is sufficient.
For processing relatively long parts (for profiling edges on door frames) you will need a tabletop of appropriate sizes. Let's look at the drawing:

For the manufacture of the frame, wood-based materials are most often used, which can effectively dampen vibrations. This could be a countertop made of chipboard, which is used in the manufacture kitchen furniture or a sheet of thick plywood. Here, for example, is a countertop made from chipboard scraps formed after installing a kitchen sink.


Krott64 User FORUMHOUSE
With this tabletop scrap, after some simple modifications, you can do some pretty decent things.

Some people make countertops from metal, others from edged boards, but, as practice shows, chipboard and plywood are always a priority.

Orfo74 User FORUMHOUSE
If I make it, it will be from laminated plywood (I have one like this on my trailer). I have already traveled hundreds of thousands of kilometers under the heat and below zero. Neither salt nor rain spoiled it. And it can still be used, but you need to assemble it either in 2 layers, or make the bottom out of simple plywood.
To make a countertop, you cannot use material that has defects on its surface (knotty boards, etc.).
Mounting plate for hand router
To the mounting plate using threaded connections a hand router is attached. Therefore, its production must be taken with full responsibility. The material from which the plate will be made must be strong enough so that the router does not tear out during operation (the consequences can be imagined). This can be a rectangle made of metal or plywood sheet (but metal is more reliable).

AlekX User FORUMHOUSE
A powerful car has a lot of dope. And if she gets thrown out of the table while working–it won't seem like much.

Dgusepe User FORUMHOUSE
The legs can be made of wood, but it is advisable to make the tabletop from 3 mm metal. For maximum cutter lift.
The length and width of the mounting plate must correspond to the dimensions of the base of the hand router, with which the power tool will be attached to the table.


Longitudinal workpiece stop
The longitudinal stop can be made from ordinary chipboard sheet or from edged boards. The stop must be made movable to ensure the possibility of adjusting the horizontal reach of the cutter. For more precise adjustment, you can attach measuring rulers to the sides of the tabletop.

The design of the locking mechanism, which allows you to secure the longitudinal stop in the required position, is extremely simple. It can consist of two slats with through longitudinal grooves and two threaded fasteners with wings.
Instead of slats, you can use two metal corners, which will last longer and will not deform under the action of clamps.

To prevent dust and chips from interfering with work, it is advisable to equip the longitudinal stop with a dust collector, to which a chip extractor or a small carpenter's vacuum cleaner is connected.

The longitudinal stop can be made double, which significantly expands the functionality of the milling table.
Superkuzen User FORUMHOUSE
The monolithic stop makes it impossible to carry out a lot of operations performed on the milling table, that is, it makes the table of little functionality.
The milling table can serve as a small jointer, if an adjustable difference between the working planes is organized between the two halves of the longitudinal stop. This design allows you to move one half of the stop relative to the other, setting one stop flush with the cutter using thin wooden plates. Adjustment plates are placed under the non-working surface of the stop.

Manual milling machine
From technical characteristics hand tools (power, number of revolutions per minute, etc.) will directly depend on the performance of the milling table. You should choose a router for a milling table based on the expected load. The additional functionality of the machine will be an additional advantage for the master. If you don’t yet have a manual milling cutter, then choose a tool with an adjustable cutter rotation speed and the ability to set the processing depth (plunge-beam milling machines). Very easy to use machines with spindle lock (for easy replacement cutting tool), as well as devices with soft start and quick spindle stop.
We looked at the main elements of a milling table, which will allow the owner to perform the simplest milling operations. In order to expand the functionality of the device, make it universal and increase operational safety, it is necessary to ensure the availability of additional accessories. Let's look at the most common of them.
Longitudinal guide for movable milling carriage
Using a longitudinal guide built into the surface of the table top, you can attach a variety of devices to the milling table: an angular stop with a protractor, a perpendicular stop, etc.

The longitudinal guide may have different designs, but most often it is an aluminum C-shaped profile into which bolts and wing nuts are inserted. This design allows you to quickly install the device you need at the moment on the milling table.


By the way, with the help of a C-shaped profile you can fix the longitudinal adjustable stop.

Vertical clamp
The upper clamp increases safety when working with a homemade router and increases processing accuracy. Its fastening can be implemented using the type of clamps for a movable carriage.

If you are planning to make a milling table with your own hands, a video about setting up a universal carpentry workshop for personal use will help you with this.
Lift for router
The vertical reach of the cutter very often has to be adjusted. To make this adjustment, there is a milling elevator– an adjustable stop that allows you to maintain the milling machine at a given height and, if necessary, quickly change this height.
It is advisable to use a milling elevator in conjunction with submersible milling machines. Their design initially has guides for adjusting the reach of the cutter (unlike machines with a fixed motor).
Lift lift for homemade router may have different designs.
Car jack lift
You can use an old car jack to create a lifting mechanism.

leon42 User FORUMHOUSE
The elevator can be made from a car jack: there is a shelf under the router, and we attach the jack to the shelf. We turn the jack - the router rises or lowers.

For convenience, the jack handle can be moved out of the side wall of the bed. This will make adjustments much easier.
Threaded rod lift
Blackk User FORUMHOUSE
The angle with the threaded rod is screwed to the protrusion on the router, to which the measuring pin is normally attached. The corner for the threaded rod is threaded. By rotating the pin, we seem to screw into the corner and pull the entire router up along the guides. Accordingly, when rotating backwards, we lower the router.

The mechanism consists of a wooden wedge (item 1), in which a through hole is drilled for a screw (item 2). Thanks to metal plates (item 3), attached to the sides of the wedge and having threaded holes, the wedge moves in a horizontal plane, raising or lowering the milling machine. The handle of the lifting mechanism is brought to lateral surface beds. To reduce the load during lifting, the router is equipped with a homemade roller (item 4).
Turning the router table on and off
All necessary equipment for the electrical part of the milling table is already provided in the design of the milling machine. The only thing you can add to what you already have is electrical diagram– this is a remote switch and a button emergency shutdown(after all, no one has yet canceled the safety rules during work).
You can use a very ordinary switch for the router. As for the possibility of quick shutdown: it can be implemented by installing an emergency button with a locking mechanism on the table (in which the unlocking is carried out by turning).

Table assembly
We have listed the main and auxiliary elements of the milling table. Each master can determine the order of assembling the device for himself. The only point to pay attention to is the manufacture and installation of the mounting plate.
After a plate is cut from a steel (or plywood) sheet suitable size, it is necessary to drill holes in it for attaching the milling machine, a hole for the cutter (its diameter must correspond to the diameter of the hole in the base of the router) and mounting holes (for attaching the plate to the tabletop).

What tools should you have in your carpentry or furniture workshop? And a video about the design of a homemade milling table and the features of power carpentry tools will help you find answers to questions regarding equipment that is extremely rarely used in a small home workshop.
Application various devices for a manual router significantly expands the capabilities of this unit, and also increases the comfort and safety when working with it. There are ready-made models of devices on sale that are designed for use in conjunction with a router, but, as a rule, they are expensive. Therefore, many craftsmen prefer to make accessories for this unit with their own hands.
If you attach a hand router in a special way under the table it will work universal table Yarny machine, allowing for precise and fast processing of long and short wood blanks. To make a table for a router with your own hands, you first need to prepare the necessary parts to assemble the entire structure. The figure below shows a cutting map on which all the details of the future milling table are located. They are cut using a circular saw or format cutting machine.
The device can be made made of plywood, chipboard or MDF. The cutting card indicates a material thickness of 19 mm, but this is not a prerequisite. The table can also be assembled from slabs with a thickness of 16 or 18 mm. Of course, to make a countertop it is better to use laminated or plastic-coated sheet materials, which will allow the workpiece to easily slide across the surface.
It should also be noted that this homemade table is intended for installation on trestles. If you need a tabletop option, then the drawers (5) need to be made much wider than 150 mm. Their width should be slightly larger than the height of the device so that it can fit under the countertop.
If the table parts are cut from plywood or MDF, then their ends should be sanded. The ends of parts made from laminated chipboard will need to be covered with a melamine edge using an ordinary iron.
Making a countertop
Installation of the router into the table can be done either with or without the use of a mounting plate. Preparing the countertop for direct mounting the unit is connected to it as follows.

Mounting the unit using a mounting plate
When installing the device on the main plate, its thickness significantly reduces the overhang of the cutter. Therefore, to install the unit on thick countertops, it is customary to use thinner ones. mounting plates from durable materials(steel, duralumin, polycarbonate, getinax or fiberglass). The plate is made as follows.

Improvement of the stop
The parallel fence can be modified to make setting up the milling table more convenient and quick: to do this, you need to cut C-shaped guides into the tabletop. The profile can be made of aluminum. A straight groove cutter is used for tapping. The profile is placed in the prepared groove and screwed in place.


Next, you should select bolts with a hex head of such a size that it can fit into the C-shaped profile and not rotate in it. Drill 2 holes in the base of the rip fence to match the diameter of the bolt.

You should also cut a C-shaped profile into the front stop bar to attach various clamps and protective covers to it.

The stop is screwed to the tabletop using wing nuts.

On the back side of the stop you can make chamber for connecting a vacuum cleaner. To do this, just cut a square out of plywood, drill a hole in it for the vacuum cleaner pipe and screw the resulting cover to the gussets.

You can also add to the stop safety shield, made of MDF or laminated chipboard and a small rectangle of plexiglass. To select grooves, you can use a jigsaw or a router with a groove cutter installed.

To be able to process small parts, it is necessary to make clamps and clamps from plywood or MDF.

It is made on a circular saw with a pitch between cuts of 2 mm.

If desired, you can make a milling table with tool boxes.

Making the table base
If you need to make a stationary machine from a manual milling machine, then you cannot do without making a solid base. Below is a cutting map with the parts marked on it that will be required to assemble the table base. The dimensions of the parts will need to be adjusted if used sheet material different thickness.


All parts of the table for a manual router are assembled using confirmations. To make it easier to move the table, rollers can be attached to its bottom. If you expand this table a little and attach a disk in the free part hand saw, then it will work out universal table for router and circular saw.

So that the machine occupies less space, it can be made according to the principle of a table-book with tabletops descending on both sides.

Homemade tools for a router
To expand the functionality of this unit, quite expensive accessories are available for sale. But in order to save money, owners of milling cutters try to make various devices with their own hands that work no worse than factory ones.
A simple tenon cutter for a router is made from two pieces of plywood and a pair of furniture telescopic guides. The milling cutter is installed on a platform that has a hole for the tool. The platform is attached to the workbench at an angle (for more convenient positioning of the equipment in height), as shown in the photo below.


So, the tenoning device is made in the following order.
- Cut out 2 platforms of the same size from plywood. The size of the device can be any.
- Place two telescopic guides parallel to each other along the edges of the first platform and fasten them with screws.

- For more precise positioning of the guides, you can screw two strips of equal length between them.

- You should extend the counter strips and place a second platform under them flush with the first. Use a pencil to place points through the bar on the second site, and then draw a line through them.
- Remove the strikers from the guides by pressing on the plastic “antennae” located on their reverse side.
- Place the strikers on the marked area so that the line passes through the center of the mounting holes, and screw them in with screws.

- Carefully align the 2 guides and push them in (you should hear a click). If you insert a part askew, you will break the telescopes and balls will spill out of them.

- Between the vertical stop with the unit and the movable table it is necessary maintain a certain distance. This is done so that when lowering the cutter it does not touch the table platform. Since in this case the maximum overhang of the cutter will be about 25 mm, you can temporarily lay a bar of the same width, that is, 25 mm, between the table and the stop. The bar will allow you to place the structure parallel to the vertical stop
 .
. - At the next stage, holding the fixture, drill 2 holes for the dowels. They will allow you to quickly position the tenoner on the workbench. When the holes are ready, insert a couple of dowels into them. Now you can remove the bar placed between the stop and the device.

- Now that the movable table is fixed, a vertical stop must be installed on its upper platform, as shown in the following figure. For rigidity, the stop is supported by two gussets.

- When all tenoning elements are secured, testing can begin. Place the workpiece on the fixture table and press it against the stop. Set the required cutter height, turn on the unit and mill the workpiece.

- After the first pass, turn the workpiece 180 degrees and repeat the processing.

- Rotate the workpiece 90 degrees, placing it on the edge, and repeat the operation again.

- Rotate the part 180 degrees and finish the tenon.

As a result, you will get an even and high-quality tenon.

By changing the height of the cutter relative to the tenoning platform, you can obtain tenons of various thicknesses.
Copy sleeve
If your router did not come with a copy sleeve, then you can make one in literally 30 minutes using improvised materials. For homemade work, you will need a metal or duralumin washer, which can be made from sheet metal, and a plumbing threaded extension.

The copy sleeve is made in the following way.
- Select a nut that fits the threads of the extension and cut it with a grinder so that you get a thin ring. After this, straighten it on the sharpening machine.

- It is necessary to make a round platform for the sleeve from sheet metal or aluminum 2 mm thick. Depending on the model of the unit, the hole in its base may have different shape. In this case, the platform must have cuts on the sides, which are ground off on a sharpening machine.

- After sanding off the washer on both sides, place it on the sole of the unit.

- Place the unit vertically without removing the washer and mark with a pencil the places for fastening through the holes in the base of the unit.

- The places marked with a pencil must be marked for precise positioning of the drill.


- First, drill the holes with a thin drill bit, and then with a drill bit that matches the diameter of the mounting bolt.


- Place the washer on the threaded extension and tighten the ring nut. Clamp the part in a vice and trim the excess thread flush with the nut using a grinder.


- Clamp the part in a vice with the other side and shorten it slightly.

- Align the part to grinding wheel, insert into the base of the device and secure it with screws. The ring nut should be slightly below the base of the unit.


Guides for working with a router
If you need to select a very long groove in the workpiece, you will need a tool for the router, which is called a tire. Ready-made metal tires can be purchased in specialized stores. But they are also easy to make with your own hands from plastic, plywood or MDF.
The thickness of the material should be about 10 mm so that the parts can be tightened with screws.
The guide for the unit is very simple to make.
- Cut three strips on a circular saw. One wide, about 200 mm, and 2 narrow ones - 140 and 40 mm each.
- Also make a small strip from the same material, about 300 mm long and 20 mm wide.
- Place a 140 mm wide piece on a wide strip, align it along the edge and screw both pieces together with screws.
- Place a narrow strip 40 mm wide on top of the wide strip, opposite the screwed part. For precise positioning, place a 20 mm wide strip between the upper parts and screw the narrow strip to the lower part with screws. Thus, you will get a long tire with a groove 20 mm wide.
- Take a 20 mm wide bar and screw it to the base of the device, as shown in next photo. To select a groove, select straight or shaped groove cutter and is fixed in the collet of the device.

When all the devices are prepared, perform the following actions. Place the workpiece that needs to be processed along its entire length on the workbench, place the tire on it, securing it with clamps. Insert the strip attached to the router sole into the groove of the guide. Start the machine and mill the workpiece along its entire length.
If you need to select a deep groove, then processing occurs in several passes so that the equipment is immersed into the workpiece gradually.