To ensure that the power supply in your homes is always of high quality, uninterrupted and reliable, it is very important when installation work connect the wires correctly. There are a lot of methods, we will consider each in detail separately with its advantages and disadvantages, with step by step instructions perform switching. We will also pay attention to the eternal question of electricians - how to connect wires whose cores are made of different metals(for example, copper and aluminum).
Removing the insulating layer from the wires
I would like to immediately dwell on a question that will be common to any method. Before connecting the wires into a common electrical unit, they must be stripped of the top insulating layer.

This can be done using a mechanic's knife. This method is simple, but there is a high probability of damage to the conductor. To do everything correctly, you must strictly follow the step-by-step instructions:
- Place the wire on some flat surface(type of table).
- Press it with your left index finger.
- Right hand take a knife and lightly press it into the insulating sheath of the wire. To avoid snagging the metal core, position it towards the cut at an angle. If the angle is right, there is a possibility of a circular cut in the core, as a result of which it may subsequently break.
- Hold the knife in this position. Using the index finger of your left hand, slowly twist the conductor one full turn, thus cutting the insulation around the entire circle.
- All that remains is to pull off the cut piece of insulation.
Professional electricians now necessarily have in their arsenal such a device as a stripper. This is a multifunctional tool that can be used to strip insulation from a wire or cut a cable. It can be simple, semi-automatic or automatic. The most important thing is that when stripping the insulation with a stripper, the conductor is not damaged. For each standard core diameter, such a tool has a calibrated hole with a cutting edge.

The length to which wire cores need to be stripped is different for each connection method.
Twist
Let's start with the simplest and most well-known method - twisting. It can also be called the oldest; it’s not for nothing that electricians call twisting the “old-fashioned method.”

We will not tell you that such a connection of wires is durable and reliable. According to the main document in electrical engineering, PUE (“Rules for Electrical Installations”), twisting is generally prohibited, despite the fact that half a century ago it was used everywhere. The fact is that in those days the load in the apartments consisted only of lighting, radio or television. If you consider the current load in modern apartments with a huge number of household appliances used daily, then no old insulation, core cross-sections or methods of connecting wires are any longer suitable.
Nevertheless, we will talk about twisting, and even first of all, because it is the main stage of such connection options as welding and soldering.
Positive sides
The most important advantage of twisting is that it requires absolutely no material costs. All you need is a knife to remove the insulating layer from the wire cores and pliers to make the connection.

The second indisputable advantage of twisting is its ease of execution. You don’t need any special knowledge or skills; it can be done by anyone who has ever held pliers in their hands.
Several wires can be connected simultaneously in a twist, but their total number should not exceed six.
Negative sides
The main disadvantage of twisting is its unreliability; it weakens over time. This is due to the fact that there is residual elastic deformation in the cable or wire cores. At the point of twisting, the contact resistance increases, which can lead to contact failure and heating. IN best case scenario, you will detect this in time and re-seal the connection; in the worst case, a fire may occur.

Electrical wires made of different metals cannot be connected using twisting. As an exception, you can twist copper and aluminum wire, but only if the copper core is first tinned with solder.
In electrical engineering there are concepts of detachable or permanent connection. So twisting does not apply to one or the other. Detachable connection characterized by the fact that its ends can be separated many times. This cannot be fully done in twisting; every time after the next unwinding and twisting of the cores, they will deteriorate. Name the twist permanent connection It’s also impossible, because it doesn’t have the concepts of strength, reliability and stability necessary for this. This is another disadvantage of the twist connection.
Installation
If for some reason you do not have the opportunity to use other methods of connecting electrical wires, you can use twisting, just do it well. Very often it is used as a temporary option and is subsequently replaced by more in reliable ways switching

How to connect wires using twist? To begin with, the cores are stripped to 70-80 mm. The main thing is to twist all switched conductors into one single twist at the same time, and not wind one around the other.
Many people mistakenly begin to twist the wires together from the place where the insulating layer ends. But it is better in this place to clamp both wires with one pair of pliers, and with the other, grab the ends of the wires and perform rotational movements in a clockwise direction.
If the wire cross-section is small, you can twist it by hand. Align the conductors along the cut of the insulation and hold them firmly in this place with your left hand. Bend all switchable ends into one single bend at an angle of 90 degrees (a bend length of 10-15 mm will be enough). Hold this bend with your right hand and rotate clockwise. This must be done firmly and firmly. If it is already difficult to twist your hands at the end, use pliers as described above. As soon as the twist becomes smooth and beautiful, you can trim the bend.
You can connect several wires this way, but then to make it easier to twist them, make the bend longer, somewhere around 20-30 mm.
How to properly twist wires is shown in this video:
There is also a way to twist wires using a screwdriver, see about it here:
For information on twisting wires using a special tool, see here:
Now the resulting twist must be carefully insulated. Electrical tape is used for this. Do not spare it, wind it in several layers, and insulate not only the connection itself, but also step 2-3 cm over the core insulation. This way, you will ensure the insulating reliability of the twist and protect the contact connection from moisture.
You can also insulate the connection of wires using heat pipes. The main thing is not to forget to put the tube on one of the cores to be connected in advance, and then push it into the place where it is twisted. When exposed to heat, the thermal tube shrinks, so slightly heat its edges and it will firmly grip the wire, thereby providing reliable insulation.
If the twisting is done well, there is a chance that it will serve you for many years, provided that the load current in the network is normal. But it’s still better not to stop at this stage and strengthen the joint by welding or soldering.
Soldering

Soldering is when electrical wires are joined using molten solder. This type of connection is most suitable for copper wires. Although there are now various fluxes for aluminum, experienced electricians prefer to refrain from such soldering. But if necessary, you can use special fluxes and even solder copper and aluminum.
Positive sides
This type of connection cannot be compared with twisting; soldering is much more reliable (in terms of reliability it is second only to welding).
Using soldering, you can connect stranded and single-core wires, as well as wires of different sections.
This type of connection does not require any maintenance throughout the entire period of operation.
Soldering is considered low in cost, the only equipment you need is a soldering iron, and flux and solder are very inexpensive, and their consumption is quite negligible.
Negative sides

The disadvantages of this method include high labor intensity. Soldering requires certain preparatory work, wire strands must first be tinned before twisting. The surfaces to be soldered must be free of oxides and absolutely clean before starting work.
And of course, you need experience in using a soldering iron, that is, the person who will connect the wires using the soldering method must have a certain qualification. Indeed, during the soldering process it is very important to maintain the necessary temperature regime. An underheated soldering iron will not heat the connection well; overheating is also unacceptable, because the flux will burn out very quickly, not having time to do its job.
Soldering is a slow process, but this disadvantage is compensated by the reliability of the contact connection.
Installation

The step-by-step soldering process is as follows:
- Remove the insulation from the cores by 40-50 mm.
- Sand the bare areas of the wires until they shine using sandpaper.
- Dip a heated soldering iron into rosin and move it over the cleaned surfaces several times.
- Perform a twist.
- Bring the soldering iron tip to the solder.
- Now immediately heat the twist with solder, the tin should melt and fill the gaps between the turns.
- Thus, the entire twist is enveloped in tin, after which it is allowed to cool.
- Wipe the hardened solder with alcohol and insulate it.
Soldering wires with a soldering iron is shown in this video:
Soldering wires using a gas soldering iron:
Soldering twists by immersion in molten solder:
Welding
In order for the connection of electrical wires to be as reliable as possible, the considered twisting method must be subsequently secured by welding. It is similar to soldering, only now a welding machine is used instead of a soldering iron.
Positive sides
This method is most preferable to all others, since it meets all regulatory requirements in terms of reliability and quality.

The welding method is based on contact heating of the ends of the wires with a carbon electrode until a ball (contact point) is formed. This ball is obtained as a single unit from the fused ends of all connected cores, which ensures safe and reliable contact; it will not weaken or oxidize over time.
Negative sides
The disadvantage of welding is that such work requires certain knowledge, experience, skills and special equipment; you often have to turn to specialists.
Installation

In order to connect wires using welding, you will need the following devices, tools and materials:
- welding inverter with a power of at least 1 kW, its output voltage must be up to 24 V;
- carbon or graphite electrode;
- goggles or eye mask;
- welding leather gloves to protect hands;
- a mechanic's knife or stripper for removing the insulating layer from conductors;
- sandpaper (for cleaning the conductive surfaces to be connected);
- insulating tape for further insulation of the welding joint.

The sequence of work is as follows:
- Free each connected wire from 60-70 mm of insulation.
- Sand the exposed wires until they are shiny using sandpaper.
- Twist, after biting, the length of its ends should be at least 50 mm.
- Attach grounding clamps to the top of the twist.
- To ignite the arc, bring the electrode to the bottom of the twist and lightly touch the connected wires with it. Welding happens very quickly.
- It turns out to be a contact ball, give it time to cool, and then insulate it with tape.
As a result, an almost solid wire is obtained at the end, that is, the contact will have the lowest transition resistance.

If you connect copper wires in this way, then choose a carbon-copper electrode.
I would like to recommend that if you purchase a welding machine (it will be useful not only for connecting wires, but also for many other purposes), then choose the inverter option. With small dimensions, weight and electrical energy consumption, it has a wide range of welding current adjustment and produces a stable welding arc. And this is very important to be able to regulate the welding current. If you choose it correctly, the electrode will not stick and the arc will hold steady.
Watch how welding is done in this video:
We looked at the main types of wire connections. Now let’s briefly talk about methods that are used less frequently, but also guarantee quality and reliability.
Crimping
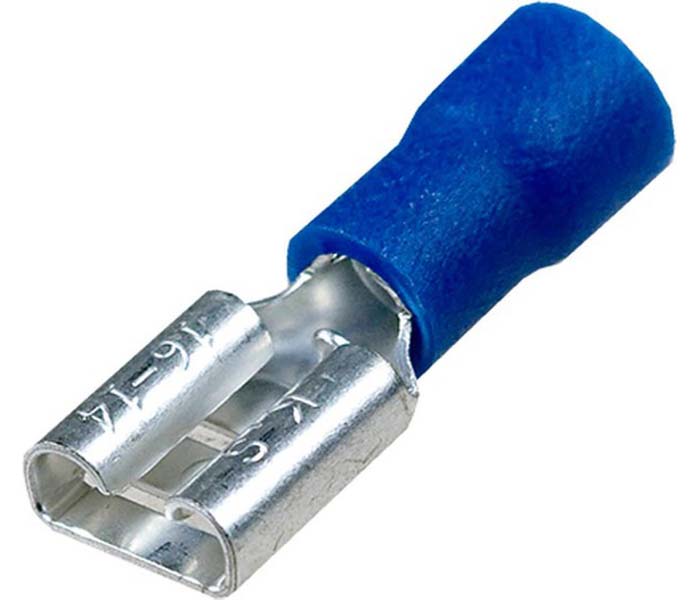
For this method, special tubular sleeves or lugs are used, with which the wires to be connected are crimped and crimped. The essence of the method is the joint deformation of the sleeve and the cores inserted into it. When deformed, the sleeve contracts and puts pressure on the conductive surfaces. The conductors engage in mutual adhesion, which ensures reliable electrical contact.

The advantage of such a connection is its reliability, and also the fact that it can be classified as “set and forget”; it does not require maintenance.
But along with positive aspects Crimping also has a number of disadvantages. First, a special tool is required (a crimping press or mechanical or hydraulic pliers). Secondly, the quality of the connection directly depends on the correctly selected sleeve (it is selected depending on the number of cores being connected and their cross-section).
Before connecting two wires using crimping, they are not only stripped of insulation, but also lubricated with a special paste. Aluminum is treated with quartz-vaseline paste; it removes the oxide film and prevents it from appearing again. For copper conductors, quartz impurities are not needed; technical petroleum jelly is sufficient. It is needed to reduce friction. Lubrication also minimizes the risk of damage to the cores during deformation.
Next, the cores must be inserted into the sleeve until they mutually stop, and alternate crimping is performed on both sides. The pressed joint is insulated using insulating tape, varnished cloth or a thermal tube.
How to connect wires with sleeves is shown in these videos:
Bolted connection
Bolts for connecting wires used to be often used, now this method is more characteristic of circuits with high voltage. The contact is reliable, but the electrical unit connected in this way is too cumbersome. Until recently, large distribution boxes were installed in apartments; at least somehow, such a connection could be placed in them. Modern boxes are smaller and are not designed for switching wires using this method.

But you definitely need to know about it, because this is one of the ways to solve the eternal problem of connecting conductors made of different metals. The bolt contact is ideal for switching completely incompatible cores - thin and thick, aluminum and copper, single-core and stranded.
The wire strands must be stripped and the ends twisted into rings. A steel washer is put on the bolt, then the rings of the wires to be connected are put on (this is the case when they are made of homogeneous metal), then another steel washer follows and everything is tightened with a nut. If aluminum and copper wires are connected, another additional washer must be placed between them.
The advantages of this connection are its simplicity. If necessary bolted structure You can always unwind. If necessary, you can add more wire strands (as long as the bolt length allows).
The most important thing in this type of connection is to prevent direct contact between copper and aluminum, and do not forget to place an additional washer between them. And then such a switching unit will serve for a long time and reliably.
Modern technologies

In many cases, the methods discussed are gradually becoming a thing of the past. They were replaced by factory wire connectors, which made installation and switching work much easier and faster:
- Terminal blocks, inside of which there are tubular brass sleeves. Stripped wire strands are inserted into these tubes and secured by tightening the screws.
- PPE caps, inside of which there are compression springs. The cores are inserted into the cap and then turned clockwise with little effort, thereby reliably compressing the connected wires inside.
- Self-clamping terminals. It is enough to place the wiring in them, and there it is automatically fixed due to the pressure plate.
- Lever-type terminal blocks. This connecting element is reusable. It is enough just to lift the lever, insert the conductor into the contact hole and lower the lever back, reliable fixation is ensured.
We do not talk in detail about all existing terminal blocks, since there is a separate article about this, where each type of wire clamp is discussed in detail.
We hope that we have clearly explained to you how to connect the wires correctly. Choose the method that suits you best. When choosing, take into account the cross-section and material of the conductors, the location of the connection (outdoors or indoors), and the amount of load current that will flow in this electrical circuit.
Cut the cable at an angle so that the end is tapered rather than blunt. Leave the wire closest to the cut point about 7-8 cm longer than the other two wires. Straighten the stiff wire and make a small loop at the end.
Pass the wire through the loop and wrap it around the stiff wire. Start wrapping the electrical tape around the cable, over the connection. Wrap the tape tightly in a spiral until you get it over the wires. Each successive winding overlaps the previous one, reducing the likelihood that the edge of the tape will catch on something as you pull it through obstacles. Copper wire is not as stiff and is more likely to come free from the connection in the style shown, so this method should not be used with it.
Connection of two flexible wires
If you are using copper wire as a fishing tool, please use Western Union connection. Start with two L's, then wrap each wire around the other without looping them over themselves. The recording step is the same for both methods.

How to connect wires correctly: 4 main ways
Methods of connecting wires are regulated by the Electrical Installation Rules. According to their latest edition, the following options can be used for connection:
- soldering;
- welding;
- crimping;
- squeeze
Nevertheless, many electricians still use one of the most common connection methods - twisting. By current rules it is not a complete process and must be followed by soldering, welding or clamping. The soldering method is not given below.
How to choose a wire connection method
Choice optimal option depends not only on the personal preferences of the master, but also on a number of other factors. For example, when joining aluminum and copper, it is important to consider possible process oxidation. Also, not all methods are suitable for a large number of wires in a connection. The load in the circuit, cross-section and number of cores, etc. also have an impact.
Connecting wires by welding
Compared to soldering, welding is an even more reliable connection method, but in quality household method rarely used, as it requires welding machine, personal protective equipment and welding skills.
The welding technique is approximately the same as in the case of soldering, but before the procedure it is necessary to take the free ends of the two wires, straighten them and press them parallel to each other in order to better form a melt ball.

The welding area must cool down in a natural way before isolation. Submerging the wire in cold water causes microcracks to appear.
The disadvantages of the method include:
- high cost of equipment;
- the need for relevant skills;
- time costs.
Pressure testing of connections
Crimping provides high-quality installation and reliable insulation. For this method special tubular sleeves are used, which are selected in size depending on the cross-section of the wire. Connecting wires in this way requires a crimping tool: pliers or a crimping press.

After cutting the wire, that is, removing the insulation and stripping the ends, quartz-vaseline paste is applied to the wires, a connector is put on and crimped. Wires can be inserted from opposite or one side. When using high-quality and professional tool You can crimp the wire in one go. After this, the usual insulation of the joint is performed.
Among the disadvantages of this method are:
- the inability to reuse the connector, as it is deformed during crimping;
- connecting copper and aluminum wires in this way is only possible when using a special sleeve, which is difficult to find on sale;
- takes quite a long time.
Connecting wires using compression
Wire compression can be done different ways, some of which are more preferable, others less.
Connecting insulating clamps resemble crimping sleeves, with the difference that inside they have a steel wire coiled into a spiral, which protects the wires from oxidation and presses them tightly together. The connections are easy to use, and you can use clamps of different colors if the wires are not color-coded to mark zero, phase, and ground.
The use of clamps is limited by the number of wires connected: they are suitable for two wires with a cross-section of 4 mm2 or four with a cross-section of 1.5 mm2. Over time, the spring weakens, causing resistance to increase and voltage loss in the network to occur. Combine wires from different materials With this method of connection it is impossible.
Using a short bolt, three washers, a nut and electrical tape, you can quickly and cost-effectively connect wires from any materials, but the junction is very bulky, so this option cannot be used in a junction box.
Screw terminals are convenient for connecting lamps, sockets and switches. They allow you to connect copper and aluminum wires without additional insulation. The disadvantages include the need to maintain connections: the screws need to be tightened periodically.
Using modern terminal blocks is the simplest, fastest and convenient way connections of wires of any type. Due to their small size, they easily fit into a junction box, there are different variants blocks for wires with different sections. They provide high quality connections and high installation speed. One of the disadvantages is the possibility of poor quality pads, which can cause disruptions in the network. Working with them requires care and attention to avoid damaging the wires.

When choosing any of the above options, you must ensure the safety and reliability of the electrical network. It is very important that all wire connections, regardless of the method of their joining, are provided with convenient access for inspection and maintenance during operation.
Wire connection methods
Hello, dear readers! This article will describe different ways wires, their pros and cons. The most important thing during electrical installation is to follow safety rules and PUE (Electrical Installation Rules). 1. Twist. The most common wire connection. Fast and cheap. You need to remove the insulation and use pliers to twist the wires into a bundle. The twist is made with high quality if its length is at least 5 cm, the strands fit tightly to each other and are not damaged. But this type of connection in this form is contrary to the rules, unlike those below. But we are all human and we all violate something.

2. Welding. This combined option the same twist, but boiled at the end. This type of twisting meets the standards and can be used for electrical installation. Welding can be done using a low voltage transformer or a low current inverter. In this case, a graphite rod acts as an electrode.

3. Screw terminals type ZVI 20. A short twist is made, after which a clamp is put on it. The clamp has two screws that compress the wires together and press them against the body. But like any screw connection, the fixation may become loose over time and the screws will need to be tightened. This connection is best used in unloaded circuits with free access to distribution boxes.
We will send the material to you by e-mail
The old-fashioned methods of primitive twisting of wires with mandatory insulation with the notorious blue tape are long gone. requires a professional approach, which means you need to use materials and devices that meet not only to the highest requirements safety, but also simplicity, reliability and attractiveness appearance. One such device is terminals for connecting wires. Today we will talk about how to choose and use them correctly.
Small terminal - a solution to many problems in electrical wiring
The way the two wires are connected depends on many factors. The metal of the conductor, the thickness of the wiring, the number of cores and the type of insulating material should be taken into account. An important factor is the conditions under which the connection will be operated.
There are several main types of connections:
Let us consider in detail the main characteristics of all these compounds.
Features of professional twisting
Twisting is the simplest method of connecting wiring. The work does not require any special tools, just a knife and pliers. To ensure a strong connection, experts recommend stripping the wires at least 5 cm. To ensure tight contact, the wires are clamped with pliers and twisted rotational movement. Afterwards, the resulting connection is wrapped in one direction and tightly wrapped with electrical tape. This is the simplest version of such a connection.
Professional electricians have other ways to connect wires by twisting:

Important! If you use electrical tape, don't skimp on the wrapping. The insulation should cover not only the twist itself, but also extend onto the wires by at least a couple of centimeters.
You can use electrical tape instead of modern material– heat shrink tube. Before connecting the conductors, heat shrink of the required length is placed on one of the conductors and then pulled into a twist. All that remains is to momentarily bring a match or lighter to the tube, it will shrink and tightly fix and insulate the veins.

With reliable insulation, such a connection will last quite a long time. Its advantage is good vibration resistance, which is good for moving mechanisms. Electricians do not recommend using this method when connecting wires. different sections. During operation, excessive resistance heats up the contact point so that the insulating layer can melt. Professionals do not recommend twisting wires with cores made of different metals and cables with a large number of wires.
Soldering for perfect conductivity
Not only the flawless operation of the mechanism, but also the safety of its user depends on the reliability and strength of the connection of the conductors. Soldering is one of the most reliable types of connections.

There is a soldering iron in almost every home, and the procedure itself does not take much time
Rosin is used for tinning, and tin or other fluxes are used as solder. It is recommended to solder copper wires with tin or lead, aluminum wires - with zinc compounds with tin, aluminum or copper. Before soldering, the wires are stripped and twisted using one of the above methods. Afterwards, rosin and flux are applied to the twisting site with a soldering iron.
Important! The heated solder should fill all the irregularities and holes in the twist.
After soldering, the connection is insulated with tape or heat shrink. The most difficult thing to solder is aluminum wiring. It oxidizes quickly at high temperatures and does not provide a strong connection to the solder material. For a strong connection you need to use tinning.
If soldering is done correctly, contact should be good. The only drawback is the fragility of the connection; under vibration and mechanical loads it will not last long.
For professionals: welding
Welding allows the metal of the conductors to fuse together and provide optimal resistance. This contact is strong and durable.

Arc, spot, torsion, plasma, ultrasonic and beam welding can be used.
Such work requires experience and dexterity, so the welding method is a tool for professional electrical installers. They use graphite and carbon electrodes, operate stationary, and use high-precision voltage-regulated inverters. This technique is not suitable for domestic conditions; only experienced welders know how to correctly connect the wires to each other in such a complex way.
Important! All welding work must be carried out wearing a protective helmet. It will be very difficult for a beginner to achieve a high-quality connection of conductors.
After welding, the contact area is also insulated with tape or heat shrink.
Crimping with sleeves
Returning to more accessible for household use methods of connecting wiring, it should be noted that crimping is simple and available method, which can be used without special skills.

The technique is very simple - wire strands are inserted into a metal sleeve and then the soft metal is crimped using pliers or a vice. It is best to use special pliers for this purpose. They can manually crimp sleeves with a cross-section of up to 120 mm². If a larger sleeve is required, use hydraulics. The disadvantage of the sleeve connection is that it is final, and, if necessary, it will not be possible to correct the contact without cutting the wire.
For your information! For crimping, sleeves should be selected from the appropriate material to ensure optimal contact. There are sleeves made of aluminum, copper and alloys. The cross-sectional diameter of the conductor is also taken into account; the conductors must fit tightly into the sleeve.
The use of terminal blocks for connecting wires
The easiest and most reliable installation is using terminal blocks.

Wire terminal clamps can be used when installing conductors made of different metals. At the same time, the design of the terminals allows us to avoid direct contact between aluminum and copper and the formation of corrosion that is inevitable for such a connection.
Terminal blocks are divided into three main types: blade, screw and spring. As a rule, brass alloy is used as the main material. Some models are filled with a gel that protects the contacts from corrosion.
Standard requirements for terminal blocks
Like any electrical component, the terminal block has developed reliability and quality standards:
| Requirement | Description |
|---|---|
| Heat resistance | The terminal housing material must withstand high temperatures and do not provide any opportunity for fire. The housing should not be deformed when heated, and the protective cover should not be made of flammable material. |
| Strong hold | The terminal blocks must be fixed without extra effort and at the same time securely hold the wire strands. In this case, the conductors do not need any additional processing or twisting. |
| Corrosion resistance | The contact plates in the terminals are of such length that direct contact between the cores is excluded. In this case, even if the wires are made of different metals, there will be no electrochemical corrosion. |
| Information content | Each connector for electrical wires contains information about the diameter of the cores and permissible voltage in the electrical network. |
Pros and cons of terminal switching
Like any device, terminal connections have their advantages and disadvantages. First, about the advantages:
- Easy to connect. Terminals can connect two or more wires with different cross-sections and metals, while each wire is placed in a separate socket and can be easily separated if necessary. If welding, jacketing or soldering were used for switching, it would be necessary to remove the insulation, break or unscrew the contacts, and then repeat the switching procedure again.
- Safety. The terminals are made of insulating material. Even if you accidentally touch the switching point, you will not receive an electric shock.
- There is no need to use a special tool. For screw connections you only need a suitable screwdriver.
- Reliability of fastening. The connection point of the wires is resistant to mechanical and temperature stress, vibration and stretching.
- Aesthetics. Connecting wires using clamps looks much neater than winding electrical tape.

Disadvantages of clamp connections:
- Price. The price of a high-quality terminal is 10÷12 rubles per piece. If you just need to connect a couple of wires in a chandelier, this is not essential. But a set of terminal contacts can cost a hefty sum. But this drawback is a matter of time. Great competition in this market and the development of new technologies will very soon make these devices cheap.
- Some difficulties in installation in hard-to-reach places. If you need to install a terminal block in a place where it is difficult to reach your hand or fingers, the task may seem too difficult. On the other hand, it is not easy to perform any other switching in such a place.
How to choose terminals for connecting wires
To choose the right terminal, you should first examine the cable you plan to connect. You need to find out, it is usually indicated in the wire marking.
Second selection criterion – quality material terminals. It must be sufficiently rigid and have reliable insulation. It is better if the screw and bracket of the device are made of steel. The terminals must be compact. It is possible that you will have to place the contact group in limited space, so the size of the connections will matter.

Another criterion for the right choice– ease of installation and maintenance. Terminals with a guide cone and a flag marking the place where the conductor is inserted are especially convenient to use.
Important! For terminals with a small cross-section of up to 16 mm², the insulation is installed on one side, so you need to be very careful about their installation, otherwise a short circuit may occur.
It is convenient if the surface of the terminal is suitable for marking. Sometimes it is necessary for further exploitation connections.

Types of terminal contacts
Modern manufacturers offer a large assortment switches for making connections for different purposes. Each model meets certain tasks and requirements; let’s consider them in more detail.
Screw switches
These simple and reliable devices are perfect for installation in sockets and other similar points. The cores are secured to the terminal with screws.

For your information! Lead and copper commutators can be used to connect a car battery. Auto mechanics recommend giving preference to lead fasteners. They do not oxidize as much as copper when exposed to acid.
Screw terminal blocks are not used for aluminum wiring. This is due to the fact that the aluminum core is destroyed under the pressure of the screw fastener. If the switch is equipped with, the head of the screw is marked with green paint.
Wire terminals
The design of such switches involves the use of a small spring that fixes the core in the desired position.

Such terminal blocks are installed in an instant: simply insert the stripped wiring and fix it with one click.
Switches for distribution boxes
These terminals are used to connect wires in junction boxes. The switch body is made of polycarbonate, and the contact point is made of copper. Springs are used to fix the cores.

For reliability, the terminals are treated with a special paste that protects the contacts from overheating.
Video on how to properly connect wires in a junction box using terminals
Fuse terminals
A separate type of switches has a built-in fuse. Such contact groups additionally protect the wiring from short circuits.

Such cable connectors take up more space than conventional terminal blocks and are used in cases where electrical appliances do not have built-in fuses.
Connection blocks
Terminals are a handy gadget for connecting multiple wires. The body of such a device contains brass tubes with threaded holes. Using such small devices, you can connect copper and aluminum wires to each other, as well as wires of different sections.
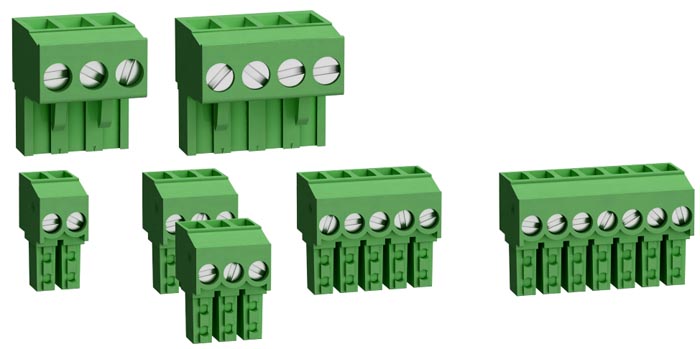
Switching in the block occurs in such a way that the cores do not contact directly. The only thing you should pay attention to is the rated current indicator on the block itself.
Blade terminals
These switches are also called wire crimp terminals. They are used for power conductors with a small cross-section of up to 2.5 mm. The maximum voltage for such a connection is 5 kV. Such a connection will not withstand a more powerful current, so knife terminal blocks are not used in large power plants.
Which terminal blocks are better
In fact, choosing a suitable terminal should be taken very seriously. Especially if there is a need to connect wires with conductors of different metals. During operation, such contacts become very hot and become deformed. This can lead to complete loss of circuit integrity and even short circuit. It is worth remembering that spring and screw terminal blocks are not suitable for fastening aluminum and copper wiring.
A few words about switch manufacturers
Products from European, Chinese and domestic manufacturers are presented on the shelves of electrical goods stores. As a rule, few ordinary buyers are puzzled by the origin of switches. And in vain. The safety of your property can directly depend on these tiny devices, the size of a fingertip. Don't blindly trust Chinese consumer goods. In most cases, Chinese products do not meet the requirements of domestic standards.

Domestic products are more reliable, but less aesthetically pleasing and technologically advanced. European goods are more expensive, but I bought such a terminal and forgot about it. Manufacturers guarantee long-term and reliable operation their products. Here are some of them:
LEGRAND
Screw switches from this manufacturer are the most popular product in this category. Brass products are coated with nickel and can reliably withstand powerful temperature changes. These terminals are highly durable and have a wide range of sizes.

WAGO
The products of the French company guarantee a strong connection of wiring of different types and cross-sections. The devices perfectly resist possible vibration and stretching and are installed without special tools. The main material of French terminal blocks is tinned copper, which gives good contact with low resistance. Some models are filled with anti-corrosion gel.

PHOENIX CONTACT
The German manufacturer is distinguished by excellent product quality. It offers more than 200 types of different switches for different types of connections. Among the presented models there are resistant to high humidity and explosion hazard.

WIEDMULLER
Another European brand offers one and a half hundred models of terminals. The core of the range is made up of screw connections made using DIN technology.

Common problem: how to connect aluminum and copper wire
Residents of Soviet-built houses often face this problem. At that time, almost all wiring was done using aluminum conductors. Modern electricians mainly use copper wire. How to connect aluminum wire to copper? There are skeptics who claim that such a connection is impossible. You shouldn't believe them. If you correctly use the techniques that we present below, the switching will be reliable and durable.
As already mentioned, ordinary twisting will not work for such a connection. The contact between copper and aluminum gets very hot and can damage the insulating layer.
Option 1 – bolt-on
This is a simple and affordable method that uses steel nuts, bolts and washers. Due to the impressive dimensions of such fasteners, it is unlikely to be placed in a modern small junction box. But such switching allows you to combine wiring not only from different metals, but also with different cross-sections. Such connections are easy to disassemble and reassemble if necessary.
Option 2 – “walnut” connection
The name of this connection was invented by electricians because of its external similarity. For fastening, use a special crimp, which is sold in electrical goods stores. The device consists of two dies with grooves for conductors. After fixing the cores, the dies are wrapped with electrical tape.
Today, there are many ways to connect wires in a junction box.
Here are the factors that determine the choice of connector:
- Core material (copper or aluminum).
- Working conditions (outdoors, in an apartment, in water, in the ground, in the floor, normal conditions).
- Number of conductors (two, three, four, etc.).
- Core cross-section (same, different).
- Core structure (single-wire or multi-wire).
Based on these factors, the most suitable and correct method. First, let's look at the materials that can be used to connect electrical wires in a junction box.
Existing methods
The following connection options are considered the most popular and effective:
- use of terminal blocks;
- installation of spring terminals (wago);
- fixation with PPE (plastic caps);
- crimping with sleeves;
- soldering;
- twist;
- installation of “nuts”;
- use of bolts.
Let's consider the essence, advantages and disadvantages of each method!
Installation of PPE caps
PPE stands for connecting insulating clips. The products are ordinary plastic caps that have a special spring inside that holds the wires.

Most often, such caps are used to connect cores in junction boxes.
Advantages of using these products:
- low cost of PPE;
- the caps are made of non-flammable material, so there will be no twisting at the site;
- quick installation;
- caps have a wide range color shades. For example, if the wires do not have a wire, you can use PPE to mark it (using a white, blue and green cap).
Flaws:
- relatively poor quality of insulation and fixation;
- It is impossible to combine aluminum with copper.
Crimping with special sleeves
Stranding and insulation
The old “grandfather’s” method consists of twisting the cores together. The essence of the work is that the conductors are stripped and carefully twisted with pliers, after which the twisted area is insulated.


Advantages:
- simplicity of electrical installation work;
- no material costs.
Flaws:
- poor quality of core fastening;
- The connection of aluminum and copper products is unacceptable.
WITH using existing methods We have figured out the connections of the wires in the box, now we will consider the remaining, important issues of this topic.
What to do if there are several wires?
There are usually no problems when connecting two contacts. But what to do if you need to combine three, four or more at the same time?

- using wago terminal blocks;
- crimping with sleeves;
- soldering;
- twisting using sizes;
- twisting and wrapping with electrical tape.
We discussed in detail the order of connecting the wires for each method above. We strongly recommend that you use the first option, because... it is one of the most modern and effective. At the same time, the cost of the vag is not too high, and the wiring lasts more than 30 years.
What to do if the wires are of different sections?
To connect cores of different cross-sections in the distribution box, it is recommended to use the same VAG terminal blocks, or more cheap option– regular terminal blocks. In this case, you need to carefully tighten the wires with a screw or secure them with a flag, and that’s it, the work is finished.

Please note that if the wires are made of different material, then it is necessary to use special pads with paste inside, which will prevent oxidation of the wires. Such pads include products from Wago.
Also, cores of different sections can be secured by soldering.
Combining stranded and single-core wires
Connection of single-core and stranded wires individually does not have any special features, so you can use any of the above methods.

In order to carry out fastening, you must choose one of two options: vago terminals or soldering. It all depends on your preference; we have provided the advantages and disadvantages of each method.
How to carry out work in water and land
During electrical installation work, a situation often occurs when it is necessary to fasten electrical wiring under water or in the ground. Now we will briefly look at the features of each case!
In water (for example, when installing submersible pump), it is recommended to use the following technology. To begin with, the ends are soldered, after which the soldering area is carefully insulated with hot-melt adhesive, over which it is placed. If everything is done efficiently and conscientiously, the joint will be airtight and safe. Otherwise, the electrical network may fail.
To connect an electrical wire in the ground (for example, after it has been mechanically damaged), it is recommended to use the method provided above (hot glue and heat shrink), but it is better to protect yourself and use the following technique. Clamp the ends of the cable using a terminal block, install a sealed junction box, and then carefully fill the box with special silicone sealant. Please note that the underground route must additionally be placed in a pipe or box to ensure reliable operation!


When installing electrical wiring in a house or apartment, connection of wires - the most important point . For trouble-free and safe power supply, you will need a reliable and high-quality connection of wires.
A careless attitude towards connecting wires and cables can lead to very bad consequences. It would seem that there is nothing complicated in connecting the wires, twist them, wrap them with electrical tape and everything is ready, but everything is not so simple... as they say folk wisdom "Electrics is the science of contacts", and the connection of wires and cables must be carried out with all responsibility, since the percentage of accidents and damage in power supply systems due to poor-quality connection of wires is very high. No matter how good the electrical contact between the wires is, wire connections have higher resistance, which means they heat up more. And the worse the contact, the more it heats up, which will ultimately lead to melting of the insulation, a short circuit, and then a fire.
In practice, several methods of connecting wires are used, I will tell you about the most common ones.
Connecting wires by twisting
Connecting wires twisted, widespreadeverywhere, but if we turn to the main book of electricians PUE, then according to:
clause 2.1.21 “Connection, branching and termination of cables and wire cores must be done by soldering, welding, crimping or clamping (screw, bolt, etc.)”

As we can see, there is no twisted connection of wires at this point, which means twisting of wires is prohibited. But twists have always been, are and will be used to connect wires when installing electrical wiring. Yes, and well-made twisting can last for decades, but the connection of wires by twisting must be done efficiently. The technology for connecting wires and cables by twisting is quite simple:
- the length of the twist must be at least 4-5 cm;
- The connected wires, stripped of insulation, must be cleaned of the oxidized film, for example, with an ordinary knife or sandpaper;
- It is necessary that the connected wires wrap around each other evenly and tightly, ensuring sufficiently reliable contact.
One “but”, problems may arise when handing over the electrical installation to the fire inspectorate, because... Connecting wires by twisting according to the PUE is prohibited. However, this applies mainly to industrial consumers, retail premises, etc., in your apartment or a private house the fire inspector will not come to check.
Connecting wires by twisting- This necessary measure , when there is nothing else left, it is better to use wire connections using the methods described below.
Connecting wires by soldering
If solder twisted wires, then we get the connection of wires soldering, which guarantees reliable and high-quality contact, which has a fairly low contact resistance, high conductivity and mechanical strength. But it is important to solder the wire connection correctly; for this you need:
- tin the connected wires with rosin (flux);
- the solder should flow into the twist;
- After the solder has cooled, you can sand it with sandpaper, because sharp edges of the solder can pierce the insulation;
- insulate the wire connection.


But such connection of wires by soldering is very labor-intensive and requires certain skills. TO negative sides of soldering wire connections, I would classify:
- need for isolation;
- complexity (not everyone knows how to solder well), and even for those who are good at soldering, doing this, for example, while standing on a stepladder or ladder, to put it mildly, is not very convenient;
- if a mistake was made when connecting the wires, it will not be easy to separate them after soldering, so it is better to leave a larger supply of wires and cables;
- high time consumption.
Connecting wires by welding
Connecting wires welding provides even better electrical contact between wires. But here everything is even more confusing than with soldering wires, since you need to have:
- welding transformer;
- welding skills;
- masks (goggles) for welding, special gloves, electrodes;
- construction hair dryer for heat shrink tube.

![]()
Wire connection by welding, you can perform only from homogeneous metals. Such a connection of wires can be found infrequently, our people do not really like difficulties, and many electricians do not like this method of connecting wires due to the large investment of time, but it is worth noting that connecting wires by welding is faster than soldering.
Connecting wires by crimping
Connecting wires crimping, consists of compressing the connecting sleeve (aluminum or copper tube) into which the wires are inserted with special press pliers. The wires are first stripped of insulation to the length of the sleeve, then we place the wires inside the sleeve and crimp it in two or three places for reliability. If the sleeve is much larger than the wires that need to be crimped, then you can stuff the sleeve with additional wires. We insulate the resulting wire connection by crimping electrical tape, or better yet heat shrink tube+ hairdryer


Sleeves for connecting wires by crimping, there are copper, aluminum and copper-aluminum, i.e. Crimping can be used to connect copper and aluminum wires.

Connecting wires using crimping is quite reliable if done correctly. Skills in connecting wires using crimping will also be useful to you when, for crimping NShVI bushings.
The disadvantages include the cost of pressing pliers for connecting wires by crimping and sleeves, the inseparability of connecting wires by crimping, i.e. they crimped the wire in the sleeve and “forgot” about it.
Bolted connection of wires and cables
Bolted connection wires, as a rule, are used when connecting wires made of different metals, that is, if we have one wire made of copper and the second of aluminum, a steel washer must be placed between them.


This connection of wires turns out to be very cumbersome, it is inconvenient to place it in junction boxes and insulate it. Periodic broaching is required.
Connecting wires with screw terminals
Connecting wires screw terminal blocks, as well as bolted, can be used to connect wires made of different metals. This wire connection meets the requirements of the PUE, but requires periodic tightening of screws in terminals that weaken over time, which means the contact itself weakens, which can close over time.


Periodic pulling the screw connection of wires involves, What connection access in the box should always be open, which will not look very nice in an apartment or private house. Also, when tightening the screw, you can damage the wire itself, especially the softer aluminum one. And if you need to connect a stranded wire, then you need to either solder the stripped ends of the wire or crimp it with tubular lugs.
Connecting wires with PPE caps
Connecting wires PPE caps(Connection Insulating Clamps). PPE are plastic caps with a conical spring inside, which, when twisted, compresses and fixes the wires, and the plastic PPE cap itself insulates the connection of the wires and is fire and mechanical protection.


This wire connection is quick and simple; to perform it correctly you need:
- strip the insulation from wires and cables to a length slightly shorter than the length of the PPE cap itself;
- fold them into a bundle, precisely into a bundle, and not twist them;
- use your hands to twist the PPE clockwise onto the bundle of wires;
- tighten the PPE using pliers.
The advantages of such a connection wires and cables are obvious (no special tools required, no need for additional insulation, quick and easy), but there are also disadvantages:
- Do not connect multi-wire wires;
- the quality of such a connection will be worse than those listed above, so I would recommend using these clamps for small loads, for example, in lighting circuits.
PPE caps are divided according to the total cross-section of the wires to be twisted and are designated by numbers from 1 to 5, which indicate the number of wires to be twisted and their cross-section.

Connecting wires with self-clamping (spring) terminals
Well, in conclusion, let’s consider the simplest, most effective, convenient, and most importantly fast connection of wires - self-clamping (spring) terminals. Spring terminals from Wago are widely used, which allow you to connect wires:
- without having any special skills;
- no purchase necessary special tools(soldering iron, welding transformer, press pliers);
- some Wago terminals have a special paste that allows you to connect copper and aluminum wires and prevents oxidation;
- no additional insulation required;
- quick disconnection of the connection (press the lever and pull out the desired wire).
Wago terminals are produced for connecting wires and cables from 0.75 to 4 sq. mm, the number of connected wires is from 2 to 8. Wago terminals


Wago terminal blocks were invented in Germany. Perhaps the most significant disadvantage is their price, average cost Wago terminal block for 3 wires will cost approximately 11-12 rubles, so if distribution boxes a lot, then the total cost of Wago terminal blocks will be considerable. You should not use Wago terminals when installing wiring with loads of more than 16 A. In general, it is better to use them maximum on the lighting line for electrical wiring in a private house or apartment, and choose Wago terminal blocks with a margin of at least a step higher.


