Homemade paper peony. Master Class.
This luxurious peony, made of corrugated paper, will be within your control, dear readers, if you study the master class posted on this page :)
Agree, such flowers look very realistic. Can you imagine how you can decorate your interior with them?!


Let's explore a master class of these incredibly beautiful peonies!
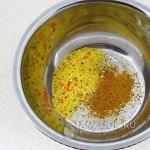
See what you'll need for this project.

You will also need a papier-mâché ball. To do this, you need to cover the balloon with paper in three layers with intermediate drying. And for glue, use a homemade paste made from flour and water 1:1.

Now learn about the unusual trick of this project in creating a base for a peony :)
If you look at a peony, its inner petals are more recessed in relation to the outer large petals.
To create this indentation, use a piece of the bottom of a papier-mâché ball about 2 1/2".

Using a needle and thread, finish the edge of the cut with stitches, as shown in the picture.

Now let's talk about the petals.
To create a variety of peony petals you will need crepe paper. You can now see the sizes and shapes of the petals on the screen.
 and further. In total, the peony has 7 types of different petals.


Now learn the technique of forming the three-dimensional shape of the petals.
In the very center of the petal we stretch the corrugated paper. And bend the base of the petal inward, as shown in the picture.

Let's take a closer look at the formation of each petal.
Petal No. 1:
Petal No. 1 is used for the center of the peony. We connect the base of the petal by squeezing the base and fixing it with hot glue, retreating a centimeter from the edge of the base. Wrap the second petal around the first as shown. in the picture Glue it in the very center of the concave shape using hot glue.

So, the very center of the peony flower is already in place :) So that this semicircular shape does not walk around the table. like a tumbler - place it for convenience in a bowl of a suitable diameter.

We continue to wrap the centering with petals, slightly stretching the middle of them, and folding the base of the petal towards each other.

Cover the edge of the cut with corrugated paper too, so that everything is aesthetically pleasing :)

Petal No. 2-5:
We continue to glue the formed petals in the direction from the center and spirally around the circumference, using as they emerge from the deep base from the smaller petal size to the larger one. 8 petals of each type. We bend the base of each petal and place it on the backing with hot glue.


Petal No. 6:
We begin to glue these petals (4 - 5 pieces) on the outer side of the base semicircle, slightly stretching the very edge of the petal in the middle. Glue it with hot glue as shown in the picture. The petals are glued slightly overlapping each other.

It’s already turning out very nice, isn’t it? :)

Since the craftswoman was making a hat from a flower, she used an additional fragment of a papier-mâché ball, which she glued to the base of the flower, as shown in the picture.
For this she used approximately 3-4" from the end of the cut.

Petal No. 7:
We glue five petals sequentially onto the base, first giving them a wavy shape.
Such a huge peony can be made as an original gift for a mother, grandmother, friend, sister...for a birthday, March 8th or other holiday. They will definitely never forget this flower, because it will be very big and beautiful!
Also, if desired, this peony can be modified into an original hat!

To create a peony you will need:
2 - 3 rolls of corrugated paper of a suitable color;
glue;
needle with thread;
a balloon about 2 times the size of your head if you want to make a hat out of it, or a balloon a little smaller if you want to make a simple peony; (note that the ball needs a regular round shape)
newspapers - will be needed to make the papier mache base.

First of all, you will need to make a blank for the peony using the papier-mâché technique and a balloon. The balloon needs to be inflated and tied.
Papier-mâché means "chewed paper" in French. The whole wisdom of the papier-mâché technique lies in pasting over some shape with pieces of soft paper in several layers. In our case, we will cover the ball with paper.
Tearing the newspaper with your hands (never cut with scissors!) into small pieces, cover the entire surface of the mold (ball) with them.
Lubricate the first layer of paper with glue and stick the second layer. To avoid confusion about which layer is which, take paper of a different color for the second layer.
Thus, cover the form with several layers of paper. The glue will need to be allowed to dry for several hours, it is advisable to even put the ball aside for a day. Then the ball must be carefully deflated or burst.
Carefully cut off the rounded “lid” of the papier-mâché workpiece, approximately 6.5 - 7 cm high from the top of the ball.

Now turn the cap upside down and insert it into the second part of the ball.
Now sew both parts with threads, connecting them together. After this, saturate the entire edge with glue for better strength (on top of the threads).

Now the petals. The petals will need to be cut into different shapes. The shape is shown in the photos below and the different shapes are numbered.
The grid with markings displays their size in inches! Therefore, the maximum petal height is not 7 cm, but 7 inches, i.e. almost 17 cm!
1 inch = 2.54 cm.

Also here the width of the widest petal number 6 = 23 cm.

The height of petal number 7 = 20.3 cm.

Each petal will need to be cut out at least 10 times.
At the end we will need to make a few more large petals, but more on them later.
Let's start collecting peony.
Standard technique for all petals:
Gently stretch the petal out from the center to create a "dish" shape, then fold the bottom of the petal back. We will use this part of the petal to glue it to the base.
Now on to the numbers. Petal number 1.
These petals are used to create the central part of the bud. Take one petal and fold it in half at the bottom, gluing the junction with glue. Take another petal of the same type and wrap it around the first one, also gluing the edges at the base with glue. Coat the lower part of the workpiece with glue and glue it to the center of our base.

The petals should peek out from behind the edges of the base.

Note: To make it more convenient for you to work, you can place the workpiece in a wide vase.
Add a few more (10 pieces) of these petals around the base of the bud, placing them a little further.

Before moving further, cover the edge of the workpiece with corrugated paper of the same color as the petals.

Continue creating a flower using petals numbered 2 - 5. The author of the tutorial used 8 petals numbered 2 - 4 and four petals numbered 5.


Petals number 5 come last, so they will need to be carefully glued to the base.

Now we need large petals numbered 6t. Four such petals need to be placed on the outside of the workpiece, so that their tops reach the tops of neighboring petals.
Now we need petals number 8. We will need quite a lot of them. They will need to be stretched from the center just like other petals, plus the upper part of the petal will need to be twisted onto a tube or tassel.
Cover most of the remaining space with these petals in a circle. You will need about 25 - 30 of these petals.
Now cut out large petals from which you can form "bowls". Glue them to the base itself, as shown in the example.
Fill in the gaps with the small petals and then fold our larger final petals over to the flower and lightly glue them at the base.

If you are going to use this flower as a fun hat, then the inside of the papier-mâché workpiece needs to be sealed with fabric. You will also need to glue or sew on beautiful ribbon ties.
Olga Andreevna Moskovtseva
Master class Peonies made of corrugated paper
For works required:
- corrugatedfloristic paper green and cherry (may be your choice) colors;
Thin wire 0.5 cm for leaves;
Thick wire for the stem;
Cardboard circle, diameter 4.5 cm;
Thermal gun;
Scissors;
Ping-pong ball or Kinder surprise capsule;
Pencil;
Ruler;
Floral tape (or cut strips of green tape in advance) corrugated paper 1 cm wide. and stretch it).

1. Made from cherry corrugated paper cut out 8 strips of 20 cm wide and 5 cm high.

2. Fold each in half and in half again

3. cut along the edges, leaving about 0.5 cm to the edge and make 2 more of the same cuts in the middle.

4. Cut off the corners of the resulting three segments, make “Flags”

5. Unfold the resulting workpiece and twist the ends with your fingers

6. We expand each segment in the middle, as if forming a petal.

7. Arbitrarily collect the resulting petals into a bouquet. IMPORTANT! So that the bottom of the workpiece is at the same level. And tie it tightly with thread. We do the same with the other strips.

8. Cut from cherry paper 20-25 rectangle measuring 7.5 cm high and 3 cm wide for the outer petals. And 20-25 rectangles measuring 7.5 cm high and 1.5 cm wide.

9. Cut out petals from all rectangles

10. Form the inner petals. To do this, stretch the middle of each narrow petal with your fingers and slightly bend the petal inward. We do the whole operation with all the narrow petals.

11. Let's start forming the outer petals. To do this, stretch each large petal into a ping-pong ball or a Kinder Surprise capsule. If there is nothing like that, you can simply stretch it with your hands.


12. Let’s start assembling the flower; to do this, glue 8-9 inner petals onto a cardboard circle, so that the petals are wrapped inside the flower.


13. Then we glue the blanks tied with thread into the middle. One in the center, the rest in a circle.

14. Turn over the resulting bud base and begin gluing small petals on the back side so that they are between the petals of the inner layer.


15. When all the small petals are glued, we begin to glue the large petals as the top layer, but glue them a little further from the center than the small ones.

16. Our bud is ready

17. Let's start creating a stem for our flower. To do this, take a thick wire and roll it into a ring twice at one end.

18. Then the wire must be wrapped with floral tape or strip corrugated paper to give it color.

19. Now glue the stem to the flower.

20. From paper green, cut out 8 rectangles measuring 6 cm high and 3 cm long and cut off their corners - we form a leaf by stretching the middle.

21. Glue the leaves to the junction of the stem and bud.

22. From paper green, cut out 5 rectangles 6 cm wide and 10 cm high. And cut them diagonally. And fold the halves as shown in the photo.

23. Cut 5 pieces of 15 cm each from thin wire.
24. Glue the halves together with adjacent edges, placing wire between them.

25. From the resulting blanks we form leaves, cutting off the upper corners and rounding them. And we bend the resulting petals and “revive” them.

26. Wrap with floral ribbon or strip corrugated paper stems of leaves. Then we connect everything together, forming one large branch with leaves. Then we attach the resulting branch to the stem using floral tape or strip corrugated paper.

Our flower is ready!


Publications on the topic:
 Good evening, dear colleagues, we present to your attention a master class “Floral Fantasy”. I'll tell you how easy and interesting it is from what's at hand.
 In November we celebrate one of the main and wonderful holidays - equally important for all people - Mother's Day. It is customary to give gifts on holiday.
 You will need: - multi-colored corrugated paper - scissors - thin wire - PVA glue - vase (ball of wool threads) 1. Prepare.
 Dear Colleagues! I present to your attention a master class on making wood from a sheet of Whatman paper and corrugated paper using double.
Poppies made from corrugated paper will be an excellent decorative element for any room or holiday. I offer a master class for educators and parents.

Beautiful garden peonies attract with the luxury of their buds and the splendor of their forms. Thanks to large velvety petals and a variety of shades, these flowers can be used to create charming bouquets.
Artificial peonies can be so delightful that they are in no way inferior to the original. Such flowers can be used not only for decorating rooms, they can become a wonderful decoration for clothes or hair. An impressive DIY craft - what could be better? A piece of love put into the work will breathe real life into the peony.
Corrugated paper is often used to make a wide variety of crafts. It can make very beautiful lush flowers. A bouquet of peonies can decorate any room and will look no worse than a natural one.
Making such a work of art with your own hands is not that difficult. In this case, it is very important to choose shades that combine with each other to create a luxurious composition. Children and adults will enjoy this work.
Paper peonies with a candy core: step-by-step instructions
- First you need to take a candy, a green wire and make a loop at the tip so that it does not pierce the sweetness. On one side, you need to unwrap the candy wrapper and wrap it around the tip of the wire with a loop.
- The base of the candy should be secured with adhesive tape.
- After this, two strips are cut out of corrugated paper. One will be twice as wide as the other.
- The resulting paper ribbons are cut into equal parts; their height should be equal to the distance from the base of the wire to the tip of the upper edge of the wrapper plus a few centimeters.
- Petals are cut out from the resulting parts. Small parts produce single petals, and large parts produce parts with several rounded cuts.
- Each petal needs to be stretched a little and given a convex shape.
- Now you should form a peony bud. One petal at a time is glued to the base of the wire, overlapping each other. To make the flower lush, the paper does not need to be pressed against the candy.
- The first few rows need to be secured with wire and larger pieces glued on top.
- When all the petals are glued, they need to be secured again with wire.
- Cut out small leaves from green paper and glue them on top of the wire.
- Finally, you need to wrap a strip of green corrugated paper around the wire stem, adding a few artificial leaves.

The finished bouquet can be presented for a birthday, and one flower will become a wonderful souvenir for a loved one.
Fabric peonies
You can also make spectacular artificial peonies from fabric. This decorative element can turn an ordinary hat into a flirty accessory, a brooch in the shape of a flower on a blouse will make the image more piquant and original, and a bright composition of textile peonies will make any room more lively and cozy.
To make flowers you will need satin or chiffon in delicate shades, a tablet candle, double-sided tape, yellow floss and scissors.

Step-by-step instruction
The peony pattern is not at all complicated. You just need to cut out 5 circles from the fabric. Four of them will be the same diameter (about 8-10 cm), and the fifth should be made a little smaller, and the contour should not be perfectly smooth.
Now you need a candle to help give the petals a more natural look. By rotating the edges of the circles near the flame, you need to ensure that they bend evenly. This is done with all the details, but this should be done with extreme caution, since satin and chiffon melt very quickly.
To give the parts the required shape, they need to be cut, thereby creating petals. The cut sites should also be held slightly above the flame. When the petals are ready, begin to create the middle of the peony. To do this you will need yellow floss threads. They are wound around two fingers, tied in the middle, and then cut along the edges. A kind of pompom will be the middle.

Assembling artificial peonies from fabric is not difficult. The parts are glued together, placing the small part on top. You need to glue yellow threads in the middle, but they can be replaced with beads. As a result, all the petals are straightened to make the flower lush.
Artificial flowers or bouquets will be a worthy decoration of any interior; they can be used to decorate clothes, hair, boxes, albums and a large number of other things. Artificial peonies can be a wonderful accessory at a party or will decorate your home with their timeless beauty.
Candy bouquets are a popular hobby. In this master class we will try to make a peony from corrugated paper with our own hands with a candy inside. One such bud can be given as a compliment, but a bouquet of several flowers will look much more interesting. Combine paper of different shades and create beautiful compositions to suit your taste.
Required tools and materials
For work, we will need corrugated paper of pale pink, burgundy or white colors for the petals, yellow for the center and light green for the sepals. The height of the petals largely depends on what kind of candy you choose for the center. If it is large, then the length of the paper pieces will need to be increased. From paper for the petals, cut rectangles 2.5 cm wide and 7.5 cm long - this size is suitable if you choose a regular caramel for the center. We will make the peony bud from corrugated paper closed, and it will not be visible. We cut the green paper into rectangles 1 cm wide and 8 cm long. For the stem, you can use floral tape of the same color or cut the paper into pieces 1 cm wide and about 20 cm long. It can be stretched to increase the size. We will make the core from yellow paper 10 cm wide and 7.5 cm high. You will also need thick wire, candy, a glue gun, tape and scissors.

Making the flower center
We begin making a peony from corrugated paper with our own hands by creating the middle. We take a yellow rectangle and cut it into a fence, not cutting about 1 cm to the end. Then we take scissors and begin to draw along the ends with twisting movements, pulling the paper and bending them in one direction. We stretch the paper to the sides, straightening the folds. Now we take the candy and wind the wire around it, making a loop at one end. We secure the tail with tape so that it does not dangle. We wrap it tightly so that the candy does not move.
Master class “Peony made of corrugated paper”
Turn on the glue gun so that it heats up. Then we apply a little hot glue to the tip of the candy wrapped in tape and begin to wrap the yellow crepe paper so that the folded ends completely cover it. We twist the wire, applying a little glue and pulling the workpiece. We corrected them so that they were all directed in one direction. Press the paper tightly so that the leg is not too thick. Then we cup the loose ends with our palms and squeeze them to close the central part. We straighten the heavily crumpled parts, giving them a beautiful shape, and set the workpiece aside.

Making petals for peony
For a large corrugated paper peony you need to prepare 21 petals. You can use a smaller amount, but then the bud will not be as large. It is not advisable to take less than 18 pieces. We make the blanks: we cut off the corners at the bottom, forming a long leg, and move upward, creating a wavy edge. There should be 3-4 cloves at the top. We cut approximately 4 mm deep. In this way we make 21 petals. Next, we take scissors and begin to pull the edges down in the same way as we twisted the yellow paper. Now you need to grab the very edge of the petal with your fingers and twist it, and then release it and stretch the paper in the center to the sides, creating a curved shape. We repeat all the steps on the remaining petals, twisting the edges and stretching the middle to the sides. It's okay if they don't turn out the same - this will give the corrugated paper peony flowers a more natural and lush look.

How to collect a peony bud?
Let's start assembling the flower. We take the wire with the middle and start gluing the petals. Apply a drop of glue to the bottom of the yellow base and glue the first leaf so that it covers the middle. We stick the next petal overlapping the previous one, moving it slightly to the side. Glue all the petals, moving in a circle. At the very end, you can see how they lay down and make additional leaves if it seems to you that they are missing somewhere. Focus on the size of the candy and your taste when creating a peony from corrugated paper with your own hands to get the optimal shape and size of the inflorescence. This material is quite pliable and if you see any flaw, it will be easy to correct.

Making sepals
Now you need to make the sepals. Large crepe paper peonies require more leaves than small ones. In our case, we will make 9 pieces. We take green corrugated paper and, if there is a strip on the workpiece, turn it so that it is at the bottom. We make a wide leg, and cut off the top so as to get a sharp tip. We twist the top and stretch the leg a little to the sides. We also stretch the middle to the sides, as in the case of the petal. Straighten the resulting sepal and break it off to the side. Now take a glue gun and glue two sepals on opposite sides. Then we glue two more. Having outlined the four main ones, we begin to add leaves between them. We move the ninth one a little to the side to get a more natural look.

Tightening the flower stem
We proceed to the final stage of making the flower - designing the stem. A peony made by yourself from corrugated paper will look more interesting if there is additional thickening under the sepals, so first we wrap the tape more tightly, and then we begin to stretch it. We smoothly go down, covering the entire surface with tape. Periodically apply glue and seal the edge well at the very bottom of the leg. The flower is ready. This concludes our master class “Peony made of corrugated paper”.