Sooner or later you have to change your interior doors. The procedure is not so complicated that it is necessary to hire a specialist. If you have at least some skills in handling a saw, a level and a plumb line, you can tighten a few self-tapping screws - you can do it yourself. When replacing, before installing the interior door, the old one must be dismantled. And here too there are peculiarities. About all the subtleties - in photos and videos with detailed instructions.
Interior doors are made from different materials. Moreover, the material and door leaf and frames. The door leaf is:
- From fiberboard. These are the cheapest doors. Represent wooden frame, to which the laminated fiberboard is attached. They have low sound insulation, they are afraid high humidity, are easily damaged.
- From MDF. They cost much more, but the quality characteristics are much higher. They have better sound insulation, are not afraid of moisture, are stronger and more durable.
- Wood. The most expensive doors. They are made from different types of wood - from pine to oak or more exotic species.
Door frames are also made from the same materials. The worst choice is that fiberboard boxes bend even under their own weight, and hanging the door leaf on them is a real pain. So try to take either MDF or wood. There is another material: laminated wood. It is good because it does not need to be processed or painted, but the service life depends on the quality of the film.
Dimensions and equipment
Interior doors are produced standard sizes, it’s just a pity that the standards are different countries are different. For example, in our country swing doors made with a width of 600 - 900 mm in increments of 100 mm. In some EU countries the rules are the same - in Germany, Italy and Spain. In France, others are standard. Here the narrowest doors are 690 mm and then in increments of 100 mm.
Is the difference really that important? If you want to change only the door leaf without the frame, then it is important - you will have to choose from your segment or completely change it along with the frame. There is a much greater choice of interior doors of the same standard as in our country, while in France there is much less choice.

What width of doors you need depends on where you are going to place them. If we talk about standards, the following values are recommended:
- in the living room width from 60 to 120 cm, height 2 m;
- bathroom - width from 60 cm, height 1.9-2 m;
- in the kitchen, the width of the door leaf is at least 70 cm, height 2 m.
If, when replacing a door, it is decided to make the opening larger/smaller, permission is not required for this, but it is necessary to remain within the limits specified for each room.
How to determine what width of doors to buy? Measure the door leaf you have and you will know what you need. If there are no doors, find the narrowest place in the opening, measuring it, you can find out how wide the door block you need. This is a door leaf + door frame. So the outer dimensions of the door frame should be less than the measured value. For example, you got 780 mm, look for a block with parameters of 700 mm. Wider ones cannot be inserted into this opening.

The most complete set of interior doors - with frame, extensions and trims
When choosing a door, pay attention to the equipment. There are three types of assembly:
- Door leaf. You buy the box separately.
- Doors with frame. Everything is included, but the box is in the form of separate boards. You will have to file the corners and connect, hang the hinges yourself.
- Door block. These are ready-to-install doors - the frame is assembled, the hinges are hung. Just cut the sidewalls to the height, align them evenly and secure them.
Even though the quality of the door leaf is the same, the prices for these kits differ significantly. But the difference in the time you spend on installation is significant.
Step-by-step installation of interior doors
In general, there are many subtleties. We will try to describe and illustrate the most common moments in photo or video material.
Step 1: Assembling the Door Frame
If you did not buy an assembled door block, the first thing you will have to do is assemble the door frame. It consists of two long posts located on the sides, and one shorter crossbar at the top - the lintel.
Connection methods
There are at least two options for how to connect these planks to each other:

Regardless of exactly how you plan to connect the elements of the door frame, the first step is to cut down the pillars and lintels on one side. Then they are placed in a box on the floor, checking the correct connection. Next, you need to decide on the height of the side parts of the door frame.
Determining the dimensions
When folded, the required length is measured along the inside of the rack. The racks are not always made the same: the floor is often uneven and this must be taken into account. To do this, take a level and check how level the floor is. If it is perfectly level, the posts will be the same. If there is a deviation, it must be taken into account: make one of the racks longer. Usually this is a few millimeters, but this is also enough for the doors to warp.
When calculating the height, keep in mind that the racks should be 1-2 cm longer than the door leaf (including cuts). Make a 1 cm gap under the door if you are not planning to put a rug under it. If there is a rug/carpet/carpet, it is better to make it larger. Don't be afraid to leave gaps. They are necessary for. Please note once again: the height is measured along the inside of the door frame - from the bottom edge to the cut. Having cut it off, try on the racks in the doorway.

Now you need to saw off the lintel to length and, if necessary, saw on the other side (if the joint is at 45°). The length of the lintel should be such that when folded, the distance between the posts is greater than the width of the door leaf. The minimum gap is 7 mm, but more is often done. 7-8 mm are distributed as follows: 2 mm for hinges, and 2.5-3 mm for expansion gaps. Any interior doors - MDF, fiberboard, wood - change their dimensions depending on humidity. To accommodate these changes, clearances are required. And 5-6 mm is not always enough, especially in damp rooms. For the bathroom, definitely leave a little more, otherwise in high humidity they may have difficulty opening.
So, we have decided on the minimum gaps when installing interior doors:
- for hinges - 5-6 mm;
- at the top, bottom and sides - 3 mm;
- bottom - 1-2 cm.
After you have cut all the pieces and made the cuts, fold the box on the floor. If you notice any shortcomings in the joint, correct them using sandpaper attached to a block. The more accurate the match, the smaller the gap.
Assembly
Regardless of the material of the box and the connection method, holes are pre-drilled for the fasteners so that the material does not tear. The diameter of the drill is 1 mm less than the diameter of the screw.
The box is folded and the angles are set to 90°. Holding the stand and lintel in this position, drill holes with a drill. If there is an assistant, he can hold it. If you are working alone, temporarily secure the correctly aligned box with two cross bars - closer to the top and one at the bottom. This will help you avoid mistakes and make the correct connection.

If connected at an angle of 45°, make three holes on each side. Two on top - a centimeter away from the edge, and one on the side - in the center. In total, three screws are required for each connection. The direction of installation of self-tapping screws is perpendicular to the connection line.

If you connected at 90°, everything is simpler. Drill two holes from above, pointing the drill straight down.
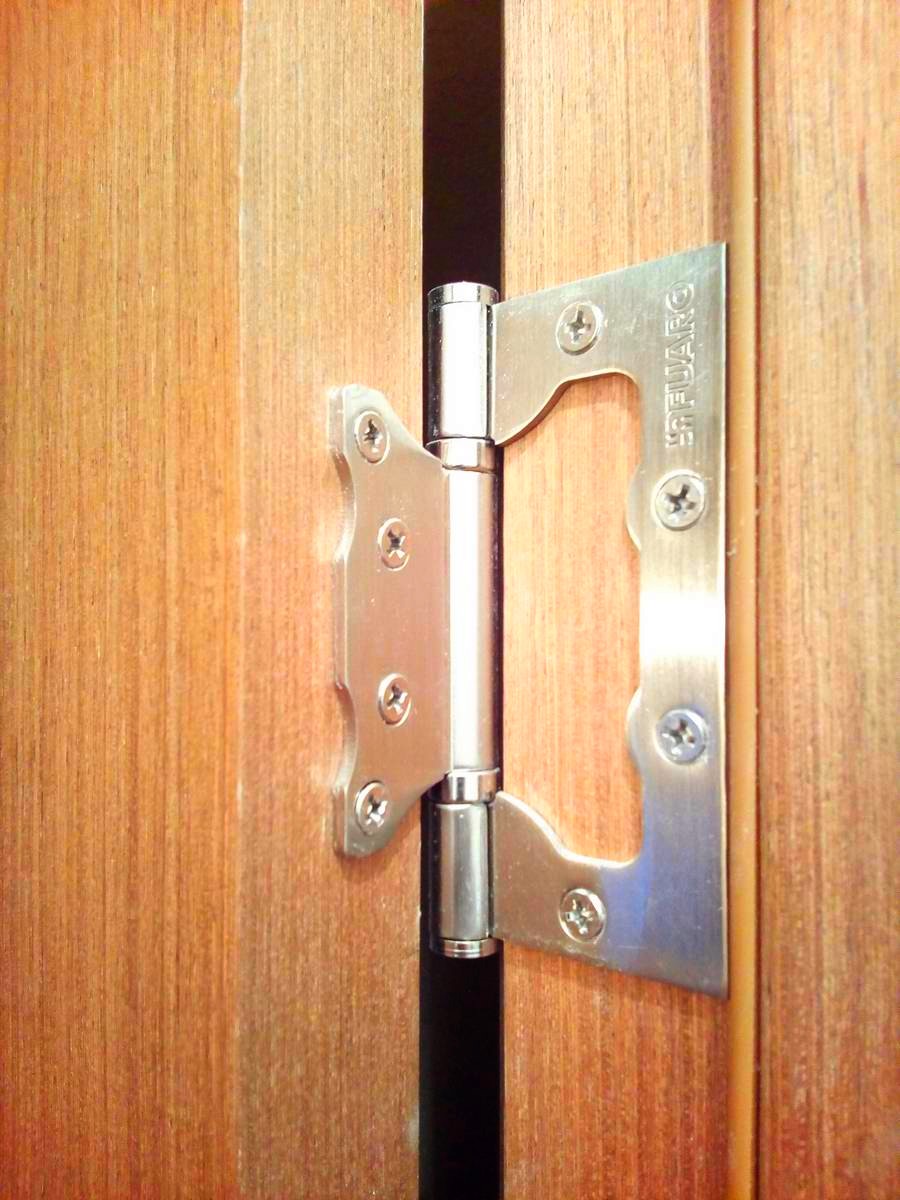
Step 2: Inserting the hinges
Most often, 2 hinges are installed on interior doors, but 3 are possible. They are placed 200-250 mm away from the edge of the door leaf. If the frame and door leaf are made of wood, choose a place so that there are no knots. First, attach the hinges to the door leaf. The operating procedure is as follows:
- We apply loops to the selected places and outline the contours. The easiest way to do this is with a finely sharpened pencil, but experts advise using a knife blade. This makes it more accurate and leaves smaller gaps.
- If they have it, if not, take a chisel and select a material for the thickness of the loop. There is no need to make any more sampling, just for the thickness of the metal.
- A loop is installed in the prepared recess. Its plane should be flush with the surface of the canvas.
- The exposed loop is fixed with self-tapping screws.
Having secured two hinges, lay the door leaf in assembled box, set the correct gaps: on the hinge side - 5-6 mm, 3 mm on the opposite side and on top. Having set these gaps, the canvas is fixed using wedges. Place it exactly in the horizontal and vertical plane (you can use pads if necessary).
After setting, mark the locations of the mating parts of the loops. Sometimes it is more convenient to remove an already installed hinge and then install it in place. A notch is also made according to the markings. Depth - so that the surface of the hinge is flush with the surface of the door frame.
DIY door hanging is described in detail in the video.
Step 3: Installing the Door Frame
The assembled box must be correctly inserted into the opening. This is a very responsible task. Before installing an interior door, knock down everything in the opening that could fall off. If the wall is too loose, the surface is treated with primers deep penetration with an astringent effect. If there are too large holes, they are sealed with plaster; very large protrusions are trimmed off. It is easier to insert an interior door into the prepared opening. If this is your first time doing this on your own, make it easier on yourself.
The box is displayed without the door leaf. It is oriented strictly vertically. Verticality is checked not only by level, but also by plumb line. The level often gives an error, so it is more reliable to check with a plumb line.

To prevent the box from becoming warped during installation, install temporary spacers on the floor and bevels in the corners that give high degree rigidity. In order for the doors to open, they are inserted in the same plane with the wall. This is the only way it will open completely. If the wall is uneven, place the box not along the wall, but vertically. Otherwise there will be problems with opening or closing the door.

How to insert an interior door with your own hands - in the same plane as the wall
Once the position is selected, you can secure it. This is done using mounting wedges - triangular wooden or plastic bars. First, wedges are placed on both sides of the lintel - crossbars, then above the racks. In this way, the position of the box relative to the doorway is selected and fixed. Next, the verticality of the racks is checked again. They are checked in two planes so that they are not tilted forward or backward.

Then install the wedges at the bottom, then after about 50-60 cm, checking that the racks are exactly level. The crossbar is also wedged in the middle. Check whether the elements of the box are bent somewhere, and correct if necessary. You can start fastening.
Step 4: Attaching the Box to the Doorway
There are also two mounting methods: through directly to the wall and with mounting plates. If the wall allows and you are not afraid of the fastener caps in the box, you can attach it all the way through. It's reliable.
To install interior doors, it is enough to screw two self-tapping screws into the cutouts for the hinges and, on the other hand, under the plate of the lock mate. Additional holes are drilled in the cutouts. They are made so as not to fall into the holes for fastening the hinges or mating part. Make sure that the head of the screws is recessed and does not interfere with the installation of the hinges and lining.
Installation of interior doors according to this diagram is shown in the video. There are also several interesting nuances regarding the placement of the door frame.
If such a quantity of fasteners seems unreliable, drill through and cover the holes with decorative washers matched to match. Or there is also a special molding made of MDF with removable slats. The fastener is installed in the prepared groove and then closed with a strip.

The second method is secret, the fasteners are not visible. First attach from the back of the box mounting plates. In principle, it can be used for plasterboard, but there are also special ones that are thicker, although when installing interior doors, plasterboard ones will suffice.
Step 5: Foaming
After all the gaps are set and the wedges are installed, the gaps between the frame and the wall are filled with polyurethane foam. For better polymerization, the wall is moistened with water from a spray bottle. Then squeeze out the foam, filling no more than 2/3. Too much foam may cause the box to blow inward. So don't overdo it.

To ensure that the doors are not warped by the foam, spacers are installed. But if you don't overdo it with foam, nothing should happen.

Spacers for fixing the frame - when installing the interior door this way, the frame should stand level
After the foam has polymerized (the exact time is indicated on the cylinder), the spacers are removed, the door leaf is hung and the operation of the door is checked. Next comes the finishing work: platbands, and, if necessary, additions.
You know how to install an interior door with your own hands. There is nothing overly complicated, but we tried to describe the main nuances. There is a lot of useful information in the video - these are recommendations from practitioners.
03.09.2016 27346
It is a frame structure that is attached to the wall, and inside which the door leaf is hung. More recently, 20-25 years ago, even entrance doors were exclusively made of wood or plywood. In the 90s, metal entrance doors appeared, and accordingly, their door frame was made of steel. About 10 years ago, aluminum and plastic ones came into use, which are produced with a ready-made box from the same material.
Made from chipboard, MDF, dict plywood and even fiberboard, the frame, trim and trims of such doors are made of solid wood, more often coniferous species, or from MDF. Woodworking enterprises have launched the production of beams and panels made of laminated MDF.
The door base can be made from MDF, a medium-density fiberboard made by hot pressing. All necessary elements are made from this material. All you have to do is adjust them to size. MDF is especially relevant for arched openings. Assembly from MDF is carried out in the same way as from ordinary wood, but working with this material is much easier. All parts are fastened together using glue or self-tapping screws.
Tools
To perform installation, you will need the following tools:
- tape measure to take measurements of the opening and parts,
- an ax or a large hammer,
- screwdriver or screwdriver,
- nail puller
- chisel,
- Bulgarian,
- level,
- Master OK,
- spatulas
- Bulgarian,
- jigsaw,
- chisel,
- miter box.
How to dismantle an old door?
Dismantling the old interior door is carried out in the following order:
- First, remove the fittings: handles, locks, latches.
- Inspect the hinges. Sometimes they are separate. If you can remove the canvas, remove it.
- For solid hinges, remove the screws. Unscrewing is done from bottom to top. Inexperienced craftsmen often make this mistake - first they unscrew the screws from above, and then they have to ask someone to hold the canvas. If you start from the bottom, then the door hangs until the very end on the top hinge, on the top screw.
- Place the door leaf to the side. Disconnect the hinges completely. Inspect the platbands, where they are fixed and in what way. Disconnect them. There will probably be fasteners for the accessories under the cash. These can be either nails or screws. Unscrew the self-tapping screws, and if there are nails, pry up the extensions with an axe. Unplug them from the box
- Find the places where the beams are attached to the wall and free the box from the fasteners. In old Soviet-type houses, it may not be secured with screws to the wall. Inspect it, if there are no nails or screws, try to knock it out of the opening.
- Clean the opening from excess pieces of plaster, boards, and putty. It's ready for you to work with.
How to install a new door in an old frame
During the renovation process, this option is also possible: a new door in an old frame. If you intend to replace a damaged old door, then you do not need to dismantle the strong frame. You only need to remove the door by unscrewing the hinges. Take measurements for new door You can use an old canvas. To prepare the doorway for installing a new leaf, inspect the frame and hinges. Pay attention to whether gaps have appeared between the boards and the beams of the main structure. You may have to remove the platbands. At the same time, check the fastening of the accessories. If the planks are nailed, knock them down and tighten an additional couple of screws. Put the trims back in place.
You can screw the door with old hinges, or you can install new ones. Then hammer wooden chips coated with glue into the old holes for the screws. Because the new hinges may partially coincide with the old holes, or the screws for them will be thinner. In any case, the choppers will seal the holes, and the hinge will not become loose under the weight of the door leaf.
You can. Inspect the lock (if there was one on the door). If you keep the old one, then when installing the lock, adjust the lock latch to the strike plate.
How to prepare a doorway for installing a frame?
Sometimes apartment owners, wanting to change the interior of the room, change the design of the interior doors. The expansion of the doorway is justified by the desire to install double-leaf swing or folding doors (book, accordion).
In houses with high ceilings sometimes they increase the height of the doorway, change the shape of the opening, making the top semicircular or arched.
The methods of this work depend on the material from which it is made. interior wall. The easiest way to work is with brick or wooden walls.
But a doorway in a brick wall is structurally difficult because it has more irregularities than the rest of the walls. This gives errors in measurements. And this must be taken into account when changing the size of the opening. The edges of the wall must be leveled by plastering, then installing the door will not be a big problem.
To expand a doorway in a brick wall, it is enough to remove a row of whole bricks from the brickwork at the edge of the opening, level its line with half bricks and a cement-sand mixture. To do this, you will first need a chisel and a hammer, and then a level, trowel and spatulas.
IN wooden wall You can widen the opening using a circular saw or grinder.
It is much more difficult to widen an opening in a reinforced concrete panel. In this case, you will have to arm yourself with a hammer drill and a grinder. The hammer drill will drill and beat out the 6-stone, and you will use a grinder to cut the metal rods of the frame. The edge of the opening at the expansion site must be leveled and plastered as much as possible.
Sometimes, doorways are unreasonably wide, which complicates the arrangement of furniture, and there is a desire to make it smaller. To reduce the opening by 8-12 cm, you can insert a thick beam between the wall and the frame, secure it with long self-tapping screws (by the way, the screws can be deepened into the timber up to 4 cm by drilling a hole for the head with a No. 8 drill), foam it and seal it with plaster . You will attach the box to the beam. Installing thick beams will allow you to reduce the opening to 24 cm. To reduce a brick doorway by 25 cm or more, you will need plasterboard, or bricks, cement and sand. Drywall can be used to reduce thin walls covered with a thick layer of plaster. In this case, the plaster must be knocked off the wall and the drywall must be overlapped. The added part of the wall also needs to be plastered and finished so that it merges with the main one.
How to install a frame in a doorway?
Preparing a doorway for installing an interior door begins with the frame. It is recommended to install it before the floor is laid (filled). The box consists of beams 7x4 cm in size connected by the letter P. This is if you do not intend to install a threshold. The assembly has a closed shape. It is necessary to correctly calculate the height of the threshold so that it is not below the floor level and is not too high. 3-4 cm is enough for him.
The frame and threshold parts must be made in such a way that a protrusion is embedded in the beams, preventing the door from overlapping and closing on the other side. Stops help increase the noise and heat insulation of doors.
The corners of the box and extensions should be sawed off on a miter box at an angle of 45° and fastened together with self-tapping screws, lubricating the cut with glue. The door frame can also be assembled using the tenoning method, since the frame is still a solid structure. The door assembly is performed on flat surface so that there are no distortions.
You need to install the box like this:
- so that it rests against the top edge of the opening. You may need to hammer in wedges to seal. Either at the top or at the bottom (if the bottom edge of the box is hidden under the floor). Cut off the excess wedges hammered on top so that they do not peek out and interfere with the installation of the extensions.
- From the outside, the box should be mounted in line with the wall.
- And at the same time, use a level to check the evenness of the box, and use a square to check that the corners are correct.
The door frame is fastened to the opening using self-tapping screws.
- Mark the points where the screws will be tightened;
- drill holes in the box with a No. 4 drill;
- Mark the location of each hole with a pencil on the wall;
- remove the box from the opening;
- Drill holes in the wall with a No. 6 Pobedit drill and hammer in the nylon dowels.
- Reinstall and level the box so that drilled holes agreed. Drive the mounting wedges into place. Screw the box with self-tapping screws.
will create a large load on the fasteners with which you screw it to the wall.
If the wall thickness is more than 7 cm, then additional boards will be required - boards that will disguise the wall of the opening. They are attached later, when the box is installed; there is no need to connect them together in advance. But sawing off the top edges of the posts and top bar should also be at an angle of 45°
How to install and secure a door in a frame?
The box is exposed and secured. Now you need to hang the door. For this
- Insert the canvas into the box.
- If you have a threshold, place three or four matches or dental sticks under it. This is necessary so that the door does not rest heavily on the threshold, and then you do not have to touch it.
- If a threshold is not provided, then place planks or plywood 5-6 mm thick.
- If you plan to lay carpet or linoleum within the door, then the door should be raised a centimeter.
The installation of interior doors must be carried out taking into account all the “ifs”, then it will close freely, without resting against the bars either on top or on the sides. The door should fit freely in the frame. On the sides and top the gap should be 2 mm, on the bottom - taking into account the “ifs” described above. Make sure all conditions are met. You can also insert matches between the frame and the doors. Everything is fine? If the door rests somewhere, mark it with a pencil - in this place you will have to work with a plane to remove the excess.
- Mark the loops. Attach the hinge and mark the height of the hinge on the frame and on the door at the same time with a pencil. Mark on the loops. Do the same with the bottom loop.
- Also mark with a pencil the location of locks, handles or latches. Now you can. The assembly of interior doors, fitting and fastening of fittings are carried out until the door leaf is secured in the frame. It is also better to paint and varnish it while it is not installed in the box and while there are no fittings on it. But let’s assume that you purchased a door that has already been finished.
- You can make a recess for recessing the fittings using a jigsaw, or manually using a hacksaw and chisel.
- Screw the hinges and other hardware to the door. Place the canvas against the box and start screwing the hinges.
- Check how your door opens and closes.
How to secure extensions and platbands
Extensions are installed if the opening is thicker than the frame. Their width should correspond to the distance from the box to the edge of the wall. Attaching the extensions to the main beams is done with self-tapping screws. For greater strength, the end of the extension can be lubricated with glue before tightening. The void between the opening wall and the extension must be foamed with polyurethane foam.
The width of the platbands should be such that on one side it is flush with the frame, and its other edge extends 1-1.5 cm onto the edge of the wall. This is the final stage of installing the box. They form a design element and therefore should look attractive. The trim should be installed before the baseboards are nailed down. Sawing should be done at an angle of 45 degrees. The fastening of cash should be done so that the fastening elements are not visible. These could be liquid nails.
Platbands can be
- Wooden,
- Plastic,
- From MDF.
The main condition when choosing cash is appearance and compliance with the design of the door or interior of the room.
It is quite difficult to determine the size of a doorway by eye, especially if trims are installed. To measure the exact parameters, you need to remove the trim and clean the layer of plaster. You can do this yourself. To take into account all the nuances, it is better to call a professional measurer. When purchasing Torex doors, this service is provided free of charge.
Dimensions door block should be 4–5 cm less than the width of the opening.
In some cases, the opening can be widened or narrowed to “fit” it to the size of the door. It is also better to discuss this possibility with the surveyor in advance. If there is a beam above the door, it should lie on the wall at a distance of at least 10 cm on each side of the opening.
Removing the old door
Dismantling the old door must be done as carefully as possible. If you use impact methods (for example, a sledgehammer or a jackhammer), you can damage the wall or the integrity of the opening.
First of all, the door is removed from its hinges. Then you need to cut off the anchors or other fasteners that held the door frame and carefully knock it out of the opening.
Extension of the doorway
The distance between the door frame and the wall should be 1.5–2.5 cm on each side of the door. If it is smaller, the opening needs to be widened. To do this, you can use a grinder or a hammer drill. We emphasize once again that the doorway must be at least 20 cm narrower than the beam located above it. Otherwise, this may lead to the collapse of the building structure.
Narrowing of the opening
If the distance between the wall and the door frame is more than 2–2.5 cm on each side, the opening needs to be narrowed. The reliability of the door installation depends on this. If the opening is too wide, the door frame seems to hang in the air, not adjacent to the wall. This significantly reduces the reliability and service life of the structure, and the door itself becomes more vulnerable to intruders.
The method of narrowing the opening depends on the width of the gap. If it is large enough, you can brick it. A smaller gap can be reduced using a plaster mixture.
Another option for narrowing the opening is to install metal frame. But the metal will serve as a bridge of cold. To prevent the house from cooling through the doorway, it is better to additionally insulate it.
If the preliminary measurements of the door were carried out correctly, and the door was selected to fit, there will be no need to narrow or widen the opening. You can proceed directly to the process of preparing the opening. The working technique depends on the materials from which the house is built.
Cleaning and leveling the opening
The wall surface is cleaned of the remnants of the mounting foam that was used to install the previous door. Remove all anchors, nails, etc. Clean the plaster down to the bricks or blocks from which the walls are built, ensuring a technological gap of 4–5 cm.
To prepare the opening wooden building You may need a hacksaw or chainsaw, as well as a chisel. The task remains the same - to clean the opening from all irregularities and elements that have become unusable.
If the beam under the threshold is rotten, it must be removed. Destroyed brickwork also removed and re-installed.
You also need to check the floor surface. If it is not horizontal, preferably near front door straighten it out cement screed, which will also allow you to slightly raise the floor.
Repairing cracks in the wall
If cracks are found during dismantling work, they will be repaired. cement mortar. Deep cracks are filled with pieces of brick and then filled with cement. Cold enters the house through voids in the walls, so it is extremely important to eliminate them.
The technological gap between the wall and the door frame will be sealed with polyurethane foam, so the wall surface may not be perfectly flat. Our task is to get rid of protruding elements that interfere with further installation, and voids in the wall.
Now that this work has been done, the opening is ready to install the front door.
Self-installation of interior doors does not require complex steps. To resolve this issue, it will be enough basic knowledge and repair skills. Installing the door leaf yourself allows you to save money, since you do not need to pay for the work of specialists.
Preparing for work
Installation of an interior door may be required during repair work. The procedure is not as scary as it might seem at first glance.
Necessary tool
Installing a new door is carried out in several stages. As a rule, it is necessary to remove the old canvas, and then proceed to install the new one. Upon completion of the work, it is necessary to secure the extensions (if necessary) and platbands. In the process of replacing the blade, various tools may be required - both manual and electric. Depending on the type of work performed and the accessories used, their list may differ.
The list of tools for replacing the door will depend on whether the frame needs to be dismantled, as well as on the selected fittings
Table: tools for installing interior doors
Drawing up a work plan
To replace an interior door, you should know how to measure the opening to order or purchase a product according to the specified parameters. Correct measurement involves taking the following indicators:

First of all, measure the width of the door. A standard opening in most cases is designed for a door of 80 cm. The easiest way to find out this size is to measure the distance between the vertical supports near the floor using a tape measure.
To obtain more accurate indicators, measurements should be taken from above and in the center.
After determining the width, you need to measure the height doorway. It is approximately 210 cm. To find out the exact value, you need to determine the distance from the floor to the top of the opening. If the floor is to be finished, it is recommended to install a new door after laying the material on the floor. In this case, there is no need to take into account the thickness of the finish or adjust the door components during the installation process. Doorway height is measured at several points, but the main reference point is the center. Measurements are taken inside the passage.
To determine the height of the doorway, you need to measure the distance from the floor to the top of the opening with a tape measure.
The width of the opening is determined in a similar way, taking into account that the door structure (opening) should be several centimeters smaller to ensure technological gaps. In order for the door to move freely, there must also be small gaps between it and the frame around the perimeter.
The width of the opening is determined by the distance between the two sides of the passage
Between the door leaf and the door, a gap of 5 mm is left on all sides, and 12 mm at the bottom.
Table: dependence of the leaf size on the width of the doorway
An important parameter for the smooth installation of a door is the evenness of the doorway. Verticality is checked using a plumb line or level. Measurements are taken in the center, left and right. Next, using a tape measure, measure the diagonals - the distance from the top corner of each side to the opposite corner from the bottom. They should be the same or at least not have significant deviations.
In addition, before you start replacing interior doors, it is recommended to draw up a drawing on which to record the measurement results. This will speed up the work.
How to choose a new door
When the need arises to select a new door, take correct solution Because of the variety of models, it is sometimes difficult. In appearance, the doors look perfect, but on the inside there may be serious flaws. It's all about geometric parameters. If the door leaf has deviations of at least 1–2 mm from the values obtained as a result of measurements, this may complicate its installation. To avoid unnecessary time spent on rework, it is recommended to measure the canvas in the store. It is also important to ensure that the exact door from which the measurements were taken is loaded and delivered. The next step is to select the door frame. Most often it comes complete with the door, but sometimes it is selected separately. Installation door design can be simplified if you purchase all the elements from one manufacturer. Then there will be no need to adjust one part to another.
Installing a door in an old frame
Sometimes there are situations when you need to replace a door without a frame. To do this, you will need to remove the old door leaf, adjust the new one to the parameters, secure the fittings and install the product in place.
Removing the old door
The hinges on which the doors are attached are different. Therefore, dismantling the canvas can be done in different ways. The canopy structure has two parts, one of which is attached to the door, the second - to the hatch. Some awnings have an axle fixed inside one of the parts. If you need to dismantle a door with such hinges, install a pry bar or some other lifting device and, with some effort, lift it. The work is best done with an assistant who will support the door at the right moments.
If the hinges can be separated along the axis, to remove the door it is enough to slightly lift the leaf
There are other hinge options where the axle fits into both sides of the canopy and is inserted through the top. To remove a door with such elements, you will need to remove the rods. The upper part of the pin has a kind of cap, which you pry off with a screwdriver and try to remove the element from the loop. It is best to start the procedure from the bottom canopy, which will prevent the door from falling, which could result in tearing out part of the hinge attached to the hinge. Damage should be especially avoided if the box has normal condition and its further operation is planned. After removing the door from the opening, the fittings are removed from it.
To remove the door from the hinges on a separate axis, you must remove the limiting cap and remove the axis
Fitting a new canvas
Replacing a door without a frame involves adjusting the new product to the old dimensions. To do this, the new product is placed horizontally, and the old door is placed on top. Both canvases are aligned along the top and long side, where the handle will be attached. If the new canvas has big sizes, you will need to remove the excess. Use a pencil to draw a line according to which from the new door circular saw cut off the unnecessary part.
The new door is adjusted to the size of the old one, cutting off the excess parts with a circular saw
Installation of fittings
After adjusting the new product, it is necessary to mark the places where the hinges will be mounted. This is done in the following order:
- We place the old panel on top of the new one, align them with each other and, on the end side of the new door, put marks with a pencil in the places where the hinges are installed.
On the door leaf we mark the location of the hinges with a pencil
- Use a construction knife to make clear lines.
Clear marking lines can be made with a sharp construction knife
- We select the recesses for inserting the hinges with a chisel. To do this, we place the door on the end so that the side where the awnings will be located is facing up. Place the chisel on the line and strike the handle with a hammer. The sharpened edge of the tool should enter the material no more than 2–4 mm, depending on the thickness of the metal of the hinges. These actions remove the excess layer of wood.
The recess for the hinges is cut out using a chisel
- We position the hinges so that the flat part is flush with the end of the door.
- When the part clearly fits into the selected recess, use a small-diameter drill to drill sockets through the holes in the canopy for easy screwing of the fasteners.
To make it easier to screw in the screws, pre-drill the holes with a small drill.
- We fix the hinges to the door with self-tapping screws, after which we try on the canvas to the opening of the door frame. By trying on, you can determine the size of the gaps and how accurately the product fits into the passage.
The hinges are attached to the door with self-tapping screws using a screwdriver or screwdriver.
Video: inserting hinges with a chisel
After installing the hinges, you can begin making seats for the locking mechanism and handles:
- The location of the fittings is marked by old door. It is important that all measurements are accurate. Otherwise, the hole will have to be moved, which will spoil the appearance of the door. If an old locking mechanism is used, all necessary parameters can be measured using the old door.
On the new door we mark the lock according to its location on the old door
- We drill holes from the end with a feather drill.
Drill a hole for the lock from the end of the door with a feather drill
- To make holes on the main surface of the door, use a saw ring type the required size.
We make a hole for the lock on the main surface of the door using a hole saw
- After drilling, install and secure inner part lock with a latch, and then install the handles.
After drilling the holes, install the lock and handles
Installing a door in an opening
The door is lifted from the floor to the required height and a piece of board is placed required thickness. After this, the canopies are combined and the pins are threaded through them, first into the upper part, and then into the lower one. When using loops of a different design, the hanging of the canvas will occur in a different way. The work is best done with an assistant, since the axles in the hinges installed on the door must simultaneously fall into the holes located in the mating parts on the door.
Installation of the door together with the hatch
If during the process of renovating an apartment or house it was discovered that not only the door leaf, but also the frame needs to be replaced, then the entire door set will need to be dismantled.
Removing the old frame and door
To remove the old door frame, you will need the following list of tools:
- mount;
- hammer;
- axe;
- hacksaw.
To dismantle the door hatch you will need an axe, a hammer, a hacksaw and a pry bar.
We remove the door frame in the following sequence:
- We remove the door.
- We dismantle the platbands. To do this, we drive the ax between the frame and the cashing and press the casing from the box.
To remove the casing, just hammer an ax between it and the box
- In the resulting gap you can see the nail that secures the casing. We place the ax under it and push the casing as far as possible. We move on to the next fastener and repeat similar steps. As a result, we remove the bar. To remove the remaining platbands, we carry out the same steps.
Place the ax under the nail and move the bar away from the box
- We dismantle the door frame. It is fastened with nails 150 mm long. If we managed to find the place of the lower fastener, measure 20 cm upward from it. Otherwise, we retreat 80 cm from the floor and saw the support.
We retreat 800 mm from the floor and saw the door frame
- We insert the ax above the cut point into the gap between the wall and the hole and try to move the support inside the passage. This way we remove the nail that holds the post up.
Use a pry bar to move the vertical part of the support above the cut point
- Similarly, we dismantle the remaining lower part of the support.
- Remove the top of the box. To do this, we drive the ax between wooden element and the opening, then move it down.
We dismantle the upper part of the box using an ax, pushing the beam down
- Using the same steps, we dismantle the remaining vertical support.
Door frame assembly and installation
The door frame can be assembled from profiled timber or MDF. The assembly process is independent of the material and consists of the following steps:
- We measure the parameters of the opening. To install the box, you need to provide a gap of about 3 cm. Using a hydraulic level, we control the horizontal level of the floor in the corners of the door opening.
- We trim the box elements with a circular saw.
Trimming of elements is carried out with a circular saw
- We mark the horizontal beam of the box, for which we install it on top of the door with a gap of 2–3 mm and apply marks with a pencil.
- Place the door on its side and mark the position of the hinges. It is recommended to install them at a distance of 200 mm from the top and bottom of the canvas. We measure this distance, attach the canopies to the markings and outline their position along the length.
Place the door on its side and mark the installation locations for the hinges.
- Mark the place where the loops on the loot will be located. To align the parts, place a vertical frame support on the side of the door and measure a distance of 10 mm from below for the gap between the floor and the door itself.
To mark the position of the loop on the loot, you need to attach the element and outline it with a pencil
- We cut the elements of the box according to the marks.
- We cut down the door frame boards at an angle of 45˚.
Door frame boards are sawed at an angle of 45˚
- We select recesses for the canopies using a chisel or a router.
- To hide the heads of the self-tapping screws that will secure the piece to the wall, we make recesses for them under the hinges. For these purposes, we use drills of a suitable diameter and make countersunk holes.
- To assemble the box elements, use a 5 mm drill to make holes in the right support and in the left corner of the top bar. The holes must be drilled at an angle of 90˚ to the trim surface to ensure that the elements are pulled together when the fasteners are tightened.
- We join all the parts of the box to each other with self-tapping screws 40–50 mm long.
We connect the elements of the box with self-tapping screws 40–50 mm long
Video: how to assemble a door trap
After connecting the frame elements, you can install it in the opening. To do this, perform the following steps:
- Carefully install the door frame into the passage and temporarily fix it with cardboard, which we place between the door and the wall. Using a level, we check the verticality on the side where the hinges are installed. To accurately position the door frame and adjust the gaps, you will need wedges made from wooden blocks with different angles.
For exact location boxes in the opening must use wedges
- We install wedges in the places where the hinges will be located. This is where they will be installed fasteners Lutki. To more securely hold the structure in the upper corners, we additionally hammer in a wedge. The box must be installed flush with external wall rooms. It is necessary to ensure that the wedging elements do not extend beyond the surface of the wall.
Wedges are installed at the locations of the loops
- We fix the box through the prepared holes, and it is important that there are wedges in the fixation areas that will prevent the box from deforming.
- To ensure the stability of the structure, we partially foam the gaps between the walls. On the side of the lock, to fix the vertical post, we use foam only in one place, since the support still has to be moved.
To make the door frame more stable, the space between the wall is filled with polyurethane foam.
- We attach the fittings to the door. Having placed a block of the required thickness under the canvas, we first attach the upper and then the lower hinge to the door frame. We close the door and accurately align the front side of the frame using wedges.
Having placed a block of the required thickness under the canvas, we first attach the upper and then the lower loop to the box
- We foam the gaps between the wall and the frame on each side.
To avoid swelling of the elements, it is recommended to install spacers between the vertical supports using any available materials.
Since door hatches are sometimes installed with a threshold, you should consider assembling such a design. Box elements can be connected not only at an angle of 45˚, but also at 90˚. In addition, a right angle provides a more reliable connection.
Video: installing a door frame and leaf
All preliminary procedures until the moment of assembly have virtually no differences from installing a door frame without a threshold. The rest of the process is as follows:
- We saw off a horizontal block to a length equal to the width of the door, and add 6 mm for gaps on both sides of the frame.
We saw off the horizontal part to a length equal to the width of the door leaf plus 6 mm for gaps on both sides of the frame
- On the vertical supports, remove the protruding quarter. Also, do not forget about the gaps on both sides. To make a quarter sample, you need to attach the upper transverse element to the end side of the vertical support and mark the width as accurately as possible. Following the mark, we saw off the protruding quarter with a jigsaw to a depth equal to the height of the quarter.
Remove the protruding quarter on the door leaf with a jigsaw
- Using a chisel, remove a quarter from the end side of the vertical supports. We repeat a similar procedure on all sides of the structure.
Using a chisel, remove a quarter from the end side of the vertical supports
- We place all the components on a flat surface and connect the upper part. It is recommended to first make holes in the frame with a small drill for self-tapping screws.
- Before assembling the threshold, we check the correct dimensions and location. For these purposes assembled frame Without a threshold, we place it on a flat surface and try on the door. We mark the position of the hinges and check the gaps. As long as the threshold is not set, the vertical supports can be slightly shifted. We measure the distance again and make corrections if mistakes were made.
- We are preparing seats on the door for hinges and other fittings.
Preparing seats on the door for hinges and other fittings
- We fix the threshold to the vertical supports with self-tapping screws and insert the box into the opening.
The threshold is attached to the vertical supports with self-tapping screws
- We install the box in the same way as in the case of installing a structure without a threshold.
Installation of extensions
If the wall is thicker than the width of the door, door extensions are used, which allow you to close the wall and visually increase the size of the door frame. To install these elements, you will need to prepare the following list:
- level;
- roulette;
- pencil;
- hacksaw or jigsaw;
- plane;
- hammer;
- sharp knife;
- polyurethane foam;
- fasteners (screws, nails or “liquid nails”);
- additional strips.
Additional strips can be installed in a groove or without a groove, so it would be logical to consider both options.
Installation in groove
If you plan to use extensions, then it is best to purchase a frame for the door leaf with a special slot.
The presence of a groove in the door frame will facilitate the installation of extensions
Its presence will speed up the installation process and will also allow you to move the additional strip, which will significantly increase the accuracy of installation. The process consists of the following steps:
- We begin installing the elements after securing the door frame in the passage. We measure the distance from the frame to the edge of the wall. Measurement of slopes must be carried out separately and in different places. To the resulting width we add the depth of the slot in the vertical support. The final value will determine the width of the extension.
It is convenient to take measurements using a construction square
- Using a jigsaw, we cut the additional strip to the required size.
Additional strips are purchased with a margin of width, and precise adjustments are made during the installation process
- We insert the strips into the grooves of the box.
We insert the additional strips into a special groove in the chest
- The extension, which is located horizontally at the top, is laid on the side elements.
The top panel lies on the side panels at a right angle
- To temporarily fix the door panels we use masking tape.
- We fill the voids that have formed between the extension and the wall with polyurethane foam. To avoid extrusion of the planks, we use spacers between them.
To prevent the extensions from being squeezed out by foam, it is necessary to install spacers
- When the foam hardens, remove everything that has come out with a knife.
After the foam has hardened, remove all excess with a knife.
Installation without groove
If the elements of the box do not have a special groove for extensions, they are fastened end-to-end. This type of installation requires precise measurements, as well as careful adjustment of the planks. Installation is performed in the following order:
- We measure the width of the slopes.
To determine the size of the extensions, it is necessary to measure the width of the slopes
- We make extensions of the required width. If after cutting the width turns out to be slightly larger, remove the excess with a plane.
- We cover the sections with edge tape, heating the edge with an iron until the glue melts and the tape adheres firmly to the plank.
To keep the edges of the nails sharp, cut off the heads with side cutters.
- We put the extras in place. First, we mount the vertical element, pressing it tightly at the bottom and tapping it with a hammer to force the nail into the vertical support of the box. Then we attach the middle and upper parts. It is necessary to avoid the formation of gaps between the elements and the frame.
- We place the transverse strip on top of the vertical ones, measure the right angle and nail it with a hammer to the top of the box.
Horizontal extensions are installed on top of vertical elements
- We also fill the gaps between the planks and the wall with foam.
Video: installation of door panels
Installation of platbands
When the extensions are secured and the polyurethane foam has hardened, install the platbands.
Platbands are decorative finishing of the door passage, which is a shaped profiled overlay strip.
To install platbands we perform the following steps:
- We measure the height of the side elements. We also add the width of the casing in the upper part to the height of the doorway.
The side strip should be higher than the border of the doorway by the width of the casing in the upper part
- We cut off the top of the right casing at an angle of 45˚. We do this so that the edge of the plank adjacent to the extension is shorter. At the same angle, but only mirrored, we saw the left plank up.
It is better to mark the top element locally
- We file the casing at both ends at an angle of 45˚.
The ends of the platband are filed in a mirror image
- We join the cashing elements and fix them with 5–6 nails for vertical planks and 2–3 for horizontal ones.
It is advisable to bite off the heads of the nails to make them less noticeable
When using self-tapping screws as fasteners, you will need to drill holes for the head, and after screwing them in, hide the heads with decorative plugs.
When installing platbands from below, there is no need to leave a gap under the baseboard
The lower part of the platbands rests on the floor, and there is no need to leave a gap under the baseboard.
Video: how to install platbands
You can replace the interior door yourself, but it is better to do it with an assistant. Professionals use a wide range of tools for such work. However, for a one-time installation, you can get by with a simple list consisting of a screwdriver, a hammer and a chisel with a level. Following step by step instructions, replacing the door both individually and together with the frame will be much easier.
U The installation of interior doors in an apartment should be carried out according to certain rules that customers should know. After all, about mistakes in the repair and decoration of a room or apartment can seriously complicate installation and cost a pretty penny!
You will be able to reduce the cost of installation, avoid mistakes in choosing doors and fittings, and help the craftsmen do everything efficiently.
Door opening dimensions
- Opening width
The door leaf is usually 60/70/80/90 cm wide. The correct width of the opening is the width of the canvas +8 or +9 cm (if the thickness of the box in its narrowest part is from 1.5 cm to 2.5), or +10 cm (if the thickness of the box in its narrowest part is 2.5 cm and above ).
- Opening height
For all cases, the correct height of the opening is the height of the door leaf + 6 cm. from the finished floor., i.e. 206cm. Doors to the bathroom can be 190 cm high, so the correct opening height is 196 cm.
Here are some examples of correct openings:
- Canvas 80x200 (cm.) - opening 89x206 (cm.)
- 70x200 - opening 79x206
- 60x200 - opening 69x206
- 60x190 - opening 69x196
 The dimensions of the doorways need to be determined in advance and it is very important to constantly monitor your team during the repair process.
Door widths for different rooms
If you have the opportunity to plan the width of doors and openings in advance and have questions about what door width to choose, then follow these recommendations:
- doors in rooms are usually made 80 cm wide so that furniture can be brought in/out. Width 90cm. This happens very rarely because such canvases are heavy and can sag on their hinges over time.
- bathroom doors are usually made 60-70cm so that the door can easily pass through washing machine 60cm thick. Keep in mind that 60cm. The door assembly has a clear opening of approximately 58cm. due to the recesses in the door frame.
- The door leaf for the kitchen is usually made 70-80cm. It is also necessary to take into account that handles on both sides may interfere with passage into the kitchen.
- V dressing room Usually they make the width 60-70cm.
When is it necessary to install extensions?
When installing interior doors, if the thickness of the wall is greater than the thickness of the door frame, it is recommended to purchase. You can, of course, stick wallpaper on the ends of the walls, but it will look out of date, and there will be nothing to nail the trim on the other side of the wall.
If you install it, it will be good decision, which will beautifully decorate the slopes. The color of the additions can be selected, for example, to match the MDF panel: 
The width of standard extensions according to the warehouse program is usually 10/12/15/20 cm. If your walls are very thick (more than 20 cm), then the extensions need to be joined in width or order non-standard extensions from production, which will cost much more.
Which side of the door should the extensions be installed on?
It depends entirely on how you planned the opening. Usually, if your door opens into a room, then the frame is placed flush with the room wall, and the extension will be in the corridor.
If you do the opposite, the door will not open completely (it will hit the door). Sometimes they put up with this so that the doors look the same - ALL extensions to the corridor or all extensions to the rooms. Therefore, this is already a matter of convenience and design, taking into account the future arrangement of furniture in the apartment.
Scheme for opening interior doors
Usually, if in one corridor some doors open into the corridor, and some open into rooms, the closed doors will look different due to the characteristics of the door frame. If the doors are next to each other, and at the same time one opens inward and the other outward, then the height of the upper trims will not match.
This is what the door looks like from the common corridor, which opens into the corridor, that is, towards us:  This is what the door looks like that opens into the room, that is, inward:
  It is necessary to ensure that the cloth does not cover the switch when torn off. It is very desirable that the doors do not intersect with their trajectories. In the bathroom, it is necessary to provide an opening of 180 degrees for quick ventilation after taking water procedures.
Make sure that a door opened 90 degrees does not block the opening of an adjacent door.
In order not to waste time coordinating the opening of doors with the craftsmen during installation, make a drawing diagram on a piece of paper in advance.
At what height from the floor should the door be?
The standard height is 1 cm from the finished floor. As for bathroom doors, it is not recommended to do less than 1 cm, so as not to disturb the air flow. If you have plastic windows don't forget to do supply valves for air from the street so as not to increase the air humidity in the apartment too much when the windows are closed.
Installation of interior doors during apartment renovation and the sequence of work stages.
In order to protect the wooden parts of the doors from warping due to high humidity during repairs, it is necessary to do installation after ALL finishing works, including in adjacent rooms.
Early installed doors can be accidentally damaged by tools during the repair process. Tile or wallpaper adhesive, especially plaster, dry quite quickly long time, releasing moisture into the room. Increasing the humidity above 70% for several days increases the risk that the doors will pick up moisture from the air, swell and stop closing properly.
However, if you like to bathe or shower frequently, humidity does not pose any threat, since the bathroom is quickly ventilated.
Installation of interior doors should be done if you already have a finished floor!
Without doors, it is much easier to lay floor coverings, and it is easier to install them later, with a clear connection of the platbands to the floor.
If you first install the box directly on the screed (main floor), then it is impossible to place the floor covering under the box, since it is already on the floor. In addition, it is difficult for the master to correctly calculate the lower gap of the door from the subfloor, taking into account the future covering, especially if the floor has not been leveled.
If you did everything correctly and did the installation after laying the finished floor, it will not be difficult to replace the floor in the future - you just need to pull out the laminate or parquet from under the door posts and slide in a new covering. In this case, the racks will not lower but will remain hanging.
What to do if the doorway is much higher (wider) than the frame?
A common mistake made by repair teams is openings that are too high, because the maximum height should not be higher than 208~209 cm, or better yet, 206 cm. from the floor covering.
Sometimes in new buildings standard opening can be 217-220cm high. This is explained by the fact that many customers make heated floors and the height after their installation becomes standard. If no one paid attention to this during the repair and a situation arose when the upper casing does not cover the opening.
Solution: if your opening is higher than necessary, but there is no way to reduce the opening, glue the wallpaper lower before installing the doors, or order high capitals instead of the upper casing, but usually they are installed on the side of the corridor. A more thorough way is to lower the height of the opening using drywall and wooden blocks and then glue the wallpaper.
Another option: if the platbands are flat in shape, saw off at the joints at 90 degrees, and the upper platband is cut from extensions that are wider. Some customers get out of the situation this way. The disadvantage is that sometimes the additional strips are thicker than the platband, and that if you do all the doors in the apartment this way, it will look a little wild)).
If the opening is wider than required by at least 2-3 cm on the sides, the foam seam will not have sufficient strength, and this is important, since the mounting foam helps maintain even gaps and ensures the overall resistance of the door to loads.
Solution: narrow the doorway with a wooden beam with a section of 3x5, 5x5 or at the repair stage using foam blocks and tile adhesive.
How to straighten a crooked doorway?
First, you need to check the walls to the right and left of the opening for humps/depressions by attaching a long rule, a plank or a flat board to the wall. Humps are especially common closer to the floor. Even one small hump will prevent the platband from fitting tightly to the wall.
To solve this problem there is only one option: to plaster and level the walls. If you don’t want or can’t level the walls in the entire apartment or wall, then do it only around the openings (about 50cm wide) and glue the wallpaper.
Then you need to check the verticality of the walls using a laser or bubble level. The ends of the openings must be parallel, the walls must be smooth and strictly vertical. If the opening is crooked, the walls are inclined, there are humps or depressions, act according to the circumstances.
If you understand that the opening is crooked and moves away from the vertical by more than 1 cm, you can level the walls with plaster according to the beacons, aligning them vertically and re-gluing the wallpaper. As you already understand, this is the best and most difficult solution!
How to install a door in a crooked opening?
But what if there is no way to level the wall? Let's say the wall in which the door is supposed to be installed is blocked from the vertical by more than 1 cm per two meters of the height of the opening. Then you have three options:
- Install the door frame along the plane of the wall, the trim will fit snugly against the wall, but the door will also be tilted and will probably close on its own, slam, etc.
- Install the box vertically in level, with the platbands adjacent in the upper part and moving away from the wall by the amount of deviation of the wall from the vertical in the lower part (or vice versa), worsening the aesthetics.
- Buy a door with telescopic platbands and install it straight, slightly deeper into the wall and, where necessary, pulling out the platbands from the grooves. This good decision problems, unless you need to open the door 180 degrees, since opening the door leaf more than 100 degrees will tear out the hinges.
The choice is yours, in all cases there are disadvantages and there are advantages, because it is a compromise.
What if the door is located close to the wall?

In such an opening, one wall is perpendicular to the other wall, and it is necessary to reduce the width of the platbands and attach them close to the wall on both sides. But by reducing the width of the trim we still spoil the appearance of the door, see photo:  However, there are several other options to solve this problem:
- If the renovation has already been done and wallpaper is glued to the walls, you can screw it to such a wall wooden beam cross-section 3x6, 3x4 or 4x4 (no more). It becomes possible to install an entire platband close to the wall.
- Extend the doorway by at least 5 cm from the wall and cut the same distance from the opposite wall of the opening at the repair stage. The platband will be located at a short distance from the wall, which looks much more beautiful.
- During the renovation stage, increase the doorway by 5 cm on both sides and order doors 10 cm wider, for example 70 cm. instead of 80cm..
Installing an interior threshold
The door leaf is located in the opening closer to the part of the wall where the door will open, so the threshold covers the joint of the floor when closed door should be located under the door leaf and then it will not be visible when the door is closed, see photo:

A common mistake made by repair crews is incorrect placement of the sills! To avoid such a mistake, draw a diagram in advance for opening all the doors and give it to the foreman before laying the finished floors.
Installation of interior doors in the bathroom
For living rooms and kitchens, it is recommended to order doors with a height of 2 meters. For bathrooms in new houses, a 1m high sheet is often required. 90cm. due to the presence of waterproofing and special high thresholds. If you missed this point and did not order doors with a height of 190 cm, then you need to expand the opening in height or, as an option, you can shorten the door.
If you increase the height of the opening, then the top mark of the doors to the bathroom and interior doors will be at different levels. If the door is cut from the bottom, the panel pattern is lowered. Therefore, sometimes it is better to order smooth doors for bathrooms.
A common mistake is making a threshold to the bathroom from a wooden door frame, as the aesthetics and ventilation of the wet room are disrupted, and in the future, mold may appear.

Preparing interior door openings
Polyurethane foam will not be able to stick if there is a lot of dust at the ends of the doorway. It is necessary to remove dust or prime the ends of the opening walls if they are covered with gypsum putty or if the walls are made of gypsum/aerated concrete blocks.
If there are open round cavities and voids at the end of the opening, they can be sealed with plaster, leaving marks with a pencil so that the craftsman does not drive fasteners into them. Holes for fastening the door frame are drilled between these cavities into the lintels.
If the walls of the opening are made of plasterboard, then in the metal profile at the vertical ends of the opening Necessarily you need to lay a dry wooden block. It is needed for reliable fastening doors with self-tapping screws through the hinges and the counter part, and it also imparts rigidity to the walls in the area of the opening. Doors installed in openings without reinforcement are doomed to short-term use and will quickly sag.
If inside metal profile the block is laid and the ends are not sewn up with anything, then this is not correct. Foam does not adhere well to galvanized metal. Peeling may occur over time. To avoid this, strips of gypsum board or gypsum board or plywood are screwed to the ends. Foam adhesion to these materials is excellent.
It is not allowed to leave voids between sheets of drywall in the upper part of the opening. The fact is that the top box is often very bent or bent when wedging, and to straighten it, for example with the help of foam, a filled end of the wall is required.
Preparing the opening for sliding doors
For those who want to install sliding doors opening height for standard door should be approximately 202 cm. and the width of the opening should be equal to the width of the door leaf or a couple of centimeters wider. In the process of finishing the opening with extensions and platbands for the portal, its dimensions should become smaller than the door leaf.
At a height of 207 cm. up to 212cm. there should be no voids from the floor in the opening, since a wooden beam with a section of 5x5 cm and a length of approximately 190 cm will be horizontally fixed here, to which an aluminum top rail with rollers will be attached.
Finishing a doorway (portal) in an apartment
If you don’t want to install an interior door, you can install a portal instead. This solution increases the space in small apartment, so this is a win-win option for visually combining adjacent rooms: hall and living room, corridor and dining room, living room and small kitchen. A doorway without a traditional door surprisingly transforms a room: 
Preparing the flooring before installing doors
A common mistake made by repair teams when laying floor coverings is when the gap between floor covering and the wall in the area of the platbands exceeds the thickness of the platband. And you just need to remember to make it no more than 3 mm. in the area of platbands.

A recess (groove) can be made in the wall near the floor to compensate for possible expansion of the floor covering.
Storing doors after purchase
To avoid deformation under the influence of gravity, the canvas, box beams and platbands must be stored on a flat surface before installation. Doors can be placed on their side against the wall.
Doors, trims and frames can change their sizes after changes in humidity. Due to the build-up of humidity after cold weather, it is necessary to store the door and molding indoors for several days before installation. Do not remove the packaging from the doors in advance until the temperatures have completely equalized.
Which loops to choose?
- If the canvas weighs up to 20 kg, then it is optimal to buy 2 loops 10 cm high
- If the canvas weighs from 20 to 30 kg, then you need to buy 2 loops of 12-12.5 cm. height
- If the canvas weighs more than 30 kg, then you need to buy 3 loops of 10 cm each. height
The hinges are hung at a distance of 20 cm from the top and bottom of the door leaf. The thickness of the metal and the absence of play are very important. If the metal thickness of the hinge is 3 mm, then these are good hinges; a thickness of 2-2.5 mm is much more common. It is very good if the hinges are made of brass or steel. Most common door hinges There are several types:
- universal hinges - these are traditional mortise hinges familiar to all of us. If the choice of hinges is not a fundamental issue, buy universal hinges. They can open both to the right and to the left. In addition, universal hinges have a longer service life.

- - not mortise, overhead hinges. Easy and simple to install. They got their name for their special unusual design - both of its elements, when open, resemble butterfly wings. During the process of closing the door leaf, one part of the hinge easily fits into the other, forming a single whole. Typically, such hinges are installed on lightweight doors.
- — time-tested mortise hinges; a door with such hinges is simply removed if it opens 180 degrees. There are right and left depending on the door opening

How to choose locks and latches?
It is best to choose locks and latches based on the quietest operation of the mechanisms when opening and closing and their reliability. Magnetic locks are quiet, but not all, they need to be bought more expensive and preferably Italian, there are very high-quality options. Don't skimp on them so as not to suffer later.

Cheap latches with plastic tabs are not always of high quality, so you should first ask knowledgeable people(not sellers), and do not buy too suspicious options. It will work quietly for six months, and then suddenly it will start making noise. Sometimes such cheap magnetic locks and latches do not work immediately after installation. Door installers know these models well.
You can buy classic latches/locks. It would be best to choose them with plastic tongues, as they are the quietest in operation and do not clank like metal ones.

Sometimes it happens that the new latch is difficult to operate. In this case, place a couple of drops of silicone grease on the lock tongue.
Door handle height from floor
For Europe - 95 cm. Nowadays many symmetrical doors are produced, in which the handle, according to the design of the door, should be located strictly in the middle of the leaf. Therefore, the standard handle height for Russia is 1 meter.
Almost all models of door handles come with screws that are too long, which, when screwed into the door, can jam the lock or lead to its unstable operation. Door installers almost always screw handles with their own self-tapping screws.
How to choose the right specialist to install an interior door and check the quality of his work?
 How to make the right choice so as not to be left with hopelessly damaged doors? Will the work be done efficiently if the door installer has doubts? Let's first find out how best to check the work of the wizard and analyze everything point by point.
How to check the work of a door installation technician?
- Look at the quality of the insertion of locks, the joints of the frame and platbands, and the insertion of hinges. There should be no gaps
- The lock tongue should fit into the strike plate without play.
- The canvas should evenly fit along its entire length to the rebate or rubber seal. When closing the door, the elastic should not be jammed by the canvas.
- The gaps between the door and the frame must be even along the entire length.
- The box is fixed in the opening not only by construction foam, but also with the help of fasteners
- The canvas should not close or open on its own.
- The fittings must rotate freely
- The price may rise only due to the increased volume of work that cannot be foreseen in advance.
How to choose a door installation specialist? Basic methods.
1. The master must highly specialize in installing doors! It is necessary to watch or see the work live (at a friend’s apartment). The master or team must have at least 1 year of experience and provide professional equipment: a miter saw, a sawing table or a manual one. Circular Saw, milling cutters, screwdriver, drill, hammer drill, hairpin gun with compressor, templates for fittings, etc. Read


