If you decide on our own install interior door structures in your apartment (or house), then installing hinges on the door will be a pressing issue. Indeed, for most people, this stage of work becomes an insurmountable problem on the way to achieving the assigned tasks. You will learn how to properly install door awnings here.
Diagram for determining the choice of loops.
More often construction stores offer to purchase interior door designs without hinges. They must be purchased separately, although it is worth knowing which door will presumably be installed and what its dimensions are.
What types of door hinges are there?
There are three types door hinges:
- left;
- rights;
- universal.

Door device.
In order to determine the required type of hinges for the door, you need to carry out the following manipulations:
- Approach the doorway where the interior structure will be installed.
- You need to stand on the side where the door will open towards you. Most people, mistakenly, stand on the side where the door opens away from them. You shouldn't do that. After all, you will end up with the wrong type of loops.
- Mentally we open the door towards ourselves. If this happens to the right side, then it is worth buying right hinges. If to the left, then, accordingly, the type of loops is left. It's all very simple and elementary. Just don't get confused.
List of required tools
- chisel;
- hammer;
- screwdriver.

Diagram of a metal door hinge.
These are the most important tools that you cannot do without during the process of installing a hinge on a door. But, of course, it would be good to also prepare additional tools, namely:
- drill;
- thin drills;
- screwdriver;
- cutter;
- awl.
Having such auxiliary equipment will greatly facilitate your work.
How to properly install hinges?
There is no fundamental difference where it is better to embed the hinges first, into the door frame or into the structure of the door itself. Although it is recommended to start the installation process with the door when it is made of solid wood and has small knots.
First, you need to decide on the place where the hinges will be attached. And only then do we accept optimal solution by finding the area on the door where the hinges will be located in the frame.
Experts recommend stepping back from the edge door design 15-25 cm - this will be the place of the first insert. Costs Special attention pay attention to how the hinges are cut into other doors in the house, especially if they are located nearby, so that there is not a big difference. The ideal option is 20 cm from the edge of the door. If it turns out that there is a knot in this place, then it is better to retreat a little. After all, there are no strict regulations in the process of performing such work, and therefore you can easily change the insertion distance.
To begin with, it is recommended to take measurements along the upper and lower edges of the door structure. In this case, you should leave marks with chalk or pencil. Carefully monitor where the top and bottom of the interior structure that you decide to install yourself are, and on which side the glass is located, if it is present on the door.
During the marking process, each individual hinge must be applied in such a way that its hinges extend from the front side of the door.
Screw-in loop device diagram.
In this case, the front side is considered to be the side where the entire structure will open. It is recommended to mark loops in two ways.
In the first case, you need to place the loop exactly in the chosen place, and then trace it with a perfectly sharpened pencil. In this case, the edges of the hinge and the door structure must be located exactly and parallel to each other.
In the second case, you need to screw the loop using screws, and then cut the outline with a cutter or draw marks with a regular pencil. In this case, it is enough to tighten only two screws. But you should understand that in this case the hinge may move a little to the side, so you need to be extremely careful and as precise as possible so that the door does not stand askew later.
Subtleties of the process

Options for door hinge sizes.
It is recommended to tighten the screw exactly in the center. And to do this, it is better to first make markings using a pencil and an awl. After all, this is the only way to avoid the loop being pulled in during the tightening process. After the marking is made, it is worth cutting the contour with a cutter to the thickness of the loop used. And only then proceed to obtain a level surface with a chisel.
If desired, the outline can be punched using a chisel. To do this, it is recommended to place the tool in the required place and lightly hit it with a hammer to knock out the contour. Special attention should be paid to the fact that for a purchased door structure, most often in the process of improper use of a chisel, the contour jams the plane of the door.
And according to the rules, the chisel should be positioned so that this outline goes inward. This part will be selected in the future to obtain the most even and beautiful edge at the loop.
Correctly embedded hinges on the door must be located at the same level. In the case when you observe a slight bulging of a separate part of the loop, it is necessary to slightly deepen the entire surface of the area. It is important not to overdo it, since the deepening should be uniform. And checking how correctly you installed the hinges on the door yourself is very simple.
To do this, you will need to take a ruler and apply it to the surface of the loop. If it turns out that the hinge protrudes somewhat, then you will subsequently have a huge gap between the interior structure and the door frame, and the door may not close on the other edge. Whereas a deeply located hinge will lead to enormous pressure on the door frame and further pulling of the hinges.
In order to eliminate the resulting consequences, it is recommended for the first case to unscrew the loop and seat it deeper. And for the second, calculate the required height of the gasket to raise the loop to the required level. This spacer is most often made from rigid cardboard, but it can be made from other materials you have available. This gasket must be placed directly under the hinge. In this case, no fixation is necessary; the loop twisted at the top will already hold it tightly.
What is the easiest way to choose a place to cut the hinges?

Options for installing different numbers of loops.
First you need to assemble door frame. Then you should put the door in the previously assembled box. Step back 2-3 mm at the top and leave a small gap. And only then mark the required places on the box along the embedded area. In the case where you initially inserted hinges into the frame, make marks directly on the surface of the door structure.
Now you know well how to insert the hinge being installed. Next, it is recommended to apply your hinge to the surface of the door, then mark it with an awl and drill it out with a thin drill. Then you need to take the screws and screw them in using a regular screwdriver. If you constantly doubt the quality of the work performed, then tighten only two screws at a time and see the result.
Butterfly loops - convenient and simple!

Door hinge installation diagram.
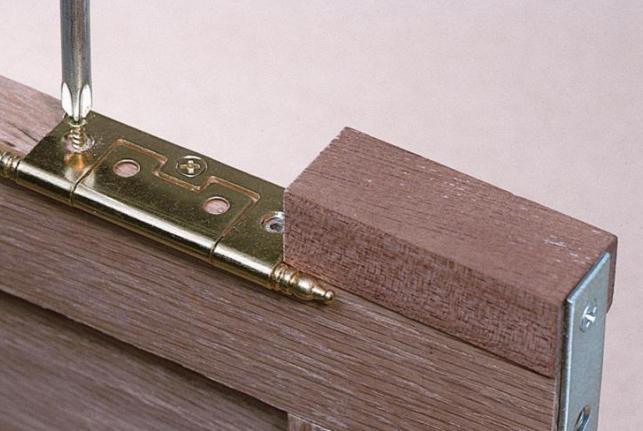
There are special hinges without mortise, which are mounted on the interior door structure as quickly and simply as possible. Distinctive feature Such elements are considered to be installed without the use of chisels and grooves.
They just need to be marked and applied directly to the surface of the door and door frame. The design of such loops implies that the elements enter into each other, and this eliminates unnecessary hassle preliminary preparation door interior structure and door frame for insertion of hinges.
After all, not every owner has the necessary skills to work with wood, as well as special tools.
Door adjustment
It is worth paying special attention to the fact that the adjustment process is carried out in stages.
- Adjustment door leaf on the opposite side for the loop side.
- Next, it’s worth checking how parallel the lines of the door leaf and frame are.
- First, the vertical position of the door structure is adjusted from the hinge side.
- And only then can you begin to adjust the gaps between the door structure and the frame.
- The final step is to adjust the gaps on the lock side.
Hinges are accessories that, just a few years ago, were an unremarkable unit of one option. Now the situation has changed and this fittings may be different. Hinges are required for opening and closing doorways. There are several options for mounting door hardware, the methods directly depend on the type of door. To carry out this work, you need some skills, a suitable tool and an understanding of a certain sequence of actions. Most often, hidden loops are chosen, since they are almost invisible and thanks to this everything looks more attractive. The insertion of closed loops is available to any craftsman.
Hinge options for interior doors
There are currently five options for door awnings. Each option has its own specificity and strengths. You can find and purchase the following types of canopies:
- straight or card - simple classic, with special side plates;
- corner - similar to the first, classic canopy with a slight difference in the shape of the plates, most often installed on pendulum structures;
- “invisible” - special mechanisms that are recessed into the door leaf, most often used on expensive doorways;
- eversible - there are no plates, but only pins on a special eversible axis;
- Italian - equipped with a special hinge, installed on European doors.
All interior hanging structures are divided into universal and those that have a specific direction: right and left-sided.
As for the loop options, they are:
- mortise;
- invoices;
- screw-in
DIY hidden door hinges
Most often, the invisible version of the loops is a priority, as it allows you to make the object aesthetically attractive. Installation of this fittings is a little more complicated than overhead fittings and also requires more time, but if you wish and have some skill, you can install the hinges quickly and correctly with your own hands.
The advantages of this option are as follows:
- Reliability and safety - thieves will not be able to enter the premises due to the fact that they cut off the hinges, as happens with overhead options; hidden hinges are hidden from outsiders.
- High strength - the product can easily withstand the weight of the structure itself, made of metal or wood material.
- Practicality - products can last for decades with proper care.
- Visual appeal - when the doors are closed, the hinge is not visible, this allows you to maintain the aesthetics of the appearance.
- Great variety - you can choose canopies that can withstand heavy loads or small designs for closet doors.
Disadvantage this method we can mention the fact that installation is not easy and requires some effort. In addition to this, there are a number of weaknesses of this product:
- A hidden canopy is expensive compared to other options. But even among the category of hidden interior designs, you can find those that are higher or lower. It should be understood that the quality of the hinge directly affects the price of the product.
- Unfortunately, there are a large number of fakes on the market; as a result, you can purchase a low-quality product and lose money
- A noticeable disadvantage is the fact that not every canopy can be disassembled if necessary.
- Due to the large recessing depth, it is not always possible to install this type of canopy.
Installing hidden hinges on doors
If you do not delve into the specifics of installing the door structure, then installing hinges hidden option simple and uncomplicated: you need to cut out a niche and insert the mechanism, then securely fasten it and start using it. But in reality, everything is a little more complicated.
Installing hidden hinges yourself is not entirely easy. It is necessary to stock up on the tools needed to carry out the work. In addition, there is an instruction that describes all the stages; following the recommendations of specialists allows you to install the mechanism efficiently and quickly. The following tools and items are required for installation:
- "invisible loops";
- fastening elements for installation;
- a simple pencil;
- yardstick;
- sharp knife;
- chisel;
- screwdriver;
- screwdriver;
- hammer.
First of all, you need to make a hidden basting. It is important to think about which direction the door will open and at what level the hidden door hinges will be located. This is not at all blindly following the requirements for show; in fact, this will affect the ease of use, durability of the canvas and Supplies. To slow down the swinging of doors, experts advise installing special stoppers. In this case, the door will not hit adjacent furniture or the wall.
The number of hinges depends on the characteristics of the door: material, weight, purpose. A classic door requires the installation of two hinges, this is enough. A door made of heavy wood has a different weight, so a couple of hinges will not be enough; three elements need to be installed. Two are installed near the floor and top of the doorway. The third loop is located in the center of the side panel. All attachment points are marked with a pencil. It is necessary to calculate the depth of the excavation in advance.
How to install concealed awnings
As already mentioned, depending on the weight and size of the door, the number of hidden hinges is planned. The markup has specific stages, and they can be displayed in the following order:
- at a distance of twenty to twenty-five centimeters from the top and bottom, a mark is placed for future loops; this should be marked for convenience with a simple pencil;
- to the future location of the canopies, it is necessary to attach loops and outline their contours;
- when installing the third loop, it is placed strictly in the center, at an equal distance between the first and second;
- two contours are immediately marked, internal for the canopy and external for the lining.
Marking a door, namely a door frame, is considered a difficult task. Like any other process, door marking has its own order and looks like this:
- The accuracy of the door leaf is measured using building level, secured with wooden wedges;
- now you need to mark the places where the loops will be inserted;
- The loops are outlined with a pencil to indicate their attachment location.
To avoid mistakes, you need to carefully carry out the insertion process. Holes must be made after several checks of the correctness of the future location of the hinged hinges of the hidden version.
How to decide on the choice of invisible loops
The hidden mechanism is a kind of invisible mechanism, equipped with a hinge, equipped with two elements connected by a screw. To make the right choice when purchasing hidden mechanisms, you should listen to the recommendations of experts:
- before purchasing a mechanism, you should study their features; if they are not universal, then you need to decide on the sides of the attachment - right or left;
- if the hinges are inexpensive, then most likely the manufacturer saved on the control mechanism;
- When installing heavy doors, you should not prioritize the issue of savings;
- when installing a door in a new building, it is necessary to purchase a copy with adjustment so that when the house shrinks, it is possible to correct the misalignment of the door, which will happen in any case;
- when installing awnings with adjusting screws, there will be no problems with large objects drifting in - the swing angle of the sash can reach 180 degrees;
- It is necessary to select hinges based on the characteristics of the door.
Door frame: how to install hidden hinges correctly
The first step to install the mechanism is milling. This is the creation of shallow recesses for recessing hinge elements. It is possible to make such connectors yourself using a hammer and chisel. The main requirement for the notch is accuracy and correct size. The depth of the notch depends on the thickness of the loop, and if a shallow one can be widened, it will be very difficult to correct an excessively deep one.
Using a drill, make a recess along the contour outlined with a simple pencil. There is no need to rush; the result depends on the measured actions. It is necessary to make recesses in the sash and in the frame. this work takes no more than forty minutes. The hinges are installed in the cleaned recesses. This involves the following actions:
- the canopy is immersed in a specially made hole, you need to ensure that the part fits tightly and takes its place;
- Recesses are made for the screws with a special tool - a screwdriver;
- You need to insert loops into the resulting recesses and tighten them, you need to make sure that the loop does not skew.
If necessary, it is important to adjust the “invisible” hinges. In this case, you can check the functioning of the door and make sure that the “invisible” hinges are located correctly.
Hidden hinges for doors with your own hands, adjustment
The adjustment features depend on the type and version of the loop. And although there is a wide range of hinges on the market for hidden installation, they all have identical adjustment options and design. To adjust the hinges, you must follow the following steps:
- the cover is removed from the loop, this allows you to expose the adjustment mechanism;
- to change the vertical skew of the door, you should turn the bolt; this manipulation can be done using a special hex key;
- Under the mechanism panel there is a screw with which the surface of the blade is adjusted.
Expensive and complex designs have a complex adjustment mechanism in three directions at once and this makes it possible to create ideal conditions for operation and quality of service.
It is necessary to avoid the situation when hinges are purchased immediately before installing the product. Such purchases can be made in a hurry and without taking into account many features, which will negatively affect the durability of the door. It is recommended to purchase hinges in parallel with the purchase of the door, in order to take into account its dimensions and weight, and select the color of the hinges. And although they are called hidden and partially recessed, when open doors they are visible, so it is advisable to choose a shade.
Also, you should not purchase a mechanism of unknown origin or go for cheapness: hinges ensure reliable opening and closing of the door.
You can make installation easier and faster using a special template. This will help avoid mistakes when basting.
How to hide door hinges, requirements for the mechanism
There are certain requirements for fittings. The main thing is that they must withstand mechanical loads. Since the door material can be different, awnings are divided into three main categories:
- for doors up to sixty kilograms of weight;
- for a one hundred and twenty kilogram door;
- for massive structures weighing up to two hundred and fifty kilograms.
If the door has even more weight, individual structures for fastening are made. There are a number of requirements for hinges:
- they must be durable, reliable, and easy to install;
- the form must be made in such a way that the fastening is as reliable as possible;
- it must be taken into account that during its service life the door can open half a million times, so the material must be appropriate;
- priority is given to the use of hinges made of aluminum, hard plastic or metal - depending on each specific situation;
- parts must be coated with anti-corrosion agents.
If you still have questions about how to make a choice and install hidden hinges with my own hands, watch the video. There you will find answers to all questions. It is possible to install hidden hinges on your own if you follow the recommendations and prepare the necessary tools. The use of such mechanisms will allow you to enjoy the quality and aesthetics of the product.
The complete set of interior doors is not complete without the appropriate fittings. Along with handles, chains, eyes and various inserts, manufacturers include loops in the sets. Perhaps this main element door set, on which the quality of fixation of the leaf in the opening depends. Typically, traditional hinge models are used, the design of which involves inserting into an array - for this purpose a special groove is formed.
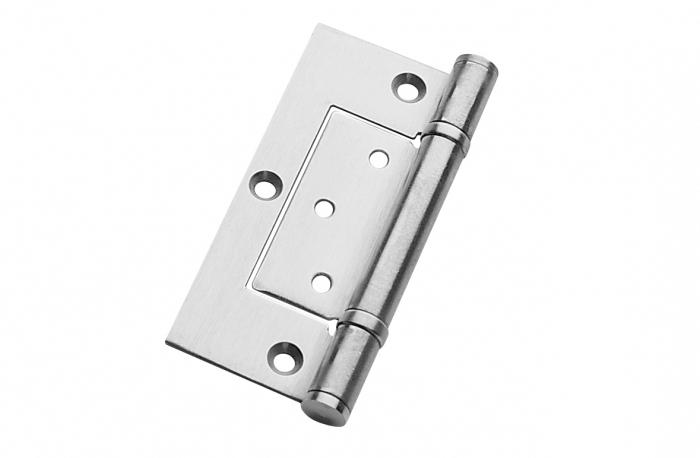
Development technological methods manufacturing and installation of doors led to the development of the “butterfly” hinge, which does not require insertion. The new fittings also have other fundamental differences, which are characterized by both pros and cons. Correct installation will preserve the advantages and minimize the disadvantages of the finished door structure.
Design Features

The main difference between butterfly hinges, which also affects the features of installation with further exploitation, is adjacent to the door surface. Such fittings do not require the creation of grooves for insertion - the looped card is placed on the surface and also twisted. The fastening sides are designed so that when the doors are closed, one part is built into the other, which explains the name “butterfly”. The number of screws varies depending on the set, but on average corresponds to classic sets of mortise hinges.
Installation process
To understand how to install a butterfly hinge correctly, you need to take a closer look at its design. The technology for installing overhead models, as noted above, is determined by the specifics of their work. The absence of the need to form grooves is a significant advantage of such hinges; otherwise, the installation process follows the usual method.
First, the location of the loops is marked. It is advisable to apply them inside, and then fix the drilling points. The gap from the edges of the fabric should be at least 200 mm - the average distance not only for a butterfly loop, but also for conventional versions of this fitting. Then neat holes are made for the self-tapping screws, which are usually supplied complete with hinges. The final touch There will be a direct screwing of the sides of the “butterfly” to the canvas.
Installation nuances
The external ease of the installation process and, in particular, the absence of the need to create niches in the array, captivates many. But all the advantages that the “butterfly” has end there. Only after installation can you appreciate how ambiguous such fittings are.

The fact is that you can get the proper effect from using hinges without insertion only if the installation is impeccable. Compared to traditional models, butterflies do not provide a wide field for modification. Firstly, the sides must fold perfectly, otherwise an unevenness will form - the door will spring back or, at a minimum, not fit tightly. Secondly, you will have to come to terms with a small gap, which, naturally, is formed from protruding loop cards. And one more unpleasant moment, which also characterizes butterfly door hinges and the design without a mortise as such, is the impossibility of removal without unscrewing the screws.
How to fix errors?
It is impossible to get rid of all the listed consequences of using such original hinges, but it is possible to minimize their impact on ease of use. Among the most important tasks that craftsmen solve during the installation of butterfly hinges is ensuring uniformity when the cards converge. Typically, inconsistencies are eliminated by creating linings. For this, cardboard, thin wood chips, paper and similar material are used - it must be placed in the part opposite to the side that is not overlapped.
In addition, the "butterfly", due to design features, do not provide high degree reliability. Of course, it all depends on the product, but they are significantly inferior to mortise-type hinges. Therefore, it is important to perform the fixation with screws as efficiently as possible - the absence of protruding heads and tilts during insertion will be reflected in reliability.
Another questionable feature is the location of the screws on the map. On one side they are located closely, and on the other - at a distance from each other. The configuration cannot be corrected, but the possibility of damage to the door on which you plan to install butterfly hinges can be eliminated. Installation is carried out on solid and reliable areas - that is, suitable for screwing.
What doors are they suitable for?
Determine the segment optimally suitable doors under the design of butterfly loops can be based on the strength of the fastening. This nuance has already been considered, and it is quite natural that it is undesirable to supplement heavy models with such systems. Still, the operation of insertion into the array adds reliability to the fastening, while external fixation without insurance seems very risky when installing a 40-kilogram sheet.

Conversely, butterfly door hinges, which install as smoothly and cleanly as possible, are ideal for lightweight doors that do not require special effort in installation. In particular, representatives of the veneered category are combined with “butterflies” not only technically, but also visually. Models made from solid wood are recommended to be equipped with mortise fittings - the complexity of installation is compensated by their reliability.
Decorative effect
The overhead butterfly loop fastening system is also due to aesthetic considerations. No matter how neat the inset is, the master will not be able to preserve the integrity and decorative completeness of the door to the same extent. By bypassing all the difficulties of installing such hinges, you can achieve an unsurpassed result. Since there is no need to interfere with the capricious laminated surface, doors with butterfly hinges should be considered as best option for living rooms, bedrooms, offices and other rooms where stylistic harmony is important.
Bottom line
It's hard to name best choice for amateurs and beginners who can count on simple installation without creating an insert. Some risks are eliminated, but others arise. Nevertheless, subject to strict markings and verified alignment of the cards, butterfly hinges will provide the result in the form of aesthetic interior doors with an original fastening configuration.
Finally, it is worth turning to mortise models, which still remain the most popular solution for fixing doors. This choice is worth making if you need durable and reliable design However, you will have to sacrifice decorativeness. Nevertheless, the clumsy principle of introducing such loops is incomparable with delicate overlay without damaging the wood.
When choosing an entrance door or an interior door, people rarely think about the functional significance of door hinges. It seems that the main thing is the beauty of the canvas, the reliability of the box, the appropriateness of the design door block for the comfort of your living space and more. But do not forget that hinges play a big role in the operation of the door unit. The canvas itself is just a blank without properly selected canopies.
Installing hinges on an interior door depends on the right choice the required set hanging fittings. Let's study this topic in more detail to know how to choose loops? How to install it yourself?
Hinges for interior doors: a choice for any occasion
Perhaps you have noticed racks with door fittings and could notice what big choice door hinges.
Hinges for interior doors differ in design, color, size, and material.
They differ in size, number of holes, variety of fasteners, and opening method. All this is no coincidence. Any hinge is designed for a specific type of door: wooden, metal, plastic. The main nuance is the weight parameter of the canvas. Can't hold a heavy one metal door two card loops. This requires powerful welded elements. All door hinges are usually divided into the following types:
- Overlays - installed without any grooves or recesses.
 Overhead hinges are the easiest to install.
 Placed on the end of the canvas and the rack of the box. Can be solid or split. Often used for interior doors made of MDF, plastic, and paneling. The canvas should not be very heavy. If such canopies are chosen for installation on a solid door, it is better to take them in the amount of three pieces.
- Mortise - installed in a specific recess made in the canvas and box.
 Mortise hinges require more skill in working with power tools.
 This type is divided into hidden and partially recessed. What is the difference? Simple mortise hinges are inserted into a small recess that corresponds to the thickness of the hinge area. The notch can be made without special tool, using only a chisel, chisel, hammer. Hidden canopies should be deeply recessed into the canvas. The hole is created with a special saw or router. Such hinges are found on expensive interior doors; they can be used on entrance structures, which reduces the risk of uninvited guests entering the house.
- Screw-in - have special screws built into the platform.
 Screw-in hinges are rarely used for interior doors.
 The hinges are screwed into the canvas and the lightweight box only. Currently rarely used.
- Corner models - shaped like a corner, used to install a pendulum opening system.
 Corner hinges for hanging doors.
 Installed like regular card loops.
Based on the possibility of opening doors, hinges can be divided into three more groups:
- left - with the ability to open the door to the left;
- right - open the canvas only to the right;
- universal - open in any direction.
This feature is important point when choosing hanging fittings for interior rooms, entrance doors. You should navigate this way:
- stand facing the doorway;
- estimate where the canvas will open - take into account fire safety standards that the door should open forward in the direction of travel;
- for double doors, sliding doors its own characteristics of hanging accessories.
This concludes the classification of hinges for interior and entrance doors. Now you need to study the installation specifics of each model.
Installing hinges on interior doors: a brief overview of all methods
Installing hinges on interior doors or input depends on the type of fittings chosen. The differences in the work algorithm are small, but it’s worth dwelling on them in order to know how to install the hinges with your own hands.
Installation of overhead hinges
This is the simplest, affordable canopy for self-installation. No special skills or equipment are required here. You need to prepare:
- canvas;
- door frame;
- set of hinges (screws provided by the manufacturer);
- screwdriver;
- drill;
- roulette;
- level.
Overhead loops can be detachable or solid. This must be taken into account during installation. It is easier to install a detachable hinge by making the correct markings. The main thing is not to confuse the upper and lower parts of the canopy. Otherwise, the canvas will not be able to stay on the box and will fly down. Check the operation of the loop before installation.
It is more difficult to install a solid hinge - it is necessary to combine the canvas and the box parallel to each other, at the same level.
- If the hinges are not universal, check that the door can be opened in the desired direction.
- Next, drill holes so that the timber does not crack if the door is made of solid wood.
- Screw the screws into the holes using a screwdriver with a special attachment.
- Check the operation of the door unit. If there is any imbalance, correct the defects.
Watch the video on installing the overhead hinge:
Installing mortise hinges on an interior door with your own hands
Mortise hinges require more time, skill, and tools to install. A mortise hinge, like an overhead hinge, can be detachable or solid, universal or on a specific side. The insertion can be carried out only to the thickness of the applied strip or set deep (secret loops).
You can install the first type of mortise hinge with your own hands. It is better to entrust hidden hinges to specialists if they are not available special equipment for cutting a deep groove. This is done with a milling machine.
Conventional mortise hinges require a chisel, chisel, or hammer for installation to make a small indentation in the product.
- Take a tape measure and measure the required distance to install the hinge in the door with your own hands. According to the standard, it is necessary to retreat 200–250 mm from the upper and lower edges. If you need to place a third loop, make a mark in the middle or slightly lift it up. Look at the diagram for installing hinges on a door according to the standard:
- Attach the canopy with a bar to the marking site and trace the outline with a simple pencil.
- Do the same with the second part of the loop.
- Now you need to use a chisel, hammer, or chisel to make a recess along the outlined contour to the size of the thickness of the plank. Perform this step slowly and carefully. If you remove more, the hinge will become skewed and the operation of the door will be disrupted. So take your time.
- Place the bar into the resulting recess. If the loop lies flush with the surface, you can proceed to screwing it.
- Drill holes for self-tapping screws in the required places.
- Tighten the screws, pulling the hinges tightly.
- Follow the same steps with the remaining awnings.
- Connect the frame to the leaf and check the movement of the interior door.
This completes the installation. More detailed steps for installing mortise hinges on a door can be seen in the video:
Hidden hinges are more difficult to install, but we will describe the sequence of actions in case you decide to install hinges on the door yourself. The sequence of actions differs little from the installation of simple mortise hinges.
You just need to have milling machine to make the groove to the desired depth. The peculiarity of hidden hinges lies in the difference between the composite strips. The canvas mounted part is larger than the post mounted part of the box. Therefore, do not mix up the elements.
- Mark according to the sizing information provided above. Place the router where the hinge will be installed and make a recess.
- Check the depth of the groove by inserting a hinge element into it. Trim off any excess with a chisel. The bar must be completely recessed into the canvas.
- Perform the same manipulations on the door frame.
- Secure the elements with the screws included in the kit.
If all work is done correctly, the door will open and close smoothly. Watch a video about installing a secret hinge with your own hands:
Additional Information
Installation of awnings for interior doors can be carried out at different times:
- when purchasing a new door;/li>
- when replacing worn-out canopies on old canvas.
There are several ways to approach installation:
- if the door is new, then it is easier to install the hinges at the stage of assembling the door frame and together with the leaf;
- you can attach hinges after installing the door frame without a leaf. This is more difficult to do and requires skill;
- If you are simply replacing old awnings, then you don’t have to choose. Dismantling and installation must be carried out with an assistant in order to correctly adjust the level of the elements. In the best possible way will buy hinges similar to the old ones and install according to the old dimensions.
In any case, installing hinges on an interior door with your own hands will be justified by cost savings and new experience in repairs. Watch a video about installing hinges with your own hands in the story about installing interior doors.
Loops are one of the essential elements accessories swing doors. It is from their quality and correct installation depends on the normal functioning of the doors. Poor quality hinges or poor installation can lead to problems such as squeaking, poor closing, spontaneous opening, and even deformation of the canvas. The installation of hinges on an interior door itself is not a complicated process, but it is painstaking. The slightest mistake can lead to problems during its operation.
By purchasing a finished product, you no longer need to worry about installing and inserting hinges. They were hung in advance. But if you purchase a disassembled structure, you will still have to embed them. Knowing the sequence and rules for carrying out this work, you can avoid many mistakes.
Types of loops and selection rules
The most popular in our country are card loops. They consist of a pair of plates (cards) in which holes are made for subsequent screwing into the canvas using self-tapping screws.
Steel hinges
The sizes of hinges can be quite different, which allows you to choose the appropriate size and quality for each individual door. This choice depends on the size of the canvas and the material from which it is made. There are four or five holes on cards that are issued.
If we talk about the metal from which the hinges are made, they can be divided into three types:
- Steel. They are purchased by those who care about quality and reliability. They will not wear off, which means they will last a very long time;
- Brass. These are the most popular and widely used hinges. This is explained quite simply - brass is easy to process, polish or coat with chrome;
- Brass plated. For their manufacture, all kinds of alloys are used, and the top is coated with brass or other compounds that are similar to it (chrome, bronze or gold).
Other factors also influence the choice of particular loops. It largely depends on them how long the selected fittings can last.
One of the most important factors- this is weight. Most often, a couple of hinges are enough, but if the door is massive or heavy, their number must be increased to three.
It is worth taking care of the presence of bearings. Products that are equipped with high-quality bearings will not creak even under intense load and long-term use.
It is also important to remember that the insertion of hinges with left-hand and right-hand openings is slightly different. This also needs to be taken into account both when choosing this fittings and directly during the installation process itself.

Installing a door on hinges
What tools are needed?
It goes without saying that this process cannot be carried out without necessary tools and components. Minimum set, which will be useful, is quite small:
- Loops.
- Chisel.
- Hammer.
- Screwdriver.
- Screws.
- Pencil.
- Level.
- Wedges.
Marking and seating
Knowing how to install interior door hinges in every detail, you can avoid many mistakes that beginners often make. The space at the top and bottom of the door should be 20 or 25 cm. It is at this distance that the hinges need to be inserted. Moreover, it should be the same at the top and bottom. If an indentation is made from below, then you will have to make it from above.
The surface is carefully inspected for the presence of chips and knots in the place where installation is intended. A screw screwed into a defective area can cause a lot of problems: it won’t fit smoothly or even split the frame. In this case, the loop will not be fastened properly. It would be much easier and better to move the attachment point a few centimeters.

Installing hinges
The installation of hinges on the interior begins. The loop is applied and outlined with a pencil in the place where they will be located. Don't rush to grab your tools. It is better to double-check whether the markings are made correctly.
The shape of the loops itself is unclear from a geometric point of view, so it is by tracing the contour that you can achieve the most accurate and tight fit of the loop to the canvas.
To avoid confusion with loops, it is advisable to mark each of them with a marker. Mark the top and bottom. In many ways, this will help complete this important process in the best possible way.
A chisel is applied to the drawn outline and, using a hammer, is tapped along the entire perimeter. This is done for the purpose of later cutting out space for the card. Cuts are made in several places along the entire length and tapped using a chisel. Thanks to this, it will no longer slide, and all subsequent actions can be carried out quite simply. You need to make indentations on the side.
In no case should the recess be greater than the thickness of the loop itself. If this rule is not followed, the door will begin to deform and break.
The loop should not fit neatly into the created recess. It is worth leaving a protrusion of one millimeter. This will allow further adjustments to be made at subsequent stages.
The same manipulations are carried out with the second landing site. Finally, all that remains is to attach the hinges and secure them with self-tapping screws. To do this, first make markings using an awl. We move it a little to the side and screw it on. The offset will allow the card to fit as accurately and tightly as possible. At this stage the door is already finished. All that remains is to cut the hinges into the box itself.

Screwing hinges to the slope
Markings on the box
There should not be any particular difficulties during marking. Yes, this is a little more complicated than what was done before, but the instructions below will help you cope with this problem.
The door is carefully installed in the frame itself and fixed in the place where it is supposed to be closed using wedges. The presence of a lock already embedded in the door will make the job easier. If it is closed, the door can be adjusted without much effort.
It is especially worth noting the need for clearances. It should be about three millimeters. If you do not take this into account and make them smaller, then problems will arise with opening and closing. If you make them big, it will simply look ugly.
Wedges are placed below, and the door is leveled to the line. It is important to remember that the door must be adjusted not only horizontally, but also vertically. If you make a mistake during horizontal adjustment, the door may close quite hard and be slightly skewed. And if the adjustment is poor in the vertical position, the door may open on its own.
When all the corners are aligned, you can start marking. In places where the hinges meet the box, you need to make notes yourself. It is impossible to completely draw the outline in this position, so it is recommended to unscrew the hinges already screwed into the door, attach them to the frame and simply trace their outline. Only after this can they be screwed back on.
The recesses on the box are cut out in the same way as was already done on the canvas itself. Don't forget how important depth is. It must exactly match the size of the card. When this process is completed, the wedges are again placed at the bottom of the door. Everything is fastened in place using self-tapping screws.
Another one important detail. To prevent cracks from appearing on the canvas while screwing in the screws, you must first make holes using a thin drill.
This is how easy it is to do this work yourself. We check the implementation and are sincerely happy with the result. Personally installed door cannot but please the eye and warm the soul!
Lazy loops
There is a simpler, more straightforward way to install hinges. The so-called butterfly loops have long been invented. They are resorted to in the absence of the necessary skills or materials. They do not need to be cut in, which means that even a completely inexperienced, novice master can install them.
Such loops work on the principle of one side of the loop entering the other. That is why they do not need such painstaking work as insertion, if this technology seemed so complicated.
The hinges are easily screwed in, and the gap remains minimal. These loops are ideal for quick installation. They look pretty good, and installation takes minimal time and effort.
Hidden hinges
Among the most recent developments, one can note this type of hinges, such as hidden ones. Among them technical characteristics note excellent resistance to all kinds of mechanical actions, aesthetics and quality. They allow you to hide this type of fittings from prying eyes. Due to this, they are beginning to be widely used in.
In addition to all the above characteristics, it is also worth noting the ability to open the door by as much as 180 degrees, instead of the usual 90.
A little about adjustment
For normal operation of the door, adjustments are undoubtedly needed. A properly adjusted door will serve faithfully for many years. Many owners do not consider this point important, although in vain. A properly adjusted door will not creak, it will be easy to maintain it in excellent condition over a long period of time without the need for constant adjustment, which also sometimes needs to be done during operation. The door can “sit” or warp over time, no matter how well it was installed.
In addition to adjustment installed fittings, the quality of the canvas is also important. From how much quality product The extent to which the manufacturer took care of its creation largely determines further work. Some of the manipulations associated with adjustment are carried out in the factory. Defects in the fabric that are not visible at the time of purchase can significantly affect subsequent installation and the durability of the finished product.