This is not just a paper respirator, this is a flight of imagination from the author Alexander Stepanchikov, who created a 3D model of a post-apocalyptic character, using Scorpion from Mortal Kombat as a prototype. The result was a kind of radioactive scorpion. Well then a kind person Necrosster I took it and created a 3D model based on this image. The result was a designer respirator. Unwrapped it sarutobi obito .
The paper respirator model is incredibly simple - only two pages in pepakura, but, nevertheless, it looks great. The dimensions are standardized and it is quite easy to assemble. I think it might help an excellent replacement Noob Saibot mask.

We are glad to present you the second version of the respirator, which I edited (modified) Vladislav Verkhoturov. This respirator layout also takes up two pages in pepakura, the dimensions are the same as the original. It's quite easy to assemble.

Respirator-progenitor edited by Necrosster"a caused a great resonance among the masses, and therefore we are pleased to present a couple more developments on this topic, for which, by the way, we must thank comrade Vladislav Verkhoturov.
The third design of the respirator has some similarities with previous models, but there are significant design changes. It takes up two pages in pepakura and looks very interesting.

Make a respirator with your own hands -
The fourth design of a paper respirator already has an independent, radically new design. It looks modern and technological (so to speak). Occupies the same 2 pages. There are jewelry moments.
Greetings!
I decided to make a steampunk costume for an event. I didn’t have time, however, but it’s not scary. But now there is time to make it even better.
The first part of the costume I decided to make was this respirator, the process of creating which I will now tell you about. And I apologize in advance for the quality of some of the photos - during work it was not possible to check each one, this would have greatly delayed the process.
Tools and materials I used:
- paper
- cardboard
- pencil
- eraser
- pen for marking leather (you can use a regular pen or felt-tip pen)
- compass
- scissors
- brass (sheet and tube)
- metal grid
- glass bottles
- threads
- beeswax
- holniten
- buckles
- blunt needles
- leather punch
- model knife
- punch (holniten installer)
- jigsaw
- file
- needle files
- sandpaper
- burner
- drill (a drill or drill press will do)
- hammer
- drill
- pliers
- combined flanges (these are like pliers, only they have one part straight and the other rounded; round nose pliers are suitable as an alternative)
- scriber
- ruler
- glue gun
Process
I started work by making a life-size model. On a piece of paper I drew a square base, from which I then started. Next, I noted where the respirator filter would be located. At first I wanted to make it round, but then I settled on the shape of a Reuleaux triangle. cut out inner part, leaving a reserve for the valves, onto which I then glued the side (also with valves).


I cut out the top of the filter.

I glued it to the side.


I cut off the extra top corners. I glued it in the place where the wedges were. Finally, the shape of the future mask began to emerge.

I applied it to my face again. I actually did this after almost every action, I was tired of running to the mirror, but at least there was some kind of movement, and not just sitting on my butt :)
After this fitting, I realized that I needed to cut wedges at the bottom so that the mask would bend under the chin. Made them level bottom corners filter.

I glued extra pieces of paper to the sides because I wanted the mask to go almost to my ears.

I cut off the excess along the bottom. It turned out to be a cute pig, it was even a pity to do anything further.

I cut off the excess from the top.

Since the bottom of the mask barely covered the chin, I glued another piece of paper there.

I cut out the excess with an arc so that it would not rest on the neck. And I added a little more paper on the sides.

At this point, the production of the model was completed. I cut it into a pattern that I was going to use to cut out the leather.

But it turned out to be somewhat crooked, so I drew it on paper, which I had previously glued to a piece of cardboard.

Now I cut out an even pattern.

I placed it on a piece of leather and traced it with a pen to mark the leather. The advantage of such a pen is that it can be erased with a special eraser. But you can also use a regular pen or felt-tip pen. And sometimes I mark on the front side of the skin with a simple pencil.

I cut the leather according to the markings.

Now let's switch a little from leather to metal. Here I forgot to take photographs of several stages, but everything is clear without them.
I started making a filter in the workshop. I took rolled brass, thickness, if my memory serves me, 1 mm. I drew the top part of the filter and marked the strips on it that would need to be cut out. I drilled holes into which I will then insert a jigsaw file. I sawed out the top part and prepared a strip of brass to make a side.

I bent the side and soldered it at the joint. Soldered with silver solder, flux - borax + boric in a ratio of 2:1. I heated the entire part with a torch and applied solder with a titanium stick to the soldering site.

Soldered the top plate.

Here is another missed step. I made the bottom part, which I will then sew on. From the outside it protrudes approximately 7mm. Soldered it to the side. Whitened a little citric acid.

I began to cut out breathing holes in the upper part of the filter.
Sanded it a little with sandpaper. I did not polish it because I wanted the respirator to look somewhat worn.

I tried the filter on my skin, everything fit fine.

He began to sew the skin end to end. I sewed with waxed threads.


I riveted two pairs of straps onto the holnitens. The top one should go above the ears and along the back of the head, and the bottom one should go under the ears. Then I rivet buckles onto the straps on one side.

I made a pattern for bottle holders out of cardboard.

I applied it to the skin and outlined it.

I cut it out and made holes with an awl in the holder and in the mask (I chose the place on the mask almost by eye). I inserted a hemp rope to tie around the neck of the bottle.

I sewed the side parts of the holder end to end and tried on the bottle. Then I sewed on the rest of the holders, there were two of them on each side. Unfortunately, I forgot to take a photo.

I returned to making the filter.
I took a brass tube with a diameter of 5 mm and cut four blanks from it. I took the length with a reserve. These will be the tubes that go from the filter to the bottles.

I drilled two holes in the side of the filter on the left and right, widened it to required diameter needle files. I also drilled holes along the bottom, through which I will sew it to the skin.

I soldered the tubes and bleached them in citric acid. Then I sanded it down a little more. True, after I took this photo.

I sewed in a filter.

This is what it looks like on the face. Once again I apologize for the not very good photos.


I realized that it didn’t fit very well, so I cut out a strip of brass that would give the shape to the bridge of my nose.

I sewed this strip and bent it to the shape of the nose. Bent it and sawed it to fit the tube.
I ran into one problem - I placed the top strap poorly, it slips off and the mask doesn’t fit well on my face. Therefore, I moved it a few centimeters closer to the bridge of my nose. I will then cut off the excess skin to remove the holes from the previous strap attachment.

I made holes in the bottle caps, inserted tubes into them and fixed them with hot glue. I used it to fill the holes in the tubes.

Finally, I cut off the excess skin from the back of the mask (the one where the strap was poorly installed). And the final step was gluing the metal mesh into the filter.
That seems to be all. View finished work in the photo below.

Our life seems safe only at first glance. If a terrorist attack or man-made disaster occurs, there will be a need to protect yourself. Including the respiratory organs. Therefore, there is no need to relax. Is it possible to make a gas mask at home? Can. And we will teach you how.
Homemade gas mask from a plastic bottle
In order to make a gas mask with your own hands at home, we will need:
- Two-liter plastic bottle
- Stationery knife
- Glue and tape
- Cotton wool and gauze
- Piece of cloth
- Activated carbon
- Two trimming PVC pipes 150 mm long and 25-30 mm in diameter.
- Linen elastic
Using a utility knife, cut off a third of the bottle at the place where its conical part becomes cylindrical. It turns out to be a funnel with a neck. This will be the basis of the gas mask. We cut out part of the funnel under the nose and try it on. If the mask fits tightly, we treat the cut edge with tape or tape so that it does not get scratched.
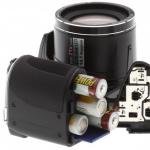
We drill holes in the cork. From the end, around the circumference, glue a piece of fabric, trim off the excess. This will be the breathing valve. Lubricate the thread with glue and screw on the plug. It should sit tightly. On the sides of the funnel, near the corners of the lips, we cut out 2 holes for PVC pipes, from which we will make filters.
We fold the bandage in several layers and glue it to the end of the tube. Place two crushed activated carbon tablets into the tube. We take the cotton wool and fluff it, pulling it apart. Place the pieces in a tube. No need to tamp. When there is 5 mm left to the top of the tube, we fall asleep again Activated carbon. We seal the end with a plug made of several layers of bandage. We cut off the excess around the circumference. By analogy with the first filter, we make the second one. We fix the filters with tape in the holes of the mask, where the PVC pipes should fit only a few millimeters. Otherwise they will get in your face.
All that remains is to cut 2 small holes in the mask for the elastic band, cut it to the size of your head and tie it on. You can make a gas mask not only for yourself, but also for your family.
Simpler options for a home gas mask
The technology described above requires a certain amount of time and some materials. What if an alarming message has already sounded on the radio or television, and at home you have nothing in your first aid kit except plastic bottles of lemonade and activated carbon tablets? A way out can also be found in this case by making a home gas mask.
We make many small holes in the bottom of the bottle with a drill or awl. We push a round piece of bandage or fabric into the neck hole along the diameter of the bottom. Using a knitting needle or wire, straighten it at the bottom. Pour in crushed activated carbon. If you don’t have it, regular charcoal for kebabs and barbecues will do. You just need to blow off any dust before putting it in the bottle. The primitive gas mask is ready. You need to breathe through your mouth through the neck and exhale through your nose. It’s not very convenient, but what can’t you do to keep your life safe?
Instead of a bottle, you can use a tall tea or coffee tin. Then you will have to make a hole in the top cover for the hose, which is secured with tape. You will breathe through the hose, exhale through your nose. Well, what if there is no time left to make a gas mask with your own hands at home? Then the simplest option will help out. Wet under the stream cold water any fabric: handkerchief, towel, scarf, wring it out and breathe through the fabric, pressing it tightly to your mouth.
Factory gas mask is the best solution
All home-made respiratory protection devices will only partially protect you. Therefore, it is better to have a traditional civilian one in your arsenal. It is inexpensive, does not take up much space, but will help out at any moment. It’s up to you to decide which gas mask to buy: filtering or insulating. The first one protects against harmful substances, the second - from lack of oxygen. In case of fire, an insulating gas mask will come in handy. You may want to have both models, which is welcome. The most popular model of civilian gas mask is . Remember your safety and ensure it in advance. Take care of your loved ones too.
It's over. The fires are almost over, those who were poisoned by smoke have almost recovered, carbon monoxide and lack of faith in justice. There has come a sobering up and understanding that most of all we need ourselves. Or rather, only for myself. And if so, then let's take care of ourselves. Further - simple solutions, accessible to everyone, which will make it easier to survive the next fire disaster.
A very active and inquisitive visitor to the site, fifth-grader Ivan, scanned and sent me pages of the book “Encyclopedia of Young Marmots.” I’ll tell you, it’s a very interesting book, but today we only have one page. Take a look for yourself and everything will become clear:

This mask is for those who work in a noisy and dusty place, but if you exclude the headphones, you will be left with a good respirator, like those worn by workers in dusty and gas-filled areas. It's very easy to make, take a look:

All this is sure to be found in any home. An ordinary plastic bottle, gauze and scissors. The gauze should be folded in several layers, and another filter layer can be placed in the empty space between the face and the gauze. The best option- this is a carbon filter, then we can talk about filtering gases, but a simple piece of foam rubber moistened with water will also do the job. And don’t forget to place a soft rubber or plastic tube around the edge of the mask so that the edges of the bottle don’t cut your face. In the first picture it is designated by the word "cambric".
Roughly the same mask was used by medieval doctors during plague epidemics:

Scented herbs were stuffed into the long “beak” to overcome the heavy odors of decomposition.
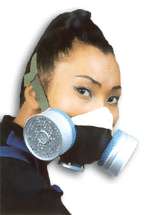
In fact, simple masks do not protect at all from carbon monoxide, which occurs during combustion. This requires special carbon filters, widely used in industry. For example, the RPG-67 gas protective respirator, which uses special replaceable absorbent cartridges:

or a filtering gas-dust protective respirator RU-60M, which is designed for individual protection of the human respiratory system from harmful gaseous and vaporous substances when their concentration in the air is up to 15 MPC and the volumetric oxygen content is not less than 18%:
All these devices are easy to find on the construction market. At the beginning of the year they cost less than 300 rubles. Of course, not everyone will dare to walk down a city street with such a device on their face; most prefer to show off in almost useless Chinese gauze masks. It's up to you to decide: beauty or health.
In conclusion, I propose to evaluate the magnificent idea of one Japanese inventor-designer. This thing won't take up much space even in a lady's handbag. When folded, it looks more like a thin notebook. But in combat mode it turns into a real respirator with a carbon filter:

It is quite enough to easily pass through a smoke or fire zone without endangering your lungs. And here's how it goes:

This miracle of engineering is called “Firescuba” and it is intended precisely for such critical situations when you need to save your life without delay. It is no secret that in a fire, most people die from smoke and carbon monoxide poisoning. This mask will allow you to slowly retreat to a safe place. You will be confident in yourself and will not succumb to panic, which means your life will be out of danger.
There is one fly in the ointment: the mask is not sold in our country. Engineers, inventors! Let's think together about how to make a filter pad for this mask. It is indicated in the figure by the word "Part1". Pay attention to the inscription in small letters "carbon filter". It’s not difficult to make a pattern, but placing on the website a diagram of how to make this essential means of self-defense is a piece of cake. Everyone can carry a piece of cardboard in their bag, briefcase or back pants pocket. Who knows what next summer will be like.