Many residents apartment buildings are faced with the problem of a shortage of square meters. Great solution this issue may become self-insulation loggias. This is a painstaking task that requires the performer to have certain construction skills and time. However, the finished result is worth it. A warm balcony expands the possibilities of using space, “ennobles” the living space and can become a source of pride for a home craftsman.
The need to insulate the loggia
Each apartment owner independently decides for himself how to use the additional square meters of the loggia. Some set up a storage room or workshop on the balcony, others use the premises more rationally - create “ winter Garden"or a separate room. The insulated loggia can be converted into cozy place for relaxation, work, a compact gym or an area for children's creativity.

In addition, an insulated balcony solves a number of problems:
- heat loss from the premises and heating costs for the apartment are reduced;
- reduces the risk of mold on the walls of the balcony.
You can perform external or internal insulation. Obvious advantages of the external method:
- the usable area is not “eaten up”;
- simplification interior decoration walls
Significant advantage internal insulation- the ability to complete the work yourself without hiring workers.
Selection of thermal insulation material
Various thermal insulation materials are used as insulation, ranging from traditional, inexpensive ones to modern high-tech ones. To insulate the loggia from the inside, it is better to use thin, lightweight materials. Thanks to their small width, you can save useful space.
Let's consider the characteristics of the main thermal insulation materials for insulating a loggia/balcony.
Foil polyethylene foam - a layer of foil is applied to one side of the polyethylene, which reflects infrared radiation and “throws” heat flows back. Insulation characteristics:
- roll width - 1 m, thickness - 2-5 cm;
- ease of installation - polyethylene foam can be easily cut with a knife;
- laying method - butt or overlap;
- thermal insulation efficiency almost doubles;
- the material is used to insulate ceilings and walls.
Insulating a loggia: step-by-step instructions. Use of penofol
Mineral wool has good thermal insulation qualities and an affordable price. However, experts do not recommend using this material to insulate a loggia for a number of reasons:
- poor moisture resistance - mineral wool absorbs liquid, so you will have to further strengthen the waterproofing;
- when using mineral wool, arrangement is required natural ventilation- a gap must be left above the insulation, which slightly “conceals” the area of the balcony;
- To cover the loggia, you will need to reinforce the wall and carry out additional measures.

Foam plastic is foamed plastic of varying densities. The bulk of the material is gas. Polystyrene foam has the following characteristics:
- slab size - 1*1 m;
- insulation thickness 2-10 cm;
- foam density - 15 or 25 kg/sq.cm;
- durability.
Extruded polystyrene foam (penoplex) is a modern heat insulator that resembles polystyrene foam, but has a more durable structure and functionality. Properties of expanded polystyrene:
- rectangular slabs 1200*600 mm;
- thickness - 2-10 cm;
- penoplex density - 35-45 kg/sq.cm;
- vapor tightness;
- frost resistance;
- the slabs are chamfered for tighter installation;
- light weight and ease of installation;
- flammability class - G-1;
- material is not used in open places where UV rays penetrate.
Insulating a loggia with your own hands: step-by-step instructions. Photo of penoplex installation

Methods for attaching insulation
The choice of insulation method primarily depends on the heat-insulating material used and further finishing of the walls.
Insulation under putty and plaster is suitable when using penoplex or polystyrene foam. Thermal insulation panels are glued to the base tile adhesive. The slabs are additionally fixed with dowel mushrooms. You can start plastering/puttying walls or ceilings the day after installing the insulation.
Laying of foil polyethylene foam occurs under the base of the frame. It does not matter how the profiles are attached - to the wall or using U-shaped fasteners. Penofol sheets are applied to the ceiling/wall of the loggia and fixed with slats. IN in this case An overlap connection is permissible, and the joining strip can be taped.

Insulation under the base of the frame is only possible when using thin insulation up to 20 mm thick. Pressing thicker thermal insulation will affect the rigidity of the slats and fastenings
If you plan to line the balcony with plasterboard or PVC panels, MDF, then it is advisable to lay the heat-insulating material in the cells of the frame. 15-density foam is used as insulation or mineral wool. The disadvantage of this technology is the increase in the thickness of the thermal insulation “pie”.
Options for arranging a “warm” floor
The technology for insulating the floor on a loggia is somewhat different from the thermal insulation of the canopy and ceiling. Excessive demands are placed on this element of the balcony.
There are several main options for arranging a “warm floor”:

Insulating a loggia with your own hands: step-by-step instructions
Below are step-by-step instructions for insulating a loggia with penoplex.
Tools and materials
To work you will need:
- foam boards;
- construction level, stationery knife, marker;
- PVC pipes for laying cables;
- container for mixing glue;
- construction mixer;
- trowel;
- polyurethane foam;
- mounting gun;
- grater for grinding thermal insulation sheets;
- plastic flat trowel for grouting the floor;
- metal grid;
- sand concrete M300 coarse-grained;
- polyurethane glue.
Insulating a loggia: step-by-step instructions. Photo - diagram of a thermal insulation “pie”.

Preparatory work
First of all, you need to install energy-saving plastic windows on the loggia. There is no point in saving on glazing - it is better to choose double-glazed windows and fittings from companies that have proven themselves well in the window market.
If the balcony is already installed quality windows, then you can move on to insulating the balcony.
Preparatory activities:

Ceiling insulation

Installation of heat insulator on walls and parapet

Insulating the loggia floor with penoplex: step-by-step instructions
Let's consider the stages of creating a “warm floor” using penoplex and cement-sand screed:

- If installation is required load-bearing frame It is better to use galvanized metal profiles. Unlike wood, it does not rot and is not heavy.
- Thermal insulation work should be carried out in dry weather. Many adhesive mixtures and primers have special features for use in conditions of high humidity.
- The cracks on the loggia are treated with foam that is resistant to low temperatures.
- The wood used must be dried and then treated with anti-fire and rotting agents.
Insulating a loggia with your own hands: step-by-step instructions. Video.
Most apartment owners use the balcony as a place to store rarely used items. If you want to get additional living space and turn it into a place to relax, a flower garden or an office, you can do this without involving specialists. We will describe in detail how to reliably insulate a balcony from the inside with your own hands.
Which thermal insulator is best to use?
Read also: How to insulate a private house with your own hands: roof, walls and foundation, description of thermal insulation materials offered on the market (Photo & Video) + Reviews

To decorate the balcony, you can use both roll and tile materials that provide reliable thermal insulation:
- Styrofoam: inexpensive tile material, which has fairly high thermal insulation properties, has two significant drawbacks; the first is the large thickness of the sheets; when using it, the already small area of the balcony will be significantly reduced; the second disadvantage is the high fire hazard; to ignite it, it is enough to accidentally throw it from top floor a lit cigarette; therefore, for balcony cladding, purchase G2 class material that does not support self-combustion
- penoplex(extruded polystyrene foam): the composition of this material is similar to polystyrene foam, but due to special way production at equal thermal insulation properties it has a smaller thickness, greater mechanical strength; however, the cost of penoplex is higher; since the material has a low water absorption coefficient, the balcony will need to be regularly ventilated to avoid condensation; We’ll tell you below how to insulate a balcony with penoplex from the inside.
- "Penofol": foamed polyethylene, protected on both sides with aluminum foil, which simultaneously serves as wind and moisture protection; a significant plus is the minimum thickness; for insulation, it is enough to use a material a few millimeters thick; “Izolon”, “Penolon”, “Teplofol”, “Energofol” have similar composition and properties; disadvantage - high price
- mineral wool(glass, slag or basalt wool): the undoubted advantage of all these materials is their high heat-insulating properties; some experts believe that the increased moisture permeability of the material in the case of insulating a balcony is only a plus - by absorbing excess moisture well, the material will protect the room from the accumulation of condensation on windows and walls; however, over time, mold can form in mineral wool, so it must be reliably protected from moisture penetration on both sides using hydro- and vapor barrier
It is undesirable to use thermal insulation materials that have a significant mass (for example, brick) for insulating balconies. After all, the load-bearing capacity of a balcony slab is limited. If there is excessive load, such a structure simply may not withstand the additional weight.
The use of expanded clay for floor screed is also not recommended. His significant drawback is the ability to absorb moisture. As a result, its mass increases significantly.
Required materials
Read also: Secrets of soundproofing walls in an apartment: we use modern materials and technologies (25+ Photos & Videos) + Reviews
Using penoplex
To finish the balcony you will need the following materials:
- gas silicate blocks 80-100 mm wide for the construction of a parapet
- glue cement-based for their installation
- slab or roll insulation
- wooden slats for the manufacture of lathing and installation of roll insulation; their thickness is selected so that it is equal to the width of the heat insulator
- self-tapping screws for installation of lathing with a diameter of 3.5-4.8 mm
- using sheet material(penoplex or foam plastic) as insulation, special glue for attaching them
- polyethylene film or membrane material to create hydro- and vapor barrier
- polyurethane foam, mastic (for example, “Germabutyl”, “Germaflex” on a rubber basis) or silicone sealant for sealing joints and cracks
Where to begin? Inspection and repair of balcony slabs
Read also: Self-leveling floor: device, recommendations and step-by-step instructions on how to do it yourself (50 Photos & Videos) + Reviews

The condition of balcony slabs is not always satisfactory - over time they may partially collapse. Therefore, before you start insulating the balcony, you should check how strong and reliable its base is.
Minor and medium repairs can be carried out independently. If significant cracks appear, or even more so, exposed reinforcement, the collapse of fragments of the slab, or its separation from the wall, you should call specialists.
Remember that major or emergency repairs should only be done by qualified installers from management company. At severe corrosion reinforcement may need to be reinforced with steel beams. In case of severe destruction balcony slab can be completely cut off.
To restore damaged areas of concrete:
- Everything unnecessary is removed from the balcony, and all debris, as well as the remains of loose concrete, are completely removed
- If the reinforcement is exposed, it is cleaned of rust. Lay on top reinforcement mesh. To prevent it from rusting over time, it must be completely buried in concrete. To do this, you need to leave a gap between it and the plate.
- Formwork is placed around the perimeter of the balcony slab
- After pouring the concrete mortar, the screed is ironed - sprinkled with dry cement, then rubbed into the undried mortar
- To protect against moisture from below, the balcony slab is primed and then plastered. Galvanized steel ebb is mounted on the sides
Read also: [Instructions] Do-it-yourself laminate on a wooden floor: a complete description of the process. Laying schemes, what materials should be used (Photo & Video) + Reviews
Pouring floor screed on the balcony
After reconstruction of the slab, it is advisable to waterproof it. For these purposes, roll materials or bitumen are used. To modern waterproofing materials Penetrating impregnation is classified as “Penotron” type. It is better to apply it in 2 layers.
The balcony railing may also require repairs. New design elements in the form profile pipes attached to anchors or by welding.
Choice of glazing methods
Read also: What to do if plastic windows in a house or apartment sweat? Causes of condensation. Ways to solve this problem (Photo & Video) + Reviews

If your balcony has conventional single-chamber double-glazed windows, they should be replaced. Otherwise, you will waste a significant part of the energy resources spent on heating the room. A warm balcony requires 2- or 3-chamber double-glazed windows. In the Far North they can have 5 chambers.
Glazing a balcony is more complicated than conventional installation of double-glazed windows. In this case, installation of additional components is required. Therefore, be sure to invite proven, highly qualified professionals.
It is not advisable to use wooden double-glazed windows for glazing. Due to the accumulated condensation, they will begin to rot over time. Plus, the weight of such structures saturated with water will be significant. If for some reason you decide to stop at wooden products, do not forget to regularly treat them with an antiseptic and paint them.
The use of latest technologies– glazing using I- or K-glass. The first option - I-glass with a multilayer coating, which includes a small percentage of silver - is capable of reflecting up to 90% of the outgoing heat. Since such surfaces can be easily scratched, they are installed with a coating inside the room.
Oxide of non-ferrous metals is applied to K-glass, due to which heat is reflected from the batteries into the room. This type of coating is less susceptible to damage. Although the prices for both glass options are the same, the degree of heat reflection in K-glass is less and is 30%.
Read also: Plastic windows in a wooden house: description of the main characteristics, how to install it yourself, photo and video instructions

A low-quality profile may turn yellow over time, That's why Special attention look for certificates of its quality. Choose profile systems from trusted manufacturers. If you want your double-glazed windows to last longer, don’t skimp on fittings either.
A more economical method of sealing windows is conventional polyurethane foam. But it will be better if all the cracks are sealed with a sealant that has water-repellent properties. There is no point in refusing to install flashings - they not only look decorative, but also protect the room from drafts.
You can order at balcony windows blinds or covering with a special opaque film. It will protect the premises from prying eyes.
Warming the balcony in stages
Read also: Foundation: description of the device, types, complete step-by-step instructions for making your own bookmarks (Photo & Video) + Reviews

It is necessary to cover not only the walls with thermal insulation, but also the floor and ceiling, otherwise the insulation will simply lose its meaning. After all reinforced concrete slabs in the cold season they freeze very much.
Preparatory work
Read also: Making and laying paving slabs with your own hands: step-by-step instructions for dry and wet mixture. Making a mold, vibrating table (Photo & Video) + Reviews

Before starting work, carefully inspect the balcony for cracks. If any are found, carefully fill them with sealant or polyurethane foam. Their excess must be cut off. After all, when installing the sheathing, they will interfere with its alignment.
To avoid having to wash dusty, dirty windows after completing the repair, attach plastic film to them. If you plan to lay communications (electrical wiring, sockets, air conditioning pipes) on the balcony, it is more convenient to do this in advance.
Read also: Blind area around the house: types, structure, schematic drawings, instructions on how to do it yourself correctly (30 Photos & Videos) + Reviews

Both foam and aerated concrete can reliably store heat, which is why they are often used to insulate balconies or loggias. However, since aerated concrete is capable of absorbing water, it is better to focus on foam blocks. Their air cells are completely closed from moisture penetration.
When using aerated concrete, additional finishing will be required to protect it from rain and snow.
- If there are significant elevation changes or potholes in the concrete slab it is leveled with cement mortar
- Work on laying foam blocks begins a week after the concrete has gained sufficient strength.
- If free space allows, metal fencing It's better not to delete it. Win 15-20 cm usable area it is possible if you strengthen the masonry with reinforcement with thick metal rods
- With the help of reinforcement, the parapet must also be additionally attached to the walls of the house. It is walled up between rows of foam blocks
- It is better to make masonry not in the usual way concrete mortar, but with a special glue designed for cellular blocks. It will help reduce the thickness of the seam to 3 mm, protect against loss of mortar and the appearance of cold bridges. Its cost is fully compensated by reducing the thickness of the seams
- To lay out the first row, the glue must be diluted a little thicker - so that the spatula installed in it does not fall on its side
- The place for masonry is marked so that the center of the bricks falls on the attachment points of the window frame, that is, the distance from it to the edge of the balcony slab is 5 cm
- To save space at the junction with the parapet, the blocks are filed
- The wall must be positioned strictly vertically. Therefore, the location of each row must be verified with a building level
When laying window frames For foam blocks, double-glazed windows must be additionally secured to the walls of the building using a channel. Otherwise, under strong wind loads, the double-glazed windows may fall down.
Insulation of walls and ceilings
Read also: [Instructions] How to make beautiful and unusual shelves on the wall with your own hands: for flowers, books, TV, for the kitchen or garage (100+ Photo Ideas & Video) + Reviews
How to properly insulate a regular or brick balcony?
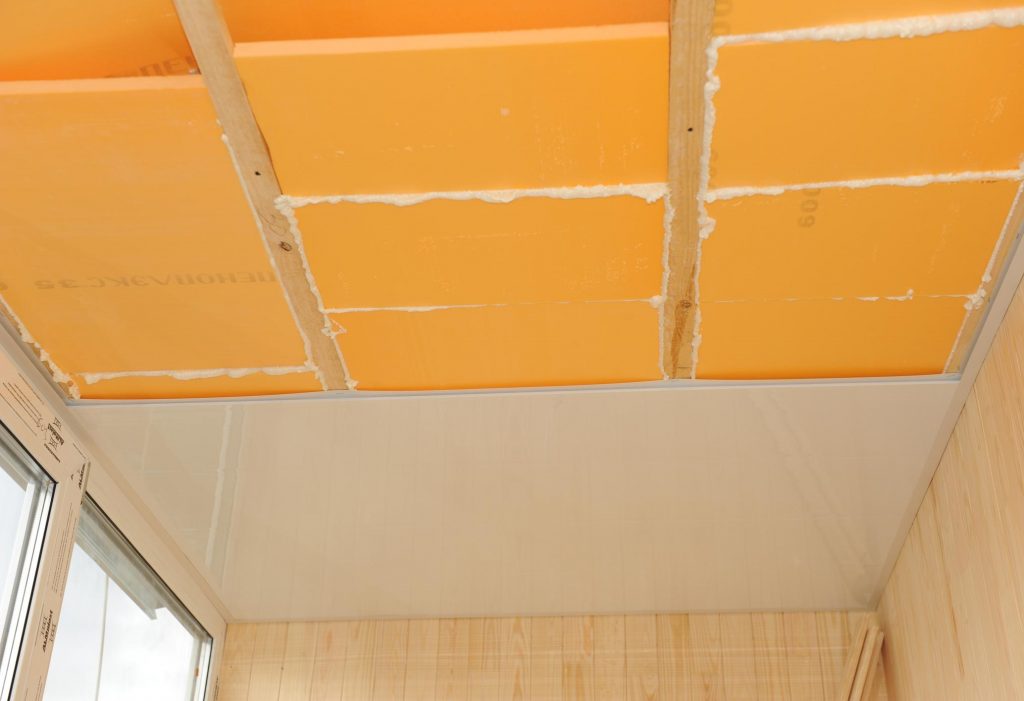
It is better to start installing insulation from the top, from the ceiling:
- The waterproofing film is laid first so that overlaps are formed. The strips must be fastened together with construction tape or a stapler. It is also necessary to make an overlap of 15 cm on the walls
- When laying roll insulation, preliminary installation of wooden sheathing will be required. Sheet insulation can be attached directly to the glue
- Since the main load will fall on the sheathing (it must withstand the weight of the insulation, as well as facing material), wooden blocks should be fixed to the ceiling with self-tapping screws of sufficient length
- To prevent the sheathing slats from deforming during temperature changes, leave a gap of 5-10 mm between them and the walls. It is mounted to the ceiling using self-tapping screws. To do this, holes are pre-prepared in it.
- Plates or roll material should fit tightly, without gaps. The sheathing pitch should be slightly larger (10 millimeters) than the size of the insulation sheets. Otherwise you will not be able to lay the material evenly
- A more reliable option is to combine penoplex with penofol with air gap 2 cm between them
- All gaps between the insulation boards are filled with foam
- The next layer is a vapor barrier made of polyethylene film or special membrane materials. There is no need to use it only if foil materials are used for insulation
- Next, a second layer of 10 mm sheathing is laid on which the finishing material. Such a gap will serve additional protection from condensation accumulation
- Even moisture-resistant drywall on a balcony can warp over time. Therefore, use gypsum boards for sheathing. Moreover, they cost no more than drywall. You can also sheathe the inside of the balcony with plywood or clapboard
- Installing insulation on walls is not much different from installing insulation on the ceiling
Floor insulation
Read also:

Since insulation under the screed significantly increases the weight of the structure, the most common method of floor insulation is insulation along joists.
So, detailed step-by-step instructions:
- After installing the waterproofing layer to concrete floor a wooden beam is attached (its cross-sectional size is 50x50 mm). The width of the bars is selected depending on the thickness of the insulation
- The wood is pre-treated with a primer with an antiseptic or coated with drying oil
- The logs are placed across the balcony so that a distance of 50-70 mm remains from the walls. Such a technological gap will not allow the bars to warp during temperature changes and changes in linear dimensions
- To ensure normal water drainage, the balcony slab is always made at a slight slope . Therefore, the logs must first be leveled. To do this, thin wooden blocks or pieces of plywood are placed under them. To obtain a strictly horizontal surface, the floors are leveled with a building level.
- Alignment concrete screed having a significant mass, in the case of a balcony it is highly not recommended . After all, this will require a significant amount of solution
- A layer of thermal insulation is placed tightly between the joists. When using foil materials, place them with the foil facing down.
- The next layer is vapor barrier. It is spread overlapping the walls
- When laying heated floors, a small layer of cement screed is poured over the film.
- If heated floors are not provided, a layer of chipboard is laid on the floor in a checkerboard pattern (with offset seams), and then the floor covering, for example, ceramic tile, laminate or linoleum. It is better not to lay plywood on the floor, as over time such a floor will begin to creak a lot

In conclusion of the article, I would like to give some important advice from professionals.
- Do not try to place radiators on the balcony central heating. This is strictly prohibited. If such a violation is discovered, you will be forced to dismantle them. For heating use only electrical devices: oil, infrared heaters or heated floors with electric heating
- It is not always worth listening to the advice of programs like “Repair School”. When combining a balcony with warm room disagreements may arise with regulatory organizations. If they think that in this way you have worsened the heating supply of your neighbors, you may be forced to restore the apartment to its previous form, as well as pay a substantial fine
- Legally demolition balcony door, a window block is considered a redevelopment and therefore requires special permission. But, since the interpretation of the law in this case is ambiguous, in some cases it is still possible to obtain such permission if high-quality insulation balcony
- Fashionable last years frameless glazing outwardly it looks very decorative, but for warm balconies, it is not suitable for loggias. Use double or triple glazed windows or tilt-and-slide windows equipped with thermal insulation for insulation.
- Before insulation, carefully seal the joints walls, ceiling, floor, as well as cracks with polyurethane foam or polyurethane sealant
- Any wooden elements be sure to treat the casings with antiseptics and materials that protect them from moisture
- Install insulation starting from the ceiling, then move on to insulating the walls and floors
- The ideal thermal insulation option is a two-layer cake with an air gap. Use thin materials for this (penoplex or penofol)
- Polyurethane foam quickly darkens when exposed to ultraviolet light, becoming unusable. Therefore, protect its outer layer with sealant, putty or paint
- Gypsum putty is afraid of moisture, so it is not used for sealing seams
- To protect the room from condensation, take care of reliable waterproofing. If it is absent, fungus and mold will certainly appear in the casing.
- To demolish a balcony door you will need a special permit
And at the end we invite you to watch a video about comprehensive insulation of a balcony
PHOTO GALLERY
8.3 Total Score
Insulating the balcony from the inside
It is very important for us Feedback with our readers. If you do not agree with these ratings, leave your rating in the comments with the reasoning for your choice. Thank you for your participation. Your opinion will be useful to other users.
Ease of implementation
Convenience
This might interest you:


Until recently, the balconies of city apartments served as a kind of storage room - people stored preserved food and various things there. What’s more, all sorts of unnecessary rubbish was taken out onto the balconies, which was a pity to throw away. However, today these premises are increasingly used as additional living space. And to implement such an idea, you need to take care of insulating the balcony.
If you insulate your balcony, you will not only be able to expand it relatively cheaply living space apartments, but also significantly reduce heat loss from housing. The fact is that it is through the balconies that most of the heat escapes. But in order for everything to be done efficiently, you need to know where to start. With a well-designed scheme, turn cold balcony albeit in a small, but almost complete room, it will be much easier.

So, first sketch out a rough work plan - it will include:

Important information! The balcony can be insulated both from the inside and outside. But since you will be doing the work on your own, that is, without the help of specialists, it is better to resort to internal insulation.
Stage No. 1. Choosing insulation
There are a lot of thermal insulation materials on the modern construction market, but for balconies the following are more suitable:

As for foam plastic and EPS, the laying of these materials is carried out using almost the same technology (the only exception is the form of adhesion - with EPS it is better due to the use of grooves).
It is better not to use mineral wool for a balcony - the installation procedure will be more labor-intensive, and the condensation that inevitably forms on the balcony is undesirable for this material. Expanded clay, for obvious reasons, can only be used for floor insulation (the insulation technology will be described in detail below).
And if we add to all of the above the fact that the balcony should in no case be overloaded, then it becomes obvious: the most suitable option- this is foam plastic 4-5 cm thick, which costs less than polystyrene foam or mineral wool.


Stage No. 2. We carry out glazing
If your balcony is already glazed, you can skip this step. The glazing procedure itself largely depends on the parapet installed on the balcony. If we are talking about iron sheathing, then you must build it up using foam blocks or ceramic brick. It is important that the resulting wall thickness exceeds 10 cm. And if you have a reinforced concrete parapet, you can immediately begin installing windows.

Today, many (especially fans of environmentally friendly building materials) prefer double-glazed windows with wooden frames. It is worth remembering that such structures need to be processed antiseptic and paint regularly. You can learn about installing double-glazed windows with wooden frames from the video below.
Video - How to install a wooden window with double glazing
However, the majority of consumers still buy PVC windows. When purchasing, choose a special one plastic profile, characterized by increased rigidity and strength properties. In addition, the profile must have good thermal insulation properties.

Still have plastic windows it should be:
- 5-chamber profile;
- 2-chamber (if you live in middle lane) or 3-chamber (if in conditions more harsh climate) double glazing;
- reinforced reinforcement.
After installing the PVC structure ordered according to the dimensions of the balcony (the work should be carried out by specialists), you can proceed directly to insulation.
Stage No. 3. We insulate the floor
Let's look at how to insulate a balcony from the inside with your own hands using polystyrene foam (although the technology described below is also suitable for polystyrene foam).
Table. Insulating the floor on the balcony
| Steps, no. | Short description | Illustration |
|---|---|---|
| Step #1 | First, prepare the working surfaces - seal with foam all the cracks found in the concrete, as well as at the joints between the slabs and the wall. |
|
| Step #2 | Mark the floor for the subsequent construction of the sheathing. In this case, it is important that the pitch of the sheathing exceeds the width of the insulation sheets by approximately 10 mm. |
|
| Step #3 | Lay the slats according to the previously made markings (the approximate size of the bars is 4x4 cm, but their width must correspond to the thickness of the insulating material). The first and last slats should be 50-100 mm away from the walls. Connect the slats using self-tapping screws. |
|
| Step #4 | Place sheets of foam plastic between the lathing slats, gluing them to the floor liquid nails or special glue. Blow out any resulting voids with polyurethane foam. |
|
| Step #5 | Lay a vapor barrier layer on top of the insulation. Lay a vapor barrier layer on top of the insulation (necessary to increase thermal insulation and prevent the formation of condensation). If you use regular PET film, then under no circumstances place it on the “cold” side of the insulator. If you are laying foil insulation, then do it with foil to the foam. |
|
| Step #6 | Fix sheets of plywood or chipboard on top, and the thickness of the floor covering should be at least 20 mm. Attach the sheets to the slats using self-tapping screws. |
|
| Step #7 | All that remains is to lay the finishing coating, which can be carpet or linoleum. |
|


Important information! There is another way to insulate the floor on a balcony with polystyrene foam: sheets of foam plastic are attached to a leveled and cleaned surface, and a thin screed from a previously prepared dry mixture solution is poured on top. Ceramic tiles can be used as a finishing coating here.
Alternative option. We use expanded clay
As noted earlier, the floor on the balcony can also be insulated using expanded clay. This material is also inexpensive, and its installation is not difficult. Let's get acquainted with the algorithm of actions.
Step #1. Lay it on the floor first waterproofing film with an exit to the walls of 10 cm.

Step #2. Place the beacons around the perimeter in increments of approximately 25 cm, being careful not to lean them too far against the walls.
Step #3. Cover the floor with a 15 cm thick layer of expanded clay and distribute the material evenly over the surface.


Step #4. Moisten the expanded clay with cement laitance (this is an aqueous solution of cement).


Step #5. Fill the expanded clay with a layer of concrete or self-leveling mixture. This must be done carefully so as not to damage the structure of the insulator.

Step #6. Wait for the screed to dry completely. After this, you can begin laying the topcoat.

Stage No. 4. We insulate the walls
The technology here is almost the same as for floor insulation. Follow these steps:
Step #1. Mark the future location of the slats on the walls (as well as for the floor).
Step #2. Attach the slats in accordance with these markings.

Step #3. Apply polyurethane foam to the surface using wave-like movements. At the same stage, you should drill holes for the dowels.
Step #4. Attach the foam sheets using plastic mushroom dowels.

Step #5. Blow out all the resulting cracks with foam, then seal with mounting tape.
Step #6. Lay a waterproofing layer on top - for example, penofol, which will also serve as thermal insulation.


Step #7. Seal the seams at the joints with foil tape.
Step #8. Mount the counter-lattice on top of the foam foam and install the finishing material.

Stage No. 5. We insulate the ceiling
This procedure is also performed using a similar technology, but some differences still occur.
- First, make a marking along which the hangers for attaching the guides will be installed.
- Install the hangers themselves necessary to fix the guides (for the latter, use a galvanized profile or timber).


- In appropriate places, cut small holes in the insulator (foam or EPS) for hangers.


- Next, secure the insulation boards using the same mounting foam.

If the insulation weighs too much, you can use dowels for fastening. Blow out the cracks with foam. Otherwise there are no significant differences.

Finishing features
In most cases, balconies are lined from the inside with clapboard or profile, but plasterboard is also used, followed by wallpapering. PVC panels are also used for cladding. Concerning exterior finishing, then it is better to entrust it to professionals, especially if your apartment is located higher than on the ground floor.


Important information! It is prohibited to install central heating there, so if additional heating is required, you can lay a film “warm floor” under the linoleum.
You can also install an outlet on the balcony to which an electric heater will be connected. The described room is small, so heating will take a minimum of time. We also note that the double-glazed window weighs quite a lot, so the remaining materials (including the insulator itself) must be of minimal weight. By the way, this is another reason why it is better to give preference to EPS or foam boards.

Video - Instructions for insulating a balcony
Now you know about the strong and weaknesses materials suitable for insulating a balcony, as well as technologies for laying polystyrene foam and expanded clay. Therefore, it's time to get to work! Moreover, there is nothing complicated here if you are armed step by step instructions and everyone necessary materials. If you do everything correctly, you will turn the balcony into a full-fledged living room with all the ensuing benefits.
How does a balcony differ from a loggia?
First of all, let's clearly separate these concepts. Both are glazed, so most people call the resulting space a balcony, although this is incorrect. And some people mistakenly believe that if you install windows on the balcony, it automatically turns into a loggia.
The key difference between the two designs is that the balcony has no walls and protrudes beyond the facade, while the loggia has side walls and, on the contrary, is recessed deep into the building. In other words, the outside air impacts the balcony with three sides, and to the loggia - from only one or two, if the apartment is corner.
What result should you expect?
You can insulate both, but the final effect will vary greatly. A well-insulated loggia is no different from a room. If there is a heat source, it becomes a full-fledged living space for year-round use.
Due to the absence of solid walls, the thermal resistance of an insulated balcony is much worse - it is comfortable to stay there until late autumn at most. A sufficient level could be achieved with an additional layer of thermal insulation, but this is irrational due to the small area of the room. After insulation there will be almost no free space left.
What about glazing?
Since 25% of heat loss occurs due to heat loss, it makes sense to insulate a loggia or balcony only if you have energy-saving windows. If installed wooden frames with one glass, you will first have to replace them with modern ones.
Double-chamber double-glazed windows with higher thermal resistance weigh a lot, and they can only be installed on loggias. Balcony ceilings have weak bearing capacity, and it most likely won’t be possible to install such windows there.
2. Think about the design
Before starting work, you need to decide on the type of insulation, choose the option for wall finishing and finishing flooring, and also decide how the room will be heated. All this will determine the design and the algorithm for its installation.
Since the insulation of a balcony or loggia is carried out from the inside, it is important to use a vapor-proof material to avoid the formation of condensation and the appearance.
 instrumentgid.ru
 Extruded polystyrene foam (EPS) is best suited for this. When installed with sealing of joints, it allows you to turn the room into something like a thermos, which will retain heat well by cutting off the outside cold. At the same time, with EPS you can achieve sufficient thermal insulation, taking away a minimum of precious space from the room.
Some people consider polystyrene foam to be toxic. This is not entirely true. The material is truly flammable and emits when heated above 60 °C. harmful substances, but this does not make it dangerous, since EPS is always covered with finishing.
Wall decoration
After good insulation Any type of finish can be applied to a loggia or balcony. Depending on the chosen coating, the technology for thermal insulation works is slightly different.
- Wooden lining, PVC or MDF panels - to attach to the wall you will need to first make a sheathing.
- Decorative plaster or putty followed by painting - this type of finish can be applied directly to the insulation.
- - the easiest way to glue it is on drywall secured to a wooden sheathing.
Flooring
The floor of an insulated loggia is no different from the floor of a room, so all existing finishing coatings can be used there. However, for each type you will need one or another version of the subfloor.
- Laminate, linoleum, carpet are laid on sheets of plywood, chipboard (chipboard), CSP (cement particle board) or OSB (oriented strand board) fixed over wooden joists.
- and porcelain tiles are laid on a concrete screed.
Balcony floor slabs have low load-bearing capacity, so it is only allowed to install floors on them wooden joists. For more solid foundations loggias, in addition to this, you can also pour a screed under the laying of the tiles.
In both cases, if desired, you can equip an electric floor heating system. The only difference is that for the construction on the joists a film infrared floor is used, and for the screeds a heating cable or heating mats are used.
Heating
It is important to understand that insulating a balcony or loggia will only prevent the walls from freezing and slightly increase the temperature compared to the street temperature. To maintain a comfortable microclimate in winter, you cannot do without a heating source.
There are three main ways to heat a room:
- Electric is the most expensive and difficult to install option, but at the same time the most effective and convenient.
- Convector - installed at outer wall The heater can only be turned on on the coldest days or only when there are people in the room.
- Central heating radiator - by law it is prohibited to move the device to a loggia or balcony, but if the partition is removed or the door is constantly open, the battery will cope with heating even from the room.
Take things out, remove shelves, hangers and other items. Clear the walls of old paint and plaster. If there are areas of fungus, remove it and thoroughly treat the areas with a special antiseptic, and then dry all surfaces thoroughly.

To prevent blowing, seal all cracks around the perimeter of the fence slab, as well as in areas adjacent to the side walls, floor and ceiling. Remove old plaster from the joints and fill them with foam.
The point is to cut off any flows of cold air from the street and make the room as airtight as possible.
If you plan to use the insulated space as a work office or recreation area, you must install the electrical wiring in advance. To do this, install lighting and switches in the right places.
 YouTube channel “We build for ourselves”
 It is better to route cables adjacent to the room. interior wall. It is not insulated, so all the wiring will be easy to hide inside the frame or layer of plaster. Sockets and can be connected from the nearest outlet in the room. But to power the heated floor, it is advisable to run a separate cable from the distribution panel.
Expanded polystyrene is sold in the form of slabs measuring 60 × 120 cm and thicknesses from 20 to 150 mm. The sheets have an L‑shaped lock along the contour, which simplifies installation and prevents blowing through the joints.

You can attach EPS to walls different ways. The most common is foam adhesive in cans, which is applied around the perimeter of the sheet and in the middle. Another option is to fix it in the corners and in the center with umbrella dowels with a plastic or metal core. Also, polystyrene foam is attached over the entire sheet area using adhesive mixtures for insulation.
To form a single thermal insulation contour, all junctions must be sealed. It is important to leave 10-15 mm gaps at the walls in the corners, under the ceiling and at the floor, so that you can fill them with polyurethane foam later. It is recommended to coat the joints in the locks between the plates with foam glue or seal them with foil.
 YouTube channel DendenTV
 The required thickness of insulation can be achieved either with one sheet or with a combination of two. In this case, the second option is even preferable, since the fragments of polystyrene foam are tightly adjacent to each other and form a single layer, and by shifting the joints between the plates, maximum protection against blowing can be achieved.
After completion of the work, you should end up with an inextricable structure, where each EPS sheet fits tightly to the adjacent one, and all joints between them in the corners, under the ceiling and near the floor are sealed with polyurethane foam.
The fence slab borders the street and is exposed to cold air the most, so the thermal insulation thickness here is maximum - 80 mm. It is better to use not one 80 mm sheet, but a “pie” of slabs: 50 + 30 mm.
 YouTube channel “We build for ourselves”
 If dimensions allow, the wooden sheathing is mounted on top of the second layer of EPS, securing the bars with anchors or dowels directly through the insulation. When the width of the window sill is limited, the sheathing is attached to 50 mm polystyrene foam, and the second layer of insulation is laid between the frame bars.
If you choose as a finish, you can do without constructing a frame. In this case, the mixture is applied directly to the surface of the EPS. For better adhesion, the sheets must be treated with a grater or scratched with a regular hacksaw.
 YouTube channel “We build for ourselves”
 For walls, a 50 mm layer of EPS is sufficient. The work is carried out according to the same principle. If necessary, sheets are trimmed to the right size sharp knife. To join the pieces together, an L-shaped lock is formed at their ends using the same knife.
It is better to insulate in two layers (30 + 20 mm), and attach the frame on top of the EPS. But if the window is installed without additions and the space is limited by the width of the frame, the second layer of polystyrene foam can also be laid between the frame bars.

If you are going to plaster the walls in the future, then lathing is not needed. It is enough to secure the sheets and roughen their surface with a grater or hacksaw.
The ceiling borders the apartment, not the street. Therefore, the same layer of EPS as on the walls is sufficient here - 50 mm. Laying is done according to a familiar principle. Fastening of your choice: glue-foam, dowel-umbrella, adhesive mixture. Expanded polystyrene is a very light material and is securely attached to the ceiling solely with glue.
 YouTube channel “We build for ourselves”
 When installing, pay attention to the height of the windows. If the frame is installed right up to the ceiling without additional profiles, then due to the thick layer of insulation, the window sashes may not open. Consider the thickness of the sheathing and finishing so that after installation there is a gap of at least 5–7 mm to the sash.
To insulate the floor, you will need EPS with a thickness of at least 50 mm, or better yet, 80 mm in two layers. Extruded polystyrene foam has a high density and can withstand loads of up to 30 tons per square meter, therefore can serve as a floor base.
 YouTube channel "XPS TechnoNIKOL"
 After installation on the EPS, it is enough to lay down plywood, chipboard, DSP or OSB - and on top you can lay a finishing floor covering like laminate or. When installing a heated film floor, you must first lay penofol or other heat-reflecting substrate.

When laying tiles or porcelain tiles, reinforced concrete is poured directly onto the EPS. cement strainer, into which, if desired, you can install cable heated floors or thermomats. If the heating elements are small in thickness, they can be easily placed in a layer of adhesive when laying tiles.
The floor on a balcony or loggia is always lower than in the room, so many people prefer to bring them to the same level and remove the step. This is done using lag from wooden beam 50 × 50 mm or 40 × 40 mm.
 YouTube channel “We build for ourselves”
 First stacked cross beams in increments of 40–60 cm and are attached to the slab with anchors. Then the gaps between them are filled with insulation and foamed, and longitudinal logs with a similar pitch are attached on top and leveled. Next, a second layer of insulation filled with foam and plywood or other sheet material is laid.
10. Finish
At the very end, the ceiling and floor are finished. If plaster is chosen, then a reinforcing mesh is glued onto the sanded EPS surface, and then two layers of plaster and paint are applied.
 YouTube channel “Vladimir Odorov”
 When covering with clapboard, plastic or MDF panels, the molded materials are attached to wooden frame on the walls and ceiling.
 YouTube channel “Loggias. bye"
 The easiest way to apply wallpaper is to cover the walls. moisture-resistant plasterboard. Use the sheathing as a frame, seal the joints between the sheets with putty and, having primed the surfaces, stick the wallpaper.
The final stage of finishing is installation of the finishing floor. Linoleum is laid or spread on the previously prepared base. If you plan to have a warm floor, then it is installed first. Next, the baseboards are installed.
 YouTube channel “We build for ourselves”
 The exception is tiles. Due to wet processes during installation, it is better to install it at the stage of floor insulation and before starting to work with the walls.