Borders around garden and vegetable gardens - practical solution, which has a lot of advantages. However, not all summer residents are in a hurry to fence vegetables and herbs, citing the complexity of the work and the high cost of materials. Let's look at the most popular methods of erecting borders, try to dispel doubts and offer options for how to quickly and easily special costs make a fence for the beds from scrap materials. A variety of techniques allows you to create beautiful and practical fences for any type of plant.
The benefits of fencing for garden beds
Some summer residents adhere to the traditional method of cultivating the land and do not understand why they fence the beds.
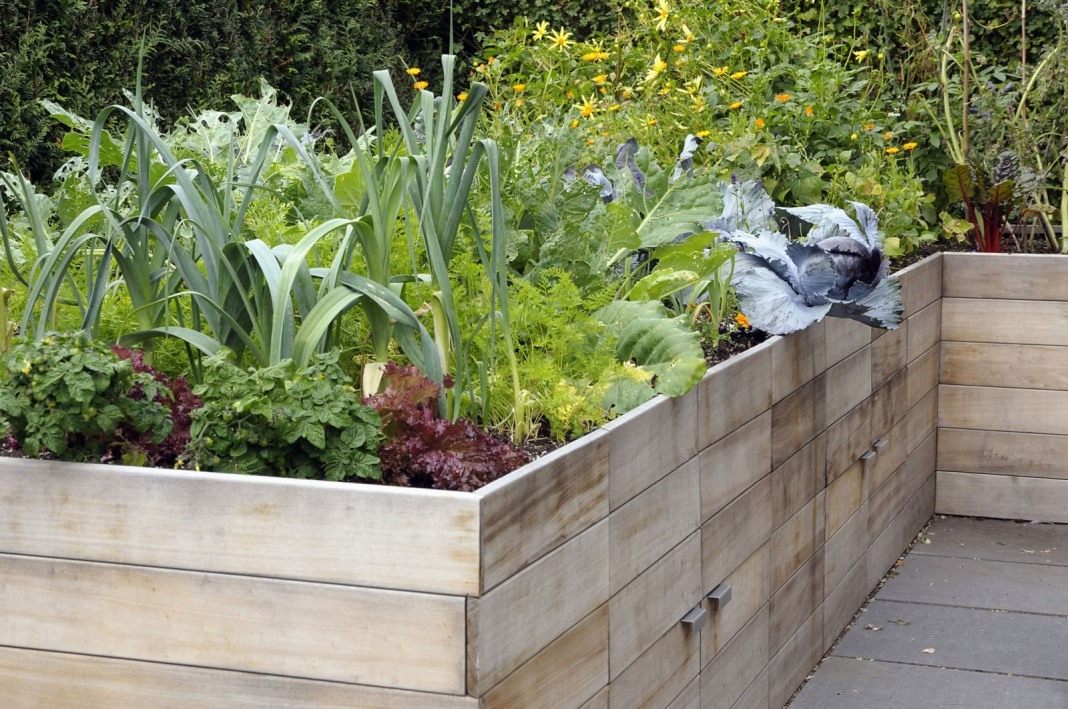
Wooden fencing
Dividing the garden into mini-zones with the construction of fences has a number of advantages, both practical and decorative:
- Reduction of weeds. Framing the beds significantly reduces the area for weeds to grow. In addition, when the sides are buried in the ground, a kind of barrier is created that prevents the spread of pests and diseases to neighboring crops.
- Strengthening loose soil. The fence for the beds prevents the soil from shedding and reduces its weathering and erosion. The use of fences is especially important for sandy loam and sandy substrates.
- Getting an early harvest. Installing borders for beds allows you to create a “thermal garden” by filling the constructed box with various organic matter. In warm plantings, the soil temperature is higher than when organizing a traditional garden, so vegetables are planted and ripen faster.
- Easy to care for. Weeding, loosening or harrowing the soil is much easier.
- Convenient lawn mowing. When mowing grass, garden bed borders protect the plantings from damage from lawnmower blades.
- The attractiveness of a flower and vegetable lawn. The row spaces remain clean and the garden looks well-groomed.

Growing crops in separate boxes
Fencing can become an integral element of landscape design. Combining multi-colored border strips for beds or the original use of familiar materials will allow you to zone the area and create a bright garden composition in your dacha with your own hands.

Zoned vegetable garden on a personal plot
Requirements for garden fences
The requirements for framing plantings primarily depend on the purpose of the fence. Fences for flowers should be harmoniously combined with the style of the entire garden, and borders for garden beds are selected taking into account the type of vegetable crops and the method of growing them.

Beautiful fencing for garden beds
- Strength. The sides must withstand the pressure of the earth and not creep to the sides when the soil gets wet - especially during the thaw period and spring floods.
- Resistance to mechanical damage. In the event of an accidental impact with a rake or shovel, the material should not deform or crack.
- Durability. It is optimal if the constructed frame lasts at least 5-10 years.
- Easy to assemble. Difficult-to-install fences should be erected for perennials - shrubs and flower beds. When arranging ridges, it is advisable to provide for the possibility of dismantling and moving the structure to another location.
- Environmental friendliness. The material must not emit toxic substances. This requirement is especially relevant when choosing polymer fencing, since some plasticizers are toxic when the temperature rises. Harmful elements can enter the soil and then into the roots, stems, leaves and fruits of plants.
- Economical. This criterion is best met by fences made from scrap materials: boards, old bricks, plastic containers.
Advice. For construction, you should not choose a material that gets very hot in the sun. In such structures, the soil dries out very quickly, and the plants experience a moisture deficiency.

Layout of a plot for growing vegetables
- the minimum height of the fence is 15 cm if there is fertile soil on the site, 30 cm if an embankment or partial replacement of soil is planned;
- for planting potatoes, beets and other root crops, a raised ridge with a height of 40 cm is suitable;
- when constructing compost thermal beds, the height of the box should be at least 60 cm;
- the width of one row is within 120 cm - this will allow you to effortlessly reach the middle of the plantings while cultivating the land or harvesting fruits.
We make fencing with our own hands
There are many techniques for framing garden beds in the country. To choose the best option, you need to compare the positive and negative qualities each way.

Practical use of picket fence
Wooden fencing - a variety of options
Wood meets most requirements. This material for beds is economical, safe, easy to install and quite durable. The only drawback is the susceptibility to rotting in high humidity conditions. However, this risk can be minimized by treating the curbs with an antiseptic composition.
To create wooden fences for your garden beds hands will do timber, lining, edged material, slab, hemp, long boards or picket fence - any household preparations are used. The options below will help you decide on the model of formwork for beds:
- a multi-tiered ridge made of profiled timber will decorate any dacha or personal plot;
- picket fence for beds - the elements should be located end-to-end to prevent soil from spilling out;
- tall warm plantings framed by slabs - an alternative to a traditional greenhouse;
- organization natural farming on high ridges made of boards.
When choosing a material, you need to pay attention to the type and condition of the wood. Suitable breeds wood:
- ash and oak - high-strength, durable wood, minus raw materials - high cost;
- pine - inexpensive, soft material, easy to process, the disadvantage of wood is susceptibility to moisture;
- cedar and larch are different long term operation;
- acacia - has good performance characteristics, but is difficult to process.
How to make sides from boards with your own hands
Let's look at step by step how to fence the beds with boards with your own hands. The proposed option is suitable for dividing a vegetable garden into open ground, box size – 1*1.6 m.

Homemade fencing made from boards
Materials and tools:
- boards 150*25 mm, length 2.5 m – 4 pcs.;
- boards 150*25 mm, length 3 m – 2 pcs.;
- board 100*50 mm, length 2.5 m – 1 pc.;
- screws;
- tape measure, pencil and ruler;
- screwdriver and saw.
Work progress:


- “Increase” the height of the sides with another row of boards.
- Fix the upper shelves - first screw the longitudinal sides, and then the transverse ones.

Fixing the upper shelves
Move the formwork to the desired location and fill it with fertile soil.
Practical metal fencing
The French vegetable garden with metal borders for the beds looks very neat. Thanks to the rigidity of the material, it is possible to achieve clear geometric lines. Galvanized frames of beds are considered the strongest and most durable - galvanized steel coating is preferable to iron.

Application metal structures
Features of metal fences for garden beds:
- ready-made modular fencing is very mobile - they are easy to assemble, disassemble, transport and reinstall;
- high cost of a metal box;
- such a design will not “float” during the rainy season and after the snow melts;
- hardware susceptible to corrosion; in the absence of galvanization, the sides will have to be painted annually;
- metal has good thermal conductivity - the soil near the fence can heat up to critical temperature, inhibiting plant roots.
Advice. It is better to install fences for beds with polymer coating– the layer reduces the thermal conductivity of the metal and protects the soil from overheating.

Purchased galvanized fencing
When creating fences with your own hands, galvanized corrugated sheeting is often used. Let's look at how to make a fence for ridges step by step:
- Determine the dimensions of the bed made of corrugated sheets, apply markings on metal sheet and cut. For cutting, you can use metal scissors or an electric saw.
- When planning the product, it is important to ensure that the direction of the waves of the metal profile should be transverse relative to the surface of the earth. The height of the formwork is calculated taking into account a depth of 10-15 cm.
- Mark the location of the bed on the site and dig a shallow, narrow trench around the perimeter of the site.
- Place the prepared sides, level them, overlap them and secure them with rivets.
- Fix a U-shaped profile on top of the corrugated sheeting - it will hide the sharp edges and protect the metal from moisture.
Durable stone fencing
Unusual decorative fence You can build it with your own hands from stone. The shape, layout order, dimensions of the elements used - everything is at the discretion of the performer. Options for constructing stone borders for garden beds with your own hands are presented below.
Dry method. Large cobblestones are used as fencing. The first row of blocks is buried 5-8 cm into the soil, ensuring the stability of the structure. Subsequent cobblestones are laid out on a sand-earth layer.

Dry laying of stones
You can enclose the beds with sandstone, limestone, basalt or pebbles. It is undesirable to frame the beds with granite - the mineral acidifies the soil, worsening its nutritional quality.
Laying on mortar. The method is more labor-intensive, but allows you to build a durable monolithic structure, which does not require any maintenance. This approach involves the use of both large and small stones in construction.

Fixing stones with sand-concrete mortar
Application of curb stones. To cover the beds, some summer residents buy ready-made decorative slabs. A wide range of suitable border stones for garden beds allows you to create original fences different color.

Curbstone in the arrangement of vegetable plantings
The disadvantage of this method is the limited height. Curb stone is not suitable for constructing a raised thermal bed.
How to make a decorative pergola around a garden bed
Gabions and pergons are bulk decorative fencing. The mesh steel frame is filled with stones of different fractions. The design is simple to implement, does not require a foundation, is affordable and fits perfectly into any landscape design.

Gabions – original way garden bed design
To create a pergon with your own hands you will need:
- durable galvanized mesh with a wire thickness of 2-3 mm;
- clamps for fixing the frame;
- geotextile for substrate;
- filler – pebbles, stones;
- shovel, pliers, tape measure, level.

Fixing the sides of the frame
Work progress:
- Prepare the sides of the box from the mesh. IN finished form the bed will be framed by rectangular blocks - the height and width are selected arbitrarily.
- Along the perimeter of the planting area, mark a strip with a width equal to the base of the fence. Level the soil, compact it and cover it with geotextiles.
- Assemble the frame, fixing the position of the formwork with wire. Screw the fasteners inward to maintain the neatness of the structure. Leave the top of the prepared basket open.
- After installing the four boxes, fill the mesh frame with stones and screw the top part.

Filling a mesh box with stones
Available plastic fencing
The simplest and quick way fencing vegetable plantings with your own hands - edging the beds with plastic. A wide range of products are available for sale ready-made solutions for the dacha.
Border tape. Flexible, lightweight fencing for edging lawns, flower beds, paths and raised beds. The tape is supplied in rolls of different lengths, the width of the strip is 20-50 cm. The kit includes plastic pegs for fixing the fence. Flat and corrugated “curbs” are available.

Plastic border tape
The technology for installing the tape is very simple:
- Mark the border of the bed on the site.
- Place pegs evenly along the contour of the “vegetable” area.
- Attach the tape to the wedges, partially deepening the border into the ground.
Important! The tape must be well tensioned - this will ensure the rigidity of the fence and prevent sagging.

Technology for assembling garden polymer panels
An alternative to flexible tape is straight flat panels. They are more rigid, but are suitable for creating only straight mini-vegetable gardens. Thanks to the presence of teeth on the underside, the installation of plastic borders for beds is facilitated.
Volumetric panels “Garden board” and “Stone”. The products emit natural building materials. With their help, various gardening compositions are created. Polymer modules are decorative and practical, the only drawback is the relatively high cost.
Do-it-yourself assembly will not cause any difficulties - the kit is equipped with panels, pegs and plugs. The performer’s task is to prepare the site and secure the curb.
Garden constructor– fencing with flexible design. Borders for beds made of plastic panels designed for creating ridges and flower beds unusual shape. The elements of the border are combined into a closed single circuit. By changing the direction of the “snake”, in a few minutes you can create an unusual fence for growing garden crops.
Budget slate fencing
For those who are looking for an inexpensive way to fence garden beds, the option of using slate is suitable. Asbestos-cement boards are resistant to moisture, easy to process and install, durable and affordable.
Fences for garden beds are often built from flat or wave slate. There are special asbestos cement strips on sale standard dimensions: length – 3 m, thickness – 16-40 mm.

Strengthening the sides of a slate fence
Instructions for edging beds with slate yourself:
- Determine the dimensions of the future ridge and, according to the dimensions, make blanks for the sides of the box. When calculating the height of the side, it should be taken into account that 20 cm of slate will go deep when installed.
- Mark the ground and dig a trench 20 cm deep around the perimeter.
- Install slate sheets in the dug holes in a strictly vertical position.
- Fix the sides - cover with earth and compact.
- Prepare holes for fasteners in metal corners and asbestos-cement sheets.
- Attach the corners to the slate with bolts.
- To give rigidity and stability to the entire structure, it is advisable to install metal supports. Weld the metal plate to the reinforcing rod - the homemade support is bolted to the sides of the fence.

Fastening the sides of the box with a metal corner
By analogy, you can block the beds with wavy slate. To strengthen the high sides, it is necessary to build a frame from reinforcing rods and boards. Attach slate sheets to wooden elements nails.

Wavy slate framing option
Before framing the beds with asbestos-cement sheets, you need to consider safety measures. When sawing slate, a lot of dust is generated, so it is important to protect your eyes and respiratory tract. The cut area should be moistened with water.

Compliance with safety measures when cutting slate
Fencing made from plastic bottles
Fence the beds plastic bottles won't be difficult. For implementation simple option you will need PET bottles with a capacity of 1.5-2 liters, a shovel, sand and colorful paints.

Fencing with plastic bottles
Step-by-step algorithm fencing beds with your own hands:
- Select containers of the same volume. It is optimal if the containers match in color, but it is difficult to collect many identical bottles. Therefore, it is better to paint them one color, preferably from the inside.
- Fill the bottles with small pebbles or sand - this will give them the missing strength and ensure stability.
- Determine a place at the dacha to form a bed and mark it.
- Dig a trench 8-10 cm deep around the perimeter; the width of the trench should correspond to the dimensions of the bottles.
- Turn the filled containers upside down and place them in the trench as tightly as possible - the elements should not wobble.

Strengthening a plastic structure
Fenced beds can be reinforced at the corners with support posts. Make holes in the bottles in advance, stretch the wire and tighten it tightly on the side stakes. This coupling will prevent elements from “falling out” when cultivating the soil.
With a creative approach to the issue, even from used containers you can build beautiful fences beds. They may have an unusual shape, consist of several tiers, or be supplemented with decorative elements.

Creating beds of unusual shapes
It is not difficult to build a fence for planting vegetables. When choosing a suitable material, you need to compare own strength, temporary and money spendings to implement the plan. Compliance with the chosen technology will help you easily “organize” your garden and increase its efficiency.
A dacha is not only a place to relax from the bustle of the city, but also good opportunity grow some of your own organic vegetables and berries. Some grow a little exclusively for the table, others grow a little more for winter storage. However, often striving for a high yield, we forget that the beds are not a second job, but a place of rest. Therefore, in order for growing vegetables and berries to truly bring pleasure, the garden beds at the dacha must not only be productive, but also comfortable and beautiful. Moreover, you can make such beds with your own hands from almost any materials.
When describing how to make garden beds at the dacha with your own hands, garden beds are often divided into types according to the material from which they are made. However, this approach does not reflect the functional and aesthetic capabilities of the beds. Therefore, it is more correct to start laying out the beds by determining their shape and location on the site. In this way you can create a convenient and beautiful vegetable garden, which can fit into a plot of any size.
Shape and location of beds on the site
For a small plot, it is good to organize beds in the corner of the plot. The beds will look great if you divide them according to a beam or radial pattern.

Fig.1.

Fig.2.
If the site has big sizes, then the beds can be laid out along the central path. Here you can make a circular or rectangular garden shape. Planting plants various colors eg salads different varieties, cabbage, pumpkin, garden beds will look no worse than a flower bed.

Fig.3.
However, making a composition from various types vegetables, you should take into account the principle of their compatibility and be guided by the table below. Otherwise, it is unlikely that you will be able to get a high yield from the beds.

Fig.4.
Bed sizes
Returning to the beds, it should be said that the most important parameters of the beds are their height and width. Geometric dimensions beds have a direct impact on productivity, ease of plant care, protection of plants from freezing, ease of arrangement of beds and their appearance.
Width of beds
The width of the bed can be arbitrary, but is usually 80-90 cm. This width is enough for two or three rows of plants. A bed up to 90 cm wide will allow you to easily reach the center from any side. However, if the beds are located close to the fence, then it is advisable to make them no more than 50 cm wide. This will make caring for the plants much easier.
Height of beds
The height of the bed is also very important. Unlike the width of the bed, the height is a little more complicated. The fact is that in high beds there is a risk of freezing perennial plants significantly higher than at low levels. This is due to the fact that the layer of snow that protects against freezing is always greater in a bed located at ground level, and snow falls earlier. In high beds the opposite is true. Therefore, it is advisable to make high beds for annual plants, and for perennials it will be limited to a bed no more than 15 cm high.

Fig.5.
Raised beds are very convenient for growing annual plants. The main convenience is that you don’t have to bend down to the ground every time you need to pull out a weed or remove a stepchild. In a high bed, water will not stagnate and the soil will not become very compacted, and therefore there is no need for annual digging, but only loosening is sufficient. Having a high bed makes it much easier to organize a warm bed that will allow you to collect early harvest. However, the height of the beds should not be more than 60 cm; an exception can be made only for growing low-growing plants, for example, lettuce, onions, parsley, etc.

Fig.6.
Warm beds
Having mentioned warm beds, a few words should be said about their structure. A warm bed consists of several layers. The bottom layer is thick branches, cardboard and other organic debris with a low decomposition rate. The middle layer is foliage, tops, hay, straw, etc. garden waste with an average rate of decomposition. Upper layer- compost and soil. The thickness of each layer is approximately 20 cm. The lower two layers gradually rot and release heat. Therefore, the bed thaws much faster after winter and seedlings can be planted in it earlier. This is how an early harvest is achieved.

Fig.7.
Of course, a warm bed can be made without being high. However, in this case, instead of simply laying the above-described layers in a box (fencing the bed), you will first have to dig a small ditch, which will significantly complicate the construction work warm bed. Plus to this high bed will provide good drainage, which is especially important when high level groundwater.
How and from what to make paths between the beds
When laying out beds and planning a vegetable garden, do not forget about the paths between the beds. Paths are not only a transport artery, but also a decoration for the garden. Good paths will create a feeling of neatness and harmony.
Paths between the beds can be made different ways. Often paths are made of paving slabs, crushed stone or simply planted lawn grass. Functionally, all types of paths are not much different, so here, first of all, you should be guided by your aesthetic preferences.

Fig.8.

Fig.9.
Having considered possible options for location on the site, shapes, types of beds and their sizes, we can move on to the question of choosing material for garden beds in the country. The most common materials when constructing beds are: wooden boards, brick or stone, slate and ready-made structures made of plastic and galvanized steel.
Materials for making beds
Board beds
Wooden boards for making beds are a favorite material. Making beds from boards is very simple and does not require any preparation or special tool. All you need is a nail saw and a hammer. Of course, the disadvantage of wood is its high tendency to rot, but this problem can be solved quite simply if the wood for making beds is pre-treated with an antiseptic. Thus, the bed can last 5, 10, or 15 years. If you choose oak or larch boards for the beds, then such a bed can last longer.
Beds from wooden planks You can make not only a rectangular shape, but also any other. If the bed has the shape of a rectangle, triangle or any other shape with corners, then you can make a bed by simply knocking the boards together with nails, with the boards positioned horizontally.

Fig. 10.
The required height of the bed is ensured by installing several tiers of boards.

Fig. 11.
If you need to make a garden bed round shape, then you can go in two ways: assemble a bed from short pieces of boards, placing them in a circle or installing the boards vertically. In both cases, the boards are connected in the same way using nails or self-tapping screws. Combinations of these methods are also possible.

Fig. 12.
If you have any doubts about the reliability of protecting wooden beds from rotting using modern antiseptic preparations on water based, then you can use traditional methods: treat the wood with hot drying oil or lay roofing material with inside beds.
Brick and stone beds
Brick and natural stone are no less popular than wooden boards. Moreover, the service life of such beds is not limited. If the bed is of low height, then the brick as a fence for the bed is installed vertically or at an angle, and no additional preparation is required. In this way you can make a bed of any shape.

Fig. 13.
Raised beds made of brick are somewhat more difficult to make. In order to make a high bed of brick or stone, a foundation is needed. As a foundation, a concrete strip with a cross-section of approximately 20x20 cm is poured on a sand cushion 20 - 30 cm thick. It is advisable to reinforce the strip with a steel rod. It turns out strip foundation shallow depth. Brick or stone is laid on the finished foundation.

Fig. 14.
When making high beds from brick, you should firmly decide on their shape and location on the site. High beds made of brick are a fundamental structure and it will be very difficult to move them after construction.
Slate beds
For most summer residents, the favorite material for building beds is slate. Indeed, slate is often available in abundance at the dacha, especially after the roof has been replaced. Naturally not to use this material is simply impossible, especially considering the fact that slate is durable, not afraid of moisture, and it is very easy to make one out of it simple design like beds.
Slate beds can be made of any shape and size. If a roofing wavy slate, then it is cut into pieces and dug vertically into the ground to a depth of 20 - 30 cm. When positioned vertically, the slate is more durable due to the presence of waves. For rectangular beds, slate can be used in any size. Round slate beds are made from small pieces.

Fig. 15.
You can purchase flat slate sheets especially for garden beds. When making beds, slates of this type are fastened together using metal corners. For structural rigidity with high beds, an additional corner is installed along the bed in increments of 1 - 1.5 m.

Fig. 16.
How to cut slate? When constructing beds, slate will have to be used various sizes. Cutting slate is very simple using a grinder with a stone wheel or a diamond wheel. There will be a lot of dust when cutting slate, so be sure to wear a protective mask and safety glasses.
Ready-made bed structures
Ready-made structures for fencing beds are no less popular. Two types are widespread: plastic and galvanized sheets. Plastic fencing for garden beds allows you to make it of any shape and size. Metal ones allow you to quickly make beds of any height.

Fig. 17.
Of course, it is difficult to make a round-shaped bed from ready-made metal structures, but simplicity and reliability are often paramount.

Fig. 18.

Fig. 19.
We considered all possible options for shapes and arrangement of bed materials. The solutions described are the simplest and will make your beds comfortable and beautiful. However, just as there is no limit to perfection, there is also no finite number of possible options for designing beds. Don't be afraid to experiment and use non-standard approaches, so your garden will be the best!
The season of gardening beds and fields is approaching, which means it’s time to start expanding your arsenal of knowledge in the field of gardening.
In a new review on specific examples new, very interesting ways design of green spaces and beds on your site. Enjoy watching, summer residents.

1. Orderly garden
Instead of haphazardly planting your entire yard with vegetables, create a neat, fenced vegetable garden on your property, with separate beds for growing different crops.
To create such a vegetable garden you will need boards, mesh and available wooden and metal containers. In-ground plank beds are great for growing cucumbers, tomatoes, peppers and eggplants, while metal and wooden containers can be used for growing zucchini, pumpkins and herbs.
2. Raised beds with support
Cucumbers, melons, legumes and any other vine plants are very demanding to care for. Such plants need warm soil, plenty of sunlight, and, over time, support. For successful cultivation Raised beds, which can be made from wooden planks, are best suited for such plants. A trellis made of bent mesh should be placed between the two beds.
3. Spiral beds
In an area with limited space, it makes sense to build spiral beds. Such structures look very attractive and are perfect for growing greens, herbs, carrots, strawberries and flowers.
4. Raised beds
To create raised beds, you can use bricks and paving slabs. This trick will allow you to beautifully zone the garden and prevent the plant roots from spreading too much, interfering with other crops. In the center of such a garden you can place a large trough or barrel of water for convenient watering.
5. Trellis
From ordinary branches, tied with ropes in the form of a wigwam, you will get wonderful trellises for growing climbing plants.
6. Cinder block bed
You can use unwanted cinder blocks to create an original and practical raised bed.
To do this, you need to outline the shape and size of the future bed and place cinder blocks along the intended perimeter, lightly digging them into the ground. Inside the bed you can cover it with oilcloth or cardboard, cover the bottom with fallen leaves and any organic waste, compost and cover it all with fertile soil. Plants in such a flower bed are not afraid of night frosts and temperature changes that occur in the spring.
7. Bright flower beds
Raised flower beds with bright edges are perfect for growing flowers, herbs and some vegetables. It is much easier to care for such beds than ordinary ones, and their appearance will please the eye and attract the attention of neighbors.
8. Beds made from pallets
From unnecessary wooden pallets you can build wonderful beds that are ideal for growing herbs, herbs and salad. Plants in such beds look very neat, and their leaves will not get dirty with soil during rains.
9. Baskets
Literally any container is suitable for creating insulated raised beds. Even banal tomatoes and cabbage will look exquisite when placed in beautiful wicker baskets.
10. Gabion flower bed
Tall flower beds made of gabions will become a real highlight summer cottage. Thanks to their flexibility, gabions can be used to make various original frames and even create real works of art.
Video bonus:
11. Metal bed
Sheets of metal can also be used to create beautiful raised beds. For example, using metal sheets you can create a beautiful multi-level structure for growing flowers and herbs.
12. Lazy bed
Make a box of the desired size from the boards with small beams on the sides. The beams need to be dug into the ground and then be sure to check the sides of the bed with a level. From the inside, you need to attach scraps of PVC pipes for hoops with mesh or film to the wooden sides, cover the bottom of the bed with a metal mesh and fill it with soil. This design can also be equipped with an automatic watering system. The harvest from such a bed will be early and rich, and caring for it will not bring much trouble.
Most often, a dacha is not only flowers and relaxation, it is also a harvest. These are seedlings in the spring, seedlings, transplanting into the ground and other concerns. If you are one of the summer residents who care not only about the harvest, but also about a neat, well-groomed area with fences, then you have probably wondered more than once how to design beautiful beds at your dacha with your own hands?
Beautiful garden at the dacha with your own hands


If you started a dacha not only for flowers and fruit and berry trees, then you definitely have beds. And usually the hardest work is their improvement. Because you need to provide so much important nuances so that you can fully enjoy the harvest. That is why we want to figure out with you what beautiful and proper garden beds they are?


Vertical beds - how to create, what are their features, pros and cons
If you have a small area and want to use it to maximum advantage, then you should think about creating vertical beds. Thanks to them, with small areas you can get excellent harvest, only once having made enough effort for this.

These beds are great if you want:
- save space,
- grow more in a limited area,
- grow in open ground,
- simplify your care and reduce the number of possible weeds,
- make watering and harvesting easier.
Thanks to their simple design and mobility, such beds are easy to assemble and move. And at the same time, you can choose how many bushes or seeds you need for seedlings.
Varieties of vertical beds
There are several types of vertical beds:
ladder type– created from boxes different sizes, stacked on top of each other like a ladder,

tubular– are plastic pipes of selected diameter, filled with soil, with holes for seedlings,

hanging– where the beds are located one above the other, being suspended or installed on a structure similar to a stepladder,

pyramids- are created according to the principle of stairs, but each new tier is smaller than the previous one on all sides and is located in the center, ultimately creating the appearance of a pyramid.

Clear instructions for creating different types of vertical beds
Creating a vertical bed is not difficult, but it all depends on your skills, the tools in your arsenal and the materials you have at your disposal.
Most often they are made from boards in order to extend the life of their structure and get maximum benefit. After all wooden beds last longer, are more stable and harmless to future seedlings. But their arrangement requires more knowledge and experience in using tools such as a drill, screwdriver and jigsaw (if you need to cut the boards to the intended size).

Generally, basic set materials for creating a wooden vertical bed are the same:
- boards,
- beam,
- nails,
- screws,
- priming,
- seedlings or seeds.
First, decide on the size of the largest and smallest beds. Saw the boards into the sections you need, and then assemble them into boxes, stack them on top of each other and fill them with soil.
Don't forget that even experienced craftsmen use a pencil and tape measure so as not to make a mistake with the size. And to protect your hands, wear thick gloves.
Take advantage of the very clear, step-by-step master class by Ekaterina Komkova, who talks about how to build a very neat pyramid for your seedlings.

And if you like a place near a fence or wall country house, then it will be more suitable for you, as in the master class by relena75:

They take up little space and fit perfectly into small areas, and due to their design they are also very mobile. After all, they are so easy to move from place to place or put away for storage at the end of the season. And they are made no more complicated than their more massive friends. See for yourself by following the instructions from the video tutorial by the Country Expert:
However, a pallet can also become a bookcase.

Tubular beds do not require much effort to make at all. And they take up much less space compared to the previous ones. And the harvest will be worthy of a full-fledged garden bed.

To create it, just cut pipes of a suitable diameter, make holes on them using a special drill attachment, dig into the chosen place, fill with soil and your garden bed is ready!
They are great for growing strawberries or cucumbers.
If you want to understand the intricacies of creating such compact beds, then you should pay attention to the master class of a country craftsman with the nickname Adek.
Disadvantages of vertical beds
But, like everything else related to the dacha, vertical beds are not a panacea. After all, due to the same design features, they also have disadvantages.
- the soil in them is quickly depleted,
- the soil has to be watered frequently due to drying out and the volume of the bed itself is small,
- if in your region harsh winters, then the ground will freeze, which has a bad effect on perennial crops,
- you will need effort and patience, as well as tools to create them.
Moreover, due to limited space Not every crop will take root in a vertical bed - plants with a powerful root system will not be able to fully develop.
Therefore, it is best to grow in such beds:
- salad,
- basil,
- cucumbers,
- strawberries,
- dill.
Warm and high beds - basic requirements, pros and cons
As you can see, vertical beds are not suitable for pumpkins, corn and potatoes. Therefore, it is worth thinking about other options for growing garden crops. For example, if you have enough space, but the ground is cold, then you will like the option of raised, warm beds, perfect for delicate, heat-loving crops.


In essence, a high bed is a mound of fertile soil, limited on four sides by a fence. She:
- easy to assemble and disassemble,
- does not require much care and attention,
- well suited even for rocky terrain,
- gives an excellent harvest.


In addition, due to the closed ecosystem, there are many times fewer weeds in such a bed, which means weeding will require less effort.

They are divided into permanent and temporary. And, as the name implies, some can be used for several years in a row, while others are more often collected for growing seedlings. But both of them essentially remain ordinary garden beds.
And the most important thing is that if you have the idea of creating a warm garden bed with your own hands, then you don’t need to put in a lot of effort.

Very impressive and convenient...

...and can be made from scrap materials!
General rules for designing and assembling raised beds
The optimal height is considered to be 15-50 cm from the ground (depending on the root system of the crop you want to grow.
The width varies from 90 to 120 cm.
The required composition of each bed includes soil, drainage and biofuel (which will become humus, which provides the main fertilizer for the root system).

But fencing materials can be completely different:
- boards,
- plastic boxes,
- pallets,
- metal profile,
- wooden boxes.
Everything will depend only on your idea and what is currently at hand.
The most common and stable are beds made of boards. If you line them with roofing felt before covering them with soil, they will last a very long time, since they will be insulated from moisture and rot.
Fencing with boards...

...metal...

...and again with boards
And creating them is quite simple if you follow the detailed instructions of Evgeny Afanasyev given in the master class.

If you are not comfortable with tools or do not have enough time to organize permanent beds, then the issue can be resolved differently. After all, such beds are good because they only require a high fence. Plastic vegetable crates or pallets stacked vertically and hastily nailed together to form a square, and even concrete blocks may be the best solution.

Pallet fencing…

... and concrete blocks.

Yes, you don’t need to have a carpentry background to organize a garden bed. It can even be made in a used barrel.
Or even weave it altogether!
If you want to plant a couple of seedlings as an experiment, then you can get by with pocket beds.

Here you don’t need to be able to saw and plan, but the skill of sewing and stitching will come in handy. After all, such a homemade product for the garden and garden, created with your own hands, will appeal to every needlewoman.
Take an old organizer for small items, combs or other household items, put film, soil and fertilizer into the pockets, sew on strong loops so that it can be hung on any wall or fence, and that’s it - your miniature garden bed is ready!

As you can see, do-it-yourself garden beds for the garden and garden are created from a variety of materials and of varying complexity. For some you will need an impressive set of tools, but the result will also give good harvest or, for others, only a few boxes and a couple of barrels will be enough, although the result will also be joyful and very pleasant. The main thing you should know at the beginning of the season is that any idea for a summer house can be brought to life with your own hands - from a garden bed to a personal garden with the most exotic flowers.