Today we will look at the issue of fastening balusters and railings when installing wooden stairs. Even a person who is not experienced in the intricacies of carpentry understands how rich and noble appearance wooden stairs are, how difficult they are to manufacture and install.
Calculation and production of parts
The railing of a wooden staircase consists of three key elements:
- Railings are horizontal or inclined elements that can be grasped by hand.
- Balusters - vertical supports between steps and railings.
- Pillars or pedestals - vertical racks, into which the ends of the railings rest. Typically, pillars have turned or carved heads.
The parts of each group are manufactured individually, after which they are assembled at the installation site. Posts and balusters are made primarily by turning, and railings by milling.

You need to start calculating the fence with the railings, which include straight and curved segments. IN general case The configuration of the railing is determined by the shape of the staircase in plan. The outer edges of the steps are taken as the base for calculations; the railings are located with some indentation from them towards the center of the flight of stairs. The offset is necessary so that the support point of the pillars and balusters is not located at the very edge. The amount of indentation is determined by the cross-section of the supports, plus some arbitrary value is added, which is dictated by aesthetic considerations. It is also necessary to take into account such specific circumstances as the overlap of spans in plan, achieving a symmetrical setback on adjacent flights and at the same time maintaining the width of the passage as much as possible.
In space, individual parts of the railing can be located strictly horizontally and under the general slope of the stairs. Calculation of the length and dimensions of the horizontal segments can be done by displaying a sketch of the railings on the staircase plan drawing. Inclined elements are calculated in a similar way, but to calculate their actual length it is necessary to divide the projection length by the cosine of the angle at which the flight of stairs is inclined relative to the horizontal normal.

When calculating pillars and balusters, several requirements apply, the most important of which is the height of the fences. According to GOST, stair railings must rise above the plane of the steps by at least 90 cm in residential buildings and at least 120 cm in public buildings and on street flights of stairs. The axial profile of pillars and balusters can be arbitrary, but there are certain requirements: the thickness of the pillars in the plane of support must be at least 10% of their height, balusters can be 2-2.5 times thinner. The length of the balusters should be equal to the height of the fence + 7-10%, while in the base part a uniform profile (preferably faceted) should be maintained for a length of at least 5% of the total. The pillars are made in quantities of at least two for each flight of stairs, the number of balusters is equal to or twice the number of steps.

The width of the railing in plan should be approximately 30-50 mm less than the thickness of the pillars in the abutment area and 15-20 mm greater than the thickness of the balusters. The milling profile can be arbitrary, but the preferred option is a rounded top with two longitudinal necks for a more secure hand grip. The length of the handrail segments should have an allowance of 50-80 mm in both directions for cutting and fitting.
Pre-assembly and preparation for installation
Before starting the installation of the stairs, it is necessary to first assemble the straight segments of the railing using adhesive joints. The spatial arrangement of the handrails is a guide for calculating the attachment points vertical elements fencing. Since the railings are precisely machined and have a flat bottom edge, they are convenient to use as a straight rail for further marking.
Sometimes, at corners and turns of staircases, the distance between flights forces the installation of short handrail inserts between the pillars. Depending on the configuration of the staircase, these sections are assembled either from one or several radius segments, or from linear segments. The railing elements are prepared and glued in advance; the connection is made using hidden domino-type tenons or 2-3 cylindrical dowels.

Also, before starting work, they should be stocked the right amount wooden dowels for attaching balusters and posts. It is also advisable to cut the pillars themselves to size: if this could not be done in the workshop, then due to the large cross-section, processing with a miter saw is not possible. It is better to apply markings along the perimeter of the base part under the square, making sure that the end of the last line coincides with the beginning of the first. Trimming is done along this line with a hand-held saw with a fine tooth; it is advisable to go 3-5 mm deeper into each face one by one. For greater confidence, you can secure the limit rail with clamps.
Marking and fastening of pillars
The pillars are the basis for positioning the entire stair railing. They are located on each top and bottom step of each flight of stairs. If there are intermediate platforms, including rotary ones, this rule must also be observed. At the same time, the uppermost post can be common to the railing and balustrade.
Factory posts come in two types: solid and box-shaped, that is, glued together from strips of thick plywood or wood panels. It is very important that each post has a straight edge at the junction of the handrails, because in the case of joining with a round support, factory trimming of the edges of the handrail is required, which significantly complicates the installation process.
Hollow pillars are attached through a boss - a 150-200 mm piece of timber, the outer dimensions of which correspond as closely as possible to the cavity of the pillar. The boss is attached through a through axial hole using a pin screwed into the step or platform. This method of fastening allows for rotation of the post around its axis and a slight lateral play for its precise positioning. The hollow post is glued using thick glue; the lower end is first lubricated with a small amount of sealant; this perimeter band will prevent excess glue from squeezing out.
 A - box-shaped post with fastening through a boss. B - solid post with dowel fastening. 1 - pillar; 2 - base; 3 - plinth; 4 - pin or anchor; 5 - dowel
Monolithic pillars are fastened to one large (20-30 mm) dowel or to several small ones evenly distributed over the support area. With this method of fastening, it is desirable that the junction of the post to the site be framed by a plinth, which helps to hide the adhesive seam and increase the support plane. If you have a baseboard, you can also use the fastening method with ties for cabinet furniture, since the niches for the nuts will ultimately be hidden anyway.
The alignment of pillars is better with parallel pairs, that is, on intermediate platforms where flights of stairs converge. The distance between the posts should provide sufficient big gap between the handrail of the lower and the steps of the upper flight. In the longitudinal direction, the position of the pillars is determined by two long straight slats laid on the edges of the steps of converging marches. The plane laid across the line of intersection of the slats is the ideal position for installing the posts. If necessary, they can be moved towards the spans, but not back, otherwise the railings will overlap. When paired pillars are positioned on landings and turns, the end pillars are also marked using the same principle; it is important here that the connection with the railing is carried out at the same height.
Trimming, installing balusters
Looking ahead, we note that the sequence of attaching the balusters to the steps, to the handrails, as well as the handrails themselves to the posts may be different depending on the method of assembling the fence. First, all balusters must be trimmed and their attachment points must be marked.

The bottom of the balusters is best fastened on dowels with zero tolerance, drilling the steps to a depth of 20 mm. To mark the centers of the holes you need to shoot laser level a vertical plane parallel to the end of the steps. If balusters are installed in the amount of one piece per step, it is enough to use a square to find its middle, based on the riser. When installing balusters in pairs, you need to achieve their uniform spacing, for which the protrusion of the upper step above the lower one is beaten off with a square, and the remaining “clean” width is divided so that the centers of the balusters are spaced from the edges by 1/4 of the resulting segment.
 When installing balusters, it is important to keep their heads strictly on the same line
Balusters with a figured profile must be aligned in length relative to the handrails. To do this, they are laid out on a flat plane, aligning the profiles along their widest part. Next, a line is drawn under the long straight rail, which serves as a marking for trimming at right angles.
The bevel cut of the top of the balusters is made on a miter saw or in a precision miter box. Balusters are trimmed in groups for each flight of stairs. First you need to determine the actual slope of the stairs by placing a strip on the edges of the steps and marking the horizontal axis along it with a laser level. Using this marking, a template is made using a small tool, according to which fine tuning is carried out turntable saws.

Before oblique trimming, centering holes are made at the ends of the balusters; their depth should be sufficient to deepen the dowel at least 40 mm after trimming. In the lower part, drilling is carried out after trimming the balusters to length. This is quite simple to do: first, dry and strictly vertically install the two outer balusters of each span, which are temporarily fastened together with a regular strip with a straight edge, aligned with the upper edge of the oblique cut. Next, one by one, put the balusters in their place, use a caliper to determine the excess length and cut the lower end, deepening it if necessary center hole and be sure to number the details.
Attaching handrails
The handrail can be attached to posts different methods, among which the most popular are fixation on spikes or self-tapping screws with making through holes. The first method is more labor-intensive and often tenon fastening cannot be done without a groove router with precise adjustment of the inclination of the sole. In the second case, installation is simpler, but there are mounting holes on the backs of the posts that need to be closed with decorative plugs.
 Railing with railing
Attaching the railings to the balusters is done in two ways. Simple - using a rail and a little more complex - using wooden dowels. The choice of fastening method depends entirely on the profile of the handrail: when fixing to an intermediate rail, a rectangular groove to the appropriate depth must be selected in the lower edge of the product. The handrails for fastening to dowels should also have a groove equal to the width of the base part of the balusters, but it is intended solely for masking the fastening points and should have a depth of 5-7 mm.

The final assembly of the fence, as mentioned, can take place in different sequences. When attaching to a railing rail, balusters are first glued to the steps on the dowels, after which the rail is installed, and then the handrails are cut and secured with self-tapping screws from below. When installing balusters on dowels and attaching handrails to posts with self-tapping screws, first glue all the railings, and drilling into them must be carried out with tolerance: in this case, landing on liquid nails will allow for more accurate alignment. If the balusters are attached to dowels, and the pillars to the handrails are fastened with a tenon connection, the pedestals are installed last, which requires the simultaneous positioning of all elements of the staircase in short term setting of glue.
Final processing of the railings
As a rule, wooden stair railings are assembled from parts that have already been primed and painted. In such cases, all that remains is to disguise the places where the railings are joined, where they join the posts and balusters to the steps, where gaps up to 1-1.5 mm thick can form. To fill the cracks, you can use acrylic sealant or wood paste based on natural wax.

If wooden parts don't have protective coating At the time of assembly, the cracks in them are sealed with wood putty, and then the entire fence along with the stairs is primed and painted. It is recommended to apply two layers of transparent water-soluble primer followed by fine sanding to remove raised lint. Next, the steps are covered with stain or glaze in 2-3 layers. It is recommended to choose two layers of transparent polyurethane varnish as the main protective coating.
Relatively recently, new options for garden fences made of polycarbonate have appeared. The well-proven material is now used in the production of fencing. This fence has a very simple installation and a number of advantageous advantages compared to standard fences.
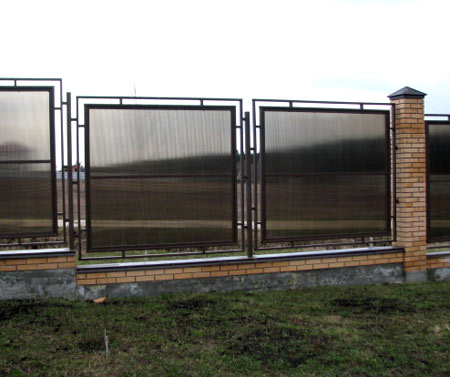
Example of a polycarbonate fence
Thanks to its excellent operational characteristics the use of such a fence is quite relevant both for urban development conditions and as a country fence.
There are two types of polycarbonate: cellular and monolithic. Each of them has its own strength characteristics:
- Cellular is characterized by its relatively light weight and special structure, which allows the use of polycarbonate for the manufacture of lightweight fences;
- Monolithic, in turn, has greater thickness, and accordingly has more heavy weight. However, this type can withstand high wind loads well, which makes it preferable in regions with difficult weather conditions.
Like the construction of any other fence, the installation of a polycarbonate fence with your own hands begins with the installation of supports.
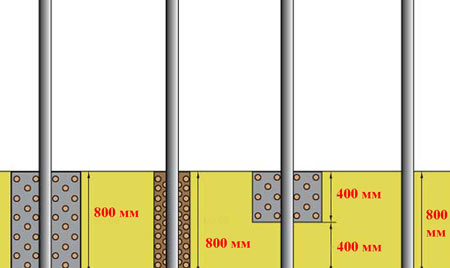 Installation diagram for fence posts
 As a rule, concrete or metal are chosen profile pipes, which are installed in pre-drilled wells.
- If manufactured concrete pillar, special formwork is made for it, or asbestos or plastic pipe, which is carefully removed after the concrete has set;
- Metal supports must be pre-treated with an anti-corrosion solution, and a crushed stone cushion is poured into the wells.
The next step should be the manufacture of a frame, which is impossible to do without. Otherwise, there is a high probability that the sheets will move or simply be torn off by gusts of wind.
The fact is that polycarbonate does not have sufficient rigidity, which is why additional reinforcement with a metal profile or corner is required.
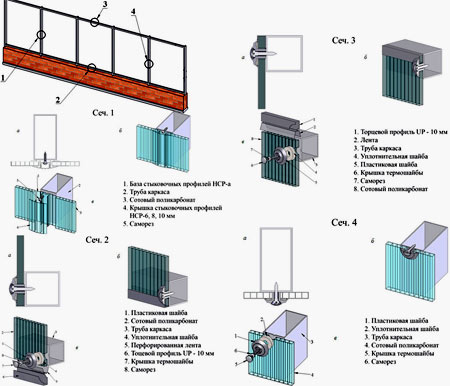
 Polycarbonate fence option
 As a rule, the design is made in the form of three guides, the distance between which should be about 0.5–1.0 m. In some cases, a metal profile is placed on the sides of each polycarbonate sheet. This not only gives extra strength to the fence, but also provides a more attractive appearance.
The polycarbonate itself is already mounted on the frame, and there are some installation nuances that must be taken into account when carrying out work.
Features of installation and fastening
Even a beginner in construction can install a polycarbonate fence with his own hands, however, during installation it is necessary to take into account some factors due to the characteristics of the material.

The last stage of working with polycarbonate is removing protective film and material design additional elements. For these purposes, you can use decorative elements made of stone or install additional lighting. Looks particularly advantageous.
Types of polycarbonate fences
Polycarbonate goes well with almost any type of material, with the possible exception of wood. This is due to the peculiarity of the characteristics: both are distinguished by their ability to expand under the influence environment.
Therefore, this combination can lead to bending of the polycarbonate and loss of appearance of the entire fence. However, there are many other poles that are quite suitable for installation.

Which option to choose directly depends on the size of your budget, since the cost of materials varies quite a lot. Most budget options pillars are made of metal and concrete, brick and stone will cost a little more.
 Example metal poles for the fence
 Why choose polycarbonate for fencing?
It’s worth mentioning right away that a polycarbonate fence is not shock-resistant enough, but the quality is quite acceptable.
If such a fence is installed in compliance with the technology and heavy stones are not deliberately thrown at it, then it will stand for quite a long time.
Polycarbonate is available in transparent and translucent versions, which makes this material extremely convenient for use in the country.
- The material allows sunlight to pass through unhindered, while filtering out ultraviolet radiation that is harmful to plants;
- Transparent polycarbonate is used if plants need a lot of light, translucent - to create partial shade;
- Another use case transparent material- when required good review territory located behind a fence, for example, when fencing car parks;
- A translucent fence, on the contrary, will hide your area from prying eyes.
The following advantage of polycarbonate is especially relevant for summer cottages: this material absorbs sound waves due to its cellular structure, providing reliable sound insulation of the area behind the fence. No less effectively, such a fence protects the area from dust.  In accordance with its manufacturing technology, polycarbonate is produced in various color scheme and does not require additional processing. In addition, plastic plugs, corners and other elements produced for this fence also have a wide variety of colors.
Such a variety of tinted solutions allows us to produce original fence, which will carry not only a functional load, but will also become a decorative element of the surrounding landscape. In addition, there is significant savings both monetary and time resources, since the material does not require additional painting.
 Example of a polycarbonate fence with forged elements
 Polycarbonate is practically not exposed to the environment, the material is not afraid of moisture, does not mold and does not corrode.
Tolerates temperature changes well (at correct installation), excellent resistance to wind loads and long-term exposure to sunlight.
In addition, the material is absolutely not subject to negative impacts insects These properties of polycarbonate distinguish it from other types of fencing.
Polycarbonate is also quite flexible and can bend in the desired direction, which allows you to install fences of various shapes. For example, if the fence is planned to be made in the form of a semicircle, it is not at all difficult to make the necessary structure from polycarbonate.
In the construction of enclosing structures for stairs, they can be used different materials and technology. If fencing is needed for a staircase in a private house, it all depends on the desires and financial capabilities of the owners. Metal structures are a popular solution, because they are highly durable and can elevate the interior.
The process of making fences from metal with your own hands is more difficult than from wood. This requires the appropriate tool and at least minimal skills in working with metal. But the result will be different depending on better side. Metal stair railings will last for decades, with minimal maintenance. A appearance Such designs may simply be unique.
What materials can be used to make metal railings
They are considered the most valuable. In addition to the fact that forged elements have the strength and durability characteristic of metal structures, they also give the interior solidity and status. There is only one problem - the complexity of manufacturing. Only a professional can forge a full-fledged fence with his own hands, and finished products are quite expensive. But forged elements can complement others well metal structures– welded, for example.
Steel railings are no less popular. They are durable and can withstand heavy loads. If you know how to use welding machine and a grinder, then you can build fence posts, patterned filling, and handrails from steel with your own hands. The appearance of stainless steel or painted black steel will suit the most different interiors. At self-production steel fencing, there is an opportunity to save.
Aluminum railings are prefabricated structures. Aluminum is softer than other metals, with significant loads it becomes deformed. But for fencing a simple staircase for a home, it can be the most suitable option. Aluminum parts are much lighter than steel ones - it is not difficult to transport and assemble fences from them yourself.
Safety standards
When you decide to make metal fencing with your own hands, you need to pay attention to safety issues. There are standards for following parameters railing:
- the optimal height is from 90 cm to 1 m;
- the load that the railing must withstand is 100 kg/m;
- the distance between the balusters is from 10 to 15 cm.
- handrail diameter, optimal value – 5 cm;
- the gap between the wall handrail and the wall is at least 10 cm.
In addition, the integrity of the handrail is important, as well as the absence sharp corners and burrs, which can easily injure your hand. The shape of the handrail is usually chosen to be round; this option is the most convenient to use. In general, the recommended values determine not only the safety of the structure, but also the comfort of its use. For example, a railing of a specified height not only protects a person from falling, but also allows him to feel comfortable holding on to them when descending or ascending.
How to attach metal stair railings
Mounting options depend on the parameters of the ladder and its location. If the span runs along the wall, then the fences can be mounted on the wall. Actually, from the railing to in this case Only the handrails remain. Installing them yourself is a breeze, and eliminating much of the stair railing reduces overall costs.
In another case, fence posts are installed on the steps. This is the most common solution; it is suitable for almost any staircase structure. The posts to which the handrail is mounted are attached to the outer edges of the treads.
The most reliable is considered to be fastening to the ends of the steps. This kind of fastening, called lateral, is used, for example, when you don’t want to narrow usable area span. But you need to keep in mind that this method is expensive and labor-intensive. In addition, if the staircase has several flights, then the distance between parallel flights should be at least 20 cm.
Aluminum option
Like most metals, aluminum has a number of important qualities, allowing it to be used for the manufacture of stair railings. First of all, this:
- corrosion resistance;
- durability;
- strength;
- resistance to low and high temperatures, as well as to temperature changes.
It should be noted that aluminum is lightweight; it sets it apart from other metals. In many cases, softness can also be considered an advantage - aluminum parts can be easily given the desired shape.
The process of assembling and installing aluminum railings is not particularly difficult; everything is done using conventional fasteners. Even an untrained person can assemble and install stair railings from ready-made aluminum parts with his own hands.
As for the appearance of aluminum fences, anodized aluminum railings are widely used today. Such material is externally indistinguishable from stainless steel. Anodizing increases the wear resistance of aluminum and improves its appearance - you can give the material different shades: gold, silver, nickel and others.
For decoration aluminum structures cold bending technology can be used. In this way, you can create, for example, rounded elements to fill the space between racks.
Cold bending of metal
Prefabricated aluminum railings for concrete stairs
The parts from which aluminum railings are assembled can be purchased at hardware store, and do-it-yourself assembly will save some money. The following components will be needed:
- racks with a diameter of at least 4 cm;
- crossbars with a diameter of 16 mm;
- handrail, diameter – 5 cm;
- hinges for fixing the handrail;
- connecting parts and holders for crossbars;
- additional fasteners and fittings - anchors, glazing beads for racks, decorative plugs, filling, etc.
The guardrails will be attached to the steps. To do this, markings are first made - it is necessary to determine the location of the racks on the stairs. It is recommended to place the racks in the middle of the steps with a distance of 35–50 mm from the edge. Then drill holes for anchors, depth - 10 cm.
The resulting recess is first filled with a special adhesive. This is done in order to mix the glue with the dust remaining after drilling. The anchor is inserted, rotated and removed. The recess is again filled with glue and the anchor is inserted again.
Then the anchor needs to be drilled at the points above which the glazing beads will be located. This is done for mounting with self-tapping screws; the stand is also drilled in the appropriate places. Next, the stand is put on the anchor, but not secured - the height may need to be adjusted.
A flange is put on it through the top of the rack; it serves as an additional fastening and should be located at the bottom. Hinges are attached to the upper ends of the posts. A handrail is mounted on them - it is placed on hinges, adjusted in height and fixed with self-tapping screws.
Advice!
If the staircase design includes several flights, then the handrails are connected to each other by rotating elements.
Do-it-yourself assembly and installation of aluminum railings.
How to weld a railing
Welded stair railing structures are the cheapest option. The raw material for the manufacture of fencing is rolled metal - tubes, angles, rods, fittings, etc.
Common manufacturing option metal fencing– creation of a solid frame. When making such a design with your own hands, you need to take into account that the frame will be raised above the steps by 10 centimeters. Having decided on the height and distance between the posts, use a power tool to cut the parts required sizes. Assembly begins with laying out the frame and minimal tackling. You should not weld tightly right away.
The next step is to reinforce the frame. Internal vertical jumpers are welded. After making sure that the resulting structure does not have distortions, you can carry out the final welding of all its elements. To increase the strength characteristics of the frame, it is recommended to weld the seams on both sides.
The last step is to add 10cm posts to the bottom of the frame. The lower parts of these posts must be equipped with plates. To attach to the steps of the stairs, holes are drilled in the plates.
Welding stainless steel railings.
Finishing
The production of welded stair railings is completed by treating their surface. If stainless steel was used as the material, then you only need to clean the weld seams.
Treatment of black steel and iron surfaces also includes the application of a primer and subsequent painting. This can be done after installing the railing on the stairs.
Advice!
But it is advisable to clean the welding seams before installation, since after installation some areas may become difficult to access.
Among modern technologies it should be noted polymer coatings. Their use makes the metal more resistant to wear and corrosion, and also increases the decorative value of the product.
A country house is a multifunctional and important part of the staircase structure as a whole, which should not only ensure safety when going upstairs, reliably protecting against falling, but also be aesthetically attractive, fitting harmoniously and naturally into the overall stylistic concept of the room.
A railing is a fencing for staircase flights, which, on the one hand, protects the person climbing (descending) from falling, and on the other, serves as a support when climbing, which is especially important for older people. The fencing structure consists of the following elements:
- balusters– these are the support posts to which the handrail is attached. They perform both a practical (load-bearing) function and a decorative one.
- handrails are an element used as support when moving up stairs. Can be installed on two or one side flight of stairs, and can be attached either directly to the wall or to balusters
- fence fillers - an element that fills the space between balusters. Often they perform a purely decorative function and in some designs, especially modern styles, fillers are abandoned altogether. However, if there are children in the house, they are required for installation - their presence significantly increases the safety of moving up the stairs.
According to current regulations and standards, the minimum height of handrails on stairs must be at least 90 cm. If the width of the stairs exceeds 1.25 m, handrails must be installed on both sides.
Advice! If there is a child in the house, then the distance between the balusters is selected so as to exclude the possibility of sticking their head between them.
Railings for stairs: selecting material
If the design of the staircase is simple in execution and there are no special design requirements for the railings, then they can be made of simple materials. Another thing is a staircase of an exclusive design or which acts as a central detail, bearing the main decorative load in the interior - here the railings will have to meet increased requirements. Otherwise, the simplicity and unpretentiousness of the railing design will ruin the whole effect. Therefore, it is important to choose the right material from which the staircase railings will be made (photos make it possible to compare different options). In this case, it is important to follow two rules - compliance with style and unconditional compliance with safety requirements.
Metal railings
A very popular option, in no small part due to the large number of design options - from simple, minimalist, consisting only of posts and railings, combined by welding, to very complex structures. They can be made of steel, iron, aluminum, and also in combination with other materials - glass, PVC, wood. Any type can be used metal profile– from fittings and simple pipes to profiles with complex patterns. They are very durable, resistant to dynamic and static loads - even the thinnest handrails can withstand high pressure. They can be used both indoors and outdoors. At the same time, metal stair railings (photos will serve as proof of this) in addition to the main one - protective, also do an excellent job of decorative function.
Wrought iron railings
They are often installed to favorably emphasize the chosen style of decorating a room, so they are most often used in the style of Rococo, Baroque and traditional classics. Besides elegance and beauty, forged elements they look elegant and sophisticated, which is often lacking in wood fragments. Typically, such railings are easy to perceive and visually “transparent”, thus the staircase does not consume space. Forged staircase railings will get additional charm if you use gold, silver or platinum finishes.
Stainless steel railings
Perhaps the most reliable and durable, primarily due to the manufacturing features. Such railings are usually made welded method, i.e. They are not collapsible, so they can withstand very heavy loads. In addition, they are durable - the stainless steel coating will reliably protect the metal from corrosion, plus no periodic touch-up is required. Stainless steel railings will harmoniously fit into modern (high-tech, minimalism) interiors.
Wooden railings
Wood remains one of the most popular materials in home construction. First of all, it is the environmental friendliness, attractiveness and affordability of the so-called “non-elite” types of wood. It is also important that wood is tactilely pleasant to the touch, so very often, even if the railings and balusters are made of metal, handrails are installed from wood. Even with minimal processing, the wood looks very attractive.
The natural beauty of wood makes it possible to create attractive combinations using various forms of frame racks. The possibility of high-tech processing of wooden blanks makes it possible to obtain wooden stair railings (the photo below will serve as confirmation) of an unusual shape. At the same time, the attractiveness of the design will in no way affect the fulfillment of safety requirements.
PVC handrails are indispensable if country railings are installed on the street. They are very durable, resistant to rot, corrosion, fungus or mold, and are easy to clean. Plastic can be chosen in almost any color so that the railings fit as harmoniously into the interior/exterior as possible. In addition, they have a non-slip structure - in this case, this is very important.
Nowadays glass fencing is gaining popularity. Despite their external simplicity and fragility, they are very reliable - they are used exclusively tempered glass or triplex. If used absolutely clear glass, this will help to visually enlarge the room - by transmitting light through itself, it will create a feeling of lightness and weightlessness. Patterned, stained or tinted glass will add uniqueness to the interior, and the railing itself will become a bright and attractive accent.


