When thinking about arranging a suburban area, many try to make and decorate even unsightly functional and outbuildings so that they fit harmoniously into the surrounding landscape.
 A toilet for a dacha may well even become a decoration for the site
 There is nothing difficult about building a presentable and functional toilet in the country with your own hands. You just need to have basic construction skills and have the necessary materials on hand.
When planning to build a toilet in a country house with your own hands, first of all you need to decide on the type future design.
Conventionally, all street latrines can be divided into two types: cesspool and with replaceable capacity. Constructions of the first type involve the presence of a hole dug in the ground. Latrines of the second type are equipped with special containers for collecting waste, filled with peat with sawdust, or a special aqueous solution.
 Country toilet with cesspool
 Traditional pit toilet. This is the cheapest and affordable way for the implementation of an outdoor bathroom. The principle of its operation is quite simple: waste products fall into a cesspool, where the liquid part of which is partially absorbed into the soil and evaporates, and the dense component accumulates. For the cleaning cesspools resort to the services of sewerage companies.
 Scheme: backlash closet device
 Backlash closet. It is also equipped with a cesspool, but the walls of which are completely sealed. Emptying the cesspool in such a system is carried out only by pumping, using the toilet itself as a receiving funnel.
 Drawing: powder closet equipment
 Powder closet. It is a structure made of a pedestal with a toilet seat. The storage container for collecting sewage, located directly under the toilet seat, is sprinkled with a layer of peat, which has moisture-absorbing properties. A scoop with a bucket filled with a sawdust-peat mixture is installed next to the toilet seat. Every time you visit the restroom, add a portion of fresh peat to the waste tank. After filling the container, it is taken to the compost heap. Due to the mobility and compact design, it can be installed both inside a residential building and in a separate outdoor booth.
 Liquid bio-toilet
 Chemical toilet. The type resembles a powder closet; unlike a bio-toilet, the processing and breakdown of sewage in it occurs under the influence of chemical reagents. By using liquids based on biobacteria, waste products can be converted into useful organic fertilizer, using them as root nutrition for plants.
Choosing a place to build
Of fundamental importance when building a toilet for a summer house with your own hands is the choice of location for its construction. It is strictly regulated by the provisions of the current regulatory documents, according to which:
- The distance of the toilet to the water well, well or reservoir should be at least 25-30 meters.
- The restroom must be at least 12 meters away from the residential building.
- Cesspools must be reliably insulated.
 Location of cesspools in neighboring areas (according to standards)
 - When choosing a location, take into account the terrain and wind direction.
- If groundwater occurs in an area at a depth of up to 2 meters, you can only install a dry closet, a chemical toilet or a powder closet.
- If groundwater occurs at a depth of 2.5 meters or more, it is possible to build a toilet with a cesspool or a backlash closet.
Following these precautions will help prevent exposure to Wastewater into drinking water.
Drawing up a diagram - drawing and determining dimensions
Before starting construction of an outdoor restroom, it is necessary to determine the dimensions of the future structure. The first step is to create a diagram or drawing. The shape and design of the future house is limited only by the imagination and capabilities of the master. It can be an ordinary house, a nice little mansion or an original hut. If desired, options for drawings of country toilets can be found on the Internet on thematic forums.
The most popular is the classic house with a cesspool. The most optimal sizes it could be considered:
- Height from 2 to 2.3 meters;
- Length 1.5 -1.7 meters;
- Width 1-1.2 meters.
 Drawing: a regular toilet with a cesspool
 Tip: A detailed diagram with exact dimensions will allow you to correctly calculate the dimensions of the structure and volume necessary materials, thereby preventing possible errors and unnecessary costs.
Construction of a cesspool
At the site where the outdoor toilet is installed, a cesspool is dug, giving it a square or round shape. The depth of the septic tank pit should not exceed 1.5 meters, and its diameter should not exceed 2.5 meters. But as practice shows, cesspools that have a round shape are more functional. They are characterized by increased strength and can withstand heavy loads and pressure.
Tip: When digging a hole, it is better to use a shovel with a short handle. With such a tool it will be easier to turn around in tight spaces. A crowbar or pick is useful when digging in tougher soil such as gravel, heavy clay or limestone.
Digging a hole of the required size, compact its base. Instead of tamping, the bottom can be lined with a bed of gravel. To ensure the necessary sealing of the device, the walls of the pit are lined with brickwork, or concrete rings are installed.
 Construction of a cesspool
 Brickwork strengthen reinforced mesh or fittings. All joints are carefully sealed cement mortar followed by installation of a waterproofing layer. This allows you to protect the crop from impurities and preserve The groundwater from pollution.
Construction of a toilet house
The easiest way is to build a toilet house from wood. It is better to use three-meter wooden beams, or metal or concrete pillars as support for the future structure.
Materials and tools for building a toilet:
- Wooden beams with a section of 100x100 mm and 50x50 mm;
- Edged boards or fiberboard for cladding;
- Floor boards for arranging the floor area;
- A 1.5 meter piece of roofing felt;
- Hacksaw and plane;
- Garden drill;
- Building level;
- Self-tapping screws, nails, hammer.
 Construction of a frame for a toilet
 Along the perimeter of the structure, using a garden drill, make four holes about one meter deep, the diameter of which is 2-3 cm larger than the size of the support pillars.
One end of each pipe is processed bitumen mastic which prevents rotting and corrosion. The columns are immersed in the holes one by one, deepening them to 90-100 cm and fixing them with cement mortar. When the solution acquires sufficient strength, you can proceed to the construction of walls.
Tip: The posts for the rear wall of the house are made a little lower to provide a slope for the roof. At all stages of installation, it is necessary to control the vertical installation of the racks using a building level.
Beams for the door are installed parallel to the supporting posts. To add strength to the structure along the perimeter of the vertical posts, upper and lower trims are made from beams of the same size.
Construction of walls and installation of doors
To provide waterproofing between the frame and columnar foundation lay roofing material, on top of which edged boards they put together a platform-floor.
Important: To extend the service life wooden elements houses, they should be treated with a moisture-repellent and antiseptic composition, which can be purchased at any hardware store.
At a height of about half a meter, perpendicular bars are installed, which will serve as the basis for attaching the toilet seat. Stepping back one meter from the back wall, a second jumper is made at the same level to arrange the seat. The base of the seat is sheathed chipboard sheet or boards. The hole in the seat is cut out using a jigsaw, and all corners are cleared of burrs with a plane. To waterproof the front of the toilet seat along the inner wall, you can use thick polyethylene film.
 Construction of a toilet seat
 The finished frame remains to be sheathed fiberboard sheets or wooden edged boards 20 mm thick. The boards can be placed both horizontally and vertically, securing them to the frame with screws or nails. If desired, the walls of the house can be insulated with mineral wool or sheet foam.
At this stage of the work, it is worth taking care of arranging a ventilation window, which at the same time will act as natural lighting.
The door block can be purchased ready-made or built with your own hands. It is installed so that it opens outwards and is framed with a platband. Latches are installed both inside and outside the toilet.
Roof arrangement
The roof can be made from any material you like roofing material: galvanized iron, tiles, slate, polycarbonate or simple edged boards. The boards are laid overlapping, secured with roofing screws.
 The roof for a country toilet can be of any shape and from any material
 The light in the toilet can be provided from the nearest building by throwing a two-core aluminum wire and installing a socket with a light bulb with a power of 40-60 W. An excellent alternative to stationary lighting can be an LED, which does not require laying a cable. LED on a small battery that can illuminate small room, enough for the whole season.
Simple DIY country toilet: video
Everyone knows the popular expression that says that getting to know the theater begins with the hanger. We won’t be mistaken if we say about a dacha that it starts with the toilet. You can judge the owner by its appearance and structure. The “hands-on” owner made this building beautiful and neat. There are no drafts or unpleasant smell.
It will be useful for beginners in country life to learn how to build an inexpensive and comfortable outdoor toilet.
In this article we will talk about the most common types of closet structures, their structure and consider the possibility of combining them with other country houses.
Based on the method of waste disposal, these structures are divided into three types:
- Powder closets;
- Toilets with a cesspool (septic tank);
- Water closets.
The first type of outdoor toilet is easy to install and operate. Its main part is a seat (stool), under which a removable container is installed. After each visit, a peat mixture is poured into it with a scoop, which absorbs liquid and unpleasant odors.

A toilet seat with a sealed lid and a bucket of peat – that’s all you need to set up an outdoor latrine
A significant drawback of this design is the small capacity of the bucket. For those who rarely visit the dacha, a powder closet is optimal. If you plan to spend weekends on your property or your family has more than three people, you will have to empty the container often.
An improved version of the powder closet is the peat dry closet, offered on the market today. It consists of a plastic case, inside of which one or two containers are placed. A tank with a peat mixture and a dispenser is installed on top.

1, 2 – containers for the solid fraction; 3 – funnel for liquid; 4 – funnel for solid fraction; 5 – tank with peat dispenser; 6 – ventilation pipe; 7 – drainage tube
To eliminate unpleasant odors, the structure is equipped with an exhaust pipe leading to the roof of the cabin. The containers in this toilet need to be emptied no more than once a week. This is achieved by separating the liquid and solid fractions of waste.
When using the dry closet, the liquid enters a funnel located in the front part of the body and is discharged through a tube into the ground or a plastic container located outside. Dense fractions of sewage accumulate in the internal container.
The dry closet is in the “combat position” and in the process of installation. In the first case, the cramped cabin is striking, so we do not advise you to save on its space at the expense of comfort.
Despite the advantages of a peat toilet over a classic powder toilet (converting waste into fertilizer, good ventilation and an extended period of use), many summer residents choose the option with a cesspool (septic tank). Its installation is cheaper than purchasing an “advanced” dry closet, and the cleaning frequency is 1-2 times a year.
At the same time, you should remember two serious problems that a cesspool can present to its owners if constructed incorrectly:
- Soil contamination by pathogenic bacteria;
- Unpleasant smell.
It is not enough to simply dig a large hole in the ground and place a toilet box over it. The container with sewage must be reliably isolated from the ground. A concrete tank treated with waterproofing impregnation is best suited for this purpose.
The second condition is the introduction of special bacteria into the cesspool. They quickly decompose sewage, disinfect it and eliminate odor. Dry bacteria concentrates for septic tanks and cesspools can be purchased today at any hardware supermarket.
The design of the backlash closet (air toilet) cannot be called too complicated. Its main part is a concrete pit with a hole. A booth is installed on it. To eliminate unpleasant odors, an exhaust pipe is placed on its rear wall. Its lower end is in a hole, and its upper end rises above the roof. Due to the difference in height, draft is generated. Air from the cabin is sucked into the pit and released into the atmosphere through a pipe.

Backlash closet design diagram
Another popular toilet option for a summer house is a water closet. Its main part is the familiar toilet with a flush cistern. It contains a water lock, which prevents the smell from escaping from the pit into the cabin. Unfortunately, it is impossible to use such a system without heating, since winter time The water in the toilet and cistern freezes. That's why this design designed for the warm season.

Drawing of an outdoor water closet
With the onset of warm days, the container on the roof of the booth is filled with water. The outlet channel is connected to through a tee equipped with a vertical ventilation pipe.
Options for outdoor toilet stalls
You can build a toilet stall from different materials. Most often, the basis of the design is wooden frame, sheathed with OSB, tongue-and-groove boards, plywood or siding.

A toilet covered with planed boards looks neat and cozy
Moving away from the use of a frame and cladding, the house can be folded from, thereby creating a picturesque imitation of a log house.

Lovers of natural wood can also be advised to use a blockhouse for cladding. It is cheaper than a massive log and is easily mounted on a frame. Toilet walls lined with wooden clapboard"herringbone"

Many dacha owners are not satisfied with the rustic appearance of the “birdhouse” toilet. Striving for originality, they erect luxurious log mansions on the plots for “solitary reflection.”

Bricks and blocks as materials for constructing latrines are still very popular. Whatever one may say, the capital structure will last for decades. Neither dampness, nor wind, nor sun will harm it.

If you don't have it at hand facing bricks, then the walls can be built from the remains of red and silicate. High-quality plaster will hide uneven masonry.

The cabin, built from assorted bricks, is awaiting plastering.
Translucent polycarbonate can be used to cover the cabin from a metal profile. This material looks very aesthetically pleasing and is not afraid of moisture.

Sheet corrugated sheets are a practical and durable material for toilet cubicles. It can be placed on either a wooden or steel frame. The only condition is internal lining walls with insulation. Without this addition, there will be a hot “oven” in the summer and a freezer in the winter.

Cabin interior decoration plastic lining– concise and hygienic
Straw blocks can be classified as unusual materials used for the construction of latrines. A cabin built from them is warm and cozy. Anyone who wants to amaze the imagination of neighbors and guests does not go to a construction site to buy materials. Having collected a certain number of empty bottles, he builds a toilet out of them, “to everyone’s surprise.”

In addition to rectangular and rounded structures, “huts” of different sizes are very popular.
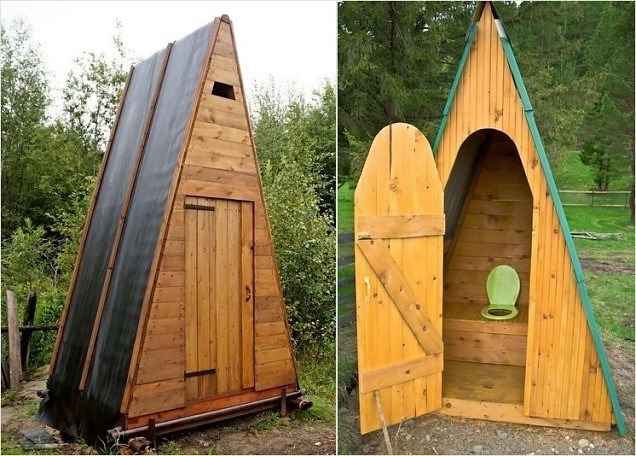
There are two rational grains in this decision:
- The slopes of a steep roof replace the walls;
- The unusual appearance of the building adorns the landscape.
Very often the toilet becomes part of the utility unit. This solution allows you to place several rooms in one building. As a result, savings are achieved during construction ( common walls) and the comfort of use increases (a warm toilet is always at hand).

Solid combination latrine with shower, lined with siding and covered with a hipped bitumen roof

Option for a brick toilet interconnected with a shower stall

Aesthetically, not a very successful combination in one outbuilding (toilet-shower) log house and plastic slate roofs

Some owners combine two toilets in the building: “for gentlemen and ladies.”
How to build a simple toilet for your dacha yourself?
Having decided on a waste disposal system (powder closet, cesspool, septic tank), you can begin construction.
Minimum internal dimensions of the cabin– width 1 meter, depth 1.4 meters and height 2.0 meters.
The basis of the structure, step-by-step construction which we will consider is chosen wooden frame from antiseptic bursa. It can be placed on a block foundation or on a shallow concrete “ribbon”. A thick sheet of plywood or OSB board with a rectangular hole cut in it is attached to the frame on top.

Having assembled the base, level it vertical racks frame and strapping bars.

Having made the frame, it is sheathed with plywood using a jigsaw and a screwdriver.

The next step is installation of the roof rafters. They are made from dry timber with a cross-section of 5x10 cm, cutting it into the upper chord of the walls. In the upper part, the bars are connected to a horizontal ridge board.

Having completed this stage, the rafters are covered with plywood. This is the best basis for bitumen shingles, which will fall on the roof.

Having finished with the roof, they begin to assemble the “podium” frame. A powder closet storage tank will be installed in it and a hole will be made for a seat with a lid.

The toilet door is assembled from a tongue-and-groove board fastened cross bars for greater rigidity.

After lining the doorway with timber, the door leaf is attached to it using hinges. The final operation is painting the toilet booth outside and inside.

In conclusion, let’s say that we have considered the option of building a summer outdoor toilet. For the winter season, the walls from the inside must be insulated with polystyrene foam (minslab) and sheathed with any sheet material (plywood, OSB, board, plastic).
If you decide to install light in the booth, then at the same time you can minimal costs increase comfort of use. Install an electric fan heater. In just a few minutes it will warm the air to above-zero temperatures.
If a person decides to purchase a country plot for relaxation with friends or family, the question of how to make a toilet in the country will arise first. A house for the fulfillment of natural physiological needs is a mandatory attribute not only of any home, but also of a garden area where you will be spending more than one hour. It is quite logical that every owner will want to start and finish building the toilet everyone needs at their dacha as quickly as possible. And although at first glance it seems that this matter is quite simple, there is no need to rush. You should carefully study the dacha area and decide on the choice of location for the toilet house, taking into account a number of sanitary requirements. And 1 more important point is the choice of the type of restroom, because there are several of them. What kind of toilet is better to build on the territory of a summer cottage?
How to choose the right place for an outdoor toilet?
Convenient and comfortable for dacha residents is to place the toilet inside the house. It's warm and dry here. Don't go out at night or on a rainy day. But such a closet requires a long time to construct and is more expensive. If a person is working in the garden beds, it is preferable to run to the yard restroom, without thinking about the possibility of soiling the floor of the home. Therefore, at first it will be easier and more correct to build a toilet on the street. Where should it be placed on the site? To do everything right, you should take into account the sanitary and hygienic requirements for the arrangement of outdoor closets. This is especially true for latrines with cesspools.
Since the most unpleasant thing about them is the smell, restrooms are usually located not in close proximity to the walls of a residential building, but at a distance of 8-10 m from them. You should not plant trees and shrubs near the toilet. The distance between them should be several meters. If there is a well at the dacha, then a distance of 50 m should be maintained between it and the latrine. If the country house is not located on the outskirts, but is surrounded by neighbors’ plots, you need to think about their comfort. You cannot build a yard latrine right in front of their house, even if the areas are separated by a fence (the distance from the fence should be at least 1 m). It is better to place the closet so that neighbors do not smell it or see it right in front of them. It is necessary to observe the wind and determine which direction it blows most often. And if there are no buildings nearby, you can build a restroom in this place.

An important circumstance is the topography of the dacha plot and the presence of groundwater underground. If the suburban area has a slope, then the toilet should be located in a low area so that the source of water intake is higher than it. In this case, dirty wastewater will not enter the clean water. It is good when groundwater flows at a depth of 2.5 m, i.e., sufficiently far from the surface of the earth. This means that you can build a latrine with a cesspool on your site. And if the depth of the groundwater level is less than 2 m, types of toilets with containers for collecting sewage are suitable. Otherwise, the soil and water may become contaminated harmful products decay.
Main types of yard latrines
Having decided on the location of the future toilet, it is worth thinking about its design. Currently, there are several types of latrines that are suitable for a summer residence:
- dry closet;
- powder-closet;
- peat latrine;
- chemical toilet;
- latrine with pit cesspool.
It is advisable to install all of the above water closets, except the last one, in areas with groundwater close to the surface of the earth. A latrine with a cesspool is installed only when the groundwater flows deeply. What are these toilet houses?
The simplest solution for a summer residence would be a dry closet. This is a booth that you can buy and install on your site without wasting time on construction. Inside the cabin there is a two-section container for collecting sewage. Special feces breakers are poured here. They process them and eliminate the unpleasant odor. 7-8 days after you start using the dry closet, it will need to be cleaned of sewage by draining it either into other containers or into the soil. Caring for this toilet is easy. But the disadvantage of such a restroom for some zealous owners is its cost.

A chemical water closet is almost no different from a dry closet. The only difference is in the antiseptics poured into the tank. Chemical reagents that destroy sewage are harmful to environment, they cannot fertilize the soil on the site. Therefore, such latrines are better suited for cities. They can be seen on construction sites or public holiday events.
A powder closet is a toilet structure without a cesspool. It is replaced by any volumetric container (barrel, reservoir) installed under the toilet seat. All sewage entering the container is immediately sprinkled with sawdust, peat or ash, as if powdered on top to eliminate the unpleasant aroma. Hence the name of the closet. When the tank is filled to the top, it is emptied and the contents are used as fertilizer.
A variant of the powder closet is the peat toilet. IN cistern dry peat is poured, which enters the reservoir under the toilet seat and sprinkles with sewage.
The most familiar to everyone, but the most labor-intensive to build, is a latrine with a cesspool. A toilet house is installed above the pit. After filling the pit, sewage is either removed manually or vacuum cleaners are called in to help.
How to build a support for a house for a toilet?
Any outbuilding begins with a drawing. The owner needs to decide on the size of the future closet before purchasing construction material. The following sizes of country toilet are common:
- height - 2 m;
- side width 1.5 m;
- depth 1-1.2 m.
But you can adjust them as you wish: make the structure taller, more spacious.
To prevent the toilet from being blown away by the wind, it is necessary to provide support for it under the frame. As for the foundation, it is not necessary for a small building. There are several ways to construct supports. In the first case, you can make a stable base from bricks or blocks. To do this, at the site of the future toilet, remove the soil to a depth of 30 cm, then thoroughly compact the soil. The perimeter of the area is laid out with blocks or bricks. A toilet house is installed on top of the support. It can be easily moved to another location in the future.

In the second case, asbestos pipes with wooden beams can be used as supports. Pipes with a diameter of at least 15 cm and a length of 100 cm will be stable and reliable. First, 50-80 cm recesses are dug along the perimeter of the base in each of its 4 corners. Asbestos pipes are installed vertically in them, into which 1/3 of the concrete solution is poured. Then wooden beams with a length of 2.3 m and a diameter of 5x5 cm are inserted inside such supports. They will serve as vertical parts of the frame of the future toilet. The tree will be firmly fixed in concrete mortar, you just need to ensure that the beams are level during installation so that they are strictly vertical. The rear beams should be 10-15 cm shorter than the front ones, since the roof of the house is usually sloping.
Making a closet frame and covering it
By installing the vertical support beams and adjusting their height, you can strap the frame. The top screed is made at the level of the roof of the structure. Horizontal slats are nailed around the perimeter of all sides of the house. In front and behind, they should protrude 30 cm beyond the boundaries of the building. Since the roof is made with a small canopy and drains rainwater from the toilet so that it does not flow directly onto the wall. The lower screed is performed at the level of the seat or toilet seat at a height of 35-40 cm from the floor of the restroom. The front wall is not touched, because there will be a door here. To make the body even stronger, diagonal jibs are placed on its side and rear walls. 2 more vertical supports are installed on the front wall of the toilet, their height is 190 cm. They are nailed along their top line horizontal jumper. The door will be inserted into this frame.

Now you should sheathe the structure with the selected material: wood or metal profile. It is warmer and more comfortable to be inside a wooden toilet. It is better to take boards 1.5-2 cm thick for it. Measure the material in height and nail it vertically to the frame on 3 sides. Be sure to ensure that the boards fit snugly against each other and that there are no gaps between them. At the bottom of the back wall you will need to make a small door from the same boards. A container filled with sewage will be drawn through it. To make this process easy, the door is made to the height of the toilet seat and the width of the rear wall of the restroom. Hinges are used to secure the door. The roof of the toilet house can be either slate or wood. To extend service life wooden roof, it is covered with roofing felt on top.
Arranging a toilet seat and door
After all 3 walls of the closet are ready, you can begin making the door and attaching it to the body of the structure. The dimensions of the door (width, height) must match the opening prepared for it. The boards are knocked together. Screw 2 hinges onto the toilet body and door leaf, and hang the door on the wall. Screw the handle on the inside and outside. 1 more important element the door is a latch. It is attached to the door on both sides. You can close the door using a regular hook, a steel latch or a latch - this is everyone’s personal choice. To make the restroom light, it is advisable to make a small window above the door and glaze it. A window can also be cut on the side wall of the toilet.

Now all that remains is to make the most necessary part of the toilet - the toilet seat. As mentioned above, its height is usually no more than 40 cm. A toilet seat that is too high is inconvenient, especially for children. The frame of the toilet seat is 50 cm wide. Like the walls of the restroom, it is covered with boards and a hole is cut out in the top center for the discharge of natural needs. It shouldn't be too big or small. A container for sewage with a volume of 30-40 liters is placed under the finished toilet seat. The rest of the floor is covered with boards. The wooden toilet house needs to be painted or varnished. When the coating is dry, the toilet is replenished finishing touches. A container for sawdust or peat and a holder (bracket) for toilet paper, put the trash can on the floor. The powder closet is ready!
How to make a cesspool?
Some owners prefer the good old fashioned pit toilets. How to properly arrange such a restroom? First, you need to dig a hole 150 cm deep. The slope is made towards the back wall of the future closet. Then all the walls and bottom of the pit are compacted tightly with a layer of clay (20-25 cm), you can line them with bricks. The toilet house, which is being built, like the powder closet, will be located above the front third of the pit. The base for the toilet is made of wooden beams. Boards are laid over the pit (outside the closet) and covered underneath with roofing felt. A hole is cut in the flooring and the lid is hung on hinges. This will be the hatch. A pipe for ventilation must be brought out of the pit up parallel to the back wall of the toilet. Its lower edge should fall 20 cm below the level of the toilet floor, and the upper edge should extend 80 cm above the roof of the closet. Install next to the pipe above the pit wooden house and secure the pipe to its rear wall using clamps. Next, around the outdoor toilet for the dacha they fill concrete blind area(1 m wide). It will prevent rainwater from entering the cesspool.
Each owner will decide for himself what type of toilet to build on a country plot, but any closet will require a little time and effort. There are pros and cons to building a country toilet with your own hands. But when the design is ready, the person will be proud that he made it himself.
The purpose does not matter - be it a summer house, garden or residential - natural natural needs no one canceled. And the first thing that needs to be installed on it is a restroom, even if you are not supposed to live on the site. Of course, at first glance it may seem that this is a fairly simple job, but upon closer examination of the issue, you can understand that there are quite a lot of nuances that should be paid attention to. That’s why we’ll now figure out how to arrange a dacha with our own hands. Step-by-step instruction should help with this.
Read in the article
Basic rules on how to make a toilet in the country with your own hands, without turning to specialists for help
The first thing you need to do is decide what kind of restroom you want. This question does not relate to the choice of structure, but to the reservoir into which waste products will fall. This depends on many parameters.
For example, very important aspect is the depth of groundwater. After all, the site usually does not have a centralized one, which means that the much-needed liquid will be taken from the well. You can imagine what will happen if sewage gets into this water. Is this necessary? Naturally not. Indeed, in addition to health problems, there is also the danger of fines from sanitary and epidemiological supervision. This, of course, is not as life-threatening as drinking contaminated water, but it is at least unpleasant.

The same applies to soil containing shale. That is why it makes sense to clarify all such nuances in advance. And if it turns out that such a problem exists, then you will have to install a sealed box (usually made of sheet iron of at least 3 mm or plastic) in the cesspool. In this case, it is necessary to provide for the possibility of pumping out sewage.
As for the shape of the building itself, garden toilets for a dacha can be completely varied - everything is limited only by the imagination and capabilities of the master.

What sanitary and epidemiological norms and rules do you need to know when installing a country toilet?
Particular attention should be paid to the already mentioned depth of groundwater. It is important that at the installation site it is more than 3.5 m, and during spring floods. Otherwise, only a sealed container will save you. Of course, there are some secrets for such cases, but their implementation will be more financially expensive. We'll talk about this a little later.

It is also worth paying attention to the location of the restroom. According to SanPiN, the distance to a neighboring house must be at least 12 m, and to a well, if available, more than 8 m. Moreover, it does not matter whether special solutions for disinfection. Even if it is a chemical toilet (why people call it a dry closet is unclear). This rule must be strictly followed. Otherwise, there is a risk of communicating with neighbors in court. After all, it usually happens that among the summer residents living nearby, there will definitely be a “guardian of the laws.”

Important tip! In order to avoid future problems associated with the location of the country toilet, it makes sense to coordinate it with the local sanitary and epidemiological supervision authorities and confirm the installation location on the map. This kind of paper can be very useful.
A restroom inside the house or attached to it - features of such an arrangement
If you plan to live on the site all year round, then it makes sense to make a toilet in the house. At the dacha, of course, this will not be a problem at all, but in the absence of it, work will increase a little. In this case, it is better to arrange the restroom not indoors, but in the form. With this arrangement, having previously insulated the toilet stall, visiting this “institution” in winter will be quite comfortable.

And yet, if you want to place a toilet inside the house, but there is no centralized sewage system, then with a little effort this can be brought to life. This option will be especially successful for owners of small plots. Let us examine in detail how the work will be carried out.
First, you need to dig a hole in the area in which you need to place a sealed steel or plastic tank. It is important to understand that the container for collecting sewage will have to be lined to prevent soil pressure on it. There should be 3 pipes coming out of the tank. One of them is at the end, located in the upper part - through it, sewage will flow from the home toilet into the box. The second, the length of which must be at least three meters, must come out from above - it will serve as natural ventilation. Well, the third is also output from above, but in the tank it comes almost from the very bottom. Through this pipeline, waste products will be pumped out using a special sewer truck. There is usually a hatch on top that must close tightly.

Well, when this work is completed, all that remains is to install a sewer pipe from the house to the reservoir. The main thing to remember is that the toilet installed in the toilet at home should be installed higher drain pipe on the container.
A toilet attached to a house is essentially built identically, with the only difference being that there is no need to install sewer pipes, because... it will be located at the edge of the cesspool. Although, if you want to move the sewage tank further from the house, you can use the option with a main line.

As you can understand, installing a country toilet inside a residential building, although labor-intensive, is a completely do-it-yourself process.
Related article:
The article talks about how to do it. Description of construction requirements supplemented with reviews effective technologies and ready-made models with characteristics and prices. This information will help you implement the project quickly and at reasonable costs.
A regular cesspool or how to install a toilet for a summer house on the street with your own hands
If the depth at which the groundwater is located allows the construction of a conventional, non-sealed toilet pit (i.e. more than 3.5 m), then the amount of work is significantly reduced. Many people strengthen the excavated recess with spacers in order to prevent the soil from collapsing, but usually a beam is simply laid on it, which serves as a support for the wooden cabin. This is the most convenient and easy way How to build an outdoor toilet with your own hands.

Standards for the location of the toilet on the site, established by the Center for Sanitary and Epidemiological Sanitation
You should not ignore the standards established by SanPiN, because they are based on research and are aimed only at maintaining public health. The best option to find out where to place the toilet on the site is not only to make your own calculations, but also to apply for a certificate from the sanitary and epidemiological service.
What depth should a cesspool for a toilet in a country house have - are there any restrictions?
There are no strict restrictions on depth. The main thing is that the pit for the country toilet, or rather its bottom, should be higher than the level at which groundwater is located during the spring flood. Otherwise, sewage effluent can get into drinking water, which can lead to severe food poisoning, even death.

How to make a toilet in the country comfortable and warm
Naturally, a person always strives for comfort. Therefore, a restroom located on the street must be properly insulated. A good solution for this could be polystyrene foam, or in other words. This is a lightweight material that retains heat very well, and if you cover the outside of the building with it correctly, a 100 W incandescent lamp will be sufficient for heating inside.

Before building a toilet in the country, you need to decide whether only the outer wall will be made, or whether there will be a layer of penoplex on the inside, which is preferable. With the second option, you need to think through the structure a little large sizes, taking into account the thickness. Also, before building country toilet It is worth taking care of the safe supply of electricity to it.

It is also important which one will lead to the restroom - after all, in any case, it is not very pleasant to walk through the mud at night to a latrine, which, according to the rules, is located in the distance. Of course, all of the above does not apply to toilets built in the house - naturally it will be both warm and clean. But covering a restroom attached to the house with thermal insulation is also worth doing. In general, at the dacha, the construction of a toilet is gaining momentum, which is not surprising. After all, it is simply impossible to do without it.

The importance of drawing up drawings for a country toilet with your own hands
Although the restroom is summer cottage is a small building, it is very important to first draw up a drawing with all the dimensions, according to which the structure will subsequently be assembled.
Important tip! The plan should be drawn up as carefully as possible, taking into account the area, so that the use of the much-needed building is as comfortable as possible.

Firstly, you don’t need to make your own wooden country toilet low. Inside is an adult man standing in full height, should not touch the ceiling with your head. Agree, it’s not very convenient to go into the restroom bent over. This rule applies not only to the ceiling, but also front door. Typically, the ceiling height is about half a meter higher than the upper level of the door, which, in turn, is 1.7-1.8 m high. Someone will say that such an entrance will be somewhat high, but this is only at first glance. In general, it will be optimal (maybe a little narrower). Isn’t it convenient to walk through such an opening? The same should apply to the restroom.

Secondly, a wooden toilet for a dacha should be made strong - you should not save material on this construction. After all, even if the sewage is not pumped out with a special machine, and the cesspool is simply planned to be filled with earth and the toilet is moved to another place, it will be more convenient to move a strong building than to dismantle a flimsy one and mount it on another. In addition, appearance it should be aesthetically pleasing - after all, no one wants an unsightly building to spoil the appearance of the yard. This is especially true if you have a garden. It's not very nice when in the middle of beauty flowering trees and bushes suddenly a sloppy, rickety structure of a latrine appears.

A wooden toilet for a dacha can be like gable roof, and with a single-pitched one - it’s whatever you like. It is during the construction of a restroom that you can practice the skills of a builder and designer. Of course, if the roof slope diverges in different directions, with a ridge in the middle, the building will look much more attractive. Shed roofs are well suited for restrooms that are attached to the house. In this case, it will look natural, forming a single whole with the house. The roof of the restroom can be covered with a profile sheet, ordinary tin, slate or tiles. The main thing you should not forget about is roof waterproofing. It's not very nice when it drips down your collar rainwater. It is also necessary to lay a layer of foam film between the ceiling wood and the roofing felt. After all, the main heat rises upward, and it is needed there more than anywhere else.

The size should be determined based on personal preferences and the functionality that the wooden toilet for the dacha will have. You can build a washbasin and place a sink in it with your own hands. In this case, the internal area of the restroom needs to be made larger. Depending on the size of the pit, if it is large enough and has the ability to pump out sewage, you can even run a water supply for a washbasin into the toilet. The main thing when carrying out such work is to insulate the pipes to prevent the possibility of water freezing in them in winter. Fortunately, these days, such work does not require skills. welding work, and making plumbing using plastic is not difficult and does not require any special skills. Even an amateur can cope with it (with the right approach, of course).

In general, building a wooden toilet with your own hands requires a careful approach, accuracy and compliance different rules and normal. Although such work is difficult, it is more in the mental and creative plane than in the physical. If you think everything through correctly, then it will be much easier to bring this to life than to build a clumsy, ugly restroom on the site without any kind of drawings. That is why you should not waste time on preparatory work. Otherwise, you can lose much more of it at the construction stage.

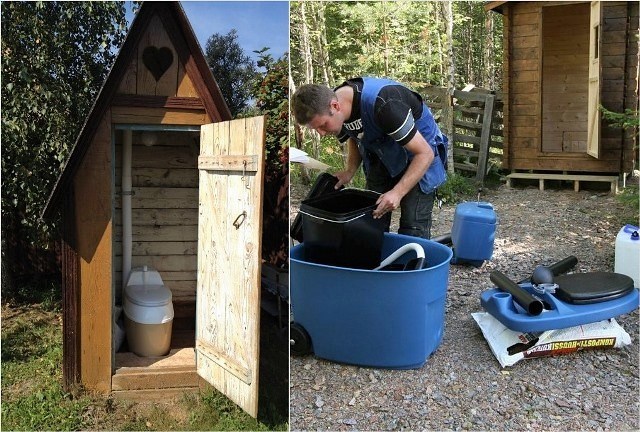
Renting an odorless dry closet for a summer residence – myths and reality
If you don’t have the time or desire to install a proper toilet in your summer cottage, these days there are other opportunities to arrange your life. Now there are many companies that are engaged in removing waste products from cesspools. And most of them offer serviced toilet stalls for rent. What are they, these mobile restrooms? Let's try to figure it out.

In appearance it looks like a plastic telephone booth. At the base, under the floor, there is a reservoir for sewage. Inside there is some kind of toilet with a seat. Actually, if the toilet is planned to be used only in summer time, This good option, requiring no effort during installation. In addition, when registering a lease, the company also enters into a service agreement at certain intervals. It consists in the fact that on days specified in the contract, company employees will arrive in a special car, pump out sewage and flush the tank. After this, a certain amount of a special chemical solution will be poured into it, which kills bacteria that multiply in waste products and also prevents the appearance of an unpleasant odor.

dry closet
The main myth lies precisely in the name - because. the liquid is a chemical solution, the prefix “bio” does not fit in with such a toilet. Of course, there are also biological fillers for tanks, but their use by companies is unprofitable due to their high cost and the short life of the “live” solution in the drainage pit.
The following latrine device can be called a dry toilet. Under the seat there is a bucket into which dry peat is periodically poured. When the bucket is full, the contents are dumped into compost pit, where sewage continues to break down into various substances for some time. In the end it turns out very good fertilizer for the garden or vegetable garden. well and chemical liquid for a toilet in the country, it does not have similar properties and requires specialized processing. That is why it would be more correct to call such latrines chemical toilets.

Liquid compositions can be divided into 3 categories:
- Formaldehyde- very effective, but at the same time very toxic solutions. They clean and disinfect the tank perfectly, but the toxic substances released by such a liquid do not allow the use of chemical toilets in the stalls, because turns out to be very harmful effects on the human body.
- Ammonium based– such liquids are most suitable for such toilets. Their properties are closer to biological ones, i.e. do not decompose waste, but accelerate the processes of their natural decomposition, and also effectively disinfect the container.
- Biological fluids– the principle of their operation is based on the work of living bacteria that come into contact with the environment in sewage and decompose them into natural ingredients. The main inconvenience in using such solutions is the short lifespan of bacteria. The fluid must be changed or topped up frequently.

It is precisely because of the toxic effect that formaldehyde liquid is not applicable for toilets in the country, and therefore it is best to opt for an ammonium solution.
Liquids and fillers for dry toilets
Related article:
An excellent alternative to sewerage is mobile toilets. In this article we will look at Explore existing models devices, average prices, reviews and some recommendations that will help you make the right choice.
An alternative do-it-yourself summer toilet made from corrugated sheets
In cases where there is no time to build a thorough toilet and, moreover, it is intended to be used only in the summer, the option of making a country toilet cubicle from corrugated sheets may well be suitable. In this case, it will only be necessary to assemble a frame from wooden beam or weld it from metal. You need to understand that the floor of such a restroom will still have to be done, because the walls and roof themselves are not a toilet stall. Therefore, it is necessary to decide what material it will be made of.

Important tip! The restroom floors must be ready before the wall paneling begins, because... otherwise, their installation will become quite problematic. Also, do not forget that the frame of a building is not only the wooden or metal edges of a rectangle. They also need to be connected with diagonal cross members to give the future restroom the required rigidity.
A country toilet made of corrugated sheets is the simplest and relatively inexpensive structure, and therefore a similar type is common in gardens and orchards where people do not live, but come periodically. For example, for planting seeds, weeding or harvesting.

How to properly build a toilet for a summer house with your own hands: step-by-step instructions
In this chapter, we will try to summarize all the information received into one whole, so that installing a garden toilet with your own hands according to a drawing does not turn into a long-term construction project. There is also a need for a photo report of such work to more clearly explain the algorithm of actions. Of course, someone may say that this is completely useless and that everything is clear without a photo, but still, illustrated instructions on how to build a toilet with your own hands in a country house, in a garden or on a personal yard will certainly be more understandable.

But first, let’s summarize the material received on the norms and rules for installing a restroom in personal plot.
Drawing up drawings with the dimensions of country toilets with your own hands
The most important thing in building a restroom on a personal plot is drawing up a detailed, dimensional drawing, which will take into account everything related to the structure. It is advisable to indicate in it the material of manufacture, the depth at which groundwater flows, and everything else that concerns the general design of the device (depth of the pit, its ventilation and pumping system). A separate drawing must indicate the structure itself with exact dimensions of width, length and height.

Of course, you can do all the work without such a diagram, but it should be taken into account that a drawing of a toilet in a country house with dimensions can be useful not only for the construction of the structure, but also for coordinating the location and other standards with the sanitary and epidemiological service. After their permission and approval of such a scheme, it can become proof that everything was done according to the rules and regulations of the law, even in court, if one of the neighbors does not like the toilet.

The size of a toilet in a dacha with your own hands can be different and depend only on the owner himself and his preferences. Inside you can place a washbasin, sink and even a shower, dividing the room with a wall. But this will require a major sealed container with the ability to pump out sewage, as well as the installation of a water supply system. Although, a metal or plastic barrel on the roof, which it is advisable to paint black, can also play its role. This way the water in it will heat up faster from the sun. For example, a 200 liter container on a sunny day heats up to a comfortable temperature in 3-4 hours.
How to properly dig a hole for a toilet in the country with your own hands - norms and rules
Before starting such work, you need to find out the depth of the so-called. water horizon. The basic rule is that the bottom of the toilet pit should not be at a level lower than the groundwater flow. This is fraught not only with fines from sanitary and epidemiological supervision, but also big problems with health. The width is usually made according to the size of the building, of course, provided that we are talking about an ordinary outdoor toilet. If sewage is discharged through a sewer pipe, then there are no restrictions on this parameter. Well, what if in simple words, then everything should be in moderation. After all, it would be completely inappropriate to dig a hole for a toilet in the dacha that is as deep and wide as the floor of the garden.

Important tip! Having compiled detailed drawing it is better to show it to the employees of the sanitary and epidemiological service before digging a hole for a toilet in the country. Otherwise, a situation may arise in which you will have to change the location of the toilet and do double work, again digging a hole under the sewage.
Photo report on how to build a country toilet step by step - stages of work
Let's try to explain what steps you need to take to install a wooden toilet yourself with step-by-step photo instructions.
| Work stage | Description of required actions |
 Drawing up a detailed dimensional drawing | A drawing is drawn up, i.e. a detailed plan diagram indicating the location, depth and communications of the latrine pit, the dimensions of the toilet structure, etc. It is better to have the layout and depth diagram certified by the sanitary and epidemiological supervision authorities in order to avoid troubles in the future. |
 Digging a hole and installing a caisson (tank) and ventilation | Having marked the required area, a pit is dug for sewage. Such work can be either manual or mechanized, using special equipment |
 Frame for pit toilet floor and its installation |
The toilet is an essential room in any place where there are people. In a country house where there is no sewerage system, it has a specific appearance and design. But this does not mean that a modern country toilet cannot be a comfortable and functional building that does not cause an internal shudder in the visitor.
With minimal experience and observing a number of sanitary and hygienic requirements, you can build a toilet yourself. Let's figure out how to do this?

Selecting a location
How to make a toilet in the country? The first and one of the most important stages of construction is the competent choice of location. In addition to ease of use, it must meet sanitary requirements.

When using a structure with a cesspool, consider the following points:
- The distance between the toilet and the basement is 12 m;
- From the bathhouse - at least 8 m;
- At least 25 m from the nearest body of water (for example, a well). Groundwater should lie no higher than 2.5 m underground;
- From the fence - a meter;
- From trees - 4 m and from bushes - a meter.


The wind rose has a noticeable influence on the final decision: choose a place so that unpleasant odors do not cause inconvenience in the future. All these points must be observed in relation not only to your site, but also to those of your neighbors.

Other designs allow for a more free arrangement: rely only on your own convenience.

Kinds
A toilet with a cesspool needs no further introduction and is familiar to everyone since childhood. The depth of the pit is 1.5-2 meters. The sewage that gets into it accumulates and decomposes naturally.

The problem of overcrowding used to be solved by moving the toilet house to another place; today, sewage machines are used to clean it. It should be done by filling the hole 2/3 full.


The cesspool of the backlash closet is sealed and cleaned with a sewer machine. Such a toilet, connected to the pit by a pipe, can be located at home.

In a powder closet, the cesspool is replaced by a smaller container installed under the toilet seat. It requires regular cleaning, and its contents can subsequently be used as fertilizer.

The rest of the time, peat or sawdust helps get rid of unpleasant odors: after using the toilet, you need to sprinkle them on the sewage. This type of toilet is suitable if, for sanitary reasons, it is impossible to dig a cesspool.

In your house, install an improved powder closet, also known as a peat toilet: it uses dry peat, not water, to flush away sewage. Also, do not forget to ventilate outside.


A dry toilet, more familiar to a city dweller, does not require additional effort during installation, since it can be purchased without any problems ready-made option. The impurities in it are broken down by special microorganisms.

The chemical toilet is similar to the previous principle of operation with one exception: instead of microorganisms, chemical reagents are used. Attention: feces processed in this way cannot be used as fertilizer.

Construction
Consider construction classic version with a cesspool.

The approximate dimensions of the pit are 1.5x1.5x2 meters. The walls are reinforced with bricks, concrete rings or antiseptic-treated boards. The cesspool of the backlash closet must be sealed, for which purpose the bottom is screeded or filled with crushed stone.


Filled from above concrete floor. It must be strong enough to support the weight of whatever is placed on it. Leave openings for the toilet, ventilation and pumping out the contents - the last point can be omitted if the prospect of building a new toilet from time to time does not scare you.

You can build a house yourself, but it’s easier to buy a ready-made option.

Having decided to make it yourself, start by building a drawing of the toilet or use ready-made ones. Study photos of garden toilets to better understand how to proceed.


Most common wooden structures, but nothing prevents you from making a reliable brick house. Please note that in this case it is necessary to take care of a reliable foundation around the pit. Typically, tape or columnar is used. A layer of waterproofing - roofing felt - is laid between the foundation and the ground.

Under a wooden frame, bricks laid around the perimeter are enough. The structure will be additionally strengthened by support pillars made of timber and logs.

Cover the walls with clapboard, slate or metal profiles. Additionally, they can be insulated with cotton wool or polystyrene foam.

You can't do without ventilation. A pipe with a diameter of 10 cm should extend 15-20 cm into the cesspool and rise above the roof by about the same amount.

A small window under the roof will be a natural source of light. Optionally, wall lights connected to a battery can be installed.

The roof is covered with corrugated sheets or metal tiles, and it also has a hole for a ventilation pipe.

The door is hung on hinges and equipped with a latch, hook or other mechanism.

The construction of a powder closet has a nuance: in the back of the house it is necessary to provide a door through which you can remove the container with sewage.

We hope our instructions helped you figure out how to build a toilet with your own hands.

Photo of a toilet for a summer residence