Imitation brick wall You can do it yourself in so many ways that we don’t even know which one to start with. Let's try to describe the most different techniques and approaches, and readers will choose the appropriate option themselves. In any case, the point is that when applying plaster, a special template made by yourself is used. Recommended for typical facing material add strong binders, such as tile adhesive. This ensures excellent adhesion of the plaster. In addition, quick-hardening materials should not be used. Let's see how an imitation of a brick wall is performed in practice.
Masonry imitation process
Template for imitation brickwork
Template for imitation brickwork Anything can serve. But, in general, these items can be divided into two classes:
- In the first case, masking tape is widely used. It is advisable to purchase a skein of a width that matches the seam dimensions of a typical brickwork. The facing solution is applied over the tape, and then, until it all hardens, the template is removed. It turns out to be an imitation of a brick wall.
- The second type of templates are molds made of solid materials. Most often it is wood or plastic. The solution is applied between the guides of the template.

Template for wall decor
In practice, there are also hybrid variations that use one and the other type of template. In this case, the outer frame is made of wood. Imitation of ligating brickwork is done with masking tape stretched inside. Obviously, such a pattern cannot be too large. Otherwise, it will not only be difficult for builders to move it from place to place, but also great difficulties will arise when passing jagged sections of the wall. Builders get out of the situation as follows:

The builder walks around with such a frame and, row by row, process the entire surface of the wall until they get an imitation of a brick wall made of plaster. The advantage of this solution is that it is also possible to work with quickly hardening solutions, such as gypsum plaster. In the time it takes the builder to cover a quarter of the square meter walls, it won’t have time to dry. Due to this, the master has greater flexibility in choosing the material. At the same time, one serious drawback is noticeable. The fact is that when applying the solution over the masking tape, you literally have to tear out the frame from under the plaster. This is fraught with damage. Some may think that the wavy areas of the edges imitate clinker well, but other craftsmen will not like this effect.

Wall with simulated masonry
That's why we recommend assembling the entire template from thin slats. Its shape will exactly repeat the design already discussed with one exception. The masking tape will also be replaced with wooden slats. In this case, the slightest gaps between the planks can cause some masonry defects. But, as we will see later, this is not so important. The main thing is to securely fasten the planks relative to each other so that the template does not move around.
Finally, by working with only masking tape and no wood strips, the template is created directly on the wall. To do this, an arbitrary area is painted with the desired design. And immediately we see the first advantage of such a solution. Dressing does not have to be regular. We can create both interlocking and longitudinal masonry patterns. Moreover, it becomes possible to imitate rough stones quite accurately. Previous, pre-created templates did not allow you to do anything like this. The brick imitation turns out to be more natural.

Ready-made template for the wall
At the same time masking tape there is a pair significant shortcomings. If the object is large, then pasting the wall will take a lot of time and a large amount of tape will be spent. This is completely unacceptable in professional planned development. But for some amateurs and apartment owners, this method may seem simpler. Because it requires a minimum preparatory work, the process of applying the mixture itself is not very complicated. The second disadvantage is that the solution should not harden too quickly. Otherwise, it will be simply impossible to tear out the masking tape from under it without damaging the pattern of the brickwork.
The process of applying plaster imitating brickwork
Let's first consider the option with masking tape, as it is the simplest. At the initial moment of time, you need to correctly mark the wall. The easiest way to do this is with a ruler and a building level. It’s also a good idea to get a strip thick enough so that the contour builder can easily be applied to its end. Regular will do building level with bubbles. The process is simplified by the fact that you only need to draw exactly one line with the rail. We will plot all other horizontal lines from the first one up and down using a ruler. Once the process is completed, you can begin simulating ligation of sutures. When laying out the horizontal lines, do not forget to take the trouble to set aside the thickness of the joint in addition to the height of the bricks.

Wall with imitation brick
The ligation of the seams is carried out either regularly with one brick overlapping exactly half of the other, or in a random order. Thus, a perfect imitation of a brick wall in the interior is performed. That is, as was written above, the master has greater flexibility to choose the appropriate aesthetic solution. Once the marking of the wall is completed, the process of gluing the tape begins. First of all, horizontal lines are laid out along the entire length. Vertical dressing seams are glued on top. This ensures the creation of a single template from masking tape, which is then very easily torn out from under the applied construction mixture.
The surface is primed before laying the plaster. If waterproofing is required, you must select the appropriate composition at a hardware store. The same applies to the fight against fungus and rodents. Next you need to act according to the instructions for the selected type of plaster. It is strongly recommended to add tile adhesive there to increase viscosity. An even layer of plaster is applied over the template. There is no need to rub this layer or specially level it. The waviness of the surface imitates brickwork even better.
While the mixture has not dried, the tape template must be carefully pulled out. At the same time, the seams remain almost completely clean. Surely many people will want to paint the resulting masonry in some color. For this purpose, a composition from the range of terracotta or sand-lime brick. After the wall has dried, you need to use a special tile grout for the seams. The color is chosen according to your own preferences.
Working with a frame template is much more subtle. The process starts from any angle. This is usually the bottom edge. Section by section, the builder goes through the entire wall. The jumpers with masking tape also end up under the plaster layer. In this case, an additional bonus is that you can imitate the natural color of the seams. Here's how it's done. A thin primer layer is applied under the main layer of plaster. A template is applied on top, and then all the work is done in the same way as already indicated above. The tape is carefully removed from under the main plaster, leaving the seams almost empty. But unlike the previous case, after drying these places will have the color of the building mixture. Therefore, all that remains is to paint the ends of the bricks.

Decorative wall
The whole problem is not to stain the seams. It is clear that the easiest way is to stick the notorious masking tape there. But this will not be the cheapest option. That is why we consider both of the above methods of making templates to be non-ideal. It would be much better to make a pattern from wooden slats, and below we give reasons why readers can understand all the nuances themselves:
- Firstly, the slats do not go under the layer of plaster. Therefore, the chance of damaging the edges of future bricks is minimized. Some may be intimidated by the complexity of applying plaster to each cell, but in fact the solution to the problem is simple. It is enough to make the intermediate slats as thick as a layer of plaster.
- Secondly, material consumption is reduced to a minimum. We have a single template that is used for all areas of the wall. For problematic and jagged areas, a smaller pattern can be made separately.
- When painting, we can use this same template to securely cover all the seams. This means that the process of giving bricks a natural color is simplified to the maximum. Moreover, you can use any colored plaster for finishing.
- To make the seams look natural, no one forbids us to apply a thin primer under the main layer of building mixtures.
This completes our instructions for simulating brickwork using plaster.
The work consists of several stages. First, the walls are prepared for processing: you need to remove the wallpaper and level the surface with sandpaper. Then a sample is made from linoleum or brick. The standard parameter is 25 × 6.5 cm. Seams are marked at a distance of 1.5 cm around the perimeter of the workpiece. Each seam is further divided in two to accurately imitate brickwork.


The brick imitation should start from the floor, retreating 5-10 cm and moving upward. Particular attention is paid to the first corner “brick”, the edges of which are outlined with a pencil. The corners of the wall are the most difficult, so work starts from the edges and moves towards the center. After creating the outline of the masonry, a primer is applied using a roller. The tool ensures strong and even adhesion of the mixture to the surface of the walls. At the same time, the markings remain clear and do not smudge.


Before applying the solution, masking tape is applied to the joints of false masonry: first horizontally, then vertically. The gluing occurs with an overlap. The solution is made from plaster and tile adhesive in a ratio of 50:50. It is applied using a spatula or by hand, after wearing special gloves (the latter method is quick and easy). Immediately after treating the wall with the mixture, you need to remove the tape - this is the main nuance of the technology. If you hesitate, the mixture will not allow the material to be pulled off, and there will be no space between the fragments. Therefore, gypsum is not used to imitate brickwork due to its instant drying.


If the solution was applied by hand, that is, unevenly, it is necessary to shape the masonry using a spatula, chisel or tablespoon. Other methods are also used, but this one is the simplest and most accessible.


After the solution has dried, the surface of the do-it-yourself brick imitation made from tile adhesive and plaster can be painted, although many leave everything as is. The wall is cleaned and leveled with a broom, sandpaper or brush. Then it is primed completely, along with the seams, and paint is applied.


How to finish a brick wall with plaster yourself?
It is necessary to use a steel spatula 5-10 or 20-25 cm wide. Approximately 10-15 liters of solution will be needed per area. The wall is first primed, then gypsum plaster is applied to it with a wide spatula and leveled. The solution dries, then markings are made on it using a rule up to 2 m long. Using the sharp end of the tool, you need to draw seams half a centimeter to a centimeter wide. The plaster is then removed using a scraper. Standard depth seams is 3-6 mm. Plaster can be removed with a chisel or construction jointer.


Cutting is done first along horizontal, then along vertical lines. The surface is leveled and the plaster is allowed to dry. Excess is removed with a sponge or rag. If you want to make an imitation of brickwork, the wall is painted in two stages: first it is tinted with a spray or brush, then the color is applied to the “bricks”. To array for a long time remained durable, do not combine gypsum plaster and cement tile adhesive.

Do-it-yourself imitation of a brick wall made of polystyrene foam
Foam ceiling tiles without patterns are suitable for this purpose. It is better to make “bricks” measuring 150 x 70 mm, since figures that are too voluminous will look unnatural. First, markings are made using any available material, taking into account seam allowances. Using a toothpick, straight lines are pressed onto the markings. Use a sharp object to push to the end of the line.


You need to cover the wall with “bricks” by applying tile adhesive to the material. An imitation of a brick wall made of polystyrene foam is performed from floor to ceiling. The seam between the “bricks” is 1-2 mm. After this, the cladding is ready for painting. A large amount of paint is applied to the seams to make the masonry as close as possible to natural.

Natural brick wall
To create such a wall, it is enough to remove the finishing from the brickwork and improve it appearance and paint or varnish. First, the surface is cleared of the finish using an emery disc and grinder. To remove visual defects and unevenness, a special mixture is used, which is applied to the joints between the bricks. Finishing procedures are completed by covering the wall with special varnish or wax. They are suitable for processing walls made of natural bricks. To avoid the glossy effect on the wall, it is enough to sand the wall with fine-grained sandpaper until it becomes matte.

Tiles as a way to imitate brickwork
To create fake masonry, take tiles made from different materials. Ceramic products have such advantages as lightness, variety of surfaces (matte, glossy), ease of installation, and compactness. If you need to cover a surface with geometrically complex parameters, this product will come in handy. It is important to use the tiles carefully: they are fragile and cannot withstand impacts. Clinker products made using burnt shale clay are durable and easy to install, with a textured or smooth surface. Gypsum tiles, which are a mixture of dyes, water and gypsum, are abrasion-resistant, cheap and lightweight. It is not used in damp areas due to its ability to absorb moisture.

Installation begins with removing the previous coating and leveling, plastering and priming the wall. Markings are applied to the surface. Gypsum tiles begin to be installed from the floor. First, a rail is attached to the bottom of the wall, along which the first row is mounted. For fastening, gypsum putty is used - it is applied to a spatula, then to the tile. The material is pressed against the wall, but not too much, to avoid cracking. Excess putty is removed. All subsequent rows are installed with a spacing of ½ tile for a reliable imitation of brick laying. To ensure that the rows are perfectly even, clamps are attached to the space between the seams. For getting standard size Brick tiles are cut into the required pieces with a hacksaw.

The seams are formed after installation of the fabric. Rubbing occurs using putty. To give the space between the seams a relief, use half of a cut tube with a diameter of 10 mm. After the material has dried, the wall is treated and painted. Installation of clinker tiles occurs in the same way as in the case of gypsum tiles. Any tile must be laid in rows from the corner.

Imitation of a brick wall in the hallway
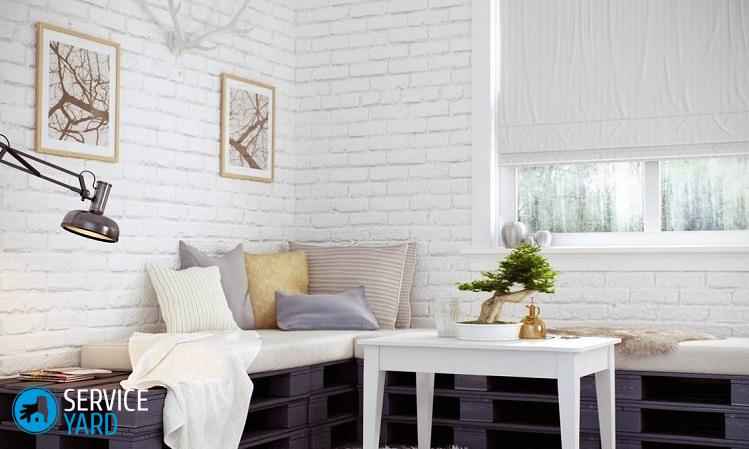
Imitation of brickwork in the corridor, made in white, visually expands the space. The seams between the fake bricks are not highlighted in a different color, but have a characteristic relief. A similar imitation can be performed on both walls. Together with wood-look laminate, “bricks” create a special style.

The hallway has imitation brickwork in a contrasting color. Here the seams between the fake bricks are painted dark, which sets off the whiteness of the “bricks”. This imitation is the closest to real masonry.

Here, imitation red brick masonry is used to decorate the wall in the hallway. This wall design creates a contrast with light ceiling. The space between the seams is not highlighted with a different color, but is treated with plaster.

In this hallway, all the walls are lined with fake brickwork. The seams are not distinguished by a different color, but are characterized by the same color as the “bricks”. Zoned wall painting is presented: one is white, the other is dark gray. This method of painting creates contrast in the corridor.

Decorative brick in the living room
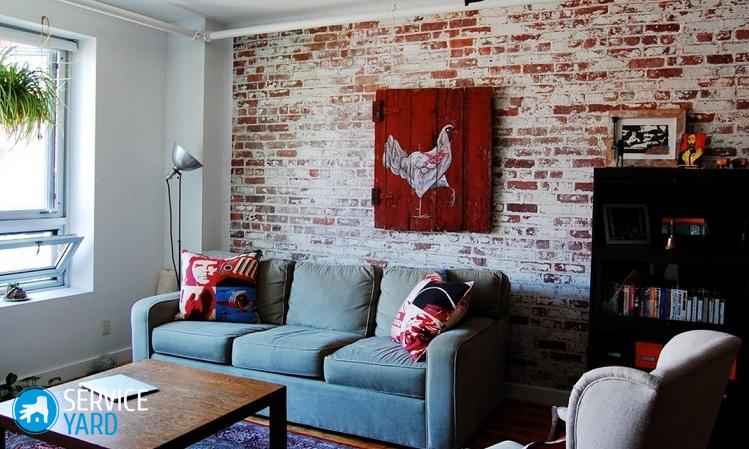
The living room, one wall of which is decorated with brick, looks modern and simple. The masonry is distinguished by its relief. The irregularities of the “bricks” help create naturalness and ease. White color walls with decorative bricks visually expand the space and add modernity.

The fake decorative brickwork in this room has a smooth texture with clearly defined seams. The entire canvas is painted brown, which creates a contrast with the light part of the living room. This type of cladding gives the room simplicity and elegance.

Imitation brick in the bathroom
Imitation of brickwork in the bathroom is created from tiles. The room is decorated in one color - white. The seams are clearly defined and painted in a dark tone, making them stand out against the white background.

Imitation brickwork in the bedroom
Brickwork in the bedroom gives the room a cozy and modern feel. Here the surface is flat, clearly defined, with a defined relief. The seams between the “bricks” are not highlighted in a contrasting color, creating one canvas with the masonry. Against the background of such a wall, interior items with contrasting colors look good.

This wall is made of foam plastic. This explains the uneven terrain and unclear seams between the “bricks”. The surface is evenly painted in a rich blue color, against which light-colored interior items stand out. The colors are pastel, calm tones, suitable for the bedroom: they are peaceful and put you in a peaceful mood.

Imitation of brickwork on the balcony
Decorating a balcony with decorative brickwork gives the room a modern feel. The imitation is created from champagne-colored plaster and clearly defined relief. The surface has irregularities, due to which naturalness is achieved. The seams are painted dark. This creates a contrast in the coating. The “masonry” is made with deliberate irregularities.

If the balcony is planned to be tiled in pastel light colors, for this purpose, you can use imitation brickwork. Here fake “bricks” are combined with flat surface walls The masonry has a marked relief, the seams between the rows are recessed inward. Applying champagne or ivory paint visually expands the space.

Imitation of brickwork in the kitchen
Imitating brickwork in the kitchen helps give the room originality, modernity and naturalness. Usage light colors contributes to the visual expansion of space. Brickwork is used only on kitchen apron. Its surface is uneven and its relief has roughness.

A brick wall is a fashionable element of the interior. It looks impressive both in luxurious apartments and in a modest small apartment. In order to create it, you don’t have to be a professional mason or finisher - in construction stores you will find a lot of materials that allow you to create an effective imitation. Now we will tell you how to make a brick wall in the interior with your own hands.
Use Cases
Before you make a brick wall with your own hands, decide which room you are going to decorate in this way. Brick or a natural stone will look good in almost any room:
- in the kitchen;
- in the living room;
- in the bedroom;
- in the hall;
- in the bathroom.
Important! Perhaps this option is not very suitable for a child’s room, but it all depends on the age. For a baby, a brick wall, of course, is not suitable, but in a teenager’s room this method of decoration may be quite appropriate if the young owner agrees. In some cases, a brick partition is suitable for a preschooler or elementary school student. For example, a low border can be used to create a corner for creativity or playing with building materials.
Kitchen
It is not necessary to decorate all the walls with brick, although this option is also possible - for example, for a medieval or ethnic style. But in any case, you will have to combine this material with other, much more modern ones. So it’s better to finish one particular area, focusing on it. It could be:
- dinner Zone;
- apron;
- niche;
- workshop, if you have one.
The materials from which the remaining items will be made must be treated with the utmost care. Brick organically combines:
- with decorative plaster;
- with a tree;
- with natural stone.
Important! A very interesting option is when one wall is brick and the rest are upholstered. wood panels. As for plumbing equipment, in this case A stone, stone-effect or shiny metal sink would be suitable.

Living room
In the living room, brick or natural stone wall decoration will look good next to a real or electric fireplace. You can lay out the entire wall or a separate section in this way. This option is also very suitable for zoning. But you need to carefully consider how you will highlight other zones:
- The brickwork from the window side will look original. It can be supplemented with cast or wooden decorations.
- If your room is made in medieval or neo gothic style, then you can lay out all the walls with bricks. But you need doors and windows that match the style - white double-glazed windows and plastic doors will not look very good; in such a situation, noble wood species are better. As a last resort, you can match the plastic to the wood.
- A brick partition can provide an interesting option. This is especially true for a studio apartment or a very large living room. It is better to make the partition low; it will simply mark a certain area. You can place figurines or pots with plants on it.
- A niche lined with brick or natural stone always looks great. This is a natural area that can be decorated completely differently from the rest of the room, so in this case the brick wall combines perfectly with almost all finishing materials.
Bedroom
In this room, you should not line all the walls with red brick. There are several reasons for this:
- walls that look as if there is no decoration on them make the room feel colder than it actually is;
- dark walls cause an anxious and gloomy mood for many.
Important! If you really can’t wait to use just this method, construction stores are at your service, where you will always find “brick-like” wallpaper in a variety of shades. It is better to choose those that are lighter.
Hallway
You can completely decorate this room with white, red, gray or whatever brick you like. Ideal option, no matter how you achieve it desired result. The main thing is to choose furniture that suits the style. She may be:
- made of wood;
- made of metal;
- with leather upholstery.
Important! Plastic cabinets and shelves are completely unsuitable for such walls. They will stand out from the general style.

Bathroom
A fashionable trend is to leave brick walls in the bathroom unfinished. This is not a very good idea, and only residents can afford it brick houses. In all other cases, it is better to choose tiles or wallpaper with the appropriate pattern. If you like brick-look walls in your interior, how can you make sure they don’t look like an eyesore? As in all other rooms, choose the right finishing materials and equipment:
- As in the case of the kitchen, it is preferable to use sanitary equipment imitated in natural stone - marble or granite, for example. Manufacturers now offer a lot of options - you will find bathtubs, toilets, and sinks.
- Wooden or metal cabinets are more suitable, and it is better to integrate appliances. However, you can find on sale washing machines, which will not stand out from the “brick” style.
There are many application options:
- you can finish all the walls, and even make an “apron” over the bathroom from decorative bricks, and not from tiles, as is usually done;
- you can decorate one wall - for example, the one where the mirror hangs (it is better if it is “antique”;
- if the bathroom is combined, you can make a low brick partition between the bathtub and toilet, and in a large room with several sinks - separating the wash area;
- if you choose the Provençal style, you can leave the brick in the corner near the imitation window, or, on the contrary, near the door.
Advantages and disadvantages
Like any material, brick has its undoubted advantages:
- you can save a lot on finishing;
- the material is easy to work with;
- all other objects are very clearly visible;
- brick provides good sound insulation;
- brick is moisture resistant;
- the wall “breathes”.
Important! For finishing, the brick wall does not need to be further leveled. This material perfectly hides minor and even not very minor surface imperfections.
As for the interior itself, against such a background all other objects stand out brightly; it is they, and not the wall, that attract attention. Finishing brick provides excellent sound insulation - however, not all materials that can be used to make a “brick” wall have this quality.
A few disadvantages
Any interesting idea turns out to be not as attractive as it seemed at the very beginning, because any material has its own characteristics and disadvantages. What are the “pitfalls” in the decision to make a brick wall in the interior with your own hands?
- real brick perfectly accumulates dust, which gets stuck in the seams;
- the room seems smaller than it is;
- red brick absorbs a lot of light.
Of course, dust will not accumulate if you use wallpaper rather than natural brick. As for the size of the room and light, the same laws apply here as for others finishing materials: dark walls reduce space and make the room darker, light walls do the opposite. All this must be taken into account when designing the interior.
Understanding styles
A brick wall in an apartment - how to make it look good and not stand out from the interior? Of course, first you need to decide on the style itself. This finishing option is unlikely to be suitable for Classic or Baroque. But in many cases, a brick wall is simply necessary if the room is decorated in the following styles:
- Romanticism;
- Gothic or Neo-Gothic;
- Minimalism;
- Ethno;
- Scandinavian;
- Pop Art.
Romanticism
For interior in romantic style Characterized by mystery and some kind of reticence, leaving room for imagination. Natural materials, including brick, are most suitable for this.
Important! The brick wall will be complemented ornamental plants in forged flowerpots, ceramic panel, porcelain plates.
Gothic
A Gothic-style room will take you back several centuries. Brick or stone walls are common in this area. They are combined with rough wooden or metal furniture, embroidered panels or carpets made using the tapestry technique.
Important! In general, in this case, attention should be paid to draperies Special attention. A tapestry on the wall may not be enough. You need heavy curtains and a carpet on the floor. By the way, the floor itself can be finished “to look like stone.”
Minimalism
A very popular design option right now that doesn’t require much effort. The main thing is that there are as few objects in the room as possible, as well as decorations.
Important! A brick wall can be without any decorative panels, flower pots or hangings at all. She's good on her own.
Ethno
Natural materials are an essential element of ethnic style:
- In this case, “like a brick,” for example, you can finish the lower part of the wall or even lay a border around the entire perimeter. It is better to make the top look like wood - from natural panels or wallpaper of the appropriate type. It will seem that the house is wooden, but stands on a stone foundation.
- The best furniture is rustic - made from unpainted material without polishing.
- Bedspreads and curtains sewn from scraps, homespun rugs on the floor, folk toys as decorations, ceramic and wooden dishes are suitable.
Scandinavian
Laconicism and spaciousness - that’s the motto Scandinavian style. This is something between Ethnic and Minimalism, but more modern. It is better to decorate one wall or even part of it with brick, the rest - from almost any materials, plain or with a small, inconspicuous pattern. Furniture should be light and elegant, and as for household appliances, they can be anything.
Pop Art
A rough brick wall with posters or graffiti on it. The original way interior solutions are now quite popular. The furniture is ultra-modern, as are the decorations. Any household appliances, plastic dishes and abstract paintings and figurines.
Brick wall decoration
There are several ways to make a brick wall in a house. Cement mortar is not always needed. There are four main options:
- brick from which the wall is made;
- decorative brick;
- wallpaper with a matching pattern;
- decorative tiles.
Natural brick
The first method is, of course, only possible in brick houses. Special effort There is no need for this, just remove all the trim and clean the wall properly. IN panel house you will have to lay an additional layer, that is, reduce the space.
The main drawback is that the brick will be the same color as the house is made of, and surprises may await you when the finishing is removed. For example, there are known cases when part of the wall is made of red brick, and part of it is made of white. This, of course, can be played around.
The processing method will be as follows:
- Using acid-containing solutions (sold in hardware stores), clean the wall of salts and cement residues.
- Wash it with water.
- Sand the surface with sandpaper.
- Seal the seams with putty.
- You can coat the wall with water-based varnish.
Brick wallpaper
The easiest way to make a “white brick” wall in an apartment is to cover the selected surface with wallpaper with a corresponding pattern. By the way, wallpaper can be not only white, but also gray and red. They work with them in the same way as with all other wallpapers.
Clinker tiles
It consists of narrow stripes. They are glued in rows. You can finish the tile joints in an original way - creating a complete imitation of brickwork.
Finishing brick
If you are thinking about how to make a white brick wall in the interior with your own hands, pay attention to finishing brick. It happens different colors. In addition, you can find different types of it:
- matte;
- artificially aged;
- glazed.
Important! This brick is much thinner than usual. They put it on special glue.
What tools are needed?
To decorate a wall with decorative bricks, you will need some tools:
- metal square;
- building level;
- roulette;
- putty knife;
- bucket;
- hammer;
- beacons.
Preparing the wall
You need to prepare the wall in the same way as for any other finish:
- Remove the leftovers old decoration, removing all fragments if possible.
- Fill up any uneven areas - putty is used for this.
- Let the wall dry.
- Sand out any uneven areas.
- Apply a layer of primer - it will provide better adhesion of the finish to the wall.
- Dry the surface.
Facing
Clinker tiles and decorative bricks are glued with special glue. It happens like this:
- Rub the part that will be adjacent to the wall wire brush to provide better grip.
- Apply glue to the same side according to the instructions.
- Glue the strips on the bottom row.
- Check the process with a level.
- Place a long, even block of wood against the row of strips and gently hit it in several places with a hammer.
Gypsum brick
A “brick” wall can be made from gypsum plaster. The wall is prepared in the same way as for other finishing, that is, it is cleaned, defects are repaired and sanded. Next, a layer of soil is applied. After this, the sequence of work will be as follows:
- Marking in progress.
- Beacons are being placed.
- Painting tape is glued to the joints of future “bricks” - first in horizontal and then in overlapping vertical strips.
In this article, we offered you several ideas on how to make a brick wall in the interior with your own hands. As you can see, there are a lot of solutions and this trend is in fashion. Which option to prefer - now decide for yourself, based on how much time, effort and money you are willing to devote to this. Happy renovation!
Decorative brick-like coating - a wide choice from purchased materials to DIY. How to combine brick-like tiles and wallpaper, and how to properly glue the material to the corners. Photo selection of brick decor ideas.
Properly created room design solves problems such as:
- compensation for lack of light;
- interesting stylistic solution.
Designers use surface finishing to solve many problems. non-standard materials, which are often used on the street side.
Brick wall decoration creative solution. It fits harmoniously in the bathroom, kitchen, bedroom. Sometimes this finishing highlights the area where the plasma is located, and sometimes it protects the surface from the influence of moisture and other factors.
Brick wall decoration: room style and design
Brick wall decoration is applicable almost everywhere: offices, cafes, cottages, private houses and apartments. And the size of the room does not matter, because the choice of material for such finishing is large - from painting to using tiles.
A brick wall has many variations:
- pure white masonry in the kitchen and bathroom;
- red facing - finishing the partition in the hall to highlight it;
- old masonry (about to crumble) - a creative solution for the attic;
- royal option - finishing corners, arches, wall edges. Highlighting a significant place with lighting;
- imitation brick with different shades for apartment interior decoration.
 Materials needed for wall decoration:
- Tiles – gypsum, clinker.
- Wallpaper - texture may vary.
- Paint - use stencils.
- Styrofoam.
- Drywall.
These materials have a light weight, therefore, when decorating the surface, it will not be burdened with finishing material.
Cladding inside the apartment
The walls of the apartment are covered with plastic panels (light weight material) and tiles. This is labor-intensive work, but upon completion of the work there is no difference between real masonry and cladding. Correct work guarantees the masonry. It can be washed and wiped. It does not scratch or crumble.
Depending on the color, the tiling is done in the kitchen. White color makes the room well-groomed, bright, and conducive to cooking and drinking tea.
In the hall, the partition is sometimes highlighted with LED strip lighting. Allocation of a niche for photographs or for a TV.
In the bedroom, this could be finishing the headboard of the bed. Here the choice falls on the “royal clinker material”.
Decoration from the inside
 Wallpaper, paint, and decorative plaster are also used to decorate the interior.
These materials create an imitation of masonry.
Depending on the chosen cladding material, the room may be slightly darkened or separated.
Let's say in big room you can select an area for indoor flowers or a place for drinking tea.

Wallpapering a brick pattern in the hallway at the entrance will not last long due to the constant impact on the wall.
In the bedroom, one side is decorated with masonry to create originality. Creation unusual interior always associated with non-standard solutions. So, you can simply insert dowel-nails into a surface made to match a certain decor and hang handmade crafts on them.
Options for simulating decorative bricks in the interior: finishing materials
Brickwork in the interior of the apartment makes the room interesting, cool in summer time, and if the masonry is decorated wooden crafts, then in winter it will be a warming element of the interior. Wood brings warmth.
 Imitation decorative bricks can be made from different materials from paint to stone.
The entrance to the apartment is laid out in the corridor with gypsum tiles. Varnishing provides protection from abrasion and impact, while at the same time making the interior unusual.
At the bottom of the walls, brickwork is made to protect the coating from pets. Everyone knows how cats love to scratch wallpaper. With the slabs the walls will remain intact.
The bathroom is special - sudden temperature changes, high humidity. Therefore, if you want to highlight shelves with accessories, then a clinker model is suitable. It is not afraid of moisture, like gypsum or wallpaper, at the same time, the manufacturers of this tile have made a wide selection of colors and for various designs, loft and Scandinavian styles.
Wallpaper
Brick wallpaper is available in many varieties. They have their differences:
- ease of adhesiveness;
- suitable for any surface due to its weight;
- application to uneven, semicircular surfaces.
Wallpapers are divided into types:
- Vinyl - repeats the texture of brick, all the bulges and roughness. They make the interior cozy, and also protect the walls from external negative factors.
- Paper – regular wallpaper with a masonry pattern applied. A budget option.
- Non-woven - have the appearance of natural masonry. Easy to stick.
- 3D wallpaper is the highest quality, realistic coating. Repeats the masonry exactly. At first glance, there is no certainty that this is not a real brick surface.
Wallpaper should be glued based on its technical characteristics. Many of them cannot withstand high humidity.
Brick plaster for interior stone finishing
 Textured plaster is a full-fledged imitation of masonry, which has a number of features:
- ease of doing the work yourself. There is no need to involve craftsmen to create brickwork;
- availability of material acquisition - has a relatively low price;
- created masonry from decorative plaster painted in various colors and shades;
- thanks to the plaster layer, sound insulation and thermal insulation are increased;
- decorative plaster is absolutely safe for health.
Disadvantages: dust collects in the grooves of the pattern.
Textured plaster is divided into types:
- The cement mixture shrinks. Used on balconies, attics, and wet rooms.
- Lime-sand - mainly used on walls susceptible to fungus and dampness. The lime dries.
- Clay solutions are well used on wooden surfaces.
- Gypsum plaster is afraid of moisture. Its application is living room, hall, room.
Each type has its own installation specifics. Therefore, before use, you need to study the technical specifications.
Dye
 A regular wall can be painted to resemble brickwork. For this, 3 methods are used.
- On a white wall you need to draw each element using brushes.
- Using tape. It is used to highlight the seams of the brickwork and paint the entire surface with the main color. After removing the tape, you will get a brick wall.
- Use foam rubber. A brick is cut out of it. You need to dip the foam rubber in paint and make a stamp on the wall.
All methods are simple and do not require large expenses. You just need to dilute the paint correctly to get a brick shade.
Brick-like gypsum tiles without coating
Uncoated gypsum elements are used only in dry rooms. Dust can quickly settle on them and they will lose their original color. Therefore, the purchased tile will either be made independently; it must be coated with paint or colorless varnish.
Plastic elements
Plastic bricks are made at home. This simple solution saves your home budget, and at the same time appears individual design premises. Plastic elements of a brick wall are cut out of ordinary flat plastic, glued to the PVA surface, then painted or left white, painting only the joints. They are fixed with self-tapping screws and glue. All borders are grouted or drawn.
Individual bricks for relief integral masonry
If the surface in the house is not plastered and there is no putty, then this is a ready-made solution for apartment design. It is worth cleaning it, carrying out a series of preparatory work and covering it with colorless varnish.
How to lay brick tiles inside a house with your own hands: how to decorate correctly
 For correct masonry slabs use 2 methods:
- Using glue.
- Using slats and screws.
The first method is no different from laying ordinary tiles. The second method is used with grooves. It is fixed to wooden slats with self-tapping screws. They are covered by the grooves of the next element.
At the end of the work, the joints are grouted with a mixture for these purposes and coated with colorless varnish. In some cases, the decorated surface is coated with paint that creates a tint.
List of necessary equipment for masonry during repairs
To fix using the wet method, you need to collect tools and buy materials:
- Meter, marker, level, ruler, glue, spatula with jagged spatula.
- Tile saw or tile cutter.
- Roller, brush, primer.
- Decorating brush.
- Grout for seams, tape.
While working, you may need a rag or a damp sponge. As well as a container for mixing the adhesive mixture.
Before work, it is necessary to prepare the surface.
How to put it: where to start
 Before laying decorative elements, work is done in stages:
- We need to level the walls. To achieve the desired result, use putty.
- After the solution has dried, the wall is coated with a primer.
- Markings are made on a dry surface. To do this, use a pencil, ruler, level. Horizontal lines must be straight, otherwise the masonry will turn out crooked.
When creating markup, do not forget about the joints. Minimum size its 3-5 mm.
If you want to make an individual design using different colors or sizes, you need to lay out the elements on the floor in advance (like a puzzle).
When the markings are made, glue is diluted. There are instructions on the back of the package that you need to follow.
How to lay out one wall
Lay out the wall according to the markings, from the second row from the corner to the center. With the first two rows laid out, everything must be left until the glue is completely dry. Then lay out another 4-5 rows and again leave everything to dry. This way the entire surface will be laid out without displacement. The very first one is laid out as the last row. If required, the elements are trimmed to maintain evenness with the floor covering and baseboard.
How long does it take for the first rows to dry?
 After mixing the glue, laying begins from the second row from the floor. This is done from the corner to the center. Having laid out the first 2 rows, the work is left until completely dry.
The first rows take about a day to dry. It all depends on the composition of the glue, the humidity in the room, and the temperature. The packaging of the adhesive composition indicates the drying time for the solution. From 5 hours (KNAUF) to 12 hours (Ceresit).
You need to wait until it dries completely, otherwise, when laying seamlessly, the upper rows will put pressure on the lower ones, thereby causing displacement.
How to trim corners
In order to finish the corner of the room, you need to measure the distance. If the tile is long, it is trimmed. On the second wall of this corner, the tiles are measured to the edge of the laid elements at the corner. Also trimmed and fixed.
There is already a formed corner available for sale. It is made at 90 degrees. All that remains is to glue it to the surface. This eliminates the possibility of cutting (dust) and taking measurements (may be inaccurate - error in millimeters).
How to style with a wallpaper combination
 There are 2 methods to combine cladding with wallpapering:
- First, according to the markings, they make the facing without the last stone. Then they glue the wallpaper and put it latest tiles overlapping
- Initially, wallpaper is glued, then cladding is done.
The first method is:
- surface preparation;
- its marking;
- cladding, without the last pebbles bordering the future wallpaper;
- gluing cut wallpaper according to the intended pattern;
- laying out the last elements. They should lie on the wallpaper by 2 mm.
Second way:
- it is necessary to prepare the surface and cover it with a primer;
- Next, draw the borders of the wallpaper and tiles. Make markings for decoration;
- glue wallpaper;
- After this, the surface is covered with brick-like slabs.
Don't forget about the seams between the rows. If glue gets on the front side of the tile or on the wallpaper, it must be wiped off immediately with a rag or sponge.
What to consider when decorating interiors
 During work, you need to take into account the following nuances:
- Do not forget about the gaps between decorative bricks.
- Before cladding the surface, you need to choose the right glue solution. If the wall is cemented, choose glue for cement based(it shrinks) if it is gypsum plaster - gypsum plaster.
- If the surface is made of gypsum plasterboard, you need to make sure that it can withstand the weight of the tiles and glue. How well is the metal sheathing made?
There is no need to cover from floor to ceiling with decorative elements if the gypsum board is glued to the surface. Can be done in fragments - around the door or below.
- If glue gets on the front side of the tile, it must be removed immediately, otherwise the appearance of the decor will be spoiled.
- The bottom-first row is laid out last, adjusting the tiles to the floor surface or the border of the baseboard. Sometimes tiles need to be trimmed.
If you know all the nuances, the installation will go flawlessly.
Is it necessary to open the surface of the decoration under artificial brick in the room with varnish?
 After the glue has dried, the surface must be varnished. This will protect you from external destructive factors: moisture, temperature changes. As well as dust settling - the varnished lining can be easily wiped with a damp microfiber to remove settled dust. Unvarnished decor will quickly wear off and darken from absorbed dust.
There are different types of varnish - matte, glossy, colored and semi-white.
How to decorate walls around imitation brick: options
The surface design around the decor is carried out according to general interior. This could be painting the wall. The color is chosen lighter than the brick, but at the same time it should be in harmony with the general background.
Wallpaper is also chosen to be light. Wallpaper with a pattern is not acceptable. Basically it is a monochromatic material.
Photo wallpapers are selected carefully so that the brick complements the overall picture and does not stand out. 3D wallpapers are also selected.
Sometimes there is a combination of cladding and wood. But this should be approached with caution - natural wood should be present in the decor of the room.
Useful video
People always strive to improve their home. The desire to update the furnishings of premises always finds proposals in the field of various design developments. The imitation of a brick wall in the interior of a home arouses keen interest from the population. To decorate a room with brick walls, you do not need to do it from natural material. It is enough to create its imitation. Few people know how to make an imitation brick wall. Inventive people have come up with many ways to create different wall coverings to imitate a brick wall.
Decorative wall surfaces in the form of brickwork
Brick in the interior can look not only in the form of convex elements of the correct geometric shape. This can be imitated masonry made from wild stone or other natural materials.
You can create an imitation of brickwork with your own hands or purchase ready-made decorative bricks in the form of tiles. Construction stores offer a wide range of similar materials.
Whatever option is chosen to imitate brickwork in the interior of the room, it is necessary to prepare the bases of the walls.
Preparing walls for decorative finishing
Before you start making brick walls with your own hands, you need to prepare the surfaces of the fences. Preparation is done in several stages:
- The walls are cleaned of old finishing coating, dust and dirt.
- The surfaces are leveled with putty. Putty is used on a gypsum basis.
- After the putty has completely dried, the walls are coated with a primer.
Ways to imitate brickwork
Exist various ways how to make imitation brickwork. Here are the most popular ones:
Painting method
One of the cheapest options to depict the appearance of brickwork on a wall is to paint the surface of a vertical fence. This can be done in 2 ways.
Option 1 involves performing the following actions:
- the prepared surface is painted using a roller;
- the painted wall is drawn into many rectangles; rectangles should represent the side surface of the brick;
- "bricks" are separated by horizontal and vertical stripes which should look like masonry seams;
- The seams are highlighted with dark paint.

With the second option, the seams need to be done differently. Vertical and horizontal grooves are pressed into the wet putty. They do this with a suitable tool at hand.
Then the entire surface is primed and painted in the desired color.
The grooves are highlighted in a different color, and sometimes left in the same color as the entire wall.
Plastering masonry walls
Brickwork can be depicted using plaster. This do-it-yourself imitation of a brick wall attracts with its simplicity. For this method, you need to stock up on narrow adhesive tape (scotch tape). Proceed as follows:
- The prepared wall surface is covered with strips of tape. The strips are glued so that they look like seams between bricks.
- A layer of plaster is thrown onto the wall. Some experts say that it is better to do this by hand. Hands should be wearing rubber gloves.
- Depending on the taste of the owners, the surface finished with plaster is made into relief or smoothed with a spatula until it is even.
- As soon as the layer of plaster on the wall becomes half-hardened, the tape strips begin to be pulled upward.
- Pull out the adhesive tape so that it leaves even grooves.
- As a result, the wall takes on the appearance of brickwork.
- Do-it-yourself bricks made from plaster on the wall are primed and painted.
- On a brick wall made of plaster, the grooves in the form of seams are covered with darker paint.
- Use a spatula to adjust the decorative relief on the wet plaster.
- The brick wall made of plaster is primed and painted in the desired color.
Video:
In some cases, they can do without adhesive tape. The grooves are pressed under the ruler with a wooden stick.
For greater strength, the plaster solution is prepared by mixing cement mortar with tile adhesive in a 1:1 ratio.

Making homemade brick tiles
You can imitate a brick wall with your own hands using homemade tiles. To make brick tiles, you need to make a mold for casting plaster decor.

At home, you can make your own silicone mold for casting decorative elements. To do this, proceed as follows:
- buy liquid silicone and hardener in the store;
- make a wooden box; it can be made from construction plywood;
- prepare templates or buy ready-made decorative tiles;
- mix liquid silicone with hardener and pour the mixture onto the bottom of the box;
- Decorative tiles or templates are lowered face down into liquid silicone;
- when the mixture hardens, the tiles are taken out of the box; The silicone mold is ready for casting homemade bricks.
Making decorative bricks
Having received the finished form, we begin to make decorative bricks. Make homemade tiles like this:
- To make it work decorative coating without damage, work surface the molds are lubricated with a fatty composition (vaseline, machine oil or a similar substance).
- Prepare liquid plaster or alabaster.
- The solution is poured into a silicone mold.
- After 2 - 3 hours, the finished tile is removed from the mold.
- Notch finished products does not create difficulties. Silicone bends well, and the bricks easily fall out of the mold.
Before pouring, the bottom of the mold can be coated with a layer of dye. As a result, the finished tile will be painted in the desired color.

Also cast plaster decor in polyurethane forms. Polyurethane is a more rigid material and practically does not bend.
Tiles are also cast in wooden formwork. The method makes it possible to obtain material only with a flat front surface.
Technique for laying gypsum tiles under brick
Do-it-yourself brickwork from gypsum tiles is done in exactly the same way as laying ceramic tiles on the walls:
- bricks are laid on a cement adhesive mixture or on liquid nails; wooden slats are used to form even seams;
- long strips are inserted into horizontal seams; vertical slats are made in length equal to the height of the tiles, or plastic liners are used;
- after laying the next row of bricks, the slats are removed; the seams are filled with the same adhesive or a special mixture is used to fill the gaps between the tiles;
- at the end of the work, paint or varnish the brick wall with your own hands;
Sometimes the laying of decorative elements is done without seams. Small gaps between the tiles are filled with putty.

Wallpaper
Imitation brick on the walls can be designed as wallpaper. Market building materials offers a large selection of brick wallpaper.
Paper
Roll wallpaper on paper based can be designed in the form of brickwork of various shapes and colors with or without jointing. Imitated paper-based masonry is one of the cheapest options for decorating brick walls.
Paper-based wallpaper rolls are sold in 50 cm width and 10 m length. They are easy to cut into convenient lengths. Of all kinds finishing interior walls paper wallpaper is the cheapest material.
Vinyl
A do-it-yourself brick wall can be made from vinyl wallpaper. Vinyl relief coating conveys the structure of the masonry well. Convex shapes create a full visual perception of a natural brick wall.
The main advantage of vinyl coverings is their high moisture resistance, so vinyl surfaces can not only be wet cleaned, but also simply washed.
Liquid wallpaper
The material is easy to process. Using a handy tool, the surface liquid wallpaper formed in the form of a brickwork relief. Pliable soft material allows you to create an imitation of masonry elements of the most varied shapes and colors.
Wallpaper is quickly glued to prepared walls, and the pasting process does not particularly litter the room, with the exception of small wallpaper scraps.
Styrofoam
Designers offer an interesting solution for wall decor in the form of foam bricks. Polystyrene foam is a soft, unusually lightweight material with low thermal conductivity and high sound insulation. Decorate the walls with polystyrene foam like this:
- Using a cutting tool, any masonry relief can be easily cut out on the surface of the foam. The front planes of the bricks are also formed.
- Treated foam boards are primed and painted.
- Polystyrene foam has high adhesion, so it can be attached to walls using any glue. PVA glue is often used.
However, it should be noted that the main disadvantage of this type of finish is its softness and fragility. If handled carelessly, the surface of the foam is easily damaged.
Repairing damaged areas of polystyrene foam is quite simple:
- foam chips are mixed with PVA glue;
- fill the damage with a spatula;
- the repaired area is primed and painted;
- if the damage is more extensive, then the unusable piece of finishing is cut out; New foam is glued in its place.

Wooden planks
The flesh-colored surface of the wood perfectly conveys the color of the surface of baked brick. Parquet boards are used as decoration.
If the farm has the appropriate woodworking equipment, then the planks can be made independently.
Planks are best made from coniferous species tree. “Brickwork” in the interior of any room in the form of wooden bricks will add a special sophistication to the interior.
Wooden elements are attached to the walls with special wood glue. Others can also be used adhesive compositions(PVA, liquid nails, etc.).
To emphasize the texture of the wood, the planks are coated with furniture varnish.
The seams between masonry elements are best made from wooden slats. Under no circumstances should wet compounds be used. Moisture can saturate the wood and damage its structure.
It doesn’t matter what material the imitation brickwork is made from with your own hands. The main thing is to decorative finishing walls brought aesthetic pleasure from the perception of the interior of the entire room. All the materials described above are environmentally friendly and will decorate any interior in accordance with the tastes of the home owners.