Production and appearance ceramic tiles have now been refined, but the popularity of ceramics has remained unchanged over the centuries.
What is so good about ceramic tiles?
- versatility of application - from decorating a fireplace to a balcony, kitchen, building facades;
- choice of color, size and shape to suit every taste;
- resistance to various aggressive substances;
- moisture-resistant, heat-resistant;
- strength and durability;
- it is easy to care for;
- made from natural raw materials.
Relevance of tiles on walls
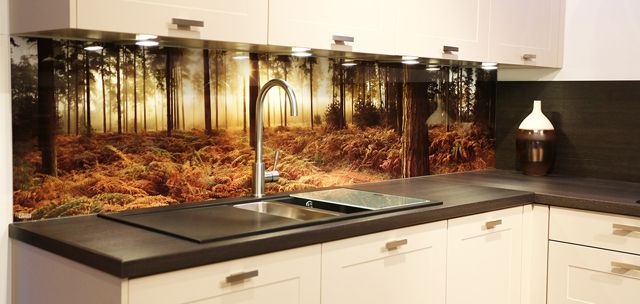
Thanks to the listed positive properties of tiles, use in the kitchen will be the right decision. A variety of colors, textures and sizes fit this material into the interior of any style - from country to minimalism. The tile will protect from water, hot steam, and oil splashes during cooking. An apron along the work surfaces will be nice and clean, as the tiles are easy to keep clean.
What tiles can be installed in the kitchen?
 Any ceramic tile can be used in the kitchen to decorate walls and kitchen backsplashes. To avoid mistakes when choosing, follow the recommendations of professionals:
- tiles are chosen after you have decided on the style and color scheme kitchen set and other elements of the kitchen interior;
- buy tiles with a margin of 10-15% in case of damage during installation or cutting;
- required amount The tiles are calculated by the master who will lay them. The salesperson in the showroom does not see the walls and features of the space, the calculation will turn out to be inaccurate;
- The size of the tile is selected to match the size of the apron. Large format ceramics look like a loser in a small kitchen.
For an apron, tiles are often used:
- Size 10x10. Requires less trimming, easier to install if there are many corners and curves of the surface.
- Clinker tiles, or boar. Suitable for any style - loft, classic, country, art deco, minimalism and other styles.
- Real mosaic from 1x1 cm to 5x5 cm, or imitation with recesses that create the effect of seams between the mosaic pieces.
- Medium format tiles – 15x15, 20x20, 20x30, 25x30 cm.
If the interior features or the size of the room require other options, feel free to choose what suits you.
A bold decision, for example, would be to decorate the walls with photo tiles. This is a ceramic tile, made individually, with a printed photograph.
DIY technique options
 Tiles are laid on the walls different ways. Most often used:
- “seam to seam” - the tiles are laid in rows strictly one above the other, this classic way styling;
- “in a running motion” - the second row of tiles is shifted in relation to the first so that the seams between the tiles of the second row are above the center of the tiles of the first row, this is repeated in each subsequent row;
- “diagonally” is a labor-intensive method that requires careful marking of diagonals and trimming of tiles;
- “chess” - combine tiles of two contrasting colors;
- “modular grid” - use three or more tiles of different shapes and sizes, distributing them randomly horizontally and vertically.
The tiles are laid using one of these methods; sometimes a combination of methods is used in one room, highlighting different zones with this design.
A certain method of laying tiles will help you visually adjust the size of the room.
How to glue ceramic tiles to a kitchen wall
 Laying ceramic tiles for different rooms and surfaces has common principles:
- A laying plan is drawn up. The required number of tiles is calculated, taking into account trimming and breaking.
- Prepare the walls for laying.
- Remove old coatings. If necessary, the walls are leveled. Then they prime for better adhesion (adhesion) of the tiles to the wall.
- Next, we begin laying the tiles.
How to lay an apron
First, determine the height of the apron. This space from the countertop of the kitchen unit to the wall cabinets is 60-70 cm. To avoid unnecessary trimming, the height of the apron is adjusted, and a whole tile looks better than halves.
The first row of tiles is launched 2-3 cm below the level of the working surface. The last row is run under the wall cabinets at the same distance.
Laying technology:
- On the prepared wall, using a level, draw a horizontal line for the beginning of the first row. Under this line they attach to the wall metallic profile or a wooden block. This support will not allow the tile to slide down under its own weight.
- Laying the tiles begins from the middle of the wall, from the most prominent central place, moving from the center to the edges.
- The adhesive solution is mixed immediately before installation. Follow the instructions on the packaging. Pour the dry component into the water and stir until smooth. Leave for 10-15 minutes. Mix again.
- Using a notched spatula, apply the adhesive solution to the wall or tile, whichever is more convenient. Place it on the wall, resting the bottom edge on the profile, and press evenly. Tap with a rubber mallet to release excess air.
- At the top and bottom corner tiles place mounting crosses that regulate the thickness of the seam.
 Are tile joints necessary? Yes. When the tiles expand from elevated temperatures, they protect against cracking. They also compensate for inaccuracies in tile sizes.
- Apply glue to the next tile. Repeat the steps as with the first. The entire first row is laid out in this way. Don't forget about the crosses between the fragments.
- After gluing ten tiles, remove excess glue with a damp cloth. If this is not done, the dried solution will be difficult to remove.
- The second row begins after the first has completely dried. This is in a day.
- Having finished gluing all the rows, allow the masonry to dry. Then they tap it with a mallet, looking for a dull sound that speaks of emptiness. Such an element is removed and re-glued, carefully applying adhesive composition on the tile.
- The next step is to wipe the tiles from any remaining adhesive and begin grouting the joints with a fugue. Don't forget to remove the crosses.
- Use a silicone spatula to fill vertical and horizontal joints with grout. An hour later, after the fugue has dried, the seams are trimmed.
- Having completed filling the joints, allow two hours for the grout to dry completely. Remains of the fugue are removed with sweeping movements using a kitchen sponge. Wipe with a dry cloth, only then wash. This will leave fewer grout marks.
Don't forget to unscrew the support profile.
How to stick on a flat wall
If tiling work is to be done on flat walls, then there are no special installation secrets. It is enough to prime the walls and then follow the instructions for laying the tiles.
How to properly glue to concrete without leveling
 Concrete surfaces usually do not require leveling. But it has low adhesion. For good adhesion, attach to the concrete surface plaster mesh made of metal.
The second method is when laying ceramics on concrete, the surface is carefully primed with “Betonokontakt”. The product dries in 12-18 hours. Then they begin tiling work.
How to put on drywall
Plasterboard walls are primed before gluing the tiles.
The only difference between laying tiles on a gypsum plasterboard surface is that the layer adhesive solution should be as thin as possible. This is to reduce the stress on the drywall.
The second difference is that after gluing, the tile cannot be removed or adjusted. When dismantling, the ceramics will come off along with a piece of drywall. Glue the tiles immediately and carefully.
 High-quality tools and the use of a special adhesive solution will speed up the process of laying tiles.
If, when laying ceramics, the adhesive solution is applied to a wall with an area equal to 3-4 tiles, the process will speed up. All that remains is to take the fragments and press them against the wall one by one.
The Raimondi Levelling System special clamps help to fasten several tiles together, while aligning them in the same plane. With these wedges and clamps, the tiles do not need to be leveled.
When decorating your kitchen walls with ceramics, take care to combine them with other finishing materials, furniture, and accessories. Buy material from trusted suppliers, follow installation recommendations, and the result will be cozy interior, pleasing to the eye and soul.
Useful video
The apron has long been a mandatory element of kitchen design. Moreover, it not only protects the wall from splashes of water and grease, but also has an aesthetic function. Beautiful, bright, original apron can become the highlight of the interior and the decoration of the kitchen, so its design should be treated with full responsibility.
Choosing the shape, size and color of tiles for the kitchen apron
The “problem” area in the kitchen - the wall along the sink, stove and work table - is called the “apron”. It is customary to decorate it with easily washable, water-repellent and fire-resistant materials. As a rule, ceramic tiles, glass, natural and artificial stone or budget plastic panels are used for this purpose. However, most housewives prefer to see a tile apron in their kitchen, since it has many advantages: practical, durable, environmentally friendly, and also has big choice colors and designs, so you can bring your wildest ideas to life. In addition, it is easy to put it down with your own hands.
An apron is a mandatory element of the interior of a modern kitchen.
Today at construction stores there is a huge variety tiles for walls of various shapes and sizes. Tiles marked “A” or “AA” are ideal for the kitchen. He has additional protection from exposure to chemicals, has good porosity and is glazed. An important parameter of tile quality is the caliber, which shows how well the actual dimensions of the tile correspond to the standard stated on the packaging. Ideally, the caliber should be equal to 0. A deviation of this indicator by one is acceptable.
Selecting tile size and shape
If you have never laid tiles before, you should not buy a shaped one; it is best to take a medium-sized square or rectangular one, for example, a hog. Unlike regular tiles it has beveled edges and is shaped like a brick. It is produced in one color and in various color variations. An ideal material for beginning craftsmen would be a 31.6 x 31.6 tile with slots for a boar. Even an amateur can easily lay such tiles. However, we should not forget that what bigger room, the larger the tile size should be and vice versa.
It's called a "boar" rectangular tiles, resembling a brick
How not to make a mistake with the color of the apron
As for the color of the tiles, the safest option is white; it will match any kitchen set and wallpaper. With the help of special vinyl stickers you can easily change its design.
Regular white tiles can be transformed using special vinyl stickers
When choosing the tone of a kitchen apron, you must adhere to the following rules:
- the shade of the tile should be in harmony with color scheme premises;
- there is no need to be colorful, from bright colors eyes get tired quickly;
- if you choose a tile with a print or pattern, it must match the size of the room. Giant fruits will look ridiculous on 5 square meters, and small ornaments will be lost in spacious apartments;
- It is best to match the color of the tile to the tone of the kitchen unit.
For example, red furniture will look great with a black, white or dark gray apron.
Red kitchen set goes well with a black apron
A single-color bright tile will suit a gray set, and tiles of delicate colors will suit a purple set: pink, blue or white.
Purple furniture in the kitchen will look good with soft pink tiles with thin gray stripes
White cabinets can be in harmony with an apron of any color or pattern, the main thing is to remember that a cold shade is combined with a cold one, and a warm one with a warm one.
A gray set will refresh a bright blue backsplash made of hog tiles
We lay the kitchen apron with our own hands
Professionals say that even someone who has never done this before can install an apron; the main thing is to strictly follow the instructions and maintain the sequence of operations.
Tools and materials you will need to make a ceramic tile backsplash
In order to lay tiles, you will need the following tools and materials:
- a corner and a water level will help to mark a horizontal line and ideally lay out the first row, on which the quality of the entire masonry will depend;
- crosses 1.5 will allow you to adjust the gap between the tiles;
- rubber mallet for shrinking tiles;
- a notched trowel will be needed to apply glue to the surface of the wall and the back of the tile;
- rubber and metal spatula (for seams and glue);
- a construction mixer for mixing glue or a drill with an attachment;
- clean rags are useful for removing excess glue;
- marker, pencil;
- tile cutter or grinder with a nozzle for ceramics;
- the primer will provide reliable adhesion between the tile and the wall;
- grout for joints, can be white or match the color of the tile;
- cement or tile adhesive. As a rule, it is sold in the form of a powder or solution, ready for use.
To install a kitchen apron you will need a set of tools
Deciding on the size of the apron
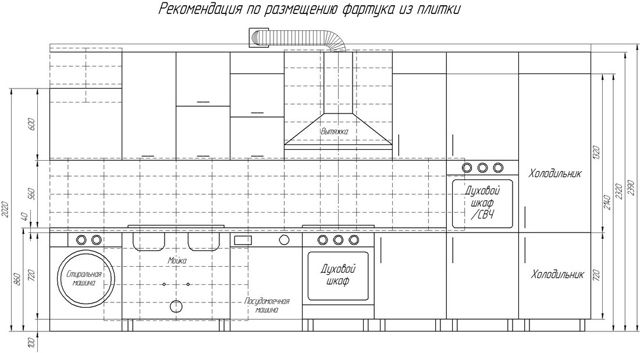
In order to calculate the material consumption for kitchen apron, you should decide on its size. If you are not going to cover the working wall from floor to ceiling with tiles, then standard height the apron will be 55–75 cm. This is the distance from the cabinet to upper cabinets. Do not forget that the edge of the masonry should be 2 cm below the level of the cabinet. As a rule, in the area of the hood, the height of the tiles is slightly higher - 65 or 75 cm. The horizontal size of the kitchen apron depends on whether you want to cover only the working wall or cover another part of the neighboring ones, designing the “problem” area in the form of the letter “p”.
According to professionals, the ideal height of the apron is 60 cm, since tiles of standard sizes of 15, 30 and 60 cm can easily fit into such parameters.
The size of the kitchen apron is calculated depending on the size of the tiles and the height of the cabinets
Calculating the amount of material for the apron
So, having decided on the size of the apron, we calculate how many tiles we need:
- First we calculate the area of the apron. To do this, multiply its width by its length.
- We measure the length and width of one tile and calculate its area.
- Divide the area of the apron by the area of one tile. The resulting value is the number of tiles that will be needed to make the apron.
- Since ceramic tiles often break during cutting, they should be taken with a margin of 5–20% of the total quantity.
- Apron area: 200 x 60 = 12000.
- Area of one tile: 30 x 30 = 900.
- We divide the area of the apron by the area of one tile: 1200/900 = 13.33, round up to 14 and get that 14 tiles will be needed for the apron plus 2 tiles in reserve.
Preparing the wall surface for laying tiles
In order for the tile to adhere well to the wall, its surface must be smooth, without distortions or potholes, therefore, before you begin laying, you should carry out preparatory work:
- Concrete walls that have not been previously finished are checked with a measuring rod for horizontal blockages and, if there are any, we correct errors using gypsum plaster.
Using a water level, check how smooth the wall is
- In habitable apartments, we clean the surface of old materials:

- To ensure that the tiles hold tightly, we use a hatchet to make frequent notches over the entire area of the future apron, filling them in - the glue will ensure reliable adhesion of the facing material to the wall.
To ensure that the tiles hold tightly, notches should be made on the wall.
- We prime the prepared wall surface well twice, after waiting for the first layer to dry completely, after 24 hours we begin gluing the tiles.
Kitchen apron markings
We will need markings so that the tile lies perfectly flat on the wall relative to the horizon line and does not “fall over”:
- We mark the lower edge of the apron, usually it is at a height of 70–85 cm from the floor, but still this figure depends on the size of the kitchen cabinets, which should be 2 cm above the tiles. We mark off the horizontal line using a water level and draw a line with a pencil.
Using a level, mark the horizontal
- We fasten the guide to the wall along the line with self-tapping screws; it will support the first row of the apron, preventing it from moving.
We fasten the guide along the intended line
- Then, using a plumb line, we mark the vertical.
You can make a plumb line yourself from a rope and a weight
You can start laying tiles either from the middle of the wall or from the edge. However, if you are going to make a corner apron, then it is better to drive the rows from the corner that is visible from the entrance to the room.
Laying the tiles
Let's proceed to the most important stage of work - masonry:
- First, prepare the adhesive solution, exactly following the instructions on the package. If the glue is in powder, add water in small portions and mix it until smooth, using a punch. Let it sit for 10–15 minutes and then stir again. Since the glue sets quite quickly, within 20–30 minutes, it is better for a novice craftsman to prepare it in small portions to avoid drying out the unused material. Hardened glue cannot be diluted with water.
To make the glue homogeneous, mix it using a puncher.
- Apply glue to the wall with a thin spatula, and then smooth it with a notched comb to form grooves. We do the same with the tile and, gently pressing over its entire surface, press it against the wall. A notched trowel is needed to ensure that the thickness of the adhesive under all the tiles is the same, this will ensure an even surface of the apron over its entire area.
Using a notched trowel, apply a thick layer of glue to the wall.
- Apply glue to the tiles.
By the way, it is not necessary to apply glue to the wall and tile at the same time; you can coat only one surface.
Coat the tile with a thinner layer
- Glue the tile to the wall, gently pressing it.
Glue the tile, carefully pressing it to the wall
- Then we take a rubber mallet and tap the tile so that it settles and the glue is evenly distributed over its back surface. Thus, periodically checking the vertical, we lay out the first row.
Tap the tile with a mallet so that the glue is evenly distributed under it.
- Don't forget to put crosses to regulate the distance between the tiles.
The thickness of the cross can vary from 1.5 to 10 mm, so when choosing crosses you should take into account the thickness and size of the tile
- Having completed laying the apron, you need to remove the crosses and wipe the tiles and inter-tile gaps with a rag, removing dirt from them. A day after this, you can start grouting the joints.
When the tiles are laid, use a clean rag to remove any adhesive that has appeared on it before it has time to dry.
- After the apron has been laid out and the glue has dried, the masonry should be tapped with a rubber mallet to check for voids. If there is a dull sound under one of the tiles, it should be removed and re-glued.
If somewhere the tile lays unevenly, you can remove it without waiting for the glue to dry, and, refreshing the solution, glue it again. Usually, after laying the bottom row, work is stopped for 24 hours, allowing the tiles to set well. Try not to let the glue get on the front side of the tile; if this happens, it should be removed immediately with a clean rag, otherwise the product will dry out and removing it will be very problematic.
The final stage of laying a kitchen apron is grouting the joints:
- Grouting the tile joints is done using a rubber spatula with a special dry mixture, which is diluted with water to the consistency of sour cream. The color of the grout should be one tone darker or lighter than the tile.
The color of the grout should be chosen depending on the color of the tile
- To ensure that the grout adheres well, the gaps between the tiles are cleaned of any adhesive residue using a spatula and wiped with a damp cloth.
Cleaning of tile joints is carried out using a spatula or breadboard knife.
- The prepared seams are filled with grout, removing its excess with a rubber spatula. If this is not done within half an hour, the solution will harden and will be difficult to scrape off.
Fresh grout residues can be easily removed even with a dry cloth
Methods for laying tiles on a kitchen apron
The same tile can look different if used different kinds masonry:
- “seam to seam” is a classic method of laying tiles, in which one tile is placed strictly above the other, forming even vertical and horizontal rows;
Modular - a rather complex type of masonry, accessible to experienced craftsmen
Video: how to lay a tile backsplash in the kitchen
These tips will help novice finishers avoid mistakes when laying tiles:
- to prevent water from flowing behind the cabinets and causing mold to appear, the gap between the apron and the furniture should be sealed with sealant or closed with a corner;
- For beginning craftsmen, it is best to take medium-sized tiles, for example, 20x20 or 15x15 cm. There will be few seams between the tiles and the work of laying it will take a little time;
- crosses can be removed no earlier than 3–4 hours after installing the tiles;
- you should choose a notched trowel based on the size of the tile; the larger it is, the wider the teeth;
- to carefully dismantle the tile, you need to drill 10–20 holes in it, starting from the center, and then chop it into pieces;
- each subsequent row of the apron is laid out only after the previous one has completely dried;
- to find out how many crosses will be needed to lay the apron, you should multiply the number of tiles by 4 or 8, depending on the size of the tile.
Despite its apparent simplicity, laying an apron is a very painstaking job, the accuracy of which determines the quality and appearance of the kitchen. However, if you strictly follow the instructions, you will get a decent result.
In this article on specific example We will learn how to lay a tile backsplash in the kitchen, sequentially going through all the stages of tiling work - from complete surface preparation to grouting the joints.
Object for laying tiles
Object: kitchen in the house
Tile: dimensions – 27 × 40 cm, tile thickness – 7 mm. Lays horizontally. The top row is a border with dimensions of 27x6 cm.
Task: lay a tile apron in the kitchen under the furniture according to an individual layout, the total volume of surfaces is 7 square meters.
Condition of the wall for laying the apron
The walls are covered with several layers of old wallpaper. The plaster is from 1974, loose, crumbling in places. The main wall is lightweight concrete with a wooden frame, also plastered.
In the corner of the room there is a chimney shaft 62x37 cm, the distance from the door to the shaft is 256 cm, the distance from the shaft to the opposite wall is 156 cm, the distance from the wall to the window slope is 86 cm.
Tile apron in the kitchen diagram
At the door and window, the tiles start from the floor and go up to a height of 195 cm (7 rows and border). In the rest of the space, the tiles go along the level of the countertop - 81 cm from the floor - in 4 rows - 108 cm + 6 cm border. The layout of the tiles in expanded form looks like this:
Having drawn up such a diagram, you and I can easily calculate the number of tiles and borders we need. Be sure to take a margin of 10%.
Material and tools for laying the apron
To make a tile apron in the kitchen, prepare the following materials:
- reinforced tile adhesive - at the rate of 5 kg/m2, i.e. 35 kg;
- acrylic strengthening primer – 3 kg;
- crosses 2.5 mm – 400 pieces;
- gypsum plaster – 30 kg;
- construction gypsum – 1 kg.
Tool
- serrated spatula with a “tooth” size of 8 mm;
- wide spatula – 30-40 mm;
- spatula (12 mm);
- electric impact drill with a 6 mm concrete drill (or a hammer drill with a 6 mm drill);
- whisk for solution;
- hammer with chisel;
- rubber mallet;
- wood screws (30 -50 pcs.), dowels;
Another tool
- sickle tape;
- skein of thick thread;
- building level 40 cm, building level 80-100 cm, building square 30-40 cm;
- construction plumb line;
- 2 drywall profiles or slats 4 meters long (necessarily level);
- roller (fur or foam), brush;
- a screwdriver or screwdriver with a screw attachment;
- two tiled profiles for internal corners 250x8, one for external corners 250x8.
And further
- a set of felt-tip pens, a construction or simple pencil;
- a bucket for the solution and primer 10-15 liters (it is best to purchase a painting bucket - in the future there will be no problems with disposing of the remaining solution: the solution is left overnight, then the bucket is tapped with a rubber mallet, and the dry solution falls out);
- bags for construction waste - 5 pieces;
- old rags or rags.
This tool is enough to lay a tile backsplash in the kitchen.
For cutting tiles
You will also definitely need something to use for cutting tiles. Let's dwell on this in a little more detail.
Tile cutting method
A tile backsplash in the kitchen will definitely require tile cutting. To cut tiles, you need to make a deep cut into the glaze and part of the tile shard, and then break the tile along the cut line.
For these purposes, you can use a lot of devices - a professional glass cutter, a lathe, a manual tile cutter (in the form of tweezers) or a lever cutter (as is the most commercially available), a hacksaw for metal with a string made of titanium carbide alloy with tungsten, and finally, an angle grinder ( grinder) with a disc on the tiles. For an angle grinder, you must choose a disc marked “for dry cutting.”
When working with an angle grinder, you must have certain skills and remember that during the work a lot of dust will appear, which means that respiratory protection is necessary. It is also worth hanging a wet sheet over the doorway to prevent dust from penetrating into other rooms.
Tile apron in the kitchen - preparing the wall
Removing old wallpaper to the ground
To do this, we collect in our bucket warm water, throw in a whisper of washing powder, which must necessarily contain surfactants. We make cuts on the wallpaper with a knife or spatula and use a roller to generously wet the surface.
Once wet, the wallpaper will peel off the wall easily. We scrape them off with a spatula. If there are several layers of wallpaper on the wall, we do the same with each layer. This is where trash bags come in handy. Next we wash the wall clean water, removing any remaining wallpaper.
Plastering the wall for laying the apron
Old, poorly adhering plaster is knocked down to the ground. In our case it is a brick. We moisten the brick generously with water, and after drying, prime it using the same roller or brush.
Unplastered parts wooden frame oliphim or treated with wood impregnation. After drying, we attach a sickle tape to them, which we crimp with self-tapping screws. Next we prime and dry.
We also prime all chipped plaster parts of the frame. If the wooden structures are deep in the wall, you can fasten a strip of drywall with self-tapping screws.
Before thinning the plaster, we check ourselves: the wallpaper is removed to the base, the old loose and poorly adhering plaster is removed. When we tap the wall with a hammer, we find no voids.
Thus: All surfaces prepared for leveling are primed and dried.
Electrical wiring before laying the apron
We complete all installation work - in this situation we are required to do the hood. Using a grinder, a hammer drill or a hammer and chisel, we make a groove 1 cm deep along the intended line.
Using a brush, prime the groove and the surface next to it. We insert the wire into it and secure it with a solution building gypsum. That's it, the first working day is over. Our kitchen looks something like this at the end of the working day.
Over the next day, you and I will have to level the walls, apply notches in places where the walls are painted, and finish everything preparatory activities for facing works.
This concludes the work of the first day.
The second day of work on laying the tile apron
We start with measuring the planes and angles for laying the apron
We use a building level of 80-100 cm, a plumb line and a prepared gypsum board profile, or a straight lath. We check the verticality of the external corners and the horizontal plane of the walls. The gaps between the flat plane of the profile and the wall should not exceed 5 mm.
We have an external corner - the chimney shaft, which has a deviation from the vertical of 2 cm. But due to the short deadlines for the work (all work must be completed within five days), we will not plaster this corner.
To correct unevenness, for example, during the process of laying tiles, we will glue a piece of drywall, thereby leveling out deviations from the vertical.
Leveling the walls before laying the tile apron
We dilute the dry plaster mixture in a bucket according to the instructions. The solution should be loose, not very liquid and not very thick. Use a small spatula to spread the plaster cakes onto the surface, and use a large spatula to level 30-40 cm. Using a profile or lath, we cut off the excess plaster mortar, trying to ensure that we have one plane, both vertically and horizontally.
We carry out leveling of walls with plaster mortar, but not plastering work. In places where the old plaster has been knocked down, we level the layer of mortar with the remnants of firmly adhering plaster.
After the solution begins to set, smooth the surface with a wide spatula. To make work easier, you can lightly spray the surface with water. But in in this case There is no need for a perfectly smooth surface. We are more interested in the absence of gaps between the wall and the profile or slats.
Notch on the paint for better fastening of the tiles to the apron
There is a lot of controversy among craftsmen regarding whether to remove old paint completely or remove only poorly adhering layers? In fact, the paint can be scraped off the wall using a hair dryer, various paint removers and other tools.
Before laying the tiles, we must prime the surface, thereby obtaining a polymer film, which is old, well-adhering paint. Naturally, peeling and swollen areas must be removed, cleaned with a card brush and primed. Chalking paint and whitewash must be removed!

Tile apron in the kitchen with notches on the wall
In our case, the paint holds up very well, the paint film is solid, without signs of peeling, swelling or cracking. Therefore, in order for the adhesive solution, in addition to paint, to also adhere to concrete or plaster, we make a notch on the paintwork.
Using a hammer with a chisel, a perforator, or a grinder, we break through the film and part of the substrate. On square meter It’s better to make up to 100 notches. Believe me, this work is not very difficult on old plaster. We make the notch with a “grinder” with a cutting disc for concrete.
We cut the mesh with a groove depth of up to 0.5-1 cm. After notching, the surface must be primed. The risks should also be well primed using a brush.
Important! If the old plaster falls off when notching, we naturally remove it and continue - see above.
Results of the second day of laying tiles on the apron
We look at the plastered surfaces: they have already hardened, although the solution is slightly damp to the touch. At the end of the second day, we completely prime all surfaces prepared for laying tiles.
Thus, on the second day we leveled the walls gypsum plaster, made a notch in the places where the paint holds firmly and primed all the surfaces on which the tiles will lie. We remove garbage. Tomorrow we face the most difficult thing.
Laying tiles on an apron
Complexity preparatory work, described above, is due only to the fact that our tile backsplash in the kitchen is installed in an old building. I am confident that later buildings will not require such extreme preparatory work. Often everything is limited easy leveling and primer.
Typically, a tile apron in a kitchen is laid out from the so-called “red corner”: in the most visible place, a corner of whole tiles is laid out, and trims are made at the end of the rows.
Designation of the horizontal level of the first row of a tile apron
We begin work by marking a horizontal line around the perimeter of the kitchen using a laser level. The line is located along the upper edge of the third tile from the floor, i.e. at a height of 81.75 (82 cm).

Because the laser level is not often on the farm, we do this:
We hang a plumb line along the doorway, thus obtaining a vertical mark along which we will orient the tile.
Using an electric drill with an attachment, mix the glue. Mix the glue exactly according to the manufacturer's instructions. When diluting the glue and applying it to the surface, remember that the performance of the diluted solution varies within 1-2 hours, open time(during which time the tiles can be glued to the glue applied to the surface) – 10-20 minutes.
Using a notched trowel, apply the glue to the wall in the place where the tiles bordering the floor will be laid. By the way, we will apply glue to the wall in all cases, with the exception of corner tiles.
Apply with a narrow spatula thin layer glue on the back of the tile. Our tiles are heavy, so this won't be a problem. We do the same throughout the entire process.
Next, we proceed directly to the work of laying tiles.
1st tile
We are installing the first tile on our tile backsplash in the kitchen. Lightly press it into the solution and press down using a rubber mallet.
Using a short level, we align the tiles vertically and horizontally. If something needs to be placed under the bottom edge to fix the tile in the correct position, we tear off the box from under the tile and put some pieces of paper under it. Whatever is at hand can be used.
We check the tiles for flatness. To do this, apply a level to the glazed side of the tile. If the tile is not level, remove it and add or remove glue as necessary.
Important! The first tiles must be installed flawlessly. The final result of our work with you depends on them.
2nd tile
Before installing the 2nd tile, pay attention to the drawing. The design must be positioned the same on all tiles, including cut tiles. There is usually an arrow or other indicator on the back of the tile. When laying, they should be in the same direction.
We place the second tile, check it in the same way, and place two crosses between the adjacent edges. We check the seam with our fingers - the transition should not be felt. We install the third one on the first tile. We use a square to check the angle between the vertical edge and the horizontal edge of the second tile.
4-5-6th tiles
Install the fourth, fifth and sixth tiles in the same way.
Using a long level, we check the plane vertically, horizontally and diagonally. There are no gaps between the actual side of the tile and the level. The crosses are installed, as shown in the figure, between the horizontal and vertical edges - 2 pieces per edge of the tile.
The cross can also be installed in the joint between the tiles. If there is a discrepancy along the edges (in our case, this indicates a deviation of the tile geometry from the standard or a difference in size), in addition to the crosses, we insert the same piece of paper from the box into the seam.
The numbers in the figure show the sequence of laying the tiles in our case.
We lay it further
The first six tiles have been laid. And, if we have not done this first using a laser or water level, it is necessary to knock off a horizontal guide line and install supports for the tiles.
For this purpose, we cut the prepared gypsum board profile or lath to the size from tile No. 6 to the wall, and join the upper part of the profile or lath with the upper edge of tile No. 6.
Tiles 7 and 8
We apply a level to the profile or rail and set it strictly horizontally. We make two marks - at the beginning and near the wall. After this, use a pencil or tapping cord (if you have one on the farm) to draw a straight line. We fasten the profile along this straight line.
We drill 2-3 holes directly through the profile, insert self-tapping screws with dowels and screw them in until they stop. Thus, we proceed along the entire perimeter of the surface to be covered. So, we have a temporary tile stand ready. We lay tiles No. 7 and No. 8.
Lighthouse tiles
We set up “lighthouse” tiles. “Beacon” tiles or “beacons” are placed in order not to lose the horizontal and vertical rows and to maintain the laying plane. Subsequently, the “beacons” are removed and used like ordinary tiles.
In the gap between the wall and the 8th tile approximately in the center (it is important that the level is long enough to check the horizontal) we install the tile. We orient it in the same way as the tiles of the first row.
Tile 9
We place the next tile (in the picture it is number 9) near the inner corner. We maintain verticality and horizontality in the same way. After which we remove the intermediate tile, clean the mortar from it and use the tile in further cladding.
Using “beacon” tile No. 9, we install the tile on the wall of the chimney shaft (No. 10). If you look closely at the tile layout diagram, you will notice that we lay full tiles on the chimney shaft from the outer corner, bringing the undercut into the corner. Therefore, by applying a level to the “beacon” tile, we beat off a horizontal line. We orient tile No. 10 along it. We align it horizontally and vertically.
Tile No. 10
No. 10 protrudes 2 cm beyond the outer corner. For ease of work, you can tighten the mooring cord (we have a thread for this). It is shown in red in the figure.
Above the far ends of tiles No. 6 and No. 9, at the same distance (5-10 mm) above the upper edges of the tiles, we drill holes and screw self-tapping screws onto the dowels. The cap should not reach the wall in both cases 15 mm.
We fasten and stretch the thread along the caps. In the future, this will help us set the row correctly. You can repeat the option with vertical and horizontal lines. This is done for our own convenience.
From the 8th tile towards the corner we continue to lay out a horizontal row. Having reached the “beacon” tile, we remove it, clean off the mortar and use it in the future.
The row is brought to the corner. All that remains is to place the trimmed tiles, add profiles and form an internal corner. We start with the cut tiles on the chimney shaft.
Using a tape measure or a square, measure the distance between the vertical edge of tile No. 10 and the internal corner. We subtract 7 mm from the size: 2.5 – seam and 4.5 mm – reserve. Keeping in mind the pattern on the tile, use a felt-tip pen to mark the cutting line along the square. Along this line we make a sharp cut in the glaze of the tile.
How to cut tiles for a backsplash
There is a whole set of tools for cutting tiles (about the tool)
When using a manual tile cutter, glass cutter or turning cutter, it wouldn’t hurt to make an incision along a ruler. Next, the cut area is lightly tapped on the back side of the tile. Then the tile is broken by hitting the corner of a table or the edge of a block, etc.
If we use a lever tile cutter, then the tiles are laid on the bed and pressed against the guide with a mark in the center. The lever is pulled back and with a sharp forward movement the roller makes an incision in the glaze, after which the tile is broken by moving the lever downwards.
In the case of using a grinder (remember about respiratory protection), a light cut is made along the line with the disk, after which the tile easily breaks. There is no particular point in sawing through the tiles completely.
Laying cut tiles in corners
We glue the cut tiles onto the wall, applying (this time) a layer of glue not on the wall (read about glue), as we have been doing all this time, but on the back side of the tile.
We place the tile and (this is important!) align the plane strictly vertically with the cut edge facing the wall.
We orient the top edge along the top edge of the adjacent tiles. The vertical seam should be strictly parallel to the vertical seam of the adjacent tile.
The crosses between them should be pressed. To do this, we tear the paper from the box and hammer it between the wall and the cut edge.
We measure and cut the tiles along the first wall in the same way (don’t forget about the drawing). We measure the distance between the vertical edge of the previous tile and the corner plane. Add 5 mm to the distance. Since our corner seam is formed from two trimmed edges, we lay a factory corner for tiles.
Installing a corner for tiles in the corner of the apron
For this purpose, apply a layer of glue (entirely) to the back of the trimmed tile with a notched trowel, and place a pre-cut profile on it. Then the cut tiles are put in place. The profile for the tile can be pressed down with masking tape so that it does not dangle in the loose part.
Let me make a reservation right away that the tile laying scheme here is not entirely ordinary. I already reminded you about the deadlines. That's why outside corner, in other conditions, it would be better to remove it with plaster using a vertically fixed strip or perforated corner.
Installation of the corner
We are considering a more complex option, which, in the absence of proper experience, I would not recommend implementing such a tile apron in the kitchen yourself. Although, if you read everything stated carefully, there should be no problems.
We have tile number 10 and three tiles up. They are set strictly vertically and protrude 2 cm beyond the corner. Lubricate its protruding part with a narrow spatula with glue and install an outer vertical profile pre-cut to size.
Press the perforated part into the glue and fix it on top masking tape. Keeping the drawing in mind, we cut tile No. 11 to size so that the cut side is directed towards the inner corner of the next wall. We place the tile and secure it and the profile with masking tape.
As described above, lay out the first two tiles of the next wall. All! All we have left for today is plaster.
Plaster for the lazy
Often, a tile backsplash in the kitchen requires rough leveling of the plane vertically. Basically, the problem is solved quite simply: beacons are placed, and the surface is given the desired shape using plaster mortar.
Sometimes, for various reasons, plastering work is not possible. There are quite a few reasons - the surface cannot be plastered (thin sheets of slate), the size and geometry of the room do not allow placing beacons, the owner does not want to reduce the already tiny room by 1-2 cm of the plaster layer, etc. Tile work initially imply right angles and vertical laying.
What should I do?
To be honest, for the time being I extended the verticality by increasing the thickness of the glue layer. But this is not a way out, because under certain conditions the tiles with the adhesive layer may begin to peel off. The second option - adding a layer of mortar after each laid row - significantly lengthens the time required for the work.
The solution was unexpectedly suggested by one of the clients who old master Soviet school laid plasterboard when increasing the layer! Gluing drywall is a technology known since Soviet times. I have already said that in this case the repair time was limited, and we had two days left.
In addition, the end of the chimney shaft has a structural recess (most likely a pipe used to pass there) which cannot be repaired in one or two passes; the brick crumbles, forming through holes.
We make an additional notch on the surface of the shaft, fill the recess with gypsum plaster, carefully prime it (again), prime the back side of a sheet of drywall cut to size and, after drying, apply tile adhesive with slaps.
We press the sheet of plasterboard to the surface and achieve a vertical level, lightly tapping it over the entire plane with a rubber mallet. The distance between the level attached to tile No. 11 and the surface of the glued gypsum sheet is 1.5 cm.
We will pull the sheet along the plane, after 15-20 cm, with self-tapping screws and dowels to the surface and tomorrow we will continue laying the tiles. Well, this is roughly what our kitchen looks like at the end of the third day. At the end of the day, do not forget to inspect the laid tiles and correct any imperfections before the adhesive hardens.
To the legitimate question of why we didn’t glue a sheet of drywall from the floor, there is a “legitimate” answer: we would have lost about 3 cm of area. The furniture has already been ordered, and the fight is on over millimeters!
Tomorrow we plan to finish the turnkey masonry. The day after tomorrow - grouting. We are finishing the masonry
Third day of work
We start the next working day by tapping the laid tiles onto the tile backsplash in the kitchen. If voids are found, it is better to remove the tile, clean off the adhesive layer and re-lay it on a new one. The adhesive layer, in this case, is removed from the tile or from the wall (if the preparation is carried out correctly, the adhesive layer should remain on the wall), the surface is cleaned, primed and the tile is put in place, preventing the same errors!
Attach a piece of drywall to the wall with self-tapping screws. We choose self-tapping screws 51 mm long for a 6 mm dowel. Using a hammer drill or drill, we go through the drywall without impact, then turn on the impact and drill to the required depth. We make a “cartridge” (self-tapping dowel), insert it into the hole and fix the self-tapping screw! The head of the screw should be slightly recessed into the drywall. We also screw in self-tapping screws around the entire perimeter and the entire plane. We prime the drywall again.
Draw the inner corner as described above.
Next wall
The next wall does not cause any special problems for us: we lay the tiles with the cut edge going into the corner (the factory side goes to the tile, the cut side goes to the corner).
All rules for laying tiles - checking vertical and horizontal levels, planes in all directions - remain in force. We did everything according to the plan, now stop!
The last wall, if we look at the layout diagram, starts from the window in one complete vertical row, i.e. from the floor and further there are four vertical rows plus a border.
According to the diagram, we see that the length of the wall is 86 cm. i.e. we get 2 whole tiles plus a 5-6 cm trimmed piece. How are you? I don't like. We cut to size, as in the first inner corner– 12 cm. Behind it comes a full-fledged tile and behind it trimming and to window slope We have adjacent tiles measuring 32 cm.
Our masonry creates a certain system. To simplify the work, we start from the floor with three cut 32 cm tiles in a vertical row. We follow the drawing, the vertical, horizontal and plane levels. We output top side under the broken horizontal line and finish the row.
We also coat the corner trims with glue on the back side and insert them into the profile. We make sure that the horizontal seams on both walls match. If we did everything correctly, then there should not be any special problems. We put borders on the top row. We also follow the direction of the drawing. All masonry is finished.
Important! During laying work, it makes sense to wipe the tiles, the adhesive layer under which has set, with a damp cloth. The seams should also be cleaned out using a cross, a thin screwdriver or something similar. If the tiles are not fixed to the mortar, it is better to postpone this operation until a later time.
Preparing to grout the apron seams
For grouting we need:
- container for the grouting compound (usually a clean bucket or bowl with a volume of 1-2 liters);
- rubber spatula, preferably softer, 8-10 cm in size;
- a piece of cable (for forming seams);
- a bucket and detergent (regular washing powder, tile detergent, etc.);
- sponge or set of rags.
Grouting the seams of a tile apron
We start by washing the tiles with warm water and detergent. Using a cross, a thin screwdriver, a plastic or wooden stick, carefully clean the seams from glue residues, all seams and wipe them with a damp cloth.
In a pre-prepared container, dilute the grout according to the manufacturer's instructions. Under no circumstances should the grout solution be liquid. The consistency of very thick sour cream. The performance of imported grouting compounds in the solution stage is approximately 20-30 minutes. We remember this and breed the amount that we can produce during this time!
For convenience in work, we take a small cardboard or plywood, where we lay out part of the grout. Using a rubber spatula, apply it to the tiles in the area of the seams and fill the seams with diagonal movements. I advise you to work with gloves - rubber ones are possible.
Do not spread the grout all over the tile. The remaining grout is collected with a spatula and laid out on our cardboard or plywood. Having worked out the diluted mixture, take a slightly damp cloth and wipe the tiles, removing any remaining grout.
Let's take a piece electric wire and iron the seams, giving them shape. After finishing grouting, wipe the tiles with a damp cloth. We will wash it in 2-3 days.
Important! The grout contains pigment. If you start washing grout that has not had time to set, the pigment will be washed out and the seams may change color.

tile apron in the kitchen markings

kitchen tile backsplash diagram
So that readers do not have different interpretations about the word apron, the authors consider it their duty to tell dear visitors of our portal that the article will focus on the surface of the wall between the desktop and wall cabinets, and not on a piece of clothing. Although not a single modern kitchen and not a single modern housewife can do without one or the other.
When renovating an apartment or building a house, people experience the greatest stress not from having to part with significant amounts of money, but from the incredible torment of choice. Number of proposals for materials, colors and design solutions, various services - so huge that choosing them takes much more time than, in fact, the repair itself. This also applies to the kitchen apron. But the authors can immediately answer main question readers - which apron is the best? The answer is clear: the best apron is hand made an apron, regardless of what material. Our article will be about how to make an apron in the kitchen with your own hands. And, of course, attention will be paid to “insignificant details” in the form of a review of materials and technologies for their installation.
Requirements for kitchen aprons in terms of combining functionality and beauty
If we consider the etymology of the word apron (translated from Polish and German it means apron or hem), it becomes clear that it was originally conceived as a piece of work clothing needed to protect against contamination that inevitably accompanies the cooking process. Polish and German linguists are still arguing about who rightfully owns this word, although this a convenient thing It was used not only by them, but by most peoples in the world. Therefore, let etymological battles pass by the world of reasonable people, that is, you and me. The main thing is to understand that the first and main purpose of an apron is protection.
However, who said that defense should be rude and ugly? It can be beautiful, it can please the eyes of its owners, without forgetting its main function. And the modern variety of materials and technologies allows both functionality and beauty to coexist harmoniously. But if you suddenly have a choice of what to sacrifice, then the clear answer is this: you can sacrifice a little beauty in favor of functionality, but you can’t do the opposite.
Why do you need a kitchen apron?
Glass kitchen aprons
Most people have a subconscious fear of glass. It is associated with something extremely fragile, brittle and sharp. However, glass is different from glass. Nowadays, tabletops, chairs and even stair steps are made from it. Kitchen aprons were also included in this wonderful material.
Glass for aprons is not ordinary glass, but tempered glass, 6-8 mm thick, which is several times stronger and can withstand heating up to 300°C. Triplex glass is also used, where two layers are glued together with a special film or laminating liquid. Glass can be either glossy or matte, painted in any color, or colorless, with or without a pattern.
It is best, of course, to use all the possibilities of a glass kitchen apron and order it with a pattern. Such aprons are also called skinali. But keep in mind that it can be done in different ways:
- Firstly, it can be used clear glass, which is mounted on a wall covered with photo wallpaper. This is the most a budget option, but it should be taken into account that moisture can penetrate into the gap between the wallpaper and the glass, which will ruin the wallpaper or contaminate the glass, thereby ruining the entire look.
- Secondly, the image can be printed on vinyl film, which is glued to the back. This solution is better, but the film can also peel off over time.
- Thirdly, the image can be printed on the glass itself from the back side of the apron using UV (ultraviolet) printing technologies.
- Fourthly, the image can be printed with UV ink inside triplex glass. This is the best, but also the most expensive option.
- And finally modern technologies allow you to print three-dimensional 3D images on kitchen aprons as well. These aprons look very unusual and are very expensive.

Glass aprons can be “revitalized” by wisely using LED lighting mounted both outside and inside the glass. The backlight can be either monochrome or color. You can organize different lighting scenarios for different moods. Modern market materials for renovation and interior design offers so many options that you can implement both a beautiful and competent solution, and any design madness. If only there was enough money for everything.
The advantages of glass aprons are obvious: moisture resistance, chemical inertness, strength, ease of cleaning, beautiful and original look. Among the shortcomings it is worth noting high price and the fact that it is still glass, which can break under impact load. Aprons from tempered glass or triplex, when broken, do not form sharp, traumatic fragments. But this still will not return the considerable money spent.
Glass kitchen aprons can also be attached either with through fasteners or with the help of special elements. When taking dimensions and planning the kitchen workspace, you should always take into account everything that will be installed on the apron. These could be several sockets, switches, holes for attaching rails - a hanging system for placing all kinds of kitchen utensils. Just as with MDF panels, it is better to entrust the entire range of services for measurements, manufacturing and installation to those who have done this many times, that is, to professionals.
Metal kitchen aprons
For those who intend to truly create, metal aprons are specially offered. They look very unusual and in some cases even beautiful. Fans of the “techno” or “loft” style can easily use metal in the kitchen, but for this you really need to have a subtle artistic taste or invite a designer with such qualities, which is rare. The line between harmony, beauty and madness with metal aprons is very thin, about the same as with mirrored aprons.

Metal aprons can be made as large sheets from of stainless steel, and tiles and even mosaics. The functional qualities of the metal are questionable. With good hygiene, metal has excellent adhesiveness to all types of kitchen contaminants and is very capricious in the choice of cleaning products. He does not tolerate abrasives.
It was previously noted that it is better to completely entrust the installation of an apron made of MDF panels or glass to those who, in fact, will manufacture them. Therefore, we will consider other options that the owner can do with his own hands. But before installation, you need to decide at what stage you need to make the apron, and what requirements the room must meet.
Requirements for the room and surfaces
Installation of aprons made of MDF, glass or plastic panels can be done already when the kitchen set is installed. Not only is it possible, but even necessary, since very high accuracy of measurements is required, which will allow the apron to fit perfectly into the workspace. The only thing is that during installation you just need to move the furniture away from the wall, and with through installation you won’t even need to do this.
If the apron will be made of ceramic tiles, porcelain stoneware, mosaic, natural or artificial stone, then you can’t do without wet processes. Therefore, furniture should not be next to the walls where the apron will be, but the exact dimensions of the furniture and how it will be installed should be known (height of the countertop, hanging height of cabinets, distance between work surface and the bottom plane of the cabinets).
What are the requirements for a kitchen space to install an apron?
- Windows must be installed in the kitchen.
- Must be mounted, all sockets installed.
- The walls must be plastered and leveled. On the wall where the apron will be mounted, the use of gypsum-based putties is unacceptable; only polymer-cement mixtures can be used.
- The floor must be level with the finishing coating already laid. Naturally, it should be smooth and horizontal.
- The temperature in the kitchen should be no lower than +5°C and no more than +30°C, humidity no more than 60%.
In other words, the room must be completely ready for finishing– wallpapering, applying finishing decorative plaster or painting. The surface on which the apron will be mounted must be dry and perfectly flat. If glass, glass or smalt mosaic will be used for the apron, then the surface should be puttied with polymer-cement mixtures based on white cement.
Kitchen apron markings
On a wall that is completely ready for cladding, it is necessary to mark the position of the future apron. But for this there must be a clear idea of the placement of the kitchen unit. It is best if it has already been purchased and a diagram of its placement has been drawn up. What you need to consider when marking a kitchen apron.
- First of all, the apron should be located in the space between the countertop and the bottom plane of the wall cabinets, and it is desirable that the apron extends beyond the countertop and cabinets by at least 2 cm. Most often, the distance between the countertop is 60 cm, but it is permissible to make it in the range of 45 -70 cm, it all depends on the height of the people who will use the kitchen.
- The height of the kitchen countertop also depends on the height of people, but in one family there may be people different heights, and they are often built into headsets household appliances: washing and dishwashers, freezers. Therefore, in most cases, the height is set to 88-90 cm, and people with “outstanding height” (more than 200 cm and less than 150 cm) will not have to bend or jump, there will simply be a slight inconvenience to which they get used to very quickly.
 Most manufactured kitchen sets are made for the convenience of people of average height
 - If a standard dome-type hood is used, then the apron should extend in height along its entire width and reach its lower edge, or better yet, if it extends under the hood at a distance of at least 5 cm or, even better, reaches the ceiling. At the same time, it is recommended to place the apron at a distance of at least 5 cm behind the side surfaces of the cabinets.
- The height of the lower edge of the hood dome above the countertop should be at least 65 cm for electric stoves, and 75 cm for gas stoves.
- The standard width of gas or electric kitchen stoves or hobs can be 30 cm, 45 cm, 50 cm or 60 cm. There are larger sizes, but this already applies to stoves for professional use. The most commonly used slabs are 60 cm wide. The dimensions of the hood dome should not be less than the width of the slab, but it is better if they are one step larger. For example, for a stove or hob with a width of 60 cm, you should select a hood of at least 80 cm. The distance between the wall cabinets should allow the hood to fit freely.
- The apron in the kitchen does not have to be located only between the countertop and the upper wall cabinets. Sometimes it needs to be done by approaching the side walls, this is especially true in the area where the sink or stove is located, if they are located along the edges. This can also be affected by nearby window or door openings.
To mark the position of the apron on the wall you will need either a laser or a hydraulic level. Laser ones, of course, are more convenient to work with, but hydraulic ones also provide very high accuracy. It is advisable that the kitchen set has already been purchased, but not yet installed on site. As a last resort, you can measure the future kitchen in the store where it will be purchased or have documentation indicating all dimensions. For marking you need:
- On the wall where the kitchen set will be installed, a mark is made on one of the edges for the position of the upper plane of the countertop.
- The level moves the mark to the other edge of the wall.
- Use a paint cord to mark the horizontal line of the tabletop position.
- If necessary, if the kitchen is corner or the apron will extend onto other walls, then similar markings are made on other walls.
- A mark is made on the position of the lower edge of the wall cabinets based on the size of the specific kitchen unit that will subsequently be installed in the kitchen.
- The position marks for the bottom edge of the wall cabinets are transferred to all walls where the kitchen apron will be installed.
- Marked parallel lines mark the location of the stove or hob.
- The position of the lower edge of the hood dome is noted (minimum 65 cm for electric stoves, 75 cm for gas stoves from the countertop).
- The position of the side surfaces of the wall cabinets at the location of the hood dome is noted; it should fit freely into the space between the cabinets; it is better if there is a gap of 1-3 cm on each side.
- The upper edge of the apron located in the hood area is marked. The apron should extend at least 5 cm under the hood, and it is better to make it up to the ceiling.
After these steps, the location lines of the future kitchen set will be marked on the wall. But, as noted earlier, it is advisable to make the apron so that its surface extends slightly under the countertop or set. It is advisable to recess the apron behind the countertop and the lower edge of the wall cabinets at a distance of at least 20 mm, and in the area where the hood is located on the left and right, the apron should be recessed under the cabinets at a distance of at least 50 mm. Therefore, parallel to the horizontal and vertical lines of position kitchen furniture the lines of the apron position are broken off
When planning and marking the backsplash, you should also take into account the size of the tiles or mosaics that will be used. For example, if the tiles are 20 cm in height, then it is completely logical that it is beneficial to make three rows of 20 cm tiles, and make the gap between the table top and the bottom edge of the wall cabinets 56 cm, taking into account the fact that 2 cm from the top and bottom will go under furniture. If tiles of other sizes are used, this must also be taken into account. If they apply decorative elements- friezes and borders - then you need to ensure that they are visible. What's the point of using expensive elements that will be hidden from view under the furniture. Each case is individual and requires its own differentiated approach.
After drawing all the marking lines indicating the position of the kitchen furniture and the apron, you need to calculate the area of the apron. The authors of the article recommend using a calculator, in which you only need to indicate the clearance between the countertop and the bottom edge of the wall cabinets, as well as the distance between vertical surfaces cabinets and the height of the apron above the bottom surface of the cabinets in the hood area. The calculator automatically takes into account all the penetrations of the apron under the furniture (2 cm on the horizontal section of the apron and 5 cm in the area of the hood).
An apron in the kitchen, laying tiles, methods for laying tiles on an apron are the topics of this article. You can easily do this work yourself if you do the repairs yourself. An apron in a kitchen is the surface of the wall above the work tables of kitchen furniture. The width of the apron is usually made 60-80 cm. The width of the apron is chosen depending on the size of the planned tiles and on your own requirements for convenience.
For example: if you are planning tiles measuring 25x33 cm for the apron, then by laying it vertically you will get 2 full rows and the width of the apron will be 66 cm; when laying horizontally you will get 3 full rows and the width of the apron will be 75 cm.
To prepare the surface for laying and directly laying the tiles themselves on the apron, you need to prepare the following tool.
Laying tiles in the kitchen - a tool for the job
- For tile laying work, prepare the following tools:
- Tools for dismantling work (scarpel, heavy hammer);
- Painting tools for preparing walls (roller or wide brush, 2 wide spatula, narrow spatula, if necessary, plaster walls - usually 1.0-1.2 meters long).
Tool for laying the tiles themselves
- Notched spatula. The width of the spatula is selected depending on the size of the planned tile. The width of the spatula for laying the apron should be the size of the tile or larger than the tile, but not smaller. When buying a notched spatula, you need to choose the correct size of the “teeth” of the spatula. They are also selected depending on the size of the tiles. For tiles 10x10 cm, choose a trowel with a “tooth” of 6x6 mm. For large tiles: 8x8 mm.
- The spatulas are simple. Width 5 cm, 15 cm.
- Rubber spatulas 1 cm, 2 cm, 5 cm.
- Wide rubber spatula (for grouting tiles)
- Construction level, preferably two: a long one of 1.2 meters and a short one of 40 cm.
- Electric drill with dual mode (with and without strike)
- An attachment for a drill mixer, but you can do without it; mixing tile adhesive by hand is not as difficult as it seems.
- A hard plastic scraper for cleaning the grout between tiles.
- Lever tile cutter
- Grinder with a diamond wheel for dry cutting.
- Devices for cutting holes in tiles (to choose from: tile drill, ballerina drill, diamond bit diameter 56 mm, metal hacksaw complete with a special string-blade) Cutting holes will be needed if there will be electrical sockets in the apron area.
- Construction corner.
- Metal scissors.
- Nylon thread for checking the level.
- Sponge.
- Crosses for seams between tiles (differ in thickness 1mm, 1.5mm, 2mm, 2.5mm)
- Grout for tiles.
- Guide profiles or straight long wooden slats 1.5-2 cm thick are the lower guide for the tiles.
- Dowel nails (6×40 mm with a mushroom head) or self-tapping screws (6×40-50 mm) with dowels (∅ 6 mm) - for fastening the guide;
- The tiles themselves are for the backsplash.
Laying quality control
For additional control of the level of the tiled surface, install a beacon tile. The lighthouse tile is glued with a small amount of glue and precisely leveled. Select the distance from the first tile laid in the corner to the beacon tile in accordance with the length of your long level or, if there is one, the rules. The role of the beacon tile is as follows. Glue the next tile, align it in levels, and generally check the plane of the tiles in the row. For what? So that after the fifth tile the wall does not become a semicircle.
10. Lay out the entire bottom row in the same way. After the first row, lay out the second. We install crosses in the corners of the tiles. Do not forget to check the vertical level of laying rows of tiles. 11. After laying 5-6-7-8 tiles, it is necessary to clean the seams between the tiles from the adhesive solution. It's done like this. Take out the crosses, clean the seams with a rubber spatula and a damp sponge, then place the crosses in the seam, as if sticking a dagger into it.Laying tiles in the kitchen perpendicular to the wall We produce it in exactly the same way, just be sure to check the perpendicularity of the apron corner with a construction angle.