The construction of frame structures has long become extremely popular. There is nothing surprising about this. This method construction is very attractive due to its simple technology, which allows all the work to be carried out on our own without resorting to the help of hired workers. And the materials required for construction are not too expensive and quite affordable.
However, when deciding on the type, one should not proceed from the mass of the building alone.
The location on which the building is planned to be erected must also be taken into account. If it is clayey, heavy enough, then without a thorough, monolithic foundation It's unlikely to get by. If the soil has a normal sand content, then or is quite enough.
If a homeowner has doubts about the quality of the soil for construction on his site, he can check its type and composition with a local architectural office. You should not neglect it without first making sure that you can actually do without it. The proposed construction will use natural material wood origin. Even fully processed, quality material, it is better to avoid prolonged contact with water.
There are two construction schemes frame house:
- All activities are completely self-guided. Ready-made blocks are not used: only original ones Construction Materials;
- construction of a structure from fully finished, complete blocks, which are manufactured industrially.
Let's consider the first, more democratic option
Diagram of frame house components: laying the foundation
The material for the roof is selected according to the preferences and capabilities of the construction owner. It could be roofing material, and much more. Like other installation work, installation of the frame also begins from the corners.
The ends of the roof frame are securely attached to the floor joists. The roof usually has the shape of an isosceles triangle. The distance between the rafters corresponds to the width of the material that is supposed to be used as insulation or coating.
It is convenient to assemble the roof frame on the surface of the ground, and then lift it and install it on the house.
Do-it-yourself cladding of a frame house
 Frame wall pie diagram
 Covering options may vary. This and more. A durable, waterproof material is laid under the overlapping sheathing, with a margin of 20-30 cm.
The walls are covered with the selected material, then the roof, windows and doors are inserted. The floors are laid last. The boards are hemmed under the laid joists, all the gaps formed between the boards and joists are filled with insulation.
If there is such a possibility, then it is better to make the floor insulation double-layer.
First, a layer of polystyrene foam, followed by mineral wool. When all the insulation is laid out, the floorboards are laid. They are placed perpendicular to the joists. For greater evenness and smoothness of the floor, you can top it with OSB boards or sheets of plywood. This is enough difficult process, therefore, before starting work, you should carefully study the technology. Who doesn't know much about construction work, you may not immediately understand what kind of nodes these are.
These are important junctions between individual structural elements buildings. The most important among them are floors, walls and roofing systems. Each of the designated main nodes in its own design also has a certain number of node connections.
Let us list them in order, from the bottom of the building to the top:
- in corner joints this is the joining of the lower trim to each other; fastening the lower frame, consisting of timber, to the foundation surface;
- installation of vertical racks: first the corner racks are installed, and only then the remaining ones;
- reliable fixation of the upper trim, consisting of timber;
- connections that serve to securely fix the structure of the frame itself in both vertical and horizontal planes: this guarantees its rigidity and stability;
- fastening ceiling beams to the timber frame at the top.
Connections of the main roof elements to each other:
- top trim and ;
- the rafters themselves at the very top, in the ridge area;
- and rafters;
- rafters and counter-battens;
- rafters and battens
All designated nodes are load-bearing, as they are responsible for the reliability and strength of the entire structure. Secondary nodes should also not be overlooked; they are no less important for the stability of the structure. This interfloor ceilings and lags. Special fasteners are used as a proven connection of individual elements of a building.
In order to build a two-story frame house, it is necessary to clearly understand the list of all necessary types of work, the algorithm for their implementation and the possibility of using certain design solutions. You must adhere to all the recommendations of specialists, allowing you to perform your assigned tasks efficiently and reliably.
Distinctive features of the construction of frame buildings are the fast turnaround time, low financial costs, environmental Safety and good operational properties structures. That is why such houses are currently in great demand, both in Russia and in many other countries of the world.
Construction Features
One of the main features of construction frame houses is that they can be erected without problems in a fairly short period of time. In just a month, a new building can be completely ready for a family to move into. In addition, it is currently possible to order a two-story frame house 7 by 7 or 8 by 8 meters on a turnkey basis.
Sectional view of the building showing its main elements.
Video of the construction of frame houses on our website. Thanks to this, the process of building construction can be constantly monitored, based on the experience of other people.
Pros of a two-story house
Almost anyone can build a two-story frame house with their own hands. This requires certain knowledge, which can be obtained from this article. And construction skills develop over a very rapid period of time.
To the main advantages two-story houses Experts consider the following qualities:
- Possibility to build a house on limited plot of land. If a person has the area of his property that does not allow him to build big house one floor, the construction of a two-story frame building is the most reliable and correct way out of this situation.
- Freeing up space on the site for a garden, vegetable garden or playground. Both in rural and urban areas, the listed elements of the exterior of the house are quite necessary for most people.
- Financial savings. This is primarily due to the compact size of some structural elements, which require significant financial costs. First of all, this concerns the roof, foundation and thermal insulation layers. Therefore, the price of two-story frame houses is quite affordable for most residents of the country.
- Possibility of clear zoning internal space. The layout of a two-story frame house allows you to create rooms for receiving guests and basic living on the first floor, and bedrooms on the second floor.
- Handsome and presentable appearance. With street lights on the facade, the frame structure will stand out from all other buildings on the street, attracting the attention of neighbors.
 Ready house on two floors.
 At the same time, it is important to understand not only why these buildings are worth erecting, but also how to build a two-story frame house so that it can be used for a long time for the benefit of the owner and his family.
Step-by-step instruction
In order to build a frame house, it is necessary to first create the appropriate step-by-step instruction. It includes a detailed description of all stages of work - from laying the foundation to the external finishing of the walls. If you follow this guide, you will ultimately be able to achieve the planned result, which is fully consistent with the chosen project.
Foundation
Two-story frame house designs imply the use of the most popular types of foundations. Among them it is worth paying attention to:
- Columnar;
- Pile-screw;
- Tape.
 Timber tying.
 The most preferable for a frame house is pile- screw foundation. This is due to the ease of use, low monetary costs, as well as the possibility of use on various types of soil. If the soil on the site is quite loose, then the use of piles is the best option ensuring the stability of the entire structure.
The main advantages of pile-screw foundations:
- There is no need to use special equipment;
- Operational installation – up to 24 hours;
- A large number of varieties of piles;
- Excellent load-bearing capacity;
- Carrying out all work at a low price, as well as purchasing materials;
- Possibility of installation at any time of the year.
 The pile screw foundation is tied with timber.
 The main disadvantage pile-screw foundation is the impossibility of organizing a basement under the building. To begin work, it is necessary to properly prepare the selected area. In any case, the entire surface must be smooth and clear of vegetation.
Installation of piles in the corners should be carried out to a depth of about 0.5 m. The step between the elements should be small - from 0.7 to 1.2 m. To complete the creation of a foundation from piles, it is necessary to concrete the trunks and install the caps.
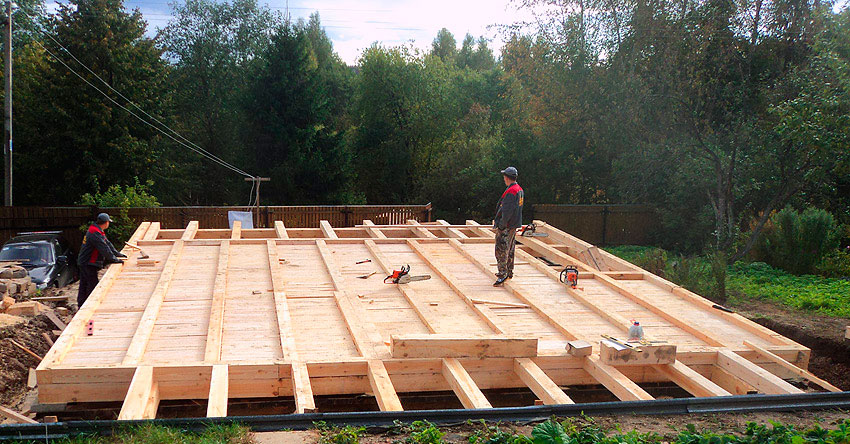
First floor frame
The process of the bottom strapping should be carried out from timber measuring 150x150, 200x250 or 200x200 m. Before laying the timber, their tops should be lubricated with mastic. It is necessary to place them on a double layer of roofing material, which will act as waterproofing. Additionally, the timber for strapping should be treated with an antiseptic.
On a note.
The timber must be installed on prepared piles around the perimeter. It must be fastened into a paw and using nails up to 120 mm long. Corners should be reinforced using metal corners or staples.
In the photo of two-story frame houses you can see that the installation of the power frame is quite simple. A board is used for this various sizes– 100x50, 150x50 and 200x50 mm.
 Power frame of the house.
 Upper harness
The construction of a two-story frame house must be carried out in accordance with the recommendations of specialists, based on existing knowledge and experience. Having made the top frame of the lower floor, it is necessary to make a second top frame and thereby tie together the vertical posts.
To give the frame structure the proper level of strength, you need to additionally install diagonal jibs. They help prevent the entire two-story structure from loosening in the future.
Second floor frame
Frame two-storey house and 6 by 8 m is erected in almost the same way as all other buildings of this type. The design of the upper floor should almost exactly replicate the features of the first floor.
 Frame house on two floors.
 The racks of the frame house must be installed on the second upper frame in the same way as originally happened on the foundation. Between the elements it is necessary to provide jibs that will prevent the building from oscillating during gusts of wind. The framing before installing the roof is tied in the same way as between floors.
Roof installation
Turnkey two-story frame houses are completed with furnishings various types roofs They can be flat, sloped, gable. If you do the work yourself, it is best to organize a gable roof. This is due to the simplicity of its design.
On a note.
The roof slope angle must be at least 25 degrees. It is best for the slope angle to be between 35 and 50 degrees. The number of slopes can be different - from 1 to 4.
Initially, it is worth installing the rafters, after which the sheathing is attached to them. The selected roofing material should already be fixed on the latter.
Wind protection
The design of a two-story frame house 6 by 8, 6 by 6 or 9 by 9 meters necessarily requires work aimed at protecting the house from various atmospheric phenomena. For this purpose, appropriate films are most often used, which are attached with outside buildings onto the frame using a construction stapler.
 TechnoNIKOL for protection.
 The main functions of wind protection are as follows:
- Preventing moisture from entering the home.
- Blocking the building's airflow in weak areas due to gusts of wind.
- Ensuring free release of steam.
An appropriate film or membrane is first attached to the frame, on top of which external finishing can be organized.
Insulation
A two-story frame house 9 by 9, 8 by 8 or 6 by 6 meters must be properly insulated. This is due to the fact that in winter period time in the house without the appropriate layer it will be cold and uncomfortable.
 Vertical cross insulation
 It is necessary to lay insulation material between the frame posts. It is best to use mineral wool for this. The main thing is to place the insulation in such a way that there are no gaps anywhere that would allow cold air to penetrate into the house.
Finishing
Frame project two-story house 6x6, 8x8 or 9x9 implies the use of a wide variety of materials for exterior decoration. This applies to siding, imitation timber, stone. The procedure for performing this type of work is as follows:
- Initially, you need to fix a sheathing made of bars measuring 40x50 mm on the frame. The fastening pitch should be about 590 mm. In addition, it will be possible to use metal profiles.
- Before using the lathing on a building, it must be treated with antiseptic and fire-resistant substances.
- Installation finishing coating carried out in accordance with the type of material.
 Exterior finishing imitation of masonry.
 It is best to carry out finishing environmentally clean materials, which allow you to create an unusual and attractive external image building.
House projects
A frame-panel house with an attic or terrace is the dream of many people. In order to build it, you need to focus on the designs of these structures available on the network. They allow you to create the most successful layout, providing for the correct design of the structure.
Frame house 6 by 6
A two-story frame house 6 by 6 is a building that is primarily suitable for the smallest plots. On the ground floor of such a building you can place an entrance hall and a common room with a kitchen. The last two rooms can be combined to expand the space.
 The construction layout is 6 by 6 m.
 On the top floor, the design of a two-story frame house 6 by 6 meters allows you to organize either one large bedroom or two small rooms for rest.
It is best to place the bathroom on the ground floor, allocating a small area for it. This can be done even under the stairs to the second floor, which allows you to significantly save free space, which a two-story frame house 6x6 meters cannot boast of.
Frame house 6 by 8
Two-story frame houses 6 by 8 meters are also very popular. They allow you to more rationally organize the space of the building. The main thing for this is to think correct layout. It should be based on the number of family members, as well as the purpose of the structure.
 Location of building premises.
 A frame two-story house 6x8 meters allows you to organize an attic, balconies and many other elements that will not only be a beautiful addition to the building, but also an important functional part of it.
Frame house 9 by 9
The project of a frame two-story house 9 by 9 meters is different in that it allows, in addition to the required rooms, to additionally allocate space for an office, dining room or guest room.
Frame houses 9 by 9 meters cannot be placed on too small plots, where an additional playground, vegetable garden or garden will be organized. That is why it is very important to correctly pre-allocate usable area in such a way that the garden area is convenient to use.
Prefabricated houses are attractive because once the foundation is ready, the house itself can be erected very quickly. For example, building a frame house with your own hands, with the help of two people, is possible in a month without haste. And this is if inexperienced workers are involved in the construction, who only know how to hold a hammer in their hands. This is because the assembly occurs step by step: regular repetition of simple actions. It is only important to know how to correctly assemble each unit. Having instructions and understanding the principle of construction, anyone can assemble a frame house on their own.
Frame construction is no less attractive because it can be done at minimal cost. How much money will be required for construction depends on the size of the house, the materials used (type and type of wood, Decoration Materials). But in any case, this is one of the cheapest methods. (
Timber frame houses are not the only ones. There are regions where wood is a luxury. They put it there. Despite the fact that metal is not cheap today, it still turns out to be relatively inexpensive.
One more thing. Many people are interested in whether it is possible to leave a frame house unfinished, and if so, at what stages. The answer is yes, and the first stage is known to everyone: the finished foundation is left to winter. The following wintering options are also possible:
- foundation + frame + roof (without floor);
- foundation + frame + roof + external cladding OSB + wind protection;
- foundation + frame + roof + external cladding OSB + wind protection + mounted and insulated floor and ceiling + partitions.
It is dangerous to leave windows and doors unattended over the winter. In other options, delaying the completion of construction is even a good idea: the wood will dry out. In winter, as a rule, there is low humidity and drying is active. At the same time, identify all the jambs in the already assembled part.

After pouring the piles, a grillage is installed, and the reinforcement is laid and tied into it. Longitudinal rods are connected to bent reinforcement outlets from the piles. At this stage, holes are left in the tape for supplying communications and (insert pieces plastic pipes across the tape).
It will subsequently be attached to the foundation strip strapping beam. To install it, studs are fixed in the tape. They are installed in increments of 1-2 meters. From each corner, 30 cm are retreated in both directions. Here, studs are required, the rest depending on the dimensions of the house, but at least every 2 meters. Please note that it is the studs that connect the frame of the house to the foundation. That’s why it’s better to deliver more often. And one more thing: no matter how short the wall is, there must be at least two studs.
When everything is ready, the concrete is poured.

After pouring the concrete, so that it does not dry out, but gains strength, it is better to cover it with polyethylene (look at the photo). If the temperature after pouring the foundation remains within +20°C, construction can continue after about 3-5 days. During this time, under such conditions, concrete will gain more than 50% of its strength. You can work with it freely. When the temperature drops, the period increases significantly. So at +17°C you need to wait about 10 days.
Step 2: Bottom Rail and Floor
To prevent the wood of the frame from drawing moisture from the concrete, cut-off waterproofing of the foundation is necessary. The safest way to do this is bitumen mastic. And it’s better - in two layers. You can also use roll waterproofing. Roofing felt is cheaper, but it breaks over time. Waterproofing or other similar modern material is more reliable.
You can coat the grillage once with mastic, and roll out waterproofing on top. Another option for shut-off waterproofing under a frame house - two layers of waterproofing coated with mastic: the closer it is The groundwater, the more thorough the waterproofing should be.

First layer - liquid waterproofing, While it is not dry, you can glue a layer of rolled paper onto it
Then the beds are laid - boards measuring 150 * 50 mm. They must be dry, impregnated with bioprotective and fire-retardant compounds. The edge of the bed is aligned with the outer edge of the foundation. In the necessary places, holes are drilled for the studs (the diameter of the hole is 2-3 mm larger than the diameter of the stud). Then the second board is laid. It is placed so as to cover the joint of the first row. It turns out to be a castle.

The second board is laid so that the joints overlap
In general, you can lay one beam of 100-150 cm, but its price is much higher than two boards, which together give the same thickness, and properly fastened two boards have a greater load-bearing capacity, although their installation takes more time. To make them work as a single beam, they are knocked down with nails in 20 cm increments in a checkerboard pattern.
We install the harness and logs

The next stage is installation and installation of the logs. These are the same 150*50 mm boards placed on edge. They are attached with two oblique nails (9 cm) at the end to the trim board, two nails on the right and left to the bed. So each lag is on both sides.

The photo shows that the first joist is installed close to the second - this way the load is better transferred to the foundation. It is installed along the second edge of the bed. The installation step is 40-60 cm. Depends on the length of the span and the cross-section of the lumber used: than longer length, the smaller the step.

If the logs are long and there is a cross beam, as in the photo above, to prevent the logs from “moving away,” jumpers are placed above the cross beam. Their length is equal to the step of installing the logs minus the double thickness of the board: if the step of the log is 55 cm, the thickness of the board is 5 cm, then the jumper will be 45 cm long.
Insulation and flooring
After the base for the flooring has been installed, it is time to insulate the floor. It can be done in different ways, with different materials. We will show you an economical option - with polystyrene foam boards with a density of 15 kg/m3 (more is possible, less is not possible). It is, of course, not environmentally friendly, but it is the only one that is not afraid of moisture and can be installed without a subfloor. The estimated thickness of the insulation is 150 mm, two layers are laid: one 10 cm, the second 5 cm. The seams of the second layer should not coincide with the seams of the first (they shift).
To begin with, a 50*50 mm cranial block is packed along the bottom edge of the log. It will hold the foam.

The foam is cut with a regular hacksaw. The blade can be used on wood - it cuts faster, but you get a torn edge, or on metal - it goes slower, but the edge is smoother. The cut slabs are laid in two layers, the seams overlap. Then they seal the perimeter with sealant to ensure waterproofing.

Next, lay the subfloor from boards, level it and lay plywood on top (preferably FSF 5-6 mm). To prevent the rough flooring of boards from warping, lay the boards alternating the direction of the wave. If you look at the cross section of the board, the annual rings go in a semicircle. So, you need the arc to look up and down (see photo).

You can do without plank flooring. Then the thickness of the plywood should be at least 15 mm. Consider what is more profitable in your region and choose.
In any case, the sheets must be laid apart - the seams should not coincide (as in brickwork). Also, do not forget to leave a gap of 3-5 mm between the sheets of plywood to compensate for changes in size when humidity changes.

The plywood is attached with self-tapping screws 35 mm long (preferably white ones - less waste) around the perimeter in increments of 12 cm, inside in a checkerboard pattern in increments of 40 cm.
Step 3: Frame Walls
There are two ways: the wall frame is assembled (all or part, depending on the size) on the floor, then raised, positioned and secured. Sometimes with this method, OSB, gypsum fiber board, or plywood are attached directly to the floor on the outside of the frame: the rigidity is greater. This technology is called frame-panel or “platform”. Factories generally operate on this principle: they build in a workshop ready-made shields According to the project, they are brought to the site and only installed there. But frame-panel house construction is possible with your own hands.

The second method: everything is assembled gradually, locally. The beam of the bottom frame is nailed, the corner posts are set, then the intermediate posts, the top frame, etc. This is the technology called " frame house construction"or "balloon".

Which one is more convenient? It depends on how many people work and whether it is possible, at least periodically, to attract help. Working on the floor is faster and more convenient than jumping up/down a stepladder countless times. But if the section is assembled large, then it will be difficult even for two people to lift it. The solution is either to call help or to break the wall frame into small segments.
Installation step and cross-section of racks
Corner posts should be 150*150 mm or 100*100 mm, depending on the load and the required width of the insulation. For a one-story frame house, 100 mm is enough, for a two-story frame house - at least 150 mm. The intermediate posts are the same in depth as the corner posts, and their thickness is at least 50 mm.
The installation step of the racks is selected taking into account the load, but in reality it is more often selected based on the width of the insulation. If you will be insulating with mineral wool in rolls or mats, first find out the actual width of the material. The gap between the posts should be 2-3 cm less than the width of the insulation. Then there will be almost no waste, no gaps and cracks through which heat will escape. The density of installation of insulation in frames is the main point, because only it will serve as protection from the cold. The slightest violation will lead to the fact that the house will be cold. Therefore, the selection of insulation and its installation must be treated with full attention.

Fastening the racks is possible in several ways: with wooden dowels, with a notch or on corners. The cut into the board of the bottom trim should be no more than 50% of its depth. The corners are attached on both sides. Fastening with dowels - old technology, but difficult to execute: long dowels are planed, a hole is drilled diagonally through the stand and beam of the lower trim, a wooden tenon is driven into it, the excess of which is cut off. It works well if the wood used is dry. If not, drying out and loss of fastening rigidity is possible. Installation on reinforced corners is much easier.
By Canadian technology The beams to which windows and doors are attached are made double. There is more load here, therefore the support must be more powerful.

Reinforced counters near windows and doors are a must. This is the only way a frame house built with your own hands will be reliable
Bevels or braces
If the outer cladding is planned to be made of high-strength slab material - OSB, gypsum fiber board, gypsum fiber board, plywood - temporary slopes are installed from the inside of the room. They are needed to level and maintain geometry until the outer skin is attached. The strength of this material is sufficient to create the required structural rigidity.
If the cladding is planned to be made up of linings, etc. installation of permanent jibs is required. Moreover, the best option is not those that are placed on several racks, but four small pieces for each: two on top and two on the bottom (as in the photo below).

Please note that in the photo above the racks are prefabricated: two boards are nailed together along the entire length in a checkerboard pattern. Such racks have even greater load-bearing capacity than solid ones and cost less. This is a real way to reduce construction costs without losing quality. But construction time increases: you have to hammer in a lot of nails.
Corners of a frame house
The most questions arise when constructing corners. If you place a beam in a corner, then there seem to be no difficulties, except that the corner turns out to be cold. In regions with short and mild winter this is not a problem, but already in middle lane Russia requires some kind of solution.

There are several ways to make the corner of a frame house warm. All of them are shown in the diagrams, so it’s clearer.


After assembling the frame, it is most often sheathed on the outside with OSB, plywood or other similar material.
Step 4: Covering
The floor beams rest on the beam of the upper frame. There are several mounting methods:
- on supporting steel brackets;
- on the corners;
- with insert;
Notching - the depth of the cut should not exceed 50% of the thickness of the top frame timber. It is hammered in from above with two nails, which must go into the harness at least 10 cm. Corners are the usual method. You can use reinforced, but not necessarily perforated staples - the shape may vary
The dimensions of the beams and the pitch of their installation depend on what will be on top. If the second residential floor or, the cross-section is taken larger, the step is made smaller: so that the floor does not sag. If only the roof and attic on top are assumed to be non-residential, these are completely different calculations and dimensions.

If a second floor is being built, the ceiling is sheathed with the subfloor of the second floor. This will make it easier to work on creating the second floor of a frame house. Its assembly is no different from the construction of the first one. The only reason is that all the lumber has to be hauled to the second floor.
Step 5: Rafter system and roofing material
When developing a house project according to frame technology the most popular are or. Their device is no different. All the same principles and calculations. The only limitation concerns weight roofing covering: it should be a lightweight material, the load from which wooden beams and floors can withstand.
To fix the rafters in a given position before the sheathing was filled, temporary jibs were used
Another relatively inexpensive technology
Step 6: Insulation
A frame house can be insulated with any of the materials available on the market with the appropriate characteristics. All of them are imperfect, but all problems have standard solutions.
The most popular insulation for frame walls is basalt wool. It is available in the form of rolls or mats of different densities. It is more convenient to install mats in walls: they are denser and hold themselves well due to the pushing force. To do this, as mentioned above, their dimensions should be 2-3 cm larger than the distance between the frame posts. The mats, of course, are additionally fixed with special fasteners, but it is more convenient to work with than with a soft roll.

Mineral wool has high thermal insulation characteristics, good sound insulation. But there is also a serious drawback: it is afraid of getting wet and it must be protected on all sides not only from moisture (rain), but also from the penetration of steam. Therefore, from the side of the room it is covered with a layer vapor barrier membrane, which prevents vapors from getting inside.
On the street side, thermal insulation from mineral wool closed with another membrane, but of a different type with different characteristics: hydro-wind-protective vapor-permeable membrane. It is not blown, does not allow moisture in liquid or gaseous states to pass through from the street, and vapors can escape from the insulation: vapor permeability is one-sided. After installing the insulation, only Finishing work. Actually, that's it, construction is over.

Now you know how to build a frame house. The detailing of some processes is far from complete, but general sequence you have the assemblies. Perhaps another video from a professional carpenter who has been building frame houses for decades will help you (see below).
Video instructions for installing frame houses
These are three videos of excellent carpenter Larry Hohn. Each of them lasts more than an hour. The technology for building a frame house on a finished foundation is described in great detail.
According to this instructions self-construction possible without any questions: all stages of building a frame house and small details are commented on and explained, down to what nails, what length, how many pieces in what increments, should be hammered into each node. The main problems that may arise and methods for correcting them are demonstrated. If you decide to build a frame house with your own hands, take the time to watch the movie. Much will become clearer to you.
The first part is the lower trim and the floor.
The second part of the video is the design and assembly of frame walls.
The third part is building the roof of a frame house.
If you still doubt whether to build a frame house, it’s probably because you’ve heard that this is a bad technology, that it doesn’t work for us. There is such an opinion. But it is based on the fact that Canadian and American frame houses are built from dry wood, with moisture. no more than 20-22%. In our conditions, wood is brought from the sawmill with almost natural humidity, and this is up to 60%. That’s why the houses twist and turn, they become cold.
But if you are planning to build a house with your own hands, what will stop you from using dry wood? Kiln drying is expensive, the difference per cubic meter is very significant - almost twice. But by stacking the wood on the site in ventilated piles, it can be dried to the same 20-22% within a year. You decide for yourself whether or not to impregnate it with bioprotection before drying. Dry wood does not rot or be damaged by fungi, but it is advisable to impregnate it with bioprotection against insects.
An example of this opinion is in the video. With an explanation of why the technology is bad...
Frame houses are very popular among developers. This is due to the fact that they are built in a short time, require a minimum of funds, and have excellent performance characteristics and are environmentally friendly.
If someone has a desire to start building just such a house, then in this article you can get information on how to do it. Here everything is described in stages. At the same time, it is meant that all preparatory, and most importantly, organizational measures have been carried out and permission to build a house has been obtained. What does that require?
The foundation is chosen at will and can be columnar, pile-screw, strip, etc. This article discusses an example of building a frame house with a pile-screw type of foundation.

This type of foundation is suitable for those areas where there is loose or unstable soil. This type of foundation has a number of advantages, such as:
- There is no need to use special equipment to build it.
- The foundation is erected in a short time: one day is enough to install it.
- Huge selection of building materials (piles).
- The foundation has excellent load-bearing characteristics.
- This cheap option foundation, compared to other types of foundations.
- The foundation can be installed at any time of the year.
On a note! The presence of a pile-screw foundation does not allow for a basement in the house. This significant drawback similar option.
How to calculate the number of piles?
Piles must have the correct geometric shape and high quality blades. You can select suitable piles from the corresponding table.
Screw pile (pipe diameter) Installation step Application
219
3-10
Houses, piers, hangars
159
2-5
Likewise
133
2-5
Likewise
108
2-5
Heavy gates, piers, hangars, houses, fences
89
2-4
Can be used as additional piles, for houses, outbuildings
76
1-3
Light buildings, terraces, signs, traffic signs
59
0.5-2
Likewise
On a note! In conditions where the soil is clayey, work should be carried out in dry, non-rainy weather. The piles are installed strictly vertically.

If thick piles are used, you will have to use special equipment. If you choose piles of the optimal diameter, you can get by with your own efforts. In this case, it is much easier to decide on the same level of installation of piles.
To begin with, the necessary markings are carried out on the site and the site is prepared. It is desirable that it be horizontally level and could serve as a kind of guide to the depth of immersion of the piles.
The next stage is determining the perimeter of the future foundation. To do this, metal rods are hammered into its corners, after which a rope is pulled between them. It is necessary to check that the future foundation has right angles.
First of all, the piles are installed in the corners to a depth of at least 0.5 meters. Although it all depends on the type of soil. It is better to install the piles by two people: one screws them in, and the second controls the verticality. Having installed the piles at the corners of the building, they begin to install intermediate piles, which can be located at a distance of 0.7-1.2 meters from one another. All piles are screwed in to the required depth, after which they begin to level them, concreting and installing the caps on the piles.

For this operation, beams measuring 150x150 mm, 200x200 mm and 200x250 mm are suitable. Before laying the beams, the tops of the piles are coated with mastic and a couple of layers of roofing felt are laid. This is the so-called waterproofing. The bars should be treated with an antiseptic.
The beams are mounted along the entire perimeter of the future building and connected to each other in half a tree using nails 120 mm long. All joints are reinforced with corners, which are fastened with nails 50-60 mm long.
The beams are attached to the base with screws; at the same time, they are placed in special heads and are well attracted by the screws.
A board is laid on top of the frame on the beams, which will cover the joints of the beams. The vertical posts of the future frame will be mounted on this board in the future. The board is nailed to the beam with nails 100-120 mm long.
The subfloor is mounted on logs measuring 100 by 150 mm, installed every 0.6 meters. The logs are connected to the frame using metal corners, after which a board is nailed on top of the logs.
Insulation is laid in the openings between the joists, and spread on it vapor barrier film. After this, everything is covered with plywood. Thick plywood is taken and it is attached to the joists. To ensure the floor is level, the logs must be installed in the same horizontal plane.

To install the frame, beams of the following sizes are taken: 100x50 mm, 150x50 mm, 200x50 mm. First of all, vertical posts are installed at the corners of the structure. They are fastened securely using reinforced metal corners. After this, proceed to the installation of the remaining racks, which are attached in the same way corner posts. All racks are equipped with jibs that minimize loosening of the structure.

The upper beam is connected at the corners by means of cutting, and to other vertical posts using corners. For greater strength, diagonal slopes are installed.

Their installation can be done in three ways:
- Through cutting.
- Using perforated brackets.
- Using metal corners.
Alternatively, it is recommended to combine several methods at the same time. This may be the option of cutting down or the option of using corners. The beams are installed directly on the beam of the upper frame. Fastening can be done with self-tapping screws, but it is better to use nails, since they allow the wood to expand freely when humidity changes.

Installing a roof is a fairly labor-intensive operation that deserves to be described in a separate article.

There is a wide range of products available for this purpose. facing materials, such as siding, timber simulator, fake diamond etc. The work is carried out in the following order:
- At the first stage, a sheathing is installed wooden beam size 40x50 mm. The sheathing pitch is 0.6 m. Alternatively, it will work metallic profile CD-60 from plasterboard systems.
- If the sheathing is made of wood, then it is advisable to cover it with an antiseptic and fire-resistant material.
- After the sheathing is ready, installation of the facing material begins.

During the work process, one should not forget about the insulation of a residential building. As a rule, everything is subject to insulation: floor, roof and walls. Don't forget about the vapor barrier film.

The construction is almost ready, all that remains is to implement it interior decoration living space. There are many options here, especially since each room requires its own approach. And rooms such as the bathroom and kitchen are subject to exceptional types of finishing.
Photo report of building a frame house on your own
Here you can see step by step the construction of a frame house with your own hands on weekends.

A two-story frame house is a permanent structure, the basis of which is a durable wooden frame. Residential buildings built using this technology are suitable for permanent residence even in harsh climatic conditions. They have many advantages that dispel the doubts of skeptics.
Advantages of two-story frame houses
Choosing two floors instead of one allows you to save space on the site and reduce the costs of building a foundation and purchasing roofing materials and roof installation. The construction of two-story frame houses is much cheaper, faster and easier than the construction of buildings made of blocks, bricks, logs, and concrete.

Among the advantages frame construction worth highlighting:
- High thermal efficiency, which is ensured using special thermos technology used in construction.
- Economical during operation. Heating costs for frame houses are an order of magnitude lower than for providing heat to buildings made of stone or wood, built using traditional technologies.
- Long service life. Frame type houses do not require overhaul, as well as regular reconstruction of walls or foundations.
- No shrinkage.
- Resistance of materials to various external negative factors.
- Non-combustibility of building materials.

It is worth noting that the list of advantages is far from complete. Frame buildings are different good parameters sound insulation and the absence of distortion of wall structures over many years of operation. Interior arrangement and finishing can be made from almost any modern materials.
How to build a two-story frame house
Choosing technology According to which it is better to build a two-story frame house, you need to study each of them. The construction of insulated projects is a good alternative to the classic solution to the problem of buying or building a house. For construction today they use the newest and modern technologies, safe and affordable materials.
Specialists have developed a huge number of projects. And especially popular today are two-story frame houses, in which several generations of the same family can live. Due to their large area, it is possible to zoning the space. The technology itself is of particular interest to consumers, so before starting construction it is best to study all the intricacies of this process.
Features of the construction of a frame house
The skeleton of a two-story frame house, bearing the main load, is the frame. You can select two types of frames:
- platform (including floor-by-floor construction of a house);
- through (the racks of the first and second floors are through).
The platform type frame is used more often. This can be explained by the fact that such a frame is very simple and quick to assemble. The design is distinguished by smaller dimensions and dimensions of all elements.

The platform type of a two-story frame is erected in the following order:
- Assembly of floor slabs, which form the basis for the walls of the first floor.
- Installation of first floor racks.
- Installation top floor first floor. This ceiling is the floor of the second floor.
- Installation of second floor racks.
- Assembly ceilings second floor, which serve as an attic floor.
Double frame technology is more complex and time-consuming. Through racks are temporarily fixed to other structural elements. This method helps to avoid deformation. The posts pass through the floors without interruption and reach the base of the roof.

As a rule, frame houses of this type are more in demand among people who prefer classic style. In such buildings, the structures and elements of the building can simultaneously serve as interior elements.
Used to make the frame timber different sections. Each element of the frame structure is rigidly and firmly mounted using steel bolts, connecting corners, plates and other fastening elements. Most often, the outer part of the frame is sheathed with slabs, for example, DSP. Such slabs can be manufactured using a variety of technologies and have waterproof and fire-resistant properties.
Technologies for the construction of two-story frame houses
Regardless of the type of frame, the following technologies can be used during the construction process:
- Canadian - using platform panels or SIP panels;
- German, including the assembly of panel panels;
- frame-frame.
All of the listed technologies differ in different approaches to the completeness and use of panel panels. You can assemble the panels directly in production or with your own hands at the construction site of a two-story frame house.
Platform technology involves the use of a pre-prepared platform and logs equipped with grooves for attaching double panels at the construction site. The shields are fastened using the top strapping. The space between the panel panels is filled with insulation.
- This is a double board or OSB, in which there is a layer of foam. They are produced at the factory and then delivered to the construction site.

German technology involves the production of panel panels, the assembly of which is completely carried out in the factory. Such panels are equipped with the necessary elements, ranging from insulation materials to engineering communications. Almost all structural elements are assembled at the plant. Then all the parts are delivered to the site using special equipment.
Frame technology is quite different from the previous two. The use of this technology involves performing all assembly work directly on the construction site. The frame of the house consists of laminated veneer lumber, the cross-section of which is 150 mm. Next, it is sheathed with boards, taking into account the requirements of the technology, or with moisture-proof boards.

After this work is completed, the walls are sheathed with special materials. Most often, frame-frame technology is used when building a house with your own hands. This technology is considered simpler and more flexible; its use does not require the use of special equipment. It makes it possible to subsequently make the necessary changes to the design and architectural characteristics of the building.
Stages of construction of a frame house on two floors
At the very beginning of the work, a foundation is installed on a previously prepared foundation, which will act as the foundation of the entire frame. To install the lower trim, beams of the required sizes, less often boards or logs, are used. When the floor beams enter the frame contour, it is performed in two rows. If the floor beams are located on pillars, the strapping contour is made in one row.
The corners are connected using direct lock. After installing the lower frame and securing it to the foundation using metal spikes, proceed to the installation of load-bearing racks. Racks are divided into corner and row, made of timber with a thickness of at least 50 cm.

Board struts are attached to the posts to provide additional rigidity. As a rule, the upper trim is attached to the supplied racks using straight spikes. When using a floor frame, ceiling beams will be mounted into it. After this, load-bearing racks of the second floor are installed in the same way as the first.

For wall insulation For a two-story frame house, basalt slabs are used, the thickness of which should not be less than 50 cm. In order to avoid cold bridges, the sheets are laid overlapping. For outer skin high-quality lining, siding or special slabs are used. For evaporation excess moisture It is necessary to leave a gap of up to 30 mm from the insulation layers.
Two-story frame house with attic
The space allocated for the attic is often used as the second floor of a frame house. But to implement such a solution, the structure of the roof slopes must be designed in a special way so that it is possible, if necessary, to increase the attic space. This floor is called an attic floor, and the solution itself makes it possible to significantly save building materials and increase living space.

Very often the attic floor serves as an office or bedroom. The advantage of arranging an attic can be called a lower budget cost, due to the exclusion of ceilings in the upper sections of the walls.
Frame ones are especially in demand houses with a compact attic. Standard sizes such buildings are 6x4, 6x6, 6x8 or 8x8 m. The total area of such a house will be from 50 to 130 square meters. m.

The most popular sizes of two-story frame houses
The total area of the house determines not only the cost of construction, but also the cost of maintenance. You need to choose taking into account the size of the plot, family composition and personal needs.
The dimensions of the house are 6x4 assumed in the project minimal amount rooms. As a rule, the total area of the building is 40 square meters. m. The attic floor of such a house is reserved for the bedroom, and the kitchen and living room are located on the first floor. The walls of the house are a frame made of timber 100x100 mm or 100x50 mm. The ceilings are beams measuring 150x150 mm. The choice of foundation depends on the type of soil - from pile to slab.

The outside of the house is sheathed OSB boards. Izospan is suitable as waterproofing, and basalt sheets 100 mm thick are suitable as insulation. The outside of the house can be finished with siding or decorative tiles. Metal tiles or ondulin are suitable for the roof.
Frame house on two floors 6x6
The area of a 6x6 two-story frame house is 64 square meters. m. Thanks to the larger area in such a house, it is easy to design several more rooms, in addition to the kitchen, bedroom and living room. For example, on the ground floor you can place a living room, a bathroom and even a sauna with a shower. And on the second there are several rooms, or two bedrooms and an office.

Frame house on two floors 8x8
The dimensions of the house provide more opportunities for design and design. The area of such a cottage is about 120 square meters. m. In addition to the kitchen and dining room, on the ground floor you can also place a children's room, living room, bathroom, shower, sauna or other rooms at the discretion of the owner.

Second floor frame house is suitable for placing several bedrooms, an office, and a recreation room. Depending on the roof configuration and design option, on attic floor There may be a ceiling of different levels. The roof can be gable, pitched, figured or another type.

Taking into account the characteristics of the soil on the site, you can choose either a concrete or a foundation on piles for construction. Traditionally, all common areas are located on the ground floor. But at the request of the home owner, the layout of the interior space can be changed in accordance with needs and capabilities.
A comfortable two-story frame house can solve the problem of housing when minimum costs. Unlike a regular apartment, such housing is more economical, ergo-efficient and functional. A house made from natural materials will be reliable, environmentally friendly and durable.
Video: building a house with an area of 160 square meters. m