Interior decoration of balconies and loggias is an important step towards transforming these premises from warehouses into convenient and comfortable ones. The range of finishing materials today is so wide that it is quite difficult to make a choice. And the features of such a room as a loggia dictate their own rules when decorating. What kind of finishing is best for a loggia, how and how to cover the walls inexpensively and beautifully - you will find answers to these questions in our article.
Types of interior decoration
The choice of materials for interior decoration of loggia walls depends on several factors:
- The purpose of the loggia room and its design.
- Warm loggia or cold.
- Loggia dimensions.
- Repair cost.


Properly selected materials, provided they are of proper quality, will last for a long time and will only please the residents of the apartment.
Finishing the loggia with clapboard
A traditional and fairly widespread material for interior decoration of a loggia is lining. It is a processed board made of wood of various species. The planks are connected to each other using a tongue-and-groove system, which ensures seam protection and easy installation.

Finishing balconies and loggias with clapboard is very popular
The board is approximately 9 cm wide and 1.5 cm thick, although pieces of any size can be made to order.
There are such types as:
- Eurolining is the same board, but made according to European quality standards. Some types of eurolining have special ventilation ducts on the reverse side. For cladding loggias, it is recommended to use a material class of at least B.
- Block house is a lining that imitates rounded logs.
The popularity of clapboard finishing is due to its high aesthetic and performance qualities. This material is environmentally friendly and has low thermal conductivity; wooden lining is suitable for complex interior finishing of a loggia: cladding walls, floors, and ceilings.

A block house in combination with decorative stone is the answer to the question “how to cover the inside of a loggia”
Among the disadvantages of wooden cladding:
- The need to apply protective compounds.
- Possibility of finishing only glazed loggias, since the material is not resistant to moisture and strong temperature changes.
- Burns out in the sun.
- High price.
There is also a type of lining called siding ( plastic lining). Recently, it has begun to be used everywhere both for the interior decoration of loggias and for their external cladding.

With the help of siding you can implement a variety of finishing ideas
Plastic lining does not require any additional processing and has an attractive appearance. Siding is presented in a wide range color scheme, which will allow you to decorate any loggia. This finish is used for any type of glazing, and some types can also be used on open loggias. It does not deform over time, is resistant to temperature changes and does not fade under the influence of direct sunlight. The installation technology is very simple, and the material itself does not require special care. Particularly noteworthy is the low cost of plastic lining.
PVC wall panels
Decoration of loggias plastic panels resembles siding. The main differences are the width of the panel (25-30 cm) and the absence of seams during installation, which makes the loggia room more aesthetically pleasing.

PVC panels are something that can be used to cover any loggia
PVC panels are durable and resistant to negative influences environment(temperature, humidity, sunlight, etc.), therefore they are suitable for covering a cold loggia. They are made from environmentally friendly materials and do not require special care– it’s enough to just wipe them.
Covering loggias PVC panels does not require special skills and can be done with your own hands short time. The cost of finishing with plastic is low, and the range of colors will allow you to cover any loggia with them.
MDF panels
Visually these Wall panels resemble a tree. They are made from wood (dried and compressed wood fibers), but the front side is the one glued to the PVC base a film that imitates natural wood in structure and color. It is thanks to this film that high performance finishing qualities are achieved. Features of MDF panels are:
- Wear resistance.
- Heat and sound insulation properties.
- Beautiful appearance.
- Easy to install.
- Not high price.

Example of cladding for a 6 meter loggia MDF panels
But this finish has a number of disadvantages:
- The panels are not resistant to moisture, therefore, before sheathing the loggia, it should be insulated.
- Low mechanical strength.
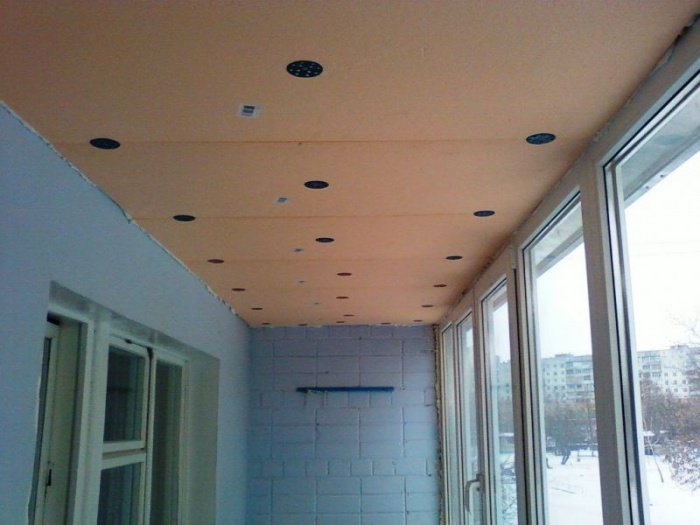
Interior finishing of the loggia with plasterboard
Drywall has long been used for finishing apartments, since it significantly speeds up repair work, does not require special preparation of the base, is easy to install and is cheap. This material is also suitable for finishing the loggia, photo below, but only if it is glazed and insulated. In addition, drywall requires mandatory finishing (painting, wallpapering, applying decorative plaster).

The photo shows the final version of plasterboard sheathing
For cladding loggias, moisture-resistant gypsum board sheets with a thickness of 9.5 mm or 12 mm are used. Drywall is best suited for finishing loggias combined with a room or converted into a living area.

Finishing the gypsum board loggia
In addition to these materials for interior decoration of balconies and loggias, photos below, are also used fake diamond, ceramic tile, cork. These materials can be used for finishing both warm and cold rooms, are durable and can give the loggia an original look. But they have a drawback - a high price, which makes their use not so widespread.

Loggia covered with cork
Decorative plaster finishing of the loggia is also widespread, photo below. This durable material, used for cold and warm finishing, can completely transform a loggia, and there are so many types and application options that unique design interior is provided.

Interior finishing of balconies and loggias with decorative plaster is the basis of a unique interior
Covering the loggia with clapboard
Finishing a loggia with eurolining with your own hands is a very simple process, the main thing is to approach it responsibly.
Step 1
It is necessary to measure the loggia to determine the quantity required material. It is more convenient to carry out the calculation in square meters. The cladding area is calculated by multiplying the height of the wall by the length. If there are complex areas, they must be divided into separate rectangles.
Important: Wood dries out over time, which leads to a decrease in the width of the slats, so when purchasing material you should give preference to lining with a moisture content not exceeding 12%. In addition, it is better to choose lining from coniferous species wood that is more resistant to rot.In addition to the lining itself, when covering you will need slats for sheathing, corners and plinths for finishing, polyethylene film for waterproofing, insulation (if you plan to insulate the loggia), sealant for sealing cracks and fasteners (screws, dowels-nails, clamps).

Claypers allow you to complete cladding faster and without damaging the material.
Tools include a hacksaw, hammer and drill, screwdriver and level.
Step 2
The wall should be covered with a waterproofing film, then the sheathing is attached. The slats are attached to the wall using dowel nails parallel to each other at a distance of about 0.5 m. The distances between the slats are filled with insulation.

Before finishing the walls on the loggia, it is better to insulate them
Important: If penofol, penoplex or similar insulation materials are used, then they are attached under the sheathing on top of the waterproofing. And if there is high humidity on the loggia, then it is better to use wooden sheathing instead metal carcass, so the casing will last longer.
Comprehensive finishing and insulation of the loggia
Step 3
The sheathing starts from the corner. The first board is leveled and nailed to the sheathing with the groove towards the corner.

Where to start with clapboard cladding
The groove of each subsequent board should fit tightly onto the ridge of the previous one; each board is attached to the frame by means of a clamp inserted into its groove, which is nailed to the sheathing.

With the help of clamps you can easily carry out installation yourself
When the sheathing is finished, all the resulting cracks should be filled with sealant, and the joints in the corners should be masked with corners.

The better the planks adhere to each other, the longer the sheathing will last.
Finally, the lining should be treated with protective tinting compounds that prevent the formation of rot and mold.
How to cover a loggia with clapboard yourself is shown in the video:
Finishing loggias with PVC panels
Sheathing the walls of the loggia with plastic panels is simple; it does not require any special skills or preliminary leveling of the surfaces. The installation method described below is characterized by high assembly speed, wiring can be hidden in the profile, the panels do not deform over time, and their dismantling will not cause difficulties.
Step 1
The loggia is measured to determine the amount of material for covering.
Important: The presence of window and door openings on the loggia increases the consumption of materials, so this should be taken into account before starting finishing.For finishing you will need:
- PVC panels.
- Mounting plastic slats.
- Mounting clips.
- Drill or screwdriver, screws, hacksaw.
Step 2
The slats are attached to the wall with self-tapping screws parallel to each other at a distance of 0.5 m. Up to required length they can be cut with a hacksaw.

Attaching slats to the wall
First, the corner profile is installed - this is done by simply pressing the bracket until it clicks.

Mounting brackets
The panel is inserted into the corner element, the tenon is snapped to the rail with a mounting bracket. Each subsequent panel is inserted into the previous one and similarly attached to the frame.

The panels fit securely together
Where the edges of the panels adjoin the openings, they should be covered with plastic corners.

Finishing the loggia with wood-like plastic
Important: This method of attaching panels is suitable for finishing loggias without insulation, or if used roll insulation. In the latter case, the slats are attached on top of it.Below it is clearly shown how to finish a loggia with your own hands using plastic panels (video instructions) on the lathing:
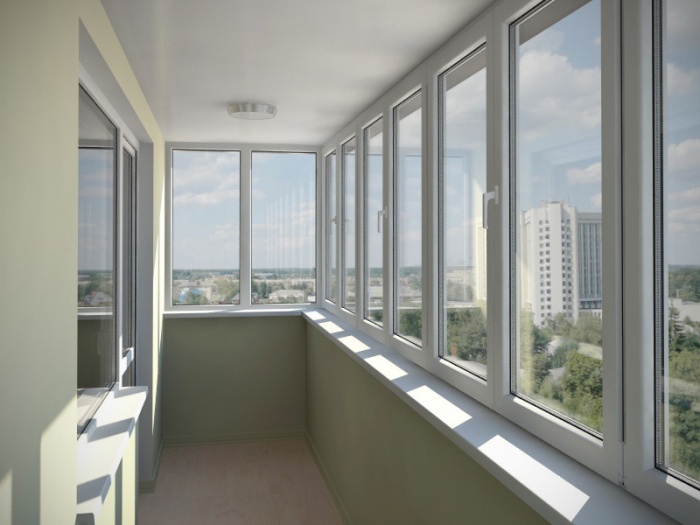
Even if you have a substantial area in a house or apartment, you won’t be able to ignore the balcony and loggia: it’s too good to relax in this small area. In winter you can enjoy the rays of the sun, and in summer you can enjoy the breeze and coolness. Therefore, finishing the balcony inside and developing a design is an important task. The place should be cozy and comfortable, but also functional. It is not easy to combine such different requirements in a very small area. There are a few key points who will help you cope with these tasks yourself. They will be discussed further.
Balconies and loggias, of course, are structurally different. This is reflected in the insulation features and when installing glazing, but the design and finishing are identical, as is the possible use of the available space. Therefore, in the article we will talk about designs of both types.
Loggia with panoramic glazing— nothing prevents you from enjoying the scenery
Types of glazing
The design of a balcony or loggia is preceded by renovation. And the main repairs on these structures are glazing and, if so decided, insulation. Glazing of balconies and loggias is conventionally divided into two groups: cold and warm. Cold protects against the penetration of dust and precipitation, can significantly block the wind, but cannot greatly affect the temperature. Warm glazing also adds sound insulation and increased temperature to the entire specified set of properties.
The costs of warm glazing are much higher, but the functions that the room can perform after such modernization are much wider. How can a cold balcony be used? For storing some things, and even in the summer - to sit and relax, in the winter you can just jump out for a couple of minutes. Workrooms and bedrooms are also installed on an insulated balcony or loggia; some move the dining area there from a small kitchen. The decision is, of course, yours, but to make it easier to navigate the topic, we will briefly list the main methods of glazing, their advantages and disadvantages.
Cold glazing
Any of the methods in this category will cost much less than warm, but the level of comfort and functionality of the room remains quite low. The methods are:

The most aesthetically pleasing are well-processed wooden frames and aluminum glazing. They are still used to this day, but metal ones can be seen less and less often. Tram windows are present only in houses of old construction: the service life is still decent, but there are very few “freshly installed” ones: the appearance is too specific, and the temperatures are, to put it mildly, uncomfortable.
Warm glazing
Until recently, there were two options: frames made of PVC profiles or double wooden ones. Double wooden ones have the same disadvantage as single ones: they require a good and regular care: painting. PVC profiles in this sense are much more practical: they only need to be periodically cleaned of dust and dirt. The second concern is that allowing them to be switched to the summer and winter positions takes only a few minutes and serves mainly to increase comfort and extend the maintenance-free service life.

Usage PVC profiles- the most popular type of warm glazing
The disadvantage of glazing with plastic profiles is their significant weight. Therefore, they are installed on a base that has a high load-bearing capacity: brick, concrete, welded from profiled pipes. In some cases, the disadvantages include the width of the profile: it limits the amount of light penetrating into the room. But high tightness and excellent thermal insulation properties, with good insulation of the floor and ceiling on the balcony and loggia, allow you to maintain a stable temperature inside. And this makes it possible to use the space more fully: balconies and loggias are combined with rooms or an office or summer garden is arranged in them.

Panoramic glazing can be warm: energy-saving double-glazed windows allow you to maintain the temperature without much effort
The third type of warm glazing for balconies and loggias is panoramic. These are double-glazed windows created using a special technology, for which a minimum of material is used for fastening. There is an option for completely frameless glazing: double-glazed windows are attached to one another. An interesting option, but expensive, and not the easiest to design.
How to decorate a balcony or loggia
To decorate glazed and insulated balconies, you can use the same materials as for finishing rooms, but the most popular method is. It can be wooden or plastic. Decorating the inside of the balcony with wooden clapboard creates a more cozy atmosphere, and plastic is easier to care for and does not need to be painted regularly. Once you decide which property is more important to you, you can choose the appropriate option.

Lining and plastic panels - the technology for finishing the balcony inside is the same, the materials are different
The second most popular material is decorative rock or clinker tiles for brick. Finishing balconies inside with these materials is possible with both cold and warm glazing, as well as without it at all. The material is durable, easy to care for, frost-resistant, and does not deteriorate under the influence of ultraviolet radiation. So not a bad choice.

Clinker tiles “brick-like” look decorative on the balcony, especially if they are skillfully used in the design
With warm glazing, finishing loggias inside with plasterboard is popular. It is especially relevant when combined with rooms, but it also looks great just on the loggia. Just one thing: just in case, use moisture-resistant plasterboards in case of condensation.

Decorative plasters have remarkable properties. They look great, are easy to care for, and many can be washed with brushes using detergents, have long term operation, there are pigments that are not harmed by sunlight. The disadvantage of this type of material is its high price. But it is beautiful and functional.

One of the options for decorative plaster. Decorating the inside of the balcony with this material is beautiful and durable
Modern trends in interior design are a mixture of different finishing materials. You can also experiment when decorating loggias or balconies. Most often, stone and tile are combined. They are usually used in conjunction with other materials. Any “duets” look good, and even unexpected combinations refresh the interior.

Options combined finishing There are quite a few, we will attach photos of the most interesting ones at the end of the article.
Floor: what is best to make it from?
The choice of material for finishing the floor on the balcony and loggia depends on the glazing or lack thereof. If the balcony is not glazed, perhaps best material- concrete or . Another option is ceramic tiles, or better yet - a natural stone or porcelain tiles with frost-resistant glue.

Self-leveling floors look great and are easy to clean
With cold glazing, the choice is almost the same, because all these materials, if the technology is followed, can withstand temperature changes. As a temporary option, you can also consider laying linoleum. But he won’t last long: ultraviolet radiation and frost are far from the conditions in which he will feel good.

Tiles are a traditional material for difficult operating conditions
On an insulated balcony or loggia, a wooden floor is most often made: it is convenient to lay insulation between the joists, and in addition, the wood is pleasant underfoot, and it itself has good thermal insulation characteristics. That is, it helps reduce heating costs.

Another option for flooring on joists: lay plywood or OSB on them, and on this base any floor covering, including laminate and even parquet board. If you want to use tiles, then it would be a good idea to have a warm floor underneath, otherwise it will feel cold even on top of a good layer of insulation.
Balcony and loggia design: ideas and photos
First, about the design of the balcony, which is used for its intended purpose: for a pleasant relaxation almost in the fresh air. Even an open balcony is suitable for this purpose. The interior decoration of the balcony shown in the photo is not super complicated or expensive, but the idea is great. The ceiling, floor and low long drawers around the entire perimeter are made of clapboard. Most likely painted with oil and pigment. A few pillows or soft mats will turn this space into a great place to relax.

With a glazed balcony or loggia, everything is simpler: install what you consider necessary. It is important to choose the right shape and size to make the most of the space. Most often, a small table and one or two chairs, small armchairs are installed. This set will easily fit even on a loggia or balcony with an area of 3 meters, and so that the table does not interfere, it can be folded.

The design style can be any, but it is desirable that it be in the same vein as the style of the entire house. The general idea should be traced in the design of all rooms. This is logical and looks more organic.

If the apartment is small and there is simply nowhere to put things, cabinets or shelves are installed on the balcony or loggia. They can be placed so that there is still room for a chair, or at least for a folding chair.

They even do it on a large loggia or insulated balcony. But few people can squeeze in anything larger than a wall cabinet that stands at the end. The only advice: if you are going to use shelves for storage and not for decoration, make them closed: few people can maintain ideal order in storage systems.
Kitchen on the loggia: design and finishing ideas
It is the kitchen area that is not being built on the loggia: neither the maintenance services nor the firefighters will allow it. They take it out to warm balcony dining area. It's possible.

It’s not difficult to create a dining area on a balcony or loggia - a wide window sill under the glazing frames, high chairs, appropriate lighting
When combining these two areas, the window sill can be removed, but the wall cannot be touched. Unless you order a project and strengthen the remaining parts: it still won’t be possible to completely demolish it, otherwise the house may collapse. To make the existing opening look like a decoration, you can round it, make a semi-arch, or choose another type of design (read how to do this.

With this approach, the decoration of the balcony inside should echo the design of the kitchen. The brick finish looks good in combination with smooth plasterboard walls.
Study
Solitude is often necessary for productive work, but finding a secluded corner in an apartment is not easy. You can organize your workplace on a warm balcony or loggia. After all, all you need is a small table and a comfortable chair or armchair.

Workplace on the loggia - a small office for work
To create the maximum working atmosphere, the interior decoration of the loggia must have soundproofing properties. This is wood, cork or vinyl wallpaper on a non-woven backing.

Shelving in place former window- don’t let the place go to waste
Bedroom on the balcony
IN small apartments Sometimes not only is there nowhere to organize an office, but even with a separate sleeping place problems can arise. If you have a balcony, even if it’s 3 square meters in area, it can be turned into small bedroom. And if the area is 6 square meters or more, then on the other side you can also arrange a work corner.

A bedroom on a balcony is not a myth. Everyone has their own approach, but it can be done
Even on a very small balcony you can make a “lying” place.

The main thing is desire, there is always a solution
An example of “green” arrangement - a garden
If none of the above methods for decorating a balcony warms you up, you might like the idea of turning it into a garden. Well, maybe not to the garden, but to the kindergarten. This arrangement option can be implemented on an open balcony, but then it is necessary to plant annuals that quickly produce greenery.

You can bring out flowers in pots for the summer. There are even more options here. If there is little space, you can make special shelves or a niche on one of the walls.

By the way, a good idea in the photo above: lay wooden shield and build yourself a place to rest on it. Comfortable and easy.
The same ideas can be implemented on a glazed and insulated structure, but the choice of plants is wider - you will still maintain the temperature, so you can even try to grow tropical plants.
Balcony design and interior decoration options: photo ideas
Sometimes you need an idea, some kind of picture that will help those thoughts that have not yet found concrete expression take shape into a final solution. This chapter contains photos that I found interesting. Maybe some of them will help you develop your own design project and interior finishing option for the balcony. 


Specialization: professional in the field of construction and renovation ( full cycle carrying out finishing works, both internal and external, from sewerage to electrical and finishing works), installation of window structures. Hobbies: see the column "SPECIALIZATION AND SKILLS"
If you want the interior decoration of your balcony to be not only beautiful, but also effective and durable, then you should not limit yourself to simply installing decorative materials on the walls and floor. I would recommend doing a full renovation, starting from repairs and waterproofing load-bearing structures, and ending with wall and ceiling cladding on top of the insulating layer.
In general, the work ahead is quite labor-intensive, so below I will tell you how best to do each of the work operations without involving third-party craftsmen and coping with complex tasks on your own.
Stage 1. Preparation
We inspect and repair the foundation
Before decorating the inside of the balcony with your own hands, you must check the condition of all supporting structures. The reason here is quite obvious: in old-built houses, balcony ceilings and fences are very often subject to intense wear and tear and are in poor condition, so reconstruction, which is usually accompanied by an increase in load, may not be able to withstand.
The critical point here will be the glazing: frames with sashes and double-glazed windows weigh a lot, therefore, before installing translucent structures, you need to carefully study the condition of the balcony base.

When reconstructing my loggia, I acted like this:
- At the first stage, I dismantled the old frames installed on the parapet and prepared an opening for glazing with metal-plastic structures.
- Next, I removed the plank flooring - the boards still began to rot and sag under minimal load.
- I removed the remaining wallpaper from the side walls and removed the peeling putty.
- I checked the bottom floor slab for cracks by gently tapping it with a hammer. I removed the chipped fragments, since it would be almost impossible to fix them.

- I cleaned the discovered cracks with a vacuum cleaner, expanded them with a grinder and filled them with cement-adhesive mortar. I did the same with the joints of the walls and floor from the inside of the balcony: I had to pick out the remains of the mortar that was used for sealing from the cracks .
In my case, the concrete slab of the lower floor was in fairly good condition, but this is not always the case. So, in addition to the operations described above, instructions for performing preparatory work must necessarily include an inspection of the area balcony slab. If necessary, repair of the end is carried out using cement mortar with additional fastening with a steel angle.
After completing this work, it is worth taking a break to polymerize the repair composition. However, if there were relatively few cracks and crevices, then waterproofing can be done in just one or two days.
We carry out waterproofing
Waterproofing load-bearing structures, from my point of view, is part of the mandatory measures. The thing is that the interior decoration of the balcony can be greatly affected by increased humidity levels. In addition, the risk of precipitation entering through open windows cannot be excluded, therefore it is necessary to protect at least the bottom plate from water.

Three methods can be used to perform waterproofing work:
| Waterproofing technology | Short description |
| Pasting | This technique is one of the most common. To protect the base from moisture, a layer of waterproof material is laid on it, which acts as a barrier to liquid. For waterproofing the following are used:
|
| Painting room | Unlike the pasting method, when painting waterproofing, a liquid composition is applied to the areas to be finished, the basis of which is most often bitumen mastic. Products of this type have good adhesion to the concrete base; in addition, after polymerization they form a continuous waterproof film. |
| Impregnating | Waterproofing impregnations for concrete can also be used to protect against moisture. When applying the material to the balcony ceiling, the active components penetrate into the thickness of the pores, where they polymerize. As a result upper layer The concrete slab becomes practically airtight, which significantly reduces the risk of leaks even if the floor of the loggia is filled with a continuous layer of water. The downside of the technology is the high price of consumables. |

To waterproof balcony bases, I usually use painting technology, but I have also worked with penetrating compounds, and it seems to me that they deserve only good reviews.
In any case, we must not forget that when waterproofing, not only the floor of the balcony is treated, but also the lower part of the walls and fences - to a height of approximately 10-15 cm above the ceiling.
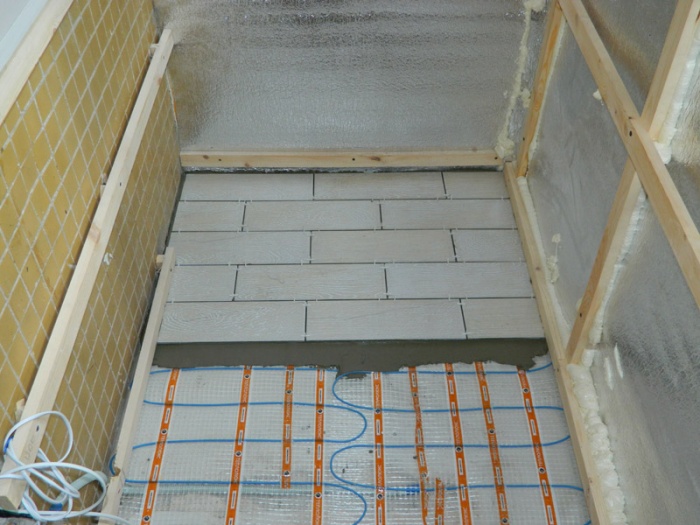
Stage 2. Laying floors
We insulate the floor
After the waterproofing material is securely glued or the applied composition is polymerized, the actual finishing of the balcony begins inside. Here it is best to move from the bottom up, starting with the insulation of the floor.

If load bearing capacity ceiling allows, then you can pour a screed up to 10 cm thick. So that the poured material not only levels the floor, but also provides it with the necessary thermal insulation, I usually prepare a polystyrene concrete solution:
- I install beacon slats on the base, forming a slight slope towards external wall(albeit small, but still protection from rainwater flowing into the apartment).
- I mix the cement mortar with granulated polystyrene, achieving maximum homogeneity of the composition.
- I pour the floor along the beacons, after which I carefully level the surface using the rule.
- I remove the beacons, sand the floor surface and dry it for at least two weeks. Protecting from external influences with polyethylene film. I periodically open the film to inspect the surface, and when the top layer dries, I moisten the concrete for complete hydration.
However, so solid foundations are rare, because much more often the interior decoration of a loggia is accompanied by insulation of the floor along the joists:

- From timber with a cross-section of 40x40 mm, I cut out three or four logs, the length of which should be approximately 50 mm less than the length of the balcony itself. I treat the parts with moisture-proof impregnation.
- I lay out the logs on the floor so that the step between them is equal to the width or half the width of the panel thermal insulation material.
- I fix the outermost joists to the wall with steel brackets, securing them at the required height (just below the threshold). I set the middle logs at the level of the outer ones, resting them on the cranial bars and leveling them on a plane.

- I lay panels of thermal insulation material in the space between the joists. Inexpensive finishing carried out using polystyrene foam with a thickness of 75 to 150 mm, but I prefer to overpay a little and take mineral wool with an equivalent heat saving indicator .
- I lay a layer of vapor barrier membrane on top of the insulation (you can use durable thick polyethylene instead).
Subflooring and flooring
Next you need to lay the floor itself. This operation can be performed either immediately or after finishing the walls - it all depends on what technologies you will use. I usually postpone installing the flooring until the last minute only if the walls are going to be covered with plasterboard - in this case there is a risk of glue or putty getting on the decorative materials.
The easiest way to make a subfloor is from plywood:
- For installation on a screed I take plywood with a thickness of 10 mm, for installation on joists - 15 mm or more. It is better to use moisture-resistant varieties, since they not only demonstrate greater stability when exposed to water, but are also more durable for a comparable thickness.

- I cut plywood sheets into squares, the width of which is approximately 30-40 mm less than the width of the balcony.
- I lay plywood sheets on the base and fix them to the joists using self-tapping screws. When installing on a screed, I use dowels with a plastic sleeve and a wide neck for fastening, and perform additional fixation using adhesive mastic.
- When attaching the subfloor, I make sure that the plywood slabs are not located close to each other. The optimal gap is 8-10 mm: this distance is enough to compensate for temperature deformations, so that the base does not swell when the weather changes.

When choosing what material to finish the floor with, I usually consider the following options:
- Linoleum - budget solution, which is extremely simple to implement. Yes, the coating is not abrasion-resistant, but let's be honest: do we plan to constantly walk on the balcony?
- Tile is an excellent choice not only for a glazed loggia, but also for open balcony. It is quite expensive, and it is more difficult to install, but the coating is very resistant and durable.

Before tiling the floor with tiles or clinker tiles, it is worth treating the plywood subfloor with a moisture-proofing compound. Otherwise, the plywood will “pull” moisture from the glue, and the bonding strength of the material will decrease.
- Laminate – a good option for a glazed balcony with high-quality waterproofing of the base. Here the potential risks lie in the swelling of the backing layer: while the front surface of laminated floor panels can withstand moisture well, the moisture resistance of the backing is not regulated, so the likelihood of swelling will be very high.

- Cork is basically the same laminate, only using natural cork veneer as a decorative layer. Moisture resistance is slightly lower than that of traditional laminate, but with high-quality waterproofing it can be used.
- Polymer self-leveling flooring is an “eternal” coating that is not afraid of either moisture or mechanical loads. The difficulty lies in preparing the base; in addition, a polymer floor is clearly not suitable if you are looking for a cheaper way to finish a balcony.

In principle, you can use other types of floor coverings, but the main requirement - moisture resistance - should not be overlooked in any case.
Stage 3. Wall insulation
Lathing for thermal insulation
After finishing the floor or in parallel with this process, you need to tackle the walls. On my loggia, in order to save free space, I only insulated the balcony parapet and side walls, but if you want to achieve maximum energy efficiency, then you also need to sheathe the wall between the balcony and the living space.

You can't do without lathing here. It can also be made from a steel profile for drywall, but I prefer wooden beam— it’s easier to work with, and its thermal conductivity is several times lower.
The sheathing is done in this way:
- I cut the timber into fragments, the length of which must correspond to the width of the area to be finished (the gap at the edges is about 20 mm on each side).
- I attach the part to the wall and use a hammer drill to make mounting holes in increments of about 40 - 50 cm.
- I hammer plastic dowels into the sockets and secure the timber with locking screws.
- It is very important to choose the correct location of the sheathing parts. As a rule, I make the gap between the wall and the edge of the frame in such a way that the dimensions of the structure are slightly larger than the thickness of the heat-insulating material.

- The pitch between horizontal beams should also be selected taking into account maximum strength. When installing with my own hands, I usually install the supporting elements of the frame at knee, hip and shoulder height (at approximately the same pitch to make it easier to adjust the thermal insulation). This minimizes the risk of damage to the cladding, especially thin ones such as gypsum board or MDF panels .
If you plan to install lighting or install an outlet on the balcony, then the wiring must be laid at this stage. The wires must be placed in casings made of non-combustible material and pass either under the sheathing beams along the wall, or in specially drilled holes.
Installation of thermal insulation material

- I cut slabs of foam plastic, polystyrene or mineral wool in width so that they fit almost effortlessly into the gap between the sheathing beams.
- I apply polyurethane adhesive foam to the underside of the insulation.
- I install the slabs into the sheathing, level them so that there are no gaps, and then fill the gaps with scraps of heat-insulating material.
- I fill small cracks and internal voids with self-expanding adhesive foam.
- On top I cover the insulation layer with a vapor barrier membrane or foil film. The second option is more preferable, since it provides significantly better heat retention due to the reflection of infrared rays.

Stage 4. Finishing cladding
Actually, we just have to decide how to decorate the inside of the balcony. For walls and ceilings, lightweight materials with good moisture resistance are usually used. Mechanical strength is also important, but still I would not put this parameter in first place - the operational load of balconies and loggias is much lower than that of other premises.
You can finish a balcony in two ways - either by immediately covering it decorative material, or by first installing plasterboard slabs on the sheathing, and then decorating them.
- Lining – traditional and universal solution, which has a lot of quite objective advantages. It looks beautiful, does not heat up in the heat, acts as an effective insulator in the cold, and can be easily repaired. By and large, there are only two disadvantages: it is quite expensive and weighs quite a bit.

- MDF panels are practically indistinguishable from lining in appearance, but are not made from natural wood, but from pressed cellulose fiber (essentially quite thick and very dense cardboard). The front layer of varnished melamine paper tolerates moisture well, but nothing more - if it stays in a humid environment for a long time, the MDF is almost guaranteed to swell. However, my skin has been standing for three years now without the slightest sign of deformation, so I can say with full responsibility: high-quality waterproofing solves many problems!

- Plastic - they compare favorably with MDF in moisture resistance and low price, but they are seriously inferior to them in appearance (especially inexpensive varieties). In addition, the strength of plastic is low, so I strongly advise installing a more rigid sheathing under such sheathing.

The installation principle of such products is simple: they are cut to size and attached to the sheathing beams either with glue, or with small nails, or with clips. When choosing the best way to fix the trim, I settled on the third option: yes, you will have to spend money on buying clips, but the finishing turns out to be collapsible
If you do not want to sheathe the balcony with panel products, then a leveling layer of moisture-resistant plasterboard. We attach the gypsum board to the frame with self-tapping screws, putty it, prime it, and then proceed to finishing. You can decorate your balcony using the following materials:

- fake diamond;
- cork, vinyl or non-woven wallpaper;
- decorative plaster;
- interior paint.
Here, as in the case of floor coverings, the resistance of the finish to external influences comes to the fore, since it will not be possible to avoid contact with precipitation and other factors.

Information for Budgeting
Both the finishing materials used to decorate the balcony and other raw materials needed for repairs are quite expensive. That’s why it’s worth at least pre-planning your budget before starting work.
A table containing prices for the most popular materials will help you with this:
| Material | Unit | Average cost, rubles |
| Mineral wool ISOVER 1200x600x100 mm | pack 4 pcs. | 1400 -1700 |
| Insulation ROCKWOOL 800x600x50 mm | pack 4 pcs. | 650 — 800 |
| Foil insulation PENOFOL 2000 | material 3 mm, m2 | 55 — 70 |
| Expanded polystyrene sheet, 1250x600x50 mm | sheet | 180 – 220 |
| Penetron (penetrating waterproofing for concrete) | 10 kg | 3200 — 3500 |
| Laminate is moisture resistant | m2 | 800 – 1400 |
| Solid floor board | m2 | 1200 – 1600 |
| Ceramic floor tiles | m2 | 250 – 2500 |
| Polymer self-leveling floor | m2 | 980 – 2000 |
| Wooden beam for frame, 6 m | PC. | 90 – 180 |
| Metal profile for frame, 3 m | PC. | 50 — 120 |
| Self-tapping screw for wood | 100 pieces. | 100 — 120 |
| Dowel-nail with plastic sleeve | 100 pieces. | 200 — 250 |
| Silicone sealant for sealing joints | 300 ml | 140 — 350 |
| Primer for walls with antiseptic | E5 l | 180 — 250 |
| Vapor barrier film | 70 m2 | 670 — 750 |
| Drywall moisture resistant | sheet | 300 — 450 |
| Profile for drywall | panel 3 m | 50 — 150 |
| Drywall hanger | PC. | 5 — 25 |
| Connecting profiles for plastic panels, 3 m | PC. | 50 — 90 |
| Plastic panels 0.24 x 3 m | m2 | 170 — 260 |
| Claymer for MDF | 100 pieces. | 50 – 80 |
| Liquid Nails | 100 ml | 60 — 120 |
| Acrylic paint for interior work | 5 kg | 200 – 500 |
| Vinyl/fleece wallpaper | roll | 550 – 1500 |
| Decorative plaster | 20 kg | 1300 – 4000 |
| Lining for wall cladding | linear meter | 90 – 250 |
Conclusion
The interior decoration of the balcony, carried out according to all the rules, will allow us not only to transform this room externally, but also to improve its thermal insulation: so instead of a warehouse for conservation and old furniture we'll get another one living room, which can be used for relaxation in the spring - summer season. In winter, the finished balcony will act as a buffer, keeping the house warm. The video in this article will help you understand finishing deposits. , and if you need advice on performing a particular operation, contact me in the comments, and I will be happy to advise you!
September 26, 2016If you want to express gratitude, add a clarification or objection, or ask the author something - add a comment or say thank you!
A beautiful, comfortable balcony is the pride of the apartment owners. It is very difficult to arrange such a small area as functionally and stylishly as possible. But these days there are many different technologies and design programs that will help you make “candy” even from an old “killed” balcony.

Peculiarities
When the renovation of the apartment is completely completed, it’s time to arrange the balcony area. And here you can give free rein to your imagination.
If your balcony offers an excellent view of nature or landmarks, you should think about converting it into a gazebo or veranda, where you can later organize interesting gatherings in good company.

In the event that there is a construction site under your balcony or if instead of a landscape there is a dull factory, then you should turn the balcony area into something like winter garden or arrange it there Gym. Or you can simply place your office or dressing room there.

Previously, balconies served people to store things. Now, that's it more people they prefer to decorate loggias in such a way that its internal area is used as efficiently as possible.
Of course, if you live in a Khrushchev or Brezhnevka building, then you won’t be able to turn around on the balcony. However, small size should not be a barrier. Even inside a small balcony you can create a wonderful interior.


If the balcony pleases you with both its area and the views, then turning it into a special relaxation area will be a real pleasure.


Materials
IN modern world There are many different finishing materials. The choice remains with the apartment owner: what he wants to see on his balcony and how it will fit with the interior of the apartment as a whole.


Lining
Most often, lining is used to decorate the balcony. It can be different. Ordinary lining is wooden slats or planks processed until smooth. This material got its name a long time ago, when it was mainly used to decorate railway cars. Plank-shaped lining is usually made with a ledge or tongue-and-groove lock. The slats are simply laid end to end.
The advantage of wood finishing is its naturalness. Wood does not evaporate harmful substances, unlike many plastic analogues, it is quite durable and less susceptible to mechanical damage.
The plastic lining is similar to plastic PVC panels. However, its dimensions, profile and lock exactly correspond to the wooden lining. The lining can be chosen in any color, even textured like wood.


Eurolining consists of boards standard parameters with an asymmetrical tongue-and-groove lock. On the back side there are 2 longitudinal grooves for draining excess moisture or condensation. Eurolining comes in different profiles - with right angles and rounded chamfers. This does not affect the ease of installation in any way, but the finished cladding looks very stylish.

MDF panels
It is very popular to cover the inside of a balcony with MDF panels. Partly because it is the most economical option finishing and, moreover, it’s easy to do it yourself. This also reduces the cost of repairs, because paying specialists is now expensive.
MDF panels are durable and moisture-resistant, resistant to temperature changes, but the downside is that they may contain toxic resins in the glue. Their content is within the established norm, but this makes many think twice before deciding to use this material.


Siding
Contrary to popular belief that siding is a material for exterior decoration, it is also quite suitable for interior decoration. This material is very durable and practical, resistant to temperatures. But if your balcony is located on the sunny side, then there is a high probability that the color of the material will fade in the sun and fade. Therefore, most often, when a balcony is sheathed with siding from the inside, a white material is chosen.


Decorative rock
If you are prone to romance and you like castles, knights and other paraphernalia of romanticism, you can decorate your balcony with decorative stone. This finish will look stylish and original.
Decorative stone is a special type of tile, the front surface of which is made in the form of natural stone. After finishing with this material, it seems that your balcony is made of stone masonry. And it can be completely different. From the colors and textures of wild natural cobblestones to neat and smooth walls tiled to look like brick.

Such tiles are usually made of cement using a special technology with the addition of various technical mixtures. In terms of composition and environmental friendliness, it is very close to natural material, and therefore such cladding is becoming increasingly popular.
In addition, artificial stone is many times cheaper and lighter than natural stone. It is evenly textured and painted inside, and therefore, even if you accidentally chip off a part or cut it in the place you need, the tile will look natural when cut.
Laying this material is identical to laying regular tiles and is done using regular tile adhesive.


Wall decoration
When starting a renovation on a balcony, first of all, you need to glaze it. Previously, they glassed themselves using wooden frames and ordinary glass. Nowadays, glazing is carried out by specialized companies that do it quickly and efficiently.
After glazing, all cracks must be carefully sealed. Usually large holes are filled polyurethane foam, and for small ones, ordinary sealant is enough.


Then we insulate the walls. If you want to save money on this part of the repair, choose foam plastic as insulation. It holds heat very well and is inexpensive. However, it is a fire hazard and produces a lot of toxic smoke when burned.
Mineral wool insulation is a little more expensive. It belongs to fire hazard class zero. However, in other characteristics it is more capricious: it also requires waterproofing on top.
The most popular insulation of the new generation is penoplex. It has low vapor permeability and thermal conductivity, is very strong and durable.

Having insulated the balcony, you can begin to complete the final finishing work for the walls. Having selected the material in advance, we begin the design. You can make walls in one material, you can do a combination. For example, decorative stone goes well with regular tiles or with decorative plaster.


Ceiling finishing
There are a lot of options for finishing the ceiling on the balcony. Nowadays the choice of materials and technologies is very large.
But first you need to seal the ceiling surface and waterproof it. After all, you will probably be laying electrical wiring, and therefore everything must be moisture-proof.
Then, in most cases, the frame for the insulation is installed, the sheathing is insulated and stuffed.
It is better to entrust electrical wiring to a professional, because this is a serious matter. It is necessary to lay the cable as safely as possible and connect all sources.


After this, we proceed to the final stage of finishing. You can make a ceiling from plasterboard. This is the simplest and most multifunctional option. You can paint drywall, cover it with wallpaper, polystyrene foam tiles or any other finishing coating.
A ceiling upholstered with clapboard, plastic panels or siding looks great and is very practical. But this is only appropriate if the walls are made of the same or a compatible material.


The Armstrong ceiling has been very popular lately. Its essence is that tiles are laid on an aluminum frame. Tiles can be made of different materials to suit every taste and budget: from pressed cardboard to stained glass.

Well, the most common option these days is the installation of a stretch ceiling. You need very little canvas for the balcony area. Therefore, this option will also turn out to be very budget-friendly and will be carried out directly by professionals in their field. On the market suspended ceilings there is a lot of competition now. To attract customers they carry out all sorts of promotions. Therefore, such a ceiling will cost you very little.

Floor finishing
The flooring on a glazed and insulated balcony is installed from materials that match the wall decoration. This can be any covering that is used for the floor in any residential area. You can cover the floor with linoleum, lay tiles, laminate, carpet, or make it wooden. There are a lot of options.


- Preparation for the coating begins with the heat and waterproofing of the future floor. A material such as penofol is perfect for these purposes. You just need to cut out an area that matches the shape of your balcony and lay it with the foil side up.
- Wooden logs are installed on this material at a distance of approximately 50 cm from each other. It is possible to lay additional heat-insulating material between them.
- Then a layer of thick plywood is installed and the selected floor covering is laid directly.
- If your balcony is an extension of the living room, it would be appropriate to install an electric heated floor. It is not so easy to install it, and therefore it is better to turn to specialists.


DIY finishing work
Finishing and decorating a balcony with your own hands can take a lot of your time. It depends on what ideas you want to bring to life. Step-by-step instructions will help you decide on the procedure.
- First of all, you need to glaze your balcony. You can do this yourself by purchasing ready-made double-glazed windows of a suitable size and installing them using polyurethane foam. But it is best to order glazing from a specialized company.
- Then take detailed measurements of the entire room in order to calculate the amount of materials that will be required for repairs in a given area.
- After this, you must carry out thorough insulation using the same foam or a special sealant. Then you lay heat and waterproofing along the entire perimeter of the balcony room, carry out electrification and decide on the issue of installing a heated floor or installing an additional heating element on the balcony.
- And finally, you need to cover the walls with the selected material.

How to repair a balcony with your own hands, see the following video.
Decor ideas
Depending on the purpose of the balcony room, you can decorate it as comfortably, stylishly and functionally as possible. For this they use various elements decor that will go well with the decoration of the balcony room.
The balcony, decorated in a classic style, looks very stylish. Small room will visually increase due to the use of a large amount light colors. French floor tiles go well with light wallpaper painted in a soft cream color. Heavy satin curtains will serve as a reliable barrier to the penetration of sunlight in the summer. Rattan wicker furniture is best suited to the classic style.

For a needlewoman, you can equip a workshop on the balcony. The walls and ceiling, decorated with light PVC panels, will serve as an excellent light reflector, and the workplace will be illuminated as much as possible. To avoid discomfort in hot weather, you need to install a room air conditioning system. Pockets and small shelves for small items will be excellent helpers for compact storage.


An office on the balcony is also a great option. The walls can be sheathed regular drywall and paint in bright hues. Make one of the walls a dark color office furniture to add a touch of contrast to the interior. Decorate the floor with abstract tiles, cover the window openings with dark blinds. Such style will suit both the student and the supervisor.


Since the balcony is the sunniest place in your apartment, you can turn it into a greenhouse. In this case, it is appropriate to cover the walls with photo wallpaper, take the window blocks with Roman blinds, and attach pots with live plants to the walls. Arrange exotic flowers and shrubs in large flowerpots and pots, and complement the interior with comfortable chairs.


If your balcony opens beautiful views on the city, you can turn it into a stylish minibar. The window sill needs to be expanded in the form of a bar counter, and elegant chairs will perfectly complement the interior.
People often wonder about expanding their living space or using it wisely. Therefore, in this article we will examine the question of how you can wisely use the space in the loggia.
In addition, we will look at the difference between a loggia and a balcony, how to decorate the inside of this room, how to glaze it, and much more.
What is a loggia
Many people believe that a loggia is the same as a balcony. It is true that they have quite a lot of similarities, but do not confuse them, because they are quite different.
Among the external differences, it can be noted that a balcony is an ordinary slab that is attached to a load-bearing wall and protrudes beyond the facade of the building. In addition, there is a parapet on the balcony, about a meter high. Unlike a balcony, a loggia is part of the house and has walls, windows and a ceiling. During construction multi-storey building, this element is located one below the other.

The balcony is often used to store screws, equipment, tools or anything else. But the loggia is used for completely different purposes. The word “loggia” means “gazebo”, this helps to understand how this space can be used.
Glazing
The glazing of a regular balcony and the glazing of a loggia are significantly different. For example, for a balcony you need a structure that is fairly light in weight; it is advisable that the window frame be aluminum. In today's time plastic windows have dropped quite a lot in price, we recommend that you install them, because they have very good energy-saving properties. Also for measurements window openings, we recommend calling an experienced specialist. He will not only pay attention to little things that you may not have known about, but will also bear responsibility in the event of incorrect measurements of the loggia openings.
The owner of an apartment or cottage must carefully ensure that the windows of the loggia or balcony are installed perfectly level. If the windows are mounted with deviations horizontally or vertically, then due to the distortion, the sashes will stop opening and very quickly the structure will become faulty. The gaps under the loggia windows need to be foamed.
At the moment, frameless glazing of the loggia has become very popular. As the name suggests, it's quite complex design, which is a profile guide into which armored glass is mounted. Thanks to such windows, a unique panoramic view is created. The disadvantages include poor thermal insulation and very high cost. But, thanks to the unusual appearance of the loggia, many are willing to pay a lot of money for such windows.
Insulation of a balcony or loggia
Insulating a balcony or loggia can begin with waterproofing the base. First, remove the existing floor covering, such as tiles or boards. Completely remove dirt, dust and debris from the floor. Cement mortar or polyurethane foam Seal all cracks and openings. We coat the floor with waterproofing material. For better effect, you can additionally spread a waterproof film on the floor.

Floor finishing materials
There are not so many materials for finishing the floor. But, before we look at them, we recommend that you think about heating the loggia. Many experts categorically prohibit moving a radiator that is connected to the central heating system. They recommend installing an electric radiator or installing a heated floor. Few people want to heat their loggia all winter with an electric heater, so the best option there will be a warm floor.
Let's look at some basic materials that can be used to decorate the floor of a loggia and balcony:

Insulation and finishing of the loggia ceiling
The first thing you should think about when finishing the ceiling is its insulation. The most common materials for insulation are polystyrene foam, mineral wool, penoplex, and expanded polystyrene. Let's look at each of them:
- Polystyrene foam is a universal material that can be used both for a suspended loggia ceiling and for putty. It will not be difficult to install it yourself. First, you need to secure it with tile adhesive or foam glue, and then secure it with a special dowel mushroom. There are five fungi per leaf. The gaps between the sheets must be filled with foam.
- Ceiling insulation mineral wool produced in a similar way. The materials differ in that cotton wool cannot be installed under putty, although it is ideal under a suspended ceiling. Working with cotton wool is quite difficult, so be sure to use eye and skin protection. People who suffer from asthma or other respiratory conditions should wear a respirator, or better yet, hire a specialist.
- Installation of penoplex or expanded polystyrene for a loggia is almost the same as installing foam plastic. This material differs from foam plastic in that it has special grooves with which the plates are attached to each other. They have greater rigidity, so only two fungi are required.
After insulation, you can begin finishing the ceiling of the loggia. Below are some of the most common finishes:

As we saw above, there are many ways to beautifully and efficiently decorate the ceiling and floor of a loggia or balcony. Decorating the loggia with your own hands is also quite possible. Below is shown what materials can be used to decorate the walls of a balcony or loggia.
Wall finishing materials
Drywall
This material is excellent for uneven loggia walls, since unevenness or other defects will not be visible under the sheet. The advantages include ease of installation and low cost. In order to cover your balcony or loggia with plasterboard, you need to use only a moisture-resistant variation.
To carry out work inside with your own hands, you need to carefully prepare the surface. We seal all cracks with polyurethane foam and treat the surface with a special antifungal mixture.
The next stage of work is installation of the sheathing. For these works, mounting rails or metal profiles are used. Cutting off right size slats and fasten with dowels and hangers. Drywall must be secured using self-tapping screws, in increments of about 25 cm.

Important! Some “experts” attach drywall for a loggia in such a way that the head of the self-tapping screw pierces the cardboard paper and is deeply recessed into the material. So, it is strictly forbidden to do this; the gypsum base will crumble and the work will be done very poorly. You need to drown it a little, but not with force.
After installing the drywall sheets, we seal the seams with a special mixture using a sickle mesh. The final part of the work is finishing the drywall surface with paint, decorative plaster, stone or other material.
Natural or artificial stone
A popular method has become finishing the surface of walls with stone. In addition to a very beautiful appearance, the material is quite strong and durable. Before starting work, be sure to level the surface. In addition, this work requires special skills, so a beautiful result can only be achieved if the work is done correctly. Also, pay attention to the quality of materials. You should only buy glue and mixtures from trusted sellers, otherwise the stones may simply fall off.

Lining

When choosing this material for finishing the loggia, you will be offered lining and eurolining. Eurolining differs in that it is more resistant to moisture. This material is made from dried wood and has special grooves through which condensate flows. Therefore, eurolining is more suitable for wet rooms.
Conclusion
Based on this article, we can conclude that if desired and correctly selected materials, it can turn out very beautiful balcony or loggia. Do not neglect this place, making it just a storage room or a place for drying clothes. With some skills and imagination, you will get a very decent result!