The quality of the home sewer system should not be inferior in reliability to the water supply or electrical network. If the sewage system in an apartment is installed efficiently with your own hands, it will last for decades, provided that installation standards are observed and high-quality materials are used. Supplies.
Do you doubt your abilities and are afraid to make mistakes? We will help you competently design and install a sewer system. The main thing is to take everything into account basic requirements, choose the right pipes and adhere to the installation technology described in the article.
Before you select the pipes and everything you need, before starting work you need to understand the principles of operation of the sewer system, including observing the angles of inclination so that the pressure in the riser is slightly higher than atmospheric.
Otherwise, atmospheric air will squeeze out unpleasant sewer gases directly into the apartment. If the internal pressure is too high, waste gases may be released from the siphons.
Let's take a closer look at all the nuances of the sewage system in the apartment.
Pipe slope is an important condition for the functioning of the system
When laying the highway, you must maintain a horizontal angle, which must be within certain limits. An insufficient one will not allow the wastewater to flow normally into the riser. If the slope is too great, the water will drain quickly, leaving contamination on the walls of the pipe.
Monitor the slope to achieve optimal fluid flow in the sewer and correct pressure in the pipes. Pipe slope standards must comply with SNiP (+)
The paradox is that with high “fluidity” the sewer system will become clogged.
Dependence of the pipeline laying slope on the pipeline cross-section:
- 30 mm/m at 50 mm;
- 20 mm/m at 110 mm;
- 8 mm/m at 160 mm;
- 7 mm/m at 200 mm.
Thus, the maximum slope should be within 150 mm/m. Exceptions are bends up to 1.5 m long for some plumbing fixtures, for example, a toilet.
Sewer pipes can only be connected at right angles in a vertical orientation using the waterfall principle.
Image gallery
The composition should be neutral - it is better to use polyurethane or silicone. Sealant must be applied to each plastic gasket. There is no need to apply anything to the rubber seals.
You need to lubricate the outer part of the pipe that will be in contact when connecting, as well as inner part pipe We connect each section separately. After the sealant has hardened, you need to check the entire system for leaks by running water into the drain from all plumbing fixtures, including the bathroom. In this case, there should not be a drop of water on the floor.
Conclusions and useful video on the topic
Installing a sewer system in an apartment is a labor-intensive process, but knowing the intricacies will help you complete a competent installation. Use video tips to expand your knowledge and watch professionals at work.
Now you know how to plan and install sewerage in an apartment. The process of dismantling and installing equipment is accompanied by many professional nuances, so if necessary, it is better to contact specialists.
Do you have experience in solving similar problems? Or do you still have questions about arranging sewerage in your apartment? Please share your opinion and leave comments. The communication block is located below.
To install a sewer system in an apartment, it is important to choose the right pipes and prepare the pipeline for assembly. Strict adherence to installation rules will help to avoid mistakes and reduce the risk of problems during sewer operation.
To equip indoor drainage systems, pipes made of cast iron or polymers are used: polyethylene, polypropylene and polyvinyl chloride.
Cast iron products are strong, durable (service life is up to 100 years), resistant to temperature changes, chemical and mechanical impact and they absorb sounds well, but they are expensive, and without special tools and installation skills it is difficult to install a cast iron pipeline with your own hands; here you cannot do without the help of specialists.
The drainage system is often installed independently from polymer pipes: polyethylene, polypropylene or polyvinyl chloride. Pipes made of polymers are easy to install and are much cheaper than cast iron, but have two significant shortcomings: lack of sound absorption and shorter service life - up to 50 years.
Each type of plastic has its own characteristics and operating temperature:
Note! Plastic pipes are used for internal sewerage gray, orange ones are for outdoor drainage systems.
An important factor in choosing pipes is throughput. This parameter depends on the diameter of the pipe and the functional purpose of the pipeline section.
Installation of sewerage in an apartment
It is necessary to install sewerage in an apartment in as soon as possible, because the sewerage network in apartment building general, and installation work cause inconvenience to neighbors. Therefore, you need to plan the procedure in advance, decide on a set of building materials, carry out necessary preparation workspace.
Process Features
The installation of a sewer system in an apartment has nuances depending on whether the old pipeline is being replaced or it is being installed from scratch.
If the sewerage system in your apartment is leaking, this problem must be resolved immediately. But not everyone can afford the challenge good master, and someone wants to try to cope on their own. It happens that constant cleaning of pipes does not produce results due to their advanced age or incorrect angle of inclination. The problems may be different, but the solution is the same - searching through the entire system.
If you do not have the required experience, installing a sewer system in an apartment will be a serious challenge. The slightest mistake can end badly, so you should think carefully before getting to work yourself. If you do decide, follow all instructions carefully to achieve the expected result.
Stages of installing sewerage in an apartment
Drawing up a diagram
Before going to the store and starting work, be sure to draw a diagram of the installation of all equipment. If the sewer system is working properly, it is enough to simply redraw what is already there. If the arrangement of elements, material or diameter changes, ask a specialist to check the circuit; it will cost less than correcting errors in an already installed system.
Not correct angle tilting pipes leads to rapid clogging of the sewer system. Many people mistakenly think that the larger this parameter, the better all waste flows off. But for proper operation the system needs to create a self-cleaning effect so that liquid sewage washes away more solid ones. The thinner the diameter, the greater the angle of inclination. To create the desired angle, make a vertical section of pipe to the desired level. A few specific meanings:
There are a few details to consider:
- The angle in the horizontal plane should not exceed 120 degrees.
- The rigid connection for the siphon should not be more than 1.5 m, and the corrugated one 0.8 m.
- Mandatory elements in the diagram: location of the central riser, all fittings and bends, indications of dimensions and location relative to the walls.
- If pipes pass through rooms other than the bathroom and kitchen, draw them too.
- To connect a washing machine and dishwasher there is no need to observe the angle of inclination, since water is removed from these devices with additional effort.
- It is better to avoid right angles, as they will cause blockages more often.
Purchasing the necessary parts
Pay attention to the type of plastic the pipes are made from. Three types are especially popular now.
- Polyethylene. Cheap, but it is not completely sealed and does not withstand high temperatures. We do not recommend using it.
- PVC. Withstands temperatures up to 80 degrees. It can only be cleaned with ultrasound and a plunger, but it is inexpensive and has low hydraulic resistance.
- Polyisopropylene. Durable and heat resistant. You can clean it with a cable and any chemicals, except for alkali and acid concentrates.
Plastic pipes make noise during operation, so think about insulation in advance. Any neutral sealant is suitable for polyisopropylene, but only silicone is used for PVC.
Choose pipes of the required length so as not to cut them later. Sometimes it’s even worth changing the design to save time and materials.
Preparation for installation
To avoid trouble when dismantling and installing a sewer system, do all of the following.
- Warn neighbors above and below not to use the toilet and water.
- Organize the shutdown of the riser valves in the basement.
- Cover the walls and floor of the toilet or bathtub with polyethylene.
- Choose clothes that you won't mind throwing away.
- Strengthen the riser at the top. It is recommended to install 2 half-clamps on anchors with a diameter of more than 12 mm.
- When working with plumbing, a lot of dirt always forms, so stock up on garbage bags.
First, try on the pipes, pay attention to all difficult places for installation, and draw up a work plan. Mark on the walls the places where pipes are connected and where anchors are installed to make it easier to install the system.
Try to assemble the entire pipeline by simply connecting its parts together. Cut the pipes to the required length, leaving 10-15 mm in reserve on the free side. Use a miter box and a hacksaw, maintaining a 90 degree angle, otherwise you will not achieve a complete seal.
Dismantling
When replacing plastic pipes for new ones made of the same material, they can simply be removed. If you need to dismantle cast iron, you will have to use a diamond-coated grinder. Professionals sometimes use a hammer, but with a large amount of work, you will spend a lot of time with such a tool. First, the pipes are disconnected from the walls and the plumbing is removed, while marking the location of the bathtub, sink and other items with a pencil. Before starting work, do not forget to turn off the water and warn your neighbors.
If you are dismantling with a hammer, you will need to hit the protruding parts hard to crack and loosen them. Wear safety glasses or cover your eyes as pieces of cast iron may cause eye damage.
When cutting cast iron, be sure to wear a respirator, as the resulting dust is very harmful to health.
You should start disassembling the pipeline from the “tee”, the junction of the apartment sewerage system with the riser.
- Disconnect the pipes leading to the tee.
- Make a neat cut 10 cm from the riser. Be sure to use a grinder or a hacksaw, as using a hammer can damage important parts of the riser. Sometimes it is not possible to remove the “tee” the first time. If it does not give in, make a second cut. Insert a wedge, chisel, or flathead screwdriver. Then strike carefully and accurately. Gradually loosen the pipe. In particularly difficult cases, you will have to heat the junction with the riser.
- Clean the bell of any excess. This will allow you to install the new riser pipe efficiently.
- Disassemble the remaining pipeline.
- Plug all holes with rags. If everything is done carefully, you can turn on the water in the house.
Installation
It is customary to start work from the riser and connect the pipes to the toilet, bathtub and other plumbing at the end.
- Install the adapter from cast iron to plastic. The installation principle depends on the design of the cuff.
- Insert the first section into the cuff and check that everything is in place.
- Apply a thin layer of sealant inside the pipe and outside the connected pipe. Unlike rubber gaskets, plastic ones also need to be processed. Wrap the joint in plastic. Then level the sealant layer using a brush or piece of cloth. In order for the pipes to hold well, you first need to insert them all the way, and then move them 10-15 mm back.
- Assemble the entire system, the toilet is installed last.
- Check for leaks.
Conclusion
Sewerage in an apartment with your own hands is not as simple a matter as some might think. Try just making a diagram first. If you are not confident in your abilities, do not get started. Correcting errors will cost more than calling a professional. If you decide to do all the work yourself, we hope that the above tips will be useful to you.
Major repairs are never complete without replacing the sewer system. But the prices for repair specialists force us to postpone this work until next year or take on the task ourselves. Without prior experience, it will be very difficult to install sewer pipes with your own hands, but the tips and recommendations from our article will help you install them at a high level.
Beginning of work
One of the main components of any apartment is the sewerage system. This system in the room is non-pressure and performs the function of discharging general wastewater. They must be delivered from the apartment to the common riser of the house. That is, in order to fulfill its immediate tasks, the sewer system must be at a certain slope. In this case, it is necessary that the angle of descent allows you to set the direction of the wastewater and allow it to move quickly.

You need to start work with the layout of the sewer system. If the owners of the apartment are simply satisfied major renovation With the replacement of old pipes, the task becomes much easier. If you have moved into a new building and there is no sewerage system, then you will need to address the issue of how the sewerage system is arranged in an apartment building. Neighbors or housing and communal services workers can help in this matter.
What actions need to be taken at the planning stage? First of all, you need to decide on the future locations of plumbing fixtures and other important details of the bathroom. Secondly, you need to calculate the correct installation angle sewer pipes. Thirdly, you will need to choose the right materials for repair work.
Selection of materials
High-quality do-it-yourself sewerage installation in an apartment largely depends on correctly selected materials for the work. Of course, most important detail pipes will become. Previously, this material had a very narrow selection. The most popular sewer pipes were cast iron, but in our advanced century many new varieties have appeared. Now, most often, owners use plastic pipes in their apartments:
- Polyethylene - their main advantage low price. But we do not recommend stopping at this option, because besides the cost, pipes have no other advantages. They are highly susceptible to deformation, have low heat resistance and are rather unreliably sealed. Only “alternative” manufacturers continue to supply polyethylene pipes for sale. But doing sewer repairs that will last a couple of days is not profitable and stupid.
- PVC - average cost. The hydraulic resistance of these pipes is considered to be the lowest. They can be connected to each other using dichloroethane glue. But there are also disadvantages. First of all, limited heat resistance (up to 80°C), low strength and resistance to chemicals. PVC pipes are cleaned exclusively using a plunger or an ultrasonic emitter.
- Polyisopropylene pipes are one of the most expensive pipes at the moment. It does not have such a smooth surface as PVC, but in other respects it is ahead of other types of sewer pipes. Withstands temperatures in excess of 130°C, so durable and resistant that they can withstand mechanical and chemical cleaning.
In addition to the pipes, it is necessary to purchase material for connecting them. The best option will become silicone grease. It was created intended for the installation of sewer pipes. By using silicone lubricant, the owner will be able to finish renovation work in the shortest possible time, and will also reduce hydraulic resistance. If your choice fell on polypropylene pipes, then you need to take into account that special cuffs are required for their installation. If they are unsuccessfully joined, the pipe will deform and create tension in this part of the sewer due to sudden temperature changes. But with the help silicone grease this can be avoided.
Calculation of the angle of inclination
As already mentioned above, selecting the angle of inclination for a sewer pipe is a very important step. If the slope is too small - waste water will not be able to be delivered to the right place, and if it is too large, then the water will drain away quickly, and contaminants will attach to the walls of the pipes, which will create permanent blockages. Therefore there are clearly defined limits of values. The minimum for a pipe with a diameter of 5 cm will be an inclination angle of 3 cm/m, 11 cm - 2 cm/m, 16 cm - 0.8 cm/m, 20 cm - 0.7 cm/m. The maximum does not depend on the diameter of the pipe and is 15 cm/m (the exception will be options over one and a half meters long). A right angle for the sewer becomes possible when it is positioned vertically.
Maintaining the angle of inclination in an apartment with your own hands is quite difficult, since you need to take into account not only the parameters, but also the design features of the sewer pipes. Therefore, at this stage of work it is better to take the help of a specialist.

Sewage system diagram
At normal replacement sewer system to a newer one - the stage with the diagram disappears by itself, since it is enough to remember the location and install it according to the same principle. But in cases where problems have arisen with old pipes or they are completely absent in the new premises, then the quality of this item will be the main guarantee of a well-done job.
The connection diagram for plumbing fixtures should include the following items:
- rooms in which work is expected to be performed;
- in each of these rooms we indicate the location of the parts of the sewer system (it is necessary to indicate the dimensions of the elements and their distance from the walls). Moreover, the details are not only bathroom fixtures, but also complete wiring;
- location of all fittings and service elements;
- the place where the central sewer riser is located.
Afterwards, it is advisable to give the drawn up diagram to specialists to check its correctness (the cost of such a service will not be too high).
Dismantling old pipes
After all previously completed actions, you can proceed directly to the repair work itself. If the house previously had a sewer system, then the first thing you need to do is get rid of it, that is, dismantle the old pipes. At this stage, relations with neighbors will play an important role. To do the dismantling yourself, we perform the following steps one by one:
- We select places in the walls where pipes are embedded. You can choose another way to solve this problem, but the main thing is that the pipeline is “freed” from the walls.
- We remove all bathroom appliances located in rooms such as the kitchen and bath, and free the rooms themselves from unnecessary things.
- In the places where new parts will be installed, draw contours on the surfaces with a pencil.
- We agree with the neighbors to turn off the water for a certain time.
- We block the riser on the floor.
- You will also need to remove the toilet bowl and toilet flush barrel.

- Disconnect the sewer line from the riser. To complete this process, you will need to cut the pipe in two places, the distance between them should be within 12-15 cm. Then we drive a wedge into the cut, which is located further from the riser. The last step is to disconnect the entire pipe and break out the trim.
- We drill holes along the previously drawn contour (or you can beat the contour with a chisel and hammer) and remove the remainder of the pipe. However, you need to remember that cast iron is quite fragile, and therefore you need to perform actions extremely carefully.
- We begin to clean the internal outlets of the draw pipe and toilet. Next, we plug them tightly using unnecessary rags.
- We open the riser and supply water, which we inform our neighbors about. The main thing is to warn them how soon you will have to start working again.
- Next, we dismantle the pipeline, starting from the far end.

Installation work
After removing the old pipes, we proceed to installation. There are two types: rough and finishing. Today we will consider the second option, in which installation is carried out starting from the riser. The basic rule of this type of installation: the size is adjusted not to the next, but to the previous sewer pipe. If you do the opposite, the wiring simply will not hold.
Instructions for installing sewerage in an apartment are as follows:
1. The first step is to make the transition from cast iron pipe to plastic. To do this you will need to install a special cuff. It is located in the riser outlet.
2. Having secured the cuff in the 1st section of the sewer pipe, we check whether the mounting pipe is secured.
3. Let's move on to trimming. This must be done carefully, observing the dimensions.
5. We complete the installation using sealant;
6. We assemble the remaining pipeline behind the pipe sections using the same principle.
7. To install the riser, you need to adjust the toilet pipe to the exact size, and then put it on the sealant, and install the toilet back.
8. As soon as the sealant has completely hardened, it is necessary to check for sewer leaks, soundproof it and install a water seal.

Many people are interested in whether a water seal is an important part in sewer installation. Without it, the pipes, of course, will work, but its installation is necessary. The purpose of a water seal in a sewer system is to prevent unpleasant odors. Therefore, if you do not want to hear the stench of sewerage, do not skimp on this detail.
Installation Notes
By following all the steps for installing pipes, the apartment owner will be able to independently install the sewer system. But sometimes these repairs become too difficult to complete. That's why we found useful tips for installing sewerage in an apartment from real professionals:
- Be sure to wear protective clothing before installing pipes;
- To avoid problems with installing the cuff, lubricate it liquid soap. Then the part will be able to fit into the pipe section much easier;
- to be more confident in the reliability of the system connection, before installation, lubricate the ends of the pipe with glycerin lubricant;
- if you don't live locally top floor- it is not recommended to replace the riser;
- socket connection of pipes is carried out using rubber seals.
Sealing connections
To perform sealing you will need to perform the following steps:
- selecting the correct sealant. To install sewer pipes, you need to purchase neutral, silicone, and polyurethane pipes;
- It is necessary to process each of the plastic gaskets. Do not apply sealant in a thick layer, this will only worsen the quality of work. Also, don’t forget to install rubber gaskets into couplings;
- Next, you will need to apply sealant to the surface of the mounting pipe and to the outer wall of the mating sewer pipe;
- we fix the pipes in couplings;
- We wrap the resulting joints cling film and level the sealant, without pressing too much, using any tool (trowel, brush, roller, etc.);
- the film should remain on the joints until the sealant has completely hardened.
After completely sealing the sewer, you can begin to use it. But first you need to check installed system for a leak.
Checking for leaks in the sewer system
Checking for leaks is a mandatory step. If you skip this process in the future, the sewer may simply break through and flood all the neighbors below. To check for the presence of a leak, fill the bathtub full. Next, you need to open all existing taps in the room and remove the plug from the bathtub. If everything has flowed out and no puddles have appeared, you can sleep peacefully, the sewage system is done at the highest level.

Conclusion
By adhering to the rules for installing pipes and the tips described in the article, you can easily and easily make a sewer system in your apartment with your own hands. The main thing is to carry out all processes conscientiously and remember that the comfort of your home will depend on the quality of the completed system. If, after reading the information presented, you still have questions, we recommend watching the video on how to make a sewer system in an apartment yourself. It is located below:
An old sewer can cause a lot of trouble for apartment owners, as it often becomes clogged and sometimes even leaks. bad smell. Of course, replacing it is quite expensive, however, by doing this work yourself, you can save a lot. To help in this matter, next we will look at how to install a new sewer system in an apartment with your own hands.
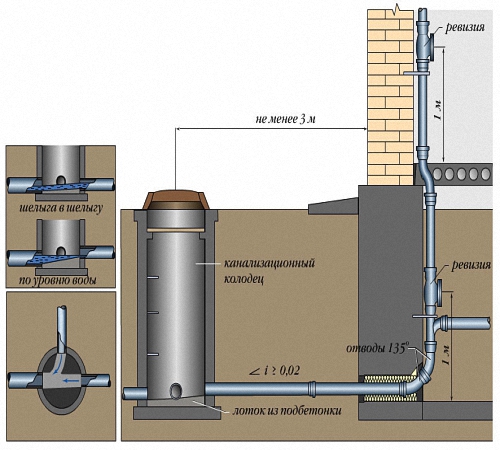
Sewage device
First of all, you need to familiarize yourself with the sewerage system. The system includes several elements:

Scheme - sewage system in an apartment
Slopes
The most important thing when installing a sewer system is to correctly slope the outlet pipes. The fact is that at small slopes the liquid will not drain, but at large slopes the water will drain quickly, but at the same time solid waste will remain in the system. Thus, no matter how paradoxical it may sound, excessive “leaking” leads to constant blockages of the system.
According to SNiP requirements, when installing a pipeline, the following minimum slopes must be observed:
- With a pipe diameter of 50 mm - 3 cm per meter;
- 110 mm – 2 cm per meter;
- 200 mm – 0.7 cm per meter.
As for the maximum slope, it should not exceed 15 cm per meter. An exception is the bends of plumbing fixtures, the length of which should not exceed one and a half meters.
Note! The connection of sewer pipes is allowed to be made at right angles only in a vertical plane.
Pipe diameters
As a rule, sewer pipes in an apartment with a diameter of 50 mm are used. The exception is drain pipes from the toilet and riser, the diameter of which is usually 110 mm.
It must be said that sometimes there are risers with a diameter of 150 or even 200 millimeters. Therefore, before purchasing a replacement, you should measure the old riser.

Materials for the sewer system
Before installing a sewer system in an apartment with your own hands, you need to purchase all the necessary elements. And to do this, you first need to decide on the pipe material.
Usually, internal sewerage made from the following materials:
- Cast iron– quite durable and fireproof, but has a number of disadvantages, such as heavy weight and high cost. Therefore, cast iron systems are practically not used recently.
- PVC– is the most common material for sewer systems. Disadvantages include instability to exposure high temperatures. In addition, they are quite noisy, however, soundproofing the sewer pipes in the apartment can solve this problem.
- Polyethylene – this material It should not be considered as an option for sewerage, as it is unstable to deformation, is not heat-resistant and does not provide reliable sealing of the system.
- Polyisopropylene– not such a smooth material as polyvinyl chloride, moreover, its price is slightly higher PVC pipes. However, it can withstand temperatures up to 130 degrees, and is also resistant to mechanical and chemical influences.
Sewer replacement
Preparation
Now let’s take a closer look at how to properly install a sewer system in an apartment. You should start with preparatory work. Of course, first of all you need to prepare the premises - take out the furniture and lay the floor.
Mandatory condition for replacement old sewer is to securely secure the old riser under the ceiling. You should not rely on interfloor fastenings, as over time they rust and weaken. Therefore, when dismantling the riser, all the upper sections may end up in your apartment.
The fastening can be done using a clamp with a pin, which must extend at least 120 mm into the wall. To ensure reliable installation, the stud must be cemented.
In addition, you should notify your neighbors in advance about upcoming work in your apartment and turn off the water.

Scheme
If you just need to replace the sewer pipes in your apartment, then you don’t have to carry out the diagram. But if the location of plumbing fixtures is changed, then first of all you should decide on paper how to lay the sewer system in the apartment. This will allow you to avoid mistakes during work and calculate in advance required amount materials.
The diagram should show:
- All premises in which work will be performed.
- Dimensions of rooms and pipelines.
- All service elements, such as inspection and cleaning bends, fittings, etc.
- Location of the central riser.
After the scheme is completed, you can proceed directly to work.

Dismantling
First of all, you need to dismantle it yourself old system. If the sewer is plastic, then the work will not be difficult, but if it is cast iron, then some difficulties may arise.
You can only break pipes with a hammer in a private house on the ground floor. In all other cases, the easiest way is to make cuts in the socket and wedge them with a screwdriver or chisel. Another option is to warm up the joints blowtorch and loosening to disconnect the pipes.
To disassemble the riser, you first need to cut off its lower part. The whole difficulty lies in the fact that cast iron elements are very heavy. Therefore, the work must be done carefully.
After the main part of the system has been disassembled, it is necessary to free the plumbing fixtures from the sewer and dismantle them if the plumbing fixtures will also be changed.

Rough editing
Next, rough installation is performed, which is carried out without sealing the connections. You just need to insert the ends of the joints into the sockets with gaskets. At this stage, the pipes are cut in accordance with the dimensions in the diagram and taking into account a margin of 10-15 mm.
The pipes must be cut strictly at 90 degrees, so it is better to perform the operation in a miter box. A hacksaw is usually used for cutting. After cutting off excess sections of pipes, you should cut off the chamfer with a mounting knife, since burrs can cause permanent blockages in the system.
Note! Only straight ends of pipes can be cut, since cutting the socket will make the pipe unsuitable for installation.
At the rough installation stage, all tees/splitters must be correctly positioned. The installation locations of plumbing fixtures should be marked on the walls with a pencil.

Finish installation
The work is performed in this order:
- A plastic-cast iron adapter is inserted into the riser outlet located under the ceiling.
- Then the first section of the riser should be inserted into the cuff and sealed with sealant.
- Tees for wiring are installed in the lower part of the riser. At this stage, the toilet pipe is adjusted to the exact size and the toilet itself is installed in place.
- Next, according to the same principle as assembling the riser, the rest of the pipeline is installed.
- Then the plumbing fixtures are put into place and their siphons are installed.
- To complete the work, siphon outlet pipes are inserted into the sewer pipes.
So, the sewage system in the apartment is ready. After the sealant has hardened at the pipe joints, you should check the pipeline for leaks.
Advice! In order to encounter clogging of the system as little as possible, special meshes should be used on plumbing fixtures. A similar simple filter for the apartment sewer systems will prevent the penetration of hair and large objects that can form a plug.


