IN last years Polycarbonate has become very widespread and popular. Greenhouses, various canopies and many other structures made from this material delight users with their simplicity and versatility. Today’s article we will devote to the topic of polycarbonate canopies, in which we will find out all the nuances of this structure, as well as what to pay attention to when making a polycarbonate canopy with your own hands.
Basic properties of polycarbonate
Before we talk about making a canopy from polycarbonate, it is necessary to understand what this material is, what types there are and what is its peculiarity. So, polycarbonate is a polymer that is used in various industrial fields. It is made from clear granules that are molded or extruded into light, clear sheets of plastic.
Polycarbonate comes in the following types:
- monolithic;
- cell phone;
- channel (cellular).
The first two are widely used, the latter is quite rare. Monolithic polycarbonate is durable, relatively heavy sheets. This type is considered an excellent alternative to glass; it is much lighter and more reliable. Monolithic plates come in several shades and tones: transparent, matte, opaque. It differs from cellular in the absence of an air layer.
Cellular polycarbonate is a material that has formed voids inside. Another word for them is honeycombs, hence the symbolic name of the species. Cellular polycarbonate is multilayer, the more of them, the stronger the sheet. Polycarbonate is quite resistant to impacts and various types of cracks. It is lightweight and has low thermal conductivity. This type is highly impact resistant and has a protective film. When working with this type of polycarbonate, it is important to consider the method of its fastening. First you need to make a hole in the material and only then insert a self-tapping screw into it, and not just drive it into the sheet with a screwdriver. Under the influence of temperature, cellular polycarbonate tends to expand. The table shows the main advantages and disadvantages of polycarbonate material.
|
Due to its versatility, polycarbonate is used in agriculture, auto and aircraft equipment, etc.
How to develop a project correctly
Polycarbonate canopies are installed not only near houses, they are used as covers for swimming pools, cars, near shops and other organizations. In today’s article we will look at a simple version of a polycarbonate canopy for a private home, which even beginners can do.
The initial stage in this matter can be called the development of a project for a future structure, which will allow you to visualize the structure, determine the dimensions and calculate the amount of required material. Experts recommend that inexperienced craftsmen pay attention to ready-made drawings of the simplest ideas.
At this stage, it is worth finally deciding on the type of material that will be taken as a basis. The choice of material directly depends on the purpose of the finished canopy and its dimensions. Using construction tools for measuring area, you should take measurements of the proposed area for installing the canopy and select the type of supports for it.
Choosing the material thickness for a polycarbonate canopy
Choosing polycarbonate panels for building a canopy is a responsible matter, because the life of the structure depends on the material. When considering this or that type of plastic sheet, it is worth taking into account the amount of annual precipitation in your area, the frequency of lathing the planned canopy, etc. Polycarbonate sheets come in thicknesses from 4 to 25 mm, optimal size for a canopy there will be a sheet of 8-10 mm. Next, let's look at these indicators in more detail.
Cellular polycarbonate has at least five types of panels of varying thickness and structure. They differ from each other in honeycomb shapes, stiffeners and actual density. When choosing cellular polycarbonate for a canopy, it is better to opt for medium-thick sheets; this will be enough for the structure to be resistant to hail and huge snow cover. Whatever the type of cellular polycarbonate, it has excellent sound insulation.
Installation of a canopy from monolithic polycarbonate no less a good choice. This type of material is sold in 10 known modifications, which differ not only in thickness, but also in the surface structure of the panels, their shades and viscosity. The thickness of monolithic panels is 2-6 mm, according to individual orders produce sheets up to 12 mm thick. When choosing monolithic polycarbonate, you should pay attention to the markings, since some models are not suitable for use in places close to fire, others are used in medical institutions, etc. Depending on the purpose of the canopy, some craftsmen, which happens quite often, combine types of polycarbonate. This material is very popular in landscape design.
Necessary tools for making a polycarbonate canopy with your own hands
Polycarbonate is one of those materials that can be processed without problems by various manual and electric tools. It can be easily milled and thermoformed. To work with polycarbonate panels to make a canopy with your own hands, you need to prepare the following working tools:
- construction knife;
- roulette;
- screwdriver;
- Bulgarian;
- welding machine;
- hammer;
- screws;
- metal corners;
- electric jigsaw.
The range of work equipment depends on the type of material for making polycarbonate canopy supports with your own hands.
How to make a canopy frame
Polycarbonate is the basis for our canopy, but to make the frame it is necessary to select another, profitable, durable, stable material. The metal frame is considered classic. To assemble it, a welding machine is used, as well as special fasteners. Aluminum is suitable for small structures; for larger structures, heavier types of metal can be used.
Some owners assemble frames from wood, but in such cases the material must be properly treated with antibacterial agents. Wooden frame involves the laying of transverse beams, which should be carefully placed so that the structure is proportional and durable.
Assembling the frame is perhaps one of the most important and labor-intensive processes in making a canopy with your own hands. Its safety and durability will depend on the quality of the assembled base for the structure.
The frames are assembled from profile pipes and are easy to assemble and reliable. This option goes well with forged parts and has an aesthetic appearance etc. Professionals recommend that novice craftsmen, in the process of assembling a frame for a canopy, turn to more experienced specialists for help.

Step-by-step instructions for installing a polycarbonate canopy with your own hands
Installing a polycarbonate canopy takes a lot of time, even if it is a small structure. The entire work process is carried out in several steps, which can be briefly depicted as follows.
Step 1. Preparing the site for installation of the structure.
Step 2. Preparing pits for supports for the canopy.
Step 3. Assembling and installing the frame.
Step 4. Installation of polycarbonate sheets.
The design of the structure is ready, the material for the frame has been decided, the tools have been prepared... The next stage of installing the canopy is preparing the site for installing the structure. The area must be cleared of debris and cleared of excess soil layers. If you plan to build a carport, you can concrete the base or fill it with crushed stone. Original version The creation of an eco-parking area (with landscaping) is also considered.
When clearing the area for a canopy, it is worth planning and measuring the location of the supports and digging deep holes for their installation. When the pits are ready, the supports are placed in place and fixed with concrete mortar. Further work should be carried out after the fill has completely dried. This will take about 4 days, during which time the concrete must be sprayed with water to prevent cracks from appearing.
The most common option is an arched frame. The installed supports are connected to each other by embedded parts, then horizontal beams are laid. At this stage the construction is called top knitting. Next, the arch is constructed. This does not mean that the canopy must necessarily be bent; it can also be secured in a horizontal position. The finished metal frame must be treated with anti-corrosion liquids and opened with paint. Frames for awnings at the porch are secured using special supports that are driven directly into the wall.
The final stage is the installation and fixation of polycarbonate sheets.
It is better to cut sheets of material in advance; a hacksaw will help with this; you can also use a circular saw. Do not rush to remove the protective film from the polycarbonate panels; there are special markings on it that will allow you to cut out the necessary pieces more accurately. The roofing material is attached to the frame with stainless bolts and self-tapping screws. If you choose cellular polycarbonate, make sure you have special thermal washers. To fix the sheets at the joints, plastic (or aluminum) profiles are used. At this stage of work, the protective film from the material should be removed. An important point for a polycarbonate canopy is the sealing of the ends of the sheet. Aluminum tape is most often used as a sealant. This allows you to protect the structure from moisture penetration into the structure. When purchasing products for processing joints of polycarbonate material, you should pay attention to the presence of acrylic in the product. You should buy liquids without it.
To ensure that problems with polycarbonate coating do not arise in the next few years, it is necessary to follow the rules for caring for the material.
First, you need to wipe the surface with a soft sponge and detergents with a simple composition.
Secondly, cleaning with various solutions such as white alcohol is not carried out on the side covered with a protective layer.
Thirdly, after any cleaning operation, the polycarbonate coating should be thoroughly rinsed with water.
If microcracks appear on the surface of the material, it is better to immediately treat them with transparent silicone products.
For detailed information on correct installation do-it-yourself polycarbonate canopy, watch the video:
To figure out how to calculate a polycarbonate canopy, you need to clearly imagine the structure and draw up a plan or drawing of the building. By and large, polycarbonate panels are just a covering that defines the total area, but in addition to this, there are also racks and rafter system. In addition, among necessary materials There will be connecting, corner and end profiles, fastening material and (possibly) lighting. It is important to calculate every detail in order to obtain a strong and durable structure.
What parameters to consider when calculating polycarbonate for a canopy?
Bent roof on garden plot
Please note that the strength of polycarbonate is much higher than the similar characteristics of glass (200 times), plastic and polyvinyl chloride. But not all panels can be bent, so their structure should be taken into account (sheets with triangular cells cannot be bent).
Selecting polycarbonate by thickness
First of all, in order to calculate a polycarbonate canopy, you need to take into account the possible mechanical load (snow, wind), on which the thickness of the panels depends. For monolithic panels, the thickness is 2, 3, 4, 5, 6. 8, 10 and 12 mm; they are called “vandal-proof”, since the sheets are difficult to break mechanically.

The difference in the structure of cellular polycarbonate
The honeycomb structure implies not only thickness, but also cell configuration:
- SX is a five-layer 25mm sheet with inclined stiffeners. The thickness can also be 32 mm. Panels with triangular cells are not suitable for curved roofs;
- SW - the sheet also consists of five layers, only the honeycombs have the shape of a rectangle (the ribs are located vertically). Thickness ranges from 16 to 20 mm;
- 3X - the sheet has 3 layers, the thickness is 16 mm, and the stiffeners are adjustable in density:
- 3H - made of 3 layers with a rectangular structure. The panel is produced in 6, 8 and 10 mm;
- 2H is the simplest sheet with square cells. Sheets are made in 4, 6, 8 and 10 mm.

Monolithic standard polycarbonate sheet
The thickness of the polycarbonate honeycomb structure varies only by 2 mm. That is, if the thinnest honeycomb sheet has 4 mm, and the thickest is 32 mm, then all intermediate sizes will be multiples of two.
Dimensions of polycarbonate sheet around the perimeter
Standard calculation of a polycarbonate canopy monolithic type made to dimensions 3050x2050 mm. If desired, you can agree with the manufacturer to change the perimeter of the panel, but a special order usually costs more.

Standard Size of Cellular Polycarbonate
Standards for cellular polycarbonate vary in two parameters, these are 210x600 cm and 210x1200 cm. Long sheets are convenient to use for wide canopies, for example, in collective parking lots with curved roofs, where joints are made only along the side edges. Also, upon request, the factory cuts from 1 m to 9 m, but this is only for colored panels.
There is also a profiled sheet, where the thickness does not exceed 1.2 mm, but, thanks to the wave, the height of which reaches 5 cm, the strength increases and precipitation is easily drained. The standard width is 126 cm and length is 224 cm.

Profiled (wavy) polycarbonate sheets
Calculation of materials by types of canopies and types of roofs
To calculate a canopy made of corrugated sheets, polycarbonate or any other material, you need to take into account the roof configuration and the type of supporting frame. Such canopies are made in three types - single-pitched, gable and curved (oval). The most complex is the bent type, but the whole problem lies only in manufacturing, not in operation.
Sheds attached to the house
In cases where one side of the frame is supported on the wall of the house, the calculation of a canopy from a rectangular pipe will be minus half vertical supports. That is, one side of the sheathing rests on the wall of the building. In any case, there must be a profile at the joints of the sheets, therefore, the distance between them is 126 cm, 210 cm or 205 cm, but this does not mean that the entire sheathing consists only of these profiles.

One side is attached to the wall of the house
In any case, the width of the roof must correspond to the parameters of the car and this is at least 3 m so that there is free passage. But such a length of the profile will cause its deformation (deflection), and this should be avoided; therefore, a rafter system will have to be made for the canopy.
When calculating a canopy for a house, you will need 6 vertical supports - only on one side, but if the structure is autonomous, then you will need twice as many risers - 12 pieces. The principle here is as follows - for each rafter leg, supports should be installed on both sides, but if one side is attached to the building, then risers are not needed there.
In addition, beams are installed along the length, and for a 6-meter width you will need 6 pieces - 2 at the edges of the overhangs, 2 along the pillars and 2 in the middle of the roof. If the length of the canopy is 10.5 m, then 10.5*6=63 m or 63/6=11 pieces of profiles. The ends of cellular polycarbonate are jammed with an end profile.

Drawing with dimensions for a lean-to building
Calculations for a free-standing canopy
To calculate the canopy in the yard, you should take into account not only its width and length, but also the amount of precipitation that falls in winter. The fact is that snow exerts a strong mechanical load and will have to be restrained in some way. The most optimal option for imparting rigidity to the frame is a triangle - this is the only geometric figure that does not provide for play.
For calculations, take a conventional roof width of 6 m, a length of 10.6 m and polycarbonate with a width of 2100 × 600 mm. Rafters can be made from a pipe profile 60x40 mm or from a wooden board 100x50 mm. Of course, a metal profile is better than wood and its service life has virtually no restrictions in the foreseeable future.

Principle truss structure
The drawing above shows a design where the upper part of the slope is 240 cm, and rafter device consists of 11 triangles - this is the best option. Considering the fact that metal profiles are usually 6 m in length, the width will be slightly less, but for each rafter leg 6 profiles will be required, taking into account vertical and inclined jumpers. In total you will need 6 rafters and 5 polycarbonate sheets.
Of course, you can save on metal and make only 2 triangles, as shown in the top photo. In this case, the calculation of the canopy frame will be reduced by at least 2 profiles for each rafter leg, but if there are 6 of them, then this is already 12 profiles. However, for the average amount of precipitation this is quite enough - calculate lean-to canopy possible in budget mode, saving on metal.

Single-pitch autonomous design
Gable carports
For gable roofs, the calculation of the metal canopy frame is very similar to that of single-pitch roofs, that is, the rigidity is created by the same triangles. Such canopies are usually made for large parking lots, the width of which exceeds 6 m, that is, there is room for parking several cars or buses.
The principle of installing polycarbonate does not change - at each joint there must be a profile and in this case These are rafter legs. The number of triangles directly affects the rigidity of the structure - the more, the better. The best option is as follows - each linear meter is divided vertical profile, and this figure is divided diagonally into two triangles.

The principle of installing a gable canopy
To calculate a metal canopy, you need to immediately determine the dimensions of the roof, and for example, you can consider the same option of 10.6 × 6 m. To cover here, you will also need 5 sheets, but they will have to be cut in half, connecting in the center with a ridge profile. The number of metal vertical supports is twice the number of rafters; if there are 6 of them, then 12 risers will be required.
More longitudinal beams are needed here - 7 pieces - a ridge beam is added. Total:
- 2 profiles along the edges of the overhangs;
- 2 on pillars;
- 2 between the supports and the ridge;
- 1 – on the skate.

Scheme of gable construction
If we convert the longitudinal beams into pieces, then 10.5 * 7/6 = 12.25 or 13 six-meter profiles. The cross-section for such beams is the same as the rafters (usually 60×40 mm), but for risers they use a pipe of 80-100 mm or a pipe profile of a similar cross-section.
Advantage for gable roof is that the calculation of the metal structures of the canopy will be more economical. Two rafter legs with a jumper already form a triangle, which can be divided into two parts in the middle. As a result, you will get two figures with horizontal (bottom) sides of 3 m each.
Calculation of materials for a curved canopy
Calculating a canopy with a curved roof on your own is more difficult, since much here depends on its convexity, that is, the steeper the bend, the more materials are consumed. But you can start from the same dimensions: 10.5 m in length and 6 m in width, although the width here will be reduced due to bending.

Curved Carport
The clear advantage of this design is the saving of material when assembling the rafter system. For given dimensions, you can get by with only two or three rafter systems, at the edges and in the middle - all other legs are simply made in the shape of an arc without a lower jumper, as in the photo. A curved metal profile mounted on two supports in itself represents a rigid figure and the only question here is a good fastening of the risers.
In this case, the design of the carport will consist of 6 bent six-meter profiles, two or three of which are equipped with a jumper and divided into several triangles. Supports will also be required for each arc, which means there will be 12 of them. 6 longitudinal beams are enough:
- 2 along the edges of the overhangs;
- 2 on pillars;
- 2 along the roof.

Arched canopy design
In total, you get 12*10.5/6=21 and 4 more profiles for jumpers.
It is quite natural that for narrower canopies less material is consumed, but here it is important to take into account the length of the polycarbonate. That is, if you work with 6-meter sheets, then they should be used either entirely or cut in half so that there is no waste. In this case, the roof will be 6 m or 3 m wide, and the length will be adjusted as necessary.
As a result, we can say that the most economical design for a canopy will be with a curved roof, although this is the most complex option. However, in such designs you can save on metal profiles, so the benefit here is obvious.
If difficulties arise during the calculation process, you can use special programs and professional services.
Polycarbonate canopies can be used for a variety of needs. These are hanging canopies over the balcony and porch; covered parking for passenger cars and agricultural machinery; covered passages between the house and the bathhouse, summer kitchen, sheds, etc.
This article will discuss different types of polycarbonate house canopies, features of the choice of materials for the frame, and calculations of buildings. You will also find here step by step guide for the construction of a structure based on a metal profile.


Types, calculation and design of canopies, choice of frame material
The most popular options for canopies and canopies made of polycarbonate are arched, cascading, single- and double-sloped. They all have their own advantages and disadvantages.
Arched structures
Arched polycarbonate canopies in the yard are considered the most popular today, especially for organizing parking lots and galleries between the house and outbuildings.
- The semicircular shape of the arch prevents snow from accumulating on the roof.
- When it rains, water drains only on two sides.
- Due to the downward facing sides, the likelihood of the canopy being damaged by wind is quite low.
- The arched design is equally suitable for both a small canopy over the porch and a spacious parking lot for several cars.
The arched polycarbonate canopy has one drawback - if you make it yourself, you may face the problem of bending the profiles.

Arched polycarbonate canopy: the photo shows an indoor parking lot
Cascade system
Cascading canopies are, in fact, a system of several arched ones. This design is chosen for installation above flights of stairs, where the roof slope is very large. And there are two reasons for this:
- When it rains, water pours from the solid arched roof, located at a high angle, into the space in front of the first steps, hitting those entering. With a cascade arrangement of roofing elements, water flows to the sides.
- The aesthetic side of the issue. Several cascading arched polycarbonate canopies look much more interesting than one solid one pointing downwards.
The disadvantages of such a system are the complexity of the design, high time and material costs.

Arched polycarbonate canopy attached to the house: photo of a three-stage system
Shed roof
A lean-to polycarbonate canopy is the easiest option to build:
- No bending of profiles is required, as is the case with arched roofs.
- No bending of polycarbonate sheets is required. Accordingly, you are not limited in choosing the thickness of the roofing material.
- During construction, you can do without the use of trusses; only longitudinal and transverse beams will be sufficient.
Shed structures are often used when attaching a canopy to the wall of a house or garage. The disadvantage is that the roof has a slight slope; in winter, snow will accumulate on it.

Wooden canopy made of polycarbonate: photo of a lean-to structure
Gable canopy
In construction, it is a little more complicated than a single-slope one, since it requires two slopes to be brought together at a certain angle. However, this construction is also more convenient to use:
- Slopes lowered on both sides provide better protection from wind and precipitation compared to a single slope.
- The angle of the roof is greater here, which means less snow will accumulate on it in winter.
- The frame of a gable roof is rigid, so it can withstand wind loads well.
A gable canopy made of polycarbonate can be used for various purposes: for parking lots, barbecues, barbecue ovens, porches, pavilions between outbuildings.

Gable roof over barbecue oven
Calculation and design of polycarbonate canopies
Even at the stage of creating a project, before starting to calculate a polycarbonate canopy from a profile pipe, you need to find out the following for yourself:
- Size and location of the future building.
- Wind and snow loads - these parameters affect the shape of the roof structure.
- The design of a private house and outbuildings - the choice of frame design and the color of polycarbonate sheets depends on this.
- Specifications of available/desired building materials.
Armed with this information, we move on to calculating and drawing up a drawing of a polycarbonate canopy. Here we already indicate exactly: the dimensions of the building and the shape of the roof; specifications material of supports, frame and roof; quantity and nature of fastening elements.
Note:when determining the features of the structural frame, it must be taken into account that polycarbonate is produced in sheets standard sizes. Their joints must necessarily fall on the transverse profiles - the sheathing.
How to make a polycarbonate canopy: the width of the purlins between the sheathing profiles depends on the parameters of the roofing material
And now about the height of polycarbonate canopies. In principle, it can be anything - it all depends on your needs and wishes. However, for comfortable use of the building, it will be better if the lowest point of its roof is at least 180 cm above the ground.
The parameters of support posts for the manufacture of canopies and canopies made of polycarbonate must be calculated based on the following figures:
- The minimum cross-section is 40x40 mm.
- Metal thickness – from 1 mm.
- The thickness of the foundation pillars must exceed the cross-section of the racks by at least 10 mm.
- The recommended depth of foundation pits is from 50 cm.
- For the sidewalls of rafter trusses, a profile with a cross-section of 20 mm is taken, for diagonal gratings - from 15 mm.

How to make a polycarbonate canopy with your own hands: the drawings must be very detailed
Note:It is better to entrust the design of structures with an area of 8 m2 or more to specialists. The roof area here will be large, which means it will be necessary to accurately calculate the level of snow and wind loads. Errors can lead to deformation or collapse of the building.Choosing material for the frame
Typically, the following materials are used to make polycarbonate canopies:
- Metal profile. Durable, easy to install and unpretentious to use. Requires minimal maintenance - only timely treatment with anti-corrosion agents. Disadvantages - heavy weight of the structure and high price.
- Metal pipes. The advantages are the same as metal profiles. The only thing is that the rounded cross-sectional shape is not so convenient for welding and other types of fasteners.
- Wood - profiled or regular timber, rounded log. A beautiful, lively material, suitable if the canopy should be stylized as something. During construction wooden canopy Making polycarbonate with your own hands will require certain carpentry skills.

Wooden frame
DIY polycarbonate canopy construction
The longest part of construction is creating the foundation. The frame itself and the installation of roofing sheets on it will take at most one and a half working days.
Installation of support pillars and installation of bindings
We install support pillars in the following way:
- We dig foundation holes - 50 cm deep and 30 cm in diameter.
- We install a reinforcement cage inside.
- Fill the holes with a cement-sand (3/1) mixture, cover with cellophane and leave to harden for several days.
- We fasten the supports to the foundation with anchors.

Concreting supports
We tie the supports along the tops with a single beam; the front part of the canopy will then rest on it. This dressing is best done from a square or rectangular profile. The use of a round pipe is undesirable here, since the contact area of the elements during welding will be too small.

A polycarbonate canopy attached to the house: the photo shows the location of the front supports
Note:The canopy is attached to the wall using a beam attached to the surface anchor bolts. On required height, checking the building level, we mark a line along which holes for fasteners are then drilled. Next, screw the beam onto the wall, tightening the bolts well.
We make a canopy for the house from polycarbonate: the photo shows the installation stage of the binding
Bend the profile for the roof frame
If the polycarbonate garden canopy has an arched roof, then we will have to think about how to bend the profiled pipe. This can be done in several ways:
- Using a pipe bending machine. Such a device is expensive, and it makes no sense to buy it just for the construction of a canopy.
- By cutting (6-8 mm) the pipe and bending it in the opposite direction. The cuts are then covered with metal “patches”.
- Manual bending of a preheated profile. To prevent flattening of the pipe, sand is compacted inside before work.

Manual pipe bending machine
Welding the canopy frame
We begin welding the frame by assembling the trusses. This is done on the ground, with the obligatory use of a building level. We start welding the diagonal slats onto parallel profiles from the edges, gradually moving towards the center. Magnets for welding will greatly facilitate the work - they are good for setting angles between parts.
On next video you may want to consider how welding magnets are used.
We place the finished polycarbonate trusses for the canopy on the binding and on the support of the front part. We bait it pointwise and then weld it. All elements must stand strictly vertically, so after installation we check the correct installation with a building level. If necessary, we slightly adjust the position using a sledgehammer.

A canopy attached to the house, made of polycarbonate: photo of the installation of roof trusses
Across the trusses we make purlins from a thin profile of rectangular cross-section. The distance between the parts is from 50 to 60 cm.

Installation of purlins
Next, we proceed to the installation of the sidewalls. We weld sections of the profile to the bases of the outer trusses and screw them along the entire length to the walls. From the lower edges of the sections to the ends of the trusses we stretch and weld profiles of the same thickness. we make a couple of transverse jumpers. You can see what it looks like in the next photo. The frame is ready, you can begin installing the polycarbonate.

Sidewall work
Fastening cellular polycarbonate to the frame
And now about how to attach polycarbonate to the metal frame of the canopy. Installation is carried out using special fasteners - thermal washers. They consist of sealing and plastic washers, as well as a plug for them. All this is tightened with ordinary self-tapping screws. Special attention Three points should be taken into account:
- Strict vertical screwing of self-tapping screws.
- Moderate tightening of fasteners. Insufficient application will not ensure the proper quality of installation, and excessive application can lead to damage to the surface of the material.
- There should be at least 4 cm from the sheet cuts to the boundaries of the hole for the self-tapping screw.
- The hole for the self-tapping screw should be 2-3 mm larger than the diameter of the latter.

How to properly attach polycarbonate to a canopy: you need to use special thermal washers
In addition to thermal washers, the following fittings are used during the installation of polycarbonate:
- Detachable profile. Used to join two sheets of material together. It consists of a base and a cover - the base is attached to the frame with self-tapping screws, and the cover is fastened to it using a special lock.
- End profile and punched tape. They are used for finishing cuts on polycarbonate sheets. First, punched paper tape is glued along their entire length, and then the end profile is fixed to it.

Additional accessories
Polycarbonate is one of the types of synthetic plastics (otherwise known as thermoplastics). The unique chemical structure of the material and its inherent physical properties have placed the material among the most popular. The most popular products are arched canopies made of polycarbonate, canopies of other designs, canopies, and other lightweight and prefabricated structures for various purposes.
When constructing structures for various purposes, two types of material are used. These are monolithic (less common option) and cellular (another name, cellular) polycarbonate. Let's take a closer look at them.
Cellular polycarbonate
The cross-section of the material is very similar to a triangular or rectangular honeycomb. It is to this that he owes his name. The initial raw material for its production is polycarbonate granules. This polymer material belongs to thermosetting plastics and is characterized by a number of properties, thanks to which it has become so popular in the building materials market.
Most often, arched polycarbonate canopies are built with your own hands using this type of material.
Classification by structure and geometry of honeycombs
The internal honeycombs are formed by stiffening ribs (oblique and straight), between which air is contained. This determines the high noise insulation properties of the material and its thermal insulation capabilities. According to this parameter, cellular polycarbonates are divided into:
- Panels “2H” are two-layer, having a honeycomb of rectangular cross-section. With a sheet thickness (h) in the range of (4 – 10) mm, the stiffeners are made in the form of simple perpendicular partitions.
- “3X” - three-layer sheets that have not only straight, but also additional (inclined) stiffeners. The thickness of the latter is determined by the manufacturer.
- “3H” - are also three-layer and have rectangular honeycombs (their length is much greater than the width). Manufactured with h= 6 mm (other sizes: 8 mm or 10 mm). This sheet is the best choice to build a canopy in the courtyard of a private house with your own hands;
- “5W” - five-layer sheets with rectangular honeycombs. Produced with h= (16 – 20) mm;
- “5X” - have inclined and straight ribs. Consist of 5 layers. h=25 mm.
Sheet dimensions:
- Thickness – (4 – 32) mm;
- Width - 2100 mm;
- Length - when sold, the material is cut to length into sheets (1 - 9) m or is offered in a standard length of 12 m.
Monolithic polycarbonate
This material belongs to the group of thermoplastics. The most popular brands are those containing aromatic compounds produced by synthesis from bisphenol.
Expert opinion
Sergey Yurievich
Ask a question to an expertThe thickness of the sheets is set in the range of 2 mm – 12 mm. Standard sheet dimensions are 2050 x 3050 mm.
Country canopies made of polycarbonate with pitched roof, located separately, it is better to make using of this material.
There is a third version of polycarbonate, profiled. But it is practically not used for making canopies.
Advantages of using polycarbonate
The demand for the material in question is explained by its inherent properties:
- Ease. Due to the insignificant weight of the sheet, the structures do not place significant additional load on the load-bearing elements. Volumetric structures mounted using it (for example, a gable canopy made of polycarbonate) provide an increase in the actual area of light-transmitting surfaces and expansion of spans. At the same time, special lifting mechanisms for execution installation work not required. A sheet of monolithic polycarbonate is twice as light as glass, and a sheet of cellular polycarbonate is almost six times lighter. This reduces the required volumes of materials for arrangement load-bearing structures and reduces the cost of work.
- Strength. Despite its lightness, the material is highly durable. The panels confidently withstand high mechanical loads, which is their undoubted advantage compared to glass. This is achieved by the presence of stiffeners and the special molecular structure of the material.
- Transparency. Cellular polycarbonate has a light transmittance of 85%, and monolithic polycarbonate has a light transmittance of 90% (for the visible spectrum of radiation).
- High thermal insulation properties, soundproofing characteristics.
- Flexibility. The sheets are easily bent, which allows the installation of arched structures, vaults, canopies and polycarbonate canopies over the door, etc.
- Easy to care for. Natural fabric, water, and household detergents can give the material pristine purity.
- Ease of processing.
- Ease of use.
- Safety.
- Significant resistance to high/low temperatures (-40°C/+120°C) and chemically aggressive substances.
Types of canopies
These designs are usually divided according to a number of parameters.
By configuration
Depending on the purpose and location of construction, there are the following types of canopies:
- Gable awnings;
- Combined type canopies;
- Structures, the construction of which requires installation that is highly complex;
- Semi-arched and arched canopies.
Expert opinion
Sergey Yurievich
Construction of houses, extensions, terraces and verandas.
Ask a question to an expertEach of the above types has its own advantages and disadvantages.
Pitched awnings
Shed options almost always represent a continuation of the existing roof. Capital hanging structures Due to its plasticity, they are practically not made from polycarbonate, except in those rare cases when materials of increased strength are used, supported by a significant number of pillars (supports). A gable canopy made of polycarbonate is quite expensive. This is explained by the many expensive elements that make up such a design.
Combined and complex canopies
Typically, such products are built according to individual design developments and are supplemented with decorative fragments and original architectural details. The design of a combined canopy can organically combine flat and arched areas. Such designs are made in single copies, exclusively to order.
Semi-arched or arched canopy
In this option, the manufacture of a polycarbonate canopy requires the use of profile pipes bent to the desired radius. All dimensions (arch bend, profile length and cross-section, chord width) are calculated before work begins.
Canopies of these designs differ favorably from other options in that:
- have high rigidity;
- minimize wind loads;
- prevent snow accumulation.
The fact that the manufacture of polycarbonate canopies is most often carried out in an arched version is due to the increased strength of such structures. They are not subject to wind vibrations, are reliable and very durable. Despite the complexity of their construction and the significant cost of performing the work, these canopies are bestsellers.
By purpose
Taking into account the tasks that canopies will solve, they are divided into several groups.
Canopies mounted above the porch or entrance doors
These canopies are a full-fledged element of the architectural decor of the facade, solving a dual problem:
- protect from the effects of atmospheric factors (rain, snow, sun rays);
- increase the visual appeal of the building.
Based on the type of construction, polycarbonate door canopies are divided into:
- monolithic - canopies that create a single whole with the facade of the building. They are characterized by durability and strength;
- modular - have a number of prefabricated elements, are easy to install and are often equipped with side canopies.
The shape of the canopy that we make with our own hands is determined by the project given in the technical specifications and is limited solely by the preferences of the customer.
Based on the type of fastening, these structures are divided into:
- hanging;
- complete with supports.
The first ones are represented by lightweight structures and have small dimensions. They are usually secured using special hangers.
The latter are fixed with special supports (vertical, in the floor, or corner, in the wall).
Canopies can be made to size taking into account the overall dimensions of the building and customer preferences. In this case, the width of the visor should be wider front door, at least 500 mm. And the installed supports should not interfere with the full opening of the door leaves.
Carports for vehicles
When deciding how to make a polycarbonate canopy that protects your car from bad weather, the design is selected taking into account a number of factors:
- Location (canopy adjacent to the house or a separate structure);
- Availability of free space;
- The number of cars that are planned to be covered;
- General design of the building and site.
The greatest demand for free-standing canopies is the arched roof shape. This is explained by significant advantages:
- The structure is monolithic, there are no joints or gaps that need to be closed;
- Water and snow do not accumulate on roofs of this configuration;
- The arch and semi-arch look very advantageous.
When attached to a house with your own hands, sheds require less space and time to construct. One side is fixed on the wall of the house, the second rests on two or more columns (supports).
Typically, carports are pre-built with a concrete base designed to support the weight of the car. A polycarbonate canopy frame can have metal or wooden posts (depending on general design territory and main building). Possible options for construction from brick, natural stone or concrete.
Shade canopies
These structures are installed when it is necessary to create shade in a specific area. The solution is perfect for gazebos, summer cafes, terraces and walking areas of kindergartens.
For such canopies, polycarbonate is selected that is designed to transmit ≤ 60% of sunlight. Optimal materials for them, lightweight metal or wooden frame structures are considered.
Pool covers
In terms of demand among solvent customers, canopies for swimming pools take second place after similar structures for cars. This is explained by a number of significant advantages that their owners receive:
- Water in indoor pools becomes polluted much more slowly, which allows you to significantly save on cleaning them;
- You can use the pool for its intended purpose in bad weather (strong wind, rain);
- Bathers are protected from direct UV radiation, so they will not get sunburned;
- The cost of heating the water poured into the pool is reduced;
- The intensity of evaporation is reduced, which means that water needs to be added less frequently;
- The structure is protected from bad weather during the cold season.
Modern polycarbonate canopies for swimming pools are divided into:
- Stationary;
- Sliding or telescopic.
In the first case, your pool can safely be classified as indoor. Such structures have reliable foundations, a monolithic roof and cover an area larger than the surface of the pool. In fact, it is a separate building. It perfectly accommodates furniture for relaxation, a bar counter, etc., it can be electrified and supplied with heating.
In the second case, polycarbonate canopies over the pool are made in the form of a mobile structure, which extends only when necessary and can provide both complete and partial coverage of the pool surface.
In addition to these parameters, pool canopies can vary in the height of the roof. With the value of the mentioned characteristic being 1 meter, it plays the role of a protective structure that covers communications and the pool mirror if necessary. If the distance to the ceiling exceeds 2 meters, this is already a full-fledged universal pavilion.
The construction of a polycarbonate canopy for these objects involves giving them various dome shapes:
- Classic (visually represents a half-cylinder assembled from several sections);
- Rectangular;
- Complex shape;
- Trapezoid shape;
- The canopy can be made in an asymmetrical version.
Such polycarbonate buildings represent a metal frame covered with a translucent material and fit perfectly into the landscape design of any style.
Canopies for terraces and balconies
Modern materials and technologies have made a polycarbonate canopy for a balcony or terrace one of the most acceptable options. This material is bright, strong and very durable.
Polycarbonate sheets are mounted on a lightweight metal frame. Awnings can be of any size and shape. And made from this material vertical walls visually make the balcony very attractive.
The decision to make a polycarbonate canopy with your own hands allows you to realize any designer’s plan. For example, turn the terrace into an attached winter garden.
conclusions
Both existing varieties polycarbonate are the optimal and balanced solution in terms of the cost of the material, its quality and the cost of performing work for arranging canopies of any purpose and configuration.
Video instructions on how to build a polycarbonate canopy with your own hands
Polycarbonate canopies – street structures, universal for economic purposes. The material is light, flexible, translucent in large quantities color scheme, convenient format, are presented in different thicknesses, which allows you to design canopies of simple and complex curved shapes. The buildings look light, elegant, do not overload the landscape, and fit into any stylistic solution of the architectural ensemble on the site.
In the article we will give step-by-step instructions on how to make a polycarbonate canopy with your own hands, how to choose the right shape, calculate and design the structure.


What you need to know about polycarbonate canopies - general criteria
The manufacture of polycarbonate canopies has become popular due to the ease of installation, practicality of the material, and aesthetics of buildings. There are:
- independent, free-standing - canopies over the pool, greenhouses, car parking, gazebos, outbuildings for various purposes;
- attached to the building: bathhouse, garage - verandas, terraces, canopies over the porch and gate;
- mobile - easily move around the site, usually over barbecues and small gazebos.

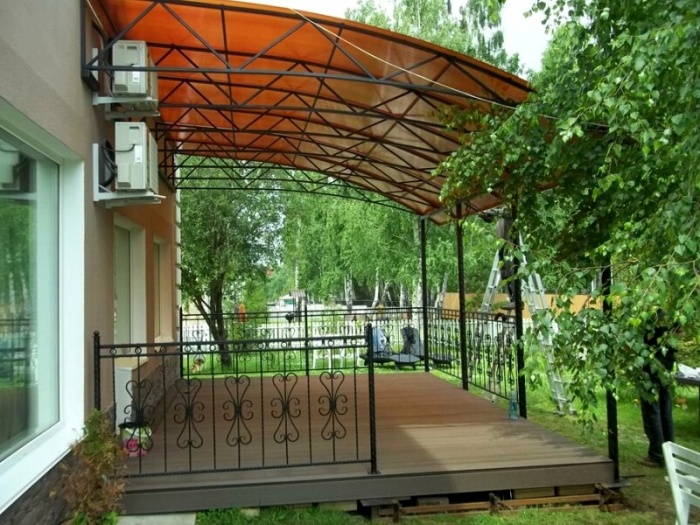
Sheds attached to a polycarbonate house, photos of large curved extensions
These are simple rectangular or complex, curvilinear structures, sometimes two-story, for example, above a garage or summer kitchen. Open and closed type, for this, the side walls are glassed, covered with panels, beautiful lattice, clapboard, blockhouse, or covered with thick curtains.

Indoor polycarbonate canopy
Advice: Soft transparent windows, sliding aluminum systems are the most universal option: do not block the view, open easily, and closed keep warm well.
Polycarbonate support canopy attached to the house, photo of a curved roof
Canopies consist of supporting vertical posts and a roof. The frame is made of wood, metal, less often of concrete, stone, brick.

Typical drawing of a freestanding polycarbonate canopy
Wooden sheds with polycarbonate roofing
Making awnings and canopies from polycarbonate on a wooden base is the most budget-friendly and easiest way to make your own small architectural form Location on. The work does not require professional equipment, household equipment is sufficient hand tools. To build a wooden polycarbonate canopy with your own hands, you use glued and profiled timber 100*100 or 150*150 mm, a rounded log ∅150-200 mm, tree trunks, strapping and a mauerlat made from the same material. For the rafter system of outbuildings, according to SNiP, it is necessary edged board 40*100 mm.

Sketch of a wooden polycarbonate canopy
The main disadvantages are flammability, poor moisture resistance resulting in rotting, fungal infections, loss of strength and aesthetics. Rodents, small bugs can cause significant damage to load-bearing elements. Wooden canopies and polycarbonate canopies must be treated with fire-resistant compounds, an antiseptic, and a durable finishing protective layer of oil or varnish.

A polycarbonate canopy attached to the house, in the photo there is a structure with a sloping roof
Metal canopies
Before making a polycarbonate canopy on a metal frame, you should choose the type of construction:
- Welded from profiled or round pipes are the most popular polycarbonate canopies. For vertical racks they use pipes ∅50-150 mm, depending on the size of the building; for piping - a profile with an edge of 40-80 mm, for a farm -25-50 mm.
- Forged ones are beautiful, elegant, but quite expensive from a financial point of view. On the construction market you can buy stamped forged parts and create an exclusive product yourself.
- Prefabricated aluminum.

Canopy for the house made of polycarbonate, in the photo there is a hanging forged canopy of a cantilever type
For polycarbonate canopies up to 5 m, use a profile with a wall thickness of 2 mm, a cross-section of 40*20 mm, for buildings over 5.5 m, you will need a 3*40*40 or 2*30*60 mm rental.

An example of how to make a polycarbonate canopy with your own hands, drawings of an arched structure
An iron canopy will last for decades, although its main enemy is corrosion. It is necessary to clean the parts with a stiff brush from rust, scale, oil stains, go over the entire surface with an abrasive, then rinse with a solvent. Next, cover with primer and paint, preferably with hammer paint; it copes well with chemical, biological and mechanical loads.

Sketch of a suspended polycarbonate canopy over the entrance
Good to know: Hardware they heat up from fire, sunlight, and quickly cool down in cold weather, so for comfort in gazebos, porches, and terraces, it is better to provide wooden railings on the parapet.Brick, stone and concrete
Brick, concrete, stone polycarbonate canopies in the yard look impressive, but light and not bulky, thanks to the translucency of polycarbonate. They do not require maintenance during operation, are fire resistant, and tolerate harmful atmospheric influences and physical and mechanical influences well, although they require significant time and financial costs. While canopies made from other materials can be disassembled and moved, such structures are stationary and cannot be dismantled.
Roof
Polycarbonate canopies, photo interesting ideas are presented in the gallery, there are also quite a lot of pictures and projects on the network, there are single and double slopes, arched, cascading, less common are conical, domed, wavy.

Typical options for polycarbonate canopies
Making the base is not difficult; it is enough to take into account the wind and snow loads in the region, but the rafter system requires serious calculations.

Farm classification:
- According to the characteristic outlines of the contour - polygonal, triangular, broken parallel belts.
- By type of lattice - rhombic, triangular, semi-diagonal, diagonal.
- According to the method of support - cantilever, beam, arched, beam-cantilever.

Cascade support-cantilever canopy made of polycarbonate
The simplest option is a lean-to polycarbonate canopy, the optimal roof angle is 22-30 degrees. The rafters are made of wood or it is a truss - a horizontal, curved or triangular frame with supporting braces, angled posts inside the main structure.

Scheme for a lean-to building
To create a project you need:
- Diagram of the canopy with the type of roof; the type of lower and upper belts depends on this.
- Drawings of polycarbonate canopies must include the dimensions of the structure, since the load changes in direct proportion to the dimensions. It is important to determine the upper as well as the lower point of the slope; the lower the slope, the more snow will accumulate on the roof.
- Take into account the size of the panels; the distance between the rafters depends on this, so that the edge does not fall into the void.
- Wind and snow loads in the region can be found using special tables.

Gable polycarbonate canopy - project with forged elements
Trusses are calculated in accordance with the SNiP regulations in section 2.01.07-85, this is difficult for independent calculations, an engineering education and also special software are required. To avoid errors it is recommended to use online calculator or take finished project. Loads and impacts are specified in SNiP standards in part 2.01.07-85, rules for the manufacture of metal structures - P-23-81 SNiP.

Arched canopies made of polycarbonate, in the photo there are sketches for small buildings
Good to know: The greater the distance from the bottom to the top point of the roof, the more load bearing capacity higher.To avoid getting confused in complex calculations, use the following recommendations:
- With a slope of 22-30 o in a building 6-12 m wide, the height and length of the triangular truss should have a proportion of 1:5;
- If the slope is 15-22 o, the dimensions are in the proportion 1:5, but the braces must be low-sloping, an even number of belts must be made, optimally 8.
- A smaller slope is suitable for larger industrial buildings, engineering calculations are required here; the length and height of the run should be in the proportions of 1:7, 1:9.

Simple diagrams on how to make rafters for a polycarbonate canopy
Calculation of a polycarbonate canopy from a profile pipe
Let's take a canopy as a basis, size 6000*4000 mm, this is an ergonomic solution: a comfortable gazebo or covered parking for a car.
Standard dimensions of polycarbonate in width and length:
- cast 2.050*2, 3, 6.12 m;
- cell phone 2,100*3,6,12 m.
For private buildings, a sheet thickness of 6-12 mm is suitable.

Polycarbonate performance table
Trusses must be placed under each edge and in the middle of the sheets, so the distance between them will be 1 m.
For the racks we will take a pipe ∅80-100 mm, the pitch is 2.0 m along the long side of the canopy. For the roof:
- essential elements - profile pipe 30*30 mm, the length of the lower ones is 3.1 m, remember the Pythagorean theorem: the square of the hypotenuse is equal to the sum of the squares of the legs, we calculate the length of the upper ones, in our case - 3.9 m;
- inclined spacers - profile pipe 20*20 mm, location - at an angle of 25 degrees.
We will install perpendicular jumpers every 0.5 m from each other.

Standard diagram of a small farm
Step-by-step instructions on how to build a polycarbonate canopy for your house yourself
To cook metal awnings For a polycarbonate dacha, a number of conditions must be met:
- Parts, as well as load-bearing elements, should not be cracked.
- The roughness of the end of the supporting rib is determined by GOST 2789-73 - Ra £ 12.5 microns.
- It is unacceptable to use steel with an internal layer and coarse slag inclusions for the lower chord of the truss.
- According to GOST 14771-76, connections are best performed by mechanical welding, in a carbon dioxide environment or its mixture with argon.
- According to GOST 2246-70 and 26271-84, it is recommended to use PP-AN-8 welding wire.
- To fasten rafters to sub-rafter elements and vertical columns, class 5.8 bolts are used according to GOST clause 7798-70.

Drawing of an asymmetric arched canopy
Practical construction
We mark the place for the pillars, dig holes 700 mm deep, make a cushion of 100 mm sandstone, 100 mm crushed stone, and tamp it. We pour 100-200 mm of concrete into the bottom, install a pillar in it, insert it with force, in a circular motion, so that it goes deep. We fill the hole with concrete, check the plumb line, correct it if necessary, and also strengthen it with supporting slopes.
Important: Professionals also recommend placing supports along the house, but if this is not possible, then a 60, 80 * 80 mm beam should be placed on the load-bearing wall with anchors, the trusses should be supported on it, connected by welding, this will allow the load to be distributed over the entire surface.
A way to secure vertical supports
When the solution has completely risen, we tie the pillars together at their heads, check the geometry, the diagonals must be equal.
It is better to cook farms on the ground, according to the chosen scheme; the most common ones are shown in the photo above. The finished parts are lifted and distributed evenly along the harness, in our case, every meter. The fastening points of the longitudinal strips and rafters are made using steel gussets, as well as welding or bolting.
The next stage is the sheathing (perpendicular purlins), from a 20*40 mm pipe, with a pitch of 400-600 mm, and sheets will be attached to it. The finished metal structure is cleaned and then painted.

The purlins will strengthen the frame, this will allow the polycarbonate to be fixed more securely
Watch video tips on how to properly attach a polycarbonate canopy to your house, this will help you avoid major mistakes when building with your own hands.
How to work with polycarbonate correctly
Cutting polycarbonate is better circular saw, equipped with a carbide disk with undetected fine teeth. Holes should be made using a drill with a metal drill, between the stiffening ribs. At the upper ends of the honeycomb panels, strips and self-adhesive tape should be installed for sealing; the lower ends should not be covered.
There are 2 ways in total:
- Thermal washers - the holes are made 2 mm larger than the mounting leg; the part should fit tightly until it clicks. The length of the washer is equal to the thickness of the polycarbonate; it is necessarily equipped with an elastic band that seals the connection, which prevents precipitation and dust from getting inside. This type of fastening is called a point fastening; the washer tightly holds the polycarbonate and prevents it from deforming when heated.

How to secure polycarbonate to a canopy using a thermal washer
- A special profile is a strip with grooves on both sides into which polycarbonate is inserted. The method is preferable if the sheets have to be joined. The edges are screwed with thermal washers. Profiles are provided for different connections: corner, docking, permanent, wall, detachable and special for docking if you need to change the roof configuration.

Photo instructions on how to attach polycarbonate to a metal canopy frame using a profile
There is also a wet method, the panels are attached with putty, but if you are making a canopy with your own hands, then it is better to limit yourself to the previous 2 tips.

Types of fastening polycarbonate to the sheathing