Nowadays, there is a huge selection of all kinds of lighting fixtures installed on the ceiling. But, nevertheless, many continue to install chandeliers in their homes and other premises as a familiar classic element. We will look at how to hang a chandelier from the ceiling correctly, and what should be avoided when performing this type of work, in this article.
How to attach a chandelier with your own hands
Ceiling lighting
A chandelier is not the only type of lighting equipment that can be used in a suspended ceiling. In addition to it, you can find all kinds of spotlights, spots, Spotlights, LED strips And so on.
However, a chandelier with a rich appearance is an integral part of the classic, familiar interior. It complements the room, making its appearance more harmonious and complete.
Review
In this article we will look at:
- Which chandeliers are suitable for suspended ceilings(cm. );
- What types of fasteners exist;
- How to fix a chandelier on a suspended ceiling.
So after reading, you can make it yours with skillful hands. Let's get started...
How to choose a chandelier for a stretch ceiling?

We hang it ourselves: how to attach it yourself
The choice of chandeliers for suspended ceilings must be made according to the following parameters:
- The base of plate-type chandeliers should not be made of metal, since the body heats up during operation. Which, by the way, should not be allowed for suspended ceilings, regardless of what material they are made of, PVC or fabric. Or we advise you to use energy efficient lamps 9not incandescent lamps), which do not cause strong heat;
- To avoid the appearance dark spots on the ceiling, choose chandeliers with shades pointing down or slightly to the side;
- Its sockets must support the use of energy-saving lamps;
- It should not be too complex in design.
The types of fasteners you will come into contact with are as follows:

What kind of chandelier and how to screw it on yourself
- Mounting hook. The most reliable type of fastening at all times. It can be anchored, with through fastening through floor covering, with fastening for fixation in hollow concrete channels ceiling or hook welded to the plate and fixed to the ceiling;

- Usually comes complete and has either mounting studs or side holes with threads and a screw clamp. Designed for chandeliers with low weight;

- Mounting plate "Cross". Comes included. Designed for large chandeliers shaped like a circle, oval, rectangle or square;

- Mounting plate “I-beam”. It is used to mount fairly large chandeliers and comes with them.
Mounting methods (briefly)
A chandelier can be hung from the ceiling using one of the methods presented in the table:
| Chandelier mounting method | Peculiarities |
|
|
In this case, the bracket or bar is attached to two screws, with the distance between them adjusted, which are then tightened with nuts. In this case:
|
|
|
It's old and enough reliable way. If the chandelier weighs no more than 4 kg, you can use a regular metal hook with a thread.
|
|
|
It attaches and works like a straight bracket, but has a larger number of structural attachment points. Allows you to use it for heavier chandeliers that are adjacent to the ceiling. |
|
|
Used to attach heavy chandeliers at several points. The mounting strips have a curved shape, which ensures free exit of wires. |


Preparation
Let's look at how to install each type of fastening structure on a base ceiling.
Hook

There are many methods, we will name old and proven methods:
- Option 1:
To secure the anchor hook, it is necessary to drill a hole in the concrete to the diameter of the anchor itself. Next, the anchor is hammered into the hole, and then the screw hook or nut is tightened to wedge the anchor in the ceiling.
Depending on the chandelier, the diameter of the anchor is selected. Their sizes vary from 6 mm to 14 mm - these are the most popular options.
- Option 2:
- If you are building your own house and have already planned what and where you will have it, then there is another option for mounting the chandelier. A through hole is drilled in the location of the proposed chandelier. Then two square metal plates are cut out from 2-3 mm steel and a hole is drilled in them in the center along the diameter of the hook shank;
- One plate is applied to the ceiling, and the second is placed on the floor top floor. Take a hook with a solid thread, screw one nut until it stops (it will prevent the bottom plate from sliding onto the hook), and screw the second onto the shank, tightening the plates on the ceiling. This fixation will be very reliable.
- Option 3:
The next type of fastener can be made as follows. Insert an 8-10 mm wire rod into a pre-made hole with a diameter of 30-50 mm in the ceiling channel.
The hook can be made from the same 6-8 mm wire rod, make a hook at one end, and a 14-16 mm ring at the other. Then insert the hook ring into the hole and thread the anchor rod through the ring.
- Option 4:
- There is also an option similar to the previous one. For these purposes, we only need one plate, a hook with a shank and a solid thread on it, and two nuts. On the plate, drill holes diagonally for fasteners with a diameter of 8 mm;
- Screw one nut to the end of the thread, insert the plate and press it with the second nut until it stops. Cut off the rest of the shank flush with the nut. Make a recess in the base ceiling so that the nut is hidden and the plate fits tightly to the ceiling;
- Mark the place for its fastening. It is better to fasten using anchor studs with a diameter of 6 mm with a nut. This design can also be used for mounting on wooden surface, securing it with wood screws.
- Option 5:
If the slabs have voids inside, then you can buy a regular wedging hook. Its installation will not be difficult.

This bar has standard sizes provided by the chandelier manufacturer. All these planks have the same characteristics: on the sides screw terminals chandeliers, and on the main part, attached to the base, there are holes for fastening.
To install the strip, use wooden beam. Its location should be approximately 3-5 mm closer to the ceiling than the level of the stretch ceiling
Mounting plate "Cross"

To attach this structure, it is necessary to provide a supporting platform. It can be made from plywood with a thickness of 16-20 mm. In terms of its dimensions, it should be slightly wider than the blades of the cross. A hole with a diameter of 50 mm is drilled in the center for the cable outlet.
Advice! To attach to the base ceiling, use straight hangers, which are attached to the platform with 16 mm wood screws or 9 mm “bug” screws on top, so that there is no possibility of damaging the ceiling surface. Attach the structure to the ceiling using concrete anchor dowels or wood screws to a wooden surface.
Mounting plate "I-beam"
The fastening method for this type of plank is the same as for the cross-shaped one. The only difference is in the way it is attached to the base of the platform. How to install a chandelier on a suspended ceiling - the video we selected for you in this article.
What you need to know first when working with pendant lighting fixtures
Let's start by listing small but very important nuances.
Practice is a stubborn thing

Let’s make a reservation right away: there are many ways to hang a chandelier from the ceiling, but practice shows that in some cases, neglecting basic rules can lead to disastrous results, such as the lighting fixture falling to the floor. At the very beginning, let's look at how not to hang a chandelier.
Why are we bringing this up now? The fact is that knowing what not to do can completely influence the entire progress of certain construction works.
Small negligence - big problems

In order not to overload you with unnecessary information, we will give a small example:
- There is a hook installed on the ceiling, and visual and contact inspection showed its sufficient reliability.
- You installed a massive chandelier on it and until a certain time, it did not cause you any trouble.
But life situations are different, there was a fire in the room, and the “specialists” secured the hook in the ceiling with plastic dowels. If in the normal state the fastening of the hook was quite reliable, after the impact high temperature The plastic dowels simply melted.
One of the last stages of apartment renovation is the installation and connection of lighting sources. Despite the popularity of plasterboard and tension analogues, the classic in the form of a painted ceiling will always remain popular. When installed, the height of the rooms remains unchanged. Whereas plasterboard and tension, due to the frame, eat up precious centimeters. And if these options involve installing a hidden guide for lighting, then what to do with classic version? How to hang a chandelier on a concrete ceiling? Let's take a closer look.
Mounting methods
There are three methods for fixing chandeliers to:
- Using a hook. This is one of the popular methods that allows you to mount fairly large lamps, including on a leg.
- On a hanging bracket. This method makes it possible to install lamps designed for low ceilings. These lamps are not massive, have a small height, and are pressed close to the ceiling.
- On the cross bar. This method designed for heavy structures.
The question “how to hang a chandelier on a concrete ceiling” largely depends on the chosen model of the lighting source.
and electrical wiring
Concrete structures are canvases with hollow channels.
The cable for lighting is laid in these holes. In new buildings, three-wire grounding wires are provided. This feature does not make it possible to implement the installation option with a two-key switch, since it is, of course, possible to attach the chandelier to a concrete ceiling, but you will need to use a four-core cable. It is best to contact a professional electrician for this process. Or abandon the idea of a two-key switch.
Lighting selection
The abundance of lighting fixtures sometimes makes it difficult to choose a lighting source. Moreover, the market is flooded with many low-quality Chinese products. When choosing, you should consider a number of nuances:
- Design. Most often, lighting is chosen specifically for it. This could be a set of a ceiling lamp and sconce, or just a chandelier.
- How many buttons are you planning to connect from? If at the installation site there are only 2 wires on the ceiling, then a 2-key connection should not be considered. And accordingly, it is better not to purchase multi-lane lamps. Otherwise, large electricity bills will come in the future. Or you may need to install the appropriate wiring.
- Ceiling height. Massive chandeliers will look out of place in low rooms, and, conversely, in high ceilings the small lamp will be lost.
- Dimensions of the room. If the room is large, it is better to provide two lighting sources. When zoning, both identical and different models can be used.
Taking these features into account, you can choose the right type of lighting. in this case it will not be difficult, and it will fit ergonomically into the design.
Features of modern lamps
Nowadays, lighting amazes with its variety and options.

There are models with built-in fans, various modes via the remote control, using more lamps with 12 W consumption. All these products may have additional connection blocks in their design. In such cases, installation instructions are requested from the seller. And if you are not sure that you can connect it yourself, it is better to call an electrician who knows exactly how to hang a chandelier on a concrete ceiling.
Preparation and safety
There are several important points at this stage of work:
- It is better to work with electricity during daylight hours. This will make the job easier. There will be no need for additional lighting in the form of flashlights, and therefore no assistant.
- Prepare the tool. This is: a drill or a hammer drill with the right kind drills/drills, indicator screwdriver, regular screwdriver and wrench for assembling the chandelier, fastener, electrical tape, pliers.
- Before installation, turn off the electricity in the panel.
- Remove old lighting, if any.
- Separate the ends of the wires. Connect electricity. Determine phase and zero using an indicator screwdriver. When it comes into contact with the bare end and presses a button on the tool, the screwdriver lights up - phase, no - zero. Insulate the ends.
- Determine the location of the wiring ceiling space. Floor slabs have hollow channels that are used for laying cables. For this work, a special electronic detector is used. Experienced owners always draw up or request a wiring diagram during electrical installation. In the future, this allows you to avoid many problems even during simple operations (such as “driving a nail into a wall”).
- Since hanging a chandelier on a concrete ceiling is, by and large, quite simple, but the process itself is unsafe, you should not forget about disconnecting the electricity from the panel at the time of dismantling, installing and connecting the chandelier. This will avoid the risk of electric shock.
Chandelier assembly
Depending on the complexity of the design, you may need instructions for assembling the lighting fixture.

The process can be complicated when you need to hang a chandelier on a two-key connection system. This installation allows you to further regulate the degree of illumination in the room by turning on all the lamps or some of them.
To do this, select a model with this connection capability or slightly upgrade the existing option if:
- The lighting device has a two-wire wire coming out for connecting to the network - it can be replaced with a three-wire wire (phase, phase, zero).
- The lamp has a three-core cable, but one of the wires is designed for grounding (it is yellow with a green stripe). If the house is old, then grounding is usually not provided for chandeliers. Therefore, this wiring can be used to connect to the second phase.
If you need to hang a chandelier on two-gang switch, then one group of horns is connected to the first phase, the second to the other.

Having assembled and prepared the lighting device, proceed to installing the fastening element. Let's consider all types.
Hook fastener
Previously, this type of mount was used for lamps. In such cases, after dismantling the old lighting, a new chandelier should be hung on the existing fasteners. If this type of fixation is not provided, then you should first purchase it. The market today allows you to choose best option for any occasions. Here are a number of products:
- Hook with petals. This type is suitable if the hole is in a void in the slab. When installing it, the petals open and securely fix the hook.
- Ceiling A drill corresponding to the diameter of the anchor is selected, a hole is made, the fasteners are inserted, and the element is tightened.
- Folding spring dowel with a ring, a bar, and a hook. A hole is drilled according to the diameter of the element, fasteners are inserted, and screwed. In this case, they sometimes use building mixture plaster for greater reliability. The hole is filled with the mixture and then the dowel is installed. Time is given to harden.
- Steel screw with ring, L-shaped hook with plastic dowel. Mounted according to the previous option.
Since hanging a ceiling chandelier, as we have already mentioned, can be done quite quickly, but the process itself is associated with the risk of receiving an electric shock, it is better to first insulate the wires coming out of the ceiling.
Hanging bracket fastener
The fixing bar and fasteners for it are included with the lamp.

But it is better to buy more powerful dowels. It will be more reliable option, especially if you are not particularly confident that you know exactly how to hang a chandelier on a concrete ceiling. The hole for each hole is first marked with a pencil. It is drilled, dowels are inserted, a fixation bar is applied and secured with self-tapping screws. This fastening method can also use mortar for stronger fastening. It is important to screw the bolts onto it to secure the chandelier before fixing the strip. The cross strip is mounted in the same way.
Final stage
After installing the fastening element, you can begin to consider the question of “how to attach a chandelier to a concrete ceiling.” For this:
- The electricity in the panel is turned off.
- The insulation is removed from the wires of the ceiling cable.
- The connection is made by terminal connection or by twisting and electrical tape.
- The chandelier is fixed to a fastening element.
There are a number of features for each type of chandelier.

For models with hook fixation, the lamp is hung on it and the wires are connected. And then they cover it with a special decorative cap. Lighting with mounting on a bracket: the mounting cover from the lamp is fixed, the wires are connected, the lamp is attached to the cover. After installation, you should check the correct connection by turning on the keys one by one. If no short circuit occurs, it means you managed to hang the chandelier correctly with your own hands.
Copper and aluminum cable
In old houses you can still find lamps and modern ones are equipped with copper wires to connect. In such cases, the connection is made only using special terminals.

Otherwise, the installation will not meet the standards. fire safety. And this, ultimately, can lead to dire consequences. So, we looked at how to properly hang a chandelier from a concrete ceiling with your own hands. The difficulty of installation lies only in the discrepancy between the number of cores of the ceiling cable and the chandelier wire. These problems can be solved if you have confidence in your abilities. But since working with electricity is associated with health hazards, it is better to trust a professional.
Installing a new chandelier in a room is a significant event. Before you hang a chandelier on the ceiling in your apartment, you need to assemble it correctly. Fortunately, the design of most chandeliers is not that complicated, so let's move on to the next part of the preparatory work.
Connecting wires
Let's start with the most basic. To get started, answer the questions:
- How many wires come out of the ceiling?
- How many keys does the switch have?
If there are only 2 wires, then forget about the possibility of turning on different parts chandeliers with two-key switch. Without installing the third wire, nothing will work. This means that all the wires in the chandelier are collected in bundles of a certain color. If 3 wires are connected to the lamp, and you do not need the light to turn on at the same time, then in the chandelier, the wires going to the socket thread and the ground wire are collected in one bundle, while the others are divided into 2 groups and are also twisted into bundles.
Poor contact will not only lead to heating of the wire, but can also cause premature failure of the housekeeper.
To work you will need a simple tool:
- Pliers.
- Small screwdriver.
- Battery-powered indicator screwdriver.
- Terminal block.
- Open-end wrench 12.
The need for a key arises when assembling a chandelier. An indicator screwdriver will be needed to determine where the wire is connected. Take it in your hands, and the moment you touch the tip of the screwdriver and its upper part, it should light up - this means that the device is working. Now, holding the top edge of the screwdriver, touch the tip to the threads (or side contact) in the socket. With your free hand, touch the wires coming out of this socket. When you touch one of them, the indicator should light up. Wires of the same color will be “ground”.
Insert the separated bundles of wires into the terminal block of your choice and securely fasten it there.
Hanging a chandelier

Let's consider two main methods.
- On a hook.
- On the mounting plate.
Hook

This used to be the most common method, but is now becoming a thing of the past. Nevertheless, there are still many versions of chandeliers with this type of mount available.
Some craftsmen solved this problem in their own way - they replaced the plastic hook with a homemade hook made from a welding electrode.

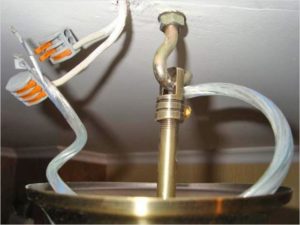
The chandelier comes with a special mounting strip, which must be properly prepared before installing it on the ceiling. Fasten the screws to it with nuts so that their heads are in the inside of the bar, just do not clamp them. Insert strip with inside bowls into the chandelier in the same way as it will later be installed, tightening the decorative nuts until they stop - the bar should be flush with the edges of the chandelier bowl, or slightly below it.
After checking, firmly tighten the screws in the bar so that they do not rotate, otherwise removing the chandelier may become difficult. big problem. Place the strip against the ceiling where it will be installed and make marks on the ceiling through the holes. Moving the bar to the side, drill concrete base ceiling and insert the dowels. After this, the plank is attached to the ceiling, and the chandelier itself is attached to it. If the base of the ceiling is wooden, then the plank is attached to it with wood screws.
Electrical connection

When the switch contacts are open, there should be no voltage on the wires.
This means that when you touch the wires with an indicator screwdriver, it should not light up. In this case, a screwdriver that operates without batteries will give a more accurate result. After turning on the power, the indicator should show the presence of voltage on two wires. The remaining one is the “ground”, which should be connected to the common beam of the chandelier. If this is not the case in your case, then this means that the switch turns off not the phase, but the ground. If you have incandescent lamps or LED lamps connected, you can leave it that way; this connection is not suitable for housekeepers, as they may blink (this was discussed above).
Do not install housekeepers under any circumstances if the chandelier is connected via a dimmer!
Connecting a chandelier with a power supply

Often people try to increase the brightness of the glow by replacing standard lamps with more powerful ones, as a result of which the chandelier stops functioning.
To prevent the transformer from breaking down, monitor the total consumption of the lamps - it should be lower than the output power of this device.
If your chandelier has halogen bulbs, then most often they are designed for a 12 V power supply. In this case, the power supply is connected through a step-down transformer, on which the voltage at the outputs is always written. Where the voltage is indicated as 220V, we connect it to the network, and the contacts marked 12V are connected to the light bulbs.
When connected directly, the bulbs must be rated at 220V. Otherwise, halogen lamps designed to operate through a transformer will explode and shards of glass will fly throughout the room.
All wires must be carefully insulated.
Mounting to concrete ceiling

In order to secure the fastening strip to a concrete ceiling, you need to attach it to the intended mounting location and make marks on the ceiling where the holes will be drilled. If the floor is made of hollow slabs, then you need to check the thickness of the concrete in the place where the hole will be drilled, since it may happen that the dowel will have nothing to hold onto. You may have to step aside or position the bar differently. If nothing can be changed, you can use anchors, or lead into the cavity of the slab wooden slats, and screw the bar to it with screws. To complete this job you will need:
- Hammer drill (or impact drill).
- Pobedite drill, according to the diameter of the dowel.
- Screwdriver (screwdriver/drill).
- Dowels (anchors or screws).
Before you start drilling, make sure that dust and sand do not get into the hammer drill chuck. For this purpose, you can pull a disposable cup or half a rubber ball over the drill, and then drill.
Depending on the fastening method you choose, secure the bar securely, but do not overdo it as it can bend if you press too hard.
On a plasterboard ceiling

What difficulties may arise when installing a chandelier on a plasterboard ceiling? The point is that it is important how appearance plasterboard ceiling and mechanical strength installed structures.
You need to decide in advance on the choice of chandelier, and determine how it will be fixed. Let's consider the main recommendations:
- The place on the ceiling where the heavy chandelier will be located must be additionally reinforced with a metal profile. This needs to be taken care of when making the frame of the ceiling structure.
- To attach a small chandelier directly to drywall, you need to buy fasteners (folding spring dowels, butterflies). There is no need to strengthen anything.
During work, it is important to follow safety precautions - ensure safe movement under the ceiling and de-energize the electrical system.
If it is not possible to turn off the power to the room, then you need to work with rubber gloves as an electrician and use a good quality tool (nippers and pliers must have intact handles).
We attach the chandelier to the plasterboard ceiling

Drywall has strong mechanical properties, and for this reason the installation is carried out directly to the material itself. But this method has limitations.
- Because plasterboard sheet can withstand loads weighing up to 6 kg per square meter, then, given this feature, when purchasing, you should give preference to chandeliers that have a relatively light weight.
- It must be taken into account that deformation may occur plasterboard ceiling when operating the device, for example, replacing a lamp or if you accidentally catch the chandelier with your hand. Therefore, in order to preserve the attractive appearance of a plasterboard ceiling for a long time, it is not recommended to repeatedly change the chandelier, especially not to make new ones next to the old holes.

First, consider the option of mounting a hanging chandelier. The first step is to drill a hole in the drywall (for the selected fastener) and insert a spring dowel or butterfly - this is where the chandelier will be suspended from the ceiling.
The spring dowel must be tightened with a nut, and the butterfly must be tightened with a self-tapping screw (there should be a click). The dowel and butterfly must be equipped with a pin or hook. After this, you can hang the chandelier on the hook and connect the wiring.
Holes are made at the designated points, as in the case of pendant chandelier, but there was a hook, and here we will use a butterfly dowel, to which the strip will be attached with self-tapping screws. Now the most interesting part - holding the chandelier under the ceiling, you need to connect the wiring, and only after that it will be possible to fix the chandelier.
It is extremely inconvenient to do this work alone, so you need someone who will hold the chandelier until you finish working with the electrical wiring. If there is nowhere to wait for help, then make a small hook and temporarily hang the chandelier on it so as not to scratch it.

When installing a stretch ceiling, you should take care in advance about what kind of chandelier or lamp will be on the ceiling, and what kind of mount for the lighting device you need to use. This is important to take note of, because the stretched material is not the basis for fastening, and if the integrity of the film is compromised, the fabric will simply tear.
How to choose the right chandelier

It is important to pay attention to the choice of chandelier so that it does not spoil the expensive ceiling covering. In this case, you need to consider what lamps will be used. For example, it is better to purchase a chandelier with energy-saving lamps, since they heat up less during operation. If halogen or incandescent lamps are used, they should be hidden in the lampshade and not directed at the ceiling, but to the side.
If you purchased a chandelier with sockets for ordinary incandescent lamps, then it is better to screw in housekeepers or LED bulbs instead. It is important to know that if the chandeliers are overhead with a thin metal base, then, adjacent to suspended ceiling in a heated state from incandescent lamps, can lead to its deformation.
You also need to make sure that the base of the lighting fixture, which covers the fastener, has no sharp edges and will not tear the film.
We attach it to the suspended ceiling

The most common and reliable installation method is fastening with a hook. But this method is only suitable for hanging chandeliers.
- if the base is under a suspended ceiling - reinforced concrete slabs, and the hook has already been installed by the builders, then it is necessary to determine whether it is installed at a sufficient height;
- if the location of the hook may not suit you, then using a dowel or anchor you can install the hook yourself by cutting off the old fasteners with a grinder;
- Another method is to install a wooden embed in the place where there will be a hole for installation in the suspended ceiling, and a hook is attached directly to it.
You need to know at what distance from the main ceiling the suspended ceiling will be located, and also lead the ends of the electrical wire to the installation site.

After the stretch ceiling fabric is stretched, where the hook is located, you need to glue a thermal ring, inside of which a hole is cut for the wires to exit, and then the chandelier is attached. This happens in this way: the chandelier must be hung on a hook, the wires must be connected, and the mounting location must be covered with a lamp cap.
The chandelier can be mounted on a strip or mounting plate.
Most lighting fixtures include special fasteners - metallic profile with screws (the mounting plate mentioned earlier). It is attached to the main ceiling, and the chandelier on top of the stretch ceiling with screws using decorative nuts.

Attaching the chandelier to a suspended ceiling also involves installing a wooden block to the main ceiling, the length of which should not reach the stretch ceiling by almost 1–2 cm. Otherwise, the block will protrude and over time may tear the film of the stretch ceiling. Next, the block should be attached to the ceiling using self-tapping screws and dowels. And when using a wooden block, it is also necessary to make a hole, reinforcing it with a thermal ring.
The mounting strip is attached to the block without going beyond the hole. Then the base of the lighting fixture is attached to the plate. Next, the holes in the base need to be connected to studs (or screws) and tightened with nuts.
In some cases, instead of a wooden block, thick moisture-resistant plywood with attached metal legs is used as a base.
Video: installing a chandelier on a suspended ceiling
Mounting a chandelier on a cross-shaped bar

This type of fastening is intended mainly for heavy chandeliers with a wide base. Due to the fact that the mounting holes are spaced apart, it will be impossible to secure the chandelier within the hole. To do this, it is again attached to the main ceiling as a base. wooden block to the size of the cross. It is necessary to carefully cut five holes in the stretch ceiling fabric and reinforce them with thermal rings: one big hole to output electric wires and connect the power, and the other four are smaller. Instead of small-diameter thermal rings where self-tapping screws are screwed in, you can use pieces of plastic that are glued to the stretch ceiling. This procedure must be done, otherwise the film where the hole is made will tear.
When the wires are connected, you can hang the chandelier on the crosspiece and secure it with nuts.
Video: installing a chandelier on cross-shaped strips
Photo


One of the mandatory elements of any repair related to the ceiling surface is the installation of lighting fixtures. Lately, spots of various configurations have become most popular, but for the most part their main function is additional lighting. Classic chandeliers rightly take on the role of the main one. Purchasing them in a store does not solve all the issues - you still have to figure out how to hang a chandelier on a concrete ceiling correctly if you have to deal with a clean ceiling base. We offer you a detailed instructional article with 51 photos and 2 videos that will help you with this.

Surface analysis, drawing up a work plan

To begin with, take a good look around. What way chandelier installation most suitable for you? Let us remind you that this can be done through:
- anchor hook;
- mounting plate;
- clamping suspension.


Of course, work with anchor hook It's always the easiest. But only if it is already installed, as is often the case in old apartment buildings. In this case, you can safely mount a heavy and massive chandelier on it.

If there is no hook, then first inspect the slab where you plan to fix it. For hollow concrete foundations, the ideal option is clamping suspension. And although it does not provide such a reliable fastening as the same anchor hook, it can handle a fairly large chandelier weighing no more than 7 kg without any problems.


Mounting strip, which is often called an invoice among craftsmen, is the third option on how to properly hang a chandelier on a base ceiling. It can be used most often when the use of the two options discussed above is not possible. Most modern chandeliers include everything necessary to fix the lighting fixture in this way. So why not take advantage of this?

Required materials and tools

- hammer drill with drill;
- set of wrenches;
- knife with a sharpened blade;
- screwdriver;
- polyurethane foam for sealing wiring;
- pencil;
- dowels;
- anchor bolts;
- terminal connectors.

- hook;
- overhead strip included in the kit;
- hanging hanging hook.


Installing an anchor hook

As noted above, this is the easiest and most reliable way to hang a chandelier on a concrete ceiling base. In many old houses it is already prudently installed in advance, so the whole process takes a modest amount of time and does not cause any difficulties even for an unprepared person.

If the hook needs to be installed, then the operation algorithm will be as follows:
- select a fixation point on a concrete base;
- drill a hole of the required depth and diameter in the concrete base - take into account the size of the decorative cap of the lighting fixture;
- insert the anchor hook into the concrete base and tighten it with a wrench.

Installation of a clamping suspension


This option is relevant primarily for hollow concrete structures, as it provides good bearing capacity even with bulky light sources. The clamping suspension is reliable design, consisting of a spacer rod and a hanging strip with all the necessary holes for fastening.


The correct sequence of operations when working with the gimbal:
- the prepared spacer rod is inserted into the hole in the concrete base;
- the hanging strip is placed inside the concrete slab;
- the spacer rod is threaded through one of the holes on the plank: if you want to reduce the distance from the ceiling to the hook, then choose one of the end holes.


Installation of trim strip

In terms of reliability, this installation method is in no way inferior to the two discussed above. Due to the fact that a newly purchased chandelier always comes with a version of such a strip, it is also noticeably lighter - there is no need to waste time on a tedious search for the necessary materials.
May be in the form:
- crosses;
- narrow plate.


To the concrete ceiling surface the overhead strip is secured with dowels and anchor bolts. Most often there are pairs of them - either 2 or 4.
Installation and connection of the chandelier

The main condition that requires strict execution is to comply with electrical safety precautions. To do this, pay attention to the following recommendations:
- turn off the electricity supply at the distribution panel;
- check the wiring location with a conventional tester;
- seal the wiring input: for this you can use polyurethane foam with active resistance
- fire or non-flammable mineral wool;
- Do not twist copper and aluminum wires together.


If you are dealing with a metal hook, then you can reliably protect yourself from short circuit will help him insulation. To do this, use regular insulating tape or a rubber cover. Both can be easily found at any hardware store.


It is also necessary to take into account some electrical features of old houses - they do not have grounding. In order to correctly hang a chandelier in such conditions, you first need to determine the phase on one of the wires of the power cable and connect it to the end of the lighting device, and the second to the one left on power cable. If the lamp still does not work, then that same second wire is grounding. In this case, it must be disconnected and secured to the other free end of the power cable.


Algorithm for direct installation of a chandelier on a concrete ceiling:
- take everything off her decorative elements to avoid damage and possible fall when fixing on the ceiling;
- on a pre-grounded hook and loop at the end of the chandelier output rod;
- connect the mounting ends of the chandelier to the power cable;
- if the mounting method you have chosen is an overhead mounting plate, then after the previous point, place the cap on the plate so that it fits onto the required holes, and use the nuts to securely fasten it;
- fix the decorative cap so that it completely covers the installation hole in the ceiling;
- Check the correct operation of the lighting fixture.


All stages of installing a chandelier on a concrete ceiling in one video
Conclusion
After carefully studying the proposed article-instructions, you will quickly understand how easy and, most importantly, correctly to hang a chandelier on a concrete ceiling, without spending a lot of precious time on it. Compared to other conditions for installing lighting fixtures - for example, on stretch fabrics- a clean base requires a simplified algorithm of actions (read about how to attach a chandelier to a suspended ceiling if it is already stretched). In fact, the most difficult thing is not to make a mistake when directly connecting the light source to the electrical wiring. Only serious attitude issues of electrical safety and scrupulous adherence to the proposed work plan will help you easily overcome this stage and after some time enjoy the spectacular lighting on your concrete ceiling.


Hanging a chandelier with your own hands is not that difficult. A person who has no experience in carrying out such procedures may at first be intimidated by the need to work with electricity. However, no serious knowledge is required to complete this task. To install a chandelier on the ceiling, you need to perform only two operations: connect it to the electrical network and secure it.
Safety precautions
Before starting any electrical work, you need to take care of safety. Attaching a chandelier involves contact with wires through which current flows. high voltage Therefore, this issue must be approached with complete seriousness. Here are the basic recommendations and guidelines:
- all electrical installation work must be carried out with the power turned off (you can simply turn off the circuit breaker in the panel);
- after turning off the machine, you should be on the safe side and check that there is no light;
- Having checked the absence of voltage in the wires with an indicator screwdriver, you can safely begin installation;
- Often, a Chinese manufacturer resorts to using low-quality materials when making chandeliers, so their choice should be treated more carefully.
How to determine the location of wiring in the ceiling?
Before hanging a chandelier on a concrete ceiling, you need to know exact location electrical wiring. If this is not done, when drilling holes for the chandelier fasteners, it will be possible to easily drill through the wires. The search process must be performed while current is flowing in the wires. That's why this procedure can be divided into the following stages:
- Power outage.
- Installing a temporary socket with a light bulb.
- Electricity supply.
- Turning on the temporary light.
To determine the location of live wires, there are many devices from different price categories. This device must be installed perpendicular to the line along which the wiring is supposed to run. You must place a mark where the phase is detected, and then continue moving the indicator. The next mark is placed at the point where the phase disappears.
To control, these steps should be repeated in the opposite direction. The wiring is laid in the gap between the resulting marks. Now you can safely drill holes for fasteners and hang the chandelier.

Methods for attaching a chandelier to the ceiling
If everything has become clear with the wiring, now the question arises: what methods of attaching a chandelier are there? Today, three most common technologies are most often practiced, allowing you to quickly and easily hang a ceiling chandelier. Relatively lightweight products can be fixed on hooks. In cases with heavier lighting fixtures, the use of anchor bolts. In addition, there are chandeliers that are attached to a bar (bracket). Another way is to mount directly to the concrete ceiling.
How to hang a chandelier on a hook?
The simplest way to attach a chandelier to the ceiling is a hanging hook. To fix it in the ceiling, you need to drill a hole with a diameter of about 8 mm. If the weight of the chandelier does not exceed one and a half kilograms, you can use a regular hook with a thread, which is screwed into the dowel inserted into the hole. For heavier products, expansion anchors with a diameter of at least 10 mm should be used.
If you plan to secure the hook in a dowel, it is recommended to choose a corrugated one. Such fasteners are better fixed in the ceiling. The screwed hook should be wrapped with two layers of insulating tape.
After these manipulations, you need to connect the wires from the chandelier to the electrical network. This can be done either using regular twisting or by resorting to the use of terminal blocks, which are most often included with most lighting devices.

The next step is to attach the chandelier to the hook, and then move the special decorative trim as close as possible to the ceiling surface. This bowl will hide all wire connections. This completes the installation of the chandelier. The main disadvantage of this type of fastening is the gap between the ceiling and the lining. It can be either a couple of millimeters or 1–2 cm.
It is important to understand that installing a chandelier on a plasterboard ceiling in this case fraught with unpleasant situations. While lightweight products can still hold out, plasterboard will not withstand heavy lighting fixtures. The hook must be attached to the frame, so its installation should be planned during the construction of the ceiling.

How to hang a chandelier with a strip?
There is a way to secure a chandelier without a hook. This procedure is a little more complicated, but quite doable.
The kit should include a special mount for the chandelier to the ceiling. This fastener is called a bracket. This chandelier strip must be attached to the ceiling, and then marks for drilling holes for dowels. You need to fix a couple of screws in the bracket itself. In this case, the distance between them should be equal to the distance between the holes on the decorative cover.
After fixing the bracket, connect the wires. Hanging a chandelier of this type can only be done with an assistant, as it will be very difficult to do it alone. One should hold it, and the second should connect it to the power supply.

At the next stage, you need to get the screws fixed in the bracket into the holes decorative overlay, then tighten the nuts. As soon as the lamp is installed and functionality is checked, the procedure for attaching the ceiling chandelier can be considered complete.
Mounting ceiling lights directly to the ceiling
Often, such fasteners are used for small chandeliers and light-weight lamps. On the back side of such products there are always several holes designed for fixing to the surface. If the base is made of wood, you can fix the ceiling lamp directly with self-tapping screws. If you want to hang the lamp on a concrete ceiling, you first need to drill holes for the dowels, and then fix it.

Installation under a single-key switch
While anyone can hang a chandelier on a concrete ceiling, connecting to the electrical network can sometimes be difficult. Most chandeliers installed nowadays have two conductors. By standard marking The blue or white-blue wire is zero, and the white or brown wire is phase.
If your home has not been rewired for a long time, there will be two aluminum conductors in the ceiling. As a rule, they are not marked, but you can determine where the zero is and where the phase is using an indicator screwdriver. If the wiring is relatively new, there will be three wires in the ceiling: neutral, phase and ground. We don't need the third one, so we can insulate it and bend it to the side.
If the chandelier has two or more shades, the wires coming from them must be connected to each other. Zero must be connected to zero, and phase to phase. After this, the neutral from the electrical network is connected to the connection of the neutrals from the chandelier, the same with the phase. Next, you can attach the chandelier to the ceiling.

When hanging lighting fixtures, you need to understand that directly connecting aluminum and copper wires is not recommended. Over time, such contact will begin to oxidize, and the connection itself will lose strength, as a result of which the twist will begin to overheat. IN best case scenario The chandelier will fail, or at worst, the wiring. In such situations, chandeliers can only be hung when connecting the wires using terminal blocks.
Installation under a two-key switch
If you want to install a chandelier under a two-key switch (that is, one key turns on only part of the light bulbs, and two keys together turn on all the light bulbs at the same time), the principle changes slightly. In this case, all the zeros of the chandelier are connected together and connected to the mains zero, and the phases are divided into groups.
In the first group it is necessary to combine all the phase conductors of the lamps that should light up from the first switch, in the second - from the second. Next, the first group is connected to the phase coming from the first key, the second - to the phase from the second key. The installation of the chandelier can be considered complete once it is attached.

How to check the strength of the fastening?
After completing all procedures, you should definitely check. Small flaws may escape your attention, so you should immediately visually determine the quality of the work. The wires must be completely hidden under the decorative cover.
You can determine the reliability of the fastening by slightly loosening the lamp. Well, the main indicator is a performance check. If, after turning on all the switch keys, the light bulbs light up and the wiring does not sparkle, then you installed the chandelier on the ceiling correctly!


