Gardeners who are in love with their work take great pleasure in growing vegetables and stocking up on the fruits of their labors for the winter. Numerous seams and vegetables neatly stacked in boxes need special conditions storage To provide them, you need high-quality: dry and cool. In this material from the site we will talk about how to organize a cellar on your site so that it meets all the requirements.
Advantages of constructing a separate cellar for storing vegetables and types of structures
Storage located outside the home has its undoubted advantages. Main - temperature regime. The home basement is always much warmer, which means there will be higher humidity. In such conditions, carrots and potatoes begin to sprout, and apples wither. In addition, mice and rats tend to move into a warm home cellar. Another thing is a free-standing structure. If it's done right, it's cool. all year round.

Such designs also have disadvantages. In winter you will have to go outside to get a jar. If the entrance to the cellar is covered with snow, you will have to wave.

The question naturally arises: how to organize the simplest cellar with your own hands so that it has a convenient entrance and optimal conditions storage in the form of vegetables and glass jars with home canned goods?
There are three main types of structures that can often be found in summer cottages: cellars with a drainage cushion, classic underground cellars, and semi-buried storage facilities.
How to make an above-ground cellar if groundwater is nearby
Such structures are relevant for areas with high level groundwater. To avoid moisture penetration, the base of the cellar is made on a high drainage pad. To do this, sand, expanded clay or crushed stone are poured into a shallow pit (40-70 cm). This pillow guarantees dryness in storage. The pillow is laid on top, a reinforcing frame is placed and poured concrete base. Afterwards, the cellar itself is built from bricks or blocks. For reliable specialists they recommend masonry. Has proven itself excellent in this regard mineral wool. But you can replace it with sawdust, small expanded clay or other backfill material.
Important! If you use sawdust as insulation, they need to be treated with copper sulfate or lime.
The outside walls of the cellar are protected with moisture insulation, and the roof is covered with metal or other materials. The under-roof space is also important in terms of quality. The ideal option for constructing a cellar with your own hands in a private house is to then fill this entire structure with an earthen mound. In this case, the storage will be ideal conditions, of course, subject to the arrangement of the ventilation system.

For your information! For waterproofing cellars, you can use any types of materials: rolls, membranes, coatings and mastics.
How to make a traditional underground cellar correctly
Underground storage facilities are built quickly and, thanks to the special heat-insulating properties of the soil, never let their owners down. If there are no problems with the groundwater level at the site, then this the best choice for storing vegetables.
For an earthen cellar, you need to dig a pit with a slight slope of the walls towards the outer edges. This expansion is necessary to ensure that the soil does not crumble over time. Additionally, the walls should be reinforced with plank sheathing.
Advice! If you are lining the walls of the cellar with wood, make the lining collapsible. In this case, it will be possible to dry the boards in the sun in the summer. This way there will be no mold or rot on them.
To maintain dryness in the underground storage, you also need to arrange the floor on a sand and gravel cushion.

The ceiling is sewn up and a layer of compacted clay and earth at least half a meter thick is placed on top of them. A ditch at least 40 cm deep is made around the cellar to drain water.
Semi-buried cellar made of bricks or blocks
Another model of country storage is semi-buried. As you already understand from the name, this is something between an earthen and above-ground structure. The walls of such structures are made of or blocks; the storage itself is sunk into the ground approximately half the height.

How to choose the right storage
The main criterion for choosing the type of construction is. If the site is regularly flooded in the spring or is located in a swampy area, do not hesitate to choose a ground-based structure.

If there are no problems with flooding, and the site is located on a plain, build a semi-buried structure. And you won’t have to dig a deep pit, and it will be convenient to use the cellar.
How to quickly and efficiently make a cellar in the ground with your own hands
The main thing in building a storage facility is to choose the right location. It should not be too far from home so that you don’t have to carry cans and bags of vegetables far. To dig a pit, it is important that the soil is not rocky. It is not advisable to place the storage close to garden trees– you will damage the roots during construction, and then these same roots will destroy the walls of your cellar in retaliation.
Step-by-step instructions for arranging an underground cellar at your dacha with your own hands
Now let’s look at the process of arranging a cellar in more detail.
| Illustration | Description of action |
 | Make markings for the future cellar based on the size of the concrete slabs (if you are going to use them). In addition to the storage chamber itself, you need to mark out the place to go down into it. |
 | Dig a pit, making a slight slope of the walls, as we recommended above. |
 | The inclined entrance should be approximately 1.2 m wide and 4.5 m long. The slope for comfortable descent is 30-35 ºС. |
 | Fill the sand and gravel bed, lay the reinforcing mesh on it and pour the concrete floor. |
 | In the process of arranging the formwork for the walls, immediately lay pipes for ventilation. The pipes should be placed on opposite walls at different heights. |
 | Install wall reinforcement and formwork around the entire perimeter of the storage facility, including the entrance area. |
 | Lay it out in advance in the places where the steps will be located. |
 | Pour concrete around the entire perimeter of the storage facility. Wait until it becomes and remove the formwork. There is no need to rush in this process; stick to the deadline. |
 | It's time to decide how to cover the cellar. Place concrete slabs on the roof and cover them with waterproofing mastic. If you do not plan to use slabs, make formwork and reinforcement for pouring. |
 | Insulate the storage ceiling with penoplex or other reliable heat insulator. |
 | To protect the heat insulator, cover it and add a layer of soil on top. A self-made cellar lid is extremely reliable. |
 | As a result, you will get a warm and comfortable cellar in which your products will be completely safe. |
Some nuances in the arrangement of the cellar ventilation system
An important factor in the normal functioning of a storage facility is ventilation. Without her, the cellar will always be damp, wood paneling and the shelves will become covered with mold, the lids of jars will become rusty, and the vegetables will rot.
It consists of a fresh air supply pipe and a channel through which the air will leave this room. The easiest way is to take two plastic pipes large diameter(about 15 cm) and place them as follows: the entrance to the supply pipe should be located half a meter from the floor, and on the opposite side under the ceiling there should be an exhaust hole.
Important! Exhaust and supply pipes should not be placed at the same height.

Top edge ventilation pipes need to be protected from rain with a canopy. It would be a good idea to install mesh rodent barriers in the pipes.
Construction technology for above-ground storage structure
In order to build an above-ground structure, you will need building material - this may not necessarily be brick or blocks. The walls of the storage facility can be made from a mixture of clay, adobe, or po, using several layers of high-quality insulation.
How to make an above-ground cellar at your dacha with your own hands: step by step
The thicker the walls of the above-ground cellar, the better it will preserve optimal temperature. Step by step, building a cellar with your own hands will look like this.
| Illustration | Description of action |
 | As in the first case, you need to make markings. Dig a shallow pit and make a gravel bed for waterproofing. |
 | Place it on the bottom of the pit waterproofing material and reinforcing mesh. Pour the concrete base. |
 | After the foundation is established, begin bricklaying. |
 | As you build walls, protect them from the outside waterproofing film. Use roll material. |
 | When the height of the cellar is sufficient, lay a metal profile or flat slate as a base for pouring. |
 | To cover the cellar with your own hands, install a reinforcing mesh and fill the roof of the cellar with concrete. |
 | Make an entrance area and steps, cover it all with a roof. |
 | Cover the structure with soil to better thermal insulation. A self-made bulk cellar will be your reliable assistant. |
How to make comfortable shelves with your own hands in the cellar: photo examples
The storage system in the cellar should have shelves for displaying cans and drawers for storing vegetables. What shelves and drawers in the cellar can be made from is a question that becomes key at the moment of arranging the finished structure.
The simplest and a budget option for storing vegetables - plastic perforated boxes. They have special grooves, thanks to which you can place them one on top of the other. Shallow, they provide good ventilation, so necessary for vegetables and fruits. If desired, the fruits in such boxes can be sprinkled with shavings or sawdust, having previously laid newspapers so that the filling does not spill into the openings of the boxes.

You can also store vegetables in large wooden boxes. But this way you will have to periodically go through the entire box to remove spoiled fruits, and getting them out when the box is almost empty will not be very convenient.
It is better to place pickled cucumbers, sauerkraut and other starters in airtight containers. plastic barrels.

And finally, the shelves. They can be made from wood or. In any case, they must be stable, attached to the walls and strong enough to support a lot of weight. Keep in mind: a three-liter jar of home canned food weighs approximately 4.5-5 kg. Just think, if you put 10 cans in 2 rows on a rack, that’s already 100 kg.

The metal frame will ensure the strength of the structure; you do not risk accidentally breaking the jar when placing it on a wooden surface. The boards can be exposed to the sun in the summer so that they dry properly.
Important! The material for the shelves in the cellar must be carefully processed to protect it from rot and corrosion. The wood needs to be sanded and the metal needs to be painted.

What are ready-made cellars for a summer residence and features of their installation?
Can be used as a ready-made structure for a cellar. The volume of such structures is thousands of liters. They are made of durable plastic and have stiffening ribs. Such cellars come with a side or vertical entrance. Here you can install a ventilation system. Such caissons can be dug into the ground, even if the water level is very high.

The disadvantage of plastic cellars is their more than decent cost. The bunker itself will cost about 65 thousand rubles. And if you install it by attracting hired workers, then that’s another 40 thousand on top. Why so expensive? The fact is that when the groundwater is high, the caissons are squeezed out of the ground. Correct installation provides for the installation of a concrete base. In addition, installation ventilation systems V plastic box– the task is not easy, you will have to invite a professional. Another difficult point is installing storage shelves. It is difficult to attach them to walls or floors without breaking the tightness of the caisson. You will have to prepare special spacers, and the design of the racks will not be particularly reliable. So it turns out that only boxes of potatoes can be stored in such a cellar. 100-120 thousand is a bit expensive for such purposes, you will agree.
YOU MAY ALSO BE INTERESTED IN:
To store and store preparations and vegetables for the winter, many summer residents decide to build a cellar on their own backyard, which is quite justified for several reasons. Firstly, independent work will save a lot of money, especially considering that the work itself on organizing the cellar cannot be called very complicated. Secondly, such a design near the house makes it possible to consume scarce vegetables and vitamins in the winter.
In this article we will try to cover as fully and in detail as possible the topic of how to build a cellar on a site with your own hands. Let's list different kinds structures for self-construction, we will offer instructions for each type of building, and also look at already ready-made solutions, available in the store. Go!
Cellar with concrete walls: instructions
The first step is to make preparation, namely, to decide building materials, location and dimensions of the cellar. We decided to choose a project made from bulk expanded clay concrete, since this option copes well with maintaining a constant temperature, and moisture will not penetrate into such a room. As for depth, in our case optimal indicator will be considered 3 meters.


Important point! At self-construction and choosing a place for a cellar is worth stopping on elevated areas. This way you can avoid the risk of the pit flooding spring time groundwater.
Let's move on to digging a pit. For greater comfort when descending into the cellar, a hole should be dug rectangular shape. The walls and floor of the underground structure should be thoroughly compacted! A gravel or crushed stone backfill is created on the floor, which is then filled with a clay solution.

If your site is located in a low-lying area and there is a risk of the pit being flooded, then you should use a concrete mortar instead of clay. In this case, before pouring it will be necessary to lay a steel mesh.
The construction of walls can be carried out by the most different ways, it all depends on the material used. Alternatively, you can arrange concrete walls. For this purpose, formwork with longitudinal reinforcement is placed in the pit, after which it is filled with concrete. The formwork is dismantled after a few days.

Another good option consists of building walls from expanded clay concrete or reinforced concrete blocks. The process of laying the material is identical. Even at the planning stage, it is worth considering places for organizing ventilation and doorways for greater comfort in the operation of the cellar.

After the walls comes the creation of the ceiling. To do this, again, formwork is created from chipboard, which is laid on top of the supports.


The formwork contains reinforcement mesh, which is then filled with concrete.
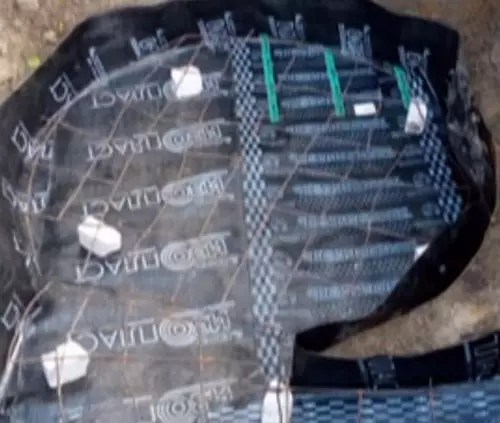
It will allow you to forget about the moisture inside the pit waterproofing! In our case it is coating waterproofing using bitumen mastic, which will be applied both from the outside and inside walls On top of the ceiling, directly on the mastic, a layer of roofing material is laid, which will act as an additional waterproofing of the cellar.


The final stage of building a cellar with your own hands will be backfilling the pit and concrete floor earth.
Advice! When backfilling the floor and pit, make sure that there are no sharp objects or stones left in the ground that could damage the roofing felt layer, thereby compromising the waterproofing of the room.


In the end, all that remains is to improve the storage, namely, carry out electrical installations, install a ladder and a door, and also place inside special places for storing vegetables and racks for preparations and cans.

Video
Brick cellar: work procedure
If desired for country house The cellar can also be built from brick. To create such a building with your own hands, you can adhere to next order works

After the final determination of the location for the cellar, taking into account the previously stated recommendations, you can immediately proceed to digging a pit of the required dimensions. In our example, the hole will be 2 by 2 meters.
After thoroughly compacting the floor and walls, we proceed to pouring the concrete floor slab followed by waterproofing.

For the construction of the walls, bricks were used in one row of masonry thickness.
During masonry work, you should constantly check the evenness of the walls when using a level and plumb line!


After the walls we move on to the ceiling. To this end wooden joists, pre-impregnated with an antiseptic composition, installed along the walls. A flooring is laid on them, on top of which a 25-30 centimeter layer of sawdust is placed.

A wooden hatch will act as a door inside. Don’t forget to insulate it with polystyrene foam so that the jars with blanks do not freeze in winter.

The final structure in a homemade cellar with brick walls will be a wooden gable roof, on one side of which there will be Entrance door with hole for ventilation.
It makes sense to dig a small ditch along the perimeter of the above-ground part of the cellar, where water from the roof will drain in the future during rain.

As for ventilation, in our case we used a pair of pipes with a diameter of half a meter. One was placed 20 centimeters from the ceiling diagonally, the second was placed at the same distance from the floor.
Red brick cellar
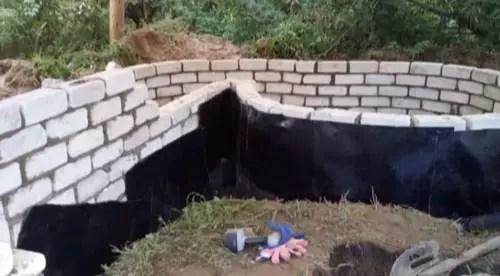
The creation of such a cellar, as in the case of other varieties, begins with digging a pit no more than 3.5 meters deep. As a result, we should get two rooms: a staircase and a vestibule.
After digging the pit, we carefully compact the steps of the stairs, the floor and walls of the room.
We are pouring concrete for the floor. After it hardens, you can proceed to laying brick walls.
It is important to emphasize that laying walls can only begin after the concrete has set and gained about 70 percent of its rigidity!
Rolled metal is placed on top of the finished walls, which will serve as a kind of basis for the future ceiling.
Right on metal frame formwork is set up and pouring is carried out concrete mixture.
After the concrete has completely hardened, you can proceed to the construction of the above-ground part of the cellar using red brick. At the end the roof is installed.
Do-it-yourself storage in the country
Before proceeding with the construction of a cellar, it is necessary to prepare in advance all the necessary drawings, draw up at least a preliminary work plan and calculate the amount of building materials. During planning, it is important to consider that the finished storage must meet the following requirements:
- The room must have good ventilation;
- It is important to keep the inside cool;
- In the underground part there should be autonomous system electricity;
- It is necessary to take measures to protect preparations and vegetables from mice;
- The temperature regime in the basement should not be too harsh.

Reconstruction of a cellar at the dacha
The first step is to remove everything from the underground covering, after which you can move on to cleaning the deciduous and earthen layers, followed by disassembling the knurling. It would be more correct if listed works start swiping from the edge to the center!
The next step is to disassemble old masonry walls with beams.

Foundation arrangement . For this purpose, a pit is dug in which the formwork is created. In order to remain relatively warm inside the cellar, the thickness of the walls should be at least one brick thick. In our case, the height of the foundation reached 150 millimeters.
Before pouring the concrete mixture, reinforcement with a diameter of 16 millimeters is laid in the formwork in 3 rows. Each row of reinforcement is welded together using metal strips. Only after this can the structure be filled with cement. The formwork is dismantled after a few days.

You can avoid problems if you weld a figure-eight rod to the reinforcement in advance, even at the stage of installing the foundation!
Klaky brick walls . The first or, as it is also called, the zero row of bricks is laid directly on top of the concrete surface of the foundation with a poke. In the center above it there is a strip of steel metal, on which the embedded parts are fixed. Thanks to this solution, reliable and high-quality grounding is achieved.
All subsequent rows are laid in half a brick, while steel strips should be placed after each row. This will provide the basement walls with greater strength. There is no need to connect the strips together!
When building basement walls with your own hands, it is important to ensure that during construction there are no voids or gaps between the materials. Otherwise, rodents may enter the cellar through them in the future.
When the height of one meter is reached when laying the walls, you can proceed to arranging fresh ventilation; in our case, sewer pipes were used for this.

Organize waterproofing of walls basement possible through sheets of roofing felt.
Creating a slab and top trim . Only after laying 21 rows of bricks can the upper part be tied using metal elements. To do this, a sheet of roofing material is laid on top of the last layer of brick, which is then covered with earth. In our example, two profiles from I-beam No. 12 were used for strapping, which was sawn in the middle. A section of rail was used as a beam.


The next step is to carefully secure the ladder!
Pouring 100mm reinforced concrete floor begins with the construction of formwork and installation of reinforcement. Afterwards the structure is filled with concrete.

In conclusion construction work in the cellar, a screed made of the finest crushed stone is filled with cement, the floor is insulated using a 5-centimeter layer of polystyrene foam, and a hatch is placed.
Electrical supply and finishing work are being carried out, during which it will be enough to simply whitewash the surfaces of the walls.
When conducting finishing works Don't forget to place the canopy over the ventilation pipes!
The difference between a basement and a cellar
In most cases, the basement is arranged as an underground room inside the house. As a rule, it is used as a place to place garden equipment, less often as a workshop, etc. The cellar is built mainly for storing vegetables and products. In addition, the cellar is often constructed as a separate room located outside the building.
How to convert a basement into a cellar with your own hands?
If there is a basement inside your country house, then if necessary, you can easily convert it into a cellar with your own hands - you just need to place racks inside for storing vegetables, and also install a wooden partition to divide the basement space. At the same time, the cellar will require a ladder, fans and lighting.

The stairs leading to the basement should remain comfortable and without steep steps!
If in winter the temperature in the basement dropped below zero, then additional wall insulation. Before this, it makes sense to apply slaked lime or an antifungal composition to the surfaces of the walls. Foam plastic, glass insulation or rolled roofing felt will work as a thermal insulation material. The insulation itself is covered fiberboard sheets or plywood.
In addition to walls, a basement may need in floor insulation, which is realized through polyethylene film and timber laid on top. If necessary, you can fill the floor with bitumen, create a 5-6 cm flooring of sawdust, covered with wood on top.

How to build a cellar in a country house?
An ordinary cellar is made in the form of a simple pit with concrete walls, on top of which the roof is placed. It is recommended to build such a structure on a high place so that during periods of abundant water, groundwater does not reach the underground room.
Work order
- Preparation of drawings. In our case, the depth of the basement will be 1.0-1.2 meters, dimensions - 1.5-2.0 meters.
- Digging a pit in the case of a separately located cellar.
- The bottom of the pit is filled with a 5-7 cm layer of crushed stone or pebbles, a steel mesh and formwork are installed, after which cement is poured.
- After the concrete has hardened, you can proceed to laying brick walls.
- Along the perimeter of the basement, on top of the walls, 50 by 50 millimeter bars are laid. A hatch is installed, insulated with ordinary polystyrene foam.

Types of ready-made solutions
Barrel cellar
To create such a solution, high-quality fiberglass is used. The cellar in the form of a barrel is an absolutely sealed structure, and therefore it can be placed in any place and soil. The operational period of the finished product reaches 50 years. Design features provide a constant internal temperature, which allows you to store vegetables and food inside without any danger. To place it on your own site, you just need to dig a hole, place a cellar inside and fill the barrel back.

Ready-made models
Similar to the previous model, many conventional ready-made cellars are designed to last 50 years. As a rule, they are made from seamless plastic. Along with them, the set usually contains: forced ventilation, steel staircase, extractor hood, built-in light source, etc. To install such a product with your own hands, you just need to dig a pit of the required dimensions, place the device inside and fill the structure back so that only a rectangular hatch is visible above the ground.

Cellar in the form of a capsule
If you don’t have time to build a cellar with your own hands, you can purchase a ready-made structure in the form of a capsule in the store. From the outside, such a product resembles a ball with a ladder. To install the product, similar to other models, it is enough to dig a hole, place a container inside and fill the voids with earth. Only the door inside will be visible above the ground.


We will send the material to you by e-mail
In the territory suburban area It wouldn’t hurt to build a cool room for storing pickles, fruits, vegetables and other food products. In this regard, it is worth considering how to make a cellar in the country with your own hands. By completing all the steps step by step, you can create reliable and durable storage.
Even the small design allows you to store a lot of food
The cellar is usually located in a separate place on the street or under a residential building. Its main purpose is to store food supplies. Due to the device, shelves and other devices, it is possible to increase the functionality of the room.
Classification of cellars by depth level:
- underground structures are installed in dry places;
- semi-underground structures are erected in damp places with average groundwater levels;
- above-ground buildings are made when groundwater is too close.

Note! In an area with too high humidity, a special cushion made of sand and gravel mixture. It will separate the structure from groundwater.
The construction of a cellar does not require obtaining any permits supervisory authorities, however, the developer must in any case decide on its location, taking into account some nuances. You should choose a site that is as dry as possible, away from trees.

DIY cellar at the dacha step by step: basic work
After selection suitable place for the country storage, you can begin basic work. The listed stages are relevant for underground and semi-buried structures. As for above-ground structures, they have a slightly different construction technology.

Pit preparation
When digging a pit, the following points must be taken into account without fail:
- the depth of the pit is determined by the design of the building;
- the area of the dug pit should be somewhat larger, since a certain part of the space will be occupied by walls and floor;
- You can avoid shedding of earth from the side walls by installing formwork;
- the removed soil should be left for embankment and design of the structure.

Important! Making a cellar with your own hands under the house deserves special attention. In this case, the need for laying floors is completely eliminated, since this function is successfully performed by the floors of the first floor.
Base structure in the form of a floor
Most suitable option is to fill the lower plane with concrete mortar. To do this, all debris is removed from the pit. The surface is leveled and compacted, after which it is covered with a 15-20 cm layer of sand. waterproofing membrane and reinforcing mesh, then concrete is poured.

Thus, when asking the question of which floor in the cellar is best to install, first of all you should pay attention to the concrete base.
Construction of the walls of the structure
The side parts of the structure must withstand soil pressure. Mainly used in their construction are:
- concrete mixture;
- building blocks;
- brick;
- wood.

Laying floors
The first version of the floors - wooden beams. Load-bearing elements they are laid with edges on opposite walls, after which they are sheathed with boards. A waterproofing membrane is spread on top. The second option is to use ready-made reinforced concrete slabs. They are durable, which is why they are popular. They are laid on the end parts of the walls, after which they are covered with earth.

Creating high-quality ventilation
Constant air exchange will make it possible to avoid the appearance of mold and rot in the room, and will also allow you to maintain optimal temperature conditions. For ventilation, two pipes must be installed. One of them will be a supply, and the other will be an exhaust.

For ventilation, plastic pipes of medium diameter are suitable. However, their sizes depend on the volume of the room. Supply elements usually located on one side, 20 cm from the floor, and exhaust ones on the other, 30-40 cm from the ceiling.

Problem with high groundwater levels: do-it-yourself cellar
A certain category of developers may have the following dilemma: if groundwater is close, how to make a cellar? It’s worth mentioning right away that this is quite possible. To do this, first of all you need to do ring drainage site where construction is planned.

Perforated elements are located below the depth of the soil along the perimeter of the pit. Their slope should be approximately 2 cm per linear meter towards the well or sewage pit. Pipes should be covered with crushed stone and wrapped with geotextile.

If the floor and walls are made of reinforced concrete, then high-quality waterproofing should be done from the inside and outside.

A large plastic container can be used as a sealed room. It is completely buried in the ground. By building a plastic cellar at your dacha with your own hands step by step, you can avoid mistakes associated with waterproofing the structure.

Related article:
Work after building a cellar with your own hands: photos + additional recommendations
Ensuring unhindered ascent and descent is carried out using. Its width should not be less than 40 cm, otherwise moving can be very difficult. It is allowed to make a slope of up to 75 degrees. The material can be wood, metal or concrete.

To store supplies, it is necessary to build special shelves or racks. Typically, 100x100 timber is used for their manufacture. The height of the structure depends on the height of the room itself.

Owners are showing increasing interest in building cellars, in particular above-ground ones. summer cottages And country houses. When a city dweller hears the word “cellar,” he certainly imagines a deep hole in the ground. While in rural areas it is not at all uncommon to find exactly above ground cellar- an excellent alternative to traditional underground storage.
Such a structure is distinguished not only by its large capacity, but also by an optimal microclimate, which allows you to keep food fresh for several months. Yes, and building it with your own hands is quite simple. The cost of construction is also quite low compared to the underground option.
An above-ground or above-ground cellar can be built on any site, including one with a high groundwater level. At the same time, the cellar, like any other outbuilding, can be beautifully decorated, and thereby make your site even more attractive. But first things first.
Choosing a site on the site
The durability of an above-ground cellar and the safety of the products in it depend precisely on the correctly chosen location of the building. Construction should be carried out in a dry (preferably elevated) place so that the groundwater level is 50-60 cm below the bottom of the storage facility.
It is better to choose a place for construction on a hillock.
If the water is very close, you should first create a cushion of sand and gravel under the bottom of the storage. It's also easy to do it yourself. Due to drainage, it will be possible to avoid water leakage into the room.
Well, now it’s time to decide on the type of this very storage.
Features of above-ground storage facilities
The main difference between cellars from each other lies in a single indicator - location relative to the soil level. An above-ground cellar is constructed entirely on the surface, in contrast to underground ones, which are buried half or completely into the ground.
Ground cellars are:
- Free-standing, that is, erected as an autonomous structure.
- Wall-mounted. In this case, one of the walls of the cellar is the wall of an existing building: a barn house, etc. An above-ground wall cellar will not be dissonant with the surrounding landscape.
Despite the external differences, both construction options have undeniable advantages:
- They occupy a small area of the site.
- They completely eliminate flooding.
- Excellent functionality at any time of the year with absolute energy independence.
- Ease of use due to relatively large sizes cellars, unlike conventional household refrigerators.
But, of course, as in any other structure, you can notice some disadvantages here:
There are three main types of above-ground storage structures.
Regular storage shed with embankment
This is the simplest structure. It looks more like a hut, and boards or logs are used to build it. Moreover, it is not at all necessary to buy new ones, because on each site there will be previously used building materials.
Scheme of construction of a vegetable storehouse.
To build such a cellar with your own hands, you only need to perform a few operations:
- Sanded logs with a diameter of no more than 25 cm should be covered with bitumen or burned to a height of 50-60 cm, which will double their service life.
- Along the perimeter of the future building, dig the blanks with the processed edge into the ground. Tie the upper ends tightly together using long poles. Thus, a complete structure is obtained.
- Make a sheathing from a “slab” and a roof from boards.
- Cover the structure with roofing felt, that is, create the necessary waterproofing.
- Arrange thermal insulation: sew up the end side in 2 rows of boards and lay a layer of roofing material between them.
- Cover (dike) with peat soil, which retains heat well. Sow any low-growing or trailing plants.
- On the north side, make an entrance with an insulated door and a canopy over it.
- Dig a not very deep ditch along the entire perimeter of the constructed cellar to create protection from the ingress of water.
- Arrange ventilation: the hood will be a wooden box equipped with a control valve and a pair of pipes: an exhaust pipe (under the ceiling) and a flow pipe, located 50 cm above the floor level.
This is what a storage shed might look like from the outside.
The optimal dimensions of the storage shed are 4x8 meters. Its service life is about 10 years.
Important! The edges of the roof should hang almost to the ground. Thus, the constructed cellar should externally imitate a hut. And the snow that falls in winter will act as a natural insulation.
There is also a collapsible storehouse model - for those who do not want to clean out their vegetable storage every year. As a rule, it is erected in early autumn and dismantled in the spring. However, after this the soil should be dug up to the depth of a spade bayonet and treated with a 5% solution copper sulfate. That is, disinfect the soil. The service life of such a cellar can also reach 10-12 years.
Cellar without embankment
A cellar built entirely above ground level, like a conventional outbuilding.
It is quite simple to build such a storage facility with your own hands, having some construction skills. You just need to follow the sequence of work:
- Make markings for the future above-ground cellar and remove the turf. Dig a hole no more than 50-60 cm deep, and collect the earth in a pile (you will need it later). Then, level and thoroughly compact the prepared area.
- Arrange a drainage pad of expanded clay, fine gravel or coarse sand, that is, equip the cellar with the necessary waterproofing.
- Create reliable protection from rodents: place a layer of 10-12 cm of well-soaked and kneaded clay on the prepared pillow.
- Lay (drown) red bricks flat into it. Moreover, the gap between them should be minimal.
- Lay out the side walls with bricks (place them on edge). The binding solution is a mixture of sand, clay and lime. In this case, the masonry should rise above the ground level by the bayonet of a shovel.
- Make the ceiling and walls: to build an above-ground cellar you will need fairly thick boards (forty or fifty gauge). They should be sewn in 2 rows, laying each thermal insulation material(expanded clay, polystyrene foam, moss, etc.).
- Sheathing the finished walls with roofing felt will help avoid unwanted drafts in the vegetable storage area.
- On one of the end sides of the above-ground cellar you built with your own hands, build a manhole with internal and external doors. When severe cold occurs, insulation must be laid between them. It is also necessary to build a small vestibule to promote more reliable thermal insulation of the storage facility. Install a ventilation pipe on the same side.
- Build a roof: it can be single or gable. The material for it will be any roofing material: slate or roofing felt.
- Dig along the perimeter of a self-built above-ground cellar drainage ditch up to 50 cm deep and equip a blind area (1 m wide) with a slight slope from the storage. This will protect it from flooding.
Ground wall cellar
A good solution that saves land area is to build a cellar near load-bearing wall Houses. Moreover, with minimal material costs (subject to doing the work yourself).
Scheme of construction of a wall storage facility.
The work order is as follows:
- Mark the perimeter of the future building (its size is selected individually).
- Lay out the walls of the storage facility: the material can be burnt brick or monolithic concrete; The masonry is done in 1 brick using sand-cement mortar in a 3x1 ratio. Internal and external walls must be thoroughly plastered with cement mortar.
- Apply 2 layers of bitumen grease outside the cellar, that is, create reliable waterproofing.
- To make the floor - thoroughly level the earthen surface, clean it and make a concrete base no more than 20 cm thick.
- After the concrete has completely hardened (after 7-10 days), pour cement-sand mortar 5-6 cm thick, that is, to finally create a floor in the cellar. At the same time, in order to avoid the occurrence of unnecessary stresses in the building, all concrete works should be done in one day. This way the mass will harden evenly over the entire area.
- Build a multi-layer roof using slab, clay and 2 layers of roofing felt.
- Fill it with dry (preferably fertile) soil and sow it with low-growing perennials.
- Along the entire perimeter of a self-built above-ground cellar, make a blind area with a slight slope away from the building and dig a shallow (20-25 cm) groove to drain rain or melt water.
- Equip with shelves and all kinds of necessary containers for storing vegetables and home canning.
Important! You should not neglect any of the systems (waterproofing, ventilation, insulation, drainage), since they are all equally important, interconnected and support each other.
Any outbuilding can be beautifully decorated.
It should be remembered that best time for the construction of a cellar, this is summer, when the level of groundwater (underground) water is lowest.
Thus, an above-ground cellar built according to all the rules with your own hands will bring only benefit and satisfaction to its owners for many years.
Since ancient times, people have used cellars (basements, underground, etc.) for long-term storage of food. IN modern world they have not lost their relevance.
But when the need arises, the question arises: how to make a cellar with your own hands?

Types of cellars
Nowadays, there are a large number of types of cellars. Their types are distinguished mainly by the type of construction material, depth level and location.
So there are:
- earthen cellars, brick cellars, stone, wooden, concrete and metal cellars;
- by level above the ground: ground, buried cellars, semi-buried, bulk and on a slope;
- balcony basement, cellar in the house, under the terrace, basement under the garage or kitchen, or free-standing storage.
But all these types of storage facilities can most often be built only on summer cottage. That’s why photos of cellars in dachas are so common – as an example of their use.

Some people may be confused by the idea of a balcony cellar, but this is the only opportunity for those who do not have their own plot to store large quantities of food cheaply.

The essence of such a repository is wooden box with a tight lid, lined with a heat insulator. To ensure that it has the same temperature, an incandescent lamp is used, which is turned on by a relay and a contact thermometer.

An underground space under a building is erected during the construction of the main structure. This is the cheapest and highest quality option for this type of cellar. Its walls are the foundation of the building, and the ceiling is the ceiling of the basement floor.

According to the construction method, the cellar under the building is built like an ordinary basement.

However, it happens that for various reasons the storage facility needs to be built separately. It is these types of cellars that we will dwell in more detail.

Where to build
Choosing the location of the future cellar is very important. It depends on the number of people in the family (than more people, the larger the cellar), on the groundwater level (if the glacier is in water, it is unlikely that anything will be preserved), on accessibility (the more convenient the approach to it, the better).

To answer the question of how to build a storage facility, the most the best option for a family of 4-5 people there will be a room 2 by 2 meters, up to 3 meters deep, located at the highest point of the site.
Under such conditions, a cellar at the dacha can be built slowly and efficiently so that it lasts for many years.

How to build
There are exactly 2 ways to build a cellar: pit and sink. With the lowering option, the basement box is built on the surface and only then is gradually buried into the ground, removing the soil.

The pit method is the most common. In this case, first a pit is created to fit the dimensions of the future cellar with an increased tolerance of half a meter, and the cellar is assembled in it.

Work in the pit
Having chosen the pit option and dug the pit itself, the problem arises - how to build the cellar next?

To do this, you need to do the following:
Note!


- prepare the base;
- build walls;
- plaster them;
- make waterproofing;
- perform interior finishing;
- build a ceiling;
- arrange ventilation.

Base structure
The base is prepared by leveling the bottom of the pit. Then it is covered with crushed stone, sand and broken brick a layer of at least 20 cm. The resulting layer must be filled with heated bitumen.
It is necessary to lay reinforcement with a diameter of 6 mm on top and fill concrete mortar. The thickness of the resulting layer should be 10-15 centimeters. Then, when the concrete hardens, a box is laid on the base.

Wall installation
The walls are made of bricks. Its thickness is 1 brick.

To make the masonry strong, it is necessary to use wire with a diameter of 4 mm at intervals of 4 rows. Its use in corners is especially important.

Plastering
The walls are plastered on both sides (outside and inside). In order for the plaster solution to stick better, laying the wall needs to be empty.
Note!


After plastering, you need to wait a month until the solution dries. This period is most desirable for the further strength of the plaster.

Creating waterproofing
To protect the cellar from moisture, you need to cover the walls hot mastic made of bitumen and glue 2-3 layers of roofing material. Ruberoid is laid overlapping, the first layer is vertical, and the second is horizontal.

When reaching the base, it is necessary that sheets of roofing material be placed on it and carefully glued. Having carried out this work, the space between the wall of the pit and the box can be filled up.

Cellar interior decoration
After all the work has been done, it’s time to start working on the internal contents of the underground. Everyone decides for themselves - you can whitewash the walls, or you can cover them with tiles.
It is advisable to cover the bottom with roofing felt bonded with bitumen, and lay tiles on top.

Note!

Cellar cover
The resulting box can be covered with either a concrete slab or wood (timber, log, board).

The type of overlap depends entirely on financial capabilities and availability of material.

Ventilation installation
Ventilation in the cellar - important element its normal performance. To create ventilation, 2 pipes are used (exhaust and air intake). One of them is placed at floor level, and the other is closer to the ceiling.

The diameter of the pipes depends on the volume of the cellar; it must allow air to circulate.
The material of the pipes can be different (metal, plastic, asbestos cement). For the winter, the pipes must be covered with burlap both outside and inside.

If your cellar is a separate building and there are no other rooms above it, it is advisable to build a cellar - a roof that performs protective and design functions. It will protect the cellar from precipitation and can be harmoniously integrated into the landscape of the site.
DIY cellar photo


