There are many options for landscaping the territory, but the most popular solution is paving slabs in the courtyard of a private house; photos of various options are widely presented in the literature and on thematic websites.
Exists large selection paving slabs, which differ in size and color. In order to choose the right one for arranging the yard of a private house, you must first understand the existing assortment and know the advantages and disadvantages of each type of tile.

For installation in the courtyard of a private house, you can use various. Their main difference is not in the shape, pattern or size, but in the manufacturing method. Paving slabs can be sold in several ways, each of which has a number of advantages and disadvantages.
Vibrocast
It is made using the vibration casting method, this is the most affordable and cheap option. The prepared solution is poured into the mold, which is located on. During its operation, the solution gradually hardens and compacts, after which the products are placed in a drying chamber.
The manufacturing process is simple and does not take much time, so the tiles have a low cost. To give a specific color, pigment is added to the solution.

Vibro-cast paving slabs
Advantages of vibrocast tiles:
- You can get any color, different dyes are used for this;
- the front side is glossy;
- quickly manufactured;
- low cost.
Flaws:
- relatively low strength;
- does not like temperature changes;
- the service life is shorter than the same tile, but made in a different way.

Vibro-cast paving slabs in the yard
For arranging paths in a private yard, vibro-cast tiles are the best option.
To check the quality of the tiles, you need to hit two products together. A ringing sound will indicate good quality material.
Vibropressed
This method makes it possible to obtain more durable tiles, since the forms, after filling them with mortar, are sent under a vibropress. The tiles are compacted due to vibration and this process allows us to obtain a good quality material.
The main advantages of vibropressed paving slabs:
- increased strength;
- you can automate its production;
- high frost resistance;
- long service life.

Vibropressed paving slabs
Its disadvantages are that there is a limited choice of shapes and colors, as well as a higher cost.
Vibro-cast tiles can withstand the weight of a car, so they are laid both in the courtyard of a private house and on the entrances to it. The fact that low quality tiles will be very bright color, since the production technology does not allow obtaining catchy shades.
Polymer sand
Its difference is not only in the manufacturing method, but also in the materials used, this is the most modern solution. The composition of such tiles includes only sand and a polymer binder, there is no cement.
First, the sand is sifted, then calcined and mixed with polyethylene. Then the resulting mixture is heated at 250 degrees, poured into prepared molds and sent to the press. The use of dyes allows you to obtain any color.

Tile design example local area
Advantages:
- high strength;
- does not absorb moisture;
- not afraid of frost;
- has low weight;
- wide choice of shapes and colors;
- long service life.
Among the disadvantages, it is noted that in hot weather the material expands, so it is imperative to make gaps of at least 3 mm.
There is a large selection of paving slab patterns, so you can always choose the option you like:
- paving stones - outwardly it resembles an old pavement;
- gzhelka - consists of a large main element around which 4 small ones are located;
- classic tile – has 4 segments, each of which has stripes;
- cloud – convex texture, so the product is rough and matte;
- clover – has unusual shape, it is easy to install;
- flower;
- kaso - allows you to get a drawing in gothic style, for this, each element is cut at an angle;
- maple leaf;
- smooth;
- parquet - the presence of a ribbed surface allows you to move comfortably in winter;
- wave;
- spool - looks like a bobbin for thread;
- cobweb and others.
If the color of the tile on the back side has a yellow tint, then this indicates its low quality, since sand and clay were used.
Installation options in the courtyard of a private house
Let's take a look in the yard. The presence of a wide selection of paving slabs on the modern construction market allows you to create a variety of patterns in your yard. The easiest way is to arrange elements of one or two colors, but when creating a pattern, you will have to work hard. To lay out the tiles in the form of a pattern, first make a sketch on paper. There are many and you can choose the one you like.
Christmas tree
This is a popular installation option, it is not difficult to perform, so even a beginner can handle it home handyman. The elements are rectangular in shape, they can be one or two colors. To create this pattern, the tiles are laid at an angle of 45 or 90 degrees.

Herringbone Layout Example
Chaotic drawing
It is also simple and affordable way styling, which will not be difficult to cope with. You will need tiles different sizes and colors, there is no need to adhere to strict lines, the elements are arranged scattered.
This allows you to get an individual and unique solution that will always look stylish and beautiful.

Chaotic styling is an interesting solution
Chess pattern
This is one of classic options, here the tiles are laid in a checkerboard pattern. It is easier to work with square elements, and they should be in contrasting colors. This pattern never gets boring and always looks original.
Volume solutions
If your imagination is well developed, then you can implement this installation option. There is a play of color and different ways styling, which allows you to create volumetric solutions.

Beautiful combination different shades tiles
Circular pattern
This installation will take a lot of time; you must first make markings for it, otherwise it will not be possible to complete the installation in a circle. This option always looks unusual and dynamic.
Other options
Except classical methods laying paving slabs, there are many other options that allow you to work with elements of different sizes and shapes. You can create a variety of ornaments, combine installation methods, which allows you to make the courtyard of a private house unique and original.
It doesn’t matter which method of installing paving slabs is chosen, the main thing is to follow the laying technology, then the result will not only be beautiful, but also practical and durable.
Laying features
After selecting the tiles and preparing the base, you can proceed to laying them. There are some features of performing these works, the observance of which will allow you to correctly implement the laying of paving slabs:
- in order not to damage the prepared surface, it is recommended to install the elements independently;
- laying is done diagonally;
- the gap between adjacent elements should be 1-2 mm;
- in order for the tiles to fall into place, use a wooden mallet;
- if the element lies below the required level, it is removed and sand is added;
- if necessary, cut some fragments, do this after laying all the whole tiles;
- a grinder with a diamond blade is used for cutting;
- installing a border allows you to give the area correct form and perfect appearance;
- after installation is completed, the surface is sprinkled with a dry mixture of sand and cement, and the seams are evenly filled with it;
- using a sprayer, pour the laid tiles;
- use finished coating possible after 2 days, this time is necessary for the cement to harden in the seams.
If the private yard area is small, then it is better to use tiles small size, this will visually increase the space. In large areas, it is better to use compositions of large elements.
Photos, installation examples
There is a large selection of styles and types for laying paving slabs in the courtyard of a private house. Each owner can already use ready-made options or come up with your own by combining the described types.
Combination of tiles different shapes and colors allows you to create original patterns that can be implemented in a multi-color, two-tone or monotone solution.

Option for laying paving slabs with a pattern

Tile combination example various types and different colors

Bright color accents
Each person, having basic skills to perform construction work and desire, can lay it in your yard paving slabs. To do this, you just need to follow the recommendations of specialists and adhere to the developed technology.
Video on the topic
Paving the yard of a private house is not just a practical necessity. If you approach this task with a certain amount of imagination and skill, you can create real masterpieces from paving stones that will decorate the site and be the subject of admiration and envy of friends and acquaintances.
The main stages of paving with tiles
Paving slabs are a strong and durable material that comes in a wide range of colors and various shapes. There are several dozen options for laying paving stones, each of which will be a worthy addition to the country landscape.
To work, the master will need the following tools:
- cord for marking and pegs;
- rake, broom, tamper;
- rubber hammer, wooden mallet;
- building level, channel;
- watering hose.
Materials for work:
- crushed stone or gravel mixture;
- sand;
- cement or dry plaster;
- geotextiles;
- paving slabs.
Stage 1: preparation
In the area selected for laying paving stones, you need to remove top layer earth with grass and roots. If for some reason this is not possible, an embankment of crushed stone and sand is made on the soil. Curbs are installed along the edges of the embankment.

Advice! It is better to lay a geotextile fabric between the materials, otherwise the sand will spill through the crushed stone fractions.
The base for laying the tiles is filled with sand (a layer of at least 8-10 centimeters) and carefully compacted. Experts recommend pouring water over the sand from a hose with a sprayer. Such sand cushion will relieve paving stones from problems with stagnant water after rain.

Advice! For more reliable fastening paving slabs, you can add a fifth of cement or plaster to the sand. In this case, there is no need to water the pillow.
The prepared base is leveled with a rake. You can use a channel for leveling. Profiles or pipes are used as guides.
Stage 2: paving
Before laying the first element of paving stones, it is important to have a drawing of the future installation or diagram before your eyes.
During the work process, paving slabs are laid in the direction “away from you”, diagonally. Each element is tightly adjusted to the previous ones using a mallet.

Comment! It is enough to leave the seam between the styling elements within 1-2 millimeters.
After the paving is completed, the surface is leveled with a rubber hammer, and the result is checked with a building level. The finished paving stones are covered with a cement-sand mixture. The excess mixture is swept away.

After laying, the area is watered abundantly. Water will penetrate the seams between the paving elements and provide strong adhesion between the cement-sand mixture and the tile material.
Stage 3: care
Paving slabs - reliable and durable material, but it also requires care. Periodically you need to sweep away dust and debris and clean out clods of dirt. It is better to wash the colored paving stones from time to time, so it will retain its brightness longer. Fallen and loose elements are laid in a new way
Important! Cannot be used to clean tiles from ice and snow. metal objects(shovels, crowbar) and use salt or chemicals. It is better to use regular sand.
How to choose a paving pattern
The selection of tile laying scheme depends on many factors:
- size and shape of the site and paths;
- landscape features of the site;
- purpose of the paved area;
- architectural features of buildings.
It is worth considering that the service life of paving slabs is very long (up to 40-50 years). Therefore, it is important to take a balanced approach to choosing a paving pattern.

Important! Areas covered with paving stones are used for recreation or parking. In the latter case, you need to choose a material that can withstand heavy loads.
Most often, classic rectangular paving slabs are used. Alternating two and more colors, laying paving elements in a certain sequence allows you to create original patterns.
Laying figured tiles is more difficult, but with its help you can achieve excellent results.

Paving options
Brick or spoon
The simplest installation pattern, allowing for economical use of material. Alternating tiles of different colors will give this coating original look. In the photo, a contrasting color border is used to decorate the paving stone path.

Braids and Christmas trees
This type of installation is one of the most common. Herringbone elements are placed at 45 degrees or at right angles. This type of paving is highly durable, which is why it is often used when laying driveways. Interestingly, the paving method at 45 degrees makes the site visually smaller, and 90 degrees makes it wider.

To imitate weaving, the transverse and longitudinal directions of paving alternate, as in this photo:

Random order
For this paving option, elements of different sizes and colors are used. Laying is carried out in any order, which allows you to achieve an interesting result.
The only thing that is required from the master is the presence abstract thinking and an artistic view of the future landscape. This installation goes well with other paving options, as in the photo:

Chess
Tiles laid out in a checkerboard pattern look impressive and neat. Symmetrical square elements of paving stones fit organically into the design of strictly shaped areas and paths.

Used for paving in the photo square tiles different colors with textured surface.
Diamonds
There are several dozen options for diamond paving. This installation perfectly combines different colors of tiles. The combination of gray, burgundy and white is considered classic. On a large area of diamonds you can make a star, as in this photo:

For such paving, it is important to prepare a schematic drawing and carefully mark the surface. In addition, with this styling you can achieve a 3D effect, as in this photo:

Circular patterns
Radial patterns using tiles of different colors and shapes look great from above on areas of any size. In this installation option, the author can give free rein to his imagination and achieve very unusual results, as in these photos:


Curly templates
Lay paving slabs on curly template not easy - in this matter it is important to observe the specifics color range and the direction of each element. Such paved areas will add zest to any landscape. The shape can be very diverse: stars, leaves and flowers, images of animals and even people. For inspiration, you can use children's drawings or works of artists. For special effects when laying, textured paving slabs are used. Such work will require careful preparation, sketching and detailed markings. Modern designers use special computer programs to create such platforms. The photo shows options for similar drawings:

Natural stone paving
Textured paving slabs imitating stone will look organic and natural on garden paths and lawns. Its installation occurs in random order. In paving, you can combine these elements with pebbles or wood. This simple technique will help you achieve excellent results without special effort. Imitation of stone is especially appropriate if the facade of the house is decorated with a similar material, as in this photo.
The courtyard of a private house is a place that is assigned a lot of tasks. Family meetings can be held here for lunch or dinner, and this is not to mention the constant movement of all household members. On the other hand, the local area must meet general principles and be in harmony with the surrounding buildings. Therefore, covering the yard of a private house must not only be strong and durable to withstand all the loads, and also cute to please the eye and . These requirements are met to varying degrees by several materials, which, by the way, can be combined with each other.
No. 1. Paving slabs
Deservedly considered one of the most aesthetically attractive coatings, therefore it is often used to organize the territory of a private house. It contains not only playgrounds, but also paths. Concrete tiles vibration pressing and vibration casting:
- vibropressed tiles– the most durable and great for organization,
- vibration-cast– is quite slightly inferior to it in terms of strength characteristics, but superior in variety of shapes and colors.
Clinker paving stones looks especially attractive, which is why it has found widespread use on European streets and squares. It is made from clay, feldspar and quartz, and in terms of performance it is almost as good as natural stone. For the yard, this is actually the ideal covering. Even more durable is, and polymer-sand has the lowest price, as it is made on the basis of sand and dyes.
The advantages of paving slabs include:
- chic appearance and the ability to create a variety of patterns;
- durability;
- environmental friendliness;
- weather resistance;
- Possibility on uneven surfaces;
- high maintainability, since if something happens, individual damaged elements can be easily replaced;
- , but goes through the seams between the tiles;
- ease of care.
There is also: the relatively high cost of coating and installation time.
No. 2. Asphalt
If tiles seem too expensive an option for decorating the yard of a private house, then the best alternative is. Low price- not the only advantage coverage that is familiar to all of us. Other advantages include:
- high strength, so the car can be parked in the yard without any doubt;
- moisture resistance;
- easy care;
- the opportunity to cover not only the usual gray, but also red or green;
- high laying speed. Specialists will cope with asphalting a fairly large area in one day, but it will take several days to arrange the same area with tiles;
- A high-quality coating will last a long time, and if necessary, it will be available.
TO shortcomings asphalt pavement include a specific smell during the heat, which makes itself felt the first time after installation. Many people find fault with the appearance of asphalt, but this is a purely subjective opinion. Often the disadvantages include the rapid appearance of cracks and the formation of puddles, but these problems arise when the asphalt laying technology is violated. If the work was carried out by professionals using appropriate equipment and materials, cracks will not soon make themselves felt.
Residents of Moscow and the Moscow region can entrust the asphalt paving of their local area to the Asphalt-Quality company: the page http://asfalt-kachestvo.ru provides examples of work, information about their own asphalt concrete plant, and the equipment used. The company's specialists can provide free consultation.

No. 3. Concrete
A worthy alternative to asphalt paving is concreting, especially since you can even handle the arrangement of a small area yourself. A concrete platform can have either the simplest gray surface or be decorated with pebbles, pieces ceramic tiles , glass and other elements. Concrete can be painted in the desired color, made on its surface imitation tile seams or even with your own hands make tiles out of it required shape and size.
The main advantages of concrete pavement:
- relative cheapness;
- high strength;
- resistance to high humidity;
- the opportunity to do the work yourself;
- the ability to fill a site of any shape and decorate it however you like, turning a boring concrete surface into a decoration for the entire area.
TO shortcomings consider the high labor intensity of all work, because you will have to deal with preparing the base and preparing a large amount of concrete - this is not so much difficult as it requires time and physical strength. On monolithic concrete sites, cracks appear relatively quickly. 
No. 4. Natural stone
Natural stone – beautiful, durable but very expensive material. If funds allow, such coverage will become great decoration territory and will emphasize the status of the owner. The benefits also include a variety of colors and textures different breeds, completely environmentally friendly and resistant to precipitation, temperature changes and other negative natural influences.
Among shortcomings heavy, difficult to transport and lay, expensive, but the price range for stone is wide: sandstone and limestone, for example, are not as expensive as granite or marble. In winter, a slippery ice film forms on the surface of the stone, which must be constantly removed mechanically, or use heating of the adjacent area to prevent the formation of ice.

No. 5. Rubber tiles
Having appeared quite recently, it has already won the title of one of the best and most practical coverings for the local area. By the way, it can also be used if there are paths on the site. Coating in progress based on crumb rubber, polyurethane, coloring and modifying additives, is distinguished by a variety of shapes and colors.
Advantages:
- high strength and wear resistance. The tile can easily withstand the load from a car and the fall of heavy objects;
- durability, preservation of aesthetic and operational qualities over a long period;
- moisture resistance, sun rays, high temperatures;
- pleasant shock-absorbing surface that softens falls;
- the rough surface of the tile has an anti-slip effect, so when wet the material is absolutely safe;
- a wide variety of colors and shapes. Rubber tiles can imitate paving slabs and paving stones;
- easy installation and maintenance.
Among cons low fire resistance, so areas with open fire (for example) are better equipped with a different coating.
Rubber tiles can be different thicknesses, from 1 to 4.5 cm. To arrange a yard, the thinnest tiles are quite enough, but for it it is necessary to prepare a base - concrete or asphalt the area. If you don’t want to waste time on preparation, you can use more expensive tiles 4 cm thick - they can be mounted on a loose compacted base, incl. sand, crushed stone and soil. 
No. 6. Lawn covering
On a site outside the city, where you want to take a break from the bustle of the city, asphalt and concrete, it is better to use natural materials, For example, . Such a courtyard will look cozy, and the surface of the area will be in harmony with the plantings and environment However, it is better to take a lawn that is as trampling-resistant as possible, but it is better not to use even that - this is an option for recreation areas and places with the least load.
Among cons lawn coverage requires constant care: fertilizing, pruning, weed control, reseeding in the most trampled places. But walking on the grass will be very pleasant, you can even move barefoot, and children will have a reduced risk of injury if they fall during games. 
No. 7. Bulk coating
Bulk covering in yards is not often installed, since it main drawback – difficulty in care, impossibility of sweeping it up, as well as a tendency to spread beyond the designated boundaries. On the other hand, with the help bulk material You can organize a site of any shape. Bulk paths are made from:

No. 8. Garden parquet
Garden parquet, also called, is far from the most popular covering for the local area of your own plot, but it can still be used. Among the types of decking, the one that is produced solid wood, treated with protective agents or temperature, and the one that is obtained from a mass of sawdust and a polymer binder. The first one is more suitable, but composite decking is a more or less suitable material for arranging a yard. Among his main advantages:
- durability;
- resistance to high humidity and sunlight;
- corrugated anti-slip profile;
- ease of installation;
- quick drying;
- variety of colors and shapes.
Composite decking, of course, is inferior in appearance and environmental friendliness to natural ones, but requires minimal care and is more resistant to negative environmental factors. This coating will cost slightly more than many analogues. 
No. 9. Tennisit
This is a relatively new coating that has not yet become widespread, but in all respects it is excellent for arranging the yard of a private house. Tennisite, as its name suggests, is a coating that is used on tennis courts, it is made on the basis of clay, lime and crumbs ceramic bricks, therefore the color has a corresponding one - shades of terracotta, brown and yellow.
Pros:
- high strength;
- shock-absorbing properties;
- puddles will not form - the coating is capable of absorbing moisture;
- environmental friendliness;
- easy care.
Among cons– impossibility self-installation, because it is necessary to use a vibrating roller. In addition, during the heat, tennisite tends to become dusty and covered with cracks, so it is definitely necessary, but it is not difficult. 
Owners of private houses have gotten used to using even the covers from plastic bottles and other available materials, so the choice of suitable coating with the listed materials is not limited.
There are various options arrangement of a yard in a private house. Some provide aesthetics to the area of the house, others make it functional. The most popular way to decorate a yard is to use paving slabs. This solution is practical and at the same time quite cute.
If you decide to decorate the yard of your home by creating a covering from this material, then this is a completely reasonable decision. However, if this is your first time are you faced with this problem?, then you probably have a question about how to lay paving slabs correctly. In order not to be mistaken with this, you need to familiarize yourself with general principles this matter. This is what this article will discuss.
Material advantages
Nowadays, paving slabs are the most common material for paving sidewalks and laying garden paths, as well as territories of private and country houses. This popularity of this material is mainly due to the advantages it has. The main ones include the following:
- ease of installation. If you use paving slabs to decorate your yard, then you can do all the work yourself, without involving specialists;
- This material is distinguished by a variety of shapes, colors and structures. A person who purchases this material for the first time is faced with the problem of choice, since the range of paving slabs is quite large. However, this has a certain advantage, since you can use this material to implement any design solution, find an option that will be in perfect harmony with the characteristics of the site. At the same time, the owner gets the opportunity to create a unique design that will be practical and at the same time pleasing to the eye;
- protection from moisture. Even with heavy rainfall, puddles do not form on the paving slab surface. Water drains away neatly without changing the appearance of the coating;
- durability. A coating made of this material is able to withstand heavy loads for decades, while maintaining its performance characteristics;
- simplicity repair work. If damage occurs in a particular area while using paving slabs, the owner will not have to replace most of it. All you need to do is replace the damaged elements. This work will not be a big difficulty even for a beginner;
- environmental friendliness. Under the influence high temperatures the asphalt begins to separate harmful substances that negatively affect human health. However, this does not apply to paving slabs, which, regardless of the temperature affecting them, continue to be an environmentally friendly material.
Flaws
However, paving slabs cannot be called an absolutely ideal material, since for it characterized by certain disadvantages. However, we note that they are insignificant.
Before making a choice in favor of tiles, you need to familiarize yourself with all its advantages and disadvantages and then, after carefully weighing everything, make a final decision.
Preparation for installation
There are a number of steps that must be completed before actually laying the tiles. One of them is preparation of the territory for subsequent creation of paving slabs. It involves holding certain events.
Before starting to lay the material, it is necessary to remove the turf from the area on which the covering will be created to a depth of 15 cm. Then the cleared space should be cleaned. Seeds and plant roots should be removed.
If the coverage area is dominated by clay soils, then in this case the device is required drainage system. It is necessary to make a slight slope, due to which water will drain from the coating.
After this it is necessary perform proper compaction using available tools. For example, you can use an ordinary log, which will do the job perfectly.
Then you need to prepare a concrete pad on which curbs or stones will be installed. When the cushion is created, prepared stones are laid out to mark the boundaries of the covering.
Base for paving slabs
Once the surface for laying paving slabs is prepared, you can lay out the material in the yard. And then you need to start preparing the foundation, which will then be material is laid out.
Laying tiles
Laying tiles is quite a difficult task, especially for a beginner. Many people are interested in the question of how to properly lay this material. First you need solve the problem with the drawing, which you want to have on the cover. It must be marked in advance on the prepared area. It is necessary to tighten the cord so that the laying is carried out as evenly as possible. Experts recommend installing tiles diagonally away from you. When laying paving slabs, you need to ensure that the particles of the future coating fit tightly to each other.
Main stages

Installation nuances
Laying paving slabs for many may seem like a simple task. However, everything is not so simple here. Eat certain subtleties, which you should know about. Next, let's look at the most important details.
- Doesn't have of great importance, what paving slabs you decided to lay in your yard. The material almost always does not lay flat. When the job is completed, unwanted waste is left behind—wasted money. Therefore, they should be included in the price so as not to spend too much. The most waste occurs when parallel tile laying is done. It is best to lay the material diagonally. This will save money on materials.
- If you are faced with the task of adjusting the plinth to a certain shape, then you must first cut it with a grinder and then break it off. Cutting tiles to the end is not best solution, since this leads to an increase in the amount of dust that will have to be removed from the surface.
Conclusion
 Many owners of private country houses want to have beautiful yard area. This is quite easy to achieve these days. Thanks to paving slabs, which are a common material, you can easily transform the courtyard of a private house, as well as paths in parks and sidewalks.
To many, laying this material may seem simple process. However, this is not true. There is certain nuances, which you should know about. First, you should get acquainted with the technology of laying a covering made of this material, and only then engage in laying out paving slabs yourself. In this case, you can avoid errors and get beautiful yard, which will delight the eye for many years.
Beautifully and evenly laid paving slabs in the yard are not only an aesthetic exterior of the site. but also the practicality of using garden paths and sidewalks. Despite the simplicity of the installation technology, you need to know it thoroughly, only then high-quality styling tiles will turn into a durable surface. Therefore, let's start with the advantages and disadvantages of this material for paths and sidewalks.
What are the tiles made of?
The products have two working layers: front and main. These layers differ in composition, and a different solution is prepared for each of them. The mold for casting one product is first filled with facial solution, which as a result should have glossy surface, be resistant to abrasion and have a thickness of ≤ 1.5-2 cm. The remaining volume is filled with the main composition - the substrate.
The solution for the front layer is made as follows:
- Portland cement M 500;
- A mixture of sand and crushed stone is prepared in a 1:1 ratio, and the crushed stone should be small (screenings); you can use gravel or granite crushed stone with a grain size of ≤ 5-10 mm;
- Clean process water;
- Dyes;
- Dispersant (a solution that consists of two or more substances that do not mix with each other and do not react with each other). Used to increase the fluidity of the concrete mixture of paving slabs, speed up the hardening process and obtain a glossy surface.

The most widely used dispersant is the NF plasticizer (it contains formaldehyde naphthalene), the substance is produced in two varieties: A and B, you can also use the C-3 plasticizer. Both of these brands give excellent result, but brand B of the NF dispersant is more expensive, since it has a more complex composition.
It is quite simple to prepare the mixture for adding to the tile mortar in the yard: the dry powder needs to be mixed with water heated to 60 0 C, the proportions are 1 part powder and 4 parts hot water. Consumption: 1 liter is poured into 50 kg of Portland cement ready solution dispersant. After preparation, the solution can be allowed to cool before adding it to concrete mixture it is not necessary to heat it up. Dispersant storage time is no more than 5 days. Dispersant powder consumption for cement mass is 0.5-0.7%. When preparing a dispersant, be sure to use personal protection(PPE) to prevent dust from entering the respiratory tract and on the skin.
After preparatory work lay the tiles on construction site so that it has convenient and quick access from all sides. Next, prepare the base surface for laying tiles:
- On the soil without turf, pour 5-7 cm of clean sand or fine crushed stone (screenings). Sand is preferable as it retains moisture better;
- When constructing a garden or sidewalk path in an area with heaving or slightly heaving soil, two or three layers of geotextile material are also laid on the sand, which will improve the quality of waterproofing;
- On top of the geotextile is covered with a layer of gravel or crushed stone of medium grain size - up to 20 mm and a thickness of up to 10-15 cm, no more. After pouring this pillow, it is moistened and compacted, and a layer of sand of the same thickness or slightly less is poured on top (you need to look at the depth of the removed layer of turf - usually 25-30 cm - to the depth of the bayonet of a shovel). The sand is leveled with a rule or a wooden block;
- Instead of pouring sand, you can lay reinforcing tiles to enhance the strength of the future path surface. You can also fill the crushed stone or gravel pad with a concrete solution up to 10 cm thick, so that after it hardens, you can begin laying paving slabs on it.

Despite the fact that the statement that laying paving slabs is a simple matter, for a novice builder it will present some difficulty. Before installation, you must have a laying diagram ready according to the designed drawing or pattern. If the tiles are monochromatic, then the whole process is much simpler. The pattern or design should first be marked on the prepared surface (sand), and the edges of the path should be marked along a stretched cord. If the path has a curvature, it is recommended to prepare patterns (templates) for constructing the angle of turns. The tiles are laid away from themselves, the seams between the products should be minimal, but taking into account the fact that the tiles may differ by 1-2 mm in the size of the sides.
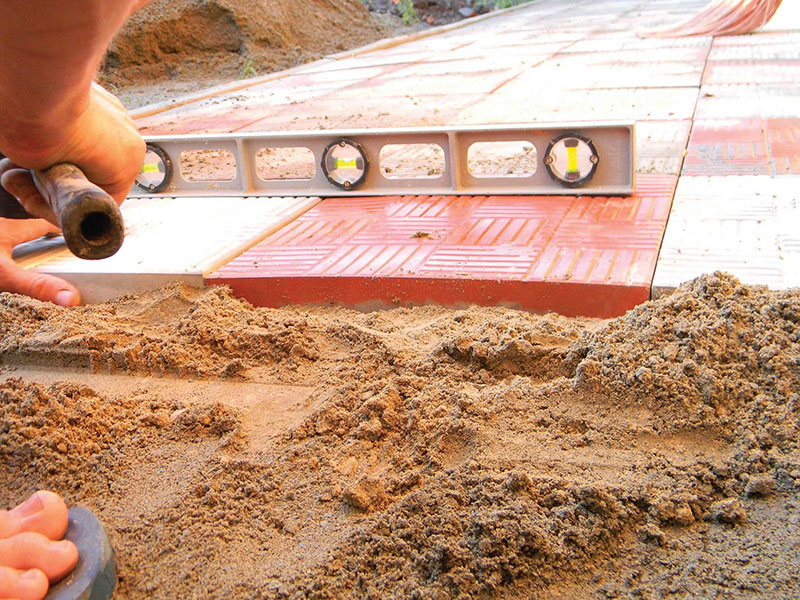
- Constant control is carried out using building level– to level the overall surface, you need to use a rubber or wooden mallet so as not to break the tiles with a metal hammer. If the tile, on the contrary, is sunk into the sand, take it out, pour in a little sand, put it back and drive it in with careful blows to the general level. It is easier to check a large surface for evenness not with a level, but with a wide bar or rule;
- After manually laying tiles over a large area, it is advisable to compact them with an electric vibrating plate;
- A flat surface does not mean horizontal. The general slope of the sidewalk should be observed storm sewer or a drainage system so that water can quickly and freely drain from the path;
- After laying the entire path, it is sprinkled with dry cement - ironclad. Cement, getting into the cracks between the tiles and getting wet during use, ensures a dense and durable seal of the cracks. If rain is not expected in the near future, the tiles sprinkled with cement are forcibly moistened.
Schemes for laying tiles for paths and sidewalks
And finally, about some of the subtleties of laying tiles:
- When drawing up cost estimates, do not forget that there will be waste - scraps, defective products, cut tiles, errors in calculations. Therefore, it is better to play it safe and order or produce more tiles, and also include increased costs in the estimate. There will be more waste if you lay the tiles in parallel, so diagonally it will be much more economical and more beautiful;
- If the tile needs to be cut (and this will have to be done in any case), then it is better to do this by cutting the surface along the seam with a grinder to a depth of 2-3 mm, and then split it light tiles blow of a mallet. It is not recommended to cut the tiles to the full depth, as there will be more dust, and even cut ends will still be hidden in the sand.


