Many people consider decorative plaster for walls to be a beautiful, but very expensive finishing material, but in reality this is not the case. Naturally, there are very expensive types similar material, but today we will tell you only about the most accessible ones that anyone can apply with their own hands.
Structural plaster for walls has several types of texture:
- bark beetle (imitation of spoiled tree bark);
- textured stone-like plasters;
- flock (with silk effect);
- with marble chips;
- Venetian;
- “rain” – imitation of raindrops on glass;
- "rock".
We will talk about the most common types for interior decoration and, what is very important, inexpensive types - rain and rock, which are the easiest to do.
Application of decorative plaster "rock"
Plaster with rock textureThis application method is the simplest and is perfect for beginners. To create a structural surface, we will not buy a special mixture, but use regular finishing putty based on gypsum or cement. Sheetrock putty is best suited for this, since it is sold ready-made and does not need to be mixed by hand. It is better not to take too soft and friable types of such material (for example, Vetonit).
Note! Decorative plaster For the walls of the kitchen, toilet and bath, it is suitable only on a cement base. Here it is imperative to apply a thick layer of water-based protective varnish over the paint. In rooms with high humidity like the bathroom and working surface in the kitchen, make a protective apron from glass, tiles or panels.
- Before doing so, it is important to prime the walls and preferably apply a layer of putty; this will eliminate gaps and improve the quality of the coverage.
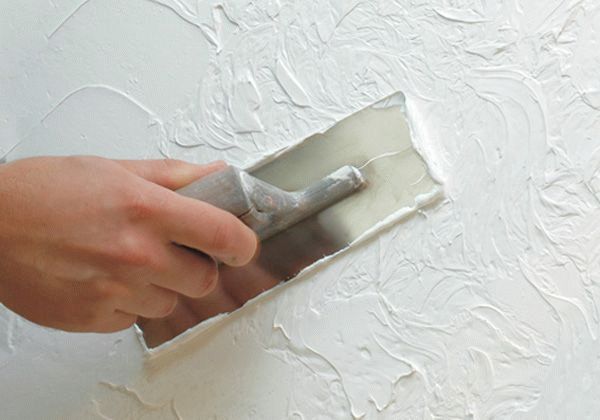
- How to apply putty? We select a small area on the wall, approximately 0.5 square meters. m., and put putty on the trowel. You need to spread it evenly with a layer of 2-3 mm. The thicker the layer, the rougher the texture will be.
- After this, having evenly distributed the solution on the wall, you can begin to create a structural pattern. Clean the float from the material and place it tightly against the wall on fresh putty. This can be done from either side, but you need to slightly lift the bottom edge of the iron and at the same time make a downward movement. If you just put it on the surface, it will stick.
- This will give you texture by creating slight unevenness in the applied mortar. To create a beautiful pattern, movements can be completely different, and this is the uniqueness of decorative plaster. The main thing is that when the trowel comes off the mixture, do it smoothly so that there are no marks left. Try it a couple of times and you will understand how to do it better. You can apply the structure using herringbone, criss-cross, vertical, horizontal, etc. movements. If something doesn't work out, you can make amends and try again.
- It is also important to clean the trowel after each applied area so that excess solution does not spoil the texture.
- After you have completed the first section, proceed to the next one, but do it overlapping the previous one so that there are no gaps.
- After application, you need to wait about a day for the walls to dry completely, and then you can begin further painting, this is described below.
During the process, you may have problems with the trowel sticking, marks from it and, as a result, an uneven pattern. If you can’t achieve the same pattern on the entire wall, then it’s okay - you’re doing an imitation of rocks. The main thing is to avoid sudden changes, otherwise they will be noticeable.
Applying plaster with rain
This finishing method is more complicated than the first, but the result is much more impressive. See the photo for an example of such a wall.
 An example of decorative rain plaster in the kitchen
 Most often, the rain structure is applied at an angle, but this is not important.
- To apply putty at an angle, mark the walls. Draw slanted lines on them approximately the width of 3 strokers. Lines need to be drawn everywhere at the same angle; it will be difficult to do this at the joints.
- Next, apply masking tape to each line so that its bottom edge lies on the line.
- Decorative plaster should be applied with rain, starting from the top corner.
- Apply a 3 mm layer of putty onto a strip with a width equal to the size of the trowel and a length of about 1 m.
 The process of applying and smoothing decorative plaster
 - To create a droplet structure, the trowel is lightly pressed against the plaster and pulled along the line in a slightly raised state. We repeat these steps until we cover the entire strip.
- At first the texture will be more like a hedgehog than like rain. To fix this, you need to smooth the surface. To do this, clean the putty from the smoothing iron, and lightly pressing it onto the solution, smooth it in one direction. It is important to slightly lift one edge of the iron so that it does not stick completely. The weaker you press the tool, the more unevenness will remain. The texture also depends on the thickness of the layer.
- The next strip should be applied with a slight overlap over the finished strip. Repeat the steps described above until we cover the entire width of the strip.
- Since you applied the tape to the width of about three trowels, the last strip will slightly overlap the masking tape. This is necessary specifically so that at this junction the layers creep on top of each other, which significantly improves the final result. appearance. In addition, the tape helps you maintain the desired angle of the design. When you've finished doing one section, simply tear off the tape and continue. You will get an even joint that does not need to be smoothed much.
Advice! If you take on one wall, be sure to finish the job. Because the break will cause a visible difference between the layers, it won't look very nice.
- When the plaster has dried, treat it with an abrasive mesh or sandpaper to remove small irregularities.
 The result of the work is a beautiful wall with a plaster structure
 You can see the method of applying plaster with rain in more detail in the video:
Painting decorative plaster
- Be sure to prime the surface before painting. No primer is needed to apply the second and subsequent layers.
- If you paint structural plaster solid color, then the texture will be lost and the result will not be the most successful. The greatest effect is achieved when painting with two colors to highlight the texture. To do this, you can use the dry brush or wash method. Applying paint with a wash emphasizes the depressions of the relief, and with a dry brush, on the contrary, the protrusions.
- Any method is perfect for rock, since its texture is quite varied, but for rain, only erosion is good.
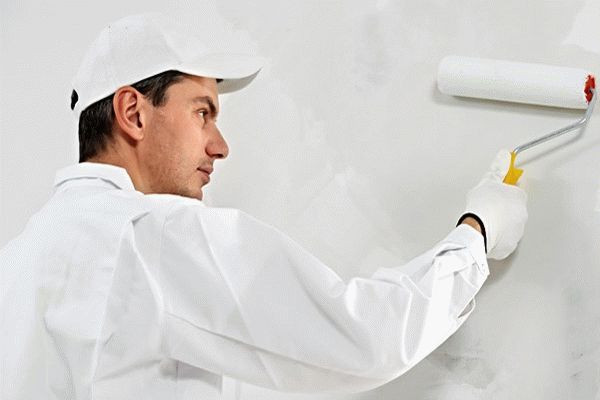
- In any case, you will have to apply the original background color, preferably in several layers. To do this, apply the paint with a long-nap roller. But a layer that is too thick will also look bad, as it can hide the small roughness of the texture you created.
Advice! Please note that the paint consumption will be greater than on regular smooth walls. To paint the background with a wash, it is better to choose a good one waterproof paint, but for a dry brush any will do.
- To highlight the relief with a dry brush, it is better to use light contrasting shades, and to emphasize the wash, on the contrary, darker shades.
Dry brush painting
Let's look at how the dry brush painting technique works. To do this you will need a wide flat brush, a paint bath and pieces of cardboard.
- Pour some paint into the tray and dip your brush into it. Then wipe the tool first on the tray and then on a piece of cardboard to remove any excess.
- Now you can apply paint to the plaster with light movements in different directions. The important point here is that the brush should be held parallel to the wall so that it barely touches its surface, and with chaotic movements, as if wiping off the residue.
The main thing is to avoid sudden color transitions and brush marks. As a result, you should have a wall like in the photo:
 Example of dry brush painting
 Paint wash
Much more difficult than the second one method of applying paint with a wash. Its essence is that you apply another, darker layer of paint to the wall. After some time, you wipe it with a wet cloth, not allowing it to dry completely. As a result, the depressions will appear darker than the bulges.
The technology itself is very simple, but requires a lot of time and physical effort. But if you make a bright spot somewhere, you can paint it over again and wipe it off.
The photo shows an example in which the first background layer of paint was white and the wash layer was yellow.
 Example of a dark paint wash
 To make it easier to wash off the second layer of wash, it is better to use simple, non-moisture resistant paint. As a rule, it costs less, so you can even save a little.
Applying varnish
The final and mandatory stage is coating the paint with varnish. This is done for additional protection and brighter and more saturated color.
- For this purpose, you can use any water-based varnish, for example Alpina or Tikkurila. Be sure to dilute it with water approximately 1:1 so that it penetrates well into the structure.
- Apply varnish with a wide brush in 2 or 3 layers. To avoid smudges on the walls, squeeze the brush against the ribs of the paint bath. Before applying the next layer, you need to wait a little, the varnish dries quickly.
In the photo you can see the result of structural plaster, which was coated with 2 layers of Tikkurila Paneeli Assa varnish. The approximate consumption of varnish is 2.5 liters per 50 square meters. m. plaster with rain.
 Varnished plaster
 As you can see, the result has become much better. Now you can freely wash such a wall with a rag and not be afraid of damaging it. To give the room a finished look, stick ceiling plinth for putty during repairs or after painting.
How much does decorative plaster cost?
- 3 buckets of Sheetrock putty, each costs 1000 rubles. To save money, you can buy a cheaper type and mix the solution yourself with a mixer.
- 10 liters of white Caparol paint – 4500 rubles.
- 2.5 liters of Finncolor ocher paint – 1000 rubles.
- 1 can of Paneeli Assa varnish – 1200 rubles.
Total: 9,700 rubles were spent on decorative plaster of the walls with your own hands, despite the fact that high-quality materials were used, and not the cheapest. It's not that expensive, but it looks very unusual. This is not wallpapering: not every apartment will have such beautiful walls.
Conclusion
As you can see, textured plaster of walls with your own hands allows even a girl to make repairs without much physical effort. The pattern will be unique on the entire surface, and the finish will be unique.
If you follow the technology described above, this coating will serve you for many years, even in busy rooms (like the kitchen and corridor). We've only covered a few ways to create a textured surface, but you can use any means to create a unique design.
Decorating with woven materials comes from ancient times. The walls of ancient rich houses were decorated in this way. Today, a lot has changed thanks to the introduction of modern technologies. Today's wall coverings are fundamentally different from their predecessors.
Do-it-yourself decorative plaster and its application in various variations allows you to create unique masterpieces and adds sophistication to any interior. Don't be afraid to experiment! It is not difficult!
Types of decorative plaster are distinguished by the nature of applying the solution to the surface:
- Texture. The formation of textured patterns is achieved by adding various fragments to the mixture. For example, stone chips, fine and coarse sand, mica and others. As a rule, plastic, rubber or metal spatulas are used for work.
- Relief. This type involves initially giving relief to the composition applied to the walls (unevenness and heterogeneity).
- Smooth surface. Only Venetian “decorative” can be included here. However, with its help, imitations of many surfaces are recreated. The mixture may include malachite, marble or other particles of natural materials. Venetian plaster will allow you to decorate walls with silk, marble, granite, cork, metal or leather. This type of decoration can highlight and decorate any room.
- Structure. Homogeneous compositions are used here. The structure is formed with special tools (graters, rollers) using a variety of techniques. But this type of plaster application requires the master to have both practical skills and artistic talent.

How to apply plaster on walls correctly
Application of various types of decorative plaster accordingly requires careful surface preparation. It will first be necessary to level out any existing defects. As a rule, gypsum, cement-sand and lime mortars are suitable for these purposes.
Next comes 1-2 layers of primer. The product is applied only after the surface has completely dried. Subsequent activities will depend on the working composition, and besides, there are quite a lot of ways to apply “decorative” materials.
Thin single layer coatings
Imitation with woven materials looks elegant. Such coatings, due to the application of minimal layers, require high-quality surface preparation. It is recommended to work with a brush. The desired effect can be achieved using vertical, horizontal or circular movements.
The composition of the product is dominated by glass, quartz sand and metallized powder.

Fur coat
Fur coat is both an economical finishing material and easy to work with. It gives a rough texture. It is painted with pigment added to the solution, or tinted with a roller at the final stage.
The technology for applying this type of decorative plaster involves preparing a creamy mortar and throwing it on the wall. To level the layer, use special spatulas and steel trowels.
To add texture, use a brush or a piece of artificial fur. It is important to carry out manipulations on a fresh surface. For protection, the wall is treated with acrylic varnish or wax.
Venetian plaster
By using Venetian plaster It is easy to imitate both polished and untreated stone. Beautifully modeled:
- lapis lazuli;
- granite;
- malachite;
- sandstone;
- marble;
- travertine.
Polished imitation
This technology is often used to recreate granite and marble stones. The task does not require special skills, the main thing is to try to replicate the natural pattern with inclusions and veins.
If you want to bring luxury and nobility to your home, follow the following recommendations on how to apply decorative plaster:
- Preparing the walls. They must be perfectly smooth, dry, and primed.
- We dilute the mixture according to the instructions.
- Tinting. Add to ready solution desired pigment. To imitate, for example, marble, you will need four colors. Shades of gray, white and black are suitable. Each of them should be diluted in separate containers.
- Application. We use two spatulas and transfer the composition from the small one to the large one. The colors are used all at once, light shades should predominate, the main thing is not to mix them. There are other options for applying this type of decorative plaster; they are simpler, but will take more time. We take the primary colors and set the diagonals, then use the rest. In some areas, small inclusions of more saturated shades are made.
- Adjustment. At this stage, the working surface is leveled with a damp trowel and rubbed down.
- Polishing. The dried “work” is treated with primer and varnish. To give the wall the gloss of polished stone, wax is applied to it and polished, without the use of varnish.

Important! Walls coated with wax are not afraid of wet cleaning!
Relief Venetian
For finishing relief Venetian coating, the use of several different techniques and methods is required. The solution should contain solid granules up to 2 mm in size; they create the desired texture. To set the texture, a finishing wax layer is applied, it is bonded to the previous one and glossed.
The weathered effect adds to the roughness of the final layer. The material looks like old marble. This technology involves the use of several layers, where the latter is treated with wax and tinted.
Rough stone relief looks expressive and is easy to work with.
How to apply decorative plaster "Bark beetle"
Decorating with bark beetle imitates wood damaged by insects. This type of decorative plaster is often used for facade and interior decoration and can be easily done with your own hands.
The bark beetle is produced in special mixtures containing marble filler. It is also prepared at home by introducing polished marble granules into the working solution.
The technology comes down to sketching out “decorative elements”. In the process of leveling the surface, stone grains tend to follow the grater, creating distinct grooved marks.
The bark beetle does not need additional waxing!
The interior design and structure of the design will depend only on the direction of the movements of the instrument!

Pebble coverings
Pebble coverings are most popular for facade and interior work.
You will need a special mesh of tools, textured roller and a brush.
How to apply decorative plaster with your own hands:
- Apply the first layer and let it dry (4-6 hours).
- Remove excess solution by mixing with the remaining solution in the bucket.
- Apply the second layer and wait 5-10 minutes.
- We proceed to smoothing with a trowel.
- We create veins with a spatula and, as it were, fluff the surface.
- Let it stand for 10–30 minutes and smooth everything with a trowel (we use “iron”).
Make sure that the wall treated with the mixture does not dry out while working, otherwise cracks will appear!The recommended layer thickness should not exceed the size of the pebble filler!
How to apply decorative plaster with marble filler
For this plastering method, special mixtures are taken with the addition of marble, where the size of the fractions should not exceed 1–1.5 grains. Thanks to this, leveling surfaces is very easy.
It is important to remember that this “decorative” is intended solely for decoration! Before using it, the walls should be prepared and brought to perfect condition.
What can be used to create a decorative effect
Each method of applying decorative plaster is unique; the imagination of the master also plays a big role here. As a rule, special tools are used for the job, but you can do without them. Using the means at hand, you will also achieve wonderful results.
Using a bath or kitchen sponge, for example, you blot the freshly applied mixture and get a very beautiful textured pattern. It is convenient to make various notches and grooves with some sharp tool, such as cutlery or a pen and pencil. Ordinary dowels, which are driven into the drying solution, can help give the surface a certain antiquity. But first things first…

Brush work
A fine-grained mixture is best for this method. After setting the starting layer, which must be applied to the prepared surface, take a stiff brush, moisten it in water and recreate the patterns described below:
- Woven materials. Using a brush under pressure, we create vertical textured stripes. Then, with less pressure, draw horizontal contours. The next stage will be vertical lines again, which are performed even weaker. Manipulations with the tool should be carried out until the pile begins to barely touch the surface.
- Grooves. The pattern is applied to the wall by forming vertical grooves. Medium brush pressure is required.
- Wave effect. Quite easy to do. Focusing on the vertical, we make zigzag movements and round off the resulting corners.
Using a paint roller
Paint rollers have different attachments, each of which can achieve a specific effect:
- foam rubber ones are designed to recreate abstractions;
- rubber ones are used for drawing three-dimensional elements;
- fur ones are suitable for a textured “fur coat”.
Decorative plasters applied in this way require further painting.
Stencils
Stencils are original solution for the decoration of any home. Can be used with various mixture compositions.
Starter plaster is applied to the prepared surface. It doesn’t matter what style of “decoration” you choose, it should be painted, and the shade should differ from the previous one by several tones. When the first layer is completely dry, a stencil is applied. Next comes finishing plaster followed by waxing.
Stamps
Stamps for walls are not so easy to apply; the technology requires some skills. Therefore, first you should practice a little!
The base layer is pre-tinted and applied with a thickness not exceeding 3 mm. Coloring can also be done at the final stage. The next layer of plaster should be about 1 mm. For this purpose, it is convenient to use a liquid solution of brighter shades. Upon completion, the desired elements are pressed onto the surface using a special rubber device. When the layers are mixed, a very original texture is obtained.
Is it possible to apply decorative plaster to old plaster?
When choosing one or another method of applying decorative plaster and the corresponding mixture, you should consider whether it is allowed to be applied to an old wall, and what the order of work will be.
To achieve desired result, strictly follow the instructions and recommendations of the manufacturer!
The method of applying any decorative plaster is not at all difficult to master. Modern technologies will come to the rescue; they greatly simplify any process. The master's work is afraid! Try it! Let it add a unique zest to the interior of your home.
Would you like to know more on similar topics? Stay tuned for new articles.
Send
Cool
Link
Stammer

![]()
Home is a place for embodiment design solutions, embodying which, do not forget about such finishing as wet decor. This is one of the varieties of decorative plaster, which has nuances in surface preparation, technology, and further maintenance.

Before choosing a canvas, you need to correctly assess the possibility of using the finishing in the room, compatibility with its condition and consider the advantages and disadvantages.
The first include:
- Wear resistance and durability. Even after ten years of use, the surface is easy to clean and clean. Flooding from neighbors and painting from children will not spoil the pristine beauty of this type of decoration. The restoration itself is easy to do only with a damaged fragment, without affecting entire areas.
- Minor area preparation. A room with unevenness, cracks and defects requires volume preliminary work. Working with liquid wallpaper smoothes out all the unevenness, which soon becomes invisible.
- Possibility of independent use. Anyone can make this decorative plaster by studying the instructions for use in advance.
It has no disadvantages, with the exception of:
- Price indicators. Compared to non-woven decor and paint, wet ones are comparatively more expensive.
- Assortment. The abundance of assortment does not outperform its “dry” counterpart, although there are stands construction stores They try to present wet plaster widely.
Types of wet decor and working with them
Before preparing the room, tools and purchasing the mixture, you should decide on the type of finish:
- Silk. They are made on the basis of silk fiber, thanks to which the fabric is durable and resistant to strong sun rays and temperature changes. Therefore, this type is considered expensive. They are diluted with water, and the application technology liquid wallpaper on the wall is available to everyone.
- Cellulose. Suitable for modern, and most importantly inexpensive renovation of premises. Compared to silk, their quality is lower. The mixture is provided in white color and auxiliary color and texture components. It is difficult to guess with proportion and saturation.
- Silk-cellulose. They are an option where the price matches the quality. Most buyers choose the third type. Anyone can apply liquid wallpaper.
The type of finish depends on the composition, durability of the material and complexity of the work. The assortment, regardless of the type, remains almost the same.
Preparing the walls
The durability of the work done directly depends on the quality of the prepared room. Putty and over-primed walls are the basis for decorative elements.

It is important to make sure that before plastering the walls:
- Homogeneous
- Close to finish color or white
- Durable and evenly absorbing moisture over the area
- No protruding potholes or potholes larger than 2 mm
How to apply liquid wallpaper to old finishing no one will tell you - you shouldn’t do this, over time the material may peel off. And nails, self-tapping screws and screws are unscrewed before starting work. This material is considered to mask imperfections, but its masking properties should not be neglected. The area for work must be well prepared.
After preliminary work, they proceed to preparation, which consists of:
- Putties. The partition, walls, joints between areas are evenly treated with putty.
- Primers. In several passes with an interval of a couple of hours, the putty surface is primed with deep penetration. After this, it is treated with water-based or facade paint that does not contain tints. The primer should be white, which will not change after the work is done.
Putty and primer are the basis of reliability. The walls must be durable and ready for finishing decoration.
Technology for applying wet wallpaper on the following types of walls:
- Covered with plasterboard boards. The surface and joints between the sheets are puttied. To avoid the appearance of visible stripes, the putty area is treated with water-based paint (always white). Applying liquid wallpaper to drywall is a common practice.
- Wooden surfaces. Wood is exposed to high moisture, under the influence of which it can become deformed. Therefore, it is pre-primed with a substance with a penetrating composition and coated with water-based paint.
Preparing and mixing the mixture

The manufacturer took care of the ease of creating the batch, providing it to the consumer already in prepackaged containers. Outwardly, it is a bag with a dry composition that resembles sawdust and contains the necessary components. It is enough to dilute it with water at a warm temperature (40 degrees), constantly stirring until a medium-thick consistency is formed. For 1 sachet – 6 liters of water.
The mixture consists of the following components:
- Cellulose and silk fiber base
- Decorative fillers
- Dry glue KMS
They are sold already mixed, or less often - you need to mix them yourself. You can mix one sachet of each component at a time without doubling the quantity or volume of water. It is also undesirable to separate the components into parts, reducing the finished result; you can get confused with the proportion of the mixture and the amount of water.
When mixing, you should observe the proportion and sequence of mixing. Water is first poured into the container, and then powder is gradually added. This will make the kneading process easier.

The solution itself is mixed exclusively by hand, otherwise, resorting to auxiliary tools (mixers or drills) can unintentionally change the structure and ornament. The composition does not contain harmful substances which would damage the skin of your hands. The solution is infused for 6 to 12 hours. It is checked before use. Sometimes it hardens so much that it becomes excessively thick, then a little 1 liter of warm water is added to it and gradually mixed.
To save time and speed up the process, the preparation of walls and mortar is combined. This can be done if the condition of the walls is close to satisfactory.
Finishing technology
The technology of applying liquid wallpaper is impossible without the use of the following tools:
- Spatula (from 18 to 80 centimeters) or set of spatulas
- Grater (plastic or metal)
- Roller
- Trowel
- ironer
- Hopper pistol
- Sprayer (spray)
The tool should be easy to use and give the desired result.

Work begins when the walls, tools, mortar are prepared, and the temperature and humidity of the room are adjusted. So, the indicator of the first is not lower than 15 degrees. The application of liquid wallpaper and the drying period prevent the appearance of drafts.
Liquid wallpaper is applied using a spatula or a Hopper gun; further distribution over the surface is done with a roller or grater. It is worth applying while holding the tool at an angle of 15 degrees. You should not press the last ones with force, as the elements will be compressed and the textured layer will be distorted. Insufficient pressure can have a negative impact - the solution will not adhere correctly and will not last long.
Use thermal appliances It is not advisable to speed up drying, with the exception of a lamp to enhance the light and give the appearance of smoothing out problem areas.
The surface should be coated evenly, from a corner or edge (preferably from light to dark), not exceeding 2 mm in the finishing layer. It is important that the area covered is the result of one batch, and not different ones. Impurities and additions are a worse option compared to excess consistency, which can be dried and reused.
The success of gluing with liquid wallpaper also depends on the production time of the component packages, which should not exceed 2 years. The manufacturer assures that even after the storage time has expired, the contents remain suitable, however, as practice shows, it is better to play it safe.
Only by following the instructions for the design technique and using by special means, you can see all the desired decorative characteristics. They appear after complete drying, which occurs from 12 hours to 3 days. The time depends on the composition, thickness, technology of applying liquid wallpaper, humidity and room temperature.
Restoration or correction of incorrect work
Finishing is subject to local correction of an area that has been incorrectly designed or deformed over time. Sometimes it is not possible to fix the problem locally and installation of liquid wallpaper is necessary.

The process of replacing and restoring a site begins with the complete removal of the previous layer and consists of the following steps:
- Wet the decor generously with a spray bottle. They fill it up clean water, without solvents and detergents, so as not to leave stains on the neighboring area.
- Removal using a spatula. The tool for applying liquid wallpaper must be sharp, and the layer to be removed must be carefully cleaned into a clean container prepared in advance.
- Treatment of dried walls with a colorless primer or enamel.
- Reusing scraped decor. The instructions for using liquid wallpaper remain the same; the mixture is brought to the consistency of “heavy cream” and left to brew.
- The joints of the old and new coating are ground so that after the new area dries it is not noticeable.
Care and durability
Wet decor is as non-moisture resistant as wood trim. Therefore, both the first and second are covered with protective agents. In the case of the first one, it is acrylic varnish.
Thanks to the acrylic binder and organic solvents, the coating remains harmless and environmentally friendly. Subsequently, the decor can withstand mechanical stress, cleaning and washing with chemical gels.
Methods of using acrylic varnish:
- Add a little while mixing
- Use as a finishing layer after the decorated surface has completely dried
As a final protective coating acrylic is applied in compliance with the following consumption rate: 20 square meters of surface are covered with 1 liter of acrylic varnish. If the first layer is not enough and there remains a risk of damage and deformation of the wet finish, the manufacturer recommends applying a protective varnish a second time. The proportion of consumption will remain the same, and the area will increase to 24 square meters.
Whatever properties acrylic has, in places where there are sources of moisture (bathroom, kitchen), the strength of the coating will not provide a 100% guarantee of quality and durable results. In this case, the best option would be a moisture-resistant coating or tile.

Wet decor became alternative option classic type. Its difference in texture is also reflected in the fact that you can apply wallpaper yourself. Having prepared the area, tools and batch in advance, having thoroughly studied the instructions, you can safely begin to implement interesting design solutions and transform the room.
Send
Cool
Link
Stammer

![]()
Painting the walls
Painting walls can be considered one of the most popular finishing methods. This option does not require large cash costs, and all the work can be done with your own hands. So that the result pleases, and the coating retains its properties long time, it is important to properly prepare the substrate before applying paint.

In order to paint a wall in an apartment with your own hands, you will need:
- Roller. It can be foam rubber or pile. The first is used if you need to apply paint to a smooth wall, and with the help of the second you achieve high-quality painting of textured surfaces. Optimal choice is considered a roller with short pile - it ensures uniform application of paint on smooth and textured surfaces.
- Brushes. They will be needed even if a roller is used as the main tool for painting walls - it will not be possible to paint hard-to-reach areas without a brush. Before purchasing the product, you should pull the nap a little. If there are fibers left in your hand, there is no need to purchase such a brush, since during the dyeing process the hairs will remain on the surface and the coating will turn out to be of poor quality. The tool needed for painting walls is selected taking into account the type of paint. For water-based compositions, brushes with nylon bristles are used, for oil-based ones - with natural bristles.
- Painting tape. Using paper adhesive tape, delimit the area to be painted and protect the baseboard and other elements from getting paint on them.
- Cuvette. A special container with a ribbed bottom helps to achieve a good result when painting walls - it can be used to easily remove excess paint from a brush or roller, thereby preventing drips from forming.
- Drill with nozzle and container for stirring the composition.
- Plastic spatula. Required if painting an uneven or textured surface.
You can also quickly and efficiently cover smooth walls using a spray gun, but in this case you must have skills in handling the tool.

To prevent paint from getting on your hands, use gloves. Protect your eyes with construction glasses.
Paint selection
Different compositions are used to paint walls in rooms and non-residential premises.
For residential premises
In living rooms, walls should be covered with non-toxic paints. Such rooms usually maintain moderate air humidity and temperature, so the requirements for the composition are not too stringent.
There are several types of water-based paints that can be used to paint walls in a bedroom, living room or nursery: water-based, water-dispersed acrylic or silicone. In addition, the use of decorative textured paints is allowed in residential premises.
Water-based
PVA-based solutions are used more often than others. They are inexpensive, convenient to work with, they lie easily and evenly, and have average consumption, and after drying they form a dense but breathable coating.
By adding colorant to water-based paint, you can get almost any shade.
Among the disadvantages: low resistance to mechanical stress, the need to very well level the surface before applying the paint composition (the paint does not hide even the slightest defects), the inability to wash the painted wall.
Acrylic
Acrylic water-dispersion paint is superior to water-based paint in its properties. It is not only easy to apply, but also masks minor surface defects, forms a dense and even coating, and painted walls can be washed. Resistant to ultraviolet rays (does not lose brightness), easily tinted.
Silicone
This paint will cost the most, however high price is explained by the excellent performance properties of the silicone water-dispersion composition: it makes fairly large (up to 2 mm) cracks invisible, so the walls do not need to be carefully leveled before painting.
The smooth coating obtained after the silicone paint dries does not accumulate dust, but allows air to pass through. Thanks to last property the composition can be used to decorate walls in the kitchen or bathroom.
Textured
Another composition that can be used in residential areas.

Painting walls textured paint gives an effect similar to that achieved by using decorative plaster. At the same time, the application process is much simpler and does not require much experience.
Differs from regular paint structure is a thick solution that, after drying, forms a relief coating.
You can paint the walls in your apartment with textured paint using different tools: a roller, a brush or a spatula; the choice depends on the thickness of the composition.
For bathroom, hallway and kitchen
In rooms with high humidity, you can use silicone or acrylic paints, as they tolerate contact with water well. Other compositions are also used in the kitchen, hallway and bathroom:
- Silicate. Paints of this type are recommended for walls that have been affected by fungus (they should be applied after mold removal and repair) - they will protect the surface from the reappearance of fungus. After hardening, the silicate coloring composition forms a durable, vapor-permeable film that does not lose its properties for a long time. Before painting, the surfaces must be cleaned of the old coating, otherwise the paint will lie unevenly. It is important to remember: silicate compounds form toxic fumes when applied, so painting walls with your own hands in this case should be carried out using a respirator, and an influx of fresh air should be organized into the room. After drying, the coating becomes harmless.
- Alkyd. They form a durable coating that is resistant to high humidity and sunlight, but allows steam to pass through. Such paints are inexpensive and can be matte, semi-matte or glossy. Main disadvantages: long term drying and pungent odor (therefore, alkyd compounds are rarely used for interior decoration), color change over time.
Preparing walls for painting
Before starting work, you should organize suitable conditions in the room. Coloring can only be carried out if the air temperature is from +5 to +20°C. Humidity should also be moderate (up to 70%).
The next step is to prepare the wall for painting yourself. They should be cleaned of old coating, dirt and dust.

After this, level it using a sand-cement mixture to seal large cracks, and cover small ones with putty. If there are traces of mold, rust or other contaminants on the surfaces, they should be removed before painting the walls in the room. To do this, use mechanical (sanding with sandpaper) or chemical (use of special alkaline or acidic agents) methods.
Afterwards the wall is primed in 1–2 layers. This is necessary so that the paint lays down evenly and does not peel off later. Primed surfaces require less paint.
Masking tape is used to cover the joints between the walls and the floor and ceiling, baseboards and other elements that may get stained with paint.
Wall painting technology
The paint is poured into a container and colorant is added to it. If the instructions for the selected composition say that it needs to be diluted with water, add required quantity liquids. Mix using a drill with a special attachment. Pour into a cuvette.

Further actions depend on which tool was chosen for applying paint.
Roller painting
Using a roller you can quickly paint the walls in your apartment. If you need to treat large areas, it is more rational to use it. Since the roller creates a very thin coating, you may need more than 2 layers.
When immersing a tool in a paint composition, it is important to ensure that the liquid does not flow into its axis, otherwise splashes may occur on the surface during operation.
Proper painting of walls is carried out according to the following scheme: on an area of about 1 m², apply it with a roller several times, pressing hard on the tool and squeezing the paint onto the surface. Then they move on to shading the composition over the entire work area. They start at the top and move down.

When all surfaces are painted, carefully remove the masking tape and carefully paint the remaining areas with a narrow brush.
Painting with a brush
To treat open areas of the wall, it is convenient to use wide brushes (about 10–12 cm wide), and use narrow ones at the joints.
We paint the walls in the apartment with a brush, starting from the ceiling. There should not be too much paint on the pile.
Cover the treated area with short strokes so that they overlap each other. The first layer is done with horizontal strokes, the second with vertical strokes. Allow a break between coats to allow the paint to dry completely. The exact time is determined based on the instructions for the specific composition.

How to repaint walls?
Repainting a wall from one color to another is possible. The procedure depends on the original and selected colors:
- If the base is darker. You will need to apply 1-2 coats of white paint first so that the dark coating does not bleed through the new paint. It may take 3-4, sometimes more, coats of new paint.
- If the wall is lighter. The wall is first cleaned of dust and dirt, then primed, and after the primer has dried, the surface begins to be repainted.
Types of wall painting
Coloring can be not only monochromatic. Various techniques will help make the interior more interesting:
- Horizontal wall division. Classic way– applying paint to the upper half of the wall light shade, and on the bottom – dark. A horizontal line is drawn along the entire perimeter of the room using building level. Then stick masking tape under the line and begin to paint the upper area. Remove the tape only after the paint composition has completely dried. Move on to painting the bottom of the wall.
- Stripes. They can be either vertical or horizontal. These methods of painting walls are quite labor-intensive, especially if many colors are used. You will first need to draw a diagram, then transfer it to the walls and cover it with masking tape. First, part of the walls is painted with one color, after which they wait for the composition to dry completely, then proceed to processing stripes of a different color.
- Coloring individual elements with a different color. As a rule, this method is used in rooms with niches, shelves in the wall and other non-standard structures.

To ensure that the coating is smooth, without streaks, and that individual areas do not differ from others in tone, you should follow the advice of experienced craftsmen:
- Painting the wall of the house should be carried out without pause. The work should be planned in advance so that one surface is processed at a time. Areas painted at different times may vary in color.
- The wall from which they begin to work is mentally divided into sections of about 1 square meter. First they paint it over, then move on to the neighboring area. The strokes are applied quickly, slightly extending over the already painted area. It is important that it does not have time to dry out yet.
- Painting walls in an apartment always starts from the top. During the paint application process, drops of liquid may fall onto the lower part of the surface and ruin the treated area. To paint areas under the ceiling, it is convenient to use a roller with a long handle.
- There should be no drafts in the room during work.
- To paint a wall without streaks, you need to carefully roll the roller or brush along the ribbed surface of the ditch after immersing the tool in the paint, removing excess composition.
![]()
Add a comment
Decorative plaster - construction material, which is used for finishing interior surfaces indoors, and in some cases, exterior surfaces. Applying decorative plaster is one of the few operations that can be carried out without the intervention of a specialist. The fact is that the modern construction market offers a huge amount various instruments, significantly facilitating the finishing process.
In addition, there is now no need to buy separate ingredients for mixtures and prepare them manually - everything is sold in stores in the form of ready-made viscous solutions or dry formulations. All that remains is to choose the right materials and tools, and also learn some of the features of applying decorative plaster with your own hands.
To choose the right plaster, you need to determine the desired effect of it, the temperature and humidity of the rooms in which the coating will be applied. It is recommended to describe the situation in detail to the seller in order to get exactly what you need.
When choosing materials for preparatory work, remember that in case of strong unevenness on the surfaces, starting putty may be required, and in especially advanced cases, sheets of drywall. You should also clarify in advance about the characteristics of the colors, since some of them lighten or darken after drying. It is better to choose a deep-penetrating primer to ensure the most durable contact between the plaster and the surface.
Tools you will need:

- trowels, wide and narrow spatulas (it is advisable to buy both rubber and metal);
- graters and half-graters - for leveling the solution and adding texture to the surface;
- paint rollers (you can get by with foam rollers, but it’s better to buy a textured one);
- fry with teeth for shaping the relief;
- paint brushes for leveling and creating shallow reliefs;
- stencils;
- To apply Venetian plaster, it is better to purchase a special spatula - it is called “Venetian”.
Preparatory work
Before applying decorative plaster, the following steps must be taken:
- Remove old coating from walls or ceiling.
- Remove any fasteners and trim any rebar that is protruding from the wall.
- Level the surfaces using putty, and after it dries, treat the walls with sandpaper or a sander to remove uneven walls with your own hands.
- At the end, it is necessary to prime the surface twice with an interval of 3-4 hours.
Features of working with decorative plaster
The technology for applying decorative plasters has the following nuances:
- When working with liquid, already diluted plaster, you should take into account that it very often falls from a trowel or spatula, so it is better to cover the floors with plastic film.
- If coarse materials were used to make the mixture, it can only be applied manually.
- The technology for applying decorative plaster, which was prepared from fillers of various fractions, is quite complex, so it is recommended for home craftsmen to use standard compositions.
- Finishing materials that are diluted with water are more environmentally friendly than plasters made with synthetic substances. At the same time, “aqueous” compositions are more susceptible to temperature and mechanical influences.
 Decorative plaster can be sold ready-made or as a dry mixture that requires dilution with water.
 There are a few more nuances that are important to remember when carrying out work:
- Decorative plaster dries faster cellular concrete or starting plaster.
- During processing wooden surfaces or walls made of plywood and chipboard, it is important to remember that water-based compounds can deform them.
- If there are defects on the treated surface, then more decorative material will be required.
- To avoid corrosion, do not use “water-based” plasters to finish surfaces with metal elements.
- Most decorative plasters set in a maximum of 5 hours, dry in 1-2 days, and strength gain lasts no more than 9 days.
Step-by-step finishing instructions
Before starting work, you should cover with masking tape all surfaces that are in the immediate vicinity of the area to be treated. You need to start applying from one corner to the opposite - from top to bottom.
Technique for applying decorative plaster:

 Creating an invoice
 It is important to know! During the finishing works It is necessary to keep the instrument clean and rinse it with water as often as possible. It is also not recommended to prepare a large amount of solution at a time (especially for gypsum plasters), since it can dry out while still in the container.
DIY VIDEO TUTORIAL on applying decorative plaster with your own hands
Various options for applying decorative plaster
Methods of applying decorative plaster to achieve various effects:

Creating a decorative effect using improvised means
You can apply decorative plaster with your own hands without special tools, and still get an excellent result. Most often, an ordinary sponge is used, which is used to “blot” the fresh solution to obtain a textured coating. Various grooves and notches can be made with any sharp object, including a knife, fork or even a simple pencil. You can artificially age the surface by driving dowels into the dried solution. Fresh mortar is also brushed across the wall to simultaneously fill any gaps and add texture to the surface.

Original ideas for finishing walls with plaster
Applying decorative plaster to walls means not only leveling the surface, but also showing your imagination. By using simple tools you can create a truly original interior.
Using a brush
This application method involves the use of fine-grained plaster. First, the walls are prepared as described above. Then the starting layer is applied. After it sets, you need to take a brush with stiff bristles and moisten it in water. Using this tool you can create the following texture elements:

Paint roller
Is it possible to apply decorative plaster with such a tool - the answer is yes. This familiar tool can also be used to apply decorative plaster with your own hands. Depending on the type of attachment of this tool, you can get different textures:

- Rubber rollers used to create three-dimensional textures that look like natural patterns, for example, the surface of leaves or the skin of reptiles.
- Foam rubber with various relief patterns is used for drawing abstract relief coatings.
- Fur attachments are great for creating a “Fur Coat” texture.
This decorative wall plaster requires subsequent painting; in most cases, the first layer is used to remove surface defects, and the second is decorative. It can be applied with either a dry brush or shaded.
VIDEO:
Plaster finishing using stencils
The use of these elements is a simple, but at the same time original and effective way to create various textured surfaces for decorating rooms. They can be used with any type of material. But if we are talking about small areas, then fine-grained decorative plaster is more suitable.
First of all, the walls are prepared, after which the starting layer is applied. This can be plaster made in any style: from specially aged surfaces to ordinary ornaments. A layer of paint is applied to the finished layer, which should differ from it by several tones. After the first layer has completely dried, a stencil is applied to the wall, after which a finishing layer plaster, which is subsequently coated with wax.

Using stamps
This technique requires certain skills, so it is recommended to first practice a little on a “draft”. First, apply a base layer with a thickness of no more than 3 mm. The solution for this layer is initially painted over with color; it is also allowed to apply paint after the procedure is completed. After this, apply a second layer approximately 1 mm thick. To do this, use a more liquid plaster with a rich color. Finally, the surface is pressed with a special rubber tool. As a result, the layers mix, forming a rather interesting texture for the walls.

Do-it-yourself plastering is at the same time a simple but detail-demanding procedure, therefore, before applying decorative plaster to walls or other surfaces, you need to study the above instructions and manufacturers' recommendations.
Decorative plaster compositions are the most popular material for unusual wall decoration. They allow you to truly create original interiors. The cost of such plasters is quite high. But we can easily save our repair budget if we apply them ourselves. It is not so difficult.
The main thing about decorative mixtures - what do you need to know?
Decorative plaster (DS) is a composition for finishing wall surfaces, consisting of a binder and special fillers. The first can be mineral (lime or cement) and synthetic (various resins - acrylic, polyvinyl acetate and others) components. The function of fillers is usually performed by marble or granite chips, quartz, white sand, as well as combinations of these materials. DSh with a mineral binder and coarse-grained additives are recommended for treating walls outside. But compositions based on a synthetic base and fine fillers are more suitable for interior finishing activities.
The described decorative compositions also contain pigment. It gives the mixture the required color. The pigment can also be synthetic and mineral (natural). Natural additives - indigo, ocher, cochineal, yellow lead, azurite, ground malachite, vivianite, charcoal and others, are prone to rapid burnout of the flame. In addition, compositions with natural pigments are expensive. For this reason, plasters with synthetic coloring additives have become more widespread.
The texture of the described coating is formed using all kinds of granules, fibers, flakes, and small gold balls. The most popular types of diaphragm among home craftsmen are considered to be:
- Venetian compositions;
- flock mixtures (silk effect coating);
- bark beetle (walls after applying plaster become like tree bark);
- coatings with rain and rock textures;
- compositions with marble chips;
- textured compositions to imitate stone.
DS is available in the form of dry mixtures (they are diluted with water before use) or ready-to-use without any additional steps. The effect of using both types of plaster is the same. At the same time, ready-to-use compositions are more convenient for home craftsmen who decide to decorate the walls with their own hands.
Rules for treating walls with plaster - we prepare thoroughly
Before using DS for its intended purpose, you need to understand the peculiarities of working with such compositions. First of all, let's find out what tools we need. Everything is simple here. We buy a scraper, a trowel, a drill with a mixing attachment, a grater, brushes, trays, rollers, combs, and spatulas of different sizes. You may also need other tools used for finishing work.
Then we begin preparing the walls for plastering. Their surfaces must be absolutely clean, dust-free and dry. If the walls are riddled with cracks, you will have to repair all existing defects. If necessary, we knock down the protrusions on the surface to be decorated and fill the depressions with a suitable composition. After this, prime the cleaned base. This operation will protect the coating from moisture, deforming stresses, temperature changes, and strengthen the load-bearing layer.
We choose a primer taking into account what kind of decorative composition we use. We carefully read the instructions for the plaster! It indicates the recommended soil type. Several Yet important points. The primer layer should have a thickness of no more than 20 mm. It should be compacted very well. If this is not done, the uniformity of the texture of the applied paint will be disrupted. In some cases, the layer of soil must be kept on the wall for several days, periodically spraying it with water.
If the plaster will be applied to drywall, wood, plywood sheets, wood boards(chipboard, OSB), they must be treated with primers deep penetration. Such bases are prone to deformation when decorative mixtures are applied to them. Also note that most modern DLs set within a few hours. However, it takes 24–36 hours for them to dry. And complete hardening of the decorative composition is observed after 7–8 days.
How can the decorative composition be applied?
There are several options for processing DH walls. The most popular methods of applying the composition are given below:
- spraying technique;
- spraying;
- pulling (creating a relief with a trowel).
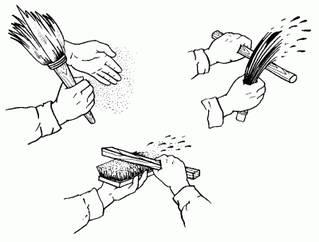
The easiest way for craftsmen to create the required coating is by spraying. This technology is simple and straightforward. We take a suitable tool (for example, a brush or even a regular broom) in one hand. We dip it in the decorative composition. We take a stick in the second hand. We bring a broom (brush) to the surface to be treated. We hit the instrument with a stick. As a result of the impact, splashes of the decorative mixture fly onto the wall. We get a coating with sprinkles and flakes different sizes. We are waiting for this layer to dry. Then we repeat the procedure described above. We apply as many layers as we need, smoothing each of them with a roller or other device.
A variation of the classic spraying technique is the so-called Italian plastering. The procedure for performing the work will be similar to that described above. But when decorating in Italian, we don’t need to wait for the previous layers to dry. The next portion of the solution is applied to a damp surface. Note! This method of decoration involves applying layers different shades. That is, if we first use blue plaster, a mixture of a different color is applied on top of it. The result is original decor, capable of becoming a decoration for any home.
Spray technology – fast and effective method finishing the walls with a decorative mixture. But to implement it, you need to rent or purchase a special installation. DSh is poured into such equipment, and it applies plaster to the surface.
Spraying is carried out continuously. Work always starts from the top of the wall.
The spraying technique is indispensable when we use DP of different fractions and want to achieve a unique aesthetic effect. With its help, you can finish the walls in one tone, and the slopes on the windows and other architectural details in another. Nuance. Apply the composition to the main surfaces in a layer of about 3 mm, to the auxiliary surfaces - no more than 1 mm in thickness.
Plaster mortar is often applied by stretching. This is an easy way to decorate walls. It is performed using a steel grater or a regular trowel. Finishing is done strictly from bottom to top. We hold the tool in relation to the surface being processed at a 60-degree angle. After applying the composition, we form the required pattern and texture using a plastic grater.
In the next section we will look at common techniques for treating walls with decorative mixtures. With their help, we can easily make the interior of our home individual and very attractive.
Rocks and rain on the walls of the home - we’ll do it ourselves
Now let's see what techniques are used to create decorative relief surfaces using DS. There are many of them. A common option is to form the texture of the rock. This technique is ideal for beginners. The procedure is as follows:
- 1. We prepare the wall according to the algorithm already known to us.
- 2. Treat the surface with a decorative composition. Apply it in a layer of up to 3 mm using a trowel.
- 3. Distribute the broadband along the wall (as evenly as possible). We create the pattern we need using the same smoothing iron.
Movements with the tool can be very different - horizontal, crosswise, herringbone, vertical, and so on. We ourselves choose the appropriate relief and shape it. In the event that the planned drawing does not work out, we quickly smooth out our artwork and try to create the original rock again. Note! The smoother should be washed after processing each individual area. Otherwise, it will simply stick to the plaster.

It is a little more difficult to apply DS with rain. But this technique guarantees a more effective drawing. The technology for creating rain is as follows. We mark the walls. We draw lines on them at a certain slope. They must have the same angle of inclination. And we take the distance between them within the size of three smoothers. Apply masking tape to the lines. We begin to apply the plaster from the upper corner of the surface to be decorated in inclined strips. We fill the space limited by two masking tapes. The working tool needs to be pressed slightly against the wall.

As a result, we will get a decor that looks like a hedgehog. But we want rain. Everything here is elementary. We wash the instrument. Apply it to the plastered surface and smooth the mixture in one direction. Then, by analogy, we cover the remaining strips with the solution. When the wall has dried, we remove the remaining minor defects and irregularities from the wall using sandpaper or an abrasive mesh. Upon completion of the work, we admire the rain that decorated our room.
5 other techniques for creating relief images
Application of decorative plaster of different types can be carried out using other methods. Let us briefly describe the most common types of wall treatment with the compounds in question:
- 1. Boulders. To create such a picture, we need to apply DF to the primed surface with a trowel. And then trim it with a brush. We hold the latter in relation to the wall at an angle of 90°. If you want to get sharply defined boulders, use a hard brush. A tool with soft bristles allows you to create blurrier designs.
- 2. Wave. We make cuts on the wall and spray it with water. Apply the plaster in zigzag stripes. Then we smooth out the resulting waves with a spatula or grater. This technique is often used when using Venetian plaster.
- 3. Travertine. We collect portions of the finishing mixture tinted in a certain color onto a spatula. We throw them on the wall. After this, smooth the surface.
- 4. Broken stones. We treat the walls with plaster. We are waiting for it to harden. We drive the tongues into the coating, breaking off small pieces of it. We get stones with crevices.
- 5. Furrows. The technique involves the use of fry with semicircular teeth. The distance between the latter should be 1.5 cm. Be sure to sharpen the teeth before applying the DS. Apply the plaster composition to the wall. We smooth it out right away. We apply the rule to the mixture and at an angle of 45° the grinder (sharpened part). We create furrows. The type of the latter will depend on what kind of fry (with what shape of cloves we use).
You can try more complex methods of applying DS. For example, shading-combing.

This technique is performed only on a fresh coating, which is processed with a metal brush. After using it, wait a day and remove loose pieces of plaster from the wall. Remove excess parts with a rag, spatula or ordinary sponge.
Apply the decorative mixture with a roller - features of the operation
Walls can also be finished with a paint roller. Although this tool is used for decoration quite rarely. It is not used when working with Venetian plaster. But for other decorative compositions (structural, textured) it is quite suitable. The finishing algorithm using a roller is as follows:
- 1. We repair and clean the walls. We prime them twice.
- 2. Prepare the solution. Pour it into a wide container.
- 3. Dip the roller into a bath of solution.
- 4. Using sliding, smooth movements, apply the composition to the wall. Be sure to leave small indentations from the ceiling, adjacent walls and floor.
We apply the plaster in strips at a time. The movement of the roller is from top to bottom. If the paint does not adhere well to the surface to be finished, moisten the painting tool with water. By pressing the roller with different forces, we obtain one or another coating structure. Its final appearance, in addition, depends on the speed of movement of the tool along the surface.

Choose the appropriate method and technique for applying decorative compositions and feel free to get to work. You will succeed!
Repairing and decorating the walls of an apartment or house is often an unpredictable thing. Sometimes, during a DIY renovation, a lot of new ideas are introduced into the original plan that can change designer style home furnishings. This happens when, after applying decorative plaster on most of the walls with your own hands, new wall design ideas appear.
Wide possibilities of decorative plaster - good and bad
Especially if you are lucky enough to see interesting and latest photos or a video about what is best to use and how to properly apply decorative plaster to a flat wall.
Before entering into the temptation to change the original idea in the design of the walls with your own hands and apply a new design, it is worth soberly assessing several main points:
- The cost of repairs, even if you do the basic wall decoration work yourself and strictly follow the original idea and estimate, always increases by at least 10-15%;
- Applying a new design to one room is not difficult, but such a move may require redoing much of the plaster finish. Apply it yourself in other rooms to preserve the style of wall decoration;
- The cost of repairs can double and lead to significant loss of time and effort.
Thanks to new materials and techniques for applying decorative plaster, you can achieve impressive results even with your own hands.
Advice ! With all the desire to make the most of the expressive possibilities of decorative plaster, it is worth stopping at one initial idea for decorating the walls and completing the renovation with minimal costs.
All interesting thoughts about decorating walls with your own hands can be collected and put aside until next time. Perhaps new money, new premises and new ideas will appear.
When and how to apply decorative plaster correctly
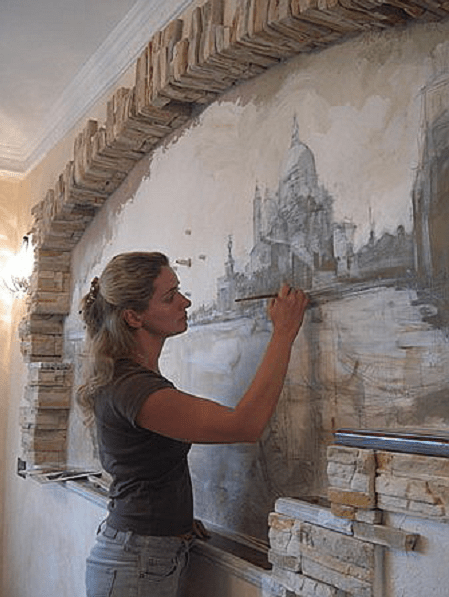
Modern wall design options allow you to create the most realistic imitations of various decorative surfaces, from broken stones to bas-relief images. But the main advantage of decorative plaster is the incredible flexibility in choosing the surface texture with your own hands. In fact, the use of plaster decor made it possible to apply real artistic images and entire paintings to the walls. Just 15 years ago, individual painting of walls with one’s own hands was within the power of artist-designers, and such a pleasure would cost a lot of money.

Using the possibilities of decorative plaster
New decorative materials Finishing a wall with plaster can be called more of a decoration method than a means of leveling and protecting the masonry walls. Polymer binders, water-soluble paints and various fillers are used as components and bases of plastering materials, which, in fact, determine the appearance of the decorative component of the walls.
Among the many approaches to the process of applying decorative plaster, several main directions can be distinguished:
- If you have steady hand and good skills in decorative modeling or drawing; perhaps, after a little practice, you will be able to apply ornaments or abstract designs to the surface in a theme that matches the style and purpose of the room. This is expensive in practical implementation, and it is even more expensive to then remake what has been done into something new;
- With good taste and sufficient financial resources, you can use a combination of specific shades and colors with a monotonous relief applied to the plane. This is easier than the previous option decorative finishing, but will require serious design skills to coordinate and combine all the premises of the apartment into a single plan;
- Simpler and more practical compositions make it possible to apply plaster decors that are simple in structure with a restrained relief or even a simple imitation of natural stone, brick or classic options decor.
Advice ! If your reserves of time and finances do not allow you to apply decorative plaster in all rooms, you can, as an experiment, select the most crooked and inconspicuous plane in an apartment or house and try to apply different kinds plaster. This will allow you to understand and see the benefits firsthand. different techniques before general renovation.
Works with decorative plaster
The first two areas of working with decorative plaster will require you to accurately understand all the nuances of the colors and textures of the walls, so before applying a complex decorative pattern with relief images, it makes sense to first make sketches or select photos of the corresponding design solutions.
The more intricate the design, the more difficult it is to apply it to the walls. For example, without practice, not everyone can perform decorative plaster with a moire effect, as in the video
A decorative composition in the panel style will require good knowledge about the properties of plaster and a lot of patience in working with it, but the resulting effect is worth it. The beauty and accuracy of the work can be appreciated in the video
In such cases, it is better to apply the decor by the hands of specialists; it is very difficult to achieve such quality on your own.
Important ! In addition to artistic taste and knowledge of the technological intricacies of working with decorative plaster, you should understand that applying the material to the surface is physically difficult, and the process will require considerable effort and endurance.

In your first experience of using decorative plaster, it is better to choose the simplest version of the design and try to apply it yourself.
The easiest way to apply decorative plaster
One of the most popular options for decorative plaster are lime composite compositions that imitate natural materials. Most often they use plasters that have been proven by practice and many years of use:
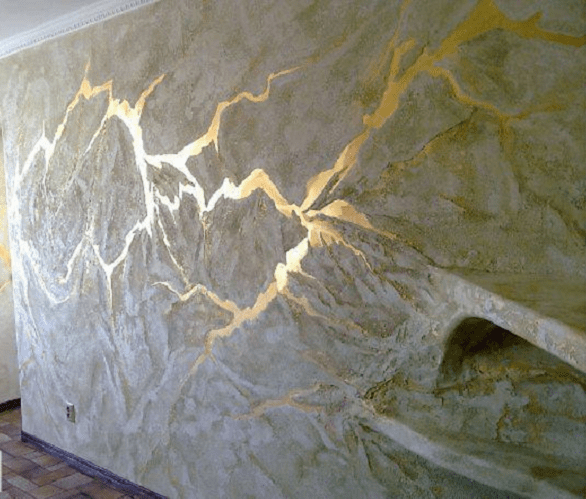
- “Venetian composition”, giving the texture of the wall in the form of an incredible number of intertwined relief elements;
- “Marmorino” and “Marseille”, similar to the surface of marble calcite, with a network of inclusions and cracks and polished surface transitions;
- Imitation of the surface of natural limestone using an uneven, deliberately rough and scratched surface, known as “Travertino”.
Important ! All the above decorative compositions plasters are very easy to apply to the wall with your own hands, obtaining almost 100% surface quality.
Venetian pattern of decorative plaster
The secret of the recipe is to use ordinary ready-made plaster mixtures - starting and finishing - to produce decorative plaster. This reduces the cost by approximately half. The initial plaster mass is prepared by mixing both mixtures in a 50/50 ratio in the amount required to apply the composition to 1-1.5 m2 of surface.
Before applying the composition, the walls are primed with an acrylic primer, and the composition is carefully applied with a spatula and a trowel to a slightly dried surface. The thickness of the layer of decorative plaster is on average from 3 to 6 mm. As you apply the decorative base with a trowel, a relief pattern must be applied to the wet material. The specifics of such work are clearly understood from the video.
Important ! Sometimes the problem arises of correctly connecting two sections of the wall on which a solution of decorative plaster is applied with a gap in time.
Most often this happens due to the need to prepare a new portion. plaster mass. Therefore, the boundaries of the plots have to be “passed” by the tool several times.

After drying a little, the relief pattern is rolled with a special tool, making the pattern flatter and more expressive. As a finishing operation, which is the “highlight” of Venetian plaster, tinting paint is applied to the surface of the wall with a roller, giving the plaster the color of “old silver.” For this purpose in 250 gr. primers add approximately 50 grams of dye.
After the drawing has dried, it is necessary to apply acrylic varnish with a small addition of glitter. Decorative plaster takes quite a long time to dry - up to two days; after final drying it acquires a slightly lighter shade.
Travertino, what could be simpler?
This is a plaster composition based on lime and calibrated quartz sand. If it is important for you to combine a beautiful surface texture with the benefits of lime plaster, then the choice is obvious. Among the advantages of the Italian recipe is the possibility of applying plaster even on cement soil, concrete or brickwork, subject to preliminary cleaning of the surface from dirt and deposits and application of a special primer mixture based on sandy quartz dust.

This primer will allow you to level and hide the “flaws” of the wall and improve adhesion to the decorative layer. On a prepared surface, for example, sheets of plasterboard or plastered walls, decorative plaster can be applied in one layer, but with pre-treatment with an acrylic primer.
The decorative composition is applied with a spatula and a wide trowel, achieving a uniform layer 3-4 mm thick. The plaster pattern must be applied with a roller with a porous surface; the process of forming the surface is well understood from the video

If you like “brick” patterns on the surface of the walls, with the help of Travertino you can get a brickwork pattern. To do this, strips of construction tape are glued onto the previously prepared wall surface, imitating the seams between brick blocks. Next, you need to apply plaster and separate the strips from the main layer, thereby creating a texture that imitates silicate or ceramic brick.
Conclusion
Simple compositions of decorative plasters do not mean that they are primitive in beauty or design. Most often, such options are used to apply a base for hand painting, painting or applying bas-reliefs from putty.