None of us can imagine life without a mirror anymore. Some have it only in the bathroom, while others have it in every room at home. Designers often include in style created interior mirrors What makes them different? Sizes, shapes and... frames.
If you have been looking for the mirror of your dreams for a long time or want to experiment with an old one, read this article, in it you will find 4 detailed master classes on how to make a designer frame for a mirror with your own hands. Each of the methods is presented as a master class, where the manufacture of the frame is described step by step.
While watching the master class, you will learn how to make frames from wood, from paper tubes, a creative frame for an oval mirror, a frame from twine, a cloud frame, and a wire frame. You will definitely find suitable option and you will understand that making a mirror frame with your own hands is not at all difficult!
What could be more unusual? What could be simpler? Check out this original and budget-friendly idea for a mirror frame made from paper tubes.

Mirror frame made of paper tubes
Materials and tools:
- 7 toilet paper rolls;
- a round piece of thick plywood;
- round mirror;
- black paint;
- mirror mount;
- wire, rope or cord;
- scissors;
- glue gun (hot glue) and PVA glue.
Frame installation process
Step 1.
First, let's prepare the parts for the frame. Let's take paper tubes and paint them well with black paint inside and out. Let's leave it to dry. Paint the wooden base black. Also leave until completely dry. Black will look stylish, but you can use any other color.

Step 2.
After the bushings have dried, press each of them and cut off a centimeter (5-6 pieces from one tube). They should look like leaves in shape. In this way we cut all the bushings.

Step 3.
When the base for the mirror has dried, take a glue gun and apply it to the back of the mirror. Press the mirror firmly against the face of the wood and leave until the hot glue cools completely. Set aside.
Step 4.
- We glue the cut leaf sleeves together, 5 pieces at a time, as shown in the photo.
Please note that all groups of leaves must be the same. To do this, first take 4 leaves and glue them together with PVA at the corners, and then glue the 5th leaf to them on top.
- We repeat this until we have glued all the leaves together, 5 pieces at a time.
- Using a hot gun, glue groups of sheets to wooden frame mirrors Apply glue pointwise, remove excess immediately before the glue dries.
- This part of the work is perhaps the most important - you need to ensure that so that all the leaves are on the same level.

If you have leftover leaves, you can continue gluing them between the groups to make it look like the next photo.
Step 5.
The final stage of the master class is making the mount.
- We take a special fastener for the mirror and install it on the back side of the wooden base in one or two places. If the mirror is not heavy, one will be enough.
- We drag the wire, twine or rope through the fastening and tighten it. It turns out to be a loop.
Now you can hang a mirror in the room, or, for example, in the hallway. She looks so fashionable that no one will guess what such a patterned frame was made of.
Master class No. 2. Creative frame for an oval mirror
If you have ever used a glass cutter, making this frame will not be difficult for you. If you have never held it in your hands and are afraid to work with it, this master class is for you. You can overcome your fear, because it's worth it!

Materials and tools:
- glass cutter;
- mirror (any kind will do - we will make the shape ourselves);
- metal ruler;
- tape or adhesive paper (which does not leave marks on the mirror);
- protractor (or corner);
- marker;
- a special knife that does not scratch the surface of the mirror;
- gloves and safety glasses;
- fine sandpaper;
- gold paint (spray);
- varnish for fixing.
The procedure for installing such a mirror with your own hands:
Step 1.
Let's prepare the mirror - wipe it from dust and place it on a stable, hard surface. We will produce an original octagonal or oval mirror.
- If the mirror was square - good, you will only need to cut off the corners.
- If it was round shape, then you must first bring it to a square shape to make it easier to make an octagon.
Step 2.
- We cut off the corners of the square in the following way: apply a protractor or corner to the corner of the square, measure 45 degrees and make notches on both sides. We repeat this around the entire perimeter of the mirror.
- Then, using a marker and a ruler, draw 4 lines through the serifs - these will be 4 cuts. If you feel more confident wearing glasses and gloves, put them on before starting work.
- We apply a metal ruler along the line and, holding it tightly and applying gentle pressure to the glass cutter, draw it along the ruler.
This must be done carefully so that the glass cutter does not move off the line, otherwise you will have to do a lot of additional work.

After that, in one motion, break off a piece of cut glass by pressing on it. Don't be afraid that the mirror will break, you will only hear a small click. Repeat on 4 sides.

Step 2.
After the mirror has become octagonal, we proceed directly to its framing. At first wipe it with detergent.

Place adhesive paper on the entire front surface of the mirror. WITH Using a marker and ruler, mark the surface as shown in the photo.
In turn:
- draw lines from each side to the opposite - we get 8 parts.
- Place dots in the middle of each side and draw 2 identical squares along them (They will be at an angle to each other).
- Lastly, draw lines from the middle of each side to the middle of the adjacent sides.

Step 3.
We take a special knife that does not scratch the surface of the mirror and cut strips along the lines (according to the original plan).
The strips can be of any thickness, from 2-5 mm to 2 cm, as you like.

Note! What we do not cut out is the very center - this will be an area without decoration.
Step 4.
After all the strips are cut out, the mirror is almost ready for painting. Before doing this, you need to lightly rub the edges of the mirror with sandpaper so that after painting there are no sloppy spots left.

Step 5.
Apply spray paint to the entire mirror and wait for the paint to dry. We also recommend applying a second layer of varnish - this will make it easier to clean the mirror later.
And now - the final stage of making a frame for a mirror with your own hands - remove the adhesive tape between the strips. Carefully pry it up and pull it together, piece by piece. The whole picture gradually appears.

The mirror is ready! You can place it on the table or hang it on the wall using special clips. Now you know that working with a glass cutter opens up a lot of possibilities for improving your home interior.


Master class No. 6. Wire frame
Despite the use of such a simple material as wire, the mirror frame made in this master class turns out to be interesting, rainbow-colored and unique!

Materials and tools:
- Mirror;
- sheet of polystyrene foam (can be bought at a hardware store);
- thick gold (copper) colored wires (5 packs);
- gold acrylic paint;
- pencil or marker;
- wire cutters (for wire);
- glue gun (hot glue);
- a piece of twine;
- short nail;
- scissors.

Build process
Step 1.
First, let's prepare the base for the mirror.
- Place the mirror on a sheet of polystyrene foam. Trace with a pencil or marker. Now we measure another 2-3 cm from this circle and draw a second circle. Using a knife, cut out a circle using this mark.
- Paint the base circle gold. You need to paint evenly on all sides. Leave to dry. After drying, evaluate the color saturation and, if necessary, paint it a second time.

Step 2.
While the paint is drying, take wire cutters and wire and cut the wires to 30-50 cm in length. The length depends on how long you want the rays coming from the frame to be. Keep in mind that the wire will bend in half.

Step 3.
We bend the wires in half, but not perfectly straight, but with bends, as shown in the photo and as your inner voice advises you.
When all the wires are bent and the base for the mirror is dry, insert both ends of one wire into the polystyrene foam.
You need to insert it at one point and to a depth of 2-4 cm. This way the material will better hold the wire beams.

Step 4.
We insert the rays on 4 sides of the frame in a cross, in the direction of all cardinal directions. Then we insert rays between them. This way we get an even distribution of rays in all directions. Don't be afraid of overlaps, this will not spoil the frame in any way; on the contrary, the curved rays will add sparkling and variety. After all, we create, and therefore unevenness is not condemned here, but welcomed!


Step 5.
We fix the mirror on the frame. To do this, apply hot glue to the back of the mirror and place it exactly in the center of the golden circle. Press firmly so that the glue sets and leave until the glue cools completely.


Step 6.
While the glue is cooling, let's make the final touch - a mount for the mirror made of twine. We measure required length rope, cut it off and make a strong knot.

We insert a short nail (slightly less than the thickness of the gold frame) through the knot and secure with hot glue. 
Immediately insert this nail from the back of the frame into the foam. It is better not in the middle, but approximately at a distance of 1/3 from the top edge of the frame.

This mirror can be hung on the wall in any room - it has earned the title of universal thanks to its subtle sophistication, the simplicity of the materials from which it is made, and its warm, golden, rich color.
Master class No. 5. Frame for the Cloud mirror
Surely, all of you have ever paid attention to composite mirrors, when one large mirror divided into several small ones. Want to try making it yourself? Welcome to the master class “DIY Mirror Frame – Cloud”.

Materials and tools:
- several small round mirrors (you can buy them at fixed price stores);
- foam board - plastic foam board (can be bought at a hardware store);
- pot lids (for tracing circles);
- pencil or marker;
- newspaper or paper;
- scissors and knife;
- glue gun (hot glue);
- PVA glue;
- hammer;
- nails.
Stages of frame production:
First, we make templates for the mirrors.
- We take the lids from the pots that the diameter is 6-8 cm larger than the diameter of the mirrors and trace them on paper with a marker. Then we cut it out.
- When all the circles are cut out, place them on the table or any flat surface to determine how the mirrors will be placed.
In our example, it turns out that the 3 largest mirrors are placed below in an arc, and the other two complement them on top.

Step 2.
- Use PVA glue to glue the circles together - this will be a mirror template.
- After drying, transfer the template to foam board and trace it.
- You can attach mirrors and see how it will look.


Step 3.
If you are satisfied with the shape of the cloud, use a knife to cut out one solid shape from the foam panel - along the outer edges of the template.
This must be done smoothly and carefully, since this is the front side of the mirror.


Step 4.
We make holes for the mirrors. To do this, take the knife again and make bushings for each mirror. They should be shallow in depth. But the most important thing is that they should not be wider, but slightly narrower than the mirror so that it fits snugly to its edges.
Step 5.
- In two places where the mirror is supposed to be inserted, it is necessary to make fastenings. This must be done before finishing work with the frame, because... then you will ruin the front side of the mirror with holes.
- Let's determine the center of gravity of the mirror and calculate where the mounts will be located to evenly distribute the weight of the mirror. Let's mark them.
- Then, using a pencil or an awl, we make 2 through holes in the frame. And only after that we proceed to inserting mirrors.


Step 6.
We take a heated glue gun and apply it to the entire back side of the mirror, press it tightly to the base and hold it a little. After a minute, you can release the mirror; soon the glue will cool down. The same procedure must be done with each mirror.


We hammer in 2 nails at a distance from the holes made in the frame. After that, we install the frame. As a result, the cloud mirror with your own hands is already ready and hangs on the wall, delighting adults and children with its whiteness and reflections.
So different in their shape, material, size, color, style, price category... mirrors for any home, for every taste and color. But there is nothing more unique and more beautiful than a mirror than something made with your own hands. It contains a particle of your creativity, your view, your handwriting, so to speak. Make a mirror with your own hands and not only the interior of your room will change, but also your reflection in the mirror will become more smiling, rest assured!
We live in an era of the formation and popularization of the author's design of premises of any type. Standard decoration of apartments and household items is no longer fashionable. Real chic is considered to be the presence of handmade items in the room - flowerpot, vases, lamps and chandeliers. Well, the mirror in a beautiful frame, which was created by the owner of the house, is a real masterpiece!
DIY designer frame for a mirror - the advantages of such a mirror design are obvious - you can choose the size of the frame and its design in accordance with the overall style of the interior, and framed mirror will not resonate with the environment, but will become an integral part of it.
Mosaic frame
Creating a mosaic is an amazingly fascinating form of needlework and art. A mosaic frame for a mirror is sophistication, uniqueness and practicality in “one bottle”. The advantages of this type of mirror design are ease of operation, low cost of materials, because you can create a mosaic even from fragments of a broken dishes. Shards of dishes, shards of tiles, jewelry, and colored glass are also suitable for this work.
The mirror is attached to a base, it can be a sheet of plywood or chipboard. The base must be larger than the plane of the mirror. The mosaic elements will be attached to the protruding part of the wooden base using glue and glue gun.
One way to add personality to your home is to decorate it with homemade items. A wide field of activity opens up when decorating. The most ordinary item can be turned, at least, into an original one. For example, the decor of a mirror turns an ordinary piece of glass into a stylish and original thing.
Basic principles of decorating mirrors
Do-it-yourself mirror decor using the most various materials, including those that usually go into the trash, and if purchased, cost very little. For example, tubes from old newspapers or magazines. In some cases they are used without dyeing, in others they are painted. Spray paint is more convenient - it is applied evenly thin layer, coloring occurs many times faster than when using a brush. You can also use broken china, mirror, colored glass, shells, pebbles, rhinestones, glass drops, buttons, ropes, plastic bottles, branches, wooden planks and chopsticks, plastic spoons and other strange things.
All this wealth is usually glued onto transparent silicone. It is sold in construction stores, available in small tubes or larger cartridges for a construction gun. It’s more convenient to work with a gun - it’s easier to control the force and get the right amount of glue, which is problematic with a regular tube.
Please note that silicone can be acidic or neutral. The acidic one smells very much like vinegar until it dries and you can only work with it in a well-ventilated area. Neutral silicone sealant Doesn't smell like anything, but costs more. Still acidic, until it hardens, it can corrode the paint that is applied to the decor. When purchasing, pay attention to the setting time. This is the time during which you can still fix something, move something forward. As soon as the glue begins to polymerize, nothing can be done - it is covered with a hard film. The average time for the formation of a surface film is 10-20 minutes, but there are also more “long-lasting” compositions.

There are two decorating techniques:
- The decor is outside the mirror. In this case, a base is cut out of thin fiberboard or thick cardboard, which is larger in size than the mirror. It can be any shape - round, square, arbitrary shape. The decor is glued to the base, after the glue has dried, a mirror is inserted into the finished frame.
- Decorating the mirror around the edge. In this case, the glue and all fragments are applied directly to the mirror surface.
There seem to be small differences, but the design looks different in different techniques. The second allows you to get an openwork decor of the mirror, which seems to be illuminated by reflection.
Examples of decor for round and oval mirrors
First, let's talk about the decor, which is “built” around the mirror. The circle is beautifully decorated. You can make a sun, a flower, a star, etc. from it. Lots of options. Most often, the decor is also built in the form of a circle, but it can be a square, a multi-pointed star or any arbitrary shape.

From sticks or paper tubes
You can decorate a round mirror with Chinese chopsticks or tubes twisted from sheets of newspaper or magazine. If the tubes are rolled from newspaper, they will have to be painted. Made from thin glossy paper on which magazines are printed, they can be used without painting. The sticks can also be painted, or left as is.
To paint, find acrylic paint of the desired color in a can, lay the tubes on a sheet of waste paper, and paint on one side from a distance of 20-25 cm. Once dry, turn all the tubes/sticks over and apply paint on the other side.

Next you will need silicone. Apply glue to the back of the mirror. You can - in a short strip (so that it doesn’t have time to harden while you lay out the rays), or in drops. If the back of the mirror is not protected by anything, the silicone must be neutral. The acid will dissolve the amalgam and the mirror will be damaged. Place the rays on the glue and wait until the glue sets. After 24 hours, you can safely hang the unique mirror in place.
The mirror can be with or without a rim - your choice. Instead of sticks/tubes, you can use strips of glass, wood, plastic, etc.
From plastic spoons
In this version, a circle of larger diameter is cut out of thin fiberboard or thick cardboard. how much more - choose for yourself. Place the mirror in the center and trace it with a pencil or marker. The decor should not extend beyond this line.
We take plastic spoons, cut off the handles from them, and glue the scoops around the perimeter of the mirror. Three or more such layers are made. They look like petals. When gluing, try to place them very tightly to each other so that the backing does not show through. They can be placed straight or slightly turned to one side.
For better effect they can also be painted. The paint can have a metallic effect; you can paint the entire decor one color or different.

After the frame is ready, glue a mirror onto the same silicone in the center and admire it. After drying, you can hang it on the wall.
Using the same technique, you can decorate the mirror with buttons, shells, and branches of different diameters cut into circles. They even use trailers and model cars. They are painted in some unusual color and also placed in a circle.
The decoration of this mirror is toy cars
Something similar can be done with a rectangular mirror. In any case, it will look good with branches and buttons cut into circles. The other options are hardly suitable.

From plastic or cardboard rings
You can also decorate a mirror using rings. They can be cut from plastic pipes or glued together from cardboard. The sizes of the rings can be the same diameter or different, their width is about a centimeter or a little less.

If the rings are made of cardboard, you will need a base on which to fix them. Suitable for these purposes plastic cover slightly smaller in diameter than the mirror. We will glue the first row of rings to the sides of the lid. The second and all subsequent ones are attached to them. We additionally secure one of the rings of the first row with a screw with a ring. We will then hang our mirror on it.
After the entire structure is glued together, take the sequins and glue them to the ends of the rings. The work is painstaking and requires time and patience. It’s easier to hold and move sequins with tweezers and better with thin tips. This mirror decor is universal - in winter it is associated with a snowflake, in summer - with the sun.

Using the same technology, rings from plastic pipe. But they do not need a foundation, since they themselves are quite rigid. We assemble a ring from them required diameter, glue it together. When choosing glue, make sure it is intended for plastic. Actually, there is a special glue gun and glue sticks for it. They are much more convenient to work with, but you can get used to regular silicone.
The edges of the rings do not need to be covered with anything. They look good themselves. But in this case, they must first be treated to remove irregularities and burrs that remain from the saw. If they were cut with special scissors, there will be almost no unevenness, but the edge will still be straight, and a rounded one looks better. The ends are processed with fine-grain sandpaper. Then they are wiped from dust and degreased (wash in water and detergent, wipe dry or dry). Only after this can you start working with glue.
From the rope
We take a thick rope. It can be synthetic or hemp. For larger sizes, you can even use a rope. We also cut out the base from cardboard or fiberboard, which more sizes mirrors A thin layer of glue is applied to this base, and the rope is laid out turn by turn.
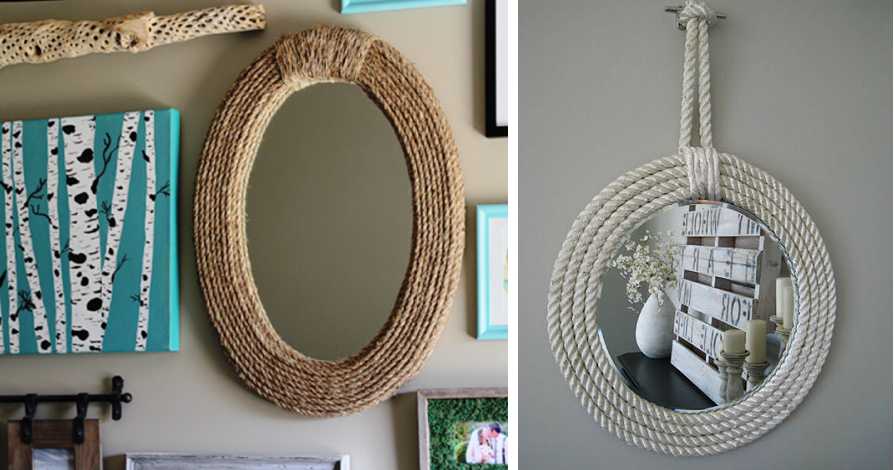
IN in this case It may be better to first glue the mirror in the center and “wrap” the ropes around it. This way it turns out to be recessed in the frame.
Decor based on the mirror
You don’t always want to make a border around a mirror surface, and the decor that is applied to the mirror turns out to be more voluminous due to reflection. Therefore, basically another rule applies here - there should be free space between the decorative elements. These techniques will allow you to decorate a square or round mirror - with virtually no difference. The main thing is to choose the right pattern or decoration method.

Transparent stones
The most simple technique- select the decor you like and place it along the edge of the mirror. At first, you can lay it out without gluing it - so that there is an opportunity to correct or move something. When you are satisfied with the result, apply a drop of transparent silicone to each fragment and return it to its place.

This mirror design looks best when using transparent and translucent stones. They can be colored, transparent, plain.
Painted decoration
For this work you will need special materials. You will need:
- Glass outline. This is a transparent or colored composition in a tube with a pointed spout. It is applied to glass and mirrors in the form of a thin strip. Usually it outlines the contours of the drawing, that’s why it’s called that. The contour on the glass can be with or without firing. Naturally, at home it is easier to use those without firing.
- Stained glass paints. They differ from ordinary ones in that after drying they become transparent. They are applied with brushes or squeezed out of the tube into the contour, after which they are distributed using the same brushes, swabs, and cotton swabs.
- Glitters. These are shiny small fragments in the form of hexagons, stripes, circles, etc. used in decoration. Can be added to paints and varnishes (including nail polishes).
You will also need the usual materials: alcohol for degreasing, cotton wool, cotton swabs, brushes (preferably with artificial bristles), toothpicks. You will also need a drawing that you are going to transfer to the mirror, carbon paper, and tape.

We place a carbon copy on the mirror, put a drawing on top, fix it with tape, and trace the drawing along the contour. Carefully remove the paper and carbon paper. Take a tube with a contour and trace the lines. Nearby is solvent, cotton swabs and toothpicks. We use them to remove flaws that appear during work.

Next, the contour should dry. This requires several days, and you can speed up the process using a regular hair dryer (not a construction hair dryer). After the outline has dried, take stained glass paints, pour a little into the outline, spread it with brushes, adjust with toothpicks - so that there are no unpainted areas left inside the outline. After stained glass paints dry, they become transparent. If you wish, you can add glamor using glitter.

The mixture of the two described technologies - painting and stones - looks very good. One example is in the photo above. The work is painstaking, but it turns out very beautiful.
Beaded mirror edging
In this technique, it is not possible to use ready-made drawings - there are a lot of accidents and it is not always possible to predict the result. But it's important to have a picture in your head of what you're going to see (or a photo of a prototype). For this work you will need transparent glue (the same silicone), multi-colored beads, stones and other decor that you plan to use. Will still be needed masking tape and brushes, toothpicks.
Place tape on the mirror at some distance from the edge. It separates the finish from the rest of the surface. The border does not have to be exactly, it can be of any arbitrary shape. The width of the decorative border is usually not very large, since a wide one looks a bit rough.

Apply silicone to a separated area of the mirror surface using a snake. Spread a small piece at a time - a strand of 5 cm. Quickly distribute the glue over the entire surface. This can be done with a piece of plastic bottle. We pour beads onto a sheet of paper and scatter them over the glue. Straighten with a brush and toothpicks. Don't use your fingers - it's hard to wash. We apply glue further, continuing decoration. Once you have gone around everything along the contour, remove the tape and leave it to dry.

Full drying time varies depending on the silicone, but is usually 72 hours or more. Then nothing can spoil your work, and you can hang it carefully within a day.

Some practical advice. If you want diagonally offset stripes different colors(as in the photo), apply glue in the same areas. This way you will get a clearer separation of colors and the work will move faster. If the boundaries should be blurred - with a smooth color transition - different colors Place the beads on different pieces of paper, pour it in, shaking it slightly from side to side. Well, immediately after application you can correct everything with a brush or toothpick.
Beautiful frame for a mirror
This method of decorating a mirror has already been described - we take the decor and glue it on. But not on the mirror surface itself, but on the frame. The frame can be made from the same piece of fiberboard, or you can buy a mirror in a plastic (for example) frame.

From mosaic
To create a mosaic you will need mosaic pieces; you can use fragments of ceramics or colored glass, mirrors. You will also need glue (silicone) and grout for the seams ceramic tiles(can be white, colored).
From fiberboard (cardboard will not work, as the decor will be heavy), cut out a frame for the mirror, place it in the center, and draw an outline. Next, apply strips of glue to the frame and place them on it. mosaic tiles or pieces of glass.

After everything has been laid out and the glue has dried (about three days), take the grout and dilute it to a thick sour cream state (the proportions are written on the packaging). This mixture is used to fill the gaps between the tiles. When all the gaps are filled, remove the excess with a damp cloth. To prevent the mosaic from looking dull, you need to remove all the grout so that the tiles are clean. And this must be done before the grout dries.

This mirror decor is perfect for the bathroom. The decor is washable and fits well into the bathroom design concept. Such a mirror will look especially decorative if the mosaic is matched to the tone of the tiles.

Of course, every owner dreams of decorating the interior of his residential building in an interesting, unique style that will not be like any other. For these purposes, accessories from famous designers are used, but this will require spending a considerable amount of money from the family budget.
A completely ordinary frame for a mirror, made by yourself, will help to complement pieces of furniture favorably, and even surpass many designer masterpieces.

It is no secret that a mirror in a home is an important and necessary item, but in addition it serves as a beautiful component of the interior decor, which will beneficially expand the free space and fill the room with additional lighting.

The mirror surface itself does not attract the eye; what makes it beautiful is the frame itself, made in a unique style.

Frames made from scrap materials
Even an ordinary old rarity can be reborn and decorated yourself, using the most common household items and even products.

A variety of food products are beneficially used for decoration: dry pasta, coffee beans, peas and cereals. The photo of the frame for the mirror shows an option for making a frame made of pasta of various configurations and shapes, which are carefully glued around the entire perimeter.

To complete a specific intended pattern, it is necessary to distribute them evenly along the entire mirror surface. In any case, the frame will be individual: both products laid out with a certain ornament, and laid out in a chaotic order.

At the end of the work, it is appropriate to cover the product with a cloth (masking tape) and spray spray paint on the surface.
The plinth for ceilings perfectly imitates wood, and it is much lighter in weight category. It is recommended to start work by attaching the mirror to a plywood sheet or chipboard in order to achieve a more reliable fixation of the fastener to the wall.

We cut each side of the frame the same way wooden version, aligning the corners correctly. But the size of the inner edge must exactly match the length of the side of the mirror. You can connect all the parts quite easily using a glue gun.


The effect of an old luxurious piece of furniture will be given by golden paint, which is applied with a regular sponge in strokes. Such a frame will be light in weight and unique in its design.

If the interior of a residential building has stucco details, it is wise to use a similar decoration for the mirror. Market building materials offers a large assortment decorations made of plaster or plastic materials, which can later be turned into an amazing picture.

The base should protrude beyond the edge of the canvas and be painted in a light, white or colored shade. Having secured the canvas, the stucco molding is attached along the entire base of the passe-partout using silicone glue.

Mosaic pieces in the interior
This design is most often created for a bathroom of absolutely any style, since the basis for the decoration is the fragments left after renovation of unnecessary ceramic tiles. The main task is correct selection drawing.

Modern minimalist style involves the presence of complex geometric patterns and abstraction. A floral motif, plants and grass are appropriate in a rustic interior.


Before making a frame for a mirror, the canvas is mounted on a sheet of wood, and the selected design is applied in a circle. Then, using a flat cutter, they cut out parts from the tiles, giving them a certain shape and placing them on the frame.

If the initial sketch is successful, you can safely attach the fragments adhesive composition onto the frame, then wait for the product to dry completely (maximum one day)


An ordinary mirror without a frame, of course, will not replace an exclusive product with a luxurious frame; moreover, it will favorably emphasize the theme of the interior and its uniqueness!

Photo frames for mirror


Almost any old thing can be given new life. You shouldn’t rush to throw away even your grandmother’s favorite mirror, the frame of which has fallen apart, and the mirror itself is damaged at the edges. Even a product in this condition can be easily turned into something original, making it a unique designer item. DIY mirror decor is an opportunity not only to decorate the interior an unusual product, but also give it a second life.
Change appearance Any mirror can be decorated in two main ways - by decorating the glass sheet itself or by creating an unusual and original frame for it. Most often, of course, craftsmen and needlewomen choose the second option - it is much easier to think of a new frame format and insert a mirror into it, or glue a new frame directly onto the canvas.
On a note! In the case of creating a frame, the decor can be located both outside the mirror and directly on it.

However, do not be afraid to decorate the mirror canvas itself. Now there are a lot of different materials and tools that will allow you to make unique applications and even matte the mirror in the right places.
On a note! Matting a mirror and creating all kinds of patterns on it has recently become very popular. It turns out that you can do this yourself, without resorting to the services of craftsmen.

What materials will be useful?
What can be used to turn an ordinary boring mirror into a real miracle? Here we can only say that everything can be used - you need to give free rein to your imagination. Children's toys, bottle caps, paper, fabric, all kinds of natural materials, from pebbles to pine cones - absolutely everything will do. The main thing is to choose the option that can be made depending on the person’s creative skills, as well as one that will simply fit harmoniously into the interior.

Wood is most often used to create original frames., as it is easy to process and fits almost every interior style. The material is time-tested, durable and environmentally friendly. Yes, and it looks very beautiful.
To decorate mirrors of square, rectangular and similar shapes, the easiest way is to use ordinary wooden borders, blocks, and plinths. Round and oval canvases are ideal for experiments. Here you can use wooden spatulas, natural driftwood, twigs and much more.

On a note! Round mirrors are often turned into original suns or unique nests using wood.
Some craftswomen who love to work with paper also use it to decorate mirrors. Often used are egg cartons that easily turn into flowers. Special stickers or . Don’t think that paper is a completely useless material. At correct technique She won't lose her job quickly. But the mirror will turn out to be very unusual.
On a note! Sometimes they even use unusual items– metal rulers, children’s toys. In the first case, the rulers can be placed around the mirror like rays of the sun, in the second, toys are glued along the perimeter of the mirror in a certain pattern. This great option for a children's room.

Concerning natural materials, then you can use stones, cones, shells. The latter will look great in the bathroom. Moreover, products can be glued both symmetrically and along different places depending on your desire.
In any case, decorating a mirror with improvised materials is a truly creative process. You just need to weigh all your wishes, strengths, possibilities and think about which option to choose in this or that case.
Decor rules
Decorating a mirror is simple, but you must follow a number of rules so as not to spoil the mirror base - then you will definitely have to throw it away. But following the rules is not difficult if you know them.
- If products with volume are used to decorate a mirror, then it is important to ensure that there are not too many of them, otherwise the finished design will look bulky.
- When decorating a bathroom mirror, it is better to use moisture-resistant materials.
- Any decor must be in harmony with the interior style.
- You need to stick any objects on the mirror using transparent silicone or a glue gun.

Attention! Silicone can be acidic or neutral. The first one has an unpleasant vinegar smell until it dries; you need to work with it only in a well-ventilated room. Also, acidic silicone can corrode paint that may have previously been coated on the product.
- Mirrors irregular shape It is not recommended to place it in a frame. Smooth round or square mirrors look best in a frame.
- If a composition of several mirrors will be formed on the wall, then it is better to choose the same type of style for their design.

Master classes on creating beautiful mirrors
There are a huge variety of techniques and design options for mirror surfaces. For readers, the most interesting options are collected here.

Flower stencil on the mirror
It doesn’t take much effort or time to create a mirror with beautiful bright colors around the edges. Brushes will be used for work, acrylic paints, pencil, regular sponge, selected stencil pattern, masking tape and nail polish remover, which can be replaced with acetone.
Attention! It is better not to use ordinary tape for working with a mirror. Sticky marks, which remain after removal, are very difficult to wash.
Step 1. Prepare everything you need for this mirror design. In this case, it is advisable to get everything at once, so as not to be distracted from work to search for something missing.

Step 2. Stencils for decoration are used ready-made, purchased in a store, or made independently from thick cardboard. They can be printed on a printer or translated using tracing paper. Absolutely any design can be used.


On a note! Acetone will be used if the drawing is damaged during application and requires removal.
Step 4. The stencil is attached with tape directly to the mirror in the selected location. If it involves the use of several colors, then part of the pattern is also sealed with tape so as not to apply paint in the wrong place. Only the areas of the stencil that will be painted with one color are left open. The locations of the stencils are planned in advance.

Step 5. The pattern is painted over with a brush or sponge. When areas of the same color are painted over, you can move on to other areas, gradually removing the tape. In some cases, the contours of the pattern can be additionally drawn with a thin brush after removing the stencil.

Step 6. In this case, the mirror is additionally decorated with pink dots, which are applied with a brush along the perimeter. Decoration is complete. Such a mirror can be hung in the bathroom, since acrylic paints will not be afraid of water. If desired, the pattern can be changed by simply erasing the old one with acetone.


Sometimes stained glass paints are used to decorate a mirror. It is better to buy those that do not require baking. They are sold in an art store.
Decorating with pipes
Probably, few people would have guessed to use polypropylene plumbing pipes to decorate a mirror! It turns out that with their help you can decorate any mirror in a very original way, the main thing is that this option is combined with the interior style. The work will require cutting pipes of the same or different diameters, sawing or cutting tool for cutting them, sandpaper and a glue gun.
Step 1. From polypropylene pipes neat, even rings of the same width are cut. The easiest way to do this is with a fine-tooth miter saw.

Step 2. After cutting, the sections of the rings are sanded with sandpaper so that they are neat and smooth.

Step 3. All rings according to the chosen pattern are glued together with a glue gun. The final shape of the original frame can be either round or square - the main thing is that it is shaped like a mirror.

Step 4. The mirror itself is glued to the rings in the selected location using a glue gun. You only need to hang the finished product by the mirror itself.

Matte the mirror with your own hands
The mirror with a frosted pattern looks very original. To work, you will need a drawing created on an adhesive film using a stencil, a piece of mounting film the size of a mirror, a special matting paste, and a sponge.
Step 1. To obtain a stencil for a mirror, the details of this pattern are removed from the adhesive film where the pattern is applied. In this case, these are leaves, grapes and other elements. To ensure that the design is already cut out, it is better to order such a stencil and print it from a specialized company. You can cut out the pattern yourself, but this will require the use of a stationery knife. In this case it is important to work very carefully. What is highlighted in white in the image will be the finished matte pattern on the surface of the mirror.


Step 2. A mounting film is applied to the film with the pattern. Its lower protective layer is removed and the film is gradually glued to the surface of the pattern and rolled with a roller. Mounting film is necessary to easily transfer the pattern to the mirror.


Step 3. Now the lowest protective layer is gradually separated from this entire film cake. The film is glued to the mirror, the protective layer is separated in stages. The film rolls well with a roller.


Step 4. The mounting film is removed from the surface of the pattern. It is important to make sure that the drawing does not follow it.


Step 6. When necessary time will pass, the paste is removed with a plastic scraper. It is reusable, you can simply scrape it off and put it in a jar.

Step 7 The mirror itself is washed with water.

Step 8 The film with the pattern is removed from the surface of the mirror.


Video – Matte the mirror with your own hands
Making a beautiful frame
A very beautiful frame for a mirror can be made from ceiling moldings. To do this you will need thick cardboard or plywood, ceiling moldings(a couple of pieces) square mirror, acrylic putty, foam glue, acrylic paints (black and silver), silver decorative cord, hard and soft brushes, palette knife or kitchen knife, as well as a stationery knife. To avoid getting your hands dirty, you can wear gloves.
Step 1. Based on the dimensions of the mirror, cut off 4 parts of the same size - parts of the frame. The corners for joining are cut using a square using a stationery knife.


Step 2. The parts are glued together with glue to form a blank for the frame.

Step 3. After the glue has dried, the frame is turned over and the joints between its individual parts are puttied from the inside out. Due to this, the frame will be stronger.

Step 4. The outside of the frame is also puttied, but not completely, but at the joints of the baguettes and along the inner edge.

Step 5. When the putty dries, the frame is painted black. The interior border also paints well.

Step 6. Once the black paint has dried, you will need to apply silver paint to the convex parts of the frame. It is applied with a sponge so that the frame remains black in the recesses of the pattern.


Step 7 After all layers of paint have dried, the frame is coated acrylic varnish. It is white, but will become transparent after drying.

Step 8 A hole is made in a piece of cardboard or plywood, cut to the shape of a mirror, but with allowances for the frame, for hanging the mirror.

Step 9 The mirror itself is glued to the center of the base.


Step 10 To ensure that there is no void between the frame and the mirror, a decorative cord is glued to the inner border.


Step 11 The frame is glued to the base, on which there is already a glued mirror.

Step 12 After the entire structure has dried, a layer of putty, black paint and silver paint are applied to the side of the frame. All layers are applied in stages, after each of them has first dried.


 And at the end - silver
 How to make a sun mirror
Original and beautiful design mirrors can be made from wooden popsicle sticks or spatulas. This is ideal for a small round mirror. Cut out circle and sticks Glue long “rays” Place narrower sticks Use scissors to cut out such drops 

Step 7 A mirror is glued to the center, around it there is a plastic edging, painted in the same golden color as the “sun” itself. The remains of an old mirror frame can be used as edging.
 Decorating a mirror with cotton swabs Decorating with scrapbooking paper Using an egg tray
And this is just foil glued along the edge.
Video - Decorating a mirror with bottle caps
Decorating a mirror with your own hands is a great opportunity give new life to an old product, decorate the interior in an unusual way, or give someone a nice holiday gift. The main thing is to give free rein and scope to your imagination.
5 /5 (3 )