Is such a building on personal plot or in the garden, where you can relax with the whole family and invite friends.
But the arrangement is not only about giving an aesthetic appearance to the building itself.
It is important to organize the internal space.
The role of the gazebo in the design of the cottage
The gazebo has a special role in the design of the dacha. In addition to its functional purpose, it must be in harmony not only with the surrounding buildings, but also with the landscape of the site.
It would be good if all the facades of buildings on a personal plot, including the gazebo, were finished with the same material. Gazebos whose roof is an exact copy of the roof of the house look interesting.
But even such a room is unthinkable without internal content, the main element of which is the table.
You can make a good table yourself
You don’t have to buy a ready-made table for the gazebo, because you can make it yourself.
This option is preferable. As a result, you will receive a piece of furniture that you not only need, but also fits perfectly in size and shape.
This does not require extensive experience in construction work And special tools. Simple skills and a small set of tools are enough.
Wood is the best choice for making a table. Its main advantage is long term service, visual appeal and naturalness.
Such a table will become a worthy element of the overall design of the cottage.
Creating a Project and Drawing
At this stage it is necessary to create a detailed drawing of the future table.
Self-tapping screws and fasteners made from of stainless steel. Be sure to use wood impregnation, which will protect the table from rot and fungus.
Development of a 3D drawing of a garden table in AutoCad.
Step by step instructions
Do garden table you can do it yourself by following this master class.
It is necessary to prepare all tools and materials for work in advance. On preparatory stage process the wooden surface and select boards according to thickness.
Then four boards measuring 15x70 cm are laid in a row and connected with thin wooden planks. And the end parts are covered on both sides with boards measuring 15x60 cm, which are fixed using special metal plates.
This results in a smooth wooden surface.

Rectangular top frame box
To prepare the top trim, make a box. To do this, you can use boards measuring 10x91 and 10x46 cm. First you need to make a rectangular base from long boards.
After this, stiffening ribs are installed on its surface, fixing them with self-tapping screws. It is important to install them at equal distances.

Support box
Preparing the lower frame
It consists of 2 parts, made in the form of the letter “P”. They are attached to each other using a long wooden plank. U-shaped elements are represented by two legs connected to each other by a bar.
Each support leg is made from four bars measuring 4x4 cm. After both parts are made, they are fastened to each other with a strip, the length of which is 10x99 cm.

To make it more convenient, turn the tabletop over and place it on the ground. Do the same with the frame.
Metal corners and self-tapping screws are suitable as fastening elements, which ensure reliable connection of structural elements.

Connecting the tabletop to the frame
We treat surfaces
All wooden surfaces must be carefully treated using a special protective compound.
He will give reliable protection from exposure to moisture and insects.

Varnish impregnation
Wooden table
Wood is the most environmentally friendly and pliable material.
A wooden garden table can be round, square or rectangular. Irregular shaped models are also popular.
If you plan to make it yourself, the tabletop may consist of narrow boards or slats.
A table made from wooden saw cuts also looks good, which can be made in several ways:
- connect the cuts to each other with a tongue-and-groove joint or staples, forming a flat surface;
- secure the cuts to some kind of base.
The finished surface is sanded and varnished. The gaps between the boards can be coated with epoxy resin.
Sand the finished product and coat it with a protective compound.
To give the surface desired shade, you can use stain or special impregnation with pigment. Such a piece of furniture can be placed not only in a gazebo, but also in an open space in the garden.
For more information on how to make a table for a gazebo made of wood, watch the video:
Pallets are used as a basis
Designers actively use to create furniture wooden pallets. This technique allows you to create an original stylistic solution.
Existing ideas can be used to implement the following solutions:
- models on a stand;
- on wheels;
- with lid;
- with glass top.
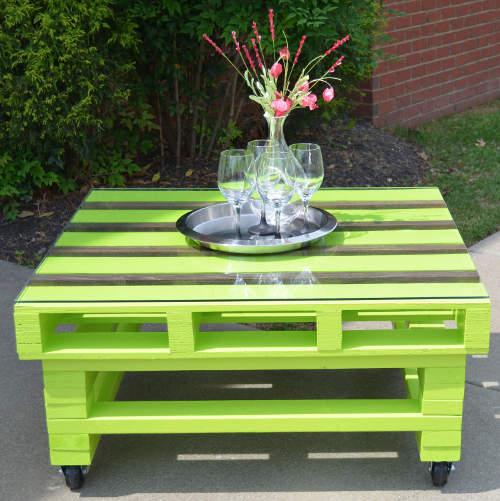
It is not necessary to buy a ready-made table. You can make it yourself using pallets.

Such tables themselves are not difficult to manufacture. To do this, you first need to find or buy a pallet. You can find it in one of the large hardware stores. Then you need to saw off a part of suitable size and screw the wheels to it.
You can put an MDF panel or glass on top. You can also buy them at one of the hardware stores. The finished table must be treated with impregnation.
If you want to change its color, use a stain of a suitable shade. This completes the production of a table from a pallet.
Such a piece of furniture will look natural not only in a gazebo, but also in the open air on a personal plot. And the design, complemented by wheels, is mobile and inexpensive.
From scrap materials
Many designers use any available materials to make a table. Such a piece of furniture allows you not only to decorate the interior space of a house or apartment, but will also look organically on a personal plot, in a gazebo or garden.

Ordinary stumps decorated with mosaics look original. Larger stumps can be used in a high-quality original table. And smaller stumps are suitable for use as unusual stools.
Any tile left after renovation is suitable for decoration. It is split into small pieces, which are attached to the surface using cement mortar or tile adhesive.
Originality lies in your creativity. Such designs often turn into real works of art.

Tabletop in mosaic
An old table that has fallen into disrepair can also be decorated with mosaics. This will update the countertop. To do this, first remove old paint from the legs, sand them and cover them with one or two layers of new paint.
Then they sand the tabletop and glue the mosaic to it. You can apply grout on top, which will protect the surface from the adverse effects of the external environment.
You can also use a wooden spool for winding cable as a table. To do this, it is enough to process it and paint it in a suitable shade. But it can be further decorated.
The resulting piece of furniture will become more convenient if wheels are attached to its lower part. In this case, you can easily move it around the site.
Also, many people have inherited tables. Usually they are not used, as they require serious modification. At the right approach they can be used as garden furniture or put it in a gazebo.
If you inherited forged table, you can simply restore or replace the old countertop.

Wrought iron furniture for the gazebo
For those who have weaving skills and sufficient perseverance, wicker garden furniture made from wicker is suitable. Similar furniture You can do it yourself.
But if you like wickerwork and don't want to make it, go to a big box store. Here you can buy tables made of wicker or rattan, as well as artificial fibers.
If there is a lot of metal left on your site and you know how to work welding machine, can be done beautiful table for a garden or gazebo.
In the presence of necessary skills you will get an openwork and original product that will be one of a kind.
But before you start using it, do not forget to process everything metal surfaces anti-corrosion agent.
If you plan to paint the table, you can coat its surfaces with a special primer and apply finishing layer paints. The most suitable materials for countertops are wood or glass.
You can use a more interesting approach. Finish a simple countertop with mosaics or pebbles same height. Then cover the surface with glass according to the size of the resulting tabletop.

Whatever table you choose for the gazebo or your garden, the main thing is that it is in harmony with the surrounding landscape and the interior of the gazebo. And a thing made with your own hands will delight you with its uniqueness and originality for a long time.
For those who live in big cities, a summer cottage is a kind of paradise. Fragrant herbs, fresh air, the smell of a fire and definitely a wonderful home that feels comfortable and homely. A special coziness of a country house and an outdoor area is given by furniture made with your own hands to your taste, which can enliven the space. In this article we will tell you how to make a table for your garden with your own hands.
Agree, it’s still easier than making a sofa or wardrobe. To implement your plans, you do not need to specifically study or invite specialists. To work, you will need inspiration and prepare the necessary materials.
Preliminary stage
The appearance of the finished product is important. When you make a table for your dacha with your own hands, do not neglect this.
It will be nice to see the admiration and surprise of your guests, to whom you will tell that you made it yourself.

- Its main basis is a wooden tabletop. As a rule, ready-made boards or wide boards are used for this.
- An important factor is also the selected type of wood from which you decide to make the table:
| Conifers |
|
| Deciduous |
|
- In addition to the tabletop, the table must have legs. You can make them from wooden shield or buy ready-made ones.
Advice: if you don’t find them in the store, look at the counters where they sell auxiliary materials for making stairs - 4 pieces of metal or wood balusters may be quite useful to you.
Factory-made blanks will add some gloss and chic to your table.

Preparation
First you need to determine where you will install the furniture and whether you plan to remove it from the house. Eg, a good decision for a country house there will be a narrow and long table that will ensure freedom of movement for people around the room.

Materials and tools
- The boards are tongue and groove. They will create a tight connection and protect the table from liquid getting into the cracks. You can also use a couple ready-made shields made of wood, size 2000x300 mm.
Tip: to ensure the table’s resistance to loads, select the thickness of the boards to be approximately 30 mm.
When choosing a material, make sure that the panels or boards are even, they must fit each other absolutely exactly, this will save time on separate measurements and cutting.
- Rails for fastening - 3 pieces. They are needed for the stability of the structure. The most suitable size is 2000x100 mm with a thickness of 28 mm.
- Table legs (finished) or balusters, their price depends on the quality of the material.
- Hacksaw.
- Self-tapping screws.
- Electric drill. Please note that this tool must be available. You will definitely need it, so if you don’t have your own, then rent it or ask for temporary use.
Advice: if there are power outages in your area, renting a diesel generator for your dacha will help solve the problem.
- Polyurethane varnish. You can choose either glossy or matte. The second one shows the structure of the tree well. Instead, you can use natural oils that will protect the wood from external factors.

In the photo - a country diesel generator
- Good quality brushes.
- Grinding machine. Its absence will make work much more difficult.
- Sandpaper with fine and coarse fractions. This will make it possible to provide the table with the desired smoothness.
Process
Below are step-by-step instructions:
- Connect the boards or boards and lay them outer side down. On at this stage it is necessary to monitor the docking so that country table was smooth.
- Secure boards or boards. Place the slats along the long sides. This will strengthen them and fix them along short boards. To ensure the stability of the table, additionally secure the boards (or panels) using slats in the center in one or two places.
- Be careful when securing slats. Screw in the screws slowly, without changing the degree of pressure, angle or intensity. Otherwise, the shield or rail will crack, which will affect the quality of the product.
- Secure the table legs at a distance of 50-70 mm from the edge. Using an additional rail, strengthen the attachment point so that the support does not deform after a while. This will enable the table long time look perfect. Secure the legs also slowly.
- Turn the table over and remove debris and sawdust, sand all rough edges using sandpaper and a sanding machine.. Dry the table thoroughly with a dry cloth.
Decoration
Building a country table yourself is not all.
Now you need to start finishing, and, if you want, decorating.
- Cover the entire surface of the table polyurethane varnish. (See also article.)
- Then you need to let it dry for 24 hours.
- Carefully examine the surface of the table, sand it again with sandpaper and varnish it a second time.
- If you wish, then you can paint the table, for example, with acrylic paint.
- Once the surface is completely dry, the product can be used for its intended purpose.
Conclusion
This article described in detail one of the methods self-made country table made of wood. Although at first glance the work seems difficult, in fact the process is quite exciting, which will make it possible to make good, high-quality furniture for little money. The video in this article will help you find additional information on this topic.

OLYMPUS DIGITAL CAMERA 
The table - an integral attribute of every home - can be made of different materials, have a simple and intricate form and carry out different functions, but it is completely impossible to do without it. Not everyone understands why make a table with your own hands if such an ordinary item can be easily bought at any furniture store. Indeed, not everyone dares to make furniture with their own hands.
But the daredevil who thoughtfully gets down to business will certainly enjoy the process and the excellent result of his labors. Some come to this wanting to save money, especially if they need something simple. Others, obeying a creative impulse, want to have a unique piece of furniture in their home that will improve their mood and self-esteem. In addition, a table created with your own hands always has ideal proportions and matches the interior style of your particular home.

Product shape and design
A wooden table is an environmentally friendly, aesthetic and durable product that will fit well into both an apartment and a country house. Moreover, there are options for special garden tables. It can be light, portable, or solid and massive, have different models and forms:
- Angular;
- Oval;
- "Book";
- Folding;
- Sliding;
- Transformer.

Transformers are perhaps the most interesting category of tables. When folded, they are very compact and look like a small bedside table. If you put it against the wall, it will take no more than half a meter. A table of this shape is indispensable in conditions limited area when it is not possible to keep a large dining table for a dozen people. Hinged tabletop covers are attached using a hinge system. Transformers are usually rectangular, but there are also round models.

Before you get started, decide what configuration and size you need. Below are general recommendations professionals:
- A handmade table must match the room for which it is created, both in size and style;
- While creating street version it is important to think in advance how many people will use it at one time;
- Folding table– an excellent option for hospitable hosts. This product will be used in assembled form For family dinners and will be a godsend when receiving guests;
- For a comfortable feast, the space at the table allocated for each guest must be at least 70 cm;
- The children's model should be designed in accordance with the age and height of the child.


Manufacturing will cost some effort and time, but the result will please you. After all, a product created with my own hands, will be inexpensive and fully consistent with your ideas and desires. If you wish, you can make an entire furniture set, but this will require special skills and dexterity.
Before you start making a table, you should carefully read the drawing so as not to waste materials.

Tables can be divided into the following design types:
- Made from solid wood;
- Prefabricated (from terraced, tongue-and-groove, unedged boards);
- Glued;
- Made in the form of a “shield” of lamellas.


Furniture made from solid wood is considered elite and has a fairly high cost. The remaining options are simpler and can be used either in pure form or in combination. Glued board tabletops look very nice different breeds wood made with epoxy is a resin-based adhesive. Natural wood patterns and different textures create an incredible effect. Products made using this technology very durable and resistant to deformation.

Material selection
The most popular material for making tables and other garden furniture is wood. This is easily explained, because wood has a number of significant advantages over other materials, such as metal or concrete. The tree has the following advantages:
- Ease of processing;
- High aesthetics;
- Resistant to different climatic conditions;
- High depreciation;
- Possibility of restoration;
- Wide possibilities in the field of processing and painting;
- Safety for human health;
- Low cost of certain categories of wood;
- The beauty of natural patterns.

Natural wood– a material with a beautiful natural texture, quite inexpensive, environmentally friendly and durable. It is moisture resistant if specially processed, malleable for carpentry tools, and therefore excellent for manufacturing home furniture and utensils.
The appearance of the finished product and its characteristics will depend on the type of material and its preparation, so you should start with the selection of wood. Each type of wood has its own hardness. The most popular tree species can be identified:
- Spruce, pine and cedar are softwoods. An easy-to-process material, but prone to deformation, drying out and cracking;


- Oak, beech, larch and birch are representatives of hardwood. Beautiful and noble types of wood. Moisture resistant and durable. Power tools will be required to process oak and other hardwood products;


- Superhard materials - yew, hornbeam and acacia - have an extremely dense internal structure and are highly durable materials. Requires professional industrial processing.


To make a wooden table you will need edged board or timber. A table made from slabs will have a brutal look and fit perfectly into Vacation home in hunting style. A wide slab can serve as material for an entire tabletop. Another material for creating a tabletop is a cut from a trunk. First the barrel is selected required diameter, then an even cut is made and varnished. This technology generates a large amount of waste.


The durability of the product depends not only on the wood processing, but also on the choice of wood species. Hard rocks are not always good choice. Under conditions of temperature changes and high humidity, the tree swells and crumbles. The best option for a street or country tabletop is elastic wood. Characteristics such as hardness and elasticity provide resistance to deformation. Spruce, aspen, larch and linden boast such properties.

Before starting carpentry work, the wood must be sanded and treated with an antiseptic, and finally it will need varnishing. In addition, stain will give the product a finished look.
Preparing tools
If you are inspired by new ideas and decide to make wooden table with your own hands, You will need to prepare the following tools for work:
- Reismus;
- Saw;
- Jigsaw;
- Hacksaw;
- Jointer;
- Milling cutter;
- Screwdriver;
- Drill;
- Grinding device;
- Clamps;
- Pencil,
- Roulette,
- Square.

In order for the work to proceed, consider the shape and size of the product, prepare drawings. The size of the product will depend on the area allocated for it, and the average height is 70 cm. Here is a list of materials needed for work:
- Antiseptic;
- Sandpaper of varying degrees of grain;
- Boards;
- Beam or slab;
- Paint and stain;
- Glue.

For a standard family of four people the table is suitable square shape with a side width equal to one meter. The size of 120 by 90 cm will accommodate both owners and guests.
Construction of a drawing
The drawing is a diagram that clearly describes the sequence of actions, following which the expected result is guaranteed. If a unique design is conceived, then you will have to work on the diagram and drawings yourself. For this you can use computer program, then print the resulting documents to have a visual guide.

Manufacturing of parts
The step-by-step process of making a wooden tabletop can be described as follows:
- Select the required amount of materials. For a standard width you will need 6-7 boards 3 cm thick. Only perfectly flat, jointed boards are suitable. Knots are not a hindrance.
- expose the tree antiseptic treatment and dry thoroughly.
- Lay out the boards in the shape of an even rectangle. Align the joints.
- Place a block on both sides and cut straight.


- Screw the timber to the boards. On the back of the tabletop, in the center of the boards on each side, drill a hole for the bolt through the block 2/3 of the way through. Make the recess on the beam wider so that the head of the bolt sinks.
- Round the corners.
- Attach the board diagonally from the bottom with self-tapping screws coated with glue.
- Sand the surface first with coarse sandpaper, then with softer sandpaper.
- Cover the product with stain and varnish. If desired, the table can be painted.


Homemade table top made of laminated wood
Tables made of this material have a smooth and uniform structure, without joints or crevices. Another argument in favor of this technology will be its resistance to deformation and cracking. To make a table, you will need 4 boards with smoothly planed edges, following parameters– 1x1.5x0.5 m. The operating algorithm is as follows:
- At the ends, at a distance of 10-12 cm, make holes measuring 8-12 mm. They are needed for attaching dowels and dowels. Holes in the two side boards are made on one side only.
- Fold the boards correctly before applying glue.
- Sand the boards and coat them with glue.
- Insert dowels and fasten the boards.
- Align the ends and make sure each board is in the correct position.
- Place the finished tabletop on flat surface and squeeze tightly with a clamp.
- Leave to dry.

Making a round table
To bring to life the idea of creating round table with your own hand, you need to place it the following materials:
- Square timber (width – 100 mm, length 750 mm – 4 pcs;
- Boards 100 by 20 mm, length 750 mm – 2 pcs;
- Boards 250 by 40 mm, length 2000 mm – 4 pcs;
- Boards 100 by 20 mm, length 800 mm – 2 pcs;
- Boards 100 by 20 mm, length 1600 mm – 2 pcs.


Step by step instructions to creating a handmade round table:
- Stack four long boards tightly together.
- Draw a circle.
- Cut along the line with a jigsaw.
- Make a rectangular frame and fasten the circle with screws.


- Attach the legs to the frame.
- Check stability and then disassemble.
- Sand the wood with sandpaper. First hard, then soft.
- Cover with stain and varnish.


At first glance it seems that the most main detail table is a table top. However, do not underestimate the legs of the product. After all, they are the ones who decorate the table and give it a certain style. The legs must correspond to the basic style of the model and the necessary parameters.
The paradox is that the more complex and elaborate the table legs are, the less they will last. The most reliable will be simple wooden, stable and lightweight supports. You don't have to make drawings for them. Stages of making table legs:
- Selection of four equal length (85 cm) bars;
- Installation of bars in the corners of the tabletop;
- Connection on each side with boards or beams: two equal in length, and two equal in width;
- This design is glued to the table and left to dry.

The table does not always have standard four legs; sometimes craftsmen resort to creating a table base from a frame and one or two legs. Glue can be replaced with furniture corners, which are fastened with self-tapping screws, or for reliability, use both options. You can create an unusual fantasy model by evenly attaching the tabletop to ornate and fancy wood roots. This will be a stunning piece that only you will have.

Assembly Features
Holes are drilled in each element of the product, then the parts are connected with bolts, which makes the product truly durable. You can enhance the effect using fixed with good glue. Self-tapping screws are screwed in from the inside under acute angle in relation to the board. If the finished product is noticeably wobbly, use special belts with clamps. This will help make the structure more reliable and stable.

For the legs are taken wooden blocks, which must be processed with a planer in the shape of a cone. Carved balusters, which you can either buy or carve yourself, are also great for this. lathe. By doing the construction with your own hands, a person gains skills in working with wood, so if the need arises to repair the product, it will not cause difficulties. You will already have all the necessary arsenal of tools. In addition, you will need wood and means for restoring old wooden products.

Treatment
Getting a good and solid result is not so difficult. The main thing is to comply with everything the necessary conditions. After the main work is completed, the time comes for the final work, but no less. important stage– processing of the product with varnish. In order to carry out this operation correctly, follow the following rules:
- Sand the edges of the tabletop by hand;
- Apply a high-quality varnish to the entire product. In addition, painting some parts of the table with paint will look very decorative;
- Flaws in the work are well masked with putty that matches the color.


The most popular option for decorative finishing of a wooden table is to cover its surface with a transparent or colored varnish, which will highlight the natural wood pattern and provide its protection from the influence of external factors.
In order for a handmade product to serve for many years, remaining the pride of the owner, It is recommended to follow simple rules:
- Avoid direct contact of the product with open sun and do not leave it outside in the rain;
- Keep the surface clean;
- Treat with polish;
- In winter, keep the table indoors so that the varnish coating is not damaged.

Before assembling each wooden part it is necessary to treat with antipyrines, which will serve as protection against rotting, increase moisture resistance and fire resistance.
Exterior decoration and design
The most enjoyable stage of making furniture with your own hands is, of course, decorative finishing, which each master performs in his own way. In order to get an original model, you need to think about the external design of the product. Sections of medium-sized trunks, decoratively laid out on the tabletop, will come to your aid. Wood carvings are also a wonderful decoration. Carved legs and the tabletop will give the product elegance and lightness.

Many people prefer to decorate the tabletop with glass. This option is suitable if the table is located indoors. A hand-painted table is unlikely to go unnoticed by guests. This product will add a special touch to any room.
For those who are not good at drawing, the option of transferring the drawing through a stencil is suitable. This is, indeed, extremely simple, but there are some nuances: it is recommended to apply the pattern with acrylic paints, since when they harden, they form a thin film and therefore do not spread.
Allow the previous coat to dry before applying a new coat of paint. You can work with either a brush or a roller.

The frame around the edges of the tabletop always looks decent. Helps you create a perfectly straight line masking tape. Cover the finished drawing with varnish. The simplest and most proven option is to play with the color of the boards. Using paint, stain and sandpaper you can create the effect of aged wood. Products of “noble antiquity” always look impressive and expensive.

The decoupage technique is simply a godsend for creating the decor of a new wooden table or restoring retro furniture. This method consists of attaching a paper picture to the surface of the product using furniture varnish. The choice of design is made according to the taste of the owner. These can be images of nature and animals, rhythmic patterns, black and white graphics, and even photos from the family archive. Materials can include napkins, newspaper clippings and vintage postcards.

A new table can be easily upgraded using tiles in the form of a mosaic. Today in construction stores there is a wide selection available. It is advisable to use one set of tiles so that there are no inconsistencies in height and do not create unnecessary relief, which can damage the pattern and make the table uncomfortable to use. In addition to the mosaic, you need to purchase glue and grout. Briefly, the process of creating a countertop with mosaic masonry can be described as follows:
- The surface of the countertop is degreased with alcohol;
- Then it is processed with sandpaper;
- Start laying out from the outer edges;
- Secure the elements;

- Leave to dry for a day;
- Dilute the grout to the desired consistency;
- Carefully coat the seams;
- After an hour, remove the remaining grout;
- Let the product rest for two days, then wipe with a cloth containing vegetable oil for shine.

Budget option mosaic decor will table decoration with eggshells. It is necessary to crush the shell into medium-sized crumbs, then place it with tweezers on the surface of the countertop, previously greased with PVA glue. Try to leave the gaps between the shells minimal. If desired, the shell can be painted.

Tabletops with decorated with gold leaf. Potal is a thin sheet of metal alloys that imitates gold. This material can be purchased at art stores. The required pattern is applied with special glue to the surface of the table; after 15 minutes, cover it with a sheet of gold leaf, carefully smoothing it out. Then you need to walk over the surface with a soft brush and admire the result.

Glowing table– excellent design solution, and is also quite simple to implement. The finished product is equipped with special lighting - small lamps or a strip with LEDs are built in, providing the most different variants backlight: from simple to colored.

Modern kitchen sets often do not include such an essential item as a dining table, and even if it is included basic equipment, then it is usually carried out according to standard project made from cheap pressed wood. Of course, such products are not famous original design and strength. Such tables are usually inexpensive, but it’s still better to abandon an unsuccessful purchase in favor of a homemade one dining table made of wood, which can be created by any beginner in home carpentry.
Physical labor associated with woodworking (sawing, planing) usually causes great pleasure beginners, and a successful result will not be long in coming.

It is important that activities related to independent design and assembly wooden models– the process is very creative. It’s rare that someone tries to completely replicate a model they like from a store. Usually the design of the model is taken as a basis, and the remaining parameters are finalized by the master according to his own inspiration. On the veranda or in country house, it is better to choose transforming structures for utility rooms:
- Folding,
- Hiking;
- Hanging;
- Garden;
- Level.

Tables for stationary use are made in constant sizes:
- Coffee;
- Massage;
- Writing
- For laptop;
- For the bath.
The assembly of such products is very durable, the parts are held together tightly, and there are no hinge joints.

Tables for a garden or terrace usually have a standard rectangular or round shape. However, there are craftsmen who manage to make a table in rustic style in the form of a stump, and the bench in the form of a log, which looks very impressive. This ensemble is easily complemented by stools made from sections of logs in the same style. As you can see, making a wooden table yourself is not a difficult job.
If you follow the instructions exactly and select the right quality materials and suitable tools, you are guaranteed to get a durable and beautiful table, which will fit perfectly in terms of parameters and style into your interior.
A garden table is an integral part of any country interior. On modern market This product is presented in a wide range - these are products made of metal, plastic, natural stone and, of course, classic version, wooden garden tables. In this article we will talk about positive qualities common options and we will give accessible instructions on assembling a table with your own hands.
Wood is always relevant
Most garden furniture has always been made of wood. Almost anyone with at least a passing command of a hacksaw and a plane can make a garden table with their own hands. The whole process comes down to joining a small number of planed planks and giving the furniture a marketable appearance.
A few words about the choice of material
If you want your product to serve you faithfully for many years, then it is better to make a garden table from strong hardwood. Of course, the best option is oak, but the price here, even at cost, will be considerable. Therefore, as a rule, more affordable larch, aspen, birch, linden or acacia wood is used.

Advice: conifers they can be used for manufacturing, but they must first be well prepared and coated protective compounds. Otherwise, the abundance of resin may negatively affect the quality of the coating and your clothes.
For a countertop, the quality and type of wood are especially important, so experts recommend not saving money and buying a good tongue-and-groove board; the increase in costs will be minimal, but the appearance will pleasantly please you. It is advisable to assemble a wooden garden table from well-dried wood, so that the parts will not be damaged later.
In addition, the tabletop and some individual parts can be made of thick waterproof plywood or USB board. Chipboard(chipboard) is less suitable because this material fears high humidity and it won’t last long in the garden.

Self-assembly
Assembly instructions can be very diverse, everyone chooses what he likes best.
The photos and videos in this article show several interesting and available technologies, we will tell you about the simplest, in our opinion, installation option.
- As mentioned earlier, it is better to assemble the tabletop from a tongue-and-groove board, so it will be completely monolithic. The joints should be glued with ordinary furniture wood glue. IN in this case We will talk about a solid product designed for a family of 6 – 8 people.
- The comfortable height of the structure for a standard dining table is 700 – 750 mm. We will make the dimensions of the top plate 930x1450 mm. For a tabletop, a board thickness of 20 mm is sufficient, but a tabletop 40 mm thick will look more solid and solid.
- The boards are joined on a flat, horizontal surface and knocked down with nails or self-tapping screws, two or three perpendicularly located 50x50 mm bars. The bars are fixed at a distance of 300 mm from the edge.

Advice: since the wood is quite dense and thick, it is better to lubricate the screws with soap before screwing them in. Then they will fit into the array much easier.
- Next we move on to arranging the legs. Boards with a section of 50x150 mm and a length of 650 mm will be used as legs. They will be joined at the ends, so in order to reduce the length of the fixing bolts or self-tapping screws, 1 cut is made in the middle on each leg, about 70 mm deep and about 150 - 200 mm long.
- The legs are joined at the ends, and the selected grooves should be with outside on the same level. A stiffening rib is inserted between two pairs of legs, the function of which is performed by a 50x150 mm board, about 1 m long.
- From above, the legs are attached to the strips that secure the tabletop boards. In the lower part, to increase the support area, two boards of the same section 50x150 mm are tacked to the legs. The length is slightly less than the width of the tabletop.

Important: the entire structure, with the exception of the tabletop, can be made collapsible; for this, furniture bolts with a diameter of 6 mm are used. Or assemble everything with long self-tapping screws, but then the table will not be disassembled.
Do not forget that wooden garden tables will be used outdoors, so all wood must be coated with protective compounds. Often one layer of stain is used to highlight the beauty of the texture and two layers of waterproof varnish.

Important: all wood must be planed and cleaned before assembly grinder or using sandpaper. Sharp corners should be chamfered so as not to drive a splinter in later.
Alternative designs
Easy coffee table it is quite possible to assemble from wooden pallets. For this you will need 2 pallets. The top row of boards should be torn off, the missing ones should be supplemented and knocked together end-to-end, more tightly.
This way you will have a monolithic countertop. To increase the height, 4 bars from the same pallets are inserted between the pallets. It is advisable to install furniture wheels from below.


Plastic garden tables are used everywhere, their price is quite affordable. They are durable, have a neat appearance and, as a rule, are quickly disassembled. But plastic rarely fits into the natural interior country cottage. Artificial materials, for the most part, have already become boring in the city, and besides, such products cannot boast of durability.

Forged garden tables are a completely different matter; they are often true masterpieces of furniture art. Of course, only a narrow circle of real specialists can make such beauty with their own hands, which is why the price of such products, frankly, is steep.
Making stone garden tables with your own hands is quite problematic. Alternatively, you can stack the brick cabinets and install a pre-purchased countertop on top. You can also use a large piece of slate as a countertop, but such installation will require considerable physical effort.

Option for making a table.
Conclusion

Often it is not so important whether you have a wooden stone or metal garden table installed. Any design can be successfully fit into landscape design dachas, the main thing is to do it with love, because you are doing it for yourself.


In order to organize a place in the country for outdoor recreation, it is not necessary to buy expensive wooden furniture or spoil the area with inexpensive plastic sets. So, you can make a table for a summer house with your own hands, having detailed drawing and a minimum of skills. Even so, this process will take a little time and will bring a lot of pleasure, both during the assembly of such a structure and in subsequent operation.
The drawing of a table for a summer house with your own hands is presented below.
Drawing of a table for a summer cottage made of wood
Drawing of a table for a summer cottage made of wood


In order to independently master drawing of a table for a summer cottage made of wood, you will need the following tools:
- plane,
- screwdriver,
- jigsaw or hacksaw,
- roulette.
We list the main materials for a DIY table:
- 10x4 block (although the thickness can be any),
- board 15x4,
- furniture bolts,
- wood impregnation or paint.
Overall dimensions of the table
Our garden table has an approximate width of 1.4 m. This optimal width so that 4-6 people can sit behind it. The height of the product will ultimately be about 0.7 m. In order to make assembling a table for a summer house as simple as possible, you can use the following patterns.

DIY table assembly process
First, the main parts are prepared. So, it is necessary to cut the timber and boards into the following components:
- Bar: 1.4 m – 2 pcs., 0.8 m – 4 pcs., 0.65 m – 2 pcs.,
- Board: 1.4 m - 8 pcs.
Base
The basis for the future table is two rigid frames made in the form of a trapezoid. Such a frame is assembled from two legs 0.8 m long and two horizontal bars (0.65 m and 1.4 m, respectively).
The legs themselves in the side section have the shape of a parallelogram with an acute angle of 60 degrees. The ends of horizontal bars are cut at 45 degrees. To rigidly fasten legs with bars, it is better to use furniture bolts with a length equal to twice the width of the bar, plus the thickness of the washer and nut.
Tabletop
After the two base frames are assembled, they must be installed vertically at a distance of a meter from each other for the subsequent installation of the tabletop of our garden table. As such, four boards 15 cm wide are used. They are fastened with wood screws, leaving a gap of 2 cm between the boards. This way, moisture will not accumulate on the surface of the table, even if most of the time it will stand in the open air.
In order to maintain equal gaps, you can use pre-prepared wedge templates, which are temporarily installed between the boards of the countertop.
Seats
Fastening the seat boards is done in the same way (see previous paragraph).
Painting
In order to DIY garden table served for a long time, after assembly it should be coated with special wood paint. The most common option is regular Oil paint. But you can also find other compositions that are more suitable in terms of environmental and aesthetic properties. The color is chosen from personal preferences, funds and the environment where the table will be installed.