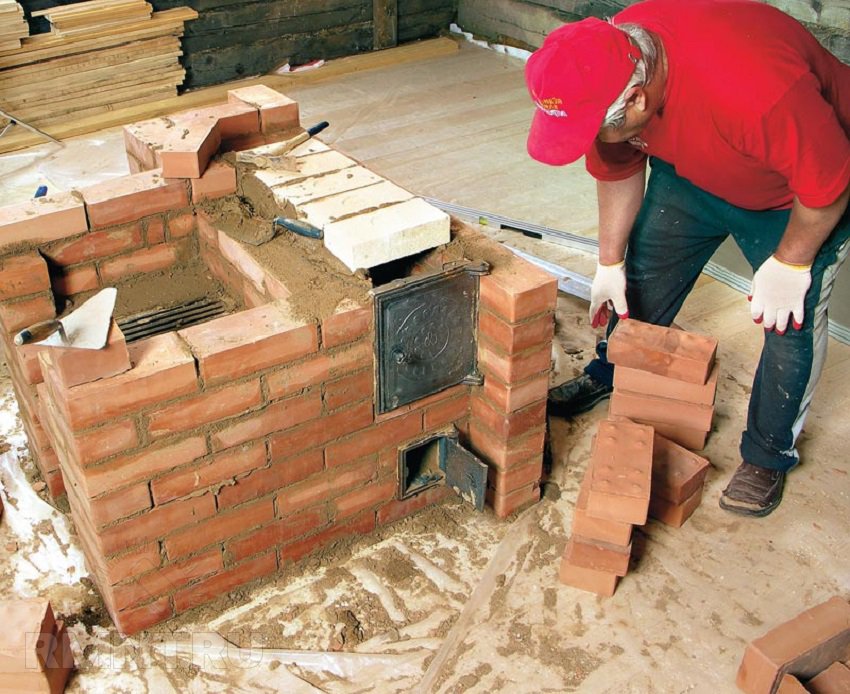
This article contains clear, very detailed photo instructions for laying a brick stove with your own hands, tips on how not to make mistakes when choosing the necessary materials and how to correctly place the stove in a private house for optimal heating of a larger area.
Options for installing a stove in the house
The placement of the stove depends entirely on what exactly the owners expect from it. If it is installed in a small house and will be used as a fireplace for friendly gatherings, you can use the first scheme. Such a stove - good option for cooking barbecue on the grill or kebabs.
Brick kiln placement options
The second scheme is for a house of solid square footage. In this case, the front side of the fireplace stove opens into the living room, the stove walls heat both bedrooms, and the heat in the remaining rooms is maintained using heat exchange.
The third scheme with a stove for heating and cooking is a budget housing option for a bachelor or small family. Pros: a warm bed and the ability to place a dryer in the hallway.
Important: it is worth taking care of the external insulation of the house in advance, because it greatly increases the efficiency stove heating.
Selection of bricks, sand, mortar
In order for the stove to serve for a long time, you need to select all the materials correctly. There are three types of bricks:
- Ceramic - can be used to build a stove.
- Silicate ones are generally not suitable in this case, even double M150.
- Fireproof - ideal, but they are often used only for fireboxes and fireplaces, varieties: fireclay, refractory bricks, etc.

Advice: when choosing a brick for a stove, you need to completely abandon the hollow types.
The solution is made from clay. Red clay is suitable if the stove is made of red brick; when using fireclay, special fireclay clay is required. Some stove makers still make their own solution in the old fashioned way from river sand with a grain size of 1-1.5 mm, clay (in a ratio of 2.5:1) and water. It is advisable to use angular quarry sand without foreign inclusions and the so-called fatty clay. However, it is easier and more reliable to buy a ready-made baking mixture in the store, preparing it according to the instructions.
From the accessories you need to purchase grates, ash and furnace doors, soot cleaners, valves or dampers.
Preparation, list of tools
Before starting work, you need to determine and mark the place that the new stove will occupy.
The chimney pipe should be no closer than 15 cm from the roof rafters.
If you are doing masonry for the first time, professional stove makers advise you to practice in advance by making a model of the future stove from prepared bricks. Naturally, without a solution. This minimizes possible risks during real masonry, allowing you to learn from your mistakes, which can still be corrected in the layout.
The stove foundation requires preliminary waterproofing; its area must exceed the area of the stove.
When laying a new row, you need to control the absolute verticality of the walls.

To build a brick kiln, the following tools are needed:
- plumb line;
- trowel;
- roulette;
- spatula;
- Bulgarian;
- knitting wire;
- building level;
- metal strips, corners;
- containers for cement and clay mortar.
Step-by-step instructions with photos for laying a stove
Different stove makers have their own masonry technologies and their own secrets that come with years of experience. Here is information about a fairly simple way to create a stove-fireplace for heating two-story house, the process will not seem extremely difficult even to novice stove makers.
Foundation laying
The base course of brickwork will serve as the foundation. It is done with any brick; some stove makers even fill this level with crushed stone.

When laying the base row, cement mortar is used.

The foundation is completely filled with mortar, the layer is leveled.

Construction of the furnace body
The first row of stoves is marked. The horizontal line from which they start when marking is the wall of the room.

A grate is placed where the fireplace is planned to be placed. From this row, the bricks are already laid on the kiln mortar.

An important stage of work is the scrupulous alignment of each new row by level.

Laying the second row. The stove wall, located closest to the wall of the room, is reinforced with additional bricks to increase fire safety.
The place where it will be located in the 2nd row remains empty, the rest of the oven is filled in completely. A door is installed through which the owners will clean out the ash.

The door is installed on the solution and leveled. For a more reliable fixation, it is secured with wire, which must be laid between the bricks.


The grate is laid not on a simple brick, but on a refractory brick. To ensure that it lies at the same level as the bricks, holes are cut in the fireclay bricks.

The size of the brick can be easily adjusted - the excess is measured and carefully cut off.

The large door is mounted next to the installed grille.

The large oven door is similarly fixed using wire fasteners.

The first row of fireboxes is placed exactly above the fireplace, it is reinforced with metal corners and a strip or thick tin. So that the masonry can lie on them, it is cut using a grinder, then the slots are brought manually to the right size.

The next brick row is laid.

The fireplace grate is laid on the refractory brick along with the brick row.

The door is fixed, the brick is strictly adjusted to it.

The firebox of the new stove and fireplace is ready.

Fire-resistant fireclay bricks are placed above the stove firebox.

The stove body is built.
Creating a chimney
The space left for the chimney is divided into wells. The design requires reinforcement with metal plates.

Brick chimney wells are laid.

Soot cleaners are mounted above the firebox roof.

The wells are divided again, the first rows of walls should be reinforced with strips of metal.

After strengthening, the ceiling of the furnace body is erected. The space associated with the chimney remains empty.

The body cornice is laid out, then the chimneys are laid.

The final stage of work on the first floor. The stove is located at the bottom left, the smoke inside the chimneys moves in a spiral and comes out at the top left. The final separation of the wells is covered with a tin sheet. In order to compensate for the pressure inside the fireplace stove, 2 brick rows are laid on the tin.

There are two chimneys stretching to the second floor of the house - from the fireplace and the stove itself, they are separated from each other. Each chimney requires the installation of a separate damper.

Floor level of the second floor. Waterproofing is installed here, the chimney is again reinforced with metal corners. To save money and avoid building a heating stove on the second floor, the chimney of the stove under construction is again divided. The smoke will snake through it, managing to warm up the room. In order for the chimney to warm up much faster, it is laid in the area of the second floor with a thickness of 1/4 or 1/2 brick.

A hole for the stove chimney is carefully cut out in the roof.

Before placing the chimney on the roof, it is reinforced with metal corners.

If the chimney is located in close proximity to the roof ridge, it must be laid out at least 0.5 meters above the ridge. If further, then the height of the chimney is allowed equal to the height of the ridge, but not lower. In this case, the wind increases the stove draft, lifting the smoke upward.

Even a small stove in the house means coziness and comfort. Larger stoves require increased skill and additional materials, but the principle of their construction is similar to the method described above.
If you are planning to build country house, is maximally equipped for comfortable living in it, then it usually cannot be done without a small stove, especially if it is planned to be used for most of the year. The lack of experience in stove work should not stop owners who want to install the stove themselves. You just need to choose a suitable, not particularly complex option, the design of which is simple and understandable.
In addition, for a large heating structure with an intricate configuration of internal channels, as a rule, there is simply not enough space in a country house. Let's consider easy-to-use options that are suitable for both a small house and a novice stove maker. – in a word, laying a stove with your own hands is simple and practical.
To make it easier to decide on a suitable model, it is necessary to highlight several conditions that are important for the right choice. Well, then consider several options, settling on the optimal one for the specific area and configuration of the premises of the house.
General requirements for brick kilns
The conditions that the chosen design must meet will directly affect the quality of heating of the house, so you should not neglect the information, which, on the contrary, should be paid close attention to. These factors include:
- The dimensions of the furnace structure must correspond to the area on which it is installed, since heat transfer largely depends on this parameter.
- In addition, it is necessary to choose the correct shape of the furnace structure. The side walls of the furnace, when heated, provide more heat, while the indicator for the front and rear walls is 3–4 times lower. Therefore, if you need to heat two rooms at once, you should choose a narrow and long stove that can be built into the wall between the rooms.

For heating efficiency, a T-shaped stove is often installed. It can be intended only for heating or perform two functions if you choose a model that includes a hob. Such a stove can heat up to four rooms with a small area.

- The next condition that is important to consider is the location of the structure inside the house; it should be as rational as possible. In order for the stove to be functional, to work as a heating and cooking device, it must be installed so that the hob faces the kitchen, and one or both side walls look into the living rooms.
- When choosing a stove, it is very important to take into account its heat transfer - this parameter must correspond not only to the area of the rooms, but also to their location and the number of external walls. This table will help you decide on the choice of stove based on its surface area, depending on the characteristics of the room:
| Room area, m² | Not corner room, inside the house | Room with one outside corner | Room with two external corners | Hallway |
|---|---|---|---|---|
| Furnace surface opening into the room, m² | ||||
| 8 | 1.25 | 1.95 | 2.1 | 3.4 |
| 10 | 1.5 | 2.4 | 2.6 | 4.5 |
| 15 | 2.3 | 3.4 | 3.9 | 6 |
| 20 | 3.2 | 4.2 | 4.6 | - |
| 25 | 4.6 | 6.9 | 7.8 | - |
- There is no need to play it safe and choose for small house a massive furnace, since to warm it up will take a lot of time and a fairly large amount of fuel, despite the fact that a significant part of the generated heat will simply be “thrown down the drain.” In addition, small structures sometimes work even more efficiently than structures that occupy half the room, since heat transfer largely depends on the internal design of the stove, and not just on its massiveness.
- Any stove, even the most heat-intensive one, will be ineffective if the house is not insulated, since all the heat it produces will escape through the walls, windows and ceilings. These will require a very large amount of fuel to maintain the temperature in the rooms at an acceptable level for living.

If you plan to save on fuel while receiving high-quality heating, you should insulate the building well and choose a bell-type stove, which, thanks to its numerous channels, will retain the heat transferred to the living quarters for a long time.
How to choose the right place for the stove?
The location of the stove in the house is determined in advance, even before its construction, when drawing up the project, so you can install the heating structure in the right area, where the heat from its walls will be rationally distributed throughout the house. In addition, laying out a foundation for a stove before building a house is much simpler both in terms of calculations and the amount of work involved. It must be said right away that the base for the stove must be installed separately from the foundation of the house, that is, there must be a distance of at least 150 mm between their walls. Otherwise, during shrinkage (and it will definitely be uneven for structures of different mass and area), one of the foundations may begin to collapse, and the walls installed on it may begin to deform.

- If there are several rooms planned in the house, then the stove must be installed so that it is located at the crossroads of the walls dividing the house into rooms. But, since the foundations of the buildings should not touch each other, the internal walls will have to be made light, without foundations. This option is presented in the diagram above.
- In some cases, home owners prefer to install a stove near the entrance from the street, since thermal radiation from the walls creates an excellent curtain from cold currents.
- Placing a firebox close to the front door will eliminate excess debris in living rooms, since you won’t have to bring firewood or other fuel into them. However, when installing the stove in this way, it is necessary to position the firebox door so that it is impossible to get burned on it.
- The walls of the heating structure should not be closely adjacent to the walls of the house, that is, free access must be provided to any of them, since for safety reasons they require periodic monitoring, and the internal channels of the furnace require cleaning of the chambers. Sometimes the stove is part of the wall of the house, in which case reliable heat insulation is laid between it and the end of the partition.

- If the stove is installed in an already built house, then, when planning its location, it is necessary to ensure that the chimney pipe falls between the attic floor beams, which must be at a distance of at least 150 mm from it, with the creation of a thermal insulating “gasket” filled with heat-resistant material. To do this, most often a metal box is fixed around the pipe, which is filled with fine expanded clay, mineral wool, vermiculite or just sand.
- The area in front of the furnace firebox must be covered with heat-resistant material - it can be a metal sheet or ceramic tiles.
You might be interested in information about what it is
Models of simple-designed small brick ovens
Small brick kilns do not lose their relevance today. And this is despite the emergence of alternative heating options, since many of these new products are too expensive, while others are unavailable in suburban conditions. The stove, traditional for Russian homes, will help out in any situation - it will warm the house and cook food. Therefore, if there is no gas supplied to the house, and the electricity is often cut off, or you just want to save money on it, you should choose a stove that includes a hob. Knowing the demand for small-sized stove models, engineers have developed quite a few options. Some of them will be discussed further.
Oven "Krokha"
The name of the model “Krokha” itself speaks about the size of this stove, and it is suitable for a residential building with any area. Moreover, when correct installation design, it is quite capable of heating not one, but two whole rooms and a kitchen. For a country house, this compact stove will be an ideal option, as it can create comfort in spring and autumn, as well as in damp or cold weather in summer.

This stove is called a “simple stove” because it is simple in design, and with a serious approach it can easily be built even by a novice master. The oven has very small dimensions, only 640×770 mm at the base, so it is suitable even for non-smokers. large room, where it will be decided to allocate a corner for it.
The designer of the stove, A. Sushkov, successfully combined compactness, elegance and functionality in it, so “Krokha” will fit perfectly not only into a cottage room, but will also decorate the interior of a private home with its cozy appearance. This stove is designed to heat one or two rooms with an area of 18÷20 m², and has the following characteristics:
| Oven parameters | Numeric parameter values |
|---|---|
| Width and length at base | 3×2.5 bricks or 640×770 mm |
| Height of structure to pipe | 2030 mm |
| Oven weight | 1260-1280 kg |
| Firebox depth | 746 mm |
| Efficiency | Up to 70-75% |
| Heat transfer with a disposable firebox | 1760 W |
| With a three-time fire | 2940 W |
| Hob | Single burner |
The designer thought well about the rationality of the stove, so for its small size it gives excellent heat transfer. During the combustion process of this model, its lower section warms up, and the “cap” located in the upper part retains the generated heat well and slows down its escape into the chimney. The stove is equipped with a “summer” operation, which allows you to heat only the hob without heating the entire structure, which is especially important in the warm season. “Krokha” has three design options that differ in the location of the hob relative to the firebox, but most often the improved and most convenient version is used, in which the stove and firebox are located on one side. This arrangement is convenient because the stove can be installed in such a way that the firebox and stove will be in the kitchen, and the other two walls, if built into the partition, will heat two rooms located across the wall from the kitchen area.

In order for the stove to last as long as possible and be safe, its fuel chamber is lined with fire-resistant fireclay bricks. Such walls can withstand not only the heat of wood, but also fuel such as coal, briquettes and peat.
Up to the level of the stove, the stove has smooth walls, and above the combustion door, under the hob, along the entire perimeter of the building, a row protruding forward by 30÷35 mm is laid out, which divides the structure into two sections: the upper, air-gas, and the lower, fuel. At the top of the furnace there are channels for circulating heated air. They help retain heat in the oven for as long as possible, preventing it from immediately escaping into the chimney.

According to the developer's idea, this stove should be equipped with a combustion door with fire-resistant glass, through which the flames are clearly visible. Therefore, if desired, “Krokha” can be used as a small fireplace. Such a door may well be replaced with a conventional cast iron version.
Since the oven is small around the perimeter, it will require fewer consumables.
| Size in mm | Quantity, pcs. | |
|---|---|---|
| Fireclay brick SHA-8 | 21 | |
| Red brick (without chimney pipe) | 352 | |
| Curly (rounded) red brick | 124 | |
| 350×250 | 1 | |
| Glass combustion door in a cast iron frame (DP-308-1S) | 210×250 | 1 |
| Cast iron ash door | 140×140 | 1 |
| 410×340 | 1 | |
| Metal sheet for flooring in front of the firebox | 500×700 | 1 |
| Chimney damper | 130×250 | 1 |
| Steel corner | 40×40×5×520 | 4 |
Compact stove model - “Baby”

The main advantage of the model is its small size, 505×760 mm at the base. Well, the low weight, only 360÷365 kg, allows the structure to be installed on a strong, heat-insulated wooden floor. A small stove has relatively thin walls, so when it heats up, it quickly begins to release heat into the room, in which a comfortable temperature is created in a short period.
When laying this stove model, it is important to take into account one point - in the first bottom row of the rear wall, the middle brick must be left free, that is, laid without mortar. This must be done so that after completion of the masonry, the brick can be pulled out and the bottom of the stove can be cleaned of fallen mortar. In addition, the resulting hole will help dry the finished structure faster. Then, the brick can be installed in place using the mortar.
If the stove is planned to be installed on a wooden or concrete floor, then a heat-resistant layer is laid on it before laying. Typically, an asbestos sheet 5 mm thick is used for this, which is covered on top with a metal sheet or roofing felt and an additional continuous layer of brickwork. In addition, it must be remembered that a metal sheet or ceramic floor tiles must be laid and secured in front of the stove.
The first heating of the finished stove should be carried out with light fuel - it can be paper or straw. After the stove is heated, its doors and valves are opened for ventilation and final drying, which must be carried out for at least 7-9 days.
After drying, it is recommended to whitewash the stove. The question arises: . Smoke will immediately appear on the whitewash layer if there are gaps between the mortar and the brick. visible to the eye small gaps. Smoke will leave black or gray streaks on the whitewash that will stretch upward from the defective seam. When such marks appear, the seam from which they come must be completely cleaned of the frozen solution and filled with a new one, but more carefully and accurately.
You might be interested in information on how to do it with step-by-step instructions
If you plan to decorate the outer walls of the “Malyshka”, then you can start this only after two to three months of using the stove.

The chimney of this model has such a design that it can be brought outside in three ways:
- Raising brickwork chimney to the ceiling, bring it out through the attic and the roof of the house;
- By embedding a steel pipe into it and connecting it to the main chimney;
- An embedded pipe can be taken out through the wall, having previously secured the opening of its passage with heat-resistant material.

This diagram will help you understand the design of this brick stove model, since it clearly shows the number of rows and the configuration of the smoke exhaust channels.
The main characteristics of the Malyshka stove are as follows:
| Oven parameters | Numeric parameter values |
|---|---|
| Width and length at base | 505×760 mm |
| Height of structure to pipe | 725 mm |
| Oven weight | 360÷370 kg |
| Firebox depth | 737 mm |
| Chimney duct cross-section size | 100×100 mm |
| Efficiency | Up to 70-75% |
| Heat dissipation | 1210 W |
| Hob | single burner |
To build the Malyshka stove, you will need the following materials and ready-made elements (if you do not take into account the chimney pipe):
| Name of materials and components | Size in mm | Quantity, pcs. |
|---|---|---|
| Fireclay brick SHA-8 for firebox | 37 | |
| Red brick | 62 | |
| Cast iron ash door | 140×140 | 1 |
| Cast iron fire door | 210×250 | 1 |
| Single burner cast iron stove | 410×340 | 1 |
| Cast iron grate | 350×200 | 1 |
| Chimney damper | 130×250 | 1 |
| 550×800 | 1 |
Prices for fireclay bricks
fireclay brick

It should be noted that this model can be easily improved, despite its compactness. Some craftsmen manage to add an oven and a tank for heating water to its design. In this configuration, “Malyshka” can be used as a sauna stove.
You may be interested in information about what mini
Heating stove with a small footprint
This mini-oven model has only one heating function. It can be used for installation in a country house if, in addition to it, there is an electric or gas stove for cooking, and there is no need for a hob. Otherwise, its installation will be irrational.

It is also suitable for a private house in which you need to heat two adjacent rooms by building the stove into the wall between them.

The advantage of this model can be safely called its compactness and high heat transfer. The side walls of the stove have a fairly large area, therefore, when heated, they will become a kind of “battery” the size of half a wall, which will quickly and efficiently transfer heat to the premises. The total heat transfer from this model is about 2000 W, with the front and rear walls accounting for 210 W, and the side walls accounting for 895 W each.
The heating stove has a more complex internal structure, consisting of several channels, which provide excellent heat transfer from the walls. Since the oven has a decent height, it will require more material.

The characteristics of this mini-oven model consist of the following parameters:
In this case, the design of the furnace, just like the structure of the “Krokha”, can be divided into two sections: the upper – gas exhaust, and the lower – combustion. The upper part of the furnace, the “hood,” consists of vertical channels connected to each other by horizontal ones. Thanks to this feature, warm air lingers longer inside the structure, heating the entire area of its side walls.
To build this model you will need the materials listed in this table:
| Name of materials and components | Size in mm | Quantity, pcs. |
|---|---|---|
| Red brick | 260 | |
| Fireclay brick SHA-8 for the combustion department | 130 | |
| Cast iron grate | 250×400 | 1 |
| Cast iron ash door | 140×200 | 1 |
| Cast iron fire door | 200×300 | 1 |
| Cleaning doors | 140×200 | 2 |
| Chimney damper | 130×310 | 2 |
| Roofing felt sheet for waterproofing | 1000×600 | 2 |
| Metal sheet for flooring under the stove and in front of the firebox | 500×700 | 1 |
To make the work easier, craftsmen use special ordering diagrams, which must be followed when laying each row.
Prices for chimney valves
chimney valves

This sequence diagram shows the laying of the furnace from the first to the twelfth row. Construction can be carried out on an equipped foundation or on a prepared waterproofed concrete floor. Since the structure is quite massive and bulky in height, it cannot be installed on a wooden floor.
- Roofing felt is laid under the masonry in two layers, and to simplify the alignment of the first row, the boundary of the base can be drawn on the waterproofing material with chalk using a long ruler.
- When laying the first row, we must not forget that the horizontal and vertical position of the furnace walls will depend on its quality and accuracy. Therefore, before starting work, it is necessary to prepare control tools - a plumb line and a building level. Some craftsmen also practice stretching horizontal cords for each row.
- As you can see in the diagram, a blower door is mounted on the second row, and a vertical smoke exhaust channel is formed.
- On the fifth row of masonry, a grate is installed, which will block the blower chamber and mark the bottom of the combustion chamber. Starting from the fifth and ending with the 15th row, the masonry is made with fireclay bricks.
- On the sixth row, in front of the grate, the combustion door is installed and secured with wire.
Prices for roofing material
roofing felt

- The following diagram represents the order, starting with the 13th row and ending with the 24th row. This shows the gradual formation of vertical channels and the combustion chamber, so it is very important to carry out the masonry in accordance with the diagram. Otherwise, the entire work may be ruined and will have to be redone.
- Having finished laying the fifteenth row and the walls of the sixteenth, a clay-cement mixture is laid out in the resulting space, and the cleaning chamber door is installed. Further, up to the 25th row, the masonry is carried out according to the order scheme.

- On the 25th row, the bottom of the second cleaning chamber is formed. To do this, a layer of clay-sand mixture is laid on top of the brickwork of the 24th row. Then the cleaning chamber door is installed.
- On the 28th and 32nd rows, two chimney valves are installed, with the help of which it will be possible to regulate the draft.
- The remaining rows are laid according to the diagram, and from the 35th row the laying of the chimney pipe begins.
Heating and cooking "Swedish" - a detailed description of the furnace laying
General description and required materials
In the final section, a fairly popular Swedish stove model will be presented. She is chosen for detailed description, because with its simple design and compact size it is multifunctional and very comfortable to use.

This version of the heating and cooking stove has a good location of all functional elements - they are located on one front side of the structure. Therefore, such a “Swede” is usually installed in such a way that the hob, oven, drying niches and, of course, the combustion chamber face the kitchen, and the smooth rear brick wall, which warms up perfectly during the fire, faces the living room.
The dimensions of this design are 1020x885x2030 mm, with a power of 2750 kcal/hour, so the stove is capable of heating one or two rooms with an area of up to 30 square meters. m.
The presented version of the “Swede” was created for certain operating conditions. So, it was created for heating country house, measuring 4000×7000 mm, built from sand-lime brick or blocks. However, this model is also suitable for houses of other sizes, as evidenced by its heat transfer parameters.
- Wood and other types of solid fuel can be used as fuel for this stove.
- For this model, only the internal lining of the combustion chamber and the areas located next to it is carried out. Therefore, fireclay brick will not interfere with the aesthetic appearance of the stove facade, made of high-quality red brick. External finishing is not provided.
- In order for the stove to be efficient and meet the heat transfer characteristics, its walls must be relatively thick (half a brick), so installing bricks on spoons is not allowed.
- In this design, the laying of a drying chamber is mandatory.
If you decide to use this development, first you should consider the table of necessary materials and calculate their cost for your region of residence.
You may be interested in information about which one is best to use when building fireplaces and stoves.
Table of materials that are needed to build a heating and cooking “Swedish”:
| Name of materials and components | Size(mm) | Quantity (pcs.) |
|---|---|---|
| Red solid stove brick (excluding pipe height) | 250×120×60 | 551 |
| Fireclay refractory brick Ш-8 | 250×124×65 | 31 |
| Blower door | 140×250 | 1 |
| Fire door | 210×250 | 1 |
| Doors for cleaning chambers | 140×140 | 3 |
| Oven | 450×250×290 | 1 |
| Cast iron two-burner cooking stove | 410×710 | 1 |
| grate | 200×300 | 1 |
| Chimney damper | 130×250 | 1 |
| Steam exhaust valve | 130×130 | 1 |
| Steel corner | 45×45×5×1020 | 1 |
| Steel strip | 45×45×5×700 | 1 |
| Steel strip | 45×45×5×905 | 5 |
| Steel strip | 50×5×650 | 2 |
| Drying rack | 190×340 | 1 |
| Metal sheet covering drying chambers | 800×905×0.5÷1 | 1 |
| Pre-furnace metal sheet | 500×700×1.5÷2 | 1 |
| Asbestos sheet or twine for laying between brick and metal elements. | 5mm thick | 1 |
Step-by-step instructions for laying a heating and cooking "Swedish"

| Illustration | Description of the work procedure |
|---|---|
 | The first continuous row, consisting of 28 red bricks, must have a perfectly flat surface and right angles, since it is the basis on which all other vertical and horizontal planes and rows will be oriented. |
 | The second row is laid out from 28 ½ red bricks, also with solid masonry, but its pattern has a slightly different configuration. This point must be taken into account when carrying out work, because the seams between the masonry of the lower first row should not coincide with the seams between the bricks of the upper second row. In other words, the bricks must be laid staggered, with overlapping seams. |
 | On the third row, the formation of the lower heating chamber begins, which will be located under the oven, and the blower. Vertical smoke exhaust channels also begin to form. When laying out a row, they leave peculiar windows for installing the doors of the cleaning chambers for the vertical channels, as well as the blower and the lower heating chamber. After completing the installation of this row, cast iron doors are fixed into the windows. After this, work is done inside the structure - two whole and two three-quarter bricks are mounted on a spoon. Moreover, the corner of the brick installed in the right vertical channel is cramped for more unhindered air circulation. In addition, a fourth part of fireclay brick is installed in the first chimney channel - it is highlighted in yellow in the figure. To lay this row you will need ½ fireclay bricks and 14½ red ones. |
 | Fourth row. At this stage, channels and chambers continue to form, according to the diagram, and the chimney channels still remain united. For a row you will need ½ fireclay bricks and 14½ red ones. |
 | When working on the fifth row, the previously installed doors overlap. The side walls of the combustion chamber bottom are lined with fireclay bricks. Moreover, in the brick that will be laid on the sides, it is necessary to cut steps for laying the grate. The second and third vertical channels remain combined, but are shared with the right first channel. To install this row, you need to prepare 8 fireclay and 16 red bricks. |
 | The sixth row is laid out according to the pattern. At this stage, the second and third flue ducts are separated from each other, and there should now be three separate ducts at the rear of the stove. The base under the oven and the inner walls of the firebox are lined with fireclay bricks - it is placed on a spoon. The wall between the oven niche and the fuel chamber is built from quarters of fireclay bricks. Next comes the stage of installing the firebox door, also in the window left for it between the bricks. The door frame must be wrapped with asbestos material so that there is an expansion gap between it and the brick for the expansion of the metal when it is heated. Temporarily, the door can be supported with stacks of loose bricks until it is firmly fixed by the next rows of masonry. In addition to the door, an oven is installed, which is also pre-wrapped in asbestos. For the laying of this row and the internal arrangement of the niches, 13 red and 3½ fireclay bricks will be required. |
 | For greater clarity, this figure shows the sixth row laid out with the oven box installed. |
 | On the seventh row, the firebox and oven chambers continue to form - the internal lining is fire-resistant, and external masonry- red brick. Fireclay brick is installed on a spoon, red brick on a bed (flat). To work you will need 13 red and 4 fireclay bricks. |
 | On the eighth row, the first chimney channel is separated from the chamber where the oven box is installed, with fireclay bricks. The rest of the masonry follows the presented scheme, and it uses 5 fireclay and 13 red bricks. |
 | Ninth row. At this stage, the door of the combustion chamber is blocked with a brick. The remaining work is carried out according to the diagram shown, and for them you need to prepare 5 fireclay and 13½ red bricks. |
 | On the tenth row, the oven is covered with masonry. The wall between the oven and the firebox is not laid out. IN fire brick, installed along the inner perimeter of the front part of the stove, a 10x10 mm step is cut out, intended for laying a cast iron hob. This row will require 4½ fireclay and 15 red bricks. |
 | Having laid out the tenth row, an asbestos cord is laid on a step cut out of fireclay bricks along the entire perimeter of the internal space. Then, the hob itself is mounted - it should be located on the same level with the outer walls of the oven, built of red brick. In front of the laid slab, on the front wall, a steel corner (45x45x1020 mm) is mounted, designed to protect the brick corner from damage and generally strengthen the row. |
 | On the 11th row, the walls of the cooking chamber are formed. The gap that has formed between the hob and the right wall of the stove is filled with bricks, which are mounted across the masonry of the 10th row. To work you need to prepare 16 pieces of red brick. |
 | For the 12th row you will need 15 red bricks - the laying proceeds according to the presented scheme. |
 | The 13th and 14th rows are laid out according to the serial pattern shown. For the 13th row you will need 15½, and for the 14th - 14½ bricks. Here you need to take into account that the seams between the bricks of the bottom row must be covered with a whole brick, which means that the 14th row will have a different pattern from the 13th. |
 | The 15th and 16th rows are also laid according to the order pattern. For them you need to prepare: for the 15th row - 16, and for the 16th - 14½ red bricks. |
 | After completing the laying of the 16th row, the cooking chamber must be covered with three steel corners measuring 45x45x905 mm. In the middle part of the space above the chamber, two corners are placed side by side, with vertical walls facing each other, and one corner at the end of the chamber. In addition to them, a strip measuring 45x45x700 mm covers the front part of the chamber. These elements form a reliable support for covering the chamber with bricks, so the corners should be laid at a distance of 255 mm from each other. |
 | The masonry of the 17th row consists of 25½ bricks, which cover the space of the cooking chamber. Moreover, a hole is left in the far left corner of the ceiling to extract vapors from the cooking chamber - its size should be half a brick. In addition to the ceiling, the laying of vertical channels continues. |
 | The 18th row is laid out almost completely, but the exhaust and vertical channels remain open. To work you will need 25 bricks. |
 | After this, a steel corner measuring 45x45x905 mm is installed on the front edge of the masonry. This element is intended to strengthen the ceiling of the exhaust chamber window, since it must support two rows of upper masonry. |
 | On the 19th row, small and large drying niches begin to form, as well as a continuation of the ventilation duct designed to remove vapors from the lower cooking chamber. The work is proceeding according to the scheme, and for laying you need to prepare 16 red bricks. |
 | The 20th row also consists of 16 bricks and is mounted according to the diagram shown. |
 | The 21st row consists of 16½ red bricks. It is laid out according to the diagram shown. |
 | The 22nd row is laid out from 16 red bricks. |
 | After laying out the 22nd row, a metal plate measuring 190x340 mm is mounted on the small drying chamber, which will act as a heated shelf. |
 | 23rd row. At this stage, the walls of the smoke exhaust channels and drying chambers continue to rise. A cutout is made on the brick laid above the steam outlet channel, into which a valve will be mounted to regulate the heating of the cooking chamber. The next step is to place a valve with a size of 140×140 mm on the prepared seat. For this row you need to prepare 17 red bricks. |
 | On the 24th row, the ventilation valve is closed, as well as the first and second chimney ducts are combined. To work on this row you will need 15½ bricks. |
 | On the 25th row, three vertical channels are combined into one. For this row you need to prepare 15½ red bricks. |
 | The 26th row consists of 16½ bricks and is laid according to the demonstrated pattern. |
 | Further, on the same 26th row, the drying chambers are covered with a steel corner measuring 45x45x905 mm and two steel strips measuring 50x5x650 mm. The angle placed on the front side of the drying chambers is intended to increase the rigidity of the structure, and also, together with the steel strips, to create a base for the steel sheet covering the chambers. |
 | A sheet of metal measuring 800×905 mm is laid on top of the steel strips and angles. It covers the surface of the chambers and vertical ventilation ducts, except for one chimney duct, into which smoke will flow from all other ducts. The chimney pipe will be built above it. |
 | On the 27th row, continuous brickwork is laid on top of the metal sheet. It should protrude 25 mm beyond the perimeter of the oven cross-section. To lay this row you will need 32 bricks. |
 | The 28th row completely overlaps the previous one and protrudes beyond it by another 25 mm. The chimney opening remains open. To lay out this row you will need 37 red bricks. |
 | Row 29 will require 26½ red bricks. They are laid out with an indentation of 50 mm inward from the edge of the previous row, essentially bringing it to the size of the perimeter of the base of the oven. |
 | The 30th row of the furnace masonry is already the first row of the chimney superstructure. A row consists of 5 red bricks. At the top of the side bricks laid in this row, a 10x10 mm step is cut out - it will serve as a seat for the chimney damper, measuring 250x130 mm. Next, the valve frame itself is mounted on the clay mortar. |
 | The 31st row is the second row of the chimney. It overlaps the edges of the chimney damper, thus fixing it from above. The row also consists of 5 bricks. Work on the construction of the chimney will begin above. |
On bottom diagram with a section of the design of this furnace, the direction of circulation of fuel combustion products is shown. It clearly shows that hot gas flows, thanks to vertical channels, cover the entire surface of the furnace, heating it, and from a well-heated surface, heat is effectively transferred to the heated room.
© When using site materials (quotes, images), the source must be indicated.
The good old brick oven does not lose its position under the pressure of modern, highly efficient competitors. Disputes - why? – there’s too many to count, but actually there’s only one reason: the brick stove breathes. Stone, by the way, no.
What does it mean to breathe? When heated, the microporous body of the stove releases moisture vapor into the air of the heated room, and when it cools, it absorbs it. As a result, the brick oven supports the so-called. the dew point in the room is within physiologically optimal limits. When they say that a brick oven is “healthier” than any other, then, known or unknown, this is precisely this factor.
In addition to the beneficial effect on health, the breathing of the stove gives another important consequence: when performing a medical and thermal calculation of a house, the lower temperature limits in it can be reduced to 18 degrees for comfort and to 20 degrees for medicine, because relative air humidity during the heating season will be close to optimal. In wooden and brick buildings it can provide super savings: at 16-17 degrees, over 80% of physically healthy people do not feel discomfort in them, and the bed linen remains dry. And in stone or concrete house, heated by radiators, and at 18 degrees it can be chilly.
When heating with water registers, the lower temperatures should be taken at 20 and 22 degrees, respectively, and when heating with IR emitters, electric or gas catalytic, another degree higher; IR devices dry out the air a lot. Therefore, a brick heating stove with an efficiency (heat transfer coefficient) of 50% can be more economical in heating costs than an ultra-modern metal-composite stove with an efficiency of 70%, because the heat loss of a house strongly, according to a power law, depends on the difference in internal and external temperatures (temperature gradient).
Note: a little breathing can be achieved by enclosing it with a convection screen (see figure) 30-40 mm thick made of plywood, seasoned hardwood or several layers of plasterboard. At the same time, uniform heating of the room along the height will be ensured. But the breathing of such a stove will not be deep and even. Here modern technologies do not yet reach the brick.

Stove breathing in combination with physiology gives a second-order economic consequence: the heating season can start later and end earlier. In the central zone of the Russian Federation, the difference over the year can reach a week, and in the Black Earth Region and further south – 2-3. For which you will not need to purchase fuel. And if you consider that a good brick stove works on everything that burns, including waste and cheap alternative fuel (pellets, etc.), then the savings increase even more.
Note: On a global scale, brick kilns still fit poorly into the environment - the extraction and production of materials for them causes damage environment greater than the savings from stove heating on losses in heat mains and power lines. But in this case, demand no longer creates, but rather dictates supply. Leading kiln companies are quietly but hard working to improve technologies for the production of kiln materials and create brick kilns that can be transported to finished form and installation immediately at the point of use.
There are no fewer people wanting to build a stove with their own hands. Professional stove makers also do not break the price: their work is in demand, competition is quite high, and, in addition, most of them are enthusiasts of their work. But in order to take on the stove yourself or competently consider the proposed project, you need to know the basic principles of stove construction, which is what this article is about.
Is it only in the house?
A brick stove on the farm is useful not only for heating and cooking. A stationary one can bring very good income, as can a barbecue for an individual entrepreneur working in the field of catering.
In everyday life, what is most important is the high heat capacity of bricks, which ensures long-term heat transfer after heating. Since the firebox is empty, you can sleep peacefully without fear of fumes. For industrial furnaces, the low thermal conductivity of the brick comes to the fore, making it possible to create a high concentration of heat in the working area. In this case, the breathing of the stove becomes a harmful factor, and it is most often stopped by placing the stove in a gas-tight case.
Small businessmen specializing in handicraft industrial production should think about these types of industrial furnaces, which are quite possible to make yourself:
- Cupola furnace – at a utility yard, up to 50 kg of scrap metal can be melted in it at a time.
- – for hardening of metal products with simultaneous cementing.
- Kiln for ceramics, etc.
Note: brick stoves are not recommended for heating greenhouses, greenhouses, poultry houses, and barnyards. A stove breathing miasma will spoil the air and will soon deteriorate itself.
The fact is that factory samples of small industrial furnaces are designed for transportation in parts or assembled. Therefore, their prices are prohibitively high. But by installing a stove on site, you can get a better one without taking out an unaffordable loan, and start a profitable business. For now, we will dwell in more detail on: they were the first to appear in everyday life and the principles embedded in them are valid for others.
Note: Sauna stoves require separate analysis. Here the brick also comes out on top, but for slightly different reasons. A special section will be devoted further to sauna stoves.
Stove in the house
It is not necessary to build a house from a stove; you can choose a stove that matches the house. But first you need to carry out a thermal engineering calculation of the building, taking into account the factors described above and determine the place for the stove in the house. You also need to know that insulating the house from the outside increases the efficiency of stove heating much more than heating with registers. And, in turn, covering a house with siding makes insulation much easier and cheaper. That is, the optimal design of a house stove should initially be comprehensive.

As for the layout, different options are possible here, see fig. The house on the left is suitable, for example, for a bachelor hermit, but not an ascetic or a childless family of convinced sybarites; a warm bed in the bedroom would be very useful here. The stove is a heating and cooking stove. The Russian one does not fit into such a house, but the Swedish one (see below) will fit perfectly. An option is budget housing for a small family, then the bedroom turns into a children’s room or an area in the penthouse is allocated for children.
In the middle the house is already larger and more impressive. A fireplace stove with a finished cast iron firebox opens into the living room, see below; firebox door made of heat-resistant glass. Here, too, different options are possible. If, for example, the kitchen and bathroom are swapped, the heating panel (see below for details) is rotated 90 degrees, and the veranda from the hallway is moved to the right side, then by slightly reducing the living room, you can fence off 1-2 more bedrooms. At the same time, there will be a corridor leading to the common areas.
The plan on the right is more suitable for a summer house. In the summer, opening the window in the kitchen-hallway will not be too hot for cooking. A fireplace stove in the corner - for evening gatherings by the fire; In case of bad weather, it will also be possible to cook shish kebab or barbecue on a rasper.
Already at the stage of planning a house with a stove, you need to consider the following:
- For a tall stove with its own chimney, or for a stove with 500 or more bricks you need separate foundation, which does not have a mechanical connection with the foundation of the building, even if they are designed and built together;
- A low and wide hob and a heating panel for it on the floor, made in accordance with the requirements of SNiP (i.e., capable of holding a load of at least 250 kg/sq. m) can be installed without a foundation, making only thermal insulation; more about her later. It is advisable to reinforce the flooring under the shield with additional joists;
- The chimney cut (also see below) should not come into contact with the ceiling beams; it is very desirable that the distances from the cut to the floor beams closest to it are approximately the same.
- The chimney must protrude at least 500 mm above the roof ridge and be at least 1500 mm away from it.
Clause 1 allows exceptions. If the stove is made of 1000 bricks or less, and the foundation of the house is sectional strip, then the foundation of the stove can be built at the intersection or T-shaped connection of the strips under the internal walls. In this case, the distance from the furnace foundation to the nearest other foundation strips of the building must be at least 1.2 m.
Note: because Since a small Russian stove requires 1,500 bricks, all Russian stoves must be built on separate foundations. But here too there is an exception - a small Russian can be built on the guardianship of wooden beam 150x150 mm, penetrating the floor to the rubble in the foundation of the building or the ground.
Furnace structure
The furnace itself is sometimes called the furnace body. The body of the stove is installed on the hydro- and thermal insulation of the stove foundation or floor and ends with a chimney exiting through the attic and roof. All this together is called the structure of the furnace. The structure of a brick heating stove is shown in Fig. right:

- foundation;
- hydrothermal insulation;
- trenches are a kind of legs, they are made for lower heating and saving bricks;
- blower;
- the entrance of the air vent - an air channel that ensures uniform heating of the room along the height;
- blower door;
- grate;
- the firebox door - worked - with the flow of fuel supply - rush;
- firebox of the firebox, or just a firebox, or just a firebox;
- firebox vault;
- the mouth of the firebox, or its hailo. Sometimes only the vertical mouth of the firebox with a narrowing (nozzle) is called hailo, and in a Russian stove hailo is the nozzle at the beginning of the chimney;
- cleaning door or just cleaning;
- crossflow (pass) – channel bend air convector strangler;
- air convector vent;
- valve for switching the furnace stroke (see below, shown conditionally);
- gas (smoke) convector, or convection oven system;
- view - a valve that is used to close the chimney after firing, so that the stove does not cool down due to natural or wind draft;
- the outlet of the vent into the room with its door. In summer, the air vent door is closed and air convection in it stops;
- chimney smoke duct;
- furnace roof;
- internal chimney trim;
- ceiling;
- fire cutting;
- fluff, or otter - expansion of the mouth chimney.
Note: The side of the stove with the work (in the Russian stove the work is sometimes called the pharynx) is called the forehead of the stove, and its side walls are called mirrors or cheeks.
Let's give some explanations. The foundation is solid reinforced concrete; for a furnace on trenches - a tape-butted one. Removal of the foundation is at least 50 mm. Insulation - 2-3 layers of roofing felt, on top of them - 4-6 mm of asbestos or basalt cardboard, then a sheet roofing iron, and on it the bedding for the masonry is a sheet of felt or basalt cardboard, soaked in a very liquid masonry mortar for the stove, see below for more information. The litter is placed wet on the iron and allowed to dry before laying begins.
The first rows of masonry of the furnace body (oblique shading in the figure) are made of ordinary ceramic red brick (not facing!) on a cement-sand mortar; this is the furnace part of the furnace. Next comes the furnace, or fire part (checkered shading), it is laid from ceramic stove bricks in combination with fireclay, more about bricks later, on a clay-sand mortar.
In front of the blower door and the roof, a sheet of roofing iron is laid on the floor on an asbestos or basalt cardboard cushion of 4-6 mm, its root edge is walled up in the nearest upper seam of the masonry. The spread of the sheet forward is at least 300 mm, and to the sides from the forehead - at least 150 mm. The free edges of the sheet are folded and nailed to the floor.
Clay masonry mortar does not set, but dries out. With irregular heating in the cold season, it gradually becomes limp from moisture. In this case, the part of the furnace body, the temperature in which does not rise above 200-250 degrees, is laid out from furnace bricks, but with cement-sand mortar, which is also much cheaper than clay, oblique hatching with gray filling in Fig. The mortar used for this part of the masonry is Portland cement from M400 and mountain sand without inclusions. Replacement with decorative analogues is unacceptable!
The lower transitions from channel to channel of the gas convector (crossflows) should be 30-50% greater in height than the upper ones (passes). This will ensure that soot accumulates at the bottom of the convector (on its bottom), from where it can be easily removed. For the same purpose, the edges of the passes are rounded.
Starting from 80 degrees in the chimney, the masonry is again made of simple bricks using ordinary cement-sand mortar. The internal cutting of the chimney is necessary; it holds a fireproof cutting (at least 50 mm of asbestos or basalt cardboard in a metal casing) and, most importantly, in the event of a fire, the soot will absorb the heat for a time sufficient to take the necessary measures.
The role of the fluff (otter) is aerodynamic. It cuts the wind flow, forcing its upper part to jump over the mouth of the chimney, so the draft is not so dependent on the wind. The height of the fluff is at least 2 rows of bricks, the offset at the mouth cut is half a brick. Neglect of fluff is a very common cause of smoking stoves.
Choosing a furnace layout
The main convection schemes for household brick ovens are presented in Fig. On the left is a channel stove with a series gas convector, the simplest in design. Similar ones are built using a serial channel circuit. In addition to simplicity, the advantage of the channel scheme is that it is very flexible in design. The convector with the firebox are mechanically connected only by a heater, so a channel stove can be designed for any ready-made room, see next. rice.
However, the efficiency of purely channel furnaces rarely exceeds 40%, and it is very difficult to build a water heater into them: a powerful internal heat flow circulates in the body of the furnace, and any violation of it leads to a drop in efficiency and increased soot deposition.

In the center in Fig. with diagrams the most advanced heating and cooking stove made of brick -, its efficiency reaches 60%. It is a chamber oven (the role of an air chamber flowing around a flow of hot gases is played by oven 1) and a duct convector stretched from floor to ceiling behind it. In the chamber part of the Swedish stove, gases heat the cooking surface in the cooking niche 2, and part of the heat from the convector enters the dryer 3. Advantages of the Swedish stove:
- The convector and oven do not have energy feedback from the combustion part, so a U- or W-shaped heat exchanger can be built into the oven on the side DHW systems with a storage tank, and place the tank itself either in a drying niche or on the roof of the stove.
- The combustion of flue gases occurs in the chamber part of the furnace. They go into the convector with a temperature below 800 degrees, so it can be made from ordinary bricks with cement-sand mortar.
- A tall narrow convector provides uniform heating of the room across the height.
- Some of the flue gases from the chamber outlet can be transferred, for example, to a stove bench, and then returned to the convector without deteriorating the furnace parameters.
- The dimensions of the convector can be varied, moved and rotated relative to the chamber part, so the Swede also fits well into a finished house and can heat up to 3 rooms, see next. rice. (after channel furnaces).
- If you open the oven door, a powerful stream of thermal radiation will come out of it, which will allow people who have come from hard work in the cold to quickly warm up and dry themselves.

The main disadvantage of the Swedish stove is the high requirements for the quality of materials and work for the chamber part of the stove. In addition, it definitely needs a foundation; without it, a tall and narrow structure, parts of which are loaded differently due to thermal stresses, will turn out to be fragile and unstable. Only an experienced stove maker can make a Swedish-type stove.

Finally, on the right in Fig. with diagrams - bell furnace. Its efficiency can exceed 70%, because it is self-regulating: flue gases will not go into the chimney until they burn out under the hood and give up their heat to the body of the stove. In addition, a bell-type stove has the property of a gas view: if you forget to close the standard one, the hot gases under the bell will not allow heavy cold air from the heat to flow through, and the stove will not get cold. This guarantees against wastage due to a view being closed at the wrong time.
However, a bell furnace looks simple only in the diagram, but in execution it is very complex due to the high loads in the structure. Then, a bell-type stove is exclusively heating; it is impossible to build a hob into it. Heat extraction for a water heater is possible only in two-bell stoves, which are even more complex, so bell stoves are not very common in everyday life. The exception is, but such talented stove makers are rarely born.
Plate and shield

The development of the Swedish idea gave rise to a very promising design: a conventional hob with a separate heating panel-convector, see fig. All that was required for this was to abandon the cooking and drying niches; this made it possible to separate the chamber and channel parts mechanically, i.e. build them separately; perhaps even in turns.
What do we get in return? Less load on the floor. In most cases, the stove can be built directly on a wooden floor, putting the same insulation on it as on the foundation for a stove. And under the shield, just a damping cushion made of basalt cardboard is enough. The problem of stability of a tall narrow shield remains, but it is solved by creating its mechanical connection with the wall, even if it is a half-brick partition, see fig. left.

Further, the shield can be moved and rotated relative to the stove, then the stove can heat the kitchen and bathroom, and the shield can heat up to 4 rooms. To do this you need to paste into horizontal section The chimney between them is a flexible link made of heat-resistant corrugation with good thermal insulation to avoid soot deposition. In general, at the cost of abandoning niches that are almost unnecessary in our time, a fundamentally new and very practical design was obtained.
Seasonal furnace runs
In the summer, when it’s already hot, there’s no need to heat the room. But putting tiny amounts of fuel into the firebox will also not work: the limits for adjusting the power of the fuel supply of all furnaces are small. The heat from a small batch will fly out into the chimney, and the remainder will not be enough for scrambled eggs. But get summer kitchen Not everyone has the opportunity to use a stove.
For such a case, stove designs with switching from summer to winter have been invented. The easiest way to switch the stroke is in a channel furnace in a parallel circuit, two left positions. in Fig. below. However maximum efficiency A channel-parallel furnace can only be achieved with a power of more than 20 kW. The square-cube law applies here, and in a stove that is too small, the heat will “whistle” into the pipe without having time to heat the convector. In addition, all two-pass furnaces are potentially dangerous: if you accidentally close both valves, a fume will occur. Finally, during the summer, the roof and part of the cheeks of the stove still get hot.

Meanwhile, there is a two-pass scheme, especially suitable for heating panels: a scheme with two chimneys, summer and winter, two positions. on the right in Fig. It only requires one valve, so it is completely safe - there will be draft in any position of the switch. The position of the valve out of season will be immediately felt by the heat transfer, and you can switch the stroke during combustion. And smoothly regulate the heating by partially closing the damper.
During the summer run, gases cannot squeeze through into the winter run: the aerodynamic resistance of the convector labyrinth is much greater than that of a straight pipe. And the complexity of constructing chimneys is not at all double: the gases enter the winter chimney cooled below 80 degrees, so the winter chimney can be lightweight and simplified, for example. asbestos-cement. The only small disadvantage of a system with two chimneys is that each pair of convector channels requires cleaning.
Special ovens
Before moving on to a more detailed analysis of conventional stoves, we will focus on several special, highly sought-after designs.
Barbecue oven

The real one is the ancient one open hearth, see fig. It is built either outdoors under a canopy or indoors under a smoke eliminator. Masonry without any wisdom: half a brick with a spoon bandage. 3-4 rows need to be laid out with pokes to form supports for the roasting pan and grates. However, for more details about the masonry, see below.
The foundation for an outdoor barbecue is the simplest, a slab of ready-made concrete monoliths or stone blocks on a sand-crushed stone bed. An indoor barbecue is built directly on the floor using the combined insulation described above.
The barbecue has one subtlety: the side of the brazier, in the right hearth it heats the cooking from the sides. Therefore, it is advisable to lay out the top 2-3 rows from fireclay bricks; it absorbs heat very well and slowly releases it. In order for the top of the brazier to heat up faster, you need to take faceted shaped bricks, as shown in Fig. below. Through the wedge-shaped depressions between them, heat will pass faster into the masonry. You can make shaped bricks for a barbecue yourself, but then you will have to work with a grinder.

Bathhouse
How to build a furnace in the usual way; The main secret here is the design of the heater. A closed heater through which flue gases pass (on the left in the figure) quickly warms up and produces the most useful dry steam. But you can’t “pour” water or kvass onto it; you’ll have to light the stove again. In addition, the slightest mistake - incorrectly selected stones, poor fuel, violation of the firebox - leads to the deposition of unburned organic matter in the heater, and dry steam can turn out to be toxic and carcinogenic.

An open heater (second from the left in the figure) is safe, but takes a long time to heat up. To steam with “supercharge”, the stove must be heated all the time, so its creation must go into the dressing room: fumes are especially dangerous at high air temperatures. If you add too much pressure, the heater can completely dry out, and the whole bathhouse will go down the drain.
The third stove from the left with a closed side heater is more perfect: the bunker with stones is washed by hot gases from all sides except the front one, so the heater warms up faster and you can put more pressure into it. But the most perfect sauna stove is the bell-type stove on the far right. The heater is located on the roof of the bell, the temperature under which is very high, there is the main source of heat generation, and this heat has nowhere to go except into the stones. Therefore, the heater warms up in a matter of minutes and you can add pressure almost without restrictions. There is no need to heat the stove, the “hood” itself will select a mode depending on the heat consumption, as long as there is fuel in the firebox.
This stove has 3 disadvantages. Firstly, the overall complexity and high cost, like bell-type furnaces in general. Secondly, a cap made of ordinary steel quickly burns out, but one made of heat-resistant steel is expensive. Finally, you can only add heat to the heater of this stove from the built-in shower, and you can’t fill it with kvass.
Flow furnaces
Flow-through stoves do not have convectors, but they only have a superficial resemblance to a fire in a chimney or cave. Continuous furnaces can be very effective. The most popular types are English fireplace and Russian stove.
Fireplace
The structure diagram is shown in Fig. To obtain maximum efficiency comparable to that of a Dutch oven, the fireplace insert should taper back on all sides, on the right in Fig.

The main proportions of the fireplace are as follows:
- The portal area is 2% of the room area.
- The height of the portal is from 2/3 to 3/4 of its width.
- The area of the combustion opening is 1.5-1.8% of the area of the room.
- The firebox bottom area is 70% of the portal area.
- The depth of the firebox is 1/2-2/3 of the height of the firebox opening.
- The back wall of the firebox is broken at 1/3 of its height.
- The angle of inclination of the “mirror” of the rear wall is 20-22 degrees from the vertical.
- The angle of convergence of the side walls is 45-60 degrees, i.e. 22.5-30 degrees for each.
- If the fireplace has a solid hearth, then its rise back is 4-7 degrees.
- The height of the podium above the floor is about 50 cm.
- The cross-sectional area of the chimney is 7-13% of the firebox area. The smaller value applies to a round chimney, the larger one to a rectangular chimney with sides 1:2. For a square chimney – 10%
Russian stove
(diagram in Fig.) with regular intensive heating it gives an efficiency of up to 80%, has amazing decorative qualities, allows you to prepare traditional Russian dishes that cannot be prepared in any other way, and is always equipped with a stove bench. But the design of the Russian stove is very conservative; only a stove maker with extensive experience working with Russian stoves can make changes to it without risking damage to the stove.

From the point of view of construction mechanics, the Russian stove also stands apart. It is not a solid module that works as one (hollow column, wall), but an almost complete analogue of a building: a coherent structure, the parts of which interact through the corners. Therefore, the corners of the Russian stove must be laid out according to all the rules. Reconciliation in order is not enough; you also need to constantly check it plumb. Key Points The masonry of the Russian stove is shown in the following figure.

Preliminary calculation of the furnace
Before choosing a stove design, it is necessary to make a preliminary calculation for the room. Usually it is based on the heat output of the furnace in kcal/hour. As the stove cools, heat transfer decreases, but heat loss in the room also decreases, because it also cools down. The task of the calculation is to maintain the temperature in the room until the next fire.
Such a calculation is theoretically complex, and using ready-made coefficients and simplified formulas requires a lot of experience. But for houses with good external insulation, quite reliable results are obtained by the method of calculation proposed by I.V. Kuznetsov based on the average thermal power per unit surface of the furnace (TMEP). For a normal firebox it can be taken at 0.5 kW/sq. m, and for heating in severe frost - up to 0.76 kW/sq. m for 2 weeks.
Using TMEP, the rough calculation of the furnace becomes very simple. Let's say we have a stove with a plan of 1.5 x 1.5 m and a height of 2.5 m. The area of its walls is 3.75 x 4 = 15 square meters. m, plus 2.25 sq. m ceiling. Total 17.5 sq. m. This stove will be able to produce from 8.75 to 13.3 kW of heat. Taking into account the features of stove heating, this is enough for a house of 80-100 square meters. m.
Firebox
To calculate the firebox, you must first determine the maximum fuel volume. It is found by the required thermal power, calorific value fuel, its specific gravity and the expected efficiency of the furnace. The calculation is carried out for all types of fuel for which the stove is intended, and the highest value is selected. The volume of the furnace fuel chamber (combustion chamber) is taken to be 2-3 times greater than the maximum volume of fuel mass, based on re-melting. In general, the maximum fuel load into the combustion chamber is 2/3 of its volume.
A complete calculation of the firebox is not for amateurs, and not even for every heating engineer. Let's take at least such a “trifle” as a grate. It will let in too much air - the fuel will burn faster than the body of the stove will accept its heat, and the remainder will fly out into the chimney. If there is not enough air, the fuel will not burn completely, and the unreleased heat will again end up in the chimney with smoke. What about soot and ash clogging the grates? And all this needs to be linked with other, no less significant components of the furnace, and for different types of fuel.
Fortunately, there are now many ready-made stove inserts on sale for different thermal powers, for different fuels, with solid or transparent, for fireplace stoves, creations. And a finished firebox will cost less than any homemade one. When choosing, you just need to pay attention to the following:
- The dimensions of the firebox and its fastening elements (pins, mustaches) must be consistent with the dimensions of the brick. Kiln bricks are produced in several standard sizes (see below), and the same firebox can be sold in several modifications for different bricks.
- For a long-term use stove, you need to use a cast iron firebox. Welded from sheet metal - for ovens used occasionally.
- You also need to pay attention to the depth of the narrowing of the combustion chamber towards the grates - an ash pit, an ash well or simply an ash pit.
Let us clarify the last point. If the stove will be heated primarily with high-calorie, low-ash fuel in large pieces (coal, peat briquettes), then the ash pan needs to be taken deeper, up to 1/3 of the height of the combustion chamber. In a shallow ash pan, such fuel will burn out too quickly. If the stove uses low-calorie wood fuel, including pellets, then the depth of the ash pan should be no more than 1/5 of the height of the combustion chamber, otherwise the bottom of the fuel mass will quickly become clogged with ash, the air flow will be reduced, and the fuel will not burn out.
As you can see, the depth of the ash pan is large. Therefore, it is better to overpay a little and take a multi-fuel firebox. In such systems, complete combustion of all types of fuel listed in the certificate is ensured by special design measures.
Note: raw firewood can be completely burned in a deep ash pit, and coal can be burned on a flat firebox floor by choosing the correct amount of fuel. But this requires the experience of a stoker and intermediate heating with screwing, which is no good at night.
Chimney
Calculating a chimney is a separate topic, perhaps more complex than calculating the entire stove. Even on a computer, you have to restart the CAD 2-3 times, manually adjusting the source data, before everything comes together properly. But for normal conditions(the cross-section is rectangular, the stroke is vertical without kinks, the height of the mouth of the chimney above the grate is 4-12 m) you can immediately give ready-made values of the transverse dimensions for furnaces of different power:
- Up to 3.50 kW – 140×140 mm.
- From 3.50 to 5.20 kW – 140×200 mm.
- 5.20-7.20 kW – 140×270 mm.
- 7.20-10.5 kW – 200x200 mm.
- 10.5-14 kW – 200Х270 mm.
These values are the minimum. They are designed to avoid “whistle” when cold air flows countercurrently into the stove through a chimney that is too wide. “Whistling” is fraught not only with heat loss, but also with a lot of other serious troubles.
If the stove in the chimney chosen “offhand” smokes even occasionally, it needs to be increased by only 0.25-0.5 m. Once upon a time, for this, a leaky bucket was placed on the pipe, now you can add a piece of asbestos-cement pipe with a cross-section no less than the chimney.
But the best way is not to be lazy and lay another 2-4 rows of bricks, not forgetting to make a new fluff. Have you ever seen a pipe with two otters? This means that the initially short chimney was increased to normal as a result of the heating.
Note: It is often necessary to extend the pipe when the aerodynamics of the area change. Let's say the forest has grown around or high-rise buildings have been built.
Furnace materials and appliances
Brick
Sources often confuse it with fireproof fireclay. The only thing they have in common is their size: if a single building bricks they are 250x125x65 mm, while the oven ones are 230x114x40 mm (standard) or, sometimes, 230x114x65 mm. In general, the stove brick is high-quality red M150. You can use it entirely to build a Dutch oven and a Russian stove. In terms of heat resistance (up to 800 degrees), it would also be suitable for a fireplace, but it absorbs little heat and cools quickly, so it is only suitable for a fireplace in a summer cottage, where the fire is only admired.
Note: The dimensions of stove bricks were formed historically in ancient times, so that anyone could distinguish them from building bricks. Firing bricks then cost a lot of work and expense, there was no concrete, and deposits of good clay were rare. Therefore, the wandering stove-makers of that time often did nothing, using weakly fired bricks made from unimportant clay.
Fireclay bricks are used for laying the combustion parts of furnaces with a fairly intense thermal regime: Swedish, bathhouse, bell-type. Its main advantage for household stoves is not heat resistance; 1600 degrees does not exist in home stoves. What is more important here is the high thermal conductivity of fireclay combined with high heat capacity: fireclay masonry is an excellent heat accumulator.
Due to the high thermal conductivity, it is impossible to build a furnace entirely from fireclay: it will first become unacceptably hot and then give off heat too quickly by radiation. On the outside, the fireclay masonry should be covered on all sides with ceramic, at least half a brick.

Judging the quality of fireclay bricks only by the depth of its color is not entirely correct, because... Fireclay clay from different deposits is very different in appearance. Almost black brick may be bad, but light yellow brick may be excellent. The main sign of quality is a fine-grained structure without many visible pores and inclusions (top left in the figure; next to it is suspicious). The next stage of testing is tapping with a light hammer. A good brick produces a ringing or clear, abrupt sound, while a bad brick produces a dull, drawn-out sound. Finally, if knocking doesn’t really clear anything up, they check for cleavage, or, in modern terms, conduct a crash test: a brick is broken or dropped from a height onto a hard floor. U good brick and the cleavage is good, it splits into large pieces with a granular fracture. A bad one produces more dust and crumbs than large fragments.
The sides of fireclay bricks are called the same as building bricks, this is also shown in Fig. Like construction fireclay, fireclay is used full-length, in 3/4 lengths (in three-quarter lengths), in halves and quarters. How they are indicated on masonry diagrams is shown in Fig. bottom left.
Well suited for laying internal critical parts of household stoves clinker brick, or simply clinker (on the right in the figure) This is the same ceramic brick, fired at high temperature. Its appearance is unprepossessing, but its strength and heat resistance are increased. Clinker costs slightly more than regular red brick, but is significantly cheaper than fireclay.
Note: Sand-lime brick is absolutely unsuitable for any parts of furnaces. It does not adhere to clay mortar, but due to alternating thermal loads it draws moisture into itself like a sponge.
Sand
Sand in mortar for laying stoves requires special consideration. For a stove designed for more than 10 years of regular use without repair, you need mountain sand without inclusions. In other types there is too much organic matter, due to which the masonry seams crumble and crack over time.
Pure mountain sand is roads. But the main thing is that now there is an ideal replacement on sale: clay sand for ceramic masonry and fireclay sand for fireclay. Don’t be surprised by the phrase “clay sand”; it, like fireclay, is ground waste of the corresponding type of brick. Brick sand most often turns out to be cheaper than good mountain sand, and mortar masonry with it is of exceptional quality.
Masonry mortars
They are used for laying brick kilns. There are many known recipes; here are the simplest and highest quality ones. For fireclay you need fireclay marl or white kaolin. For ceramic bricks - any refractory ground clay; Gray kaolin, blue or gray Cambrian are best. In both cases, for 100 pcs. bricks will need 40 kg of clay.
When purchasing, they immediately check the clay for the smell: any clearly noticeable smell, pleasant or unpleasant, indicates an admixture of organic matter; such clay is not suitable for laying a stove. Next, you need to determine the required proportion of sand in the solution, because Clay from different deposits of the same quality has different fat content - a combination of adhesive ability and viscosity. Take 0.5-1 kg of clay powder for a sample, fill it with water in a container to the top of the backfill and let it sour for a day and gain moisture. Fireclay marl completely sours in 1-2 hours, overexposure is not a problem.
The soured clay, adding a little water, is kneaded until the consistency of very thick dough or plasticine. Then the batch is divided into 5 parts and sand is added to each: 10%, 25%, 50%, 75% and 100% by volume. All samples are thoroughly mixed again until completely homogeneous and dried for 3-4 hours.
Now the samples are rolled into sausages with a diameter of 1-1.5 cm and a length of at least 30 cm. Each sausage is wrapped around any round object with a diameter of about 5 cm and the result is observed:
- The solution, based on a sample that has settled absolutely without cracks, is suitable for any furnace, including the fuel part.
- The dried crust has torn, forming a network of small cracks - the solution is also suitable for all ovens, incl. for the Russian furnace and the Dutch furnace.
- The cracks went 1-2 mm deep - the solution is suitable for parts of the stove heated to no higher than 300 degrees, for barbecues and country fireplaces.
- Deep cracks, breaks, breaks - there is too much sand, the solution is not suitable.
The main point of testing the proportion of sand is to reduce the cost of construction: brick sand is much cheaper than high-quality clay. Accordingly, the more of it goes into the solution, the cheaper it will be.
Note: This test is only suitable for mortar on brick sand. For solutions on natural sand, other tests are used.
The working solution is prepared according to the same principle as the sample, but in the required volume:
- The clay is soaked for a day; fireclay marl – hour.
- Knead the mixture until it forms a dough.
- Rub through a 3x3 mm sieve.
- Sand is added according to the test results.
- Add water little by little and knead until the cream becomes thick.
- Check the fat content of the solution in the usual way, by wetting the trowel.
- If necessary, add clay or sand (very little!), knead and begin laying.
Note: on average, 3-4 buckets of ready-made solution come out of a clay sales package.
Furnace appliances
Stove devices (doors, valves) are attached to the body of the stove either with mustaches located at the seams of the masonry (on the left in the figure), or with a skirt made of heat-resistant steel, wrapped before installation with a 5-mm asbestos cord, on the right there. The first ones, of course, are cheaper, but they are not suitable for fireboxes, ovens and fire dampers: during the life of the stove they have to be changed several times, and it is bad to disturb the masonry by tearing out the mustaches from the seams. And, of course, the installation dimensions of the devices must be consistent with the dimensions of the bricks, taking into account the thickness of the seam.

Laying and dressing
Brickwork can be tongue and groove, depending on which side of the brick faces outward. The bricks are laid on the bed. “Bed” masonry, when the brick is placed on a poke or spoon, is extremely fragile and SNiP is prohibited, but in exceptional cases it is used for exterior finishing unloaded structures.
The masonry is carried out with bandaging of the seams, i.e. the seams of individual bricks must have a spread (offset) in the masonry row (in one or two directions horizontally) and between rows (vertically). In untied masonry, any microcrack that cannot be avoided will inevitably creep further, destroying the structure.
There are dozens of methods for bandaging seams in construction alone, but in the stove business they also have to be changed in order to lay out complex chimney ducts. However, check finished project ovens or one developed independently can be guided by fairly simple principles:
- The masonry begins and ends with bonded rows.
- Any brick must rest on at least 2 others.
- Bricks of adjacent courses must overlap by at least 1/4 in length or width.
- All vertical seams must be filled with mortar, otherwise the masonry will delaminate into vertical layers.
- The vertical seams of the butt and spoon rows should not coincide.
- Protruding thresholds, areas under beams and liners must be butted.
- The hewn parts of the bricks should not protrude outward. The exception is bricks processed with a grinder with a diamond wheel.
The normal seam width when laying a stove is 3 mm, the minimum is 2 mm. Widening up to 5 mm is permissible; on flood rows and in the vault - up to 13 mm. In places where fireclay and ceramic masonry meet and around liners made of any other material (stove appliances, concrete beams, pins under the hob, etc.), the masonry is carried out with a seam of maximum width - 5 mm. The grate bars are placed in a nest on the firebox floor to dry, so that they can be removed for cleaning.

All rows of masonry must be tied vertically. In extensive internal spaces rows, incomplete bandaging in a row is allowed (see Fig.), or masonry using the backfill method, i.e. filling them with bricks without dressing. It is convenient to do ligation between similar rows (for example, underfloor ones) using the mirror reflection method, similar to how they lay out fence posts, on the right in Fig.
Laying the convector and shield

When laying convector partitions, it is necessary to leave bypass windows at the top (passes) and bottom (crossflows). There are no problems with the passes - it’s enough not to add 2-3 bricks, and that’s it. But you can’t put the overflow like that, you’ll end up with a hanging wall. The partitions above the crossflows are laid out as shown in Fig. The supports from the butts are alternated every 3-5 rows. The windows of the tray row near the butts are covered with brick halves.
The walls of the furnace convector are laid out in its order, and the walls of the heating shield are laid out with spoons with a simple spoon dressing. Her diagrams for walls of half a brick, a brick and one and a half bricks are shown in the following. rice. The latter uses mirror image dressing.

Vault masonry
In household stoves, semicircular (in the form of part of a cylinder) and flat vaults are used, see fig. below. In the best Russian stoves, very experienced stove makers sometimes, by special order, make the furnace vault oval, four-centered, and in Pompeian stoves the vault is domed, but both require high skill and experience. In a mechanically weakly loaded semi-circular stove vault, the outer stones of the wings - the heels - and the central stone - the castle - do not differ from the others.

The semicircular vault is laid out in the following order:
- Prepare a drawing of the vault on a scale of 1:1.
- Thrust bearings are placed along it - bricks on which the wings of the vault will rest.
- Place the thrust bearings on the mortar and interrupt the laying of the furnace until the mortar is completely dry.
- According to the patterns - circles - the wings of the arch are laid out, observing the dressing between the rows.
- Apply the solution generously into the groove of the lock and insert the keystones into it one by one, hammering it in with a wooden sledgehammer or log. A sign of correctly executed masonry will be the uniform squeezing of the mortar out of the seams on the wings.
- They wait for the mortar in the vault to dry completely, remove the circles, and continue laying the stove.
The vertical seams of the lock should not coincide with the seams on the wings. To do this, already at the drawing stage, the wings need to be made in a mirror image, and not by simply shifting one to the other side. Maximum angle the discrepancies between the bricks in the vault are 17 degrees. With standard size bricks, inseam in 2 mm outer 13 mm this angle will be maintained.
The flat vault is laid out on a flat pallet instead of a circle of shaped bricks, ready-made, purchased or made independently. The masonry technology is the same, but keep in mind that a flat vault does not tolerate the slightest asymmetry! If the whole thing is moved a little to the side, it will begin to collapse on its own. Therefore, even experienced craftsmen lay out a flat vault from shaped bricks according to a proprietary template pallet.
How many bricks are needed?
How many bricks are needed for a stove? After all, the amount of mortar and, therefore, the main construction costs are tied to it.
Once upon a time, the number of bricks was calculated using empirical coefficients for typical projects. The method gave up to 15% of the fight (and theft), which is unacceptable at current prices.
Nowadays furnaces are calculated using computer-aided design (CAD) systems. The program immediately displays how many full-size, longitudinal and shaped bricks are needed. But, since they don’t build a blast furnace or kiln for a factory at home, and mastering CAD requires a lot of work, time and special knowledge, then the homemaker has no choice but to simply count the bricks according to the order of the stove. This will take an hour and a half for an average home stove, but if you count carefully, you can reduce the battle to 2-3%
Note: a correctly completed furnace design must be accompanied by a specification indicating the number of bricks, other materials and full list devices indicating their type and variety.
Tool
Tools for kiln work are generally the same as for other masonry work (see figure below): a hammer-pick (butt) with a wedge-shaped spine for brick pegs, a trowel (trowel), cutting tools for convex and concave seams, mortar shovel. But order is definitely added. In this case, this is not a masonry diagram laid out along its rows, but a tool for checking its correctness.

The fact is that the masonry of the stove with seams of uneven thickness will soon crack from temperature deformations. On the other hand, masonry on clay takes a long time to dry, at least a week, and even dried seams can be soaked and a failed structure can be rebuilt.
The ordering tool (on the right in the figure) is a flat wooden strip 50x50 mm, on the sides of which the row numbers for different types of bricks are marked, taking into account the thickness of the seam. The stove needs at least 4 rows, and one for each additional corner, internal or external. Use the order like this:
- The flood rows are laid out in formwork.
- The orders are secured in the corners with 2 staples with pointed ends each. The staples are pressed into the masonry seams.
- A mooring cord is moored to the rows, along which the laying is carried out. For a Russian stove, the corners are additionally aligned with plumb lines.
- As you lay out the top bracket, shaking it, is removed from the seam and inserted into the next one.
- The holes from the bracket in the previous seam are sealed with masonry mortar.
Working principles
In all furnaces, without exception, the mechanical connections are relatively weak and the loads are high. Therefore, “brick on brick - drive, grandma, mogorych!” it doesn’t go unambiguously here. A stove that has not yet reached the ceiling will most likely collapse, as described by Makarenko in his “Pedagogical Poem.” When laying a stove, the following rules must be observed:
- Bricks are laid only one at a time. For beginners, it is advisable to lay out the next row on a dry surface, level it, and only then place the stones on the mortar.
- Before laying, each brick is mopped (not to be confused with scraping!): thoroughly cleaned of crumbs and dust with a hair brush.
- Dip the ceramic brick into clean water for a second or two and shake it off thoroughly, then it will immediately stick to the mortar.
- Fireclay bricks are not “bathed” under any circumstances!
- It is difficult to apply a layer of mortar exactly 3 mm thick with a trowel, so experienced craftsmen apply the mortar by hand. But this also requires a certain skill.
- The brick is put into place in one motion, you cannot move or knock!
- If the stone does not immediately lie properly, it is removed, the mortar is cleaned from the brick and its bed and placed again.
- The removed solution is thrown away; it is no longer suitable for use!
Design examples
As an example, consider a couple of constructions with which you can begin the transition from theory to practice. In Fig. - diagram and order of the simplest brick oven: a hob that does not require a foundation. It will take no more than 130 ordinary red bricks, taking into account the battle at the hands of a novice master. A U- or W-shaped hot water heat exchanger with a storage tank made of a metal water pipe can be built into the descent from the gas channel pass to the chimney outlet (marked in red in the figure).

Despite its simplicity and small size, the heat output of this stove is about 650 kcal/hour, which allows flue gases to pass through a heating panel that heats 20-25 square meters. m of living space. A standard size 1 hob is laid loosely on 3-4 mm steel tendrils 2, embedded in the seam between the 11th and 12th rows of masonry. Its thickness is 6 mm.
On to the next rice. – a small apartment with a single-burner hob. It is also made of simple red brick M150. Taking into account amateur fighting, you will need 270-280 pieces.

The cast-iron stove lies freely on the mustache, as in the previous stove. You can remove it and insert a barbecue barbecue into its slot, or place skewers with kebabs on the opening of the stove. With an open (or transparent) firebox door, the stove turns into a fireplace.
It is no longer possible to place this stove on the floor; it is too high and narrow. But on soils with sufficient bearing capacity (loam, sandy loam, forest soil, etc. “dacha” soils), the foundation for it can be a solid slab on a sand-crushed stone bed, as for a barbecue fireplace.
Video: example of laying a simple brick oven
The most important principle
Finally, let’s give the most important principle for the construction of brick household stoves: the stove and the house are closely interconnected, they can be friends and enemies. It is very simple to reconcile the stove with the house: any of them will show all their advantages only in a good-quality, well-insulated house.
Despite the modern abundance of heating and kitchen equipment, many owners do not imagine private house without a stove - and this is absolutely correct. Even if you plan to create an autonomous heating system, then a stove would also be useful. For example, in order to save money in the spring or autumn, when full heating is no longer needed, but you also don’t want to create excessive dampness in the house. By heating the stove once a day or every two days, you can maintain an optimal balance of humidity and heat in the rooms.
Build the oven yourself step by step instructions which has intricate configurations - it will be quite difficult for a beginner. Therefore, if there is no experience in the furnace business, then it is better to choose affordable option order, which will be easy to understand.
When choosing a model, you need to take into account not only the simplicity of the design, but also the heat transfer and functionality of the stove, since there are stoves that do not provide all the functions. Heat transfer is selected depending on the area that the heating structure must heat.
There are quite a few models of stoves, since experienced stove makers, working on one of them, make their own adjustments to its design, and thanks to this, new and new versions of the heating device appear. And in order to choose one type of stove, you need to know what they are in terms of functionality.
Prices for fireclay bricks for laying stoves
fireclay brick
Types of brick kilns
There are T There are three main types - heating and cooking, cooking and simply heating without additional built-in elements.
- A heating and cooking stove can have not only a hob, but an oven and a tank for heating water, as well as a drying niche. In addition, such a structure can heat one or two rooms of a certain area.

Such stoves are often built into the wall, turning the hob and firebox towards the kitchen, and the back wall towards the living room. Thus, the oven performs a triple function - it works as a partition, food is cooked on it, and it gives dry heat in the bedroom or living room.
- They work only for heating, and most often have a compact size. Such a stove is installed precisely in order to maintain the balance of moisture and heat in the house in the fall or spring, when it is too early to turn on the autonomous heating or the central heating has not yet been turned on.
It is good to install such a stove, for example, in a country house, if there is a device on which you can cook food. If the power supply in a holiday village is often turned off, then it is still better to choose a building with a hob for installation.
- The cooking version of the stove can also be used for heating if you need to heat a small area. The device is perfect for a country house or for a small building for permanent residence.
Having such a stove and a supply of firewood, you don’t have to worry that the house will be cold and damp, and the family will be left without dinner or hot tea if the electricity or gas is cut off.
It should be noted that any type of oven can be compact or massive. The choice of the size of the stove structure depends on the area of the house or room, as well as the space allocated for construction.
Choosing a place to install the stove
When choosing a place to build a furnace, you need to consider nuances that are important not only for creating comfortable conditions operation, but also for fire safety reasons. It is especially important to think about location stoves in an already built house, since the chimney pipe should not bump into the attic floor beams or roof rafters during its construction.
The stove is installed near the inner load-bearing wall, in the middle of the room or built into a wall located inside the house.
- It is not recommended to build a stove near external wall, since it will quickly cool down, and the efficiency of its use will be significantly reduced.
- A stove is installed in the middle of a large room if it is necessary to divide the room into two zones. Moreover, with a beautiful decorative finish, it will decorate the house and can become one of the elements for the interior that will emphasize a certain style.
- When building a stove into a partition between rooms, you must ensure that it is insulated from flammable wall materials using heat-resistant asbestos sheets or special plasterboard.
- The space allocated for the stove should be 120 ÷ 150 mm in each direction larger than its base, since the perimeter of the foundation is always slightly larger than the size of the stove.
- To make it easier to determine the size, you need to choose a model that comes with an order diagram.
When the model has been selected and the installation location has been determined, you can proceed to purchasing materials and preparing all the necessary tools. The quantity and range of materials for each model is selected individually, but the tools used for laying are always the same.
Tools for getting the job done
For the process of constructing a furnace, you will need the following devices and tools:
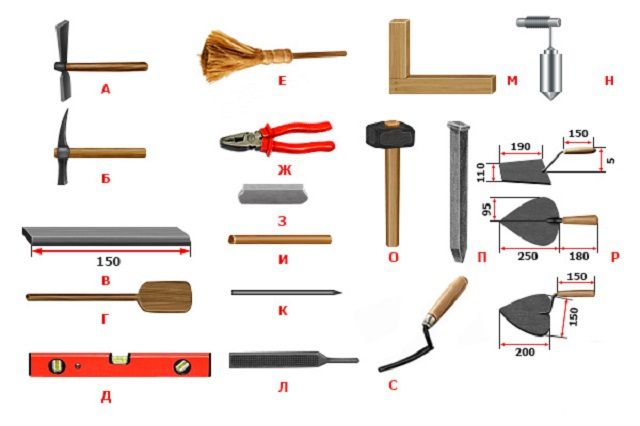
A) The pick is used for hewing and splitting bricks.
B) A stove hammer has the same functions as a pick, but, in addition, it is convenient for removing dried mortar that has protruded beyond the masonry.
B) The rule is used to level the concrete on the surface of the foundation. Often it is made independently from a perfectly smooth planed board.
D) A wooden spatula is used to grind and mix the clay solution.
D) A level is a necessary tool, as it will help maintain the evenness of the rows, both in the horizontal and vertical directions.
E) A sponge brush is used to remove sand and hardened mortar from the internal surfaces of the oven.
G) Pliers are used to bite and bend steel wire when installing and fixing cast iron building elements.
H) A lead scriber is used for markings when finishing the stove with tiles.
I) Squealer - a piece of pipe used to fit tiles.
K) Scribbler-rod for markings.
K) The rasp is used to grind in lumps and remove sagging on finished masonry.
M) The construction angle is necessary to bring the internal and external angles to 90 degrees.
H) A plumb line is used to check the verticality of the walls.
A) A rubber hammer is used to tap bricks laid in a row.
P) A chisel is needed to dismantle old masonry and split bricks.
P) Trowels or trowels are used to remove excess mortar and apply it to courses of brick during masonry work.
C) Jointing will be necessary if the stove will not be lined with finishing material, and the seams between the rows will be neatly formed.
In addition, you will need two containers for the solution and water, as well as a sieve for sand if the solution is made independently.

Laying the upper rows will be easier if there are “goats”
For the convenience of carrying out work, you need to have a scaffold, which is otherwise called “goats”. It is convenient to stand on them when laying masonry at a height, especially since the size of the working platform provides space for installing a container with mortar.
Arrangement of the foundation for the furnace
- The foundation for the furnace is usually laid together with the general foundation for the entire structure, but they should not be connected to each other, since when deformed or shrinking, one of them can damage the other.
- If the stove is being built in a house that has already been built on a strip or columnar foundation and has a wooden floor, then the covering will have to be opened and the foundation under the stove will be raised from the ground.
- If a compact stove model is selected, and a slab foundation, then the heating structure can be erected directly on it by making a waterproofing gasket.

If the foundation Sun However, you will have to arrange it “from scratch”; you need to remember that it must have the same shape as the base of the stove, but protrude beyond it by 120–150 mm in each direction.
- On wooden the floor is marked the contour of the foundation, a part of the plank covering is cut out according to the markings.
- Next, a pit of the required size is dug in the underground soil, 450÷500 mm deep.
- The soil at the bottom of the pit is well compacted, and a sand bedding is made on it, which is moistened with water and also compacted to a thickness of 80–100 mm.

Pit for a furnace foundation with a sand and gravel “cushion”
- After this, roofing felt can be laid around the perimeter of the pit, which will serve as waterproofing and formwork if it is temporarily reinforced with boards or bricks. After the concrete solution has hardened, the formwork is removed from the foundation.
Instead of roofing felt, you can use formwork made of boards covered from the inside with polyethylene sheeting.
It should be noted right away that it is better if the concrete base for the stove rises 70 ÷ 100 mm above the floor. This way you can save bricks and simplify the joining of the floor surface and the side walls of the foundation.
- A layer of crushed stone of the same thickness is poured on top of the sand and is also well compacted.
- The next step is to install a reinforcing grid at the bottom of the pit, made of metal wire or ready-made mesh. The lattice elements are connected to each other using twisted wire.

Foundation reinforcement - option
- The first layer of solution is poured into the prepared pit. It may consist of crushed stone, sand and cement- 1:2:1 or gravel and cement 3:1. This layer should occupy approximately ⅓ of the filled space.
- After pouring the first layer, immediately mix and pour the second layer, consisting of sand and cement in proportions 3:1.
The second layer is poured to such a height that 50 mm remains to the top, which will be required for the upper leveling layer of the foundation.
If necessary, for the top layer of concrete, the formwork can be expanded and then laid on top of the poured mortar reinforcing mesh, having cells of 70÷80 mm.

- Then the last top layer of mortar is poured and leveled using the rule.
The foundation is left for concrete to mature for 27–30 days. It is advisable to moisten it with water daily and then cover it with plastic film - this will help make the concrete more monolithic and durable.

After removing the formwork, two or three layers of roofing material are laid on the finished foundation, which will protect the brickwork of the furnace from capillary moisture coming from the ground or from the underground.
After this, you can proceed to the main work - laying the stove.
Several recommendations for masonry work
- Before you start laying bricks on the mortar, the entire structure is raised dry from brick, but each of the rows must be laid out strictly in accordance with the order diagram.
Experienced stove makers advise preliminary dry laying to be carried out by all craftsmen who are taking on the construction of a stove for the first time. This event is necessary in order to understand the location of all internal channels and not make gross mistakes when adjusting the bricks in each of the rows.
To carry out dry masonry, you need to stock up on wooden slats, which will determine the thickness of the seam between the bricks. Typically their thickness is 5-7 mm. The same lath will need to be used for the main laying, carried out with mortar. Such “calibration” of the thickness of the seam is especially necessary if the masonry is being done “for jointing” and must be flawless.
This process is carried out slowly and thoughtfully, since it is very important to understand how the smoke will be removed from the firebox and how it will get into the chimney pipe.
- Having lifted the structure dry before laying the pipe, it is carefully dismantled. If the bricks were adjusted to size at the same time, then each row can be folded into a separate stack by marking the row number and place in it on the bricks with a marker.
- When performing the main masonry, each of the rows is also first laid out dry, and then, after carefully adjusting all the parts, it is mounted on the mortar.
- When the main laying is carried out, two measuring strips are laid on the edges of the previous row to maintain the exact thickness of the seam. Then the solution is applied in a layer of 10÷12 mm. A brick is placed on top of the mortar, pressed, and, if necessary, tapped with a rubber hammer until the brick rests against the measuring rod. The excess solution that appears is picked up with a trowel.

- The slats are pulled out of the masonry after installing the third ÷ fourth row above them, and then used again. Therefore, you need to prepare several pairs of these auxiliary elements.
- Having pulled out the slats, the seams are carefully filled with mortar and immediately “unstitched”.
- When laying the mortar, each row is checked using building level to maintain horizontal and vertical planes.
Compliance with these nuances will help simplify the process of constructing any furnace and avoid “fatal” mistakes that may lead to the need to redo the entire work.
Heating and cooking furnace with drying chamber designed by Yu. Proskurina
As mentioned above, there are a large number different models ovens. This publication will discuss one of the compact and functional options that can be installed in small house, since it does not take up much space, but is capable of heating a room with an area of 16 ÷ 17 m².
The design of the Yu. Proskurin stove is a double-turn heating and cooking option, equipped with a single-burner stove and a drying chamber designed for drying vegetables and fruits, medicinal herbs, mushrooms, etc.
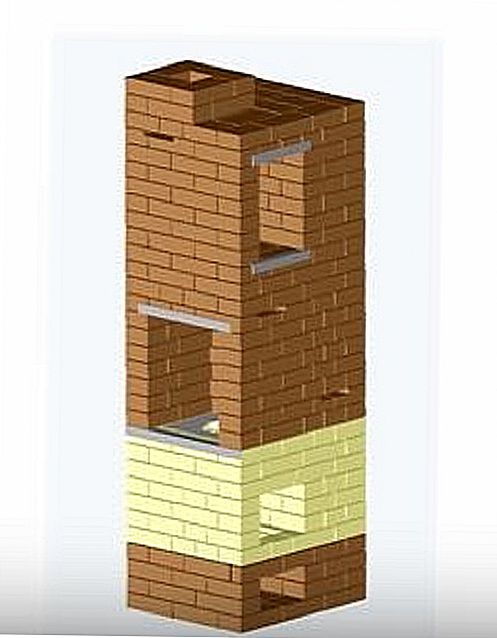
If desired, an oven box of a suitable size can be installed in the niche of the drying chamber.
The stove has dimensions (excluding the height of the chimney pipe) 750×630×2070 mm. Its heat output is 1700 kcal/h. The design provides two operating modes - summer and winter, which is very important both for fuel economy and for the ability to heat the stove and cook food, without heating everything structures in the summer.
List of required materials
In order to build such a heating structure, you will need the following materials:
| Name of materials and elements | Quantity (pcs.) | Element dimensions (mm) |
|---|---|---|
| Red brick M-200 (excluding pipe laying) | 281 ÷ 285 | - |
| Fire-resistant fireclay brick, grade Ш-8 | 82 ÷ 85 | - |
| Fire door | 1 | 210×250 |
| Doors for cleaning channels | 2 | 140×140 |
| Blower door | 1 | 140×250 |
| Summer damper for chimney | 1 | 130×130 |
| Fire valve | 1 | 130×130 |
| Stove valve | 1 | 130×130 |
| grate | 1 | 200×300 |
| Single-burner hob | 1 | 410×340 |
| Steel strip | 1 | 40×260×5 |
| 1 | 40×350×5 | |
| 1 | 40×360×5 | |
| Steel corner | 1 | 40×40×635 |
| 3 | 40×40×510 | |
| 4 | 40×40×350 | |
| Roofing iron | 1 | 380×310 |
| Pre-furnace metal sheet | 1 | 500×700 |
In addition, the work will require clay, sand, cement, crushed stone, gravel, marl and an oven box, if it is decided to install an oven instead of a drying niche.
Scheme of construction of a furnace designed by Yu. Proskurin
| Illustration | Brief description of the operation being performed |
|---|---|
 | The first row is laid out as a continuous plane, respecting the location of the bricks. It is very important to lay this row perfectly evenly in all respects, since the quality of the masonry of the entire structure will depend on it. |
 | In the second row, a blower (ash) chamber and the base of two vertical channels are formed. The doors of the blower and cleaning chambers are installed on the same row. |
 | The metal doors have special ears into which pieces of steel wire are threaded and twisted - they will then be embedded in the seams between the bricks. Temporarily, until they are completely secured, the doors are supported with bricks on one or both sides. |
 | On the third row, the formation of the blower chamber and the lower part of the chamber of vertical channels continues. At the same time, the installed doors are secured on both sides. |
 | On the fourth row, the doors of the blower and cleaning chambers are completely blocked with bricks. The common chamber of the vertical channels is divided in two, so instead of one large hole, two are formed, measuring ⅔ brick in length and half a brick in width. |
 | The fifth row is completely laid out with fireclay bricks. A hole is formed above the ash chamber with a seat for the grate. To do this, a part of the brick is cut out from the side on which it should be turned towards the hole above the blower chamber. |
 | The grate is also mounted on the same row. It is planted on a clay mortar or laid freely, without mortar. There should be a distance of 4-5 mm between it and the brick. |
 | On the sixth row, the formation of the combustion chamber and vertical channels continues. |
 | In addition, a combustion door is installed on the same row, the frame of which must be wrapped or lined with asbestos before installation, which, when the metal is heated, will allow it to expand without stress or damage. |
 | The seventh and eighth rows are laid out in order, and the formation of the firebox and vertical channels continues on them. |
 | On the ninth row, the fire door is covered with brick. Moreover, in order to remove the load from the ceiling from the door, the side and third bricks from the edge are ground off on one side and between them a brick is installed, hewn on both sides. |
 | On the tenth row, the fuel chamber and the first vertical channel are combined - this is done so that the hot smoke from the firebox is directed precisely into this created hole. To ensure smooth smoke flow, the protruding corner of the solid brick enclosing the second vertical channel is cut off. |
 | On the eleventh row, the masonry follows the pattern, except that at the edges of the bricks framing the combustion chamber, cutouts are made that will form a recess for mounting a single-burner hob. |
 | Then, on the same row, asbestos strips are laid on the cuts made on the bricks, and the slab panel is mounted on them. A steel corner is installed on the side where the cooking niche is formed. |
 | The 12th row is laid out of red brick, and in the future all masonry comes from it. Two vertical channels are formed again, and a niche is being formed around the hob. |
 | The 13th row is laid according to the diagram, but in the front part of the first vertical channel a place is formed for installing the summer-winter valve. After this, a valve is mounted on the clay-sand mortar. |
 | From rows 14 to 17, the masonry is carried out according to the same principle - a cooking niche and channels are formed. |
 | On the 18th row, steel corners are used to cover the cooking niche. One of them is mounted on the edge of the niche, the second - at a distance of a brick from the first, and the third is pressed against the second with its back side. This is done to make it convenient to lay the next row. |
 | On the 19th row, the cooking niche is completely covered, with the exception of the formation of the opening for the steam exhaust channel and the place for installing the valve. To do this, cutouts are made on the bricks into which the valve is mounted. |
 | Row 20 is laid out according to the pattern. The formation of two vertical channels and a steam exhaust hole continues on it. Moreover, if you look closely, you can see that one of the bricks forming the first vertical channel is cramped. |
 | On the 21st row, the first vertical channel and the steam exhaust channel are combined using the left hollow space. In this row, almost all bricks are placed only along the perimeter walls of the structure. Only the second vertical channel is protected. |
 | In the same row, the resulting cavity is covered with metal strips, which are laid according to the pattern shown in the figure. |
 | Next, a sheet of roofing iron is laid on the steel strips, with the help of which a chimney opening is created, located on the opposite side of the steam exhaust opening. |
 | On the 22nd row, the laying is done on top of the roofing sheet. A hole for the chimney and two holes for vertical channels are left. In the place where the drying niche will be formed, a piece of corner is laid, which will protect the brick on the edge of the chamber from damage and make the edge of the niche more neat. |
 | Row 23 - a drying chamber is formed, and its rear wall is made of brick installed on its side. It will isolate the chamber from the opening of the chimney duct. |
 | On the 24th row, the walls of the drying chamber, chimney and two vertical channels are formed. |
 | Row 25 - work continues according to the diagram. The second brick of the back wall of the chamber is installed in the same way as the first. |
 | On the 26th row, preparations are underway to combine two vertical channels, so the internal bricks in both holes are ground at a slight angle. |
 | Row 27 - the first and second channels are combined with masonry. A common cleaning door is installed for them. The rest of the work proceeds according to the plan. |
 | On the 28th row, the drying chamber is covered with three pieces of corners according to the same principle as the covering of the cooking niche was done. The vertical channels are combined into one wide one, and the cleaning door is secured with side bricks. |
 | On row 29, the drying chamber and vertical channels are completely blocked. A hole in the chimney channel is left, which is lined with bricks with cut-out landing grooves for the chimney valve. After laying the row, a frame with a valve is installed on the clay-sand mortar. |
 | On the 30th row, the entire surface of the oven is completely covered. Only the chimney hole is left, which should be the size of half a brick. |
 | 31-32 row - formation begins chimney. |
This figure shows a cross-section of the oven. The diagram clearly shows all the internal channels through which heated air will circulate.
Today there are many options for heating a dacha: centralized gas, boilers, electric heaters. But if it is not possible to implement all this due to the area’s remoteness from civilization, a do-it-yourself brick stove for a summer cottage will be an excellent solution.
Reliable and durable - it will gather more than one generation of household members around itself, providing the house with warmth and filling it with comfort.
The services of a good stove maker are not a cheap pleasure. Therefore, if you decide to implement a brick stove project at your dacha, it will be useful for you to read this article, in which we will tell you about the operating principle, features and layout of the stove structure.
A brick stove can become not only a functional device, but also the main highlight of the interior if it is used correctly. Today there are many ways to beautifully veneer and decorate a stone stove.
No matter how much time has passed since the appearance of the first stove designs and no matter how far home heating technologies have come, the stone stove still does not lose its relevance. Compared to other types of heating (electricity, gas), it is more economical. At the same time, thick stone walls allow you to retain heat for another day after the firewood burns out.
According to their purpose, furnaces are divided into the following types:
- heating;
- cooking;
- multifunctional;
- combined.

- combustion chamber, which is purchased ready-made or lined with fireclay bricks;
- an ash pit where ashes are collected;
- chimney.
This type of design also includes a fireplace with an open or closed firebox. It is used not only for decorative purposes, but also allows you to effectively heat a room of 15-20 square meters. meters.
Depending on the selected material, wall thickness, masonry scheme, heating stoves may have different heat output.
The most popular type of stove is the one-brick design. This allows the walls to be heated to 60 0 C. The famous Dutch ovens are laid out according to this scheme.
In terms of dimensions, the heating stove can be wide and flat, or it can have an elongated rectangular shape. It all depends on the area of the room, the style of the interior and the personal preferences of the owners.
For cladding such a stove, tiles, decorative plaster, and decorative stone are usually used.
Brick heating stoves in the form of a three-sided prism look very stylish and original, but a beginner cannot implement this option, since it requires a lot of experience. Of greater difficulty is the cutting of bricks and the requirements for maintaining an angle strictly at 60 0.
Round stoves, which are laid out according to the design of the famous Russian furnace engineer V.E. Grum-Grizhimailo, also look beautiful and unusual. The furnace operates on the principle of free movement of gases. To ensure tightness, the outside of the structure is covered with sheet metal. Such a stove can heat a large country mansion and will become a real decoration for any home.

The design of the stove consists of a brick body, inside of which there is a combustion chamber, an ash pan, and a chimney. There is a metal plate on top (an oven can be built in).
- A heating and cooking stove is already a multifunctional design.
This is a more difficult project to implement, as it consists of:
- combustion chamber;
- chimney;
- ash pan;
- hob;
- oven.
The stove looks massive and is usually chosen for dachas where there is no other heating option.
In our country, heating and cooking stoves are the most popular, allowing you to heat the house and prepare a delicious dinner for the whole family.
It can be additionally equipped with a drying chamber, where you can make preparations for the summer: mushrooms, berries, fruits. In cold and damp weather, you can quickly and safely dry clothes and shoes in this chamber.

By the way, ovens with drying chambers was first invented in the countries of Northern Scandinavia, where hunters and fishermen needed to dry their clothes and boots in one night.
Many schemes of heating and cooking stoves have additional devices in the form of a comfortable bench, drying for firewood, an oven, and a water-heating tank.
Construction of a stove for a summer residence and its features
The main elements of any brick stove for a summer residence are:

10 basic rules for laying a country stove

Which brick stove to choose for your dacha?
The choice of stove design determines the size and type of room. For large cottages, you will need a massive stove structure with thick walls, which will take a long time to heat up, but at the same time can long time maintain temperature. Building such a stove is not an easy task. This will require some experience and knowledge.
But even a beginner can handle a small stove for heating a small dacha if you strictly follow the diagram and do not change the laying rules.

The first place in the popularity of heating and cooking stoves is worthily taken by the Swede, which enjoys well-deserved love and respect among Russian stove makers.
This design is a compact, ergonomic shape with a small cooking surface and a three-channel chamber. It is ideal for a small cottage, the length ranges from 880 to 1250 mm.
For the location of such a stove, the place most often chosen is between the kitchen and the living room. Thus, the stove performs a double function: it serves for cooking and decorates the living room with a fireplace.
Today you can find hundreds of different layouts for laying a Swedish stove with a hob on the Internet, so it won’t be difficult to implement it for your dacha. Many stove makers have added additional options to the standard masonry scheme, so each design is called by the name of its creator: the Buslaev, Kuznetsov stove, etc. But the principle of operation in them is the same.
Traditionally, a Russian stove can be called a bulky, massive structure, which is decorated not only with a hob with an oven, but also with a spacious bench.

This stove is not only a functional device for cooking, but also a place for relaxation. It allows you to warm up the room well, retaining heat for a long time, and has a beneficial effect on the human body, thanks to which the owners of such stoves are less susceptible to colds.
The building usually has two fireboxes (main and additional). Thanks to the special design of the oven, heating is carried out evenly, from bottom to top. Any solid fuel is suitable for kindling, and there are no particularly strict requirements for the materials for laying a Russian stove.
A special place among small heating and cooking stoves is occupied by the little V.A. Potapova, created by a famous engineer at the beginning of the 20th century. To lay it you need only 211 bricks, and the dimensions of the furnace are only 630 * 510 mm.
Moreover, this little thing contains a single-burner stove, a small oven for baking and a hood. This type of stove would be an excellent solution for a small garden house or one-room cottage.
In this article, we invite you to study the rules and main points of laying a small heating and cooking stove.

Do-it-yourself stove laying
Step 1. Select a brick and prepare tools
Which brick to choose for laying a small country stove? We will need 2 types of bricks: fireclay (heat-resistant) for the construction of the firebox and red ceramic (at least M-150). You shouldn’t skimp on materials; further developments depend on it. operational properties, oven safety and efficiency.
Fireclay brick can be easily recognized by its yellowish color and porous surface. The composition of this material includes refractory clay and crumbs. This material, in addition to its heat-resistant properties, is also valued for its ability to accumulate heat for a long time. Even after the firewood has completely died out, such a stove is capable of giving off heat for a long time.

Heat-resistant fireclay bricks can withstand temperatures up to 1500 0 C, so the combustion chamber must be made exclusively of this material.
The smaller the mass of fireclay bricks, the greater the number of pores it contains, which are created by aluminum oxide. Such a brick will conduct heat very well. The cost of this material is almost 5 times higher than the price of red brick, but there is no need to save.
But it’s also not worth laying out the entire stove from fireclay bricks; the outer part of the structure does not heat up much, and red ceramic bricks look more attractive.
When choosing bricks for the stove, pay attention to color and shape.

You can test the material. If you throw a brick from a height of 1.5 meters and it doesn’t break, take this batch. But a bad, overexposed brick can split into several parts. Such a brick makes a dull sound when falling.
The brand of brick for lining the furnace should be M150 or M200. The number in this case means how much weight the brick can withstand per 1cm 3 .
Do not use silicate or hollow bricks. It's not even about the ability to withstand high temperatures - they can handle that. Sand-lime brick It conducts heat poorly and a room with such a stove will not be very comfortable.

For masonry mortar you will need sand, red oven clay and water. It directly depends on its quality and consistency. appearance and durability of the oven. To prepare it, you should use red oven clay of medium liquid. When frozen, it should not fall off or crumble.
The masonry will be made with a thickness of 0.5 mm, in which case the precious heat will not escape quickly.
You can also use ready-made masonry mortar for construction, which is sold in stores. Usually it contains various impurities that add strength and heat resistance to the structure. In this case, it will be enough to dilute the dry mixture with water and bring it to a homogeneous state using a construction mixer.
The consistency of this solution should resemble thick sour cream. If the mortar rolls off the trowel, you need to add more dry mixture. If it turns out to be too thick, then it will be difficult to work with it and make thin seams. Add some cold water and stir again.
So, to build a furnace, we will need the following materials:

- Masonry mortar (sand, red oven clay).
- Red ceramic brick M150 – 120 pieces.
- Fireclay bricks – 40 pieces.
- Foundation material (cement, graphite, sand).
- Ruberoid.
- Asbestos cord, galvanized wire.
- Plywood or boards for creating formwork.
- Reinforcing mesh for foundation construction.
- Grate.
- Metal stove for one burner (cast iron).
- Ash pan and ash pan (blower) door.
- Cast iron firebox door.
- Chimney duct damper.
- Chimney view.
- Metal chimney cap.
Tools needed to build a furnace.
- Construction level.
- Shovel
- Construction marker.
- Goniometer.
- Spatula, rule.
- Trowel.
- Measuring tape (roulette).
- Construction plumb.
Important! When laying a furnace, much depends on the quality of the clay. Ideally, use red river clay of medium fat content, which has been outdoors for at least 2 years. Make exactly as much solution as you can handle in “1 go”. The solution quickly becomes thick and difficult to work with.
Step 2. Preparing bricks for laying the stove
Before starting to lay the stove, it is necessary to lay out all the bricks in advance and prepare them according to the ordering scheme.
TO at this stage include dividing the brick into ½ or ¼ parts, cutting off the corners.

Study the diagram carefully and see which pieces of bricks you will need for each row.
If necessary, you can number the brick so that later it is easy to navigate which row to insert it into.
How to properly split a brick? Before “beating off” the required part of the brick, according to the diagram, you first need to make a groove. This can be done using a hacksaw or file.
To make ½ brick, make 1 groove.
For 1/6 or 1/8 brick, make a groove on all sides of the brick.
Step 3. Choosing a location for the oven
This is a very important stage in laying the stove, which is advisable to carry out at the stage of building a house.
But there are times when the decision to lay a stove arises among home owners already in the process of using the dacha. In this case, determine the place where it will be easiest to remove the chimney.

It is also important to evaluate the distance between the stove and windows and doors. After all, cold air blowing from the doors can interfere with the natural circulation of heat in the house, reducing the efficiency of the stove.
In addition, the stove should not interfere with free movement around the room. It should become one with the space without creating inconvenience. In many ways, the placement of the stove depends on the purpose.
The heating and cooking model is best placed in the kitchen, and the fireplace stove will look beautiful in the living room.
- The distance to the nearest wall should be at least 25 cm.
- The chimney must not pass through beams.
- The floor and wall will have to be lined with fire-resistant material.
- It is better to place the fireplace near interior wall Houses. To increase efficiency, it makes sense to install a stove in the space between the kitchen and living room. Thus, one stove will heat two rooms at once.
An excellent place to place the stove is the corner of the room, unless there is an entrance door opposite the corner, from which cold air will blow out the flame.
Step 4. Construction of the foundation
To build a brick kiln, it is necessary to make a separate foundation. If it is laid during the same cycle as the construction of a house, completing it is not a difficult task.

If you decide to lay the stove after the completion of the general construction, then it will be necessary to remove part of the finished floor and go deep into the ground.
Why is it so important to perform a separate foundation? A brick oven, no matter what size it is, has a lot of weight, which will create a lot of pressure on the foundation. When shrinking, the house will sag. This should in no way affect the shape or design of the stove.
That is, the general foundation of the house should not pull the stove along with it, as this can lead to a violation of its sealing and deterioration of its technical properties.


Attention! Before laying bricks on the mortar, lay out all the bricks “dry”. First, it will allow you to see if you have enough material. And secondly, you will be able to see difficult moments at the draft stage that you will have to pay special attention to.
Step 5. Laying the stove
Attention! Before laying the stove, place the bricks in a bowl of cold water so that they absorb moisture. This way they will not draw water from the masonry mortar.


Fill this gap with sand. The entire area under the stove will be practically occupied by grates, which will ensure good and easy care of the stove, as well as complete burning of the wood.
We block the ash door with a brick.

Installation of the combustion door
We install the combustion door, having previously wrapped it with asbestos cord. To make it easier to install, place the door on a thick wire and support it with bricks on both sides. Then these bricks will need to be removed.

- 6th row. Closes the furnace door.
Here we begin to form a smoke channel pipe, creating overlaps for two vertical channels.
We lay the base of the firebox, which is made of fireclay bricks.
- From rows 7-9 we lay out the firebox with fireclay bricks according to the diagram.
In this row, two bricks covering the grate should be cut at an angle of 45 degrees.
- Row 10 - cover the oven. We create a partition from brick, raising it by 2 cm. Apply a clay-sand mortar to the oven, to the level of the partition. We are preparing a place for installing a hob.
It is necessary to make recesses in the bricks for reliable fixation with the slab and create thermal niches for the expansion of the metal. Immediately place the slab on a dry surface and number the bricks - this will make it easy for you to later lay the brick on the mortar and avoid making mistakes with the correct recesses for the slab.
We lay an asbestos strip on the brick (to expand the metal).


Step 6. Exit the chimney through the roof
This is a responsible step that should ensure complete safety of the furnace operation.
Follow the SNIP standards when installing a brick pipe through the roof. According to these standards, the gap between the roof and the chimney must be at least 13-25 cm.
Around the place where the pipe passes through the roof, it is necessary to insulate it with thermal insulation materials. This will ensure reliable protection from blowing cold air and will ensure reliable fire safety.
If the stove is installed in an already residential building with finished roof, it will be necessary to remove part of the roof. After installing the pipe, you will need to completely ensure the integrity of the roof in this place so that during rain or snow, moisture does not get inside.
To waterproof a stone pipe, a special plate is used, which resembles a kind of pedestal around the chimney. The joining of slate and metal plate is done using sealant.

If you want to simplify the task, then the chimney will not be difficult to complete using steel pipes kind of sandwich. They have a stylish look and are easy to assemble. In addition, they have much less weight than brick and will not create as much pressure on the foundation.
When determining the required height of the chimney, be guided not only by the height of the roof, but also by the height of the ridge.
The efficiency of heating the room and the presence of draft directly depend on correctly calculated parameters.

The edge of the pipe must protrude above the “ridge” of the roof by at least 0.5 meters, otherwise the turbulence that forms around the roof can prevent good draft and will constantly blow cold air into the chimney.
We complete the construction of the chimney with a metal grate. It will prevent debris from entering the chimney.
We put a metal cap on top, which reliably protects the pipe from precipitation.
Step 7. Furnace lining
There are many ways to beautifully veneer a stove for a summer cottage.

The decorative material can be clinker tiles, tiles, decorative plaster, artificial stone etc.
Or you can simply leave the stove in its original form, especially if you bought high-quality, beautiful brick.
Keep in mind that any facing material reduces heat transfer. Therefore, if you do not want to lose thermal properties, you can cover the stove with a thin layer of decorative plaster.
Step 8. Lighting the stove
After completely lining the furnace, you need to take a technological break for 10-14 days until the structure is completely dried. Leave the door wide open.

When you are sure that the masonry mortar is completely dry, you can carry out the first test firing of the stove. There is no need to rush and immediately, after laying, light the wood.
Prematurely lighting a damp stove can cause it to crack. For the first time, use ¼ of the firewood, add small logs. This will allow the structure to dry well from the inside. Do not exceed the maximum temperature of 60-65 degrees in the first week of operation.
- Do not use trash for kindling.
- The firebox door must be closed when lighting.
- Warm up the oven gradually, do not immediately turn on high heat.
- Use high-quality, well-dried firewood.
For ease of use of a country stove, you can make a stylish one with your own hands, which will become a decorative and functional element in your home.
As you can see, if you follow a clear ordering scheme, it is not so difficult to build a beautiful and high-quality country stove.
Video: Laying a brick kiln “dry”
Below we provide a detailed master class on laying a brick stove for a summer cottage.
Video. Master class on laying a stove for a summer residence


