When looking at the beautiful relief coverings of walls, paths and fences, it is difficult to imagine that they are all made of the usual material - concrete. But modern coatings, unlike their “ancestor”, known for its unattractive dull gray appearance, have a special aesthetics. Thanks to its presentable properties, decorative concrete is widely used not only in construction, but also in landscape design.
Decorative concrete was first used in the early 60s of the last century by the Americans during the construction of runways at military airfields. They were faced with the task of creating a building material that successfully combines both excellent performance characteristics, and decorative qualities. The material, which consisted of cement, water, aggregate, paint and additives, fully met these requirements and therefore became widespread in many industries.
Today, decorative concrete can be seen in parking lots, roads and sidewalks, and metro stations. It is used in the restoration of architectural monuments
Thanks to the efforts of developers, today decorative concrete has a number of undeniable advantages, the main ones among which are:
- Resistance to petroleum products, chemicals and aggressive compounds;
- Ability to withstand load (2-3 times more than pressed paving slabs);
- Resistance to UV radiation and the ability to withstand up to 300 freezing cycles;
- Ability to withstand temperature changes in the range from -40°C to +40°C;
- Abrasion resistance and mechanical stress.
Using pressed concrete you can create exceptionally beautiful and at the same time durable coatings. Special additives included in the material help prevent delamination and cracking of the surface.
Unlike ordinary concrete, the technology of which boils down to ordinary pouring, decorative concrete involves application to upper layer after the final filling of a certain drawing.
To decorate the surface, various stamps and other special tools are used. Stencils, molds for sandblasting and chemical compositions for etching allow you to create complex patterns, and fine lines made with saws with diamond blades can add expressiveness and clarity to the design.
Applying modern technologies for the manufacture of concrete surfaces, manufacturers produce a material that can create the effect of not only natural stone, but also wood, brick, decorative tiles and other relief coatings.

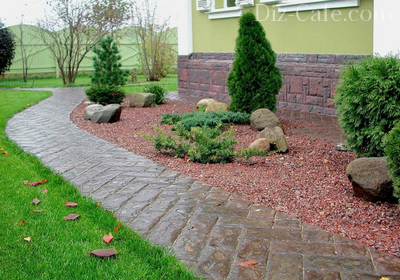
In landscape design, decorative concrete is used in the arrangement of recreation areas, decoration garden paths and construction of garden landscape elements
Such concrete is suitable not only for arranging platforms and paths. It is used in the creation of fencing and manufacturing.
Decorative concrete fences can have any surface, from traditional brick and stone to imitation of the Parthenon bas-reliefs.

Picturesque balusters that look like low columns and elegant railings are not inferior in beauty to refined marble and alabaster figures
Concrete balusters look impressive as fencing for gazebos and verandas, and as supports for railings. Lone columns entwined with climbing plants, concrete floor vases and flower beds can be an elegant decoration of the garden. And a concrete fountain decorated with stucco will be the center of attention.
Cast concrete is one of the most practical garden structures. Depending on the style of execution, they can easily be integrated into the landscape design, making them an elegant addition to the site.

This garden bench made of decorative concrete combines beauty and practicality - it is always pleasant to sit down and relax on it
Types of finishing materials
Depending on the options for the components of the material and the effect it creates, there are three main types of decorative concrete.
Colored concrete
The color range of coloring pigments used in the manufacture of decorative concrete includes more than twenty shades.
Thanks to a wide palette of shades, colored concrete can successfully complement the architectural and plant composition suburban area, acting as a worthy decoration for the driveway, parking space and garden paths
To produce colored concrete, manufacturers use special coloring pigments, which, thanks to a special hardener, are able to maintain color fastness even in negative impact environment. Most often, such pigments are oxides and salts of various metals. For example, to give concrete a greenish tint, chromium oxide is added, reddish - iron oxide, and violet - manganese oxide.
Using innovative diamond cutting technologies, manufacturers can produce concrete that closely matches natural surfaces laid hundreds of years ago.

IN in capable hands masters, concrete is able to take on the appearance of any natural material, be it paving stones, brick, slate, cobblestones and even marble
The imitation turns out to be so believable that even with careful examination it is not always possible to determine whether it is a natural stone or a skillfully made copy.
Coatings with a relief structure
Decorative concrete with an expressive structure is created by adding coarse aggregate to the composition. The desired effect is achieved by exposing the grains, which appear on the surface after removal with tools or special solutions top layer.

Such decorative concrete can turn an ordinary sidewalk into an ancient pavement, and a patio into an extravagant Spanish patio.
When creating concrete with a relief structure, aggregates from crushed marble, granite, anthracite, limestone and basalt are used. Spectacular surfaces are obtained using aggregates in grey, red and pink shades.
Self-production of decorative concrete
Decorative concrete is ideal for arranging paths and decorating a garden area. With excellent quality characteristics, it is particularly aesthetically pleasing. Besides, concrete covering Easy to clean and resistant to grease and oil. Playgrounds and alleys with such coverage do not need to install a curb, so you can save a little on construction.

Playgrounds and alleys with such coating do not need to install a curb, so you can save a little on construction
If desired, decorative concrete can be made with your own hands. The dry mixture and the form for its preparation can be purchased at any hardware store.
The design option depends only on your preferences. On sale you can find plastic or silicone molds, including combinations of rhombuses and squares, “fan”, “executive”, “animal skin”, “basket weaving” patterns.
The technology for creating a relief surface includes several stages:
- Preparing the base. When making a garden path, a layer of soil 10 cm deep is removed from the marked area, formwork is installed and a layer of crushed stone is poured.
- Pouring concrete. Cement mortar is laid on the leveled surface and smoothed.
- Application of color hardener. To give the surface the desired shade, the solution is sprinkled with dry bulk dyes or treated with a colored hardener, which, in addition to coloring pigments, includes a granite or quartz sand filler.
- Pressing with molds. Seized, but not completely frozen surface lay out the forms, pressing them closely together. To obtain a clear imprint of the design, the laid forms are lightly compacted. You can determine whether a concrete mixture is ready for stamping by touching it with your finger. The mixture is ready if she doesn't reach for it.
- Cleaning the coating. After waiting for 2-3 days, wash the concrete surface with a brush dipped in a solution of hydrochloric acid. After the top layer has completely dried, apply protective composition, preventing the evaporation of moisture from the surface of fresh concrete.
In places of probable fracture, expansion joints should be provided, making them at a distance of 6 meters from each other and filling the voids with colorless sealant.
To extend the service life of concrete and significantly improve the aesthetic properties of the material, it is advisable to treat the surface with a special impregnating composition that forms a protective film.
A path made of decorative concrete can be used in 10-15 days. Ideally, it is advisable to treat the concrete surface annually with water-repellent solutions.
You can create a beautiful and attractive relief using decorative concrete. Decorative concrete found wide use in the second half of the twentieth century. The technology was first mastered by American builders of military airfields, whose primary task was to achieve a durable, wear-resistant coating within short time. The high performance and decorative characteristics of the coating have made it popular in the domestic sphere: today, decorative concrete is used for interior and exterior finishing private houses and cottages, landscape design. What you need to know in order to make concrete decorative coating hands - read the article.
What is stamped concrete
Printed (decorative) concrete is painted concrete onto which, even before the solution hardens, a relief imprint is applied that imitates the texture of natural wood, stone, brick, tile, etc.

Stamped concrete is quite common because it is beautiful to look at and practical.
Due to its availability, durability and attractive appearance, pressed concrete has a wide range of applications. Today, concrete decorative surfaces are used for finishing floors and walls of both residential premises and adjacent areas (decoration of areas near swimming pools, garden paths, finishing of gazebos), as well as industrial facilities, shopping, entertainment and exhibition complexes, internal and external areas of gas stations, airports, train stations, etc.
Decorative concrete is also indispensable for restoration work on ancient surfaces, when it is impossible to find an identical material: with the help of special forms and colors, you can easily and quickly obtain a product that imitates ancient masonry.
Stamped concrete: advantages
In addition to wide application possibilities and beautiful appearance, decorative concrete coating has many other advantages related to its performance characteristics.

The advantage of stamped concrete is that it can easily withstand heavy loads
So, the main advantages of stamped concrete include:
- The ability of the material to withstand high loads. Printed concrete for household use capable of withstanding a load of 400-500 kg per cubic meter.
- Resistance of the coating to moisture (corrosion), exposure to UV radiation.
- Concrete resistance to sudden changes in temperature (up to -40 to +40 degrees Celsius).
- Frost resistance. The coating can easily withstand more than 300 seasons.
- The ability of the coating to withstand the effects of acid-base and products without changing the appearance oil industry, fat.
- Durability. Life time concrete base is at least 25 years old.
At the same time, decorative concrete has a rich color palette and a wide selection of textures (if necessary, a textured print in the form of plants can be applied to the coating, graphic images, complex drawings).
What types of stamps are there for concrete?
The relief pattern is applied to concrete using special stamps. It is thanks to them that you can get a surface that imitates wood, masonry, or paving stones. At the same time, the drawing can be anything.

Acquainted with various options stamps for concrete can be found in specialized stores
Today, to obtain high-quality impressions on concrete, the following types of stamps are used:
- Silicone (polyurethane) are flexible stamps with which you can create a texture of any complexity. Their advantages include long term services. In addition, silicone stamps do not need to be lubricated with oil: the formliner is easily removed without any lubricant.
- Plastic - rigid stamps that are distinguished by their ability to clearly and accurately convey geometric shape. Most often, they are used to imitate paving stones, brickwork. You can work with rigid stamps both on the floor and on a vertical surface.
Separately, there is a concrete stencil - a form that represents a contour for pouring concrete. Working with such a stencil is very simple: lay it on the ground, then fill it with a solution, wait for it to harden and remove it, rearranging it further. Thus, you can make a garden path, decorate a porch, the floor of a gazebo or terrace.
You can purchase ready-made molds from many construction stores and the Internet (for example, in the Damascus online store). In addition, products can be made independently from available materials.
DIY decorative concrete
Stamped, decorative concrete, due to its high performance and attractive appearance, is perfect solution for registration personal plot private house, dacha. You can order the laying of paths using decorative concrete from specialized companies, or you can save money and make artistic concrete without professional help, with your own hands. To complete the work you will need a solution, a stamp or stencil, a tool ( building level, fasteners for stencils, trowels for decorative concrete).

It is quite possible to make decorative concrete yourself, the main thing is to prepare everything necessary materials and tools for work
The technology for creating relief prints includes the following steps:
- Preparing the base. In order to obtain a high-quality concrete coating, a layer of soil 100 mm high is removed from the area to be poured. After which the formwork is installed the desired shape and the ground is covered with rubble.
- Pouring the mixture. Depending on the type of stamps, concrete is poured into a stencil or laid out on crushed stone. To ensure that the surface is level, use a building level.
- Decoration. To obtain an attractive wood or stone surface, concrete is coated with bulk dyes. To consolidate the result, use a colored hardener (to give the surface rich color, plaster or “wet stone” effect, use a special varnish for stone and concrete, which can be ordered on the Damascus company website).
- Seal. If a stencil was not used to create the relief, then the design is applied to a flat concrete surface using stamps.
- Cleaning the coating. The relief surface is washed after 2-3 days with a solution of hydrochloric acid.
- Applying a protective UV and moisture-resistant layer (most often an acrylic fixer is used for this).
This way you can create high-quality, attractive stamped concrete that will last for decades. The covering design option depends on the landscape design of the site, the decoration of the house, and the personal tastes of the apartment owner.
Dry mix for preparing pressed concrete can be purchased at any store. building materials(from budget options you can choose Flex Concrete brand material), or you can prepare it yourself.
How to make printed concrete: technology and recipe
The mixture for the production of decorative concrete includes sand and crushed stone, Portland cement, and a plasticizer. An important ingredient is polypropylene fiber, which increases the service life of the relief coating and prevents it from cracking and chipping. The ingredient is taken in the amount of 600 grams per cubic meter solution.

In the production of decorative concrete Special attention you need to pay attention to the choice of plasticizer
For the production of decorative printed concrete, it is better to choose Portland cement grades M400 and M500/D20, which are moisture and frost resistant and can withstand loads of 400 and 500 kg per cubic meter.
The choice of plasticizer depends on the type of future product. Thus, experts recommend choosing a superplasticizer for the production of paving slabs. Suitable for garden paths that are resistant to extreme temperatures, explosion- and fireproof plasticizer C3.
It is worth remembering that the plasticizer should be added to the concrete mixture in the form of an aqueous solution.
The composition prepared from such ingredients is placed in the formwork, spread using a trowel for decorative concrete and compacted. Recipe ready-made mixtures indicated on the labels.
Artistic concrete is plastic, like clay or plasticine, so both specialists and DIYers show great interest in it for their works.
- Application. Main characteristics. Functions of the components of the concrete mixture.
- Why you can’t use a universal composition and what conditions affect its change.
- A few words from theory.
- Conclusion.
Artistic concrete also has a number of other synonymous names: architectural, sculptural, polymer, decorative, plastic and others.
Application, main characteristics and functions of the components of the concrete mixture
Due to its plasticity, artistic concrete has a very wide range of applications. It can be made into any size, and much more.
For clarity, to understand the principle of filling, here are a few examples with the grain sizes of these components.
The grain of ordinary cement has an average value of 40-80 microns, dolomite flour - 30 microns, marshalite - 50...100 microns, microtalc (MITAL) - 5...20 microns, microcalcite - 100 microns, ash - 12...25 microns, microtalc TRPN - up to 90 microns, microsilica – 2…10 microns.
Experts use formulas that determine the optimal ratio between the components of the mixture. It is necessary to obtain a mass in which there will be minimal voids between the components of the mixture. In addition, one must take into account specific gravity components and their chemical activity. It’s good when they contain more SiO2.
A few more words about polymers. To increase the stickiness of the solution, as previously noted, various redispersible powders (RPP) are used to retain water (if it is not possible to cover the concrete layer plastic film) cellulose ethers are used. We have already briefly discussed the rest. There are many other components, but you can’t tell about everything at once in one article. That's all from theory for now. In the future we will study it in more detail as we carry out practical classes at home and in the countryside.
We have already used some of the components listed above and presented their quantitative composition in the manufacture of an angel for a fountain and a concrete vase.
Conclusion
This amazing plastic material – artistic concrete – has enormous possibilities with the correct preparation of recipes and its further use. Enthusiasts who want to master technologies without stupidly repeating known approaches, and have a desire to somehow modernize them, especially in their application, will undoubtedly succeed.
Architectural concrete is actively used not only in the field of construction, but also in landscape design. It is noteworthy that decorative items made of concrete have greater ductility and high level strength. Using decorative stamped concrete, you can quickly make garden paths and platforms that can successfully replace paving slabs.
The finished product made of decorative concrete resembles tiles in appearance, but is much cheaper and has a longer service life. Decorative concrete perfectly imitates appearance natural surfaces (for example, wood-like concrete, natural stone or marble looks original).
The easiest way to have a beautiful front lawn
Of course you saw perfect lawn in the cinema, on the alley, and perhaps on the neighbor’s lawn. Those who have ever tried to grow a green area on their site will no doubt say that it is a huge amount of work. The lawn requires careful planting, care, fertilization, and watering. However, only inexperienced gardeners think this way; professionals have long known about the innovative product - liquid lawn AquaGrazz.
Art concrete allows you to implement unique design solutions.
As is already clear from the name, artistic concrete performs supporting and aesthetic functions. Thanks to the polymers it contains, it can be used not only to create, but also to decorate existing objects. Depending on the composition, products made from decorative concrete can be more structural (geometric concrete), decorative or artistic and decorative (sculptural concrete mixture). Popular stamped and colored concrete are varieties of artistic concrete.
Due to its flexibility in its uncured form, concrete can easily imitate various surfaces— for this you should use special stamps (metal, polyurethane). This is the so-called pressed concrete (press concrete), which you can easily create with your own hands.

Depending on the functional purpose, architectural concrete the composition of which can be changed, for example, using superplasticizers or more mineral additives, will improve its decorative or structural qualities.
Any concrete decor must be covered with a layer protective coating, which creates a more durable surface that is resistant to abrasion and mechanical or chemical damage, and exposure to ultraviolet radiation.
Algorithm for manufacturing platforms and paths from printed concrete
When starting to make a concrete platform or garden path, you should carefully prepare the site and draw up a project. First of all, you should install wooden formwork, which limits the pouring area. The surface of the area is cleared of debris and covered with thick polyethylene film, installed storm drain. Then to prevent destruction concrete structure is installed reinforcement mesh on which concrete is poured.
If desired, a small amount of reinforcing polypropylene fibers can be added to the concrete solution - this will prevent the appearance of cracks on the surface during drying and use.

To make decorative concrete with your own hands, you will need high-quality cement (gray cement is also possible, but cement is more preferable white), sand (quartz), stone chips, coloring pigments, plasticizing additives. All ingredients should be mixed, first sifted through a fine sieve (this is done to make the dry mixture more homogeneous and eliminate lumps and foreign impurities), then carefully pour in water (in small portions).
The proportions of ingredients depend on many factors, first of all, the chosen technology, the brand of cement used, and the type of finished product.
Advice: the selection of concrete grade should be approached with all responsibility, since the quality of the finished site depends on such qualities as frost resistance and strength. The best option there will be concrete grade M (M300, M400, M500).
The concrete is carefully leveled and compacted with a vibrating screed or roller. Adjustment of the top layer of uncured concrete is carried out using a special tool - a trowel.
After the concrete has set, a colored fixative is applied to its surface (after application, the top layer should be leveled), which gives the coating the desired color - this is how you can make colored concrete yourself. Do not forget that all work should be performed at above-zero temperatures, in dry weather.

When the concrete has hardened, stamping is performed. To apply the required relief, use a special stencil for concrete. The pattern is transferred to the surface by compaction; in some cases, patterns are finalized using special rollers.
Helpful tip: since embossing is the most popular way to make stamped concrete with your own hands, during the work process, so that the concrete stamps do not stick to the surface, a special release agent in the form of a powder is applied to it. For maximum realism, stamps must be placed on a concrete surface long time(before its final hardening), after their removal, the concrete is washed with water and covered with a special protective layer.
At the final stage, decorative printed concrete is coated with a layer of protective varnish. This improves the appearance of the coating, makes it more resistant to mechanical stress, precipitation And ultraviolet radiation. For example, concrete made in this way successfully withstands sudden temperature changes, does not deform and does not lose brightness.
How to make the right decorative concrete stone

In order to make decorative rock made of concrete, you will need:
- wooden box suitable size;
- sealant (silicone);
- plasticizers, additives;
- quartz sand, marble chips, cement;
- tiles with a decorative stone-like surface;
- flat brush.
Concrete can easily be made into stone blocks used in decorative purposes. First you need to make or select a form for filling. A wooden box of a suitable size is coated with a thick layer on the inside silicone sealant. To prevent voids from forming during the application process, the sealant is pressed and smoothed with a wet flat brush.
A tile imitating a stone surface is applied to the layer of sealant (face down). Such simple manipulations allow you to create a high-quality imitation of natural stone from concrete with your own hands.
Tip: to avoid sticking to the sealant, the tiles should first be lubricated with grease. If you were unable to purchase suitable tiles, you can use natural stones instead, which are placed at some distance from each other.

After the silicone has dried, the tiles (stones) are removed, and the resulting relief is used as a stencil.
For cooking concrete mortar you should mix Portland cement, quartz sand, stone chips with water in the proportion recommended by the manufacturer, add a plasticizing agent. For additional strength of the finished product, a small amount of reinforcing fiber can be added. The consistency of the solution should not be too thin, but should resemble thick pancake batter.
A small amount of mortar is poured onto the bottom of the mold, a mesh of reinforcement is laid for greater strength, then the whole thing is filled with the rest of the concrete mortar and left until completely dry. Prepared this way decorative blocks used for finishing sidewalks, curbs, paths, floors.
In addition, the technology with the intriguing name flex concrete allows you to imitate absolutely realistically different kinds surfaces, ranging from tree bark to granite or even aged surfaces. This decorative technological system will help you make your home or yard unique. To prepare a flex concrete solution, you need to mix the ready-made dry mixture with a small amount of water.

A properly prepared solution has a consistency that is convenient for use and does not stick to the working tool. Surface treatment (refinement) can last for 24 hours after mixing and applying the solution. After drying, the surface is painted using a brush, roller, or spray.
Concrete can be used to make many products and architectural elements. Special place Among such products are concrete columns, which can be not only decorative, but also load-bearing elements buildings. Despite the simplicity of the technology, working with decorative cement requires certain skills and relevant experience. However, if you follow all the recommendations, you can easily create a beautiful platform or garden path from art concrete yourself.
How to make colored concrete
Despite stereotypes, concrete floors can be more than just dull gray, but also have a variety of colorful shades. Despite the apparent complexity, making colored concrete with your own hands is quite simple. For achievement desired result you can use one of the following methods:

- in the process of mixing concrete mortar, pigment can be added both in dry and liquid form - this method most suitable for giving the required color to paving slabs, curbs, paving stones;
- spraying - great for simulating drawings, various patterns or images. The required color brightness or surface texture is achieved through the use of an acid dye, which can be applied in several layers or using a special stencil;
- coating a hardening surface with pigment mixed with a penetrating base or varnish. This method is optimal if you want beautiful concrete floors.
So, the technology for creating decorative concrete has its own characteristics, but its popularity is fully justified by its high functionality and aesthetics.
Increasingly, technologies are appearing in construction that can create works of art from familiar coatings and materials. Such a transformation is possible even with such an ordinary material as concrete. By using polyurethane or metal stamps, a dull concrete surface can be made to look like stone pavers, wood flooring or slate slabs. This type of concrete is called stamped, printed or pressed concrete. We’ll talk about it now, as well as the possibility of creating a printed surface yourself.
The essence and possibilities of using this technology
Stamped concrete is ordinary concrete, onto the surface of which decorative embossing is applied using special stamps. The relief pattern can imitate any material: brick, paving stones, boards, animal skins, weathered stone, cracked earth. You can choose stamps with leaf patterns, dinosaur footprints, and animal figures.
Stamped concrete is especially popular when decorating patios, areas near swimming pools, garden paths, sidewalks, gazebos, floors in restaurants and exhibition halls. This technology becomes indispensable for complex restoration work. For example, when it is necessary to recreate a destroyed part of an ancient pavement. It is often not possible to find exactly the same materials that have aged naturally. And with the help of stamped concrete technology, exact copies of existing old brick or half-erased stone can be easily created.
Variety of stamps for printed concrete
The first stamps for stamped concrete were made of cast aluminum and were massive molds equipped with handles. Such matrices are well suited for simulating ordinary brick or stone patterns. But they are unable to copy complex textures. Modern polyurethane stamps are a completely different matter. They are cast on real materials, the texture of which must be copied. As a result, incredibly authentic textural effects can be achieved using polyurethane molds.
Ready-made stamps can be purchased at many construction stores or centers. When choosing, you should pay attention to the degree of rigidity of the shape. The denser the stamp, the easier it is to create a clearly visible design. Forms that are too soft and pliable are more difficult to work with and require more effort during the printing process.

Self-production technology
The technology of stamped concrete is quite simple, but you should only take it on if you already have some skills in working with concrete. Otherwise, the result may not be what you expected. Problems may arise for the following reasons:
- concrete hardens quickly, after which the use of stamps does not produce clear embossing on the surface;
- To perform embossing using stamps, you need to apply physical force;
- errors in embossing a concrete surface are difficult to correct;
- stamped concrete technology requires the worker to be able to handle special tools for shaping and smoothing the surface.
Once you are confident that you can handle the potential problems, you can begin creating the concrete pad and performing the stamping work.
Step 1. Preparing the concrete site
The basis for stamping is a regular concrete platform with reinforcement, made of concrete grade M350 and higher.
Technology for creating such a platform:
- using pegs and a cord, mark the boundaries of the area where stamping will be carried out;
- remove the top layer of soil (depth 15-20 cm), compact the soil bottom;
- pour a crushed stone cushion (10-15 cm thick) onto the bottom of the excavation and tamp it down;
- formwork made of boards is installed along the border of the site;
- lay a reinforcing mesh in the formwork, raising it above the ground level by at least 3-5 cm (by placing stones and bricks under the mesh);
- concrete is mixed manually, using a concrete mixer, or ordered ready-made;
- concrete is poured into the formwork, a metal rule is used to obtain the required level of the site;
- compact the concrete with a vibrating screed;
- The top layer of concrete is smoothed with a trowel, achieving a smooth and uniform surface.

Step #2. Application of color hardener
A colored hardener is applied to still fresh concrete, which simultaneously colors the surface and increases its strength. A colored hardener is a powder that contains coloring pigments, binder filler and ground particles of granite and quartz sand. Due to the dispersion of the mixture, its particles penetrate into the pores of concrete and fill them. The concrete surface becomes more dense and durable. At the same time, the particles give the concrete a lasting color (about 30 tones to choose from).
Work on applying a colored hardener begins after the initial setting of the concrete surface. You can focus on the moment when all the water that appears from the surface has evaporated.
Colored hardener powder is scattered over the concrete surface manually, from the center of the site to the edges. At the same time, they perform movements similar to throwing a bowling ball. Scoop up a portion of the powder, move your hand back and with a sharp movement throw the mixture forward from waist level. This principle of applying powder minimizes the number of particles flying through the air.
The first layer of hardener should be absorbed into the concrete, which takes 5-10 minutes. During this time, the surface of the concrete is smoothed by rubbing the dye into it using a magnesium smoother. Corners are also processed using corner smoothers to make them curved and neat.
Then a second layer of colored hardener is applied. It is necessary to paint the surface more evenly and compact it. The powder is applied in exactly the same way as in the first case. After application, the surface is leveled with a steel trowel.

Step #3. Application of the release agent
The release ink prevents the concrete from sticking to the dies during the printing process. In addition, it additionally colors the surface of the concrete, giving it subtle shades colors. The release agent is available in the form of a dry powder or liquid. Most often, powder is used, applying it to the surface of the concrete with a wide brush (brush).
The brush is immersed in a bucket with a separating component so that the bristles are evenly covered with powder. Then, holding the brush at waist level, throw your hand forward and “spray” the powder over the surface of the concrete.
After painting, the corners of the area are treated with textured sandpaper.
Step #4. Surface stamping
Before you start stamping, you need to make sure that the concrete has acquired the required degree of plasticity and has become similar in consistency to plasticine. If you start stamping too early, the concrete surface will not be able to support the weight of the workers and maintain the print lines. If you are late, you will have to put more effort into the stamps to print clearly. In addition, the texture of the stamps may not be imprinted at all on concrete that is too dense, especially at the end of the job.
To determine the degree of density, just press your finger on the concrete surface at several points on the site. If there are prints left with a depth of 4-6 mm, then stamping can begin. You can also check it another way: place a stamp on a concrete surface (at the edge of the site) and step on it. The stamp must support the weight of the worker, not sink into the concrete, and not slide across the surface.
If all tests pass successfully, you can begin stamping. The stamps are laid out on the concrete surface, one after another. Manufacturers often number the stamps (1, 2, 3... or A, B, C...) to indicate the desired sequence of their placement in the printed design.
To imprint the texture of the stamps into the concrete, you can often simply step on them. Sometimes light hand tampers are used for this.
After the prints are made, the concrete surface is left to cure for 12-24 hours.
Step #5. Elimination of defects
On the concrete surface, where the dies meet, a slight displacement often occurs cement mortar. Sometimes, due to insufficient compaction, the seams of the printed pattern may appear blurry and indistinct. To correct surface defects, a hand roller is used along the seams and joints, and uneven surfaces are smoothed out with textured sandpaper.
Step #6. Cutting shrink joints
Several cut seams in the slab provide stress relief and prevent cracks. Such joints can be made in still fresh concrete using a special cutter. Or cut the seams with a grinder after the concrete has dried.
Step #7. Surface washing
The next day, wash the surface. Use a hose to wash off excess separating agent. Afterwards, an acid wash (with hydrochloric acid) is performed to obtain the desired effect of a combination of two colors on the surface. During this process, the pores of the concrete also open, which promotes better interaction of its surface with the sealant.
Step #8. Applying sealant
The next day, a sealant varnish is applied to the concrete. It performs a number of functions:
- protects the surface from abrasion and wear, as well as from the penetration of oils and chemicals;
- gives the surface a shine of varying saturation (from barely noticeable satin to rich varnish);
- enhances the color saturation of concrete;
- simplifies the care of the treated surface.
The sealant is applied with a roller, rolling it over the surface. But, if the stamped texture has deep imprints, when applying sealant it is advisable to combine rolling with a roller with additional processing with a brush. Typically 2-3 coats of sealant are required.
After the sealant has dried, the stamped surface will be completely ready for use.

I would like to note a few points:
- If you are using a stamp for the first time and have no idea what the stamp will look like on concrete, do a test stamp on compacted sand.
- Avoid repeating the printed pattern on the surface, especially if the stamps imitate natural materials(stone, wood, etc.). Random compositions will look more realistic.
- To achieve an antique effect on the surface, apply a small amount of dry release agent (in powder form) to the still liquid concrete. Spray a liquid release agent over it. The liquid will dissolve a light layer of powder, after which color accents will remain on the surface, similar to scuff marks.
- Make sure that the release agent particles are well pressed into the concrete when printing. Otherwise, it will simply be washed away with water when washing the surface.
- Make sure that the person walking on the dies while compacting wears clean shoes free of traces of construction debris and dust. Inevitably, these contaminants will transfer to the fresh concrete and disrupt the desired texture of the stamped surface.
That's all the secrets of stamped concrete technology! But, before you start stamping yourself, we suggest you watch a short educational video. It demonstrated the main stages of the technology: painting concrete, applying a release agent and creating a surface texture using stamps.