Lately, we often watch our favorite films on the screen of our smartphones. We don't want to search for and download movies to watch on TV. However, there is a simple and inexpensive way to turn your smartphone into a real projector and watch your favorite movies on a large “screen”: a wall or even a ceiling!
In order to make a projector for a smartphone, we need very few things: a strong shoebox or similar, tape, a utility knife and a magnifying glass. I will dwell on the magnifying glass in more detail. It is advisable to find a large Soviet magnifying glass - our grandparents still had such magnifying glasses in abundance. If you are unlucky here, then go to the store: now you can buy relatively inexpensive magnifying glasses of decent quality, just don’t go for outright cheapness.

At the end of the box in the center, carefully mark and carefully cut out a hole for the diameter of the magnifying glass. If the inside of the box is white, then it is best to paint it dark inside or cover it with dark paper.


Now you need to carefully secure the magnifying glass in the resulting hole. Use tape or suitable glue. Work carefully: do not cover the glass with tape or stain it with glue.

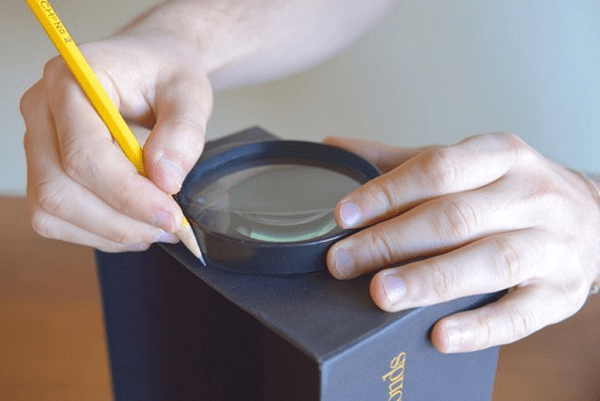
Now you need to prepare a place to install the smartphone. Use thick cardboard and tape. Make sure that the angle of the smartphone screen is optimal and that the entire image falls on the lens. Refer to the photo below.

Perform the final installation of the phone according to the following procedure. In a dark room, move the phone inside the box and change the angle until you achieve a sharp, high-quality image on the wall.

All that remains is to make a hole in the box to output the charging wire for the smartphone and close the box.


Important: problems you may encounter when creating a projector:
- poor image quality – try to adjust the position of the smartphone inside the box.
- the projector does not work at all - perhaps you used the wrong magnifying glass, try using a friend.
- the image is upside down - to correctly orient the image, use one of the mobile applications on your smartphone, for example, Ultimate Rotation Control.

- Don’t forget to set the brightness of your smartphone screen to maximum.
- Watch movies using a projector only in a very dark room, otherwise the brightness of the smartphone screen will not be enough.
How to turn a cardboard box into a cheap homemade smartphone projector.
Smartphones and tablets are great for watching movies and videos when you're away from home, but the screen at home is too small. There are quite a few projectors on the market that work with mobile devices, but they can get expensive.
The good news is that it's quite easy to hack your own projector with items you probably already have. This homemade projector is made from a cardboard shoebox, a magnifying glass, a paper clip, and duct tape. 
Start by tracing the outline of your magnifying glass on one end of the box. Use a knife to cut the line and then make a small hole at the other end for the power cord. 
Next, use electrical tape to secure the magnifying glass to the box. Make sure you get a tight fit so you don't lose any light.
Now take a paperclip and bend it into a small phone stand. Here's the tutorial where they got the idea, for reference. You'll have to experiment a bit to figure out the best way to position the stand (this will also depend on the power of your magnifying glass).

Your projector is now complete. To see the image correctly, since it will appear upside down when passing through the lens, you will need to flip the screen.
On an iPhone, you can do this by selecting " Settings" -> « Basic" -> « Special abilities", then switch " Assistive touch" on ON. Click on the small white circle to open the menu, then go to Device -> Rotate Screen .
For Android users, there is no way to make your screen rotate without an app. We suggest using Ultimate Rotation Control, which is free to download from Google Play, but after the 7-day trial you will have to pay to continue using it. I couldn't find any free alternatives, so if anyone knows of any, be sure to let us know in the comments below. 
For more information on projector assembly and setup, check out Photojojo's complete guide. You can also try this other DIY projector created by one of our users here on WonderHowTo.
Need a screen? You can paint one on your wall for less than fifty dollars, or build a more professional-looking screen using a wood frame and some spandex.
It is best to watch videos and movies on a big screen, as in a real cinema hall - this requires a projector and a screen, all of this is very expensive, and not every family can afford it. But there is a way out - you can build a projector with your own hands at home, and then invite everyone to the first viewing. According to competent experts, such a miracle of homemade technology is practically not inferior to a standard product. There are several manufacturing options - they are all similar because each uses a special lens and cardboard boxes of different sizes.
An out-of-the-box phone-focused projector is one of those DIY projects that you can easily do yourself. To make it clear to every reader how to make a projector from a phone, we provide a step-by-step manufacturing algorithm, accompanied by photographs of the process. To make a homemade video projector, you will need a simple set of tools, consisting of an old shoebox, a 10x magnifying glass, a sharp knife, a marking pencil, electrical tape and a smartphone.
For a magnifying glass, use a standard magnifying glass or a Fresnel lens, which can be purchased at any home improvement store.
A homemade projector for a home theater is ready, now we check its operation, determine a specific location and invite family members to watch videos. There is an excellent tool to help masters video.

Tablet or laptop based
If you decide to make a projector for your home with your own hands and want to achieve a better image, then you should use a tablet as a transmitting monitor - the screen resolution is much higher than that of a smartphone, which means the quality of the transmitted image is many times better.
For a laptop, these parameters are even better, but the projector itself will be bulky - here you have to choose, taking into account the dimensions of the room for showing films.
box To build a home device based on a tablet, choose a larger one: its length should be at least 50 cm, and the end side should be slightly larger than the tablet screen. To increase it is better to buy a large one magnifying glass Soviet production, then the quality will be excellent. An example would be a device for reading full-page books; the cost of the lens would be around $8.
Using a knife, cut a hole at the end that will be slightly smaller than the magnifying glass, then attach the lens using double-sided adhesive tape, with the corrugated surface inside the box.

We fix the tablet inside the box, taking into account that the lens flips the image.

Design laptop based slightly different - rectangular holes are cut on both sides of the long end of the box. The device itself is located with the monitor down, and the keyboard on the top of the cardboard base - this helps to get the correct image, and not an upside-down version.


How to improve image quality
To increase the quality of the final image, it is necessary to set the maximum settings on the monitor of the product from which the broadcast is carried out, to exclude the penetration of light into the room where the viewing is being organized. The distance to the screen also affects the quality: the closer the homemade projector, the better the quality, but the smaller the picture.
All these parameters are easy to adjust in advance and achieve a quality that will completely satisfy you. There are separate requirements for the screen on which the picture is projected: the canvas must be of high quality, without seams or defects.
Important! If you paint the inside of the box with black paint and eliminate the “leakage” of light through the cracks, the quality of the picture on the screen will significantly improve.

Original solutions
Similar to a device based on a smartphone, you can make a home 3D projector with your own hands or construct it from improvised means, for example, CD boxes, a homemade laser projector for displaying holograms, only these options are more labor-intensive, and the costs will be from 8 to 15 thousand rubles.
For 3D devices You need a special-sized plastic pyramid, the dimensions of which can be found on websites on the Internet. For example, this option: height 45 mm, truncated entrance hole - a small square 10x10 mm, and the lower part - 60x60 mm. Then we place this original design on the smartphone exactly in the center of the screen and turn on a pre-selected video story.

Before you make a projector with your own hands, you need to clearly define the purpose of its use; the chosen type of design will depend on this.
- If you want to surprise not only the younger family members, but also the older generation, then do holographic projector, download various videos from YouTube to your smartphone and show magical holograms.
- Based on a mobile phone, you can make an original design and play cartoons in the children's room at any time.
- When you really want to watch exciting films, like in a cinema, but there are no financial means for this in the family budget, then make a projector according to the second option - surprise with a home theater in your apartment.
To implement your plan, you just need to use a little imagination and purchase not so expensive components, assemble according to the instructions and enjoy watching.
Make a screen/film/projector with your own hands from scrap materials? Easily! Today we will present another homemade product. Whether it is original or not will be determined by you, the readers of the site.
Some may say that it is not worth wasting time; the market for real such equipment is full of any products. They are of the highest quality, capable of depicting your trip to the exotic on the wall, illustrating enlarged slides and frames of developed film.

But ideas for homemade projectors are floating around, waiting for craftsmen, and we will show you how to translate them into cardboard, metal and lenses.

We design on the wall
But the spirit of ancient childhood lives in us, which our children and grandchildren should feel. It is for them and with their help that such pleasant crafts are created. We advise you to look at the examples in the photo of a homemade projector.

And now a mini-excursion into history. At the end of the fifties, when television was just emerging in the USSR, simple and inexpensive devices called slide projectors were on sale.

The best of them - FDG-49 - still evokes nostalgia for many, remaining the most expensive on the Internet.
Why the prefix “dia” was not explained then; today a slide projector is referred to as a slide show with captions. “Dia” is translated from Greek as “movement through” or “from beginning to end.”

Below we will suggest that the most advanced home-made people create a semblance of FDG or its improvement in 1970 - already an F-1 filmoscope costing 6 rubles. at that time with its own lighting.

They were intended for displaying, on a fairly large space of white cloth or a whitewashed wall, photographic films for sale with frames of fairy tales, something frozen, like a cartoon, with short explanatory texts.

So, home cinema
A product made from a shoebox, a large diameter lens or magnifying glass, and a smartphone.

Here are the methods for making a projector and the technology of creation:

A hole is cut in one of the smaller parts of the box, strictly in the center and in diameter of the magnifying glass (at least tenfold). The center is determined at the intersection of the lines from the 4 corners.

The lens or magnifier is attached to it with tape, cardboard side covers on the outside, secured with a glue gun, or in another way of your choice.
Inside, closer to the back wall, place the smartphone on a cardboard stand, turn it on at full brightness and adjust the angle so that the pictures from it come out fully and in the highest quality.

You need to have the Video Rotate And Flip app installed on your phone. It is necessary because the picture from the phone from the vertical is 180 degrees. And it needs to be turned over.

The duration of the “session” and powerful lighting will drain the battery, so broadcast with a charger connected to the network and to your mobile phone.

No complicated expenses for a projector, except, perhaps, instead of a magnifying glass and the insufficient focus of a conventional lens, purchase a Fresnel lens. But it has an advantage and a disadvantage: the image is blurred at the edges, but focuses well in the center.


The picture on the screen will be brighter if you choose the right distance from the projector to the screen: the closer, the better.

After the first session, you can immediately improve the projector by changing your smartphone to a tablet, changing the mount. Improved broadcasting will only occur in complete darkness in the apartment. Parents, children, and your guests will be delighted to watch it on the big screen.

Attention to the screen!
This is a very important point about creating a primitive projector and running a slide show. The best reflector of pictures is a special canvas.

But you can attach a Whatman paper measuring 594 x 841 millimeters (A1 format) to anything. It is cheaper than canvas.

Another homemade product
The image translator generally takes five minutes. What you need to make a projector: a battery-powered lamp or flashlight and a magnifying glass for viewing small texts. This is all. The lens is better than the Soviet one and is not very convex.


Hang the screen, as mentioned above, from canvas or whatman paper. Place a stool a couple of meters from the screen.

Place the slides in front of the flashlight; it is advisable that they stand in an inexpensive special stand - it is uncomfortable to hold in your hands. Improve the image quality by moving the stool.

So, let's create something like an F-1 filmoscope
In it you can demonstrate frames from color photographic film, moving from top to bottom with rubber rollers along the edges with a protruding handle from half a spool of thread.
A metal sheet of thin steel is required, since the thing is not done in one session.

Three main parts are cut out of it (see on the website):
Main building. In the horizontal part, place a step-down transformer (12 V) - any small household one - and a switch.

Vertical part. This is a stand on which a box is hung from behind, the front and bottom parts of which are cut off, and the top is hinged on the stand.

In this box, a 12-volt auto lamp with 21 candles is mounted in a socket opposite the frame window (in F-1 there was a six-volt power supply and the transformer was lowered to this level).

Make holes in this cover to allow heat from the lamp to escape, but so that your viewers are not disturbed by random light.

A single-lens tube with a focus of 62.4 mm and a two-lens condenser behind the frame is attached to the front stand. The tube can be installed from a durable cardboard tube with a slot for moving the lens.

The maximum distance to the screen is three meters, the screen is 70x100 mm.


Today there is a huge variety of devices for playing video materials: TVs, smartphones, home theaters, etc. But organizing a broadcast for any wide audience, alas, is not so easy, since a home theater or projector costs a lot of money, and not everyone can afford such pleasure. Therefore, we will look at the theoretical aspects and several methods that will allow you to make a projector with your own hands.
Theory
The principle of transmitting an image from any medium to a vertical surface is based on the laws of optics. When various carriers interact with the light flux, the rays are refracted, the spectrum changes, and is subsequently displayed on the screen.
A homemade projector can be implemented in different ways. In practice, there are several image transmission technologies that are implemented in all kinds of filmoscopes, sliders and projectors. The most popular design solutions are:
where from the light source 2 the flow is directed by the reflector 1 to the slide 4 located in the focusing lens 3. The modified spectrum extends to the optical amplifier 6 and is transmitted to the screen 7.

The figure above shows the principle of operation of a reflective type projector, in which a light source 1 transmits a flux that is reflected by mirrors 2 and falls on an image 3. The modified light flux moves through the lens to a reflector, which transmits the image to the screen.

Today, digital multimedia projectors can easily compete in photo and video quality with the best HD TVs. Therefore, home projectors can be used as a personal cinema for family movie viewing or as a means of displaying visual materials at conferences and lectures. Alas, it is almost impossible to recreate a digital multimedia device with your own hands, since it is necessary to synchronize the operation of mechanical, optical and digital elements. But anyone can implement a classic projector using digital equipment.
Smartphone based
Mobile phones are used not only for long-distance communication, but also for exchanging video data. That is why the idea of making a projector from a pocket gadget arose. Theoretically, the process of obtaining an image consists of converting a graphic signal from the display through an optical lens to any surface. To do this, you need to make a case that completely darkens the surrounding space, and mounting devices for both the lens and the mobile device.
It's quite easy to pick up a magnifying glass or magnifying glass. The main thing is that its overall dimensions are commensurate with the size of the phone screen. You can use the front wall of the case to fix the magnifying glass. To secure the phone vertically, you can use a cardboard box or cardboard ribs in which the mobile phone will not wobble. The easiest way to make a housing is from a cardboard box, since it is easy to cut a hole in it with the required parameters without special equipment.
For work you will need tape, glue, a stationery knife, pencil, ruler and compass.
The process of making a projector from a smartphone is as follows:
- Choose one of the walls of the box so that the distance from it to the opposite one is greatest. This will provide a wider range for customizing display options.
- Mark the middle on the selected wall, around which cut a hole for a magnifying glass.
 Rice. 4: make a hole for the magnifying glass
 - Attach a magnifying glass to the side of the box. To do this, you can use either tape or good glue; it is important that they do not get into the lumen of the lens, otherwise it may ruin the image from the projector.
 Rice. 5: Attach the magnifying glass
 - Make a holder for your mobile phone; it is important that during installation it does not cover the display and fits inside the box.
 Rice. 6: Make a holder
 - To adjust the image experimentally, select the most optimal distance from the mobile to the magnifying glass.
 Rice. 7: choose the distance
 - Make a hole for the mobile charging cord to lead it out of the box.
The projector from your smartphone is ready, you can start broadcasting, but first install a special application that will rotate the image 180°. In some phone models, it is enough to disable auto-rotate screen and install the gadget upside down. It is better to organize viewing in a well-darkened room to increase the clarity and brightness of the picture.
In addition, a holographic projector can be made from a mobile phone and polymer plates (Fig. 8). But the cost of such a homemade product will amount to a considerable penny, with a relatively low image quality, so it can compete with the above-described sample only in the originality of the picture.
 Rice. 8: Example of a holographic projector
 Tablet or laptop based
This projector has higher image quality due to its larger screen. There are both more “humane” methods of execution, in which digital devices remain intact, and methods for which you need to remove the graphics matrix to broadcast the image.
To make a projector from a laptop, you will need a cardboard box large enough so that its end side is comparable to the monitor, and its length is at least 50cm. The magnifying glass should be quite large; a Fresnel lens will do the job well; it is also important to use a lens from a device for reading full-page books. To assemble the projector you will need to do the following:

Its dimensions are made slightly smaller than the lens so that it can be secured to the edges.

It is important to ensure a tight fit between the glass and the cardboard to prevent light from entering the projector from the outside.

When installing the latter, the edge of the cardboard should overlap so that light, again, does not penetrate inside the projector.

The simplest laptop projector is ready, just plug it into a power outlet and you can enjoy broadcasting your favorite movie. Using the same principle, you can use a tablet to assemble a projector.
Projector from slide viewer
Making a projector from a ready-made unit greatly simplifies the task, since you no longer need to make any adjustments in terms of optical effects. These settings are made at the factory and the slide viewer perfectly displays graphic objects from paper or other A4 format media. Your only task is to choose the most suitable photo-video signal translator. In this example, we will look at making a projector from a working tablet monitor that fits the size of the diascope.
To do this you will need to do the following:

When dismantling the matrix, be extremely careful not to damage the fragile element.

The distance is necessary for ventilation, since a powerful stream of light will also cause excessive heating of the surface.

Due to its low weight, it is attached using double-sided construction tape.
The projector is ready - just connect both devices to the network and launch the desired video material through the computer. With this projector you will get fairly high image quality, which, as a rule, depends little on the distance to the screen. It should be noted that smaller devices for viewing slides that will be comparable to the screen of a smartphone can be found on sale.
Ways to improve picture quality
To increase the image clarity from a homemade projector, you need to perform the following simple measures:

In addition, external factors also affect the quality of the projector’s broadcast. So, in order for the picture to be well perceived, the windows should be covered with curtains during daylight hours, and at night all lighting sources should simply be turned off. Remember, the shorter the distance to the screen, the higher the image quality on it. The screen itself also matters - it is preferable to have a smooth, monochromatic surface in calm colors.
Video instructions
Creating a projector with your own hands at home is not difficult: often all you need is a phone or tablet and a small amount of office supplies. A homemade device will allow you to view photos, movies or videos on a larger screen. When choosing how to build a projector, be guided by your goals: different options are suitable for different situations.
Mobile device based
A homemade projector can be made from a smartphone. You should collect the materials necessary to create an overhead projector in advance. You will need a cardboard shoe box, a lens or magnifying glass that magnifies the image 10 times, adhesive tape or blue tape, a pencil, a paper clip and a mobile phone.
This option is suitable for people who want to entertain children with cartoons. A picture shown on the wall is less harmful to children's vision than watching cartoons on a TV, laptop or tablet. In addition, this option allows parents to control what their children watch and exclude programs not intended for children.
You need to cut a window in the box for the lens. It should be installed exactly in the center of the box. Calculating the required distance is simple: you need to connect the corners with diagonal lines, at the intersection of which the desired point will be located. Once the center is found, make a hole of the desired size.
After this, you should attach the magnifying glass. Scotch tape or electrical tape is suitable for this. You can use other methods: glue gun, silicone.
Next, you need to install a stand in the cardboard smartphone projector so that the phone is fixed in one position. A specially curved paper clip will do. You can also make a stand from pieces of cardboard.
You should first test the operation of the resulting device and select a suitable location for the smartphone in the box. It's worth trying different positions of the gadget to find the best angle. It is also important to fix the picture on the phone in the desired position: the lens flips the image, so the picture (video) on the device must be upside down.
To make a projector out of your phone, you also need to make a small hole in the box for the charger. This will allow you to watch a movie without interrupting to recharge your gadget.
Tablet or laptop based
There are several ways to make a projector with your own hands. You can use laptops or tablets for this purpose. They have a higher screen resolution, and the picture quality will be better than when watching movies from a phone.
You'll have to make a projector out of a larger box. Its length should be at least 0.5 m. The back wall should be slightly larger in size than the tablet so that the gadget fits inside. A projector made from a monitor will require an even larger box.
The tablet should be secured inside the box. Remember that the lens will reverse the image. If the gadget automatically rotates the picture, you should download a special application in which you can fix the screen in the desired position.
If you use a laptop to create the projector, you should make 2 cuts in the box. The device is folded onto the top half with the keyboard down. In this case, the inverted screen should be located at the site of the cut. It is important to choose a box that will support the weight of the device placed on top of it.
How to improve image quality?
When you make a projector from your phone yourself, the image projected from the magnifying glass can be improved for more comfortable viewing. On the screen from which the picture will be projected, the settings should be set to maximum. You can adjust the quality by moving the smartphone in the box. The closer the phone is to the magnifying glass, the clearer the image, but its dimensions will be smaller.
The lens should also be prepared: cleaned of dust and dirt. If there are scratches on the lens, it is recommended to replace it with another one - this will improve the image quality.
There should be no light in the room in which the home theater projection room is located. Thick curtains should be used and all extraneous sources should be eliminated. Painting the inside surface of the box with black paint will also help: this will eliminate the “leakage” of light rays through the cracks and make the picture clearer.
The quality of the surface on which the film is projected is also important. There should be no defects, seams or dirt on the canvas. It is recommended to use a special screen or white surface.
Original solutions
You can also make a 3D projector with your own hands at home. It is more difficult to create such a device; it will also require financial costs.
It is necessary to create a truncated plastic pyramid. There are different sizes. An option is suitable, the larger base of which is 60x60 mm, the smaller - 10x10 mm, and the height - 45 mm. To show holograms from a tablet, you will need a larger pyramid, since the device's screen is larger than that of a phone.
It should be placed on the phone screen in the center. After this you can turn on the movie. This type of projector is well suited for entertaining children: holograms will strain the eyes less. In addition, this option looks unusual and attracts attention.