Even such a strong and reliable structure as a house actually has quite vulnerable structures. First of all, the foundation of the house, its foundation, needs protection. It serves as a support for all elements, but its location poses the threat of constant destructive influence of moisture contained in the environment. Moreover, moisture can enter the soil either from the level rising during floods groundwater, and from melt water penetrating deep into the water or storm water.
What is a blind area, what is its importance
First you need to figure out what the benefits of the blind area are. Its main task is to protect the foundation from moisture; sufficiently high-quality protection will prevent a very negative phenomenon, subsidence of the foundation, which over time can lead to the destruction of the house.
Except technical purpose the blind area plays a role decorative finishing area adjacent to the house. It frames the entire perimeter of the house, allowing you to walk around it comfortably in any weather.
A well-made blind area will eliminate the possibility of the house being washed away by storm water or melt water, as a result of this negative process, the soil is moistened unevenly, which threatens the rapid appearance of cracks on the foundation or walls.
An equally important point will be the blind area, properly constructed if the house stands on heaving soil. Sometimes one winter is enough to destroy a house on soils prone to swelling. The problem is that water-saturated soil causes uneven swelling. The pressure exerted by this can sometimes cause serious damage.
Analyzing the essence of this problem, we can conclude that the blind area on heaving soils should be insulated.
Experts say that the blind area should be built immediately after finishing the cladding of the walls of the house and its base. Postponing installation for a whole year, as some developers do, is quite dangerous.
Learn more about the benefits of a blind area and the rules for its construction in the video:
Blind area device
The design of any blind area consists of two elements:
- underlying layer,
- coverings.

When constructing the underlying layer, the following can be used:
- sand and clay,
- fine fraction of crushed stone, etc.
The thickness of the underlying layer should not be less than 0.2 m; its material in a particular case is selected depending on the coating.
In practice they are used different types blind area, but the following claims are made to the coating materials:
- high degree of water resistance,
- impossibility of destruction by waters,
- sufficient decorativeness.

Blind areas can be constructed from:
- asphalt,
- cobblestones,
- paving stones and paving slabs,
- concrete and other durable building materials.
A mixture of sand and clay, or sand and clay with the addition of small crushed stone, is sometimes used as the underlying and covering layers. The thickness of such a layer should be at least 10 cm.
How to make a blind area around the house with your own hands
Because main task Since the blind area will drain water from the foundation, it should be planned in such a way that the side adjacent to the house is higher. The slope angle is calculated depending on the covering material. For example: when constructing an asphalt blind area, the slope angle can be 3-5 degrees, but if the blind area is made of cobblestones, then it is recommended to make an angle of about 10 degrees.
To calculate the optimal width of the blind area, you should take into account the type of soil and the width of the eaves overhang. If the soil is dense enough, then the blind area can be made wider than the eaves overhang; if the soil is planting, then the width of the blind area should be at least 1 m. In any case, the width of the blind area should not be less than 0.6 m. A tray for draining water can be a useful addition to the design , install it along the entire perimeter of the blind area. It can be concrete or made from an ordinary pipe sawn lengthwise. Place it on a prepared concrete base.

Particular attention will be required to the design of the joint between the blind area and the foundation; here it is recommended to carry out expansion joint, its width should be from 1 to 2 cm. You can fill it with sand, but it is better to use a strip of roofing felt in two folds. With the same success, you can use bitumen or special sealants.
A simpler option would be to waterproof the foundation; waterproofing will need to be continued up to the level of the blind area. It is not recommended to connect the base to the blind area - even in the case of slight shrinkage, the finish of the base may be damaged.
Blind area - step-by-step instructions
Since the quality of the blind area, designed to protect the foundation of the house, can affect the integrity of its walls and extend the service life of the base, attention should be paid to the process of its arrangement.
We have already mentioned that the materials for making blind areas can be different, but they are most often used concrete pouring on an appropriately prepared base. The recommended width of the base is 0.7 m. This is quite enough to prevent additional moisture from entering the base.

At the first stage of preparation, you should measure 0.7 m from the walls and install pegs along the entire perimeter of the foundation, marking the edge of the blind area with a rope. Next, you can begin excavation work, namely, soil sampling, which can be used to level the area. The depth of the trench should be about 15-20 cm, this will create a good sand cushion.
A trench is dug along the entire perimeter of the house, and the specified width and depth must be observed. The surface of the foundation should be cleaned of soil and dust - this will ensure more high level adhesion of materials when pouring concrete.
The base under the sand cushion will need to be leveled using the usual building level, at this stage of work a regular shovel can be used.
It is not recommended to refuse to fill the sand cushion; it will serve as a kind of buffer, softening the impact of the soil during seasonal temperature fluctuations. This is especially important in the case of construction on soils prone to swelling. Sometimes it happens that within one year the concrete blind area becomes covered with cracks and its appearance becomes unsightly.
To avoid problems of this kind you should:
- Take sand for backfilling that is clean, without adding broken bricks and various construction debris, when the soil swells, these inclusions will be squeezed onto the surface of the sand backfill and can contribute to the destruction of the lower layer of the blind area.
- Along the bottom of the trench, sand is covered with a layer required thickness and levels out.
- Next, compact the sand; this can be done using a simple device, made with his own hands from scraps of wooden beams.
- The compacted sand is moistened with water, the procedure is repeated several times until the pillow of the required density is obtained. You can make sure that the proper quality has been achieved by standing on the sand - there should be a clear mark on the surface, the pillow should not fall under your feet.
- As for the thickness of the pillow, it should be at least 5 cm, while its surface should be approximately 5-7 cm below the ground level.
When building on non-heaving soils, red clay is sometimes used as the bottom layer of the cushion; the thickness of the clay layer can reach 10-15 cm. If the soils are prone to heaving, it is better to use sand to backfill the cushion.

At the next stage of work, you will need to set up a curb. Curb stones are installed on outside blind area, strictly along the tensioned cord, tracing the horizontal level of laying and checking the vertical installation of each fragment. It is recommended to leave a distance of about 1-1.5 cm between curb stones. When pouring, the concrete will fill these gaps, and when it hardens, sufficiently strong bonds are formed. After installing the curb, you can fill it with gravel; its layer should be approximately 3 cm.
For convenience, we divide the blind area into sections, installing boards soaked in protective solutions or tarred boards at a distance. Ideally, the distance between the two boards should be filled with the amount of concrete obtained from one batch of a concrete mixer.

After completion preparatory work You can start pouring concrete. To prepare it, you can use the standard recipe:
- 3 parts gravel,
- 1 part cement,
- 1 part sand
- water - until a creamy consistency is obtained.
Concrete should easily fill all existing voids, but it is not recommended to make it too liquid; excess moisture can cause bubbling.
More information about the construction of a concrete blind area:
In order to ensure uniform distribution of concrete, it is recommended to periodically tap the wooden lintels. After pouring the section with concrete, you will need to level its surface either with a wide spatula or a plaster rule. We should not forget that the slope of the concrete surface towards the curb should be no less than 5 degrees.

Experts do not recommend making the concrete blind area continuous; the threat of its destruction after the first winter will be very high. It would be correct to install every 2.5 - 3 m expansion joints, they should be installed across the blind area. As seams, you can use slats treated with melted bitumen. Install them on the edge.

To increase moisture resistance, the concrete surface is ironed. The process consists of covering the surface of not yet hardened concrete with a layer of cement and smoothing the surface with a metal trowel.

As you can see, pouring the blind area with concrete is not particularly difficult; it is quite possible to do all the work with your own hands.
Features of the construction of a blind area made of cobblestones
After digging a trench, you will also need to create an underlying sand layer, its thickness can be from 10 to 20 cm. When using fine crushed stone, the thickness of the underlying layer can be reduced to 3-5 cm. The recommended thickness of cobblestones is within 10 cm, for filling the space, which will remain between the individual fragments of the blind area will need to be covered with sand.
Blind area made of paving slabs, what are its advantages

The basis for a blind area made of paving slabs can also be sand cushion, built from small crushed stone. Clean sand can also be used to fill gaps between tiles.

In order for the blind area to be neat and easier to install, you should design a width that is a multiple of the width of the tiles. In this case, you will not have to violate the integrity of the tiles and trim each of them.

Paving slabs, when assessed from a practicality point of view, are optimal material for the blind area:
- it installs quickly and does not require an additional base layer,
- its service life is decades,
- if necessary, it is easy to replace each of the damaged fragments,
- The appearance of high-quality laid tiles is quite attractive.
How to build a blind area from paving slabs:
A blind area is a simple element that can significantly extend the life of a building. This is also an indispensable part of decorating the local area.
The blind area around the house with your own hands looks presentable, combining or matching the materials from which the sidewalk and the entrance to the garage are paved.
When answering the question of how to make a blind area around the house with your own hands and why it is needed in general, it would be useful to list the functions of this structure.
- Protective. A properly constructed blind area with your own hands protects the foundation from prolonged contact with the foundation. The design provides for water to be drained directly into the sewer system.
- Decorative. The blind area around the house gives the building a complete and solid look.
- Preventing soil swelling. Reducing soil freezing will prevent soil swelling. What's the benefit? There will be no soil shifts around the foundation, which means its integrity will not be compromised.
- Thermal insulation. The blind area of the house significantly reduces freezing of the soil and foundation as a whole. Thanks to this, the floors will be warm and the heat will not leave the house.
- Protects the base from dirt.
Where a blind area may be needed
The blind area must be built not only near each permanent structure, but also near small buildings. This will create a slope for water to drain and protect the foundation. Its importance is not at all exaggerated, since this building made from concrete and bulk materials has already proven itself as reliable protection foundation for many years. This means that having learned how to properly make a blind area around the house, you will not spend extra money on repairing the basement, and the walls will not crack from constant exposure to moisture.
What types of blind areas are there?
The blind area is built taking into account how you intend to use it in the future. The first thing you need to decide is whether it will serve only a decorative function or whether it will also be used as a sidewalk. In the first case, the slope can be made large, and in the second - minimal. Depending on their characteristics, blind areas come in different categories.

Types of blind area:
- multi-layer and two-layer;
- cast, prefabricated and bulk;
- soft and hard blind areas.
The following materials can be used:
- wood;
- tile;
- concrete;
- reinforced concrete slabs;
- bricks;
- cobblestones;
- asphalt.
3 conditions of effectiveness
In order for your home blind area to be effective in protecting the foundation from excess water, the following conditions must be taken into account.
- The first and most important rule is that the blind area should be made with a slope towards the site. The amount of slope is affected by the type of coating. Reliable concrete blind area must have a slope of at least 5-10 degrees.
- Its width should exceed the roof overhang by 30 centimeters. On heaving soils it is made no narrower than one meter, on sandy soils - at least 0.6 meters.
- The correct blind area is built around the entire house without gaps. Since the settlement at the blind area and at the foundation is different, it is necessary to construct an expansion joint, which is filled with sand, filled with bitumen or filled with sealant.
Popular methods for constructing a blind area
When covering the facade with panels, siding or stone cladding, the blind area plays an important role, since it is the basis for installing the cladding.

In its absence, a noticeable gap appears between the casing and the ground level. This probably shouldn’t even be discussed, because no one will finish their façade without a previously constructed blind area.
Concrete is the easiest option
The technology involves the creation of 2 layers. The first layer is the underlying layer. It is necessary to create a smooth, compacted base. The following materials can be used for this: fine crushed stone, clay and sand. The choice of materials for creating the underlying layer depends on what materials will be used for the second layer. The coating must be waterproof and resistant to moisture.
- Marking. The required dimensions of the structure were discussed above. The soil is removed and compacted around the entire perimeter of the building. The ground is prepared exactly to the marked width. For concrete structure the earth is removed to a depth of at least 25 cm.
- Formwork. To create the formwork, a 20 mm thick board is used. A layer of clay is placed on the compacted earth, which is also compacted. After which a 10-centimeter layer of sand is laid. To ensure a good seal, it is spilled with water. Now a 60 mm layer of crushed stone is laid.
- Reinforcement. The use of reinforcing mesh increases the stretching of the blind area in tension and compression. In addition, it will be quite difficult to destroy it - maintainability and vandal resistance increase. Buying reinforcement mesh with delivery to the site. The mesh is usually sold in sheets of 2x6 meters, which is very convenient. You can split it in half so that the width is 1 meter, this is ideal for reinforcement. You can cut the mesh with an ordinary grinder into fragments measuring 1x2 meters. You can cut into 3-meter pieces, but due to their large weight, carrying them is very inconvenient. The mesh is mounted in the formwork so that the distance from it to the crushed stone cushion is 2 cm. This is done in order to position the mesh inside the concrete, and not on the pillow. There shouldn’t be any difficulties, because no matter how you compact the pillow, pebbles will always remain above the surface. The cut mesh fragments must be laid overlapping. Excess wires are bent or cut off with a grinder. Reinforcement is the fastest and easiest stage. 2 people are enough for this.
- Pouring concrete. When poured with concrete, the mesh can bend greatly - the concrete will begin to squeeze it out. You will need to quickly compact the area or, after hardening, start cutting off excess fragments. It should be noted that this is not an easy procedure.
Waterproof option
If you are planning to do drainage system, then a permeable system is right for you. This is the simplest option. Geotextile material is placed in a compacted trench, on which expanded clay, pebbles, gravel or crushed stone are laid.

Geotextile material is used to prevent crushed stone from being pressed into the base. Having chosen such a blind area, you must be prepared for the fact that it will have to be adjusted regularly, and it is not very convenient to walk on it.
Using paving slabs
To create a solid layer, crushed stone with sand can be used, on top of which the tiles are laid. It is impossible to do without creating a drainage system. You can also create waterproofing at the base of the blind area to drain water into the sewer.
- Let's prepare the base. The earth is dug to a depth of tile size + 10 cm. To create a waterproof effect, clay is used, which is laid at an angle to a height of 10 cm.
- A layer of PVC waterproofing is laid on top of the clay. The waterproofing is attached to the wall using a metal strip. Next, sand is laid in a layer of 4 centimeters, which is leveled and compacted.
- Only now can you begin laying paving slabs. The solution should consist of concrete and water in a ratio of 1:4. The solution should be very thick. The tiles begin to be laid from the corner. After laying, 4 tiles are removed and a mortar layer of 4 centimeters is laid in their place. We install the paving slabs into place using spacers and a hammer.
- After laying all the tiles and removing everything wooden spacers it is necessary to fill the seams with sand. To fill the sand as densely as possible, the tiles are watered. Even a well-made seam must be periodically covered with sand during operation.
Repair of concrete blind area
We have already figured out the question of how to make a blind area with our own hands, but what to do if it breaks? If damage is discovered, repairs must be made as soon as possible to prevent structural damage from spreading. Repair should begin with determining the boundaries of the damaged area.
Several significant potholes can be combined into 1 damage. The damaged asphalt surface is cut down to its full depth using wedges and cleaned of dust. The edges, walls and bottom are lubricated with liquefied bitumen and filled with concrete. The new coating is laid slightly higher than the old one, which will ensure best connection plots.
To repair peeling cracks and potholes, the following are used:
- fine-grained concrete;
- cement-sand mortars;
- sealing pastes;
- rubber bitumen mastics.
We will send the material to you by e-mail
After completing the construction of the house, it is mandatory to install a blind area. It will protect the foundation from soaking and cracking, and will also significantly extend the life of the building. The design is quite simple and therefore the blind area can be made with your own hands - step by step instructions and recommendations will help you go through all stages of installation without errors.
Appearance of the blind area
The structure of the blind area around the house is quite simple and consists of two main elements: a substrate and a covering. The main role of the substrate is to create a smooth and solid foundation for styling protective coating. Typically, the substrate is two layers of clay or sand and crushed stone. The good thing about using clay is that it can perform a waterproofing function and not allow moisture to pass through, but to do this it will need to be laid well and ensure a uniform layer. Sand is easier to use, as it can easily smooth out any unevenness in the soil surface.
Any suitable materials that have the following properties can be used as a coating:
- Have sufficient strength to withstand expected mechanical loads.
- They have high-quality waterproofing properties.
- Resistant to sudden temperature changes.
- Thanks to the smooth surface, they are able to efficiently remove moisture from the foundation.
Therefore, concrete, asphalt, stone or tile coverings are mainly used for blind areas.
Related article:
Photo of the blind area around the house: main types of structures
When designing photos, blind areas around houses will greatly simplify their selection. There are these types of structures:
- Tough. They are structures based on hard coatings that, under load, retain their shape without deformation. Usually made of concrete or asphalt. Their service life is usually compared with the duration of operation of the building. In terms of installation costs, rigid structures will be more expensive than others, as they require mandatory insulation and waterproofing. Requires medium or high density soil for installation.


- Soft. They are distinguished by simple installation technology and minimal operating requirements. Actually consists of several layers bulk materials. Requires minimal cost and physical effort to install. The service life is on average 5-7 years. They can be laid on any type of soil, including loose ones. They are used mainly for temporary purposes, since their appearance is not entirely aesthetic and is unlikely to fit into the design of the building facade.


- Semi-rigid. They represent a compromise between hard and soft structures in terms of financial and physical costs. The outer layer is usually tiled, stone or reinforced concrete slabs. The service life can be up to several decades. They have excellent maintainability, since part of the structure can be replaced or rearranged without any problems. However, they are limited for use in areas with high groundwater, on soils with a large freezing depth and on heaving soils. The cost of installation work will be cheaper than hard work, but the highest quality aesthetic appearance will be achieved.


Determining the parameters of the blind area
In order to understand how to properly make blind areas around houses, you need to choose it correctly technical parameters. One of them is width. It is determined by the current building codes and rules that say that it must be 20 cm longer than the most protruding part of the roof slope. Usually this size is measured from the gutters. The width of the blind area around the house is determined based on the selected type of material, the density of the soil on the site and the magnitude of the expected variable and static loads. In most cases, the width of the structure for private houses is made at least 1 m.
Another parameter is the degree to which the structure is buried in the ground. It is mainly influenced by the level of soil freezing. In regions where there is a significant decrease in air temperature, the structure is significantly affected by soil properties such as heaving, which can damage it literally within a year without the possibility of recovery. Therefore, the filling level must provide sufficient strength so that it effectively resists heaving and does not deform. The minimum depth is at least 10 cm, including a layer of sand and crushed stone cushion. If expected permanent loads, then it is recommended to increase the thickness to 15-20 cm.

Useful information! Where the porch adjoins the house there is no particular need to lay a blind area, since the main foundation in this case will be protected. However, if a monolithic or brick porch is built, then it is recommended to protect it too, since the weight per unit area is quite large and the likelihood of subsidence is high.
For high-quality sediment removal, the surface must have a certain slope. The magnitude of the angle to the horizontal, on the one hand, is influenced by the amount of precipitation in a particular region, and on the other hand, by the ease of use of the structure as a pedestrian path or for other purposes. A value of 2-3° is considered optimal.
In order to prevent flooding of the structure, it is recommended to make it 5 cm higher from the ground surface. If there are trees or bushes near the house, you will need to uproot them to a distance of approximately 1.5 m from the house.
Attention! You can protect the structure from destruction by the roots of trees or any plants by installing a border.
Preparatory work
Preparation for installation is carried out in several stages:
- Marking the territory.
- Carrying out earthworks.
- Laying the underlying layer.
We mark out the area for installation of the blind area
Using pegs around the perimeter of the house it is necessary to mark. To do this, use a tape measure to measure a distance of 1 m from the walls and drive wooden pegs into the corners to a depth of 0.5 m so that it is possible to draw earthworks without moving them from their place. We pull a rope on them.
Useful information! If the building has a large area, it is recommended to install additional pegs along the walls every 2.5-3 m.

Excavation stage
Using a shovel, you need to dig a trench according to the markings. The depth is determined by the type of structure chosen, climatic features and soil composition. The layer should be removed evenly with a slope of 2-3° from the building. This is quite easy to do by setting the digging depth along the building and along the marking line.

Since the main foundation and the design of the blind area will have different coefficients thermal expansion, then it is recommended to create a thermal gap between them of 1-2 mm. To do this, after stopping digging, you need to lay a damping layer based on polyurethane tape along the wall.
The bottom of the trench should be thoroughly compacted special tool, which is a steel rod with a flat sheet welded on the lower end. If such a device is not at hand, then you can use a regular log.
Laying a pillow under the blind area
It is necessary to lay waterproofing at the bottom of the prepared trench and fill it with a layer of sand 10-20 cm thick, depending on the type of structure and the depth of the trench, with careful compaction and leveling. For ease of work, it is recommended to spill the layer with plenty of water in order to compact it as much as possible. However, before laying the outer layer, you will need to wait until the pillow dries.

Important! If construction is carried out in an area with high groundwater, a drainage system will need to be installed. It is a pipe with holes in the upper part, which is located around the perimeter of the building and is connected to the storm sewer system.
On top of the sand it is necessary to pour gravel with a fraction size of up to 5 cm, and top layer level with crushed stone with a grain size of up to 5 mm. This will save building material on the outer layer due to the absence of the need to fill the pores formed.

Useful information! Crushed stone can be replaced by other types of stone or even broken bricks. The most important thing is to use a homogeneous material so that areas with different strength characteristics are not created.
How to properly make a blind area around the house?
The installation process depends on the type of structure and the selected material. For example, when installing a soft structure, no additional work will be required, but when installing a hard one, you will need to lay several waterproofing layers. How to carry out installation correctly will be described in the following subsections.
Installation of a rigid blind area
It is recommended to install a rigid structure on a heat- and waterproofing layer, which will significantly extend the life of the structure. For these purposes it is recommended to use thermal insulation materials, which are highly resistant to moisture and have increased strength under significant mechanical loads. An example would be expanded polystyrene or foam boards.

Attention! Before laying, it is necessary to install the formwork, for which it is recommended to use boards lined with a waterproofing film on the inside. This solution will prevent the absorption of moisture from the subsequently poured concrete solution and it will be able to gain design strength. Otherwise, the dehydrated parts will become brittle and the service life will be significantly reduced.
To understand the technology of pouring a blind area around a concrete house, how to make formwork and what sequence of actions to follow, you need to read the step-by-step instructions. It looks like this:
- We install the first slab from the corner of the building along the wall, checking the correct position using a building level.
- We fix the insulation onto a suitable type of fastening, pressing it tightly against the wall.
- We install the next one butt to the first plate with a minimum gap.
- We secure the slab and carefully seal the joint with construction foam.
- Similarly, we lay the entire perimeter of the walls with heat-insulating material.
Attention! If the blind area is installed in the northern regions, then it is recommended to lay two layers of insulation with ligation of the joints of the two layers. This will avoid the formation of cold bridges.

Before pouring concrete into the formwork, it is necessary to lay the reinforcing mesh. For these purposes, ready-made meshes with a rod diameter of 8-10 mm and a cell size of 10-15 cm are used. It is important to lay them in such a way that the steel rods are in the concrete layer. To do this, you need to use special plastic supports.
It is recommended to fill the structure with concrete mortar grade M400 or higher, and at one time, so that the structure acquires maximum strength. Therefore, you need to calculate the approximate volume in advance and order the solution in the right quantity at a cement plant.

When pouring, it is important to create a uniform layer, for which you carefully smooth the concrete over the surface using a shovel or mop. Additionally, the solution must be stirred to remove air bubbles from the layer. After driving the layer to the level of the edges of the formwork, it is necessary to level the surface as a rule. The side parts of the formwork will serve as guides.

At the final stage, the surface of the blind area must be sprinkled thin layer cement. To ensure ideal conditions To harden the concrete, you will need to cover the entire top part with a layer of polyethylene. Every day it is necessary to moisten the surface with water. The curing time is 28 days depending on the temperature and humidity of the environment.

Installation of a soft blind area
The soft blind area around the houses is laid on a waterproofing layer laid on top of a sand cushion. As insulating material It is recommended to use rubemast, which has an increased service life. Laying is done overlapping at a distance of 10-15 cm not only along the main surface, but also on the walls of the main building. The connecting seams are sealed with bitumen under the heat of the burner.

On top of the waterproofing it is necessary to pour a 10 cm layer of a dry mixture of sand and crushed stone in equal proportions. Then the surface should be thoroughly compacted and leveled. In this case, it is imperative to maintain the angle of inclination. Another layer of crushed stone with a grain size of no more than 5 mm is laid on top of the embankment and also compacted.
DIY semi-rigid blind area: step-by-step instructions
Is it possible to create a semi-rigid structure on your own in the absence of suitable experience? The task is completely solvable and you can create a reliable blind area with your own hands - step-by-step instructions will allow you to go through all the stages without errors. It is installed directly on a prepared sand-crushed stone cushion, on top of which an additional layer of sand 8-10 cm thick is poured. For paving

How to repair a blind area?
The blind area around the house, if you do not know the nuances of laying technology, how to properly pour concrete or lay tiles, will certainly contain defects that will emerge sooner or later and require repairs. repair work. Restoration is carried out depending on the degree of damage:
- If there are cracks of no more than 1 mm, repairs are not required, since they are not critical and will in no way worsen performance characteristics designs.
- If the crack size is up to 3 mm, then it is recommended to use water-cement mortar in equal proportions. After the solution dries, a durable layer will be created that will provide maximum protection to the building foundation.
- For cracks up to 3 cm, it will be necessary to fill them with concrete mortar, having previously cleaned them of dirt and treated them with a primer. deep penetration. It is also possible to use waterproof putties or sealants.

- Cracks more than 3 cm - it is necessary to study the strength of the structure and evaluate its maintainability. It may be necessary to remove part of the top layer and level the pillow. After making sure there are sufficient load-bearing capacity The structure should be filled with concrete.
- The crumbling of the blind area is eliminated by applying a water-cement mixture to the surface in order to strengthen it.
Conclusion
It has been shown that a do-it-yourself blind area can last a long time if step-by-step instructions are used and followed construction technologies. The main installation methods for all types of blind areas are given. Some methods for repairing damage to the external surface of a structure are indicated.

Save time: selected articles delivered to your inbox every week
During construction, it is very important to properly make the blind area around the house. It allows you to reduce the amount of splashing dirt during rain, which reduces contamination of the facade. However, poor design can lead to waterlogged foundation walls. There are several opinions among specialist builders about how to make a blind area around a house correctly with your own hands.
Some believe that making a moisture-proof blind area, for example from concrete, will effectively drain rainwater from the wall. Others argue that this element is built purely for aesthetic reasons, serving as narrow “sidewalks” along the façade.
The third popular opinion is that the main function of the blind area is to keep the house clean, as it helps to avoid contamination during rain.
So how to do simple blind area around a house made of stone, tiles and other materials, what to pay attention to, how to prepare the foundation and what materials to choose - this will be discussed in the article.

Blind area around the house - how to do it correctly and what is it for?
First of all, it’s worth figuring out how rainwater influences external walls buildings. When it rains, water soaks into the ground (through the lawn or permeable strip around the house made of crushed stone, tiles or other materials). Some of the water will be absorbed to the groundwater level. However, some of it will rise up through the soil capillaries and evaporate from the surface, which is sometimes called “self-draining” of the soil. In the case of a waterproof blind area, for example, made of concrete, a constantly wet zone of soil may appear directly under the house, in contact with the foundation walls. In practice, this will have an adverse effect on the foundation walls; moisture can penetrate into the building and contribute to the development of fungus, especially if the house has a basement.
How to properly make a blind area around the house - video
Many specialists in recent years It is recommended to insulate foundations using a waterproofing membrane film. Diffusion film membranes allow the walls to “breathe” and better drain water from the foundations (through a system of channels in their structure). This is only true if there is a place for the water to pass through to evaporate. If we place a membrane film under a waterproof blind area, it will not do its job.

In this case, the blind area must be made water-permeable, for example, from decorative stone or tiles laid on sand, gravel or gravel mixture (concrete or cement-sand bedding cannot be used). The border of the blind area must also be made, for example, a concrete rim or a plastic rim.

Functions of the blind area
According to most experts, the blind area of a house performs two main functions:
- First of all, it allows you to leave the facade clean, since rainwater splashes, bouncing off tiles or stones, which leads to mud splashing the walls.
- The second function is to improve the aesthetics of the building (of course, this is a matter of taste for each of us).
This is not the only possible application. This building element can also serve as an auxiliary path around the house, as well as a support for stairs or scaffolding for façade maintenance or window cleaning. Every year it becomes more and more important, as it becomes widespread mechanical ventilation, in which non-opening windows are often installed in the house. In this case, the only access to them is the outer wall of the building.
How to choose the correct blind area width?
In order for the blind area to perform these functions, it cannot be too narrow. However, the most commonly used width is 40-60 cm, it will be enough to complete the main task, but it will not work in any of those listed above additional functions. A width of 80 - 90 cm will make the blind area relatively comfortable. For the passage of two people, this width increases to at least 120, but better to 150 cm. As for the “path around the house” function, in practice it does not have much practical use, since it is much more convenient to move along paths built directly in the garden than on the narrow sidewalks at the front.
It should be borne in mind that paths leading to the entrance to the building located too close to the wall will lead to much faster contamination of the facade. For the same reason, you should not connect the blind area to the group of the main communication line. If there is enough space, it is better to separate it with a narrow strip of greenery from the sidewalk. This will greatly improve ease of use and help maintain cleanliness.
Finally, the width of the blind area is selected to match the module of the selected tile or stone format. For example, we decided to use 18.2 x 18.2 cm tiles - then there is no point in creating a 70 cm wide strip, because this means cutting out almost all elements and significantly increasing labor and waste costs. Instead, it is better to choose 55 cm (18.2 × 3), 73 cm (18.2 × 4) or 91 cm (18.2 × 5). This will reduce the amount of waste to almost zero (tile elements will be laid whole or cut in half). For the same reason, when choosing trapezoidal tiles or other uneven-sided shapes, it is better to place them along the facade.
How to make a blind area around the house with tiles or stones?
We already know how to choose the shape of the blind area and what functions should correspond to it. Therefore, the only question is how to properly make a blind area? This is not particularly difficult, since it is structurally no different from other sidewalks and paths made of stone or paving slabs.
The best choice is a blind area made of paving slabs or stone; it can be made of decorative stone, pebbles or the more popular paving slabs. The main function of this design is to protect the facade from dirt and slush, as well as protect the foundation from moisture.

The most popular blind area natural stone, gravel, paving slabs.
The work begins with a trench (it is important to remove all humus, which is quite simple to do), then a foundation, a leveling pad and a surface of tiles or stone are made. However, there are some additional rules.
First of all, you need to make sure that the level of the planned strip will be below the top edge of the vertical foundation insulation. Otherwise, the walls of the building may become damp. To protect against snow, it is recommended to perform vertical insulation at least 30 cm above the level of the blind area.
Second important point– slope. It must provide drainage from the building. For normal conditions the slope should be 2%. This means a 2 cm height difference for a strip width of 1 m. It is also important that the top edge of the curb does not protrude above the plane of the tile. It should be flush with its bottom edge.

- Exterior wall buildings.
- Border of the blind area.
- Tile, stone.
- Priming.
- Vertical building insulation.
- Sand bedding.
- Bedding with a slope.
- Foundation of the building.
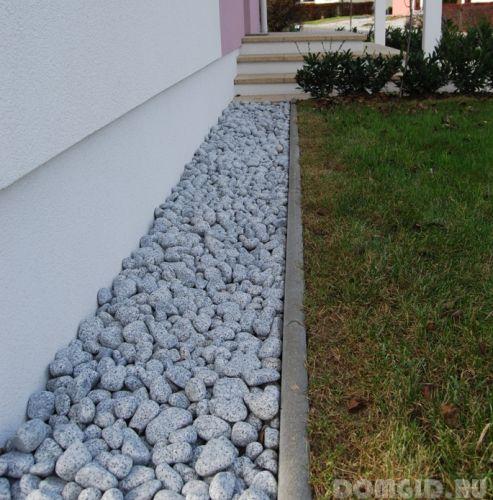
This design is very simple to implement and does not require precise compliance with height differences. This is due to the fact that water penetrates very quickly through the stone layer into the soil. What is the best way to make a blind area around a house from decorative stone? The top layer can be made using decorative stones or coarse gravel. The most aesthetic solution is white stone, but at the same time it can quickly become dirty.

It is recommended that the top layer of stone has a thickness of about 15 cm. The stones should be scattered on an even layer of sand about 10-15 cm thick. This solution will ensure that the flow of rainwater quickly penetrates into the ground, as well as the rapid drying of the substrate.
The structure should be surrounded by a concrete or granite border. Lack of a border will quickly lead to the rocks "spreading" into the garden. However, any stones that fall on the lawn can damage the lawn mower.
For a gravel and stone strip, install a curb so that it protrudes about 2 cm above the level of the stones. This will protect the blind area from stones or gravel falling onto the grass. At the same time, you need to make sure that the lawn behind it is also about 2 cm lower, which will prevent dirt from being deposited on the layer of stones.

To keep the side stable and ensure a constant width of the blind area for many years, it is worth strengthening it from the outside with concrete, or building a support. In addition, this design will allow you to later work in the garden directly next to the house (for example, digging a trench for drainage or laying cables, etc.) without damaging it.
Paving slabs are much easier to maintain than stone structures. In the case of stones, after a few years it is often necessary to replace their top layer (about 5 cm) with new, clean stones in the desired color (usually white stones). At the same time, we must not forget that it is undesirable to use concrete pouring or a cement/sand mixture, as this will interfere with the free movement and evaporation of water.
Can be used for blind area at home paving slabs or granite 4-6 cm thick. No need to use road tiles(8 cm thick) since there is no traffic or other extreme exposure.

Geotextiles can be laid under paving slabs and sand. The cost of creating such a structure depends mainly on the material of its top layer.


In terms of functionality, both solutions are similar. Therefore, it is better to make the choice mainly by considering the decision from the point of view of financial issues, since the cost of sand and sand and gravel mixture each region is different, as is the availability of any of these materials on the construction market.
In the case of paving slabs, it is important to maintain the proper height difference between the blind area and the lawn. It is recommended that this difference be 1-2% or even 2-4%, which means with a strip width of 0.5 m, the difference in levels will be 1-2 cm. You cannot tilt the angle of the height difference to the wall of the building so that the water does not stand along walls and foundations (water penetrates into the cracks between the tiles much more slowly than through a stone path).

When laying tiles, it is very important to thoroughly compact the layer of sand bedding, since if the sand is not compacted, the tiles will settle unevenly. If the blind area is made of decorative stone, careful compaction of the sand is not necessary (only slight compaction of the surface is required).
The tile must be limited by a side. In the case of a concrete border, it is recommended that it be slightly lower than the tiles (0.5-1 cm), which will improve the drainage of rainwater onto the lawn.

Border for paving slabs - concrete, granite or plastic?
In the case of a decorative blind area made of stone the best solution there will be a concrete sidewalk curb 6 or 4 cm thick. A granite option is also available. In turn, in the case of paving slabs, you can use both concrete and plastic curbs for paving slabs.

Laying geotextiles in the blind area of a house
Placing geotextiles (or so-called permeable agrofiber) under a layer of sand will limit the growth of weeds and other vegetation. However, it is important that the fabric is permeable in both directions (top and bottom). Sealed insulating films must not be placed in this location.
Geotextiles can be laid out along the entire length of the blind area of the house, with an overlap of subsequent strips of about 30-50 cm. This material will not completely limit the growth of vegetation, but will significantly reduce the scale of this phenomenon. In practice, this will make it easier to maintain good appearance designs.
To improve the appearance, you can place lighting fixtures between the elements of paving slabs or stones, diversify the design with flower beds and other garden decor.

When it comes to aesthetic issues, color is of paramount importance. It should be remembered that the blind area around the house is not the most important element whole, therefore should not dominate environment. It should be harmonized with the facade, but it should merge with it, since this can greatly spoil the proportions of the building. If we don't have much experience in choosing colors and we're afraid of experimenting, "safer" will be a little more dark color than the facade of the house. It is also good if it is made of a material and color that matches garden paths around the house.


Construction of a house – complex process. It consists of several main stages, most often obvious and necessary. But there are a few things that can be overlooked that, if done, will greatly improve the aesthetics and comfort of the building. These include the blind area around the house. It will, first of all, protect the lower part of the facade from dirt, and also provide an aesthetic separation of the house from the garden. However, in order for the architecture of the building to be complemented and not spoiled, it is important to carefully consider the project and choose the appropriate material.
Having devoted a large number of articles to the construction of various kinds of buildings, this time we want to talk about such an important final stage of construction as the blind area. What is a blind area, why is it needed and how to make it - you can learn all this from this article.
What is a blind area
A blind area is a covering that runs along the perimeter of the house, with a slope away from it, to protect the building from water. To make it more clear, a blind area is a “path” that runs above the house along its perimeter.
Why do you need a blind area?
We would like to emphasize that the blind area is really needed - it is an integral part of the construction of any capital building. Why is a blind area necessary?
The blind area is necessary primarily to provide a runoff water barrier so that flowing water does not create puddles near the foundation and destroy it. In addition, the blind area drains water flowing from the roof of the building, again so that it does not form into puddles and destroy the foundation.
The blind area is also used as a decorative element, which gives the building a look of completeness. The blind area also protects the foundation from freezing.
As you understand, the blind area is an integral part of the building and performs protective functions. If it is not there, then the foundation and base will collapse.
What is the blind area made of?
Previously, when building houses, the blind area was made of asphalt or concrete, but now, as a rule, asphalt is not used. Most often, now the blind area is made of concrete, this is quite practical, and besides, the concrete blind area can be laid with paving slabs, which will look very nice against the general background of the building.

How to make a blind area around the house
First, you must measure where your blind area will be. The optimal width of the blind area is 1 meter. If the canopy of your building protrudes over a greater distance, then the blind area must be made larger so that the flowing water falls on it.
When you have decided on the width of the blind area, we mark it. To do this, arm yourself with pegs or rods and rope to outline the area where the blind area will end. After this, we remove a layer of earth 25 centimeters deep (that is, the fertile layer of earth), along the entire perimeter where the blind area will be made, from the base to the borders of the blind area. Then compact the soil well.
The next stage of work is the construction of formwork for pouring concrete. It also needs to be done around the entire perimeter where the formwork will go. We would like to draw your attention to one rather significant nuance. It is best to make concrete for formwork in one piece. Why? If you pour concrete in parts, then the joints of these parts will not be as strong as a monolith; in the end, we can say with great confidence that in this place in the future, a crack may appear and you will have to repair the blind area. Therefore, we advise you to take this point into account in advance and eliminate the possible occurrence of negative consequences and fill the monolithic blind area.
But before pouring concrete into the formwork, it is necessary to pour a sand cushion. To do this you will need sand and tamping material. Along the perimeter of the blind area we pour a layer of sand 10 centimeters high, after which we spill it with water, but not too much, so that the sand does not spread and turn into mush, but so that it is loose and can be easily compacted. You can compact it with any available means with a flat surface.
When the sand cushion is ready, we fill in the crushed stone. The height of the crushed stone layer should be at least 5 centimeters. There is no need to water it, but you can compact it slightly.
When the crushed stone flooring is ready, we place a road mesh made of rods on top. This mesh can be purchased at finished form V hardware store, or do it yourself. The mesh width should be 1 meter.
After laying the mesh, we move on to the most difficult stage - pouring concrete.
How to make a blind area slope
The blind area, as you understand, acts as a drainage system, so it must be sloped so that water drains from it. A meter wide blind area is made at an angle of 5 degrees. In order to fill the blind area at an angle from the side of the base of the house, a little more concrete mortar is poured, approximately 1 centimeter, after which it is all leveled with a level and a rule.

How to pour a concrete blind area
When the area for the blind area has been prepared and the formwork has been constructed, you can begin pouring concrete. You can prepare the concrete yourself or order it. Of course, each of us tries to save money and decides to make concrete ourselves, but rationality is important here. Prepare concrete mortar you can do it yourself if you have a small house, but if your house is large, then prepare, for example, 8 tons of concrete in 4 hours, until the poured part begins to dry out - you need to try very hard. At the same time, it is very difficult to do this alone, if at all possible. Therefore, if you need a fairly large amount of concrete, then it is better not to save money and order a machine that will pour concrete and you will not need to carry and pour it yourself. The only thing you need to do is level its surface and make a slope of 5 degrees using the rule.
When the concrete is poured, give it a couple of hours to dry and cover it with film. After two days the film can be removed. This is done so that the moisture in the concrete does not evaporate.
Finishing the blind area with paving slabs
As mentioned earlier, the blind area can be finished with paving slabs. To do this, when the concrete blind area is completely dry, we lay waterproofing film, pour 10 centimeters of sand on it and compact it well. A border is made at the edge of the blind area that will hold the tiles. Then we lay out the paving slabs and fill the seams.


