Taking into account the features of the layout small apartments standard type, it’s hard to disagree with those who want to add at least one more piece of free space to their miniature home. And one of the most common solutions to this problem is glazing of balconies with remote control.
Indeed, using remote glazing of the balcony, you can slightly increase the area small apartment. However, before you begin such serious transformations, you need to figure out whether the costs and efforts spent on reconstructing the balcony are worth the result that you will get in the end.
Advantages of a balcony with take-out
First of all, it is worth considering that without completing the appropriate documentation, you can expand the balcony space by no more than 30 centimeters. On the one hand, it may seem that such a transformation cannot produce much effect. However, if we take into account the possible increase in the area of this room by 30 cm along the floor and the same amount along the window sill, you will notice that this is not so small, especially in cases where these few tens of centimeters are not enough to place an ottoman or small sofa.
In those cases, if you are planning to organize something more serious and grandiose on the “reconquered” territory, it makes sense to think about a larger expansion of the balcony, say, by 50-100 centimeters. And here it’s worth mentioning right away that this process will be more complex technically and documented, since it will be necessary obtain permission to remove the balcony.
And it’s worth starting such a rework by visiting a fairly large number of different authorities, including the City Department of Architecture, Design Organization, Urban Planning Department, Ministry of Emergency Situations, Sanitary and Epidemiological Station, Gas Service, BTI, etc. In addition, before starting work on glazing with removal and completing the necessary documentation, you need to obtain written consent your neighbors for redevelopment. So, if you decide to do something like this, you will have to stock up on time and patience.
Remote balcony options
Having decided on the number of free centimeters you need and collecting the whole package accompanying documents, you need to decide how the balcony will be removed. For example:
- expansion by removing the window sill;
- extension of the balcony along the base of the slab.
At the same time, when using the first redevelopment method, the area of the base of the balcony remains unchanged, and an increase in the size of this room is achieved by constructing a structure that extends outward beyond the old fence. That is, the glazed frame is brought forward at a distance equal to the width of the window sill or on all three sides. Thus, you can achieve an “increase” in free space by 30-35 cm.

This reconstruction method can be used if there is no need to increase the floor area in this room. For example, in situations where, due to the small size of the balcony, it is not possible to install a full-fledged window sill or shelf for books or plants in it.

The second conversion option, moving out the balcony along the floor, is more complex, but when used, the increase in area can be up to half a meter.

In some cases, for a balcony with an extension, another one is used original way reconstruction, popularly called "butterfly". When using it, fixation balcony design carried out at an angle from the sides, with the installation of glazing on a triangular truss attached to the wall of the building and the side of the balcony.
 Extension of butterfly balconies
 However, there are situations in which it is not possible to expand the balcony with your own hands through the use of external elements. These include:
- The large weight of the remote structure exceeds 80 kg, which often happens when it is planned to remove balconies at.
- The “advanced age” of the balcony itself, ranging from 20 years or more.
- Inappropriate location. For example, if the balcony is on the first floor, then all precipitation, as well as debris from upper neighbors, will “land” on your canopy.
Basic glazing methods
One of important stages reconstruction of this type is the implementation of glazing of the balcony, which makes it possible to make this room warmer and more convenient for use. Balcony glazing can be warm or cold. The main advantage of the first option is the ability to use this room at any time of the year. In addition, thanks to warm glazing, a better level of noise and heat insulation in the apartment is achieved. However, installing this type of glazing is a rather complex and costly undertaking, due to the need to strengthen the thermal insulation layer and strengthen the entire structure as a whole. This is due to high weight plastic double glazed windows, used in this case. Therefore, this reconstruction option is most often used when rebuilding loggias.

But cold-type glazing is suitable for balconies of any type. A lightweight and durable material is used as a structural basis. aluminum profile, which does not create additional load on the balcony base. And this glazing option is much cheaper.
For the manufacture of frame structures used for remote glazing balconies are used various materials. These include:
- Tree
The main advantages of frames of this type are their environmental friendliness, good thermal insulation characteristics And low price. However, in order for such products to have a sufficient service life, they require periodic treatment with antiseptic compounds.
- Aluminum
These frames are characterized by minimal weight, reliability and durability. Used on balconies various types, mainly for cold glazing.
- Plastic
PVC frames are most often used when arranging insulated balconies. They have excellent noise and heat insulation characteristics and an affordable price.
In addition, for arranging balconies with removal it can also be used frameless method glazing, where a glass wall without a frame is used as a window system. Glazing of this type allows you to visually expand the balcony space and achieve maximum illumination on it.
Exterior finishing
Before glazing the balcony, it is necessary to do it. Most often, vinyl siding is used for this - modern and practical material, having a very low cost and light weight.
In addition, one of the fairly popular materials used in finishing the outer part of balconies is corrugated sheets, which are sheets of galvanized sheet, with outside, covered with decorative polymer coating. Its plus: long term operation. However, compared to the same siding or plastic lining it has a higher cost.
One of the original and modern solutions V exterior decoration balconies and loggias can be called the use of steel or aluminum siding, as well as aluminum composite panels, which are a “pie” of two thin aluminum sheets with a polymer layer located between them.
Removal and glazing technology
When arranging a balcony with a take-out with your own hands, it is necessary to follow the technology for the production of this type of work, making sure that each stage is completed in a timely manner and with high quality.

The sequence of work to remove the glazing may be as follows:
1. Construction of an external frame. To do this, it is necessary to install metal brackets resting on the parapet. This can be done in two ways:
- welding them to a metal parapet;
- screwing it with anchor bolts to the concrete base.

2. Construction of a new frame connecting the external structure with the balcony parapet. It will bear the entire brunt of the load in the future.
3. Installation external cladding balcony
4. Installation of glazing.
5. Installation of drains, canopies and other additional elements.
Important: The weight of the future glazing must correspond to the characteristics of the parapet. It is advisable to mount the brackets for the remote structure at a distance of 50-70 cm from each other.
Due to the specifics and technical complexity of these works and the need to use specialized equipment at various stages of installation (in particular, welding machine), it would be more rational to entrust their implementation to professionals.
In case of independent implementation of projects of this kind, it is necessary to carefully observe regulatory requirements And technological sequence work, since not only the duration of its operation, but also the safety of the people on it will depend on how well the balcony is removed. So, approach the installation remote balcony with your own hands should be done with all seriousness and responsibility.
Removing the balcony video
And now we bring to your attention a video that demonstrates the glazing of a balcony with an extension, from installing the frame for the window frames, to installing the roof and carrying out the interior finishing. We highly recommend watching this video.
Balconies with photo removal
And this section presents a small photo collection on the topic of our article. All photos are clickable.
The problem of expanding the area in the apartment can be solved by increasing the balcony. In this article we will look at two options for work: the removal of glazing and the base of the slab with step-by-step instructions.
Method for removing glazing: instructions
Not every person can increase the space in an apartment, but sometimes increasing the balcony remains a completely constructive way. With some forms of conversion you can easily do renovation work. As a result of the expansion, you will receive a cozy and multifunctional area for the whole family. There are two options for expanding the area:
- capital or expansion of the balcony along the base of the slab;
- removal on the windowsill.

The two methods are quite simple and accessible if you want to expand the object within 30 or 35 cm. With a larger increase in area, you must contact the appropriate authorities to obtain permission to carry out the work. Expansion of balconies, photos of which help to evaluate the most acceptable option for increasing the area.
To start work, all that is needed is the availability of available materials, tools, and skills. The only obstacle may be welding work. At a minimum, they require the availability of equipment and the ability to use this device. For those who have these skills, increasing the balcony is not a problem. Otherwise, it is better to call for help from specialists who will help do the welding work.
This method is also called window sill removal. The essence of the work is to position the window frame outside the balcony using brackets made of durable materials.
So, let's look at step-by-step instructions for expanding a balcony using the method of removing glazing.

Work begins with the installation of metal brackets. They are made from welded corners, which represent a structure made of steel and strips. All parts are installed on the parapet. First of all, it is important to securely fasten the brackets, and their corner part rests on the parapet, and the slopes maintain the degree of load on the entire structure.
The process of attaching brackets to the parapet:
1. The brackets are treated with an anti-corrosion agent.
2. They are attached using welded fastening if the entire structure is metal, and if it is concrete, then it is attached with anchor bolts.
3. Installation metal pipe helps strengthen the brackets together, which determines the stability of the structure. It is then used to install a profile under the base for glazing.

4. If necessary, the structure can be strengthened using metal fastening, in this way:
- instead of the old metal fence, we weld steel corners and profiles;
- the formation of a structure that connects the entire parapet and is attached to the wall.
Work on expanding the balcony with your own hands can be done in two ways: the first involves increasing the front edge of the balcony, and the second involves expanding along the entire perimeter.
Next, they should put on the installed brackets plastic window sill. It performs decorative and protective function. In the first case, it is intended to increase the area of the internal part, and in the second, it protects the entire completed structure.
Work order:
The technology for expanding balconies involves complex work steps to obtain a high-quality structure.
List of working tools:
- Bulgarian;
- electric drill with a set of necessary drills;
- hammer;
- level for construction;
- mount (can be replaced with a slice);
- anchors - 4 pieces, sizes from 20 to 25 cm;
- profile pipe dimensions 40x40;
- primer and brush;
- pencil or chalk for marks and designations.

1. The total length of the profile is calculated. To do this, add the length of the side walls to the length of the parapet, as well as the distance between the lintels, and all calculations are doubled.
2. Using a grinder, you need to cut off all the old railings, leaving only the posts. After this, the profile is prepared in accordance with the length of the balcony. If the length is too long, then you can divide the profile into two parts and remove them separately, then weld them together.
4. The profile must be placed on the end of the balcony slab, and according to the marks it is welded on one side.
5. Then, with the help building level having placed it in a horizontal position, they also grab it and weld it on the reverse side.
6. It is important that the entire profile is level. To be sure, check it with a level, and if there are any unevenness or bends, correct the situation using a pry bar or hammer.
7. All parts must be professionally welded. This is necessary so that the entire structure can withstand the falling load, and this is determined by the quality of the welded seams.
9. Use chalk to mark the places where the jumpers are attached.
10. They are welded on all sides: side, bottom and top. Before this work, the jumpers are also checked for evenness and adjusted if necessary.

11. To make the outer frame, you need one more profile length. It is suspended, so the overall length does not have to be long.
12. The profile is attached to the ends of the jumpers.
13. In the lintels on the sides, which are located towards the wall, two holes are drilled and attached to the base using anchors.
14. If there are no sides, corner supports must be installed at the end of the frame.
15. After welding, all slag in the areas where elements are welded must be disposed of. At the end of the work, the structure is primed.
The second method of expanding along the base of the slab: step-by-step instructions
This method is also called expanding the balcony along the slab. This technology helps increase the space by about one and a half times. All work is carried out using channels made of heavy-duty metal. This extension represents reliable design, which practically does not wear out. In this process, just like in the previous version, it is necessary to resort to the help of a welder.
Preparing for work:
The metal fence must be cut off with a grinder, and only the base of the slab should be left for the work process. To save money, some elements of the old fence can be used for welding certain parts. Some use reinforcement and strips.
Before starting work, the working space below should be fenced off with tape, and the fence that was cut off should be wrapped with rope. All this is necessary to ensure security measures.

List necessary tools remains the same. Just for work it’s worth adding new materials:
- corners measuring 50x50 and 40x40;
- profile pipe of the following sizes: 20x20, 40x20, and also 100x50;
- galvanized sheet;
- strip;
- corrugated sheeting
Step by step instructions:
1. You need to make a corner measuring 50x50 around the perimeter concrete base. This design will allow you to create an extension of the base of the balcony for subsequent steps. The most reasonable way would be to increase the area by about half a meter on each edge.
2. If an increase in the base requires more indentation, then it is necessary to make supports from below the structure. Another option is to weld the heels along the plane of the wall, which are attached using anchor dowels. The work process is carried out by installing a beam under the floor through the base of the wall, which is welded 1 cm thick from sheet iron.
3. Supports for the structure should be made of solid pipe. One edge is fixed to the hole in the wall, and the second is welded to the beam. In general, the result should be a triangular structure.

5. The same profile must be welded to the wall from the side parts of the slab. One end is attached to the wall, the sides are attached to the corners, and the second end of the pipe should determine the new length.
6. All profiles attached to the sides must be horizontal.
7. The front pipe measures 100x50 and must correspond to the wall pipe. It is attached to the side pipes located on the left and right sides of the slab. This work should be done by two people, which makes the task easier. One person must hold the positioned profile with his hands, and the second welds it. The ends of both pipes should coincide with each other, forming a triangle shape.
9. Using a cutter, make a hole for the profile measuring 100 millimeters. The work is carried out on the same base as the wall pipe. The hole must be completed using a chisel, which will allow the side profile to exactly coincide with the wall and front. In order for the structure to be stable, it is necessary to make a hole in the wall at least 30 centimeters deep. Next, the pipe is driven into the hole and secured by welding.
10. It is necessary to weld several profile pipes between the wall and outer spaces, which will serve as lags. To ensure that the entire structure has rigid support, you can weld parts from the balcony railing, resting on the main slab.
11. To separate the free space and the slab, you can weld a 20 by 20 profile at the ends of the slab.
12. Weld a strip to the profile pipe to form an empty rectangular shape.
13. You can secure the bottom of the floor by attaching stainless steel or galvanized sheets to the base.
14. The entire frame, after welding work, is coated with a primer in several stages.
Balcony floor
We have already learned how to expand the balcony along the base; all that remains is to make fences, a floor and, if desired, glaze the loggia. A simple option for the floor is to treat it with a primer. If it is necessary to make the base of the balcony concrete, then you need to add triangular supports, which are located from the structure to the wall. To pour a concrete floor, reinforcement can be used as fastening materials.
Balcony railing
We considered two options for expanding the balcony, a video of which can be seen at the end of the article. The last stage is the construction of a fence for the balcony. The following steps should be followed:
1. The fence is constructed from a profile pipe measuring 40 by 20. Its height is about a meter. It is best to make the entire structure on the floor, and then weld it to the floor profile.
2. The side elements of the fence must be attached to the wall; dowels and pieces of strip are used.
3. The fence should be placed flush with the bottom of the profile.
4. The length and perimeter of the floor profile must coincide with the perimeter of the railing in any position.

Balcony glazing
The process of glazing a balcony is not a necessary element of rebuilding a balcony. But if you decide to completely enclose the balcony, then you should also take care of heating. As a rule, glazing elements are PVC profile- This available material good quality and reasonable price.
To purchase windows, you need to contact the manufacturer and place an order according to your measurements. It is best to invite experts in the field. They will accurately measure the parameters of the window frame, this will avoid difficulties during installation.
Before attaching the double-glazed windows, it is important to attach expanders made of PVC to the base of the frames in order to adjust the dimensions of the entire structure. This will strengthen the frame and give it rigidity. The upper extender can become the basis for covering the balcony roof. All frames are attached to the railings and to the wall of the house. They help secure the front and sides, creating a seamless design. Then you can install the glazed frame on special ebbs.

All work on expanding the balcony in Khrushchev or ordinary apartment must be carried out taking into account safety regulations. It is better to carry out welding work together with specialists in this field so that the structure is rigid and stable.
In order to use additional square meters with benefit. In addition, such measures help protect the premises from the penetration of extraneous noise and dust from the street. In this regard, manufacturers have improved their technologies, thanks to which you can now glaze a balcony with your own hands, or resort to the services of professionals for this purpose.
This option became ideal solution for owners of narrow balconies, since in this way you can significantly expand the space, which is important. A take-out balcony has the following advantages:
- The presence of a large window sill that carries a functional load.
- Compared to other balconies in apartment building such a structure looks impressive.
- Using this method you can increase the strength of the parapet and the top balcony slab.
DIY installation work
You should not count on the fact that you will be able to expand the area several times in an apartment building, but it is quite possible to increase the balcony by about 0.5 m. A more accurate indicator depends on technical condition building and in particular the balcony itself.

There are two ways to implement this project:
- Removal of glazing of the entire balcony parapet.
- Removal of the front side.

To make a mounting system for carrying out a balcony, you need to use metal triangles. They are fixed to the parapet with screws or dowels. After this, metal strips are attached to the triangles by welding, and then metal corners are welded along the edges of the triangles. Thus, the structure acquires maximum strength, and the entire load is distributed along the entire perimeter of the structure.

In principle, the process is not very complicated, but for this you will need a welding partner.

Required tools:
- hammer;
- welding machine;
- grinder and protective equipment for work;
- building level;
- drills;
- mount;
- drill;
- felt-tip pen or chalk;
- anchor bolts 25 cm;
- primer paint and brush;
- profile pipe 4*4 cm.
Stages of work

- Take measurements of the length of the balcony, and also determine the desired width of the extension. If your balcony does not have side walls, you need to build them and then take these dimensions into account. As a result, the gap from the transverse lintels should be approximately 40 cm. After this, you will need to purchase a profile with a length equal to the length of the balcony, multiplied by two, taking into account the lintels.
- Then take a grinder and cut off the balcony railings without touching the posts. Measure the required section of the profile. If the length is too long, you can make two pieces and subsequently weld them.
- Place the profile on the edge of the balcony slab and weld it on one edge. Check the horizontal level along the entire length and weld the other edge. All seams must be of the highest quality, otherwise the profile will not cope with the pressure exerted.
- Next, cut the jumpers, taking into account the fact that they are butt welded.
- After cutting the jumpers, mark the places where they are attached and use a building level to align them. Weld them at the top and bottom.

- Your next step will be cutting the profile for the outer part of the frame. This must be done taking into account that the profile will be suspended until it is fixed by welding, so measure short sections.
- Attach a piece of the profile and weld it to the ends of the jumpers. Drill a couple of holes in the lintels fixed to the wall and secure them with anchor bolts. If there are no side walls, the ends of the frame must be equipped with small supports. After assembling and welding the frame, treat the welding seams and coat it with primer.
Window installation

To install windows correctly, you will need to make 3 holes for each of them to fix the windows with screws. Remove glass or double-glazed windows completely from windows.
When making the ebb, calculate everything in such a way that it covers the distance from the window to the balcony and extends 15 cm into the balcony room. That is, if there is a standard length balcony tide 30 cm, of which 20 cm will protrude. If you carry out an offset of 25 cm, the ebb will be equal to 70 cm - the width of the ebb (30 cm) + the width of the outlet (25 cm) + an additional 15 cm.
Before starting installation work, secure the ebb on the window, make markings and drill holes in future fastening locations on top of the remote element. Next, proceed to installing the windows.

If you decide to entrust the installation window designs professionals, check with them about the possibility of removing the balcony themselves. Otherwise, you initially need to carry out the removal, and then invite specialists.
With the help of a balcony with a take-out, you can arrange additional space for yourself, which you will use at your discretion, from arranging a place to relax and ending with a place to store things.
Video
We bring to your attention videos that show the process of removing the balcony. By the way, you can increase the area of the balcony by expanding the floor area. You can see this in the second video.
Balcony glazing with extension is an excellent solution if there is not enough space in the apartment. As a rule, such a room is used for relaxation, work, storing various things or growing plants, so it is important to make it comfortable and safe. The advantage of taking out is that in the process installation work the existing slab or parapet is strengthened, which will allow the balcony or loggia to serve for a long time.
The procedure for expanding a balcony includes certain difficulties that can be overcome by carefully studying the mechanism for performing this work.
Any work to expand the area is regulated by law and is formalized legally. Balcony glazing with extension is carried out without documentation only if the planned expansion of the slab is no more than 30 cm.
Coordination of a project for glazing a balcony with an overhang is carried out in several services, including:
- architecture department;
- gas service;
- sanitary and epidemiological station;
- fire service.
After installation work, a commission is assembled to conduct an examination. If the result of the extension corresponds to the previously provided project, then an act of acceptance of the building into operation is drawn up.
Balcony removal options
There are two ways to remove a balcony: along the window sill and along the floor. The choice of arrangement depends on the characteristics of the room and the desired result.
- On the windowsill. The removal mechanism in this way is based on the expansion of an existing concrete parapet or metal frame. This type of assembly allows you to strengthen the balcony itself.

- By gender. This assembly is quite labor-intensive and more expensive than the previous option. However, this type of expansion will allow you to get a noticeable increase in area.

Carrying out preparatory work
Before work, remove excess items from the balcony, remove baseboards and remove lighting fixtures. Next it is cut with a grinder metal fencing, parts of which are used during welding work. At this stage it is important to pay attention special attention security:
the fence to be removed must be secured with a rope, and the area below must be fenced off with tape.
Construction of an external structure
In the case of installation along a window sill, installation begins with the installation of metal brackets treated with an anti-corrosion compound. Welded fastening or anchor bolts are used depending on the material of which the parapet is made.
The metal pipe that reinforces the brackets adds rigidity to the assembly. If the room is unreliable, then you should additionally strengthen the structure with metal, or create an additional welded structure that will firmly attach the parapet to the wall of the building. A window sill is placed on the brackets, which performs a decorative function on the inside and a protective function on the outside.

Scheme of the design of the window sill extension
When carrying out the floor, the same heavy-duty metal channels are used. This assembly is reliable and lasts for many years.

Scheme of the design of the floor extension
Installation procedure
Work to remove a balcony or loggia primarily requires accurate design calculations. In the absence of experience in construction work of this nature, it is better to turn to professionals. Regardless of the removal method you choose, it is important to remember the law and safety. Before work, it is necessary to assess the reliability of the balcony slab.
Procedure for carrying out work on the windowsill
- The sheathing is removed from the parapet.
- Welding is carried out on the supporting plate at the ends.
- The lintels are attached to the parapet railings (using welding).
- Jumpers are welded onto all or front railings (depending on the project). The selected length of the elements determines the width of the window sill.
- The external contour profile is welded to the ends of the jumpers.
- Between load-bearing slab and the profiles of the external contour, the spacers are attached by welding.
- The outer side is covered with siding.
- To increase the space on the window sill, double-glazed windows are placed outside its boundaries. This method visually expands the space. The wide window sill is also convenient for placing plants.

The balcony can be extended forward or on three sides. Both warm and cold glazing can be suitable for a balcony with an extension made using this method. The undoubted advantage of carrying out the window sill is the relatively inexpensive cost of work.
Procedure for carrying out work on the floor
- Welding work is based on a corner that is welded around the perimeter of the floor. Typically the expansion is 50 cm on all sides. If the required extension size is larger, then additional supports from below are used.
- Supports are made from pipes round shape. One end is attached to the beam, the other to the wall of the structure. The result should be a triangle-shaped structure.
- Next, the profile is installed in the areas of the future floor. The width of the slabs is placed profile pipe using anchor dowels, then the same profile is installed on the sides of the slab. It is important here that the side profiles are in a strictly horizontal position.
- An additional pipe is used, which is welded to the ends of the side profile pipes.
- Already on top installed profiles another one is placed, which serves as a temporary support, then it is secured by welding.
- A hole is drilled in the wall for the profile, after which the structure is welded.
- Several profiles are installed between the wall and outer ones, then a strip is welded in between.
- A primer is applied to the resulting frame in several layers.
- The final stage of work is covering the outer side for aesthetically pleasing facade.
For clarity, below are presented various options metal frame structures.

Balcony design for improvement appearance removal and protection from moisture. For a metal parapet, PVC siding is used, for a concrete parapet, a galvanized sheet of iron with a coating is used.
When glazing a balcony, aluminum windows are usually used. The ebb is installed externally, and the structure is fixed using metal strips. A canopy must be attached to the top, which will protect the building from precipitation. Calculation of brackets requires careful checking of the strength of the parapet and the exact weight of the glazing.
It is important to choose quality materials to install the visor. This will avoid freezing and condensation in the room.
Finishing
With proper reconstruction, the balcony will be functional, comfortable and aesthetically pleasing. The service life always depends on the quality of the materials used in the work and the competence of the craftsman.
Stick on the walls thermal insulation materials. Next, you can choose the design to suit your taste, but you should pay attention to the recommendations of experts. The most successful and inexpensive materials for balcony floors are marmoleum and linoleum. Walls are possible: they are quite easy to maintain, resistant to moisture and their cost is low.
If necessary, electrical wiring, sockets and lamps are installed.
The light installation can be open or closed. Open wiring easy to implement, but its appearance can spoil designer finishing premises. Therefore, this method is recommended when covering a balcony with panels. Closed method requires cable laying in grooves.
If the balcony is used for relaxation, the ideal lighting option may be LED backlight. Such lamps will add dynamism and effectiveness to the interior.
When using a room for work, brighter lighting is required, so in this case it is usually installed wall sconces or lamps. Halogen lamps can become great solution, as they are practical, durable and produce an intense luminous flux.
Having familiarized yourself with all the features of glazing a balcony with an extension, you can begin to take action.
September 12, 2016Specialization: master of interior and exterior finishing (plaster, putty, tiles, drywall, lining, laminate, etc.). In addition, plumbing, heating, electrical, conventional cladding and balcony extensions. That is, renovations in an apartment or house were done on a turnkey basis with all necessary types works
Balcony glazing with extension - 4 options in a row
Often the balcony area is very small, so you want to expand the space. I suggest that you familiarize yourself with the information on how to glaze a balcony with the window removed by several tens of centimeters.
Let me reassure you right away that this does not change much in the design - you just get space, for example, for flowerpots with which you can decorate your home.
Removing the window on the balcony
Let me immediately note that we are talking specifically about the balcony - this is not a loggia with a take-out, since the loggia is part of the building and has three walls.
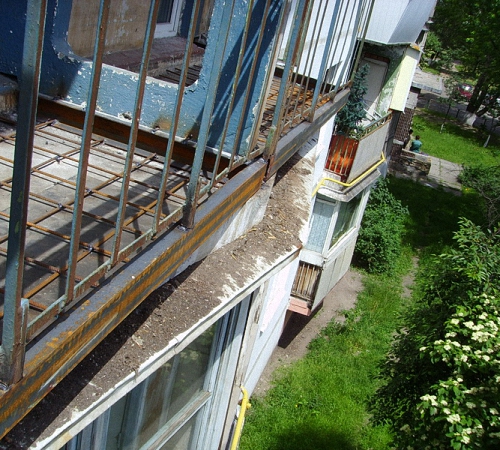
Step one - dismantling the old structure

Let's figure out what is included in the preparation:
- all the work that you will do with the removal of the window sill must begin with the complete dismantling of the entire structure, that is, you should be left with one slab;
- first of all, if you leave the slab without any fencing, you will be able to assess its condition by its strength, and it does not matter what kind of house you do this in - in a Khrushchev, Stalin or Brezhnevka building;
- the whole point is that some reinforced concrete products are not made very well, and simply begin to crumble. Consequently, mortgages lose their stability - they do not last;
- each slab is reinforced and the embedded parts are placed on its perimeter, which allows fencing to be welded to it;
- in addition, the installation of the fence involves fixing it in the wall, and there can also be problems and most likely there are - this is observed in all houses that are more than 20-25 years old;
- more big problems it may be that when you have the top floor and the structure has a slate roof, it will need to be removed, and this is not so easy;
- the problem is that such balconies are many years old and the condition of the frame leaves much to be desired - it is simply dangerous to climb there;
- in such cases, a real problem can arise - it is easier to disassemble the lower fence along with the trim than the top;
- Of course, each case is individual, but I can give advice based on many years of practice (although this is not an instruction) - remove the old one first window frame, and then move on to the roof - dismantle everything else later;
- one more note about old frame- don’t try to remove it entirely - it’s better to cut the profiles - it’s much easier.
Step two - welding work

Whether you are going to extend the balcony along the floor or simply remove the window, you will need a reinforced slab. Buy 6m of corner 50x50 mm. Why exactly 6m?
The average width of the slab is 330 cm and about 80-90 cm at the edges, but don’t skimp - the leftovers will be useful to you in any case in future welding work. If your mortgages are “alive”, then you can calmly and without problems weld a corner to them, as shown in the photo above, but you may have to do them yourself.
There are many cases where a slab has collapsed. If concrete is made poorly and moisture can get inside it, then the reinforcement is destroyed and all strength is reduced to nothing. And then you need to do something about the mortgages yourself.
There is no particular difficulty here, even if it is moving the balcony along the slab without permitting documents - you just need profiles of different configurations. First of all, you need to fasten a strip of metal to the wall of the house on top of the slab and from it with the same strips (you can take 40 mm wide) weld embeds along the floor - 5-6 pieces will be enough for the entire floor.

Of course, permission and the law require certain actions, but I want to tell you that in most cities of the Russian Federation the authorities themselves welcome such structures - they strengthen the building. But, be that as it may, it is, of course, better for you to consult on this issue with a city architect or simply with someone who is involved in this.
For railings and balusters, I advise you to use a 20×40 mm profile - this is the most best option and this has been tested by many years of practice - I have tried a lot. Well, I can say that my son and I have been doing repairs for about 15 years (I took him with me when he was 14) and we tried different options. I’ll tell you honestly that the removal of the balconies was not just done once, but installed, so to speak, “with sweat and blood” - I personally made more than 400 of them - it’s difficult to count.
You can use a 50x50 mm corner on the remote one - this is very convenient for the design - welders will understand me. It is best to apply 30 cm - no more.
Too much offset implies a large load, which means additional reinforcement of the frame is needed. This width of the window sill will give you the opportunity to build a whole greenhouse and also make a place for cats who love to sleep in the sun.

There is one more point on how to make a frame offset. I think everything is clear in the photo. The window needs a subframe so that there is somewhere to install it, and it is made from a metal profile. To do this (I prefer it this way), you need two 40x40 mm corners (for the risers) and one 20x40 mm profile (for the U-shaped crossbar).
Step three - covering

We continue to make a balcony with a window sill and are now sheathing the metal with wood. For this, slats 20 mm thick will suit you well - do not confuse them, not inches, but 20 mm!
The whole point is that there are two 20 mm slats and metal profile 20x40mm will be 60mm, and this will be the thickness of your wall (50mm foam fits perfectly there). At the bottom you need a board 200 mm wide - it covers the slab completely (you can cover this with self-tapping screws on the slab).

In order to strengthen the siding, you will have to wood paneling fasten CD profiles, which are usually used for drywall (ceiling or wall lathing). This, in fact, is easy to do - each profile is cut on the jumpers (slats), that is, they are removed side shelves. It is simply screwed on with self-tapping screws.

Now you need to sew the siding on yourself, and this should have been done even before installing the window. The panels should be reinforced with self-tapping screws (you can use nails), but the fasteners should not be rigid, which means that the screw should not be tightened by 1.5-2 turns. But at the same time, all guides must be fastened firmly, all the way.
Step four - interior finishing


And one more stage that should be mentioned when considering the removal of the balcony when glazing PVC is interior decoration. Firstly, this includes insulation, and secondly, the installation of internal lining.
First of all, never do interior lining before installing it - it will create problems for you! If you want to sheathe a balcony wooden clapboard, then be sure to close the insulation plastic film- waterproofing is required!
And one more thing, regarding the floor - it’s best to cover it with OSB - it’s quite cheap, but it will save you from many problems!
I do not advise you to insulate the floor on your balcony with expanded clay - best insulation V in this case, this is polystyrene foam. It is not only lightweight, but also has excellent thermal insulation properties. Its thermal conductivity is approximately 5% lower than that of mineral basalt wool, therefore, it is a higher quality insulation.
Conclusion
In fact, I have already written more than once about a balcony with a take-out, so that, if you wish, you can compile the necessary information for yourself. However, if you have specific questions on the topic, I will be glad to read your comments.
September 12, 2016If you want to express gratitude, add a clarification or objection, or ask the author something - add a comment or say thank you!


