Modern floor coverings delight the eye with their design and interesting texture. But for any of them, be it laminate, linoleum or parquet board, the subfloor must be absolutely flat, without drops or waves. If there are differences in height, cracks or other defects on the concrete screed, then before laying the finished floor it is necessary to repair and level the base. Let's try to figure out how to level a concrete floor quickly, correctly and efficiently.
First of all, it is necessary to carefully analyze the quality of the concrete floor. Using a level, measurements are carried out and irregularities are determined. To do this, use a water level or a laser axis level. The latter device allows you to create the most even horizontal plane.
The laser axis builder will automatically level itself, and in the “horizon” mode it will create an even, strictly horizontal plane
After this, armed with a tape measure or a long ruler, you need to measure the room around the perimeter and determine minimum distance between the floor and the horizon. This will be the zero point of the new floor. IN panel house measurements are carried out only along the perimeter, since the reinforced concrete panel used as a ceiling is quite flat. In a private home, significant differences are possible.
After measuring the floor and determining the zero point, they begin to eliminate existing unevenness.
Alignment methods
The time has come to choose a method for leveling the concrete floor. Technologically, there are several ways to level a concrete floor. Depending on the existing differences and the required height of the build-up, leveling the floor with your own hands can be done in three ways:
- cement-sand screed;
- dry screed;
- self-leveling mixture.
To work you will need:
- water and laser level;
- rule longer than 1.5 meters;

Equalizing the mixture using the rule
- set of spatulas;
- squeegee;
- electric drill;
- nozzle for stirring the solution;
- bucket;
- beacons for screeds.
Depending on the chosen installation method, you will need a mixture to prepare the solution or a set of individual components.
Cement-sealed screed
Most often, home craftsmen use cement-sealed screed. To prepare the mixture, cement and sand are taken in a ratio of 1:3. For floor screeding, it is better to use cement grade of at least 400.
Leveling the concrete floor using this method is done in stages. It is important to follow not only the technology, but also the procedure:

This leveling method allows you to eliminate differences in height up to 5 cm.
Dry screed
This method allows you to level the floors in an apartment in a short time.

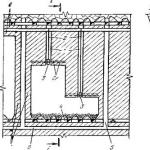
Dry screed organization diagram
The procedure is as follows:


Laying sheets of thick plywood
Important! It is necessary to provide compensation gaps between the floor covering and the wall, which will prevent further deformation of the floor when humidity changes.
- The seams between the sheets are puttied or filled with sealant.
At each stage of floor leveling, horizontal level measurements are taken using this method. At this point, the installation of the screed is completed, and you can begin laying the finishing coating without much waiting.
This installation method has a number of significant advantages:
- there is no need to mix the screed solution;
- such a screed has a relatively low price;
- the work will require low labor costs, and it is possible to do the work alone;
- installation can be carried out at the desired pace and in parts;
- held additional insulation floor due to a layer of bulk material;
- it is possible to quickly and conveniently lay engineering communications;
- if necessary, the project can be completed in the shortest possible time.
Self-leveling mixtures
Such mixtures appeared on the market building materials not so long ago, but immediately won the love of consumers. This leveling method makes it quite easy to obtain a completely flat floor surface. This coating is sometimes called liquid linoleum. After applying the self-leveling mixture, the floor can be used as a base for the finishing coat, or as an independent coating that does not require additional finishing.

Pouring the floor with self-leveling mixture
The self-leveling mixture is stirred according to the instructions on the package. After dilution, a solution with the consistency of liquid sour cream is obtained, which, when applied, spreads and forms a smooth surface without unevenness.
Please note! Differences in the floor on which the self-leveling mixture is used should not be more than 2 cm. Otherwise, financial costs increase sharply and the drying time of the surface increases.
Stages of laying self-leveling floors:

When using this leveling method, it is necessary to fill the entire floor surface in the room at once.
The solution is mixed in a handy container (basin or bucket) with a construction mixer or a special attachment attached to a drill. Kneading is done at low speed. The mixture should be homogeneous, without compactions or lumps.
Please note! All self-leveling mortars, regardless of the type of mixture used, harden very quickly, so do not prepare large portion solution. There should be as much solution as you can fill in short term at one time. The flow time of the mixture ranges from 20 to 60 minutes, depending on the brand of the solution.
The mixture begins to be poured from the wall opposite to the entrance. To speed up the spreading process of the solution, use a squeegee. Possible bubbles and excess air are removed from the solution with a special needle roller. When performing work, monitor the air temperature in the room. It should be at least 5 degrees Celsius. The drying time of the self-leveling mixture is about an hour, but it is better to wait for the surface to completely harden for 2-3 days. Until the mixture has completely dried over its entire thickness, proceed to finishing works it is forbidden. Small bumps that may arise are sanded with sandpaper or a stone.

Optimally smooth concrete floor
Leveling the floor with your own hands is quite a feasible task for home handyman. You can, of course, entrust this work to professional builders, but this will significantly increase the cost of the floor. To avoid extra costs We advise you to study our recommendations and perform this procedure yourself. More interesting and useful tips you can watch in the video below.
Video: filling the floor with your own hands
The greatest load in any room falls on the floor covering, and in order to maximize the strength of the floors, it is necessary to level the base before laying surface materials. The article will discuss how to properly level the floor in order to achieve maximum reliability and long-term operation.
Leveling the floor
Any floor covering requires certain conditions that the installation was carried out without complications, and during operation various shortcomings did not make themselves known.
For example, minimal surface unevenness can be neglected:
- if ceramic tiles are used, then minor leveling can be done using an adhesive for installation;
- To lay thick linoleum, it is enough to have a solid cover without cracks, chips or large cavities. To do this, you need to know how to level the floor under linoleum so that there are no flaws.

If you plan to make parquet or laminate flooring, then the quality of the subfloor must be ideal. In this case, the minimum permissible change in the base level is 2-3 millimeters. Such deviations can only be determined using building level and rules. If defects in the subfloor are identified, it must be leveled.
Leveling the concrete base
Regardless of the material that will be laid on concrete base, it is best to achieve a perfectly flat surface without significant defects (more details: " "). Leveling work should begin with a careful inspection of the subfloor.

Minor defects such as pits, cracks or bumps, as well as minimum slopes can be eliminated using grinder and high-quality cement mortar. More serious imperfections can be corrected solely by filling cement screed.
Cement strainer
To prepare for leveling the surface, you must first purchase certain building materials and a set of tools:
- shovel;
- construction level, preferably laser or liquid;
- containers for mixing cement mortar;
- hammer;
- rule.

Every owner should remember: the better the floor is leveled, the longer the main coating will last. Accordingly, building materials must be of high quality. If you are planning to make a floor on the balcony, and do not know how to level the floor on the loggia, it is worth studying the nuances of such work.
The standard list for pouring cement screed contains the following items:
- sand;
- cement with a grade of at least 150;
- fine crushed stone;
- damper tape;
- metal profiles or slats for installing beacons;
- polyethylene.

Today you can also purchase ready-made mixtures for pouring screed, which only need to be diluted according to the instructions on the package and used for their intended purpose. The most commonly known are gypsum and expanded clay coatings.
There are also ready-made self-leveling coatings, but it will be easier and cheaper to use sand-based cement mortar in a ratio of 1:3. The best brands cement can be poured reliable coverage, and its characteristics can be improved by adding plasticizers to the mixture: lime, tile adhesive.
Stages of pouring screed
When replacing the coating, it must be dismantled, or immediately begin inspecting the subfloor for serious defects. Preliminary leveling is carried out using construction tools, and Special attention At the same time, it is worth paying attention to the corners of the room where the floors and walls meet.

The next step is to remove any construction debris, dust and dirt, and then treat the base with several layers of primer. It is important that each layer is applied on top of the previous one only after drying.
To eliminate possible natural deformations of the floors at the corners of the room, it is necessary to glue the perimeter of the junction of the walls and the floor damper tape. The tape should occupy a significant part of the wall and floor. Usually the plinth laid at the end overlaps the tape, but in the case of protrusions certain parts You can remove them with a sharp knife.
Laying the waterproofing layer and determining the screed level
Before leveling the floor, it is very important to waterproof it. It is very important to carry out this work high level, because the waterproofing materials protect against excessive penetration of moisture into concrete covering. This will also provide additional protection from leakage of the entire ceiling and will help regulate the air humidity in the room.

The waterproofing layer can be made from liquid mixtures: pure bitumen, possibly with the addition of polymers, or a ready-made plaster composition for water based. However, it will be cheaper and more reliable to use thick polyethylene. Pieces of material are laid on the prepared subfloor, overlapping with a margin of 8 to 10 centimeters, and the edges are taped. Surface of this material covered with fine crushed stone, which eliminates the risk of subsidence and cracking of the screed.
To determine the required thickness of the leveling coating, you should carefully read how to make a horizon on the floor and why you need to maintain the thickness of the coating. The screed standards are such that its thickness must be at least 3 centimeters. If the coating is less durable, then over time the coating will crack and crumble.

It is best to draw the horizon line using a building level. The laser installation, using visually distinguishable beams, will display the horizon line, which can be marked with any drawing device, and then the filling process can begin. When using a conventional or liquid instrument, it will take more time and an additional pair of hands, since the process of determining the required horizon line requires closer contact with the instrument and the walls of the room.
Cement screed device
Before leveling the floor without filling, beacons should be installed. For this purpose, ordinary slats or metal profiles are used, the surface of which must coincide with the drawn horizon line. It is advisable to maintain a distance between two adjacent beacons that is less than the length of the rule that will be used to level the poured mixture (more details: " "). The profiles can be fixed with plaster or thick plaster.

The screed solution must be prepared in such a way that it has time to settle (at least 1 hour) before starting work. Filling should start from the opposite corner of the room and move in wide stripes to finish the process directly at front door. The first area to which the mixture will be applied should be moistened with a wide brush.
The solution should be applied using a shovel, and then leveled and regularly check the surface level for compliance with the horizon line. Finish the work by leveling the concrete layer using the rule.

After leveling the cement floor, it is necessary to cover the resulting surface with polyethylene. This coating will promote uniform evaporation of moisture from the coating. Within 12 hours, the concrete will set, the screed can be freed from the film, and then it will need to be moistened, which will prevent the formation of cracks. Repeat this procedure should be applied for three days in a row, and after complete hardening, any unevenness can be sanded with a spatula and a wooden grater. The floor is again covered with polyethylene and covered with an even layer of sand. The surface is left in this state for another 2 weeks and regularly moistened with water.
Leveling the base with joists
An easier way to level the floor in an apartment with your own hands is to use logs. This method will save the owner a significant amount of money, and also provide better sound and heat insulation (read also: " "). Such advantages of leveling the floor along the joists are due to the fact that various communications and insulating material can be laid in the voids between the beams.

This will create improved ventilation, especially necessary for wood structures. It is worth considering that this design is ideal for rooms in which the use of cement screed is unacceptable due to the high load on unsuitable floors.
Preparing to level the floor along the joists
Joists laid on the subfloor are wooden beams, which are further processed by various means, increasing their service life and protecting them from deformation, rotting, etc. Standard size The cross section for such a beam ranges from 50x100 to 100x50 millimeters. If the room does not allow a significant increase in the level of the base, then you can use slats measuring 50x50 millimeters.

You can use one of the following materials to install the base along the joists:
- plywood;
- chipboard or cement bonded particle boards(more details: " ");
- CBPB slabs– are best suited because they have the highest strength index.
DSP boards, as the most effective coating, have other advantages:
- high moisture resistance;
- excellent strength;
- optimal fire resistance;
- protection from microorganisms;
- simple processing and installation process;
- low cost.

To level the logs, you will need a significant supply of materials, means for processing them, as well as a full set of tools:
- logs directly;
- antiseptic drug;
- floor covering, which is destined to become a new foundation;
- grinder or fine-toothed hacksaw;
- materials for waterproofing and insulation;
- cord or fishing line to check the level of beacons;
- drawing device;
- consumables: nail dowels, self-tapping screws;
- electric drill, grinding machine.
Laying CBPB on joists
We will talk about how to properly level floors if you plan to lay CBPB slabs on joists as a base.
The work must be performed according to the following algorithm:
- the subfloor must be cleared of dust, debris, etc. before starting work;
- logs should be mounted strictly on the same horizontal level. To completely match the tops of the beams, it is recommended to use a fishing line (cord) stretched perpendicular to the laid logs;
- in the case of DSP, the recommended distance between the lags should be 45-50 centimeters;
- transverse pads are laid on them, which together with the logs create a kind of lattice;
- followed by a layer of insulation (foam, mineral wool);
- the prepared sheets are secured to the joists using self-tapping screws;
- the gaps between adjacent slabs must be sealed with putty, and after it dries, carefully sanded to achieve uniformity of the coating;
- Having allowed the surface to finally harden and, possibly, partially settle, you can begin priming and preparing for laying the base flooring.

Bottom line
The article describes in detail how to quickly level the floor and achieve maximum efficiency floor covering. If certain difficulties arise, you can always seek help from specialists who will help not only with leveling the floors, but also with the selection of high-quality building materials, and will also be able to lay the main floor covering.
Smooth floors are considered not only the finishing touch of the interior, but also an indicator that the renovation in the house was carried out with high quality. Ideally, the floor should have one level without differences or steps, because in the future from correct installation decorative covering The functioning of doors and furniture will depend. In addition, a crooked floor in residential areas often causes problems with appliances; its unevenness makes it difficult to install a refrigerator or stove.
Today, there are many leveling methods, thanks to which the surface is smooth and subsequently serves as an excellent basis for installing any type of floor covering.

Peculiarities
When renovating a house, it is sometimes necessary to replace floors if they have lost their original appearance or simply don’t fit into modern design housing. Before you start laying new material, you need to not only dismantle, but also level the old floor in the apartment.
Each type of coating has its own characteristics of surface preparation:
- Ceramic tile. Installation of this product carried out on different kinds screeds with mandatory waterproofing and cleaning of the base from dirt and dust. Due to the fact that the tiles are laid on a thick layer of glue, minor unevenness is allowed for its installation in the floor, but in this case the glue consumption will be large.


- Linoleum. The base for laying such a covering requires a flat surface without defects or cracks. Therefore, the screed should be made from high-quality mixtures that will not only preserve the old layer of the floor, but also eliminate all its flaws.


- Laminate. If its boards are placed on a curved surface, then over time they can undergo deformation and will constantly “creak”. As a result, the floor covering will not last long, and repairs will have to be done again. To avoid this, it is recommended to install the laminate on a perfectly flat base.


- Carpet. To lay it, you will need a well-prepared surface, which must be leveled, cleaned and primed. For this purpose they most often use chipboard sheets. After laying them, the joints are puttied and primed. You can also fill old wood floors with a self-leveling solution.


To make the base ideal for covering, first of all it is necessary to comprehensively inspect the room and determine in which places there are differences, then find the lowest and highest point of the floor. After this, it will be possible to select a suitable method for leveling the surface and eliminating all flaws. For this, as a rule, a laser level is used.
Such measurements are carried out as follows: a mark is made along the perimeter of the room and, using tools, they are found on the surface desired point, in which all the lines from the perimeter are collected. This will serve as a starting point for determining the height of the floor.
In case you don't have it at hand professional level, you just need to select any point on the wall and draw parallels from it to the ground and draw lines using a regular board.
This procedure must be repeated until a closed loop is formed. The floor should be level from the lowest to the highest point.


Why is this necessary?
There are many reasons for having a level floor. The further fate and operation of not only the floor covering, but also equipment and furniture will depend on the condition of its surface. In addition to all this, the presence of bumps and grooves on the base will spoil appearance rooms.
Most materials do not tolerate defects in the “rough” layer during installation; for example, laminate or parquet installed on a crooked floor will begin to loosen and crack just six months after use. But not Smooth surface in the bathroom and toilet will cause a serious problem with the plumbing, the drainage system will be disrupted and the water will not drain well.


Floor leveling is important in both residential and non-residential premises.
If you post ceramic tiles in the bathroom on the bumps, then its strength and adhesion properties will be lost, and the product may also “float”, and this will provoke the appearance of voids and dampness: later mold and mildew will appear in such rooms, which will be difficult to remove.
It is worth noting that uneven surfaces are found both in old houses and in new buildings, where slopes often exceed acceptable standards. Therefore, when starting a floor renovation, you should eliminate differences in all rooms of the apartment and make a screed that will correct surface defects and simplify the installation of new coatings.

Methods
You can do the floor repair yourself or use the services of hired workers. Of course, in in this case It’s best to trust the professionals, but lately most home owners prefer to save money and level the flooring with their own hands. In fact, there is nothing complicated about this, you just need to choose the right material and technology for performing the work. First, the old base is dismantled, large cracks are repaired and waterproofing is applied.


After preparing the surface, the level of the future floor is determined and the leveling process begins, which can be done in several ways.
Using a solution
This is considered the most affordable and easiest option for eliminating surface defects. The mixture is prepared from cement, water and sand. The solution turns out to be liquid and spreads evenly over the base, creating a smooth surface.

The work stage is as follows: a primer is applied to the preliminary surface, and then a solution is prepared and the floor is covered with it.
In addition, when preparing the solution, you must strictly follow the “recipe” and the ratio of water to sand and cement; all components are thoroughly mixed with a drill and nozzle. Ready mixture pour onto the surface and distribute evenly around the entire perimeter, while removing air bubbles using a needle roller. This floor dries completely on the third day and is ready for further finishing.


Concrete screed
This technology involves leveling the floor with concrete. The result is a durable monolithic and smooth surface. This screed is used in cases where the bulk mixture cannot be used.
Although concrete is considered a heavy material, it provides the base with a long service life and allows the floor to be perfectly leveled. First, prepare the surface, perform waterproofing and find the zero level. Then beacons are placed around the perimeter of the room and slats or metal profiles are attached, retreating 30 cm from the walls.


The beacons must be placed strictly according to the level, so that upon completion of the work, horizontal guides should be obtained. After the solution has dried, you can begin the screed itself. The main point in this alignment is considered proper preparation mixtures, the slightest inaccuracies can further damage the coating.
The concrete is laid out in strips, performing shaking movements, this will help get rid of air bubbles; after installation is completed, the surface of the solution is moistened with water, covered with film and left to dry for two weeks. This method is often used both in panel houses and in “new buildings”.


Bulk screed
Expanded clay is also used to obtain a smooth floor. It is a lightweight material that is easy to install and allows you to eliminate strong slopes with deep holes.
As a rule, expanded clay is chosen when you need to raise the level and level the floor on your own in a “Stalin” building. It will not create large loads on the floors and will ideally eliminate all defects.

In this case, the zero level is chosen to be the highest, since the thickness of the floor will increase by backfilling the material by 4 cm. After preparing the base, set up the beacons and prepare expanded clay, for this purpose the fine and medium fractions are mixed well together.
When the expanded clay is poured, sheets of chipboard or fiberboard are laid on it. It is important to ensure that the seams of the sheets match; self-tapping screws are used to fasten them.
Then “light” cement mortar is poured and covered waterproofing film, for greater reliability, it is recommended to complete this leveling with a concrete screed.


Alignment by lags
This technology is suitable for wooden bases and involves installing logs on old boards. At the end of the work, the slopes are removed and small irregularities are hidden. For determining zero level in this case, the thickness of the beams is added to the highest point in the room.
Compared to previous alignment methods this method characterized by speed and purity.

Most often, logs are used in private houses and apartments on the ground floor. In addition, when performing such alignment, it becomes possible to lay additional communications and thermal insulation.
The base of the floor is prepared, primed and joists are applied. In this case, you can buy both ready-made material with adjustment and ordinary bars with a cross-section of 40*100 mm. The logs must be laid strictly level at a distance of 50 cm.
If necessary, you can additionally place a plastic spacer or plywood board under the beams.
The logs are fixed to the floor using plates or anchors, and the cells formed between them are filled with insulation.


Covering installation
For such leveling use regular sheets plywood or chipboard. They are laid in two layers and fixed with self-tapping screws, and the resulting joints are puttied.


What to choose?
When the question arises about leveling the floor covering, everyone wants to find cheap options for this. Recently, in the interior of houses they prefer to make floors from laminate, linoleum or tiles. If you choose a self-leveling mortar or screed for their installation, you will not only have to wait a long time for drying, but you will also need additional expenses on the material. Therefore, it is best to give preference wooden floor, it installs in one day and allows you to continue finishing immediately.
Cement mortar screed is also considered an economical option.
Unlike natural wood, cement and sand are much cheaper, and such leveling is characterized by strength and durability.


How to make a flat floor?
The result of any repair is the final covering of the floor, but before that it is necessary to do rough screed and level the surface. In order for the floor preparation to be carried out correctly, it is necessary to follow all work technologies and use high-quality materials.
Leveling the floor- a mandatory step during repair and finishing works, followed by installation of the floor covering. Why is it mandatory? The fact is that over time, floors lose their original shape - bulges, crevices and cracks form in them.
If you want to update the appearance of the room and lay, for example, laminate or carpet, this initially not so noticeable defect becomes a serious obstacle to the realization of your cherished goal. The only way out of this situation is alignment, which you can do yourself.
Floor leveling mixtures
Leveling mixtures form a screed that has many advantages. First of all, this is:
- the ability to install any floor coverings (linoleum, tiles, parquet boards, etc.);
- perfect adhesion to the substrate;
- high strength;
- environmental friendliness;
- low abrasion;
- ease of installation;
- no shrinkage;
- unpretentiousness in subsequent care (no need for daily watering);
- gaining strength within a few days.
Classification of mixtures
Leveling mixtures are divided into leveling and self-leveling. The first ones must be leveled manually. High viscosity values make it possible to obtain thick screeds and develop slopes. The second - thanks to their high fluidity, they create a flat horizontal surface with virtually no active human participation. By the way, they can be called differently: levelers, self-levelers, self-leveling floors, self-leveling solutions - the imagination of ordinary people knows no limits.

There are self-leveling mixtures for initial and finishing application. The difference is in the size of the fractions. Solutions for initial application consist of large particles, which means there is no need to talk about a smooth surface. Finishing mixtures include fine fractions and provide the opportunity to obtain an even horizontal screed.
Conditions required for application
Not everyone knows that when working with leveling mixtures, several rules should be followed: important rules, on which the quality of the coating depends. First of all, you need to close the windows and doors. No air movement should be felt above the floor surface during work and for the next 24 hours.
The base temperature, as well as the room temperature, should vary from +5 to +25 degrees. No more. As for relative humidity, the maximum permissible level is 90%.
Breeding rules
Pours into the prepared container warm water. Not hot - otherwise the mixture will set quickly and achieve a smooth surface. Add the dry mixture in small portions, stir with a drill with a special attachment operating at low speed.
There should be as much water as indicated on the package. Amateur work is fraught and leads to foaming, poor hardening, and delamination of the screed. Breeding should begin only after the final preparation of the base. Please note Active participation an assistant is a must. While you are applying the solution, your assistant is preparing a new portion.

Floor leveling methods
There are several types of leveling; the choice of one method or another depends on the time allotted for the work, differences in floor level, and the features of the sound insulation device. So, let's look at the most popular alignment options.
- cement-sand screed- the easiest way to prepare a subfloor. If the budget is limited, then you should give preference to a polymer-based screed (cement, sand, PVA). The screed is made along the beacons, after it hardens, it is applied on top thin layer glue or self-leveling mixture;

- dry screed- has recently become a more popular method of floor preparation. It is based on a far from new bulk principle. Dry floor screed has many advantages, among which, first of all, it is necessary to highlight the speed of installation, high thermal insulation properties, the possibility of laying cable and film electric heaters and low weight.
The laying technology does not present any difficulties; the only condition is to maintain consistency.
1. Vapor and moisture barrier flooring ( polyethylene film or glassine). It is necessary to lay it with an overlap (20 cm), at the edges the material rises by about 5-6 cm. To ensure sound insulation, gaps (10 mm) should be left around the perimeter of the walls, which are glued with a special tape.
2. Lay out the bulk component (expanded clay, sand, fine-grained slag). The thickness of the backfill layer is about 4 cm, with significant unevenness - up to 6 cm.

3. Level the backfill. Then place it on a compacted chipboard surface, GVL, waterproof plywood. The sheets are attached with glue and self-tapping screws.
- Self-leveling floors — optimal solution problems with preparing the rough surface. They are durable, easy to use and will be a real salvation for those who decide to level the floor under laminate or linoleum with their own hands. So, the features of the technology.
1. Clean the floor and degrease it with a cleaning agent, remove the baseboards, and cover the cracks with bars.
2. Fill Potholes mortar, level it out.
3. Draw lines along the length of the room in accordance with the length of the rule and screw in screws along these marks in increments of 30 cm.
4. With laser level Determine the highest point on the base, add the thickness of the self-leveling floor to it and screw in the screws perpendicular to the marks made. For beacons, place alabaster near each screw.
5. According to the instructions, mix the mixture with water and after testing for homogeneity, feel free to pour the solution onto an area no larger than 2 m2.
6. As a rule, level the mixture along the beacons. Go over the surface with a needle roller.

Leveling a wooden floor
A wooden floor quickly surrenders to the crushing power of time - it bends and loses its original shape. But even in the most difficult case, when the floor is drying out right before your eyes, you can find a way out - correct method alignment. Let's consider options for eliminating defects in more detail.
1. Looping- a labor-intensive but effective way to level a plank floor. It is advisable if you plan to only varnish, without laying the floor covering. Cycling is carried out manually or mechanically. To be fair, it is worth noting that the manual method is less effective, so it is better to arm yourself with a scraping unit.

- we prepare the room - cover the furniture with film, remove curtains, take out unnecessary interior items;
- We examine the surface for nails, carpet buttons and other fasteners. If we find any, we either remove them or recess the caps below floor level;
- put on protective clothing (remember gloves and headphones) and get to work;
- We begin to loop from the corner, moving around the room like a snake. Once removed upper layer, cover the holes with putty and take a break - wait for it to completely polymerize;
- We process hard-to-reach areas with a manual scraper;
- After completing the work, remove dust and sawdust with an industrial vacuum cleaner. All that remains is to wipe the floor with a lint-free cloth soaked in white alcohol and apply varnish.
2. Leveling with self-leveling mixtures becomes necessary if a coating needs to be laid on a warped, old floor.
- prepare the surface again (recess the caps, secure the spring boards with self-tapping screws). Sanding the floor. If voids are found, fill them with acrylic-based putty;
- We apply a moisture-proof primer that will ensure the necessary adhesion of wood and mortar;
- We clean the walls around the perimeter insulating material. Don't forget to create expansion joint from expanded polystyrene;
- We use the water level to determine the level of the future self-leveling floor. IN doorway install a wooden beam;
- fasten to the floor reinforced mesh with an overlap of 6 cm;
- Prepare the mixture according to the instructions, let it sit and stir. Pour the solution onto the mesh rubber roller remove bubbles and level the surface (with a rule, rubber spatula or mop);
- Drying time depends on the composition of the mixture. Information about this can be found on the packaging.

Leveling a wooden floor with a self-leveling mixture increases the level of the floor. This fact should be taken into account when carrying out construction activities.
3. Leveling a wooden floor with plywood guarantees a smooth subfloor. The method is most justified when it is necessary to lay laminate flooring. Plywood is purchased with a thickness of 12 mm, class 4/4 and higher.
- We install beacons (screws). Then we begin to lay 30 cm wide logs, covering the voids with plywood blocks. We fasten them with glue or self-tapping screws;

- We prepare sheets of plywood - we divide a standard sheet into 4 parts. It is necessary to cut carefully - there should be no delaminations or chips;
- We lay the plywood offset to avoid the seams intersecting at one point. We cut the sheets, paying due attention to the shape of the floor in the places of arches and protrusions;
- We fasten the plywood with self-tapping screws with a countersunk head and countersink the fastening points.

Ready. If you planned to level the wooden floor under a laminate, then you can start arranging the substrate, if under linoleum, you can start sanding and varnishing.
Leveling a wooden floor: video