A garden bench is not easy ordinary furniture designed for relaxation. With this furniture you can decorate personal plot, create entire compositions that will fit perfectly into the surrounding space of the garden or yard. It’s not difficult to make a garden bench with your own hands; the main thing is to choose the design of the furniture, its location and the material from which it will be made.
Materials for a garden bench

Plastic
Light plastic furniture has many advantages: it is easy to move from place to place, it is easy to care for, it has affordable price category. You can choose any color option, which fits perfectly into the landscape design. Cons plastic furniture: quickly becomes scratched, fades in the sun, looks cheap.


 Or even a chair. By the way, the chair cushions are foam chips in plastic bags. Warm, cozy, extravagant
Tree


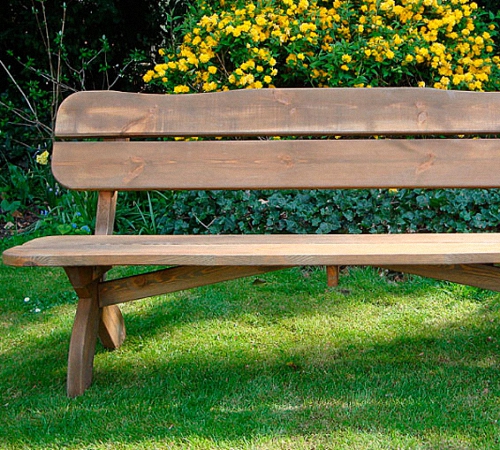
This material is ideal for creating furniture: it absorbs heat, looks noble, and is easy to process. Any type of wood is suitable for making a bench, the main thing is that the material is sufficiently well dried and has no external defects.


Stone


This one is natural and beautiful material fits perfectly into any stylistic direction landscape design. Stone compositions look solid, noble and unusual. But, despite many advantages, natural stone has several disadvantages. Sitting on a stone bench is not very comfortable, and it is also unsafe for health. Therefore, it is imperative to make warm covers or pads along with the bench. Stone compositions are installed permanently; they cannot be moved from place to place.
Metal

Garden benches made by hot or cold forging- This is a real decoration for a garden or a place to relax. The designs look beautiful and stylish, especially if additional decorative elements. Metal is most often combined with wood, glass or other material.
Requirements that a garden bench must meet
Convenience

First of all, you need to think about the ergonomic design of relaxation furniture. It should be convenient and comfortable. It is best to make furniture with a backrest on which you can lean back and relax.
Safety

A garden bench must be strong, carefully assembled and withstand heavy loads. For these purposes it is best to use quality materials and accessories.
Resistance to changes in humidity and temperature

Since the furniture is made for the garden or yard, the material must withstand all climatic changes without defects or damage.
Prices for garden benches
Garden benches

Bench design
The length of the seat and backrest will be 1500 mm. This furniture can comfortably accommodate three people at once. Seat height - 450 mm, back height - 900 mm. It is advisable to place the back at an angle of 18-20 degrees. The seat width is 400 mm.
Material and tools for making a garden bench from wood
- Wooden boards 1500 by 150 mm, thickness 35-40 mm. Three blanks for the seat and two for the back.
- Blanks that serve as legs and holders for the back - 900 by 150 mm, 35-40 mm thick.
- Blanks for the front legs of the bench - 360 by 150 mm, thickness 35-40 mm.
- Beams 40 by 40 mm will be used to strengthen the structure of the bench.
- Self-tapping screws.
- Electric jigsaw for cutting boards.
- Electric planer for grinding the surface of boards and processing chamfers.
- Screwdriver.
- Sandpaper.
- Varnish and primer.
Making a wooden structure

Step 1. Boards for making a bench can be purchased immediately to size; if they are not available for sale, the wood will have to be cut into blanks using a jigsaw or miter saw.


After the wood is cut to the desired length, it needs to be carefully processed. The blanks for the back and seat need to be sanded. All ends of the boards also need to be processed with an electric planer, it is advisable to give them a rounded shape.

Step 2. The long rear legs of the bench, which additionally serve as a frame for the backrest, need to be given correct angle tilt To do this, you need to apply markings to two wooden blanks having a length of 900 mm.
The first to be noted is the height of the bench - 400 mm. This section of the board does not need processing. Starting from the segment, you need to make a 20-degree cut along the entire remaining length of the board, which forms the angle of inclination of the back of the bench. The cuts on the two rear legs should be the same in both height and angle. Otherwise, the bench will be skewed.

Step 3. The legs are assembled first in the bench design. The distance between the front and rear legs is 280 mm. The legs are connected by a beam, which is cut to cover the entire width of the bench - 500 mm. It is advisable to do a double strapping - top and bottom.
Step 4. After the two sides of the bench are assembled, you can connect them together with boards intended for sitting. The boards are screwed using self-tapping screws to the upper beams of the frame. It is desirable that gaps of equal size remain between the wooden pieces - 1-2 cm. These gaps promote air circulation and moisture removal.

Step 5. Strengthening the bench structure. In order for garden furniture to be stable and durable, it is advisable to strengthen its structure. For these purposes, you need to make the lower strapping along the legs using beams. Two pieces, 1500 mm long, are screwed to the front and rear legs of the bench. If there is not enough lumber, you can use one crossbar, which is attached to the lower beams of the frame.
Step 6. Installation of the bench back. The bench is almost ready, left finishing touch- fastening two boards that serve as a backrest. It is recommended to attach the first board at a distance of 200 mm from the seat. The second is at a distance of 380 mm from the seat.
Step 7 Finish coating garden furniture. To protect wood from damage environment, it is advisable to use varnish. Impregnation will protect the bench from moisture, mold, and pests.
The varnish will give the furniture a beautiful and elegant look. To give the wood shine, you need to thoroughly polish the material and varnish the workpieces several times.

Video - Detailed instructions for making a garden bench


Video - Shop in 6 minutes
Find out a few interesting options how to do it from our new article.
DIY metal garden bench
You can decorate your garden plot not only wooden furniture. Metal benches are another way to create a cozy and comfortable place to relax. To make a metal frame, it is not necessary to master hot forging techniques.

 An example of a bench made of metal and wood
 You can use cold forging technology, in which a frame of metal blanks is welded into a single structure. Can be refined during manufacturing various elements decor, unusual inserts and additions.


Tools and materials for making a garden bench using cold forging
- Angle grinder with discs for cutting and polishing metal.
- with a set of electrodes.
- Pipe bending device. This could be a “Snail” mini-machine or a metalworker’s pattern vice, with which you can bend the metal according to a template. This device is needed if you plan complex shape backs with rounded edges.
- Metal pipes square shape(30 mm by 30 mm).
- Decorative elements of hot forging to decorate the structure.
- Material for seat and back (wood, MDF, plywood).
- Roulette.
- Level.
- Primer for metal.
- Protective coating for wood.
Step by step instructions

It is quite difficult to make a complex and elaborate bench design without experience. But make it simple and robust construction can be done without difficulty.
Step 1. Develop the dimensions and dimensions of the bench. A standard-sized garden bench has a length of 1500 mm, a width of 400-500 mm, and a back height of 800-900 mm. Angular shapes furniture is the easiest to make, so for the first time it is better to try to make a simpler model with your own hands.

Step 2. Making a frame for the seat. The metal pipe needs to be cut into 4 fragments: 2 x 1500 mm and 2 x 400 mm. All details are in a rectangle. To make the seat more durable, you can weld 2 additional stiffeners into the rectangular frame.
Step 3. Making legs. The metal pipe needs to be cut into 4 identical sections of 460 mm each. These blanks need to be welded to the corners of the bench. It is recommended to weld additional stiffeners between the front and rear legs.

Step 4. Making the back. Two workpieces 440 mm long and one workpiece 1500 mm long need to be welded together. This structure is then welded to the finished part of the bench. The back should be mounted at an angle of 15-20 degrees. In this case, sitting on the bench will be comfortable.
Step 5. To make the back of the bench stronger, you can additionally strengthen its frame with stiffeners, transverse or longitudinal.
Step 6. The metal frame of the garden bench is ready. The final work is cleaning all welding seams, polishing the metal and coating the frame with a primer.
Step 7 Making the back and seat from wood. Wooden boards or beams are the most suitable material for finishing a metal bench. The wood for the back and seat must be carefully planed and polished, and the chamfers must be processed. The wood needs to be cut into blanks that can be fastened both along and across the back and seat. It all depends on the length of the material.

Step 8 Using an electric drill, you need to drill holes for installation in the metal frame of the bench wood finishing benches. To connect metal and wood, it is recommended to use bolts with rounded heads and nuts.

Step 9 After the back and seat are screwed to the metal frame, the wood needs to be covered with stain or varnish. This will protect the material from environmental influences.
The garden bench is ready. Thanks to the fact that metal pipe The inside is hollow, the furniture is not very heavy and can be moved from place to place. Well-processed metal and wood are easily tolerated high humidity and temperature changes, thanks to which a bench made with your own hands will serve for many years.

 Garden bench for the prevention of spinal diseases: side support, back and front legs, armrest, rectangular frame, bent under obtuse angle, wooden seat, wooden backrest, armrest section with through holes, hinge joint, side view Side support, back and front leg, armrest, rectangular frame bent at an obtuse angle, wooden seat having a width less than the width of the seat contour, and wooden backrest , spherically curved upward, a section of the armrest with through holes, a hinged connection, a wooden seat and a backrest in the form of a beam, moved along the grooves to the extreme positions, side view. A fastening unit for a wooden seat or backrest, a vertical hole and a metal plate with a hole.


 Relaxing on a garden bench is a pleasure
 Video - Making a garden bench from a metal corner
To garden plot was quite comfortable, it should be properly equipped. An important component are garden benches. They can be made independently in different ways and from different materials.
Bench made of concrete slabs and boards with backrest
By looking at the drawings of the bench, you can find out the features of its structure. You can make such a design with your own hands relatively easily, quickly and without high financial costs.
Making a bench with a backrest with your own hands is described in great detail in step-by-step instructions.

Assembly: initial stage
After preparatory work The time for wood processing is approaching. In order for a hand-made bench with a back to serve for a long time and decorate the area, the materials must be pre-treated.
The tree is covered antiseptic compounds and let it dry. After this you can start collecting backrests

On one of the two-meter boards, fifty centimeters are measured from the edges. At this level the edges of the beton slabs. From this mark another fifteen centimeters are measured towards the center of the board. This is where the first boards will be attached. From the resulting marks we measure seventeen and a half centimeters - the gap between the back boards. Next, we measure fifteen centimeters for two more boards. There should be a gap of five centimeters between them. All this can be seen in the drawing.

Wood glue is applied to fifteen centimeter sections. They are attached to boards, the length of which is sixty-five centimeters. Additionally, they are secured with self-tapping screws.

On top, between the boards of the back, pieces of seventeen and a half centimeters are glued. To ensure that the parts stick together well, they are clamped and held until the glue sets. After gluing is completed, the back is covered with an antiseptic.

All wooden parts can be coated varnish. This will give them additional stability and attractiveness.
Assembly of the main part

It is better to assemble the main part of the bench from both sides. Placed between the boards concrete slabs, and in drilled holes insert M16 threaded rods fifty-five centimeters long. You will need four of them.

The rods are fastened with M16 nuts and washers. They are twisted simultaneously from different sides to make the bench level.


Simple DIY bench
You can make benches for your garden with your own hands quite quickly if you follow the instructions. Let's consider four options for such garden structures.

On drawings benches, all its features are indicated in detail. Making such a bench with your own hands is quite simple. The only difficult element is the concave seat.


The number of parts and their dimensions are indicated in the table.

We begin making a bench with our own hands from wood with blanks necessary details. Boards and beams are cut into pieces of the required length.

Making seat supports will be somewhat more difficult. You will need to mark the blanks. Two points are marked along the edges at a distance of seven and a half centimeters from the bottom side, and in the center a point at a distance of four and a half centimeters. They are connected using a flexible plastic ruler and cut out jigsaw. The sections are processed with sandpaper.


The seat supports are attached to the two upper drawers. One on each edge and one in the middle. Next, screw in the supports, spaced from the outer ones by the width of the leg. All connections are made with self-tapping screws.

Boards are attached to the resulting base seats. It is advisable to deepen the screw caps.

Then attach legs. They are attached to the seat supports. The lower drawers help secure the legs.


The finished product is coated antiseptic and varnish.
Simple bench No. 2
To make such a garden bench with your own hands, you will need concrete flower girls and boards. Flower girls are required to create the base of the bench. Use two with a rectangular base and two cubic ones.

To make the base stable, the flower boxes must be glued or connected from the inside with staples secured with self-tapping screws. The container is filled with a layer of drainage and soil. This increases their stability.
The seat for the bench is made of boards. To do this, they are cut into pieces of the required length. These blanks are laid so that there is a distance of half a centimeter between them. They are then connected using cross bars. The planks are placed in three places: at the edges and in the middle. Corners are attached to the slats. With their help, the seat will be secured to the flower girls.


DIY bench with backrest

Prepare the bench parts shown in the figure. They are being processed antiseptics before connecting.


Then the parts are assembled into supports. The corners are first rounded and chamfered. First, parts A and B are connected with a bolt, and then B, C and D are also connected using a bolt.

The inclination of the backrest is determined by part D, after which it is connected to part A. Similarly, but in a mirror image, another support is made.

After this, the back and seat are assembled. To do this, the supports are placed so that there is a distance of one meter and twenty centimeters between them. First, the front and rear strips are screwed to the supports, then all the rest, and finally the stops are screwed in.

At the last stage, the back of this bench is screwed on.

Bench No. 4Another option for a simple DIY bench. Its length is one hundred twenty centimeters. The height from the ground to the seat is fifty centimeters, the height of the backrest is also fifty centimeters.

The base is made from boards, the thickness of which is five centimeters and the width from ten to twelve. One of the legs continues and serves as a support for the back. The supports are connected using the “half-tree” method and secured with bolts.

The basis for the seat is a block secured with self-tapping screws. The short supports on the back of the bench are connected with a collet to increase stability. The seat and back are covered with boards of less thickness. The surface is painted or varnished.
A simple bench with a back for a summer cottage

Design dimensions and wooden parts can be seen on drawings benches. If we consider how to make a bench with our own hands, then this option will be the most optimal in terms of the simplicity of the process and the result obtained.


It is better to purchase materials already cut to size. If this is not an option, then you need to cut them yourself.
The resulting blanks polished. The ends of the boards are processed with an electric planer.

The back legs of this simple DIY bench also double as a support for the backrest. To create the desired level of inclination, the workpieces are marked.
At a height of forty centimeters, mark the attachment point seats. Above, the board is cut at an angle of twenty degrees. The cuts on the two workpieces must be identical.
First they collect legs benches: the front ones are connected to the back ones using a beam. It is better to do this from above and below.

When the side parts are assembled, they can be connected to each other with seat boards. Screw the boards with self-tapping screws, leaving a distance of one or two centimeters.

To strengthen the structure and increase its stability, make the lower harness timber along the legs. Two boards are attached for the back.
Finish the work with finishing coated, which will protect the product from moisture and adverse conditions.

DIY pallet bench
Make a bench with your own hands from pallets It’s not difficult if you use your imagination. To do this you will need three or four of these wooden structures. Some will need to be sawed to obtain additional parts. The most simple design DIY benches made from pallets, when two pallets are attached perpendicular to each other, creating a back and seat.


To prevent the design from becoming too bulky, it is better to cut the pallets according the right sizes. The elements are fastened with self-tapping screws. Add side parts to enhance strength and make legs. All this can be seen in the photo.


Since the material of the pallets is untreated and rough, it will be required first polish. This will allow you to avoid splinters.
The manufacture of a bench with your own hands from pallets is completed by coating it with varnish or paint.


Puzzle bench
You can make such a bench with your own hands if you have a wide board and cuttings for shovels. Curly seats are cut out of the board in the form of puzzle pieces. Legs made from cuttings for shovels are attached to them. You get separate stools that quickly assemble into one long bench. All manufacturing stages are discussed in detail in step-by-step photos.


Benches from unnecessary chairs: two DIY options
First option

To create such a bench for your dacha with your own hands, you will need four old chair.

From the first two chairs remove parts from the front of the seat.

The remaining sawed off the front legs are slightly lower than the seat structure.

From the resulting parts you need take off old varnish or paint. To do this, apply to the parts special remedy, dissolving paint coatings. Then the softened layer can be removed with a spatula.

The racks should drill holes for dowels. Holes are required on the front and end sides.


The dowels are lubricated with glue and inserted into the drilled holes.

When the dowels are glued, you can assemble base benches. To make the structure durable, the parts are fastened with self-tapping screws. Surface of the structure sanded.


For seats benches choose a board that is suitable in size, saw off the excess.

If several narrower boards are used, they are glued together with wood glue. For a tight connection, they are clamped with clamps and wait for the glue to dry.

The finished seat is also glued to the base with wood glue. Heavy objects are placed on the board and clamped together with the base with clamps.

When the glue dries, close the seat masking tape And paint paint the remaining structural elements for wood.

The tape is removed and the seat is treated stain. Finally, the entire bench is varnished.

Second option

To make a second garden bench with your own hands from old furniture you will need two chairs. It is better if the back and hind legs are not separated.

Two identical chairs clean up all parts of the structure except the rear legs with the back.
They take bars five centimeters wide and three centimeters thick. Cut two parts equal in length to the width of the chairs, and two pieces of the same length as the finished bench. A rectangle is assembled from these four parts. It is secured to the backs of chairs with self-tapping screws.

Another frame is assembled in the same way. Several transverse strips are attached to it. This design is attached under the seat, makes the bench more reliable and acts as a shelf.

If the chairs have old covering, then remove it with sandpaper. After this, the surface is puttied with a special compound or coated with a primer. When the layer has dried, it must be sanded with fine-grained sandpaper. Finally, the structure is coated with paint.

The seat for the garden bench is made from Chipboard or plywood. A rectangle is cut out of the selected material, which is half a centimeter larger than the base on each side. Then cut out a piece foam rubber with the same dimensions. From upholstery fabric cut out a rectangle. It should be five centimeters larger than the seat on each side.

Foam rubber is placed on a sheet of plywood and covered with fabric on top. The fabric is attached from the inside out to the furniture stapler.
The seat is attached to the base with a piano hinge.
Bench-swing

To make such a bench for your dacha with your own hands, you should prepare necessary materials. Manufacturing begins with creation basics designs. The seat bars are attached to the back bars at the selected angle.


Additional ones are installed along the seat ribs, providing rigidity.


Attached to the seat planks, drilling holes for fastening in the base bars. The same goes for the back.


Armrests are installed on both sides of the seat. They can be secured with bolts.


The resulting bench cover wood protection products and varnish. It is very important to paint everything as carefully as possible.

The bottom of the bench is reinforced with metal profile. Chains are attached to the profile on which the swing bench will be suspended. It is imperative to check the reliability of the beams on which the bench will be suspended.


Log bench
To make such a bench with your own hands from wood you will need chainsaw. The main material is taken thick log one meter long.

Log mark, so that you get two slightly unequal parts. The back will be made from the smaller one, and the seat from the larger one.

Chainsaw log sawed along the mark. The resulting irregularities are immediately cut off with the same saw.


The cut triangular piece is cut into pieces and inserted into the holes in the seat. The back is secured on top. The bench is almost ready. All that remains is to give it a more decorative look.


Can the seat be placed on legs. To do this, recesses are made in the lower part to install a pair of logs as legs.


Transformable bench
The design features of the transformer can be seen in the drawings of the bench. A transformer bench is made with your own hands from planed boards, which is sawn to the specified dimensions.


Sliced timber parts holes for fasteners are drilled.


At the tabletop, the boards located on the edge can be made wavy.

In material intended for countertops, drill holes with a diameter of twenty-two millimeters and a depth of three centimeters. Cuttings of the same diameter will be inserted into them.

The edges of parts and edges are processed and rounded. 

All elements are assembled using screws and screws. Screws are needed with dimensions 6x70 and 6x90, screws - 8x80.


Wooden parts are painted stain.

The structural parts that will move are connected by hinges.

Parts of a round shape are placed between the boards of the tabletop. cuttings

Install a stop for backrests

A hand-made transformer bench is covered varnish.


Rocking bench
Do original bench making a backrest with your own hands is not difficult if you have the tools and materials. First you need to consider the drawings of the bench, which contain a small number of parts.

The side parts according to the pattern are transferred to Europlywood three centimeters thick. They are cut out using a jigsaw and the ends are processed with a grinder.

To attach the connecting strips, markings are made. Then the holes are drilled. After assembling the frame, the slats are attached using self-tapping screws. The fastening points are sprayed, and the entire product is varnished.

Bench around a tree
The simplest version of such a bench is hexagonal. The size depends on the size of the tree. Measurements are taken at the height of the seat. A margin of fifteen to twenty centimeters is added to the result obtained. If you divide the result by 1.75, you will get the length of the inner side.

To cut boards ten centimeters wide, they are laid in four rows with intervals of one centimeter.

The cutting location is marked immediately for all rows with an angle of thirty degrees. So cut out six sets of blanks.

Legs are used with a height of sixty to seventy centimeters. They are connected by cross members by drilling holes and using bolts and nuts.

The seat is installed so that the joints are located in the center of the ribs of the legs. The outer parts are screwed on first, and then the inner ones. In this way, the entire hexagonal structure around the tree is assembled.


Finally, the back is made and the apron is installed. The result is a DIY circular bench with a backrest.

The finished product is processed oil impregnation.

Bench made of curved branches

A bench made of curved branches will look original. It will require branches for the front part, two legs, a horizontal top and a pair of transverse branches.

Sawing branches so that they fit each other as accurately as possible. Next they are connected by metal corners.


The back part is made in the same way and connected to the front.


The finished product is placed on a flat surface and the seat is assembled.

Bench options
- Log bench, which blends well with the surrounding nature. It consists of half a log, used for a seat, and two short round logs, which are legs.

- Beautiful wooden bench with a back and armrests, reminiscent of a sofa. Curved and cut elements make it more attractive, while leaving knots and irregularities gives the structure a natural look.

- Bench made of wood and metal. The base of the structure is metal. The wooden parts of the seat and back are attached to it. The thin metal parts make it look lightweight.

- The bench has a simple, classic shape. It is made of wooden, rather wide boards. This width allows you to sit comfortably on the bench. Armrests make the design more complete.

- Original bench made of wood with figured details. This option is well suited for a site with a natural, rural design. Carved legs and armrests, a figured back - all this gives the product originality.

- Bench with an interestingly shaped back. The curved parts gradually bend back, creating a unique design. The seat is slightly curved but has a more traditional appearance.

- Wooden complex- a table with two benches. The design looks traditional due to the material used. An original solution is the fastening of all components into a single structure.

- The bench is made of solid logs. A single piece is cut out of it, combining the back and seat. The legs are attached to the bottom. The log required is quite large.

- Bench with storage box for toys. Outwardly it looks like an ordinary wooden bench-sofa, but under the seat there is a drawer in which you can put various things.

- A comfortable bench made of wood with a simple shape. The base is made in the form of a rectangular box. The back is also simple with a straight shape. Placed on the seat soft pillows, providing additional comfort.

- Wooden bench located around a tree. It is made as if it consists of four benches, each of which has one armrest. The composition looks attractive and comfortable.

- A simple bench made of wide boards. It looks solid, but its dimensions are somewhat hidden due to the gaps between the boards and the light blue, in which it is painted.

A bench in a garden or country house serves not only as a place to relax, but also as an element decorating the exterior. Therefore, the process of making a garden bench must be approached with special responsibility. We will learn further about how to make a bench with your own hands.
DIY benches photos and varieties
There are a large number of materials from which you can build a bench in the garden. The first of these is plastic, this material allows you to purchase a ready-made bench. Making a plastic product yourself is problematic. However, let’s still get acquainted with the advantages of this material.

First of all, let's note the ease plastic products. Thanks to this quality, the bench can be easily moved from one place to another. In addition, plastic products are affordable, they are easy to care for, do not require additional painting, etc. Among the disadvantages of a plastic bench, we note: tendency to mechanical damage, instability in front of ultraviolet radiation, cheap and unpresentable appearance.
By using plastic pipes and a tool for soldering them, you can make your own bench for the garden. Liquid nails, which reliably connect plastic pipes together, will help replace the soldering iron.
The most popular, affordable material for creating a garden bench is wood. Wooden products They are distinguished by their practicality in operation; they easily fit into any exterior, especially a garden, where there are so many trees. However, the choice of wood must be approached with special responsibility; you should select types of wood that can withstand adverse weather conditions well. In addition, drying the wood should be optimal for working with it.
The next material for creating a bench in the garden is stone. Stone products are natural and stylish; they are perfect for any exterior. Stone compositions are stylish, unusual and noble. However, the stone is suitable for making bench legs; sitting on the stone for a long time can lead to health problems.

Therefore, a stone bench is either covered with additional covers and pillows, or is made not only from stone, but from a combination of several materials. Please note that a stone bench is stationary and does not move from place to place, unlike a plastic or wooden one.
If there are metal compositions or forgings in the garden or area, we recommend choosing a steel version of the bench. This bench will perfectly decorate the garden and become good place for relaxation. The appearance of the structure is particularly attractive, especially when using additional steel elements. It is possible to combine metal with other materials, such as wood, stone.
When choosing a material to create a bench, you should first of all proceed from its combination with other objects located on the site. A garden bench should be original, attractive and practical.
Decide on the type of bench, whether it will be portable or stationary. In addition, there are folding versions of benches that are installed on the site in the spring and autumn and removed for the winter.
The most popular are benches made of wood. Wood is easy to process, so benches of various shapes and sizes are made from it. In order for a wooden bench to serve you for as long as possible, you need to properly care for it and choose certain types of wood that are resistant to unfavorable conditions operation.

The initial stage of creating a bench with your own hands
Before you start creating a bench in the garden, you should decide on the location of its installation. The size of the bench, its shape and appearance will depend on this. We recommend installing the bench in a place surrounded by plants so that it is always in the shade on a hot summer day. The view from the bench should be attractive and natural.
If there is a fountain, waterfall or other source of water in the garden, place the bench in such a way that you can watch them from it. It is possible to install a bench next to a flower bed or flower bed. This way, you will have the opportunity to enjoy previously planted plants. A bench surrounded by flowers or bushes is cozy; it’s comfortable and pleasant to sit on such a bench.
In any case, the bench should be located with shady place, thus, you will be protected not only from the heat, but also from strong wind. It is possible to create a cap over the bench to protect it from precipitation, in which case you will be able to get a whole gazebo for relaxation. In any case, the bench should be located in such a place as to provide its owners with proper rest.

DIY wooden bench drawings
Before creating drawings for a garden bench, you need to determine the requirements that apply to it. A bench in the garden should be, first of all, comfortable. Having a backrest makes you feel more comfortable, especially if you are going to spend a lot of time sitting in the garden.
The second requirement is safety; all connections between the individual parts of the bench must be strong. The bench must withstand heavy loads from several people. That's why, special attention you need to pay attention to fittings and fasteners; they must be made of high-quality steel. If the bench is made of metal, then welds must also be of high quality and well protected.
Since the furniture will be located in the garden, the material from which it is made must resist moisture, solar radiation and changes in temperature.
We invite you to familiarize yourself with the method of constructing a simple wooden bench back with your hands. The length of the seat with backrest will be about 145-150 cm. This bench seats three people. The back angle is about 22 degrees. The width of the seating area is about 40 cm.

When working on a garden seat you will need:
- wooden blanks, the dimensions of which are predetermined by drawings;
- blanks for making legs and holders;
- panties that reinforce the structure of the bench;
- self-tapping screws and various fasteners;
- an electric jigsaw, which is used to cut wood;
- grinding machine for processing material;
- screwdriver;
- brushes;
- antiseptic primer, paints and varnishes.
If possible, buy ready-made boards according to the size of the blanks. Otherwise, use an electric jigsaw to cut them.
After cutting the wood, it is carefully processed. Previously manufactured parts can be ground. To process end sections, use electric plane. It can also be used to round corners.

Next, the long legs holding the frame part of the back are processed. To do this, markings are first applied to them, and then they are processed in compliance with the slope. Initially, it should be noted that the seat height is 40 cm. This part of the board does not require additional processing. Next, on the next part, the part is cut at an angle of 18 degrees. Please note that the cuts on each leg must be the same. Otherwise, the bench will turn out asymmetrical.
Initially, in the design of the bench you need to assemble the support legs. The interval between them is 28 cm. Make sure that this interval is maintained between the two pairs of legs. Use a beam to connect the legs together. We recommend using the double strapping option, which will significantly improve the strength of the bench.
After assembling the two sides of the bench, they are connected using boards. Use self-tapping screws to secure the boards to the support legs. Please note that the interval between the boards is 20 mm, it must be equal in all areas of the bench. These gaps significantly increase the service life of the bench, as air circulates through them and moisture is removed.

Further actions are aimed at strengthening design features benches. In order to increase the level of stability of the bench, it is necessary to perform additional reinforcement. To do this, perform bottom harness using timber.
Next, you install the backrest on the wooden bench with your own hands. To make it you will need two boards. The first is fixed with an interval of 20 cm between it and the seat, and the second with an interval of 18 cm from the first.
At this point, making a bench with a backrest with your own hands is completed. Next, the wood should be treated with various compounds that will protect it from moisture and insects. To improve attractiveness appearance benches, it is covered with varnish or paint. Special impregnations protect wood from the effects of fungus or mold. To achieve an ideal surface shine, wood can be polished.

Do-it-yourself bench for a summer house made of metal
In the process of working on a garden bench with your own hands, you will need:
- profile pipe, the diameter of which depends on the size and strength of the bench;
- boards that will serve as a seat;
- welding machine for connecting pipes to each other;
- Bulgarians;
- grinding machine;
- anti-corrosion composition;
- paints for working with wooden surfaces;
- fasteners;
- hammer and bolts.
To further decorate the benches, use forged elements that are installed on it using a welding machine.
Before starting work, prepare your own drawings for the bench. Decide on the cross-section of the pipes used in the work. The best option will use a pipe measuring 3x3 cm. In the process of working on a middle bench without a back, you will need about eleven meters of pipe. To cut parts, use a grinder or a hacksaw.
While working, do not forget about the safety rules. To create the long parts of the seat, use two blanks measuring 230 cm. For the long parts of the rectangular structure, blanks of 60 cm will be used; six of them will be required. In addition, it is necessary to prepare six parts measuring 45 cm.
Wooden boards will become the basis for making eight bars. Connecting bars with metal frame made with bolts and nuts. Please note that the fasteners must have a round and flattened cap, which in the future will not catch the clothes of people sitting on the bench.
Easy to assemble steel bench do it yourself, follow the recommendations below:
1. The long parts of the workpieces are located in a horizontal position, and the short parts - in a vertical position.
2. In the process of welding parts together, make sure that the angles at which they are connected to each other are straight.
3. It is possible to adjust the bench length. If the length of the bench increases, then the number of supporting components increases.
4. After welding the pipes, it is necessary to clean all connections and also arrange holes for fixing the fasteners.
5. The frame part of the bench must be coated with an anti-corrosion solution.
6. Before fixing wooden parts, it is necessary to cover them with paint or stain.
7. At the final stage of assembling the bench, the boards are fixed to the surface.

Wooden boards on the bench can be replaced with steel parts in the form profile pipes. In order to improve the aesthetic appeal of the bench, the steel ends of the slats are equipped with metal frame, hiding the cuts. Duralumin pipes are not welded together. Bolts are used to connect them.
To make a bench with a back, you will need to use more material. In this case, the convenience and comfort of using such a bench will be higher.
In any case, when making a garden bench with your own hands, you should be guided primarily by the number of people who will relax on it and the materials that are available. Only in this case will it be possible to obtain high-quality and optimal place for relaxation and free time.
Most often made of wood. This is understandable: this is the most accessible and “plastic” material that can play even in the hands of a beginner. The main thing is to approach it wisely. Get a tool and get some theoretical knowledge. And after a little effort on summer cottage There will be a place to relax in the fresh air.
Any homemade bench starts with a diagram. In the age of information, it is quite easy to find inspiration, but sometimes you have to look for the details for productive creativity. So, for a simple request “ drawings garden benches made of wood“Google brings up a lot of photographs and diagrams, unfortunately, devoid of the details necessary to make these same benches yourself. And when looking for a bench layout, what really matters? Material, production process and, above all, dimensions.
So, choose based on preferences: product with backrest, straight or angled, wide or narrow, long or designed for only two people, dug in or installed on the ground. Next, the material is prepared. And you can start creating.
Drawings of garden benches made of wood
This is something that can be done in one day. The idea is not new, but the drawing is original. The bench, made with your own hands according to the scheme, has been successfully fulfilling its function for a whole season in the open air.
Main drawing


Bench base
First they gather side racks benches according to the following schemes:


Keep in mind: any drawing, even the most detailed one, is still a diagram, a sketch from which you need to build. During production, parts will still have to be adjusted depending on the quality and quantity of materials, the availability of the necessary fasteners and decor options. This is a chance to give free rein to your imagination and make an exclusive thing.
Another drawing of a bench with a wooden back

Drawing of a bench with a back
General assembly plan


Assembling the legs

Drawings of garden benches with a wooden back
A wooden bench for a summer house will last longer if it is coated with a special impregnation. There are enough such compositions on sale. Some of them protect the wood more strongly, but change its shade. Others are able to protect against UV exposure and preserve the texture of the wood. Oil paints on wood perform the same functions, but cover the “wooden pattern”.
Among the small architectural forms The most common are benches and benches. Can be made from any materials or combinations thereof: wood, metal, stone, concrete, plastic, glass.
They are everywhere: streets and city squares, parks and squares, sports and educational institutions, public institutions and residential premises. An almost obligatory element of landscape design, a plot of a private house or cottage.
The easiest material to process and affordable is wood. Do-it-yourself wooden benches provide an opportunity to save money, demonstrate your craftsmanship at home and be a creator.
Wooden benches: economy option
Make wooden benches using existing “blanks”. It is enough to process it a little and assemble a strong and functional structure - with a seat, back and legs.
Moreover, such “modules” are inexpensive, sometimes purchased for “pennies.” We are talking about pallets, or pallets.
But not everyone is suitable for arranging garden furniture. You should not use products made from off-grade or unedged boards. In the first case, large knots may fall out, in the second, the “aesthetic” qualities suffer.
There are cases where the board fastening step is clearly not suitable for a bench.
The pallet is a wonderful donor for a bench
A pallet, as in the photo, would be better. With a corner chamfer removed along the contour.

The width of the pallet is large for bench seating. It needs to be trimmed, the remainder can be used to construct the backrest.

If the width of the backrest is not enough, then the bench will have to be made from two pallets.
The seats and backrest are part of the structure. Need legs. Let's make pallets from the board itself.

- the bench may not be stable
Rigidity is ensured by the seat, and the mounting area of the legs is quite small. Usually a lower ligament is added to prevent them from “spreading apart”. A simpler option is to use another pallet (or rather part of it) as a base.

Pallet benches
or two. Do-it-yourself benches and benches made of wood in detail and clearly.

Fixing the backrest, as can be seen from the examples, can be done using a pair of slats, a board, a rope or rope. The assembled bench, its surface is cleaned, sanded, varnished or painted.
You can not cut the pallets to width and make a garden sofa.

There are examples of using pallet boards to make benches and other products from the class of small architectural forms. Flowerpots are also taken in the photo.

It is not necessary to waste time disassembling pallets, but it is better to buy standard lumber.
Simple bench shapes: board and timber
There are designs and execution options - from the simplest to specimens with wood carvings, worthy of being called real works of applied art.
The easiest option for making is a wooden bench without a back.
The drawing shows a do-it-yourself wooden bench, made entirely of boards with a thickness of 75 mm.

Bench made of boards and timber
Each element consists of two parts.
The seat with beveled ends is assembled from two boards. If the bench stands on open area or outside a heated room, it is better to provide a gap. It will allow water to drain and compensate for wood swelling.
The leg consists of two glued elements. To ensure reliability of the end connection, a pin (dowel) is inserted. Two short support beams and seat fastenings are attached to the leg. The legs and beams are connected with grooves, fixed with glue and self-tapping screws. IN assembled form the leg and beam are attached to the seat board with two pairs of screws and dowels, holes are drilled for them in advance.
Benches: assembly order
1. Cut out the workpiece;
2. Process the ends and clean the surfaces for gluing;
3. Glue the legs together;
4. Beams are attached to them;
5. Assembling the shop;
6. Sanded and coated with varnish (or paint).
Images and drawings of a bench made of 30 mm boards with a support beam.

Bench made of 30 mm boards with a support beam
There are already shaped elements in the form of legs with radius cutouts. You can make the work easier and make them rectangular. The drawing is not a dogma - it can be taken as a basis and changed in the direction of simplification or in the direction of complexity. They do the same with sizes - make the bench wider, shorter, etc.
What is the difference between this option and the previous one?
One long support beam is used instead of four short ones; it also serves as a stiffening rib for the base - the legs and the entire structure are more stable. The connection between the legs and the beam goes through a tongue and groove, and the tenon is much easier to cut out. That is, this form is a little easier to manufacture, more stable and provides more opportunities for experimentation.
Below are several options for a similar design, but in a different design.
For example, in the minimalist style - there are not even protruding edges. Splicing according to the tongue-and-groove principle is used to connect the legs and the seat.

In this model, they simplified the task as much as possible - they even abandoned cutting out grooves and tenons. In this case, it is better to make the connection between the legs and the beam using confirmats rather than self-tapping screws (they have a larger contact area). For strength, they usually add a pair of dowels on each side, set with glue. The hidden fastening of the seat is done with a dowel, the open fastening with a self-tapping screw.

If the bench is not very long, then the beam can be placed at the bottom. In this design, it serves solely as a stiffener.
In the photo below you can see an unusual case of using a dowel - it attaches the beam to the legs not with a hidden installation, but with an open one.

In this bench, a block was used to “help” the board.
Legs with crossbars and two oblique supports for sitting are made from it. All fastenings are made on confirmations, and the beams of the legs are connected to each other using grooves.

Here also a block is used for the base. Due to the large thickness of the seat board, it does not require additional support. The lower beam serves as a stiffener.

Making a small bench with a back is not much more difficult. The principle of installation and fastening is similar to simple benches: grooves, tenons, dowels, glue, screws and confirmations.
You can take a design with “solid” board legs as a basis. Move them a little from the center to the edge so that the ends of the seat and legs are in the same plane. Attach vertical beams to the legs and screw the backrest to them.

Bench with carved back
For a model whose base is made of a block, making the back is even easier. Two pairs of legs: front - for seat support, rear (high) - for fastening load-bearing beam, seats and backrests.

These were lightweight and “mobile” designs of benches and benches made of wood, which could be used with equal success in an open area, under a canopy or indoors. There are more massive forms aimed at “stationary” placement.
Benches: large format
Making a wooden bench with your own hands for a summer residence involves using any form of material. Including those that are used in the construction of wooden houses.
For example, timber. For reference: timber is classified as such if the aspect ratio is no more than 1:2, and the smaller side has a size of 100 mm or more. Reducing the size transfers such lumber to the “block” category.
It is not easy to assemble a bench like the one in this photo with your own hands, but it is possible.

Assembling the legs is not difficult at all. The only difference from a board and a block is that more powerful fasteners will be required. For example, such self-tapping bolts for wood.

You will have to widen the hole under their head (but confirmations also require this) and place a washer.
Installation and installation of the seat is much more difficult.
To “bundle” the beams together, three metal pins are needed, with a length almost the width of the seat, and two - the width of the bench, taking into account the legs. It’s difficult to find these on sale - you’ll have to make them from round reinforcement (stainless steel). The gap between the beams can be maintained using wooden plates from boards strung on studs. The thickness of the plates should be the same as the three supporting vertical beams that support the seat in the center of the bench.
And this specimen is made of even more powerful timber (150×100). Its assembly is much simpler. Two seat beams are attached from below through short cross beams, which are then mounted to the T-shaped legs.

Bench made of timber
Another easy-to-follow example using a large-format board. Load-bearing capacity The materials are such that the use of reinforcing beams is not required - the seat is attached to the ends of the short legs. The author of the project knows well that the toughest geometric figure- triangle. Therefore, both the configuration of the lower part of the supports and their connection with each other with bolts has the shape of an equilateral triangle.

If possible, order two non-standard wooden beams, then making such a bench with your own hands will not be difficult: you will need to “add” four short timbers (100×100) for the legs and two timbers (100×50) for the back.

Timber bench
But if this is not possible, then instead of a non-standard beam you can use a couple of standard ones.
Such garden bench He already uses logs from wood with his own hands.

The most difficult thing in this option is to use an ax (or adze) to make a longitudinal groove and tenon for connecting the logs. For reliable fixation, you will need a couple more dowels on each side (this is the same dowel, but only thicker and longer). The seat and back can be made of boards (as in the photo) or timber. Do-it-yourself benches and benches made of wood - ideas and solutions.
And this version of the bench is already more complicated.
But not really. The main difficulty is making the back, or rather the notch on it. All fastenings of parts of the structure to each other are carried out using dowels.

Basically, like this wooden fastener quite durable - log houses with a couple of floors (including wooden churches) were previously built without a single nail.
And a very simple option: two logs with a groove and half a log sawn lengthwise.

Bench simplicity perfection
Wooden bench
In conclusion, here are a couple of examples of how you can make a bench from wood, not purchased wood, but found in a nearby planting or forest. Benches and benches made of wood with your own hands from auxiliary materials.
In this example, only the seat is made of boards, everything else is made of natural material, which had to be selected according to thickness and adjusted to size.

To make the seat of such a bench, you need professional tool, so you will have to either order longitudinal sawing of the log, or (which is easier) take an unedged board as a blank.

Information to note : , .