There are many varieties of laminated wall panels. They are made from different materials and different formats, auxiliary profiles are produced for them. But no less popular for wall decoration is laminate, designed as a floor covering. Although because of this, its installation follows different rules.
Laminate differences
For the most part, interlocking laminate flooring is not intended for rigid attachment to the base. This is a floating floor type, main feature which - reliable fixation of floorboards to each other. Typically, a rigid grip is provided by an end-lock connection with a complex snap profile. Of course, you can also find adhesive connection, but rarely.

Finishing with wall panels requires the opposite - rigid fastening to the base, and the profiled end comes as an additional option, providing a hidden type of installation.
The most common type of slatted panels is lining with a regular tongue-and-groove end. Therefore, laminate is often mounted to the walls as well - through a groove, fixing it to the sheathing with fasteners. But this is not the only type of installation.

Mounting methods
There are three ways to fix the laminate to the wall:
- using glue;
- nails through the bottom wall of the tenon to the sheathing beam;
- with clamps to the sheathing.
Glue mount
Laminate at its core can be considered a type of fiberboard, so to attach it, a water-free adhesive is required. This is especially important if the wall surface is leveled using gypsum board or plywood - with prolonged contact with a humid environment, either the base or the panels themselves may swell and “deteriorate.”

You can use parquet adhesive, but not dispersion, but solvent-based or two-component.
The wall surface should be almost perfect. While minor unevenness in the subfloor can be compensated for with a substrate, this is not possible for a wall. The glue is quite expensive, it is applied thin layer, therefore, an uneven wall surface will lead to a decrease in the adhesion area, which will affect the reliability of the fastening.

After leveling the wall (plaster, putty, drywall), it must be primed and dried.
Then lines are drawn onto the surface using a level, which will be used as a guide during the installation of the laminate.

The most common laying pattern is to offset adjacent rows by half the length of the plank.
The first row starts from half. Coat its reverse surface and the contact spot on the wall. Press for a short time, then “tear off” and let the glue dry, then press again until initial setting. In principle, this is a technology for working with quick-drying adhesives, which may differ in the exposure time at each stage. In this algorithm, the first row of laminate is glued, and then all the rest.

The second row starts with a whole panel, and the third again with a half. The technique for connecting panels between rows depends on the type of laminate lock.
The advantage of this installation method is minimal loss of useful volume.

There are more disadvantages: significant labor intensity, high consumption of expensive glue, low environmental friendliness of quick-drying waterless adhesives. In addition, walls whose surface has been leveled with plaster and putty may not have sufficient strength of the top layer to support the weight of the laminate.
Fastening on the sheathing
Installing the laminate to the wall on the sheathing has the same sequence of operations as when finishing with clapboard:
- Choose the laying direction: vertical, horizontal, diagonal.
- Markings are made perpendicular to the direction of laying for attaching the sheathing. Its pitch should ensure fastening of the laminate at at least three points - along the edges and in the middle. Therefore, the axial distance between adjacent rows of sheathing must be fixed: 1/2 or 1/3 of the length (an exception can only be for the lower and upper rows of sheathing). Reducing the offset step of the laying pattern to 1/4, which is practiced for flooring, technically impractical, given the width of the bar for the sheathing.
- For lathing choose wooden block with a width of at least 40 mm, since the distance from the edge of the short end of the laminate strip to the attachment point must be at least 15 mm. The joints of the laminate planks in each row should be in the middle of the sheathing bar.
- In the lower and upper rows of the sheathing, you can use a block of smaller width. The installation of the row should begin and end not in the center of the bar, but at its edge.
- The sheathing bars are attached to the wall in accordance with the markings, maintaining the general level of the surface.

Adhesive laminate with smooth profile The tongue and groove is mounted to the sheathing in the same way as the lining: with a thin nail through the bottom wall of the groove or using clamps.

To attach the interlocking laminate to the sheathing, clamps are usually used, but under them you will have to:
- for a Click lock, trim the profile of the bottom wall of the lock groove at the attachment point;
- for the Lock lock, cut the lower part of the tenon of the inserted panel at the attachment point.
Disadvantages of laminate as a finishing material for walls
Among all types finishing materials wood-based laminate is one of the most expensive (more expensive only parquet board and parquet). Previously, it would have been possible to save on a class, but classes below 31 are no longer available. The cheapest domestically produced laminate with a thickness of 6-8 mm will cost about 400 rubles. per sq. meter. Therefore, there is no need to talk about the availability of this type of finishing.

The high wear resistance of the laminate, the use of HDF in the load-bearing layer and the complex profile of the interlocking connection are all excellent qualities for wall panels, which will not “work” and will not affect the durability of the finish.
Installing laminate on walls is more difficult than wall panels. Even when using sheathing, more materials, fasteners and time will be required.

The only thing that justifies the money and effort spent is the high decorative properties and the ability to create harmonious interior. Moreover, it is not necessary to cover all the walls (or the entire wall) with laminate - usually it is enough to select a separate zone.
Performance qualities of laminate and wide choice color solutions, textures and patterns, the relative ease of installation make us think about its possible use for wall decoration. Of course, first of all, this is a floor covering, popular and in demand, and not very often used as a wall covering. However, laminate can add interesting and fresh “notes” to the design of a room precisely when it is not used for its intended purpose. Which laminate to choose for installation on the wall and what are the specifics of such installation?
Arguments for"
At first glance, the idea of decorating a wall or niche with laminate looks unexpected. However, if you look at it, there are strong arguments in favor of such a decision:
- Beautiful appearance. Some models of this coating are difficult to distinguish from natural wood valuable species.
- Wear resistance, strength and long term services. The top protective layer perfectly protects the laminate from external influences.
- Antistatic.
- Simple installation that literally anyone can do.
- Easy care of laminate flooring during use.
- Affordable price for a material with such characteristics and appearance.
This coating has all the qualities to become part of the original and stylish design rooms, even if not in a very familiar “role”. Laminate on the floor and on the wall, matched in one color scheme, will help to visually expand the room.

Choosing a laminate for wall decoration
Important! To decorate walls, you should choose a low-class coating (21-23) - it will experience virtually no stress. This way you can save a decent amount. It is important for you to choose a material that matches the color and pattern of your design ideas. However, it is quite difficult to buy low-class laminate; stores try not to keep it in stock.
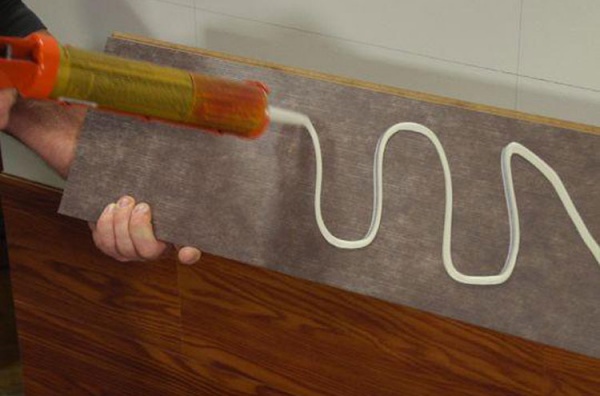
The choice of panel connection option (adhesive or locking) depends on the class of the laminate. Covering classes 21-23 are not available with a Click-lock; laminate of this class has only an adhesive connection. Laminate with an adhesive connection is mounted on a leveled surface, and the adhesive is applied in a zigzag pattern to the back side of the panel. Then glue is applied to the end of the panel and the next one is laid. Excess glue is immediately removed with a damp cloth, which is soaked in a weak solution of vinegar. A block is placed under the bottom panel as a stop so that the structure does not start to slide down.
Laminate flooring with Lock and Click locks is secured to the wall using liquid nails and kleimers. Clamps are galvanized staples; they vary in size and shape. One type of clamp has teeth that are driven into the end of the panel and fixed with screws or nails to the sheathing or wall, the other has a flat protrusion that fits into the groove of the panel. Clamps are specially designed for fastening lining, laminate and other similar coverings to walls, providing a very reliable fastening.


Advice from experts. The locking connection of panels with Lock and Click locks does not need to be coated with glue. But experts strongly advise using gel for laminate flooring - the gel will help maintain the elasticity of the joint.
Where and how will we use it?
Let's start with rooms where laminate flooring should not be laid on the walls. This is a kitchen, a bathroom, an uninsulated balcony, a basement in country house. Changes in humidity and temperature will negatively affect the material, and it will quickly lose its appearance.
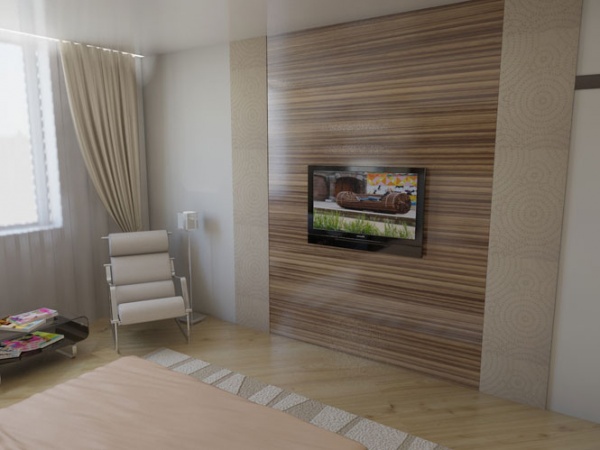
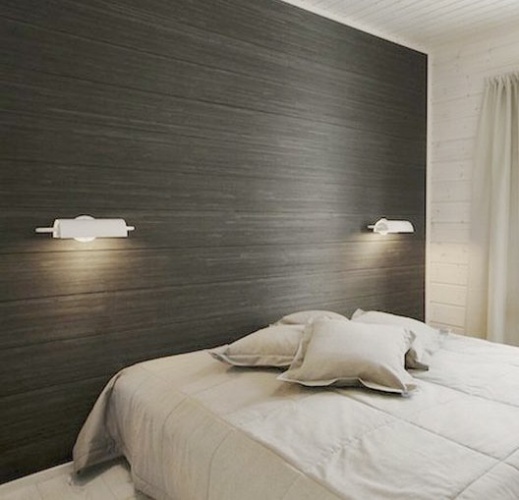
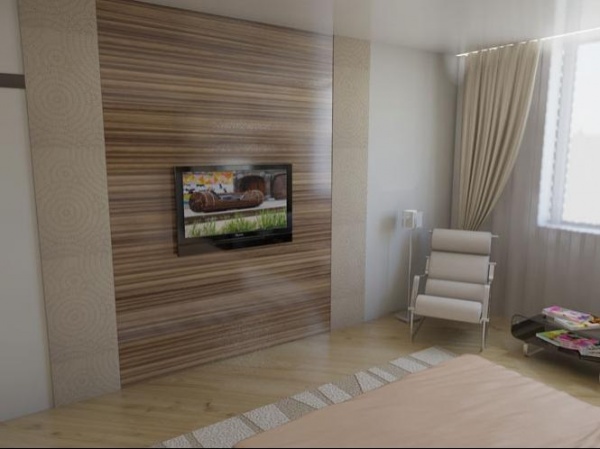
Traditionally, laminate is used to decorate walls in the hallway to the height of the panel. They decorate part of the wall above the head of the bed in the bedroom with this coating; they make it from laminate decorative panels behind the TV in the living room, niches are being trimmed. The difference in shades of material in the same color scheme on the floor and on the wall creates an interesting effect.


Features of the installation process
Laminate is intended for laying on the floor, and the technology for installing it on walls, taking into account all the features of this material, has not yet been fully developed. Only recently have some manufacturers begun to produce special frames for attaching this coating to the wall.
One group of specialists refers to extensive practical experience and in videos posted on the Internet demonstrates fastening with liquid nails, clamps, and even self-tapping screws and nails. Some manufacturers (for example, Egger) show in video instructions that the first panel from the bottom is fastened with self-tapping screws at the bottom, and nails are hammered in the upper part (this is how the lining is attached).

Another group of specialists claims, and claims with good reason, that the coating cannot be fixed rigidly, which is why it is called a “floating floor.” A twisted screw or a hammered nail is not very compatible with the concept of a “floating floor”.
The truth, as usual, is somewhere in the middle. There is no point in refusing to use laminate as a material for decorating walls based on the theoretically correct judgments of the second group of specialists. But these judgments cannot be completely ignored either.
Important! During installation, try to avoid rigid fixation of the panels. How to do it? For example, the top panel in the structure is rigidly fixed to a metal sheathing using clamps. Next, the panels are secured with clamps with a flat protrusion, but the clamps themselves are not screwed to the vertical rail. Fixation is carried out only on panels of the 6-7th row, which gives some mobility to this part of the structure.
At glue method fastening, the wall surface must be dry and very smooth. You cannot attach the material to drywall that is simply glued to the wall - the entire structure will collapse under the weight. It should be remembered that laminate is a fairly heavy material.
For fastening to the sheathing, the pitch of the bars should not exceed 600 mm. For vertical installation of laminate, the sheathing bars are positioned horizontally, and for horizontal installation, the bars are mounted vertically.

A distance of about 10 mm should be left between the laminate structure on the wall and the walls in the room. The same distance should be between the structure and the floor. To maintain this distance, plastic wedges are used.
When laying laminate on a wall horizontally, it is necessary to maintain a checkerboard pattern or offset the next row by one third of the panel. Everything is the same as when laying it on the floor. With one long vertical seam, the load on the fastener increases. It is more convenient to start installation from the left corner of the wall and move to the right. However, it is more convenient for “right-handers” to work this way; it is more convenient for “left-handers” to start from the right corner.

Conclusion
You should avoid using laminate to decorate walls in rooms with large changes in humidity and temperature.
Among modern materials used for building finishing, there is a class of various coatings that have been developing quite successfully for more than 20 years. For simplicity, all types of such coatings are usually called laminate, and it does not matter whether they are domestic or foreign products. This type of material is actively used for various purposes. Today, finishing walls with laminate has become quite common.
What is the difference between this material and similar ones?
The basis of the laminate is a structure that is very similar to a sandwich. Multilayer panels have four or five layers with a total thickness of 12-15 millimeters. The dimensions of the laminate sheets are 30 centimeters wide and two meters long. This coating was invented in Sweden and was originally intended for floors. However, thanks to their excellent properties, it has become possible to attach artificial panels to walls. Laminate has such qualities as high strength and resistance to various external factors, which are combined with ease of processing and ease of installation. When producing panels, the manufacturer forms a stabilizing bottom layer, which is impregnated with resins.

Production Features
The supporting base is made using HDF technology, which allows for high density of the layer material. That is why finishing walls with laminate allows you to obtain a surface with high strength, much higher than the level of strength plastic panels, enjoying considerable popularity at the moment.

Features of the finishing process
With all the above parameters, the enormous popularity of laminate is due to the fantastic variety of designs: it imitates the beautiful texture of almost any natural material and even unusual drawings. Such diversity, as well as durability and highest quality became the reason that laminate wall decoration is becoming more and more popular. It is worth noting that the technology for installing panels on walls, like floor mounting, is characterized by high execution speed and simplicity. Laying laminate on the wall has another advantage - the ability to hide unevenness without using “wet” puttying or plastering technologies.

Types of fasteners
As you know, laminate panels can use one of two types of connections: castle type or with click-type latches. The latter type is so simple to assemble that it does not require any special experience, so installation can be carried out even by inexperienced workers.
If you are deciding how to fix the laminate to the wall, you can resort to a regular wooden frame sheathing, consisting of beams and slats. Between the walls and inside panel bases are often placed additional thermal insulation in the form of foam sheets or mineral wool. Step of horizontal and vertical elements frame sheathing is designed to ensure sufficient rigidity of the covering after it is fixed.

Decorative aspect
Wall laminate imitating stone materials or valuable wood species is often used. The color can be matched to the floor covering or preferred contrasting combinations, which allows you to get very modern solutions wall decoration in full compliance with long-standing traditions. At the moment, materials that imitate not only the tone and color of natural material, but also the structure of its surface have become especially popular. Rough and smooth laminate panels are easy to clean, washable, simple and hygienic to clean, which can be considered an additional advantage.

Installation process
Before you begin the finishing process, you need to take care of the room. Work should begin only after the material has been kept for two days at room temperature. Before finishing begins, all “wet” stages of work must be completely completed. Depending on what material was used for construction, plastic or wooden plugs may be needed to secure the frame elements.
While finishing walls with laminate can be considered a quick and dry decoration technique, it is worthwhile to first repair cracks and chips on the walls in the room, as well as putty them and do other similar work. During the installation of the sheathing frame, before laying the laminate on the wall, it is necessary to ensure absolute verticality, as well as the absence of curvature of the future surface.
For these purposes, a sufficiently long building level, with which you can check everything. The required level can be maintained by inserting pieces of board between the wall and the beam. Operations will be significantly faster if you use a drill or screwdriver with the appropriate attachment. The screw heads must be recessed to the level of the surface of the bars.
Finishing walls with laminate is done in accordance with a technique slightly different from that used for covering floors. The slats need to be tightened before they are finally secured to the sheathing. It is quite convenient to use special metal plates with a flat hook designed for fastening panels. You can hook them tightly onto the edge of the groove, and then nail them to the frame elements, which will allow you to pull the next panel tightly together. Fastening with nails by nailing the inner edge of the groove to wooden elements the frame turns out to be inconvenient, since you can damage the panel in the area of the outer edge of the groove or drive the nail head loosely, which will complicate the installation of the next lamella.
It is worth saying that finishing the walls with laminate in the hallway or in some other room is done using tools such as a hacksaw, tape measure, jigsaw, construction cord, corner, plumb line and level. Naturally, you will need a marker or pencil, a screwdriver, a construction knife or scissors. Fastening is carried out using self-tapping screws, nails, fastening strips, plastic or wooden plugs.
Installation of laminate flooring using wooden sheathing
IN in this case The installation technology is quite simple. In this case, the gap between the laminate and the wall remains at the same level chosen by you. First you need to make a wooden sheathing or simply fix the beams on the wall in a horizontal direction. The panels are already attached to them. Fastening is carried out using special fasteners - clamps. Fastening is carried out at the very top and bottom of the laminated board. It is important to always apply a layer of laminate sealant to the locking joint, which will prevent moisture from penetrating through the joints, significantly extending the life of the material.
If the material is laid on the wall, a gap should be provided between it and the floor, as well as the ceiling, so that the laminate has room to expand. This is especially true if the walls are decorated with laminate in the kitchen. After installation is complete, close the edges using aluminum corners, under which you also need to apply a layer of sealant.
Installation of laminate flooring with glue
This method allows you to significantly save space. But at the same time, the walls must be carefully leveled. The laminate board is assembled on the floor and then glued to the wall. The joints must be sealed with sealant, and the edges must be covered with an aluminum corner.
This question will undoubtedly arise from a person who learned about this finishing option for the first time. Laminate has long established itself as an excellent decorative finishing material for floors, durable and practical to use.
Laminate can be used to finish floors and walls in almost any room in an apartment or private house.
Laminated panels are increasingly being used for wall decoration, thereby displacing traditional finishing materials such as or conventional wall panels.
Advantages of using laminate for wall decoration
- European, as well as domestic, manufacturers release to the market ecologically pure a product that suits everyone modern requirements safety, so covering the walls with laminate is quite possible.
- If you decide to use laminate for walls, then be sure that this material durable, and if operating rules are followed, it will last for decades.
- Using laminated panels of low class 21-31, you can save a lot. After all, such panels are inexpensive, but are designed for use as a floor covering, and they will not be demolished on a wall.
- Variety of textures and color solutions of this material provide a wide field of activity for designers when decorating premises.
- Carrying out work on installing laminate flooring on the wall with your own hands — simple task, if you carefully read all the tips indicated in the article and follow them. Even a beginner can carry out repair work on his own.
Disadvantages of laminate when finishing walls
- First drawback laminate as a finishing material for walls is its sensitivity to moisture, which can cause swelling of the material and lead to cracking of the outer decorative surface laminated panels.
- Another drawback is sensitivity to temperature fluctuations, especially to high temperatures, which can spoil the attractive appearance of laminated panels.
Therefore, you should not install laminate on the wall of the kitchen or bathroom, since in these rooms high humidity and frequent temperature changes. Laminate on the wall of a balcony, basement or loggia is also not the best solution.
The microclimate of these rooms will be harmful to laminated panels and will destroy even the most high-quality and durable laminate. To decorate these premises, it is better to use traditional materials, or MDF panels.
Lock system
 Adhesive laminate. This system does not have locks for fastening the panels to each other, so fixation occurs using glue. How to glue laminate to a wall you ask? Apply to the end and back of the laminated board construction adhesive, for example, on a silicone basis or the so-called “” and is pressed against the wall.
Next is installation next panel and in the same order all the others. Any glue that bleeds through the joints should be immediately removed with a cloth soaked in a solution of water and vinegar. The adhesive laminate has a small contact area with the surface on which it is laid, so it is rarely used when laying on lathing.
 This type of laminated covering has a fastening in the form tongue and groove lock, which does not need to be glued with glue, which allows you to get neat and dry joints.
When installing this type of covering, the panel strips are secured in the groove of the tongue using small nails or clamps. It should be noted that the fastening takes place on a wooden or special metal sheathing. Sheet pile option will do for cladding walls, floors and ceilings.
 This option has an improved tongue and groove system, which is a convenient lock for connecting panels together. When laying laminated boards with click lock, the material is tilted perpendicular to the other panel by 20 degrees, then the panel is inserted into the grooves of the lock and easily snaps into place.
Clicky decorative laminate can be attached to the wall to a wooden sheathing using glue. This laminate has increased strength and resistance to deformation.
Price and strength class
 To install laminate flooring on a wall, first of all, follow the color and texture that will be used in the interior of the room. In most cases, one of the most important factors is price finishing material. True, you should not always save on this, since the quality of laminated panels directly depends on their price.
When covering walls with laminate, you can use material of low 21-31 grades, and not 33-34 (high strength), which are used where high abrasion resistance of the coating is required. After all, laminate walls in the interior will not be subject to high loads, since they will mainly perform only a decorative function.
 Therefore, by choosing an inexpensive finishing material for walls made from laminated boards, you can significantly reduce your renovation budget and at the same time get Beautiful design
premises.
Therefore, by choosing an inexpensive finishing material for walls made from laminated boards, you can significantly reduce your renovation budget and at the same time get Beautiful design
premises.
You can buy laminate for walls inexpensively, but you should still take into account factors that may affect performance facing material, for example, these could be animals or children.
Let's summarize the criteria for choosing laminate for walls:
- Consider the intensity loads, which will be carried out during operation at laminated coating, therefore very important. If you have a pet that can damage the surface of a laminate wall with its claws, then you should not choose inexpensive option, having low resistance to physical influences.
- Another important parameter is appearance, that is, a design with laminate on the wall should first of all please the eyes and bring aesthetic pleasure to the owner. The modern construction market is replete with laminated finishing materials of various colors and textures. Choose from a variety of options that simulate different breeds wood or even stone can be done without any problems.
- The following parameter applies to installation method laminate on the wall. One of which is to attach laminated panels to a frame made of wooden or metal slats. You can also glue laminated boards directly to the wall. But at the same time, the surface should be as smooth as possible.
How to lay laminate flooring on a wall with your own hands?
Methods for laying laminate flooring: glue or lathing?
 In case of glue method When attaching the laminate to the wall, you should carefully prepare the surface, since unevenness will have unpleasant consequences during operation. First of all, it's not aesthetic appearance walls where the gaps of some laminated panels will protrude due to unevenness. Secondly, the cost of preparing the walls can cost a hefty sum, which is not very good for thrifty people who are used to counting their money.
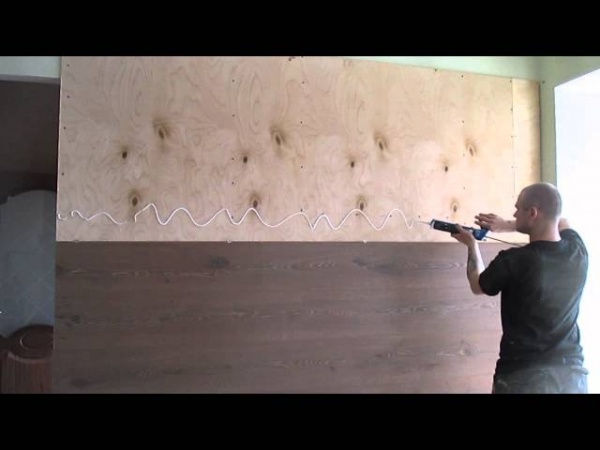
The glue method is quite simple to implement and does not require special knowledge, which will allow you to implement it. How to glue it to the wall, and what nuances may arise during the work we will discuss further? You can glue any type of laminated boards, and panels with a lock and without a lock at all.
 Creating a sheathing for laying laminated panels it will be more profitable in the sense that you do not need to level the wall, that is, plastering or installing drywall to create flat surface not required. The lathing will allow you to insulate the wall with appropriate materials and provide additional sound insulation. Some manufacturers, aware of the growing popularity of wall decoration with laminated panels, offer special fastening systems for quick creation comfortable lathing.
What tools are needed to install laminate flooring on the wall yourself?
- In addition to and for the bevel, you will need these simple tools, like a square, ruler, tape measure, pencil.
- You will also need hacksaw on wood, metal or better electric jigsaw, which will significantly speed up and facilitate the work.
- You will need a special wooden block (boss) for padding laminated boards and spacer wedges, designed to install gaps between the laminate and the ceiling-floor of the room.
 For a visual overview of the installation process laminate on the wall, video (at the end of the article) with the stages of work will help to better understand the entire progress of the repair. For a person who has decided to cladding with laminated panels on his own, viewing the educational information is simply necessary, as it will prevent many mistakes and incorrect actions.
We install laminate flooring on the wall with our own hands
Stages of work:
- We calculate the amount of laminate. Everything here is quite simple, because the amount of material required is calculated using a simple formula - the height is multiplied by the width and the total area is obtained. In this case, you should add about 10% additionally for fitting and cutting the material.
- We prepare the wall surface for laying the laminate. With the glue method, you will need a dry, clean and even wall, so you will need to clean it well.
When creating a frame for laminate you will need to create a sheathing made of wood or metal. To create a wooden frame, you need slats 20-40 mm wide, which are attached to the wall at a distance of 30-40 cm from each other. The slats are installed perpendicular to the direction of the laminated board panels. Metal carcass made from slats designed to create plasterboard floors. Or you can use special systems that manufacturers offer for attaching laminate to the wall. - Select a starting point. When covering the surface completely or only the upper part of the wall, you should begin installing the laminate on the wall from above. You will need to mark a distance of one board from the ceiling and begin cladding from this boundary. It does not matter what position of the panels will be used - horizontal, vertical or diagonal. If you want to sheathe only the lower part of the wall, you should accordingly start from the floor and follow the same steps.
- We install laminate on the wall. When gluing laminate to a wall, the material is treated with an adhesive. These can be silicone-based “liquid nails”, as well as special glue for laminated panels. Next, the board is pressed against the wall and fixed. This is repeated with all panels. In this case, you can coat the fastening lock of the laminate boards with glue for better strength.
When creating the sheathing, the panels are fastened using special brackets (clasps) or nails. This method of fastening is also used when working with lining or MDF panels. The clamps can prevent the laminate lock grooves from moving into place. Simply trim the mounting points so that the grooves fit into place. - We install skirting boards. Corner places, as well as the joints of the floor or wall after installing the laminate on the wall, require fastening and corners. This will create a finished look for the interior. The many options for different corners and baseboards currently available in construction supermarkets will allow you to choose what you need.
There are many varieties of laminated wall panels. They are made from different materials and different formats, and auxiliary profiles are produced for them. But no less popular for wall decoration is laminate, designed as a floor covering. Although because of this, its installation follows different rules.
Laminate differences
For the most part, interlocking laminate flooring is not intended for rigid attachment to the base. This is a floating type of floor, the main feature of which is the reliable fixation of the floorboards to each other. Typically, a rigid grip is provided by an end-lock connection with a complex snap profile. Of course, you can also find an adhesive connection, but rarely.
Finishing with wall panels requires the opposite - rigid fastening to the base, and the profiled end comes as an additional option, providing a hidden type of installation.
The most common type of slatted panels is lining with a regular tongue-and-groove end. Therefore, laminate is often mounted to the walls as well - through a groove, fixing it to the sheathing with fasteners. But this is not the only type of installation.
Mounting methods
There are three ways to fix the laminate to the wall:
- using glue;
- nails through the bottom wall of the tenon to the sheathing beam;
- with clamps to the sheathing.
Glue mount
Laminate at its core can be considered a type of fiberboard, so to attach it, a water-free adhesive is required. This is especially important if the wall surface is leveled using gypsum board or plywood - with prolonged contact with a humid environment, either the base or the panels themselves may swell and “deteriorate.”
You can use parquet adhesive, but not dispersion, but solvent-based or two-component.
The wall surface should be almost perfect. While minor unevenness in the subfloor can be compensated for with a substrate, this is not possible for a wall. The glue is quite expensive, it is applied in a thin layer, so an uneven wall surface will lead to a decrease in the adhesion area, which will affect the reliability of the fastening.
After leveling the wall (plaster, putty, drywall), it must be primed and dried.
Then lines are drawn onto the surface using a level, which will be used as a guide during the installation of the laminate.
The most common laying pattern is to offset adjacent rows by half the length of the plank.
The first row starts from half. Coat its reverse surface and the contact spot on the wall. Press for a short time, then “tear off” and let the glue dry, then press again until initial setting. In principle, this is a technology for working with quick-drying adhesives, which may differ in the exposure time at each stage. In this algorithm, the first row of laminate is glued, and then all the rest.
The second row starts with a whole panel, and the third again with a half. The technique for connecting panels between rows depends on the type of laminate lock.
The advantage of this installation method is minimal loss of useful volume.
There are more disadvantages: significant labor intensity, high consumption of expensive glue, low environmental friendliness of quick-drying waterless adhesives. In addition, walls whose surface has been leveled with plaster and putty may not have sufficient strength of the top layer to support the weight of the laminate.
Fastening on the sheathing
Installing the laminate to the wall on the sheathing has the same sequence of operations as when finishing with clapboard:
- Choose the laying direction: vertical, horizontal, diagonal.
- Markings are made perpendicular to the direction of laying for attaching the sheathing. Its pitch should ensure fastening of the laminate at at least three points - along the edges and in the middle. Therefore, the axial distance between adjacent rows of sheathing must be fixed: 1/2 or 1/3 of the length (an exception can only be for the lower and upper rows of sheathing). Reducing the offset step of the laying pattern to 1/4, which is practiced for flooring, is technically impractical, given the width of the lathing.
- For the sheathing, choose a wooden block with a width of at least 40 mm, since the distance from the edge of the short end of the laminate strip to the attachment point must be at least 15 mm. The joints of the laminate planks in each row should be in the middle of the sheathing bar.
- In the lower and upper rows of the sheathing, you can use a block of smaller width. The installation of the row should begin and end not in the center of the bar, but at its edge.
- The sheathing bars are attached to the wall in accordance with the markings, maintaining the general level of the surface.
An adhesive laminate with a smooth tongue-and-groove profile is mounted to the sheathing in the same way as the lining: with a thin nail through the bottom wall of the groove or using clamps.
To attach the interlocking laminate to the sheathing, clamps are usually used, but under them you will have to:
- for a Click lock, trim the profile of the bottom wall of the lock groove at the attachment point;
- for the Lock lock, cut the lower part of the tenon of the inserted panel at the attachment point.
Disadvantages of laminate as a finishing material for walls
Among all types of wood-based finishing materials, laminate is one of the most expensive (only parquet boards and parquet are more expensive). Previously, it would have been possible to save on a class, but classes below 31 are no longer available. The cheapest domestically produced laminate with a thickness of 6-8 mm will cost about 400 rubles. per sq. meter. Therefore, there is no need to talk about the availability of this type of finishing.
The high wear resistance of the laminate, the use of HDF in the load-bearing layer and the complex profile of the interlocking connection are all redundant qualities for wall panels that will not “work” and will not affect the durability of the finish.
Installing laminate on walls is more difficult than wall panels. Even when using sheathing, more materials, fasteners and time will be required.
The only thing that justifies the money and effort spent is its high decorative properties and the ability to create a harmonious interior. Moreover, it is not necessary to cover all the walls (or the entire wall) with laminate - usually it is enough to select a separate zone.


