Residents of private houses and owners of summer cottages cannot do without firewood. They need to be dried, stored and stored somewhere. To protect firewood from dampness, a canopy or more serious structure is built for it. How to make a woodshed without outside help, what tools and materials you will need, what type of woodshed is most suitable for your site - this article is devoted to these issues.
Let's dance from the stove
We don’t start with purchasing materials, choosing a location, or even with a drawing. Initially, you need to understand how much firewood is needed for the season. Why do you need them?

For stove heating at home? Bath kindling? Organizing outdoor picnics or a home fireplace? All these needs require different amounts of firewood.

The choice of design depends on the volume that will have to be stored. Do you go to your dacha only on weekends to take a steam bath and barbecue? Then prepare no more than one and a half “cubes”.


In this case, there is no need to build a fundamental structure. It is enough to get by with a light free-standing canopy or stack a woodpile with your own hands, for example, against a wall country house or baths. Next I’ll tell you how to do this.

Do you constantly live in a house that is heated by a stove? Here the calculation of the need for firewood will be different.

It is believed that for heating a living space of 100 square meters. m will burn up to 2.5 cubic meters of wood per year. But it's always better to have a two-year supply on hand. After all, wooden blanks reach minimum humidity only after a year of storage. They are the ones that burn the best and longest.

Those that have been cut down recently are not suitable for kindling. Such firewood is still damp, smokes and produces “zero” heat. They need to be allowed to mature. The fuel supply should be enough to heat the house, bathhouse, and barbecue.

In villages, up to 12 “cubes” are harvested at a time. These are several cars. For warehousing and storage of large volumes, a simple shed is not enough.

Below you will find a description of different types of woodsheds - attached and permanent. And also tips on how to stack firewood at the dacha so that it retains its combustible properties for as long as possible and does not spoil appearance plot.

Types of buildings, material, tools
A woodshed is a structure for drying and storing firewood. It can be attached to a building or standing alone in an open space. Temporary or permanent. On a columnar foundation or on block supports. Made of iron, wood or construction remains. The type, size, material and cost depend on the specific needs for the amount of firewood and the budget.

For carpentry work You will need a beam or metal pipe, nails, bricks or cinder blocks, a hammer, a hacksaw, pliers, a plumb bob, a screwdriver, metal corners, and suitable material for sheathing and waterproofing. Any woodshed is a frame of four posts mounted on a solid base.


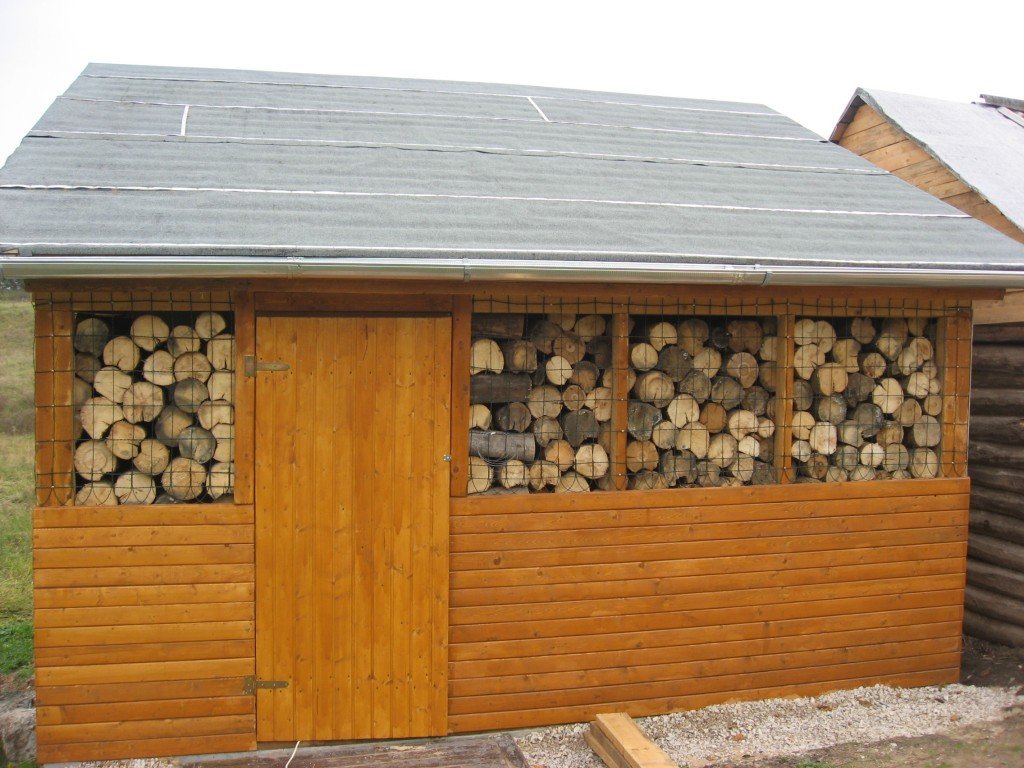
When a woodshed has a foundation and a door, it is a woodshed. It is often connected by a common roof together with summer shower and a toilet. The result is a convenient utility unit, organized according to the “three in one” principle. Doors to each sector are made separately. You can see what such a combined woodshed looks like in the photo.

When starting work, it is important to set the level accurately. Otherwise, the structure will become distorted over time and become unusable.

So that it doesn't drip on your head
No matter what drawing you draw, the requirements for any type of woodshed are the same. Freshly cut firewood should dry well in it, and dry firewood should not get wet in the rain and snow. This means that it is necessary to ensure good airflow (ventilation), but protect the structure from dampness. And direct sunlight.

The latter seems strange, but experienced people confirm: firewood that has been lying in the sun for a long time does not burn well in the stove and produces little heat. Provide lighting. It will come in handy in the evening.

Choosing the right place to store firewood is extremely important. It is worth setting up a woodpile or woodshed where a car with firewood can drive as close to it as possible. When unloading, carrying logs across the entire site is hardly convenient.

The approach to the woodshed should be convenient and clean. If you are not confident in your design talents, place the woodshed on the back side of the house so that it does not become an eyesore. Choose a site for construction on a level and dry place.

Economical and not difficult

The option with a structure adjacent to the main building has several attractive points.
- Firstly, it is convenient to always have firewood at hand.
- Secondly, it is economical. It will take a lot less material than in other types of woodsheds.
- Thirdly, a woodpile installed along the wall will serve as a interior space the role of additional thermal protection.

But there are also disadvantages of the extension type. Precipitation water flowing from the roof will moisten the top rows of firewood. This flaw can be easily eliminated by lengthening the slopes of the main roof using a wide visor. It will protect the firewood from snow and rain.

A canopy is made from several end boards knocked together. If this is not possible, cover the woodpile with film, a tarp or a piece of roofing felt. Large slabs of bark are suitable for this purpose.

Making an extension for firewood
It's good if local area paved or paved with tiles. Then the lower rows of the wood supply will remain dry. For better ventilation as supports in corners future basis install several bricks or cinder blocks.


Place a piece of plywood or a storage pallet on them. There may be several of them, depending on the amount of firewood. For strength, fasten the pallets together with metal staples or steel wire. Make holes in the bottom.

The elevation can be made of wooden or metal frame, pulled tight waterproofing material(ruberoid). To ensure that the woodpile is stable, secure it at the ends with two pairs of poles, nailing them to the base. Stack the logs parallel to each other. With the thicker end towards the retaining wall.

A woodpile folded like a cage will be much more stable. Each subsequent row is folded perpendicular to the bottom one. Round timber or lumps, split into two halves, are placed along the edges. This is the simplest type of wood burner. Even a teenager can handle its device.

If conditions and your abilities allow, the frame is made more durable. Dig four into the ground to a depth of 30 cm. metal pipes or timber. These will be the racks. We fill them around the circumference with crushed stone and compact them.

Treat the part of the timber in contact with the ground with antiseptic impregnation to protect it from rotting. Sheathe the racks on two or three sides - at your discretion. This is the so-called “harness”. A floorboard (25 mm) or slats or polycarbonate sheets are suitable for it.

For fastening we use screws or nails, two on each side. The main thing is that there is a gap between the sheets or boards for free air ventilation. This way the wood won't get damp.

A roof from any available material is attached to the corners on top. roofing material. There's a trick here. We make the rear pillars higher by 20-30 cm. This way we will get a roof with a slope along which water will roll without spoiling our firewood. The floor is laid on long boards (logs) placed on columns of bricks or cinder blocks.

They are covered with a base covering of boards of larger diameter so that the floor is not pressed down by the weight of the woodpile. If there is not much firewood, plywood can be used as a base. There should be several block or brick supports under the joists.

Lay out the bottom row of the stack with meter-long firewood. When everything is ready, coat the wooden parts of your masterpiece with an antiseptic on the first layer, and after drying, paint with a pest additive or polyurethane varnish.


It is important to take one more precaution. If the house near which you are building a storage for logs is wooden, you need to think about how to protect it from wood bugs and dampness. To do this, leave space between the wall and the logs for ventilation. Protect the section of the wall in the desired location from bark beetles with a steel sheet.

I came across a woodshed near the house, the frame of which was welded from iron corner. This design is not afraid of dampness; there is no need to be afraid that it will be overturned by a strong wind. However, the cost of the material and welding work much more costs in the designs described above.

Thorough and durable
A closed wood storage can be arranged away from the house or bathhouse. This will be much safer for fire reasons. They can be very simple - from several pillars or capital ones.

Previously, we agreed that we choose a place for a wood storage that is dry and level. As a rule, free-standing woodsheds or woodsheds, especially for large supplies, are built on a foundation. This is necessary if the soil on your site is soft - clay or loam.

We start by digging a ditch with a depth of 20 to 80 cm around the perimeter of the future building. It depends on how much the soil freezes in winter in your region. Fill the hole with layers of sand and crushed stone (at least 10 cm). We compact each layer thoroughly. Involve your household members in this activity.

We concrete all support pillars. We begin covering with boards or other material only after the solution has hardened well. Holes in the ground for the posts can be easily made using a drill.

Remember that you cannot place the woodpile directly on the ground. The bottom rows of firewood will rot over time. And when the snow starts to melt, your entire structure will float. On the Internet you can see a photo of a wood warehouse without a foundation.

In this case, the top layer of soil is removed from the entire perimeter. Dry sand is poured in and then compacted tightly. The top is covered with paving slabs. The elevation for firewood on such a basis is made from the bars and crossbars of the bottom row of the wood stack.

In addition to the roofing materials listed above, it is also suitable for the roof soft tiles or galvanized iron. Make the size of the roof with a margin of 30-50 cm. The size of the permanent shed depends on the amount of firewood you need.

Let's return to the option of a columnar foundation. The building on it can be square or rectangular. The four end support posts can be metal or made of timber or unbarked logs.

This is how you get a woodcutter rustic style. Using a timber, treat its lower part, which will be in the ground, with impregnation to protect it from rotting. A budget product is machine oil.


The lining of the walls may not be continuous, but only up to half. Buildings with slats filled like blinds, with a slope or in the form of an oblique lattice look aesthetically pleasing.

The optimal height of the structure is 2 meters. The roof can be single or gable. When building a woodshed, always remember the need for ventilation in it.

From greedy hands
For convenience and better preservation, separate freshly cut firewood from dry wood. This is necessary for large stock volumes. Inside the woodshed, leave a passage in the middle. Do not bring it close to the back wall. Along it, logs are stacked in one or two rows. On one side of the aisle there are dry ones, on the opposite side there are wet ones.

Lay long boards vertically between the rows at equal intervals. These will be sections. Arrange the logs in them by type of wood or size. Sometimes there is a need to hide your stock under lock and key.

To hang the door in the center of the front wall, two additional timber supports are installed at the construction stage. Loops are fixed on one of them. It is not necessary to remake the door. An old room or half of a cabinet will do.

Anything goes
For a small supply that is used only for a fireplace or barbecue, you can adapt a metal or wooden rack. It will provide convenient sectional storage of firewood. There is a place for the rack on a large porch with a canopy, on a closed veranda, under a roof canopy against the wall.

Firewood can be stored under an outdoor staircase or porch. The main thing is that the storage location is well ventilated, protected from precipitation on top and from dampness below. It was located away from open sources of fire.

Afterword
Now that you have read to the end and learned how to make a woodcutter with your own hands, it’s time to move from words to action. Draw up a drawing, decide on dimensions, estimates, and proceed to construction. Good luck.

Photo of the woodshed


In villages and neighborhoods with cottage buildings, houses are heated with wood and coal. Even if the boiler or stove is fired with coal, it is still necessary to store wood for ignition. When purchased, regular firewood has high level humidity, so they need to be dried. To store and dry logs, special sheds or entire rooms called woodsheds or woodsheds are equipped. The design is very simple, so any homeowner can build a woodshed with his own hands.
Types of wood burners
Sheds for storing firewood, regardless of material and size, can be attached to a house or bathhouse or stand-alone. The first type of woodsheds is built much faster, but it is not possible to build such a building in all areas. And most importantly, attaching woodsheds to wooden buildings is dangerous. This is explained not only by the increased fire hazard of the entire complex of buildings, but also by the attraction of wood-boring beetles to the woodshed, which can begin to penetrate the walls and frame of the house. Often wooden buildings With such an extension, impregnation does not protect against pests, therefore, if you still plan to build such a woodshed, protect the wall connecting the house and the woodshed with a metal sheet. The steel layer should be larger size woodshed, this guarantees high-quality protection of your home from pests.

Free-standing woodsheds can be open or with a roof. The roof is laid on pillars or a frame with walls. The roof of the structure is made sloping so that water drains immediately without penetrating inside the woodshed. The rest of the work is done by the sun and wind. The firewood is dried naturally. After this process, the wood dries no worse than in closed dryers. For regions with heavy snow and rain, the walls of the woodshed are covered with plywood and other particle boards. In the spring they are removed to dry the firewood.
Construction of woodshed walls
To ensure that the walls of the woodshed do not interfere with the air flow and drying of the wood, they are made of slotted or latticework. The dies are stuffed onto the frame of the woodshed at an angle or overlapping, like blinds. This technique protects the firewood from getting wet during slanting rain and wind. Even when packed tightly, firewood stored in a grated woodshed dries efficiently.

Boards are attached to the poles or frame of the woodshed, most often horizontally, stuffed at an angle. With any fastening method, it is imperative to leave frequent gaps. Sometimes the boards are attached vertically, along the pillars, but such structures are less common.
It is impossible to say exactly which method of fastening boards (vertical or horizontal) is more effective, because no comparisons have been made in this regard. Usually the master uses the type of fastener that is convenient for him. Some builders believe that it is more effective to fill the dies obliquely. So, for boards 10 cm wide, gaps of 1.5-2 cm are made. In addition, with this method of building a woodshed, you need to make a different bevel direction for the boards for each wall. The creators and admirers of this method claim that under favorable weather conditions, firewood under a woodshed with such partitions dries out within a month.

The gaps in different woodsheds range from 1.5 to 10 cm. The size of the gaps largely depends on the width of the board. For snowy regions, it is not recommended to make too large gaps, as snow will blow into the woodshed. This will negatively affect the condition of the firewood. IN middle lane You can fill the slats rarely, this promotes drying and saves material when building a woodshed.
Many woodsheds are made without a door. Structures with a door are already considered a shed for storing firewood. Some craftsmen do not block the front wall of the woodshed with boards, but leave it open for active airflow. If in your region theft at dachas and in private homes is a common occurrence, then you cannot do without doors when building a woodshed for firewood.
Pay attention! When constructing an opening for the woodshed and a fence, make sure in advance that you can enter the room with an armful of firewood.
Stacking firewood
If the firewood in the woodshed is stacked in small batches in one or two rows, there are no problems with airflow and access to logs. Inexperienced homeowners do not know how to properly store large amounts of firewood. In such cases, woodsheds are erected, divided into sectors by partitions. In woodsheds made using this method, fresh firewood will not block the passage to the old ones, and most importantly, uniform airflow of the wood is ensured.
For square-shaped rooms, the sections are placed so that you can walk through and get the driest firewood. In such structures, a passage is arranged in the middle, which must always be free. It is recommended to make the length of the passage from the entrance to the other wall. Only one row of firewood can be placed on the wall opposite the entrance to the woodshed; they will be able to dry and will not block the passage.

It is much easier to store firewood in rectangular open woodsheds. The woodpiles are fenced off between each other with partitions made of posts or planks so that they can accommodate from 2 to 4 woodpiles.
Extended woodsheds can accommodate from 4 to 8 cubic meters of firewood. In large woodsheds, the back wall must be ventilated.
The woodshed at the dacha is usually made small. If you do not live in a dacha year-round, then a couple of cubes are enough to heat an average house in the off-season. However, to heat a house with a bathhouse, you need an impressive wood burner. In such cases, the height saves - it is made up to 2 meters. Firewood is never stacked close to the ceiling; a gap is always left for airflow from above. Therefore, if all household members can reach a height of 170-180 cm, the woodshed is made up to 210-220 cm in height. For a person of average height, such a canopy is optimal.

Building a woodshed with your own hands
The process of constructing a woodshed for firewood near the house will be described below. Installation of the structure takes from 2 to 4 days at a leisurely pace (this period includes painting of the woodshed). The design, the diagram of which is discussed in the article, is of a frame type.
Materials for woodshed
Before you understand how to build a woodshed with your own hands, you need to understand the dimensions of the structure. Below we will describe the construction of a woodshed with dimensions of 180 by 370 cm. The height of the front supports is 245 cm, the rear ones are 220 cm. The capacity of the woodshed is 13 cubic meters of firewood, it is recommended to load no more than 10. It is not necessary to load firewood into such a storage to capacity. Leave 15-20 cm on top, if the family is short - 30-40 cm. If the firewood is stacked end to end, be sure to install jibs so that they do not break the wall dies.
The frame of the woodshed is assembled from timber. For the lower and upper trim, use a material of 10 by 10 cm. Before work, it is recommended to soak the wood in machine oil or other protective compounds. Assembly is carried out end-to-end, fastening the parts with nails. For greater strength of the frame, corners with screws are used. Ordinary wood is used as supports for the woodshed. foundation block with dimensions 20x20x60 cm, for the entire woodshed you will need 6 blocks.
Preparatory stage
A drawing of a woodshed is needed if, in addition to firewood, you plan to store tools and garden tools in it. In this case, the woodshed also serves as a barn.

By making a drawing of the woodshed, you can determine the size of the canopy. When calculating the dimensions, take into account how much firewood is spent on heating the house during one season. It is recommended to stack firewood with a small reserve (in case of severe frosts). So on average, per house is 100 square meters For heating from autumn to the end of winter, about 2.5 cubic meters of pine material or 1.8 birch material will be required. Firewood with a moisture content of no more than 20 percent is considered dry; this level is reached after a year of drying in the woodshed. When heating with freshly cut wood, more logs will be required, since calorific values theirs is 1.5-2 times lower. It is recommended to stock up on firewood for approximately 2 seasons.
Everyone has heating device your efficiency. Thus, modern hearths can boast of an efficiency mark of 80 percent. To heat a house with such a stove, one stack of firewood is enough for 7-10 hours. This number of logs is only enough to heat a residential building. To these supplies you need to add firewood for the bathhouse, barbecue and fireplace (if there is one in the house).
In addition to wood, you will need:
- drill (for digging supports into the ground);
- hacksaw;
- hammer;
- pliers;
- plumb line and rope;
- stepladder.
Advice! Wood for the woodshed is purchased based on the type of buildings on the site. The firewood can be assembled from leftover material after building a house or bathhouse. Often, timber and boards remain on the site after dismantling old buildings.

Installation of the frame and base of the woodshed
Before building a woodshed, it is necessary to prepare the site. To do this, the soil is leveled around the perimeter of the building. On viscous and soft soils, a cushion of sand and crushed stone is installed. It is not necessary to fill gravel and sand around the entire perimeter of the building; it is enough to fill it under the supports. To do this, make small pits up to 25 cm deep and pour sand and crushed stone there at the same level. Support blocks are installed on top of the pillow.
Pay attention! The blocks must be wrapped in a couple of layers of roofing felt. The harness does not need to be fastened to the support with anything, but if you want to make the woodshed monumental, you need to drill holes in the supports and attach the harness to them using pins.

Assembling the woodshed frame includes the following steps:

There is no need to skimp on fasteners when installing the housing, especially in snowy regions. If there is a heavy load on the roof, the supports and fasteners may simply not be able to withstand it.
Roof installation
After installing the supports, you can begin assembling the roof. The construction of a firewood storage begins with two support boards on the front and back walls. Then two more boards are nailed on the side walls. They are placed on the same level as the pillars of the rear wall. These boards are 5 cm thick and 10 cm wide. To sheath the roof of the firewood storage, use a board 10 cm wide and 3 cm thick.

Once the firewood storage sheathing is assembled, the roofing material can be laid. Corrugated sheets, slate, soft tiles, etc. are suitable for these purposes. The installation technology depends on the type of roofing material. To protect from rain, overhangs and projections of approximately 30-35 cm are made.
If the roof of the firewood storage is used to cover metal materials, it is necessary to lay waterproofing on the sheathing, for example, roofing felt. This will protect the logs and the ceiling from condensation. Roofing felt is laid on the sheathing from below with an overlap.
Once the firewood storage roof is assembled, the floor can be assembled. Floor boards are used from 30 cm thick, any width, but the wider the better. For fastening, use 2-3 nails for each board.

The final stage of construction is painting. To cover wooden buildings, use any protective paint or impregnation against pests.
After painting, the woodshed is ready for use. The construction of such a woodshed does not require specific skills. It is enough to be able to hammer nails and saw material. Even the roof structure of such a woodshed is very simple.
Woodsheds of other designs
There are many types of firewood burners for the garden and home. Below are the simplest and most popular types of canopies

Extension to the house
To assemble such a woodshed you will need a minimum of lumber, but you will have to mix concrete. The supports that are nailed to the house are made high. Square or metal profiles are used as front supports. round section. Pipe posts are driven into the ground and filled with concrete. Two beams are already attached to them. The floor is made of brick and plywood. They lay a couple of bricks and put them on top fiberboard sheet or plywood. Boards are nailed to the posts nailed to the walls of the house and attached to the pipes. The dies are attached in steps of 2-5 cm (depending on the size of the boards).

Large extension
Using the same principle as the design above, you can make a large storage for firewood. They make it using exactly the same technology, the only difference is in size. The width of the woodshed is made from 2 to 8 meters (depending on the size of the house). To ensure that the roof does not sag and it is convenient to store firewood, supports are installed every 90-100 cm. You can make partitions slightly larger than the width of the logs so that each log is stored in a separate compartment.

If the region does not have very heavy rains and snow, it is not necessary to build a foundation. It is enough to fill the bottom of the woodshed with sand and compact it. A wood floor is laid on top of the pillow or paving slabs.
Portable woodcutter
Such devices are relevant for houses with a fireplace or barbecue. You can buy a lot of varieties of such products in the store. Forged wood burners look very interesting. If you don’t know how to make a woodshed with your own hands, read the instructions described below.

Instructions for manufacturing a portable structure include the following steps:

This product will fit perfectly into a traditional interior with a fireplace.
Proper placement of a round woodpile
The woodpile does not have to be laid in a “well”. Very effective method For storage, round woodpiles are considered (an example is shown in the photo); with this arrangement, the wood is dried directly on the street. The firewood dries quickly in them, and such a structure looks unusual.

For a round woodpile, you need to dig a wooden pole about 200 cm in height into the ground. Logs or small logs are placed around it in a circle. The radius is made 2 times the length of the firewood. If the log has a length of 30 cm, then the diameter of the circle is made 60.
After this, you can stack the first row of firewood. The logs should rest on one end of the logs laid out in a circle, and the other should “look” at the pole. When laid in this way in the outer circle, gaps are formed between the firewood. There is nothing wrong with this, since the cracks will be closed by the second row.

The second row is folded parallel to the first, trying to close the gaps. At the same time, firewood is placed tightly around the pole parallel to the pole. And so, gradually laying rows around the perimeter of the circle, filling the center of the woodpile.
Advice! When the firewood around the circle begins to fall a little, you need to lay out a transverse ring of firewood to raise the logs in the circle.

Then the firewood is laid out until it almost covers the vertical logs in the center. At this moment, the second row in the center of the woodpile is already starting to be stuck into the gaps between the lower row of vertical firewood around the pole.
Pay attention! Try to lay the wood evenly and tightly along the entire length of the woodpile.
Using this technology, the woodpile is laid up to the top of the pole, as long as you can reach your hands. Usually 2-3 levels of firewood are formed. Around the first row of the woodpile, two more can be stacked, which allows you to store a huge amount of logs in one place.
Most country property owners, one way or another, are faced with the problem of storing firewood on their property. This publication will describe in detail how to create a convenient woodshed with your own hands, and will discuss diagrams and materials suitable for self-construction of the structure.
Basic requirements for the design
 Wood-burning stoves have been used by people since ancient times for cooking and heating their homes. For efficient operation of such equipment, fuel of appropriate quality is required. A wood shed (wood shed, firewood shed, woodpile) is a simple structure in the form of a canopy that provides the ability to dry and store supplies of firewood.
Despite the simplicity of the design, a number of serious requirements are imposed on this building:
- Protecting fuel reserves from atmospheric precipitation. Based on this requirement, the structure must have a roof and floor that protect the fuel from moisture.
- Free access to firewood. Before you build a woodshed with your own hands, study the projects, choose suitable place for the construction of a building.
- Good ventilation internal space for proper air circulation in the woodpile.
- Necessary capacity. The structure must provide the ability to store firewood reserves in quantities sufficient for seasonal use.
In addition, the woodshed in the country should have an attractive appearance, for which it is often decorated decorative finishing. The area around the building is planted with decorative grapes.
Types of woodburners and features of their design

Despite the diversity of architectural and design solutions, there are two types of woodburners:
- free-standing;
- attached.
 The simplest free-standing woodshed is a canopy on metal support poles without any fencing. Strapping for roofing covering a wooden beam serves. The floor in such structures is most often made of pallets laid directly on the ground or cinder block supports. A more serious version of the woodshed is a permanent woodshed on a foundation with wooden walls in the form of a lattice.
 The attached structure can be made in the form of a canopy attached to the wall of a permanent building or a full-fledged canopy. The wall of the structure will act as a blind fence.
Without a doubt, the second option is much simpler to implement, however, attaching firewood sheds to wooden buildings is not recommended for two reasons:
- Fire hazard. A woodshed is a structure for storing fuel. Any spark can ignite the wood, causing a fire.
- Insects that live in abundance in wood and can quickly destroy wooden structure, even treated with bioprotection.
If there is no other option, like adding a woodshed to wooden wall If there is no house, then experts recommend insulating the surface adjacent to the structure with a steel sheet.
 There is another type of woodshedder – mobile. This design is made in the form of a metal stand and is used for storing firewood indoors directly next to the stove or fireplace. A portable metal woodcutter can be a decorative piece of furniture that fits into the overall decor of the room.
We build a woodshed with our own hands

Before building a woodshed, the developer will have to answer a number of questions:
- Size of the structure.
- Choosing a location to place the structure.
- The optimal type of wood burner.
- Design of the structure.
- Selection of necessary materials.
Let's consider the solution to some issues in more detail.
Dimensions and capacity
 If the supply of firewood is intended to be used not for seasonal heating of the house and cooking, but only from time to time for lighting a fire or barbecue, then very little firewood will be needed. In this case, you can limit yourself to the construction of a free-standing shed or a small shed, which will perform two functions at once: a warehouse and a utility unit.
If full heating is planned country house, then a larger structure should be erected, located near the house.
To determine the dimensions of a future building, it is enough to know the volume of fuel consumed.
The second way to determine the dimensions of a woodshed is the availability of the material that is planned to be used for its construction.
Choosing a location on the site

The dimensions, purpose and type of future construction will be decisive when choosing the location of the structure:
- If you plan to use firewood exclusively for lighting the barbecue, then the best option would be to build a woodshed with your own hands pitched roof, located in the recreation area.
- As a rule, a building for storing firewood is not an architectural masterpiece, so the best option is to place it in a corner in the backyard of the site.
- When designing such a structure, one should take into account the possibility of a free approach and the presence of a path with high-quality coating. This will ensure access to the woodpile during rain and winter.
- The place for storing firewood should not be located in a low area where moisture accumulates.
- The building will inevitably create shadows, which may interfere with the growth of green spaces. Choose a place free of vegetation for the woodpile.
Despite the fact that a firewood shed or shed is located on its own land and is not qualified by law as a permanent structure, it should not be placed this building, guided only by their own preferences. If the building interferes with the normal use of the adjacent plot, the neighbors can go to court and demand that the nuisance be eliminated, including moving the building, which is associated with additional financial costs.
Selecting the type of storage and materials for its creation
 When choosing a woodpile design, most developers start from the budget, comparing it with the desired result. The simplest design is an attached canopy with a floor and three enclosing walls.
Attached canopy
First of all, study the legislation, and specifically GOST 21.501-93, GOST 21.204-93. After which:
- Draw a sketch. This will allow you to determine the dimensions of the building, the angle of the roof, and the option of joining the roof to the wall of the barn.
- Prepare materials for creation supporting structure and roofs. An edged board or timber is the optimal material for creating a frame. Wooden slats Suitable for creating a side fence. Sheets of corrugated sheets, metal tiles, and polycarbonate can be used to create a roof.
- Count the materials. To support a roof with an area of up to 5 m2, pine boards with a section of 100x50 mm can be used. If the roof area exceeds 5m2, then use timber with a section of 100x100 mm. For all cases apply wooden rafters 100x50 (on edge) with sheathing made of boards 100x25 mm.
- Provide a foundation, the design of which and its depth depend on the type of soil and the depth of its freezing.
Freestanding woodshed made of polycarbonate
 The design can become not only functional solution, but also as a decoration for your site.
Popularity of this material due to low cost and good quality characteristics. To make the frame, a profiled pipe with a cross-section of 40x25 mm is used. The roof support structure is created from a steel strip or metal angle. Polycarbonate is mounted using special fasteners. 
Many domestic summer residents are interested in how to make a woodshed near a bathhouse? The simplest option is to assemble a metal frame, which can be sheathed with sheets of polycarbonate or corrugated sheets.
When creating an arched roof, stiffener channels in the sheets cellular polycarbonate oriented parallel to the bend line.
Classic woodpile
 In some cases, you can limit yourself to the construction of a classic cylindrical woodpile, which copes with the tasks quite well.

Right assembled structure It is durable, spacious, does not spoil the appearance of the site, and the firewood in such a woodpile dries quickly enough.
Woodshed made from pallets
 One of the most budget ways construction of a storage facility for storing firewood - a firewood shed made from pallets.
It is very simple to assemble such a structure:
- Prepare the area.
- Lay out the pallets that will act as the floor.
- At the ends, secure them together with a solid board.
- To create walls, use pallets installed vertically.
- Using metal corners, secure them to the base.
- Place a board on the edge in the front part of the structure, securing it between the side walls. It will support the pallets that serve as the roof.
The last step is to treat the structure with an antifungal compound.
Do-it-yourself wood firewood: stages of construction
 As an example, consider the stages self-creation detached wooden structure summer cottage. The first thing you need to do is choose a place to install the structure. The best installation option is an elevation on the site. This arrangement will prevent flooding of the building.
To assemble a woodshed for your summer house with your own hands, you need drawings. 
We present an example of a reliable and spacious structure with a pitched roof and the possibility of installing doors to transform the woodshed into a permanent shed:
- To create a reliable supporting structure we will use metal pipes. To do this, you need to drill holes, as shown in the drawing. Depth – below the freezing point. A layer of crushed stone is placed at the bottom of each hole. Layer thickness – 100 mm. Pipes are installed in the prepared pits and concreted.
- After the concrete has hardened, the upper frame frame is created. For this, use a 150x50 mm board.
- At a height of 100 mm from the ground, a beam with a cross-section of 100x100 mm is attached to the frame, which will be used as a lower frame and supporting structure.
- Logs are laid on the timber. To make them, use a 100x25 pine board laid on edge. The distance between the logs is 400 - 500 mm.
- They lay it on the joists floorboard. The best option— lumber with a section of 100x25 mm.
- The frame of the woodshed is sheathed edged board. Installation is carried out with gaps for better ventilation.
- To create a rafter system, lumber with a section of 100x50 mm is used. The lathing is made with a board with a section of 100x25 mm.
To ensure protection of firewood from moisture, it is necessary to provide overhangs in the roof structure. The minimum length of overhangs is 300 mm.
After erecting the building, it is necessary to treat the lumber with an antiseptic. The last question remains: how to paint the woodshed? The right paint should protect the wood from moisture, UV radiation, and protect the material from insects and pathogenic microorganisms (fungi, mold). In addition, good paint should be resistant to abrasion and provide a decorative effect over a long period of time. All of the above qualities are possessed by latex paints, which, according to professionals, have virtually no disadvantages.
Woodcutter with female hands - video
In private properties with stove heating or a bathhouse, firewood is indispensable. To keep them in order and dry, special storage facilities are installed. The logs are securely stacked in them and protected from precipitation. Eat different ways How to make a firewood shed at your dacha with your own hands.
To figure out how to make a firewood log, you need to get acquainted with its different types:
- Canopy. These outdoor firewood boxes are chosen for summer cottages; assembling them is not difficult. The process consists of preparing a floor raised above the ground, organizing at least 4 supports and a roof. To store large volumes, several sections are made, separating them with supports or partitions.

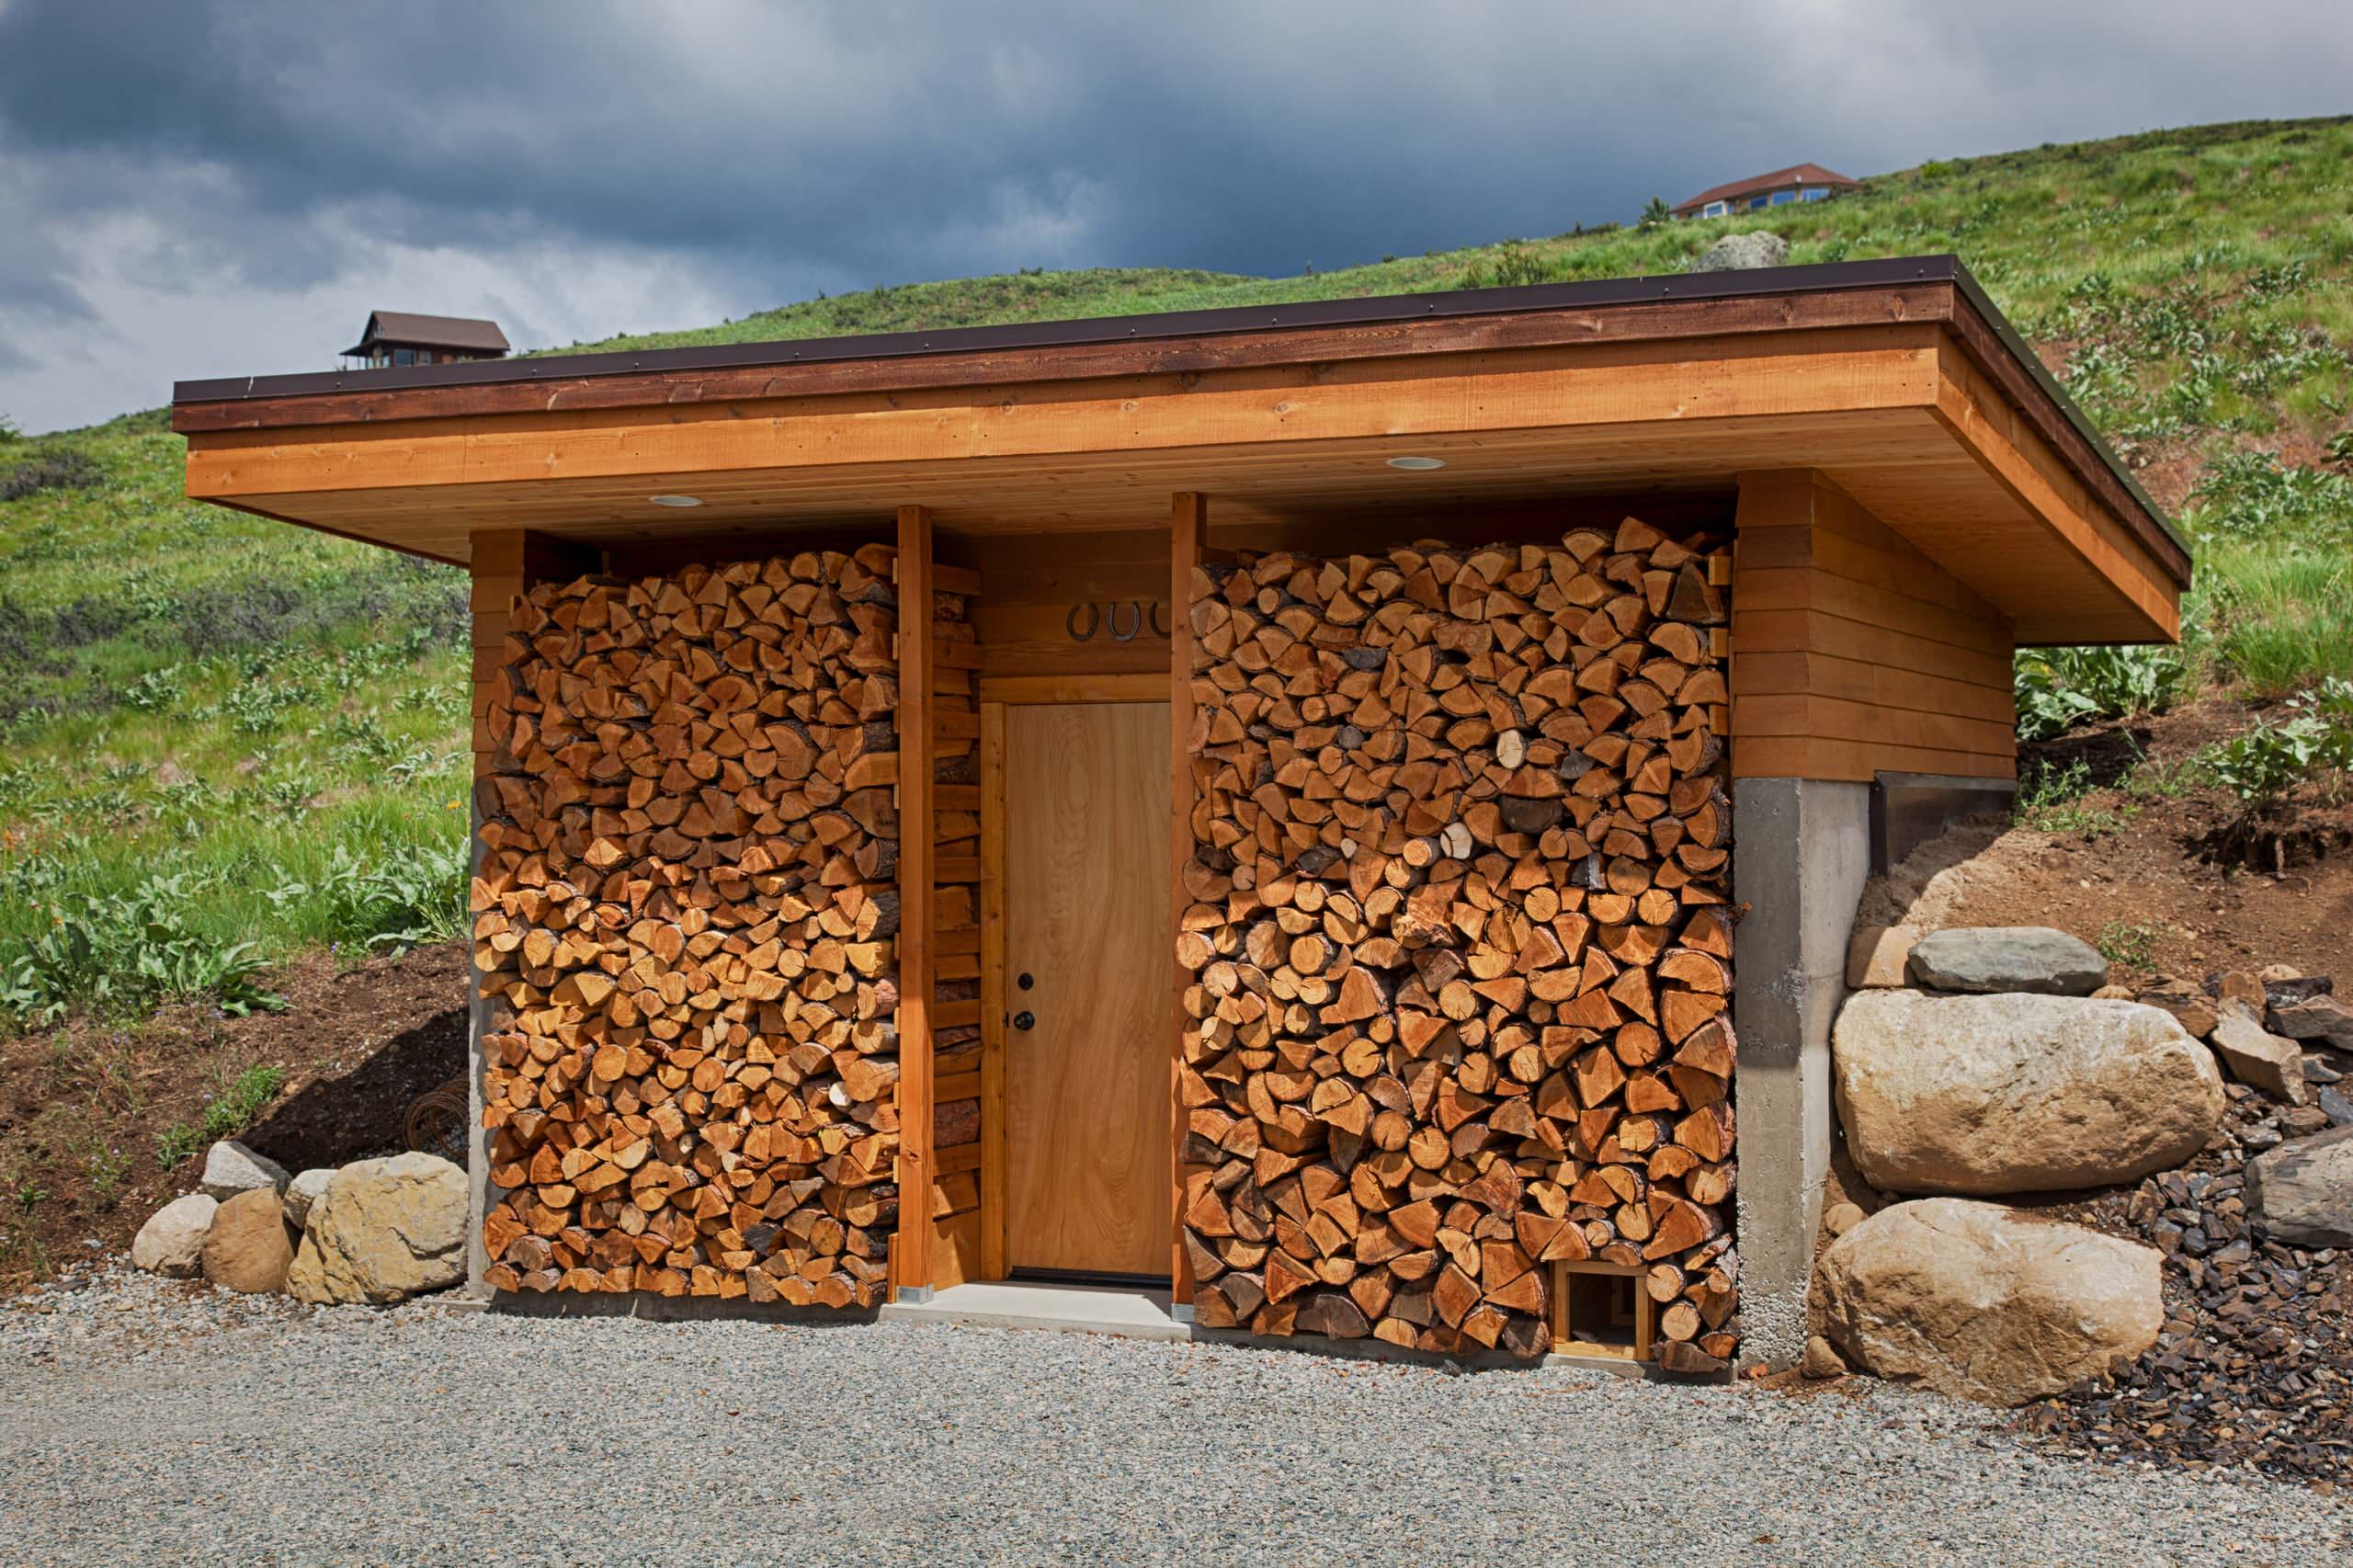
- Extension. It is stable and simple, with a building as the back wall. The important elements are a lower frame with an upper ceiling; it is not necessary to make walls. Such extensions are not recommended for wooden buildings, as the fire hazard increases.

- Free-standing firewood rack for a summer house or home. It is stable and used for large volumes of fuel. There are different manufacturing methods.

- Mobile firewood for a dacha (at home). It is designed for small volumes of fuel and can be moved.

Simple country firewood
For a summer cottage on the street, you can build it with your own hands simple design, it will be cheap.
You need to prepare:

If properly prepared, the process will take several hours. The algorithm is as follows:
- Cut out the parts to the required sizes.
- Make a frame. Assemble a rectangular frame from two long and two short boards. Use the remaining short strips as crossbars to keep the frame secure.
- Attach long pole bars perpendicular to the frame. Install them in internal corners grounds. From below, the bars should protrude beyond the frame, forming legs.
- Using short bars, fasten the side racks at the top in pairs.
- Secure the rear crossbars. Without them, the structure will be unstable.
- To be on the safe side, you can do top floor or replace it with 1-2 boards.
Advice! In order for even the simplest wooden firewood logs for the dacha to last longer, you need to paint them. To ensure reliable connection, it can be treated with waterproof glue.
Making a metal country firewood box
For the woodshed, you can take a profile pipe. It will turn out strong. For a metal woodcutter you will need:

To get everything smooth, you need to use a level. The work will take several hours, the algorithm is as follows:
- Saw the metal profile in the middle.
- Cut one corner into 0.6 m sections.
- From the second corner, prepare 4 sections of 0.3 m each, the same number of brackets of 0.15 m each and legs of 5 cm each.
- Collect side racks. The vertical supports will be sections of 0.6 m each; connect them at the bottom and top with sections of 0.3 m each.
- At the bottom of the rack, connect in parts metal profile- they will serve as the long sides of the frame.
- Attach the support legs.
- Fasten the profile to the side posts with brackets, placing them at an angle of 45°.
A metal building for the street will suffer from precipitation, so it needs to be painted. It is better to use matte black paint.
The metal firewood rack must be installed evenly. A platform is being prepared for this. You need to remove the sod and add gravel. It is better to install bricks under the legs.
To make the metal woodshed more stable, you need to strengthen the supporting frame with a crossbar. It is also placed on legs.
Outdoor country firewood
A DIY garden design will make it easier to maintain logs. At a summer cottage it is usually made of wood. You can make good wooden firewood sheds for your summer cottage if you use pallets as a source of materials.
To build a wooden woodshed with your own hands you will need the following boards:

The algorithm is as follows:
- Prepare the floor. Lay 6 long boards in a row, reinforce them across with 0.6 m strips. Fix two of them at the edges, three together in the middle, two more in between. Turn the base over.
- Secure the vertical posts at the corners. Use meter blanks. Fix another one vertically in the middle of the long side of the floor - it will support the back wall.
- Connect the vertical posts with small strips - three on each side. Leave equal spaces between the bars.
- Place the remaining pieces on the long wall.
To reliably fasten materials, it is better to use galvanized edges. For safety, all edges are smoothed with sandpaper. In order for a DIY firewood log to last longer, you need to paint it.
Important! It’s easy to make such a firewood shed at your dacha yourself, but it doesn’t have a roof. Firewood can be protected from rain and snow with a tarpaulin cover.
Woodshed adjacent to the building
This kind of firewood can be done quickly with your own hands. The back wall is replaced by the wall of the house, so some of the work is already eliminated.
There are a lot of options for creating storage for logs adjacent to the building. You can build a rectangular shelf frame or think through a design, for example, several polygon sections resembling a honeycomb. There are various projects on the Internet to organize your own firewood storage for every taste.
The simplest firewood container is formed from a raised floor with supports, side walls and a canopy roof. A similar firewood rack is well suited for a bathhouse. A large supply of logs is not needed, and construction will take a couple of hours.
It matters how to make a woodshed and what place to determine for it. To ensure good drying of the logs, it is better to choose the side exposed to the winds. Usually this is north.
Important! A sheet of metal should be placed between the firewood and the building. This will increase the safety of such a neighborhood. To prevent the appearance of woodworms, wooden structures must be treated with a special compound.
Free-standing woodshed
Such a structure is more reliable and leaves room for design. Construction will take more time, but the result can be a decoration for the site. A free-standing country firewood rack is usually made of wood.
You need to prepare:

It is more difficult to carry out such a construction for a dacha on your own, so they start with drawings. To build a woodshed with a pitched roof with your own hands, you must follow the algorithm:
- Mark the area, dig holes for log stands. For stability you need three supports in front and behind. Go half a meter deep. Fill one third of the prepared holes with crushed stone and compact it.
- Cover the logs with an antiseptic, wrap the bottom with roofing material - it serves as waterproofing. Place supports and secure with concrete (you can take a stone). To make a woodshed with a pitched roof with your own hands, the logs on one side should be 3-5 cm higher or more.
- Proceed to the floor. To do this, make a frame with several cross members, strengthening them with corners. Its height is 10 cm. Place the floorboard on the finished base and fix it. Leave ventilation gaps.
- Place the vertical supports and work on the frame for the top floor.
- Cover the walls.
- Install rafters - there should be at least three of them.
- Perform lathing and lay the roof from the selected material.
A coating is required to protect the structure. This could be paint or varnish.
If desired, you can build a gable structure. It may include not only firewood, but also coal.
Portable woodcutter
This firewood rack is suitable for a bathhouse or home. It can be wooden or metal. The structure should move easily. To make it you will need:
- boards and bars;
- corners;
- saw;
- drill;
- 4 wheels;
- screws and clamps.
The dimensions of the portable firewood rack must be determined independently. They depend on the room and doorways.
The design is made as follows:
- Assemble a rectangular frame. Secure the base from the inside with corners.
- Make 2 U-shaped side frills from the timber. Attach them to the frame.
- Use clamps and screws to secure the wheels.
- Make the plank flooring by laying the pieces crosswise on the base frame. Fasten them at intervals.
- Treat the firewood and paint it.
Firewood without tools
Tools are not always at hand, and logs need space. Without them, you can create a durable structure that can be quickly assembled and disassembled. It is stable and can withstand even heavy, damp firewood.
For firewood you will need 2-3 hollow concrete blocks, 2-3 logs and thick bars.
The algorithm of actions is simple:
- Find or prepare flat surface.
- Install two blocks with the holes facing up. If necessary, install another block that will serve as a support in the middle.
- Insert blocks into the holes in the blocks to serve as vertical supports. It is worth filling the pebbles first, which will get rid of the accumulation of dirt.
- Place logs on the outer edges of the blocks to support the logs. Between the vertical bars you can lay a log or thick timber for strength.
The resulting design is very simple, can be disassembled instantly, and can be moved to any place. Instead of a roof, you can use a tarpaulin or thick film.
How to make a woodshed
It is not difficult to build such a structure; in many ways it resembles a free-standing firewood shed.
You will need the following materials:

You need to act step by step:
- Assemble the floor frame. This is a rectangular frame and several cross members.
- Secure the vertical support posts. The height on different sides should be different so that the roof is sloped. Attach the posts below the frame. To make legs.
- Cover the walls, attaching the planks horizontally.
- Prepare the boardwalk. Depending on the length, the material can be laid lengthwise or crosswise. Use galvanized screws to secure.
- Equip the frame for the roof.
- Prepare the rafters, maintaining an angle of at least 15°.
- Lay a plywood sheet on the rafters, securing it lengthwise with screws at intervals of 15 cm.
- Lay down roofing felt.
- Secure the shingles. The starting point for styling is the lower left edge. The tiles should protrude approximately 5 cm from each edge.
The final stage is processing and painting wooden surfaces.
If you need a closed structure, then you need to form a fourth wall. You can install a door or leave a wide opening. Its width should be such that a person with an armful of logs can easily get out.
Making a shed for logs
It’s easy to make a shed for firewood at your dacha with your own hands. Possible options there is a lot of performance. This can be a barn-like configuration without a front wall or a pole-supported shed top with or without sides.
The basic elements are a floor with supports and a roof on them. If there is an adjoining building, then it is enough to add only the side walls.
A shed for firewood at the dacha is made from wood with your own hands. The roof can be wooden or made of roofing felt. The service life depends on the selected material.
To make a shed for firewood with your own hands, it is worth studying photos of such structures. The process does not require special skills and will take several hours.
Firewood bins can be different sizes and configurations, metal and wood. You can build a simple shed or shed, or an original building that decorates the site.
Photos of firewood for cottages and baths:


Introduction
Vacations at dachas, recreation centers, and campsites are becoming increasingly popular. When relaxing in nature, we grill shish kebab and warm ourselves in the bathhouse; in cold, dank weather we warm ourselves near the fireplace. Firewood is needed to fire them and start a fire in the barbecue. There remain houses with stove heating, where the preparation of firewood is relevant. They still remain the most affordable and environmentally friendly type of fuel. This raises the question: “How to store raw materials for heating?” To store and store them, you need a special shed or firewood shed.
She:
Before choosing the material from which you will make the firewood box, decide on the purpose and location. Stationary and portable outdoor firewood burners are made of brick, wood, metal, and stone. Indoors, they can be stationary or portable, used for their intended purpose or be part of the decor of the room.

The raw materials from which it will be made depend on this. For decorative firewood holders, dense fabrics, cord, jute, and glass are used. They are combined and decorated various elements. Forged firewood racks near the fireplace look gorgeous.

Metal firewood rack for a summer residence
A metal firewood holder is the most durable and reliable. It is made from a lightweight aluminum profile, but for a small number of logs. It is possible to make a portable version.

More reliable would be a stationary firewood logger made of round steel or profile pipe, channel The frame is covered with welded steel mesh. We cover the metal with primer-enamel or a protective layer of varnish. The fireplace may have a decorative stand for logs made of forged elements.

Wooden firewood for a summer residence
Wooden firewood is the most popular. It is easy to construct from scrap materials.

Any wooden blanks (boards, pallets, timber) are suitable for its construction. Making a beautiful woodshed is not an easy task. You need to show imagination and creativity, make the walls carved with beautiful patterns.

They must be ventilated to ventilate and dry the logs.
Peculiarities
decorative firewood - can be indoors or outdoors. Be additional functional and decorative element in the interior or to be an element of landscape design.

firewood holder - installed indoors or in open and closed gazebos with a fireplace. They are made portable or stationary, organically fitting into general interior. They are made from wood, metal, thick fabric and other materials.

Types of woodsheds
You cannot throw logs randomly into a woodpile. They should be folded correctly for better preservation.

Methods for stacking firewood:
- Circular method
- "Stack"
- With stakes
Circular method
If you don’t have a stationary woodshed, then you can stack the logs in the form of a barrel tower. It is necessary to drive a stake. It will serve as the basis of the structure being built.

Tie a fishing line or rope and draw a circle of a given diameter, depending on the amount of raw material. To prevent them from becoming damp and rotting, place tree bark or thick plastic film on the ground as a base.

Place the firewood on it in a circle carefully and tightly so that the structure is stable and does not sag. By laying firewood about 0.5 m high, you can fill the middle by stacking them in any order, but quite tightly. Continue laying in this way until the barrel tower is about 1.5 m high.

"Stack"
Stacking of logs is often used. This type of installation requires support. As a support a wall will do houses, bathhouses or other buildings; firewood grate for a summer residence. When laying, strictly control the slope towards the support. If you are laying two rows, then place thinner logs on the support and thicker ones on the outside. Due to the difference in size, there will be a slope towards the support.

If your structure stands separately from the wall, then use a wooden beam as a support. The height should be small, otherwise, under the pressure of the firewood, the support beams may break and the structure will fall apart.

With stakes
If it is not possible to lay it otherwise, you can use stakes as a support. The stakes must be those that will not bend from the logs. Drive them into the ground from several sides, forming a frame.

When stacking firewood, line each row with branches. They will play a reinforcing role. Place the logs in a checkerboard pattern. The top must be covered with any covering material that does not allow water to pass through.
Selection criteria


How to make a firewood shed at your dacha with your own hands
To build a woodshed for your dacha, you don’t need to have special education. It is worth analyzing its purpose, collecting necessary materials, make a drawing and get to work.

What we take into account when building a firewood shed for a summer house:
It should aesthetically fit into the landscape, in harmony with all buildings.
Logs must be protected from all atmospheric conditions (rain, snow, sun rays).
It should be installed in a shaded, well-ventilated area so that the logs are dry.

Place firewood on permanent or temporary flooring (wooden or concrete base, polyethylene film), on top there must be a roof or temporary protection made of any waterproof material (slate, sheet metal, dense polyethylene film)
Firewood must be carefully stacked so that it does not fall over, so that it is convenient to take and not get injured.

Build a woodpile from various materials Doing it yourself is not a tricky thing. The easiest way to do this is from wood.

What do you need for this?
Materials:
1 Wooden beams and boards;
2 Screws, wood screws or nails
3 For nails, a hammer, for screws and self-tapping screws, a screwdriver and a bit with a corresponding slot or a screwdriver;
4 hacksaw or jigsaw with wood file;
5 roulette;
6 boards 250mm wide, at least 25mm thick, 3m long - 4 pcs., 2m long - 1 pc.
Construction stages
1 You have a question: “How to build a woodshed from wood at the dacha with your own hands?” We need to know the amount of firewood that we will place in it. If you only need firewood to barbecue or light a fireplace in cool weather for the season, then you will need a small firewood rack with a capacity of 1.5-2m3.

This can be a free-standing structure or randomly folded blocks. If they are needed for a bathhouse, for grilling shish kebab, and for heating the house, then it is worth building a woodpile with your own hands, taking into account the consumption of firewood for 2-2 years. It takes from 2.5 to 6 cubic meters of firewood per year to heat a house. Only after a year does the firewood dry out well enough and produce good heat during combustion.
Wet firewood (recently harvested) burns poorly, produces a lot of smoke and produces almost no heat.

2 Choosing a place on the site for firewood

Take seriously the issue of choosing a place for a woodshed. Consider whether you are ready to build it stationary or a portable option will do.

If you plan to heat a house or bathhouse, then it would be reasonable to locate it near them or make an adjacent canopy. The approach to the woodpile should be convenient; it is advisable to lay paths to it. The place itself should be dry and shaded. It is better to pave the base of the woodpile, pour a concrete blind area, or, alternatively, use wooden pallets so that the firewood does not have contact with the ground

3 Let’s start building a wood firewood shed with our own hands
The simplest option:
1 Take two three-meter boards 250mm wide for the base
2 Cut a two-meter board into 25 cm pieces, take 4 pieces for the base
3 For vertical racks, cut 4 boards of 1.5 m each
4 We twist the boards for vertical posts and short boards together, then screw three-meter boards to them
5 We fix the remaining 25 cm of boards in vertical boards in the middle and on top.
6 It is advisable to process the structure antiseptic or paint it so that it does not deteriorate under the influence of precipitation.
7 Making a canopy

If you have a free-standing woodpile and it is not possible to make a stationary canopy, use any covering material (roofing felt, polycarbonate, slate sheet, etc.)

For a woodshed built with your own hands, you can make a pitched roof.

The main function of a canopy is protection. It protects against natural phenomena, and also provides ventilation for wooden chocks. It is necessary so that the logs dry out and are not exposed to putrefactive fungi.

Cover the canopy with sheets of metal profiles, colored or galvanized, slate, polycarbonate, brick, etc.
Video description:
Outdoor firewood rack for a summer residence
If the size of the shed allows, wooden blocks are placed inside. The advantages of such placement are as follows:
firewood is not exposed to atmospheric conditions;
aesthetic, they are not scattered on the site;
there is no need to build additional outbuildings;
firewood can be stored for a long time without changing its characteristics;
they are hidden from prying eyes and unscrupulous neighbors.

DIY firewood shed

If the size of the shed does not allow you to place wooden blocks inside, build an extension to the shed from the outside.
Advantages:
Saving space and materials;
Convenience, all buildings are nearby, no need to go far;
Additional thermal insulation of the adjacent room.

1 Install the extension on a flat surface. It’s good if the blind area is already made of concrete, brick, tiles or asphalt.
2 Make a base of bricks, concrete blocks or wooden pallets. The base is necessary for ventilating the firewood.
3 The frame can be made of metal pipes or wooden blocks. Metal pipes can be used round, profile or channel. If you plan to use the woodpile long time, assemble a solid structure by digging the woodpile posts into the ground to a depth of 0.5 m
4 If you use metal pipes as racks, then make the walls of the woodpile from welded mesh by screwing or welding it.
5 If you use them as stands wooden beams, then the walls can be covered on one, two or three sides, depending on the design of the building. Suitable materials include slats, boards and other materials.

The main thing to remember is that the structure must be ventilated.
There is one drawback. Insects and wood pests come with the delivered firewood. Therefore, it is worth protecting the wall of the shed adjacent to the woodpile. It can be treated with special protective agents or a sheet of metal nailed to the wall.

DIY woodshed
As mentioned above, the woodpile can be stationary or portable.
They can be both inside the house and outside.

Stationary outdoor firewood sheds are often built separately. They can be in the form of a closed firewood shed or in the form of a very simple canopy. Such a woodshed can be placed far from the house and other outbuildings for fire safety purposes.

When building it, you need to fill the foundation in compliance with all the rules. Dig a ditch around the perimeter of the woodshed under construction to a depth of soil freezing of up to 1 m. We fill in layers of sand and crushed stone and compact each layer thoroughly. We pour the concrete foundation.
You don't have to fill the foundation. To do this, remove the top layer of soil, cover it with sand and compact it well. Place a base of stone tiles on the sand, on which wooden beams should be laid.

We cover the roof with any available building material.
Drawing of a woodcutter with dimensions

Firewood holders for fireplaces and stoves
If in your home or closed gazebo If you have a stove or fireplace, then you need another firewood box. It can be stationary or portable.

A stationary firewood rack is made in the form of special niches or shelves next to the stove or fireplace, which harmoniously fit into the overall interior.
If during the renovation you did not think about or plan for such a niche, then a portable firewood stand will be the way out of this situation. It can also be used in small enclosed gazebos.

Forged firewood stands are very original and beautifully made, which can be used not only for storing firewood, but also as a chair-bench.

Baskets woven from wicker are also used as firewood. But they are not durable, so they have not gained much popularity.

Housewives handicrafts sew decorative covers for woodpiles from burlap and weave from thick rope. They look very modern and original.

Using imagination and creativity, craftswomen decorate homemade woodpiles with appliques, embroiderycoy. And you can knit or sew an original design piece.