A shower stall is a great addition to an ordinary (and extraordinary) bathtub, and it can completely replace a cast-iron pond. Installation shower tray must create with my own hands reliable foundation for full water procedures - durable, comfortable and safe.
Specifics of installing shower trays with your own hands
A cabin with a built-in shower can be placed in a small bathroom - however, it will not be superfluous in large plumbing apartments. Behind its walls you can enjoy hydromassage and tropical showers, music and lighting effects, a working telephone and aromatherapy, personal privacy and the romance of joint water procedures. The more functions there are, the more expensive and complex the shower cabin is. installation plan. However, the number of budget models is steadily growing, and many of them no longer belong to the category of “luxury”. This applies to both the cost of the cabin itself and the cost of installation.
Yes, it is not at all necessary to install a shower tray yourself. You can purchase a turnkey cabin and experienced specialists will install it quickly and with a guarantee. This will slightly increase the repair budget, but will allow you to start enjoying the benefits of the shower right on the day of purchase. It is important to remember that shower trays are made from different materials, and some of them are not worth installing yourself.
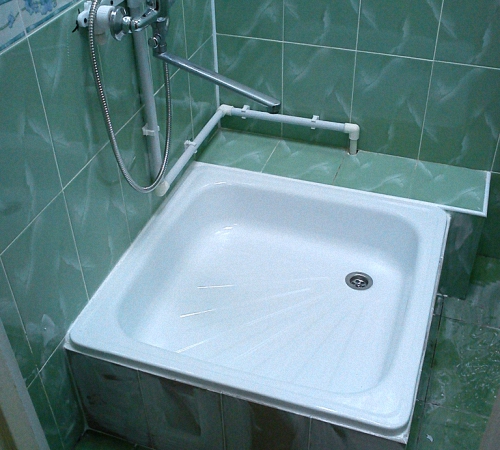
Marble is heavy, and if there is no experience working with this stone, it can crack even at the stage of preliminary measurements. Ceramic trays are very beautiful, but they are afraid of even slight impacts - they are fraught with the destruction of ceramic beauty into many fragments. Self-installation most often means steel or acrylic tray– they occupy about 85% of the total market. Steel is stronger than plastic, so let's look at the secrets of installation acrylic base for the shower.
DIY acrylic shower tray installation
Most acrylic structures have an obvious weak point - the lack of support under the central part. No matter how strong the perimeter is, a man advances into the middle! A floor in a cabin that is cracked underfoot is dangerous not only because shower water leaks to the neighbors below, but shards of acrylic can seriously injure a person who is absolutely unprepared for such a turn of events. Therefore, the typical installation sequence when installing an acrylic pallet is as follows:
Installing an acrylic shower tray with your own hands - step-by-step diagram
Step 1: preparatory
Renovations in the bathroom must be completed by the time you purchase the shower cabin. This applies not only to finishing the walls with tiles or plastic - it is much more important to carefully install the sewerage system, water supply pipes and electrical wiring. Most shower cabins are connected to all three communication systems. Therefore, hidden electrical wiring must be highly resistant to moisture and minimum quantity"twist".
If the wiring fails, pull new wires under ceramic tiles it won't work without something new overhaul. It is equally important to use only quality pipes- both for water supply and sewerage. They are tested after installation and their outlets must allow easy connection of hoses. Before installing the shower tray yourself, these mounting holes must be closed with reliable plugs.
Step 2: installation
Any shower trays (not just acrylic ones) must be set strictly at level. Their profile allows water to flow into the sewer hole only if the installation is perfectly horizontal, otherwise there will definitely be puddles in some corner after a shower. That’s why it’s so important to complete your bathroom renovation; installing a tray on a flat tiled or ceramic surface is easy and simple.
But easy and simple does not mean durable! Therefore, after installing the pan level, you cannot lean on it, and even connect the sewerage prematurely. It will be necessary to secure the central part without losing horizontal accuracy. To make this task easier, you can draw thin lines with a pencil along the wall tiles along the entire perimeter of the tray.
Step 3: Firming
Specific method for increasing strength acrylic surface under our feet is related to the size of the mounting clearance. It is advisable to leave it in such a way that there is access to the sewerage system for possible cleaning and/or replacement of sewer pipes. If the clearance size is sufficient, additional elements bricks will serve as the foundation, if it’s too small - steel pipes. Thick rubber should be laid on top of the pipes and bricks and the entire structure should be pushed tightly between the floor and the acrylic “ceiling”. Only after this the cabin is connected to communications.
Shower tray - do it yourself with
You can create a base for a shower without a tray at all - or rather, make it yourself rather than buy it in a store. The labor intensity of such work is much higher, but you are not limited by the size of the man-made shower. If you are not sure where to start renovating your apartment, feel free to choose the bathroom. Those who have done a good job of arranging the plumbing room will definitely not be afraid of rooms with attics and corridors.
DIY shower tray - step by step diagram
Step 1: Waterproofing and drainage
Location homemade cabin it is necessary to waterproof to a height of about 30 cm. For this, sealant, fiber rubber or other compounds are used, the choice of which is more than wide. The sewer pipe is led to the very center homemade pallet, this makes it easier to drain. All sewerage elements must be carefully taped and checked for leaks before installation. The outlet sewer pipe should protrude 12-15 cm above the base floor level. Do not forget to carefully seal the pipe so that construction debris or other foreign objects do not get inside.
Step 2: Lay out the barrier
Having installed the shower tray with your own hands, we lay out a barrier of bricks along its perimeter. The barrier line must correspond to the walls of the future cabin. Height brick perimeter– at least 5 cm above the level of the drain pipe. Sharp brick corners are unacceptable, so you will have to work with the mortar and carefully smooth them out. The solution is prepared to be moisture-resistant and durable; it can be mixed in a medium-sized container with a trowel and spatulas without using shovels - large volumes of cementation are not planned. When mixing the solution, the ratio of cement and sand is maintained at 1:1, with the obligatory addition liquid glass for water-repellent qualities.
Step 3: Fill the floor
Pouring the floor under a homemade pallet is carried out in three stages. First, using a self-leveling cement mixture a basic fill is made - smooth, from wall to wall, about 5-8 cm thick. After it dries, the entire surface is treated with waterproofing - Fiberpool, Decoprof etc., maybe in two layers.
When the waterproofing layer has dried, mix a solution of tile adhesive and cement mortar. It is applied in concentric circles, gradually increasing the level from the drain hole. The work is painstaking. It is necessary to maintain the same radius of curvature; a rough transition cannot be hidden under the finishing. The cement surface must be thoroughly rubbed, getting rid of rough edges and miniature steps.
Step 4: Finishing
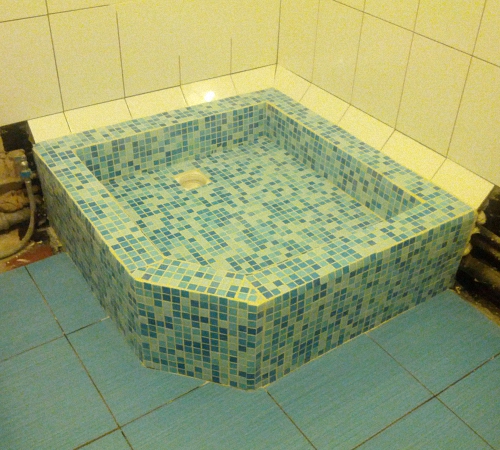
It is better to finish a cement floor with a slope using mosaics. Small mosaic elements can hide unevenness and look great for many years. Special glass mosaic for baths has anti-slip properties and does not lose its original colors during use. Of course, laying mosaic tiles is much more difficult than tiles on a porch, but no one promised that a completely homemade shower tray would be a cakewalk in renovations.
The hand-made tray for an exclusive shower stall is ready. Yes, we almost forgot - Before installing the shower tray, be sure to replace the plastic drain with a steel or brass one! Even if the plastic one is included, and the manufacturer describes its incredible strength. It is customary to walk on the pallet and shift from foot to foot - so only brass or steel will withstand the load, and it is easier to clean them as needed.
For long-term use of the shower cabin, it is necessary to install the shower tray correctly. The technology for performing the work must be accompanied by competent installation of all structural parts. In this article we will describe the features of installing a shower tray in accordance with the rules and recommendations of specialists.
Types of pallets
The shower is an excellent addition to the bathroom, which saves free space in the room. The method of installation of the shower tray must be installed in compliance with safety regulations. Installation options depend on the type of pallets and the technology of fastening to a specific material. However, it is important to remember that not all pallets can be installed independently, and in some cases, you need to seek help from specialists.

Shower trays differ in the type of material from which they are made. So, the following types of structures are distinguished:
- cast iron products;
- marble and ceramic trays;
- steel products;
- acrylic pallets.
Marble products are considered the most durable and reliable, however, their cost is quite high, so not everyone can afford such a purchase. Ceramic pallets are also expensive and have excellent decorative properties, but are too sensitive to various damages.
An affordable option is to install a shower tray made of acrylic materials. To install the structure, it is necessary to build a special frame that would support the pallet, because such products tend to sag under weight. The kit includes special mounting feet, as well as reinforcement parts that ensure the strength and reliability of future installation. For example, cast iron pallets are the cheapest among other types of products. The peculiarity of such pallets is their durability and reliability, which is indicated by the material used.

Aspects of pallet installation
The cost of a shower cabin depends on the variety of functionality of the product. For example, a shower with hydromassage, telephone, lighting and other effects will have a high cost. It is important to take into account the payment to workers for installation of the entire structure. The easiest way to install acrylic or steel products with your own hands.
During the DIY installation process, it is important to remember to level the surface under the shower so that the legs are in a vertical position. The technology for assembling the structure can be seen in the instructions for the product. They indicate the installation features of a plastic or metal product, and also describe connection tips sewer system to the shower stall. Pallets can be installed on plastic support elements, which can be replaced with bricks.
Important to know! To insulate the shower tray, as well as to seal all voids, it is necessary to use polyurethane foam. However, this method can complicate dismantling or repair work. To check correct installation shower trays, you need to stand in it with extreme caution, after which you will determine the stability and reliability of the structure.
Installation of an acrylic pallet with your own hands: features of the work
The main disadvantage of acrylic products is the lack of support under the central part of the pallet. Thus, the surface may be damaged by careless movement. This will cause damage to the installation and damage to the human body due to splinters.
Therefore, when installing an acrylic tray, it is important to follow the sequence.
Preparatory work
During repair work in the bathroom special attention pay attention to connecting the sewer system and water supply. The shower stall must be connected to several systems, which include water supply and drainage, as well as electrical wiring. At the same time, the last part must have high resistance to dampness and water.
To install a shower tray for showers, you need to purchase high-quality pipes and other products to avoid leaks in the future. After installing all communication systems for the bathroom, it is important to carefully check everything, especially the water supply and the operation of the sewer drain. All pipe openings are closed with temporary plugs at the time of installation work.
Installation process
During installation, it is important to align all pallets strictly vertically. This is due to the need for proper drainage into the sewer, only if the product is installed perfectly evenly in a horizontal position. This will prevent the formation of puddles in the shower stall. To install the tray, it is important to make a flat base of tiles or ceramics.
To properly mount the pallet, you need to secure the central part of the product, while the horizontality of the structure should not be compromised. To simplify the work, draw a contour along the entire perimeter of the pallet to establish the exact position of the product. After this, you can begin connecting sewer pipes and other elements.
Strengthening the shower tray
To ensure the installation strength of shower trays, it is necessary to measure the distance between the product and the floor. At the beginning, it is important to leave space for the drain so that the drain pipes can be cleaned or replaced later. Additional support parts can be bricks or steel pipes, which depends on the design parameters.
Rubber is placed on top of the pipes or bricks, after which the supports must be pushed tightly under the base of the acrylic tray. After this, you can connect the communication systems.

Detailed instructions for installing shower trays
Before starting installation work, you need to prepare necessary tool. For installation you will need the following materials:
- FUM tape;
- sealant or special glue;
- twin to the sewer network;
- If the kit does not include a siphon, then you need to buy it at any plumbing store.
1. The tray with legs must be leveled horizontally. To do this, the legs are separately unscrewed and fixed in special locking screws. If you purchased a booth without supports, then you need to fill the floor with cement mortar. The level of the base should correspond to the position of the floor in the bathroom. After this, installation work begins and finishing is done using ceramic tiles or other products.
2. It is important to fix the pallet on the wall side using adhesives. Joints and fastening points must be additionally sealed with sealant. All work must be carried out carefully to avoid further flow of water between the wall and the structure. A double is attached to the sewer system; if there are other types of connections, a tee is installed.
3. All parts and joints of the pallet must be carefully sealed to avoid water leakage and destruction of the pallet.
4. It is important to install the pan above the level of the sewer pipes. This is necessary for further access to communication items for their repair or dismantling in case of breakdown or damage.
5. Finally, you need to check all attachment points. They also check the water supply and drainage. If there is a leak in some areas, it is important to tighten all connections more thoroughly. If necessary, additional insulation is carried out.
Features of installation of other types of pallets
Cheap cabin tray can be installed in different ways, for example, on a brick base, on plastic supports or a metal frame. The technology for carrying out the work depends on the characteristics of the product and the materials from which it is made.
For a ceramic tray there is no need to install supports or other racks, because the structure is mounted directly on a flat floor. Mounting clearance in in this case will not happen, therefore it is important to install all communication systems efficiently and professionally. To carry out repair work or replace sewer parts, you will need to dismantle the pan. Answering the question: how to install a shower tray without legs made of ceramics, you need to attach the product using glue or a cement mixture for tiles. Lastly, install the drain hole.
To install steel or cast iron products, you need to use more reliable support elements, which are bricks. Initially, the boundaries for installing the pallet are set on the floor. After this, a cement mortar is prepared and brickwork is made. The height of the masonry must correspond to the parameters of the pallet and have the same shape. The pallet must not be in contact with the floor in order to be able to install the communication system.
Three days later, after the cement mortar has dried, you need to install a pallet. You need to apply a layer of cement on top of the masonry, then apply the product and level it in a horizontal position. A hose must be attached to the drain system. As facing materials tiles are used, decorative panels, mosaic and other finishing options. This is necessary to complete the installed structure.
Unlike installing a low shower tray, for other products you need to use a metal or plastic frame, making the DIY installation process simple. The work process consists of aligning the legs, installing the tray and fixing the drain hole.
At the end of installation, it is necessary to check the stability of the structure. If the pallet is loose or fastened, then additional supporting elements need to be made such as brickwork or attaching steel pipes.

The process of making a pallet with your own hands
It is quite possible to install a pan with your own hands without buying similar products in plumbing stores. The main thing is to adhere to the rules and detailed instructions performance of work. The shape of the base for the shower cabin can be different, you can also use different materials for finishing, creating your own design of the structure. The work process has the following sequence:
1. First, we designate the location of the drain and installation of the drainage system. We cover the surface of the base under the shower tray with a waterproofing layer, and the height of the wall covering should be 30 cm.
2. A brick barrier is installed along the perimeter of the structure, the height of which should be more than 5 cm above the position of the drain hole. Next, the screed is poured, which should be 6 cm below the drain point.
3. After the screed and brickwork have hardened, the barrier is covered with a layer of insulation. Filling of adhesives or cement mortar is carried out with a slight slope towards the drainage system. The technology for applying the mixture starts from the edge and moves towards the center. It is important that there are no steep angles of inclination, as this creates significant and sloppy transitions.
4. At the end of the work, the surface is finished different materials, for example, ceramic tiles, mosaics and other products at the discretion of the owners.

Features of installing sides for a shower tray
After determining the specifics of installing the shower tray, a video of which is presented at the end of the article, you can begin building the sides. If the tray has a large height, then it is necessary to build one or more steps for the shower stall. The masonry can be made of bricks with the installation of formwork, however, the type of material used does not matter, because the surface will be covered with tiles.
After laying the steps and removing the formwork, it is important to cover the surface of the sides with a primer and a layer of waterproofing. After this, the treated and correctly erected structure can be covered finishing materials. It is important that the shade and type of finish matches the appearance of the shower stall and the style of the bathroom. It is important to tiled the walls behind the pallet if they are not treated with waterproof materials. As a tile adhesive, you need to choose waterproof products without the addition of silicone, as it darkens over time and spoils appearance shower cabin.

To equip a shower stall in an apartment, it is better to seek help from specialists. This will allow you to correctly distribute the load on the base, as well as lay all communication systems. It is easier to install such a structure in a private house or in a country house, where there is no danger of flooding the lower floors of the house. During the work process, it is important to fasten all parts and elements firmly and securely in order to extend the life of the shower tray.
Small bathroom? Or do you simply prefer a shower to a bath? If you nodded your head in agreement to at least one of these questions, then this article will be interesting to you. Here we will talk about how to install a shower tray in your bathroom.
However, not all at once. It is important to know the installation technique, but first we will understand the types of pallets and other important nuances.
Types of pallets. Making the right choice
Pallets are quite varied. Color, material, depth, shapes and sizes - all these parameters vary between models. If you have already purchased the pallet, great. But if you are just at the selection stage, we will try to help you not make a mistake.
Differences in shape and size
In total, you can distinguish 4 main forms of shower trays:
- Square (with edge sizes up to 130 cm);
- Rectangular pallets have minimum size 70x80 cm;
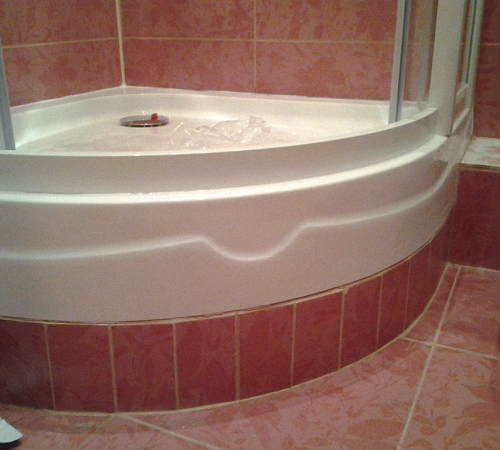
- Semicircular – 80x80, 90x90;
- Pentagonal – 100x100 cm.
In addition to shape, pallets also differ in depth. So you can purchase plumbing fixtures with a depth of only 4.5 cm. The maximum is 18 cm.
Not all sizes are listed. More details can be found upon purchase. However, it is worth considering the size of the bathroom. But you shouldn’t forget about comfort either. If the small size confuses you, and the minimum depth causes discomfort, it is better not to save money and choose a larger pallet.
Differences in materials of manufacture
There are enough materials for making shower trays. The main ones are: acrylic, ceramics, cast iron, steel and even marble. Which one should you choose? The answer to the question lies in another question. Quality or appearance. The fact is that some materials are more durable, others are more durable. design solution. Therefore, you should decide what is more important to you. Or you can combine both qualities. But here comes a financial problem.
The best option would be a marble tray. In terms of external parameters and strength, none of the above options can be compared with it. However, this is where this comes into play financial plan. The cost of the pallet is high compared to other models, so not everyone can afford it.
If you rely on strength, then do not ignore cast iron and steel models. The first ones also have an attractive appearance, which, alas, cannot be said about the second option.
Acrylic and ceramic trays have a beautiful appearance. However, compared to plumbing fixtures made from other materials, they are more fragile. Despite this, acrylic pallets are purchased most often. Many are not embarrassed by the fact that even under the weight of a person they already bend and can crack. To be fair, we note that this can be avoided. This is done by first installing a special stand for the pallet. Curious to know how to make it? Read on.
Acrylic shower tray installation basics
Since we have already touched on the topic of installing acrylic pallets, we will not deviate from the course and will immediately analyze the installation technique.

First of all, you should decide on a stand for the pallet. It can be installed on the floor, and then the legs can be adjusted. However, it is better to mount a brick stand that will provide support from below. This way the pallet will stand more confidently, and you won’t have to worry about waiting for the day when the coating bursts.
Basic installation steps
You already understand about the brick substrate. But let's look at everything from the very beginning. It is worth noting that further instructions apply to all pallets, not just acrylic ones. So, let's go.
We have already discussed the parameters of pallets and how to choose them. However, there is another nuance that lies in the drain holes. Usually they are located at the bottom, but there are options when the holes are shifted to the side. This should also not be forgotten when choosing a pallet.
Once the shower base has been delivered, you can move on to the main work. The most necessary thing is to make markings. To do this, place the pallet in the selected location and outline it with a marker. Also, do not forget to indicate the drainage location. Try not to make any mistakes in the markings so that further problems do not arise.
After this, remove the pan, disconnect the drainage hole into parts, the outlet of which is connected to the main one sewer pipe. Do not forget that the location of the hole must coincide with the previously applied markings.
Now take the pallet again and try it on in accordance with the markings. If the hole fits perfectly, you can go ahead and install the pipes. Remember that their joints must be well sealed. Finally, the pallet itself is installed.
Adviсe
The debate about how the pallet should be installed—flatly or with a slight slope—will probably never end. In fact, there is not much difference. And if the essence of a perfectionist comes out in you, and you want the pallet to stand perfectly level, stock up on a water level. But if you consider it necessary to install the shower bottom with a slight slope, be sure to take care of additional strength.
Remember when we talked about how important it is to install bricks under an acrylic pallet? If not, move the page up a little higher. So, in addition to support, they serve as a soundproofing covering for your neighbors. The water that beats against the pan will be incredibly audible to the residents of the lower apartment. If you don’t want them to know the schedule of your showers, or just want to protect other people’s nerve cells, soundproofing is a must. However, it can be not only bricks. Now available for purchase modern materials that do their job better.
Do you want to visually expand the pallet? Cover it with brick, on top of which stick ceramic tiles. Why ceramic? She tolerates it best high level moisture. In addition, it is better to install the tiles with a slight slope towards the pallet. This way the water won't stay on it.
We make a pallet with our own hands
People often say that you have golden hands? Then maybe you can try making a shower tray with your own hands? What are the advantages of this method?

- You can choose any shape and size;
- At the same time, you will save something;
- And once again make sure that your hands are truly golden.
However, think again before you jump into action. After all, the work is really not easy. Have you changed your mind? Great, let's begin.
To begin with, we determine and install the location of the drain, the height of which should be at least 20 cm from the floor. However, we are in no hurry to consolidate it. You will definitely do this, but a little later, when you have carried out all the calculations and are convinced of their correctness. After this you can secure the drain. This is obvious, but let us remind you anyway. The drain must go into the main sewer.
There is still a lot of dusty and difficult work ahead that can damage the drain. To prevent this, it should be covered metal pipe, which fits in diameter and attach it to the floor with clamps. Next you need to create a platform for the future pallet. To do this, lay bricks around the entire perimeter, which should be poured concrete screed. By the way, it should be about 7 cm below the drain level, since there will be several more layers on top. You will find out very soon what they will be made of.
So, while your screed is drying, don't waste your time. Consider what the side for the tray should be and whether a step under the seat is needed. All this can also be made from bricks, and ultimately finished with ceramic tiles.
Finishing work
When the screed and brick compound are dry, you can prime the surface with a special waterproofing compound. Now the design is almost ready. All that remains is to cover it with ceramic tiles. You should choose it in accordance with the overall style of the room.
The shower tray is ready. When everything is dry, you can try it out.
As you can see, you can install a shower tray with your own hands in various ways. And you don’t necessarily need to start by purchasing this plumbing fixture. However, whether it is a purchased pallet or a home-made pallet depends only on you. The main thing is to follow all installation procedures correctly, and then you for a long time You will enjoy your time in the shower.
Video: how to install a shower tray
Shower stalls are deservedly popular. Every owner dreams that a newly purchased new cabin will delight him for many years, without causing any trouble in the form of neighbors flooded from below. This condition can be met only under one condition - the shower tray must be installed in accordance with all the rules of professional installation. It is worth considering in detail how to install a shower tray so that it serves for many years.
Types of pallet designs
Improper installation of the pallet over time leads to its gradual destruction and, as a result, complete failure.
Pay attention! When installing a pallet that rises above the floor, it is advisable to install an additional step. This is necessary not only to make getting into the shower stall as comfortable as possible, but also for safety reasons.
If all installation is done correctly and according to the instructions, the shower stall will please all family members for a long time and will leave the neighbors dry.
Do you want to save space in your bathroom by installing a shower? The bathroom is a place of relaxation that should be practical and aesthetically pleasing, right? You plan to do everything yourself installation work, but are you confused about installing a shower tray and connecting plumbing?
We will show you how to cope with this task - the article discusses important points that will be encountered during installation. We also paid attention to the features of pallets made of various materials, describing in detail the installation process for each option.
To help the novice plumber, we have selected photographic materials demonstrating important nuances, and a video detailing the assembly and installation of a compact shower cabin.
Manufacturers are ready to surprise the most sophisticated owner, offering many shapes, sizes and design options.
One of the first classifications is the division of models by shape. These can be square, oval, round, triangular, rectangular products.
It is worth choosing the shape and size of the tray that will distribute the space in the bathroom as ergonomically as possible with the appropriate level of convenience.
Image gallery
No. 4 - installation of ceramic and marble models
Ceramic and marble sanitary ware are trending today. Shower trays are no exception. Such products are durable and massive, so they do not require the use of legs or reinforcing elements.
The installation method is selected depending on the design of the pallet.
There are two options:
- Niche design. Many ceramic models have a niche in the tray cavity for installing a siphon and draining the sewer system. Such a tray simply needs to be connected to the sewer and installed directly on the bathroom floor without any additional steps. All that remains is to attach the walls of the shower stall.
- Monolithic option. In this case, in order to connect the drain hole to the siphon, you will need to build a pedestal. Inside it there will be space for connecting to the sewer.
The construction of the pedestal occurs as follows. We apply a layer of waterproofing to the area where the pedestal will be built.
For this you can use liquid rubber, roofing felt, polyurea or other composition. You must wait for complete polymerization if you used a liquid product.

Any material can be used as waterproofing modern version liquid formulations, which, after application, polymerize and create a waterproof layer
Inside the contour of the pallet we make brickwork with a height that would be enough for the normal location of the siphon. It is necessary to provide a cavity for the drainage system.
We connect the drain hole, the reverse end of which is connected to the outlet pipe. Apply a layer of cement mortar on top of the masonry.
DIY pallet construction
The process begins with preparing the future space for the shower stall.
Step 1. To begin with, the installation area is waterproofed, as in the previous paragraph. This will help protect the walls and floors from mold, mildew and dampness.
The process of making a pallet yourself includes the following steps:
Image gallery
The drain hole is immediately connected to the sewer system. The installation must be very tight, so you can use glue and sealants on all threaded connections.

When purchasing a drain for a homemade pallet, you cannot save money. Choose quality product, which is suitable in size will last as long as possible
Step 3. Now you need to lay out the base (use brickwork or rough screed) after the waterproofing composition has dried.
We lay the walls using silicate or ordinary bricks. Before this, you need to put a metal mesh on the base to make the structure solid.
We process the entire base of the pallet waterproofing material. After it dries, we apply a layer of screed over the entire surface of the pallet to hide all the brickwork behind it.
It is important that the screed has minimum slope towards the drain so that water does not accumulate after using the shower stall. After drying, apply the penultimate layer of waterproofing.
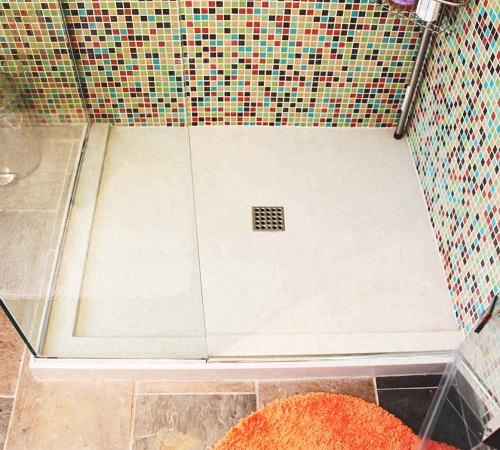
Step 4. Leveling the surface of the pallet. To do this, you can use a self-leveling mixture. We apply the final layer of waterproofing and cover the pallet with tiles. It can be mosaic or any other tile.
Tile or mosaic cladding
In many cases, side cladding is required to hide the mounting bases. One of the most convenient options to solve the problem - use mosaic tiles on a plastic or glass base.
A layer of glue is applied to the base using a notched trowel. After pressing the tiles, excess adhesive must be removed immediately.
With the help of mosaic, you can cover any uneven surfaces, since it can be easily cut with construction scissors or a knife thanks to its paper base.
It doesn't matter whether you use tiles or mosaics, all seams need to be sealed. This especially makes sense when you've decided.

The space between the pallet and the floor can be closed using mosaic or tile cladding. Mosaic fragments are flexible and allow you to quickly and efficiently line the sides or the entire pallet if you build it yourself
When forming seams, use crosses. After facing, you need to grout the seams using waterproof grout and a rubber spatula. Then the remaining grout is removed and everything is wiped with a piece of cloth. After everything has dried, you need to wash the tiles.
Strengthening a steel or acrylic product
These solutions, especially acrylic ones, do not have a strong enough structure. Measures to increase strength come down to installing supporting elements, which can be bricks.

It is important that the pallet presses on all supports with equal force, otherwise one of them may simply push through the bottom
In this case, all supports in places of contact with the bottom must follow its shape. For this you can also use gaskets made of paronite or rubber.
Some complete ones have a greater height of the fence and tray, for the installation of which the ceiling height may not be sufficient. In this case, you need to make a excavation of the floor in order to install the tray and connect it to the drain.
Conclusions and useful video on the topic
How to install a shower stall correctly:
Installing a shower tray when the right approach does not take much effort and does not require special training. If you follow the instructions, you will get a first-class installation of a monolithic pallet with the highest possible reliability.
Do you have anything to add or have questions about installing a shower tray? Share your opinion and leave comments on the publication. The contact form is located in the lower block.