Since ancient times, fences have been built in Rus'. They were mostly wooden. With the advent of new technologies, materials such as metal, reinforced concrete, polycarbonate, corrugated sheeting, brick are increasingly crowding out the aesthetic, but not so durable wooden fence from our lives. Those who prefer environmentally friendly materials, create a rustic design on their site or already have wooden house, chooses a wooden fence. In addition, if you study the issue in detail, you will see how diverse wooden fences are. They can be one of the most impressive elements in your garden design.
Types of wooden fences

By wooden fence we often mean an ordinary picket fence, which we have long been accustomed to and which was quite common in Soviet times. Over time, the situation has changed radically and now wooden fences are herringbone, cross-country, chess, and lattice. And an ordinary wooden picket fence looks great equipped with brick pillars.

Classic wooden fence

Pipes are installed along the perimeter of the site and concreted into the ground. Between the pillars, veins or purlins are attached, made of timber measuring 50X100 mm or so. Fence boards are nailed perpendicular to the veins either joint to joint or at a short distance from each other.
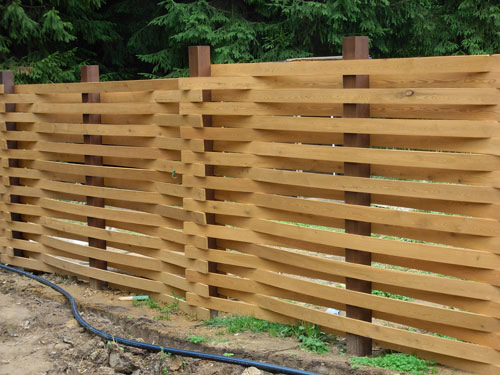
Wooden fence with ladder or herringbone pattern

Similar to a classic fence, pillars are concreted into the ground. On their internal and outside fastened decorative overlays made of wood. They will become guides for the remaining boards. Boards measuring 25x100mm are laid in the grooves between the overlays - horizontally overlapping. If you use calibrated pads, you can create a ventilated fence. And additional thin vertical metal stakes allow you to create another type of such fence.
The fence columns are covered with wooden decorative covers.
Fence "Cross"

It is possible to combine a wooden fence with reinforced concrete by constructing a “Cross” fence. The same 60X80 mm columns are installed in concrete-filled holes in the ground. The pillars are equipped with grooves into which decorative elements are first installed. reinforced concrete slabs(their approximate size is 300x300x550), and then wooden blocks. Both the columns and the fence fabric are covered with decorative covers to prevent moisture from entering the structure.
Checkerboard fence with clearance

Veins are laid between the pillars. Boards are attached to them in a checkerboard pattern - first on one side, then on the other. If you look from the side, the fence turns out to be not “solid”, but with gaps.
Fence "Lattice"

Foundation and load-bearing elements For this type of fence, pillars are similar. Between them, ready-made lattice sections made from slats are installed. The slats can be positioned either parallel or perpendicular to the posts, or diagonally. Such a fence is illuminated, allows the sun to pass through, and does not enclose the space. Its function is more decorative.
Fence "Rancho"

This is a barrier where 2-4 wide boards are attached horizontally to heavy wooden posts with small gaps. If you take well-processed thin boards and a little more of them, you can build a beautiful fence for a wooden house.
Fence "Palisade"

Treated, smooth, not too large in diameter logs are installed vertically to each other.
If you install the pillars and the entire structure on the foundation, this will protect the lower part from interaction with the ground and moisture, and, therefore, will significantly extend the life of the fence. Can be used as fence supports metal pipes, concreted into the ground, pillars made of stone or brick, ready-made reinforced concrete pillars or wooden logs.
Materials for building a fence
The cost of a wooden fence depends on its type and what material will be chosen: boards, pickets, beams, logs (for a picket fence). You will also need the following materials: crossbars (wooden or metal), support pillars, reinforcement for formwork, cement, sand, brick and stones for erecting pillars, nails and screws, fire-retardant and antiseptic impregnation for wooden surfaces, bitumen or creazote for processing those installed in the support or strip foundation of wooden pillars.
Tools
To build a fence, stock up on the following tools:
- drill or shovel
- roulette
- stakes
- level
- screwdriver
- hammer
- jigsaw
- brush
- sandpaper
How to make a wooden fence?
Before you make a wooden fence with your own hands, you need to decide on its design and how much of a major construction is planned. For a fence with a foundation, the sequence of actions will be as follows:
- marking;
- foundation construction;
- installation of poles;
- fastening wooden elements;
- processing of wooden surfaces.
Marking
Marking for the future fence is carried out using a tape measure and rope. We determine the location for the placement of the wicket and gate. We install them in pillars in the corners of the site. We tighten the lacing between them so as not to deviate from the given line when determining the locations for the pillars.
Foundation

The most labor-intensive part of building a wooden fence with your own hands is pouring strip foundation. Under a light wooden fence, the foundation is not particularly deepened. To do this, dig a trench (depth up to 1 meter, width - 30-80 cm), deep into which a sand cushion is poured. Next, reinforcement is knitted, formwork is created, pillars are leveled and the foundation is poured. He might be like zero level, and higher - 30-50 cm above ground level. After it hardens (after 2-3 days), further work begins.

Installation of pillars

The more often the posts are placed, the stronger the fence will be. The pillars are installed during the process of pouring concrete into the foundation. The distance between them is about 2 m. The fewer pillars, the more crossbars there should be. If a foundation is not planned, then in the places designated for placing the pillars, dig holes 1-1.5 m deep, pour sand (20 cm) into them and water it abundantly with water. Next, using a level, install the pillars in them and fill the recesses with concrete.


Regular foundation for a fence

Foundation using stones
If the post is made of wood, then its lower edge is treated with bitumen or creosote to protect the wood from moisture and rotting.
If brick racks are planned instead of pillars, then space must be provided for them. After all, they will occupy square areas with a side of 1.5 bricks. To decorate the counter at the very bottom and at the top, the masonry is expanded by a quarter of a brick. During the laying process, cross members are installed in the racks. It is important to use a level to check whether the stand is laid evenly.

Fence installation
Next comes the installation of a wooden fence. Slats and boards are attached either to the crossbars or installed in grooves - depending on the selected type of fence. A simpler option is to install sections. If the pillars are wooden, then grooves are made in them to lay the crossbars; if the pillars are metal, then fasteners (corner) are welded to them, to which the legs will then be attached.
How to extend the life of a fence?
In order for a wooden fence to last a long time, the wooden elements need to be coated with antiseptic solutions and fire retardants, and only then with paint (oil-based and water-soluble are used), stain, and varnish. Impregnations are applied even before the fence is installed. Fire-retardant impregnations will prevent fire, and antiseptics will protect the wood from the colonization of microorganisms and subsequent rotting. They extend the life of the fence to 30 years, protect the wood from the sun and dampness, and preserve the natural texture and beautiful appearance.
Galvanized fasteners are suitable. Before driving a nail, it is immersed in drying oil.
In the future, periodically, at least once every 2-3 years, the wooden fence must be treated with protective impregnations.
Original do-it-yourself wooden fences - photo:


A metal picket fence is an original, reliable and strong fence. The metal picket fence has a more impressive design. Euro picket fences are an excellent choice at an affordable price.
A wooden fence, along with all kinds of hedges, has always been an important attribute of the design of a garden landscape. Such designs are quite multifunctional, because... serve as delimiters of private property, as well as decorative elements. On one side, the fence closes the area from prying eyes, street animals and intruders. On the other hand, they are an aesthetic hedge that harmoniously combines with the landscape composition. This article will discuss how to make a fence from boards.
- Checkerboard fence made of terrace boards. In this design, the treated boards are attached with a 1/3 overlap to the veins in a checkerboard pattern, regardless of the type of installation - vertical or horizontal.
- A solid fence is the most common type of fence, which will require material with a moisture content of more than 14%. During construction, the boards are fixed tightly so that there are no gaps or gaps.
- A ladder is a design in which the boards are mounted overlapping each other, maintaining a horizontal orientation at a small angle.
- Palisade - stakes driven deep into the soil.
- A picket fence is a fence during installation of which a special board is fixed in a vertical position, leaving gaps between the wooden planks.
- Ranch is a type of fence that consists of low posts to which rails (beams) are attached. This type of fencing is decorative.
A fence made of boards. Photo:


Advantages and disadvantages
The construction of wooden fencing has remained relevant at all times. Owners of summer cottages and country cottages often give preference to this type of fence, since it has such undeniable advantages as:
- Environmental friendliness. A fence made from unedged boards is made entirely of natural material, which has a characteristic structure, color and even smell.
- Affordable price. Wooden fences are much cheaper for site owners than their metal or reinforced concrete counterparts.
- High aesthetic qualities. The fence can be made in absolutely any style by choosing suitable breed wood with a unique texture.
- Ease of construction. Even a novice master can build a fence from boards with his own hands, because... the process does not require special skills, knowledge or the use of any equipment.
- Variability of design. There are a great many ideas for designing a wooden fence, as well as methods for its construction, which will allow you to choose the most suitable design for the overall design of the garden landscape.
Among the disadvantages of this type of fencing, one can highlight only a short service life, because... a wooden fence will last on average 7-10 years. However, these indicators are relative, since they depend on the individual characteristics of the soil and the climate of a particular area. Weather conditions, insect damage, humidity, intensity of solar radiation - all these factors negatively affect the condition of wood. But in any case, there remains the option of caring for a fence made of natural material, which will be discussed below.

Wood selection
Before you start building the structure, you need to determine how many boards you need for the fence and what type of material you should choose. Experts recommend giving preference to such raw materials as:
- planed board (universal for all types of fencing);
- decorative material(artificially aged);
- terrace board for the fence;
- unedged material.
The best performance characteristics observed in such wood species as:
- pine;
- larch;
- cedar;
- alder;
- ash;
- aspen.

How to build a fence from boards: construction method
Undoubtedly, a wooden fence is the most popular fence design due to its cost and ease of construction. However, it is worth considering the fact that the longevity of the fence largely depends not only on its care, but also on the correctness of its construction. Let's take a closer look at each stage of work on installing a wooden picket fence.
Construction of supports
- The initial task when constructing a fence is the installation of strong load-bearing posts. The material for their manufacture can be wood, metal or concrete. On in this example Let's consider the installation of supports made of a square metal profile, the length of which was 6 m, width - 6 cm.
- To begin with, the profile must be cut into separate fragments measuring 200x40 cm. An ordinary grinder will be suitable for this purpose.
- Then using welding machine It is necessary to attach metal covers on top to prevent precipitation from getting inside. For greater reliability, it is worth covering the pillars with paint.
- The part of the support that will be in the ground must be processed bitumen mastic to increase service life.
- Next, we pull the cord in the area where the support pillars are planned to be located. We fasten the lace.
- Using a garden auger, we make holes in the soil. The diameter of the auger should be at least 13 cm, and the depth of the hole should be 90 cm. To simplify the task and speed up the drilling process, white electrical tape should be attached to the auger, which will be used to determine the desired depth. This will eliminate the need to measure each cavity separately.
- Then you need to cut off a fragment of roofing material, roll it up and lower it into the resulting hole. This will ensure waterproofing properties for the metal parts of the fence and extend their service life.
- After this, we align the supports vertically, fill them with gravel or crushed stone and compact them with a heavy crowbar or a vibrating plate, if available.
- In order for the fence posts made from edged boards to be at the same height of 150 cm above the ground, it is necessary to use a hydraulic level - a special device in the form of two flasks with water connected to each other by a hose. The principle of operation is as follows: one flask is fixed to the first support, and another container is leaned against the second pillar. By raising or lowering the metal rod in the pit, the water level in both flasks is equalized. This makes it possible to install all supports at the same height.
- Next, we secure and fill with crushed stone all the metal posts along the perimeter of the future fence.
- The next step is to install the veins on which the boards will be attached. For this you can use like wooden beams, so metal profiles, treated and painted against exposure to atmospheric precipitation. The latter are more reliable and durable.
- We fix the profile measuring 2 cm x 4 cm to the supports using bolts and nuts. To do this, you need to drill holes, insert a bolt and tighten it as much as possible with a nut.
- For even fastening, it is important to check the horizontalness of the joist with a level.
- At this point, the support for the wooden fence is ready and you can begin installing the boards.

Fastening boards
For the fencing, we will prepare boards measuring 600x10x2 cm. The edges must be processed with a plane, and the boards must be cut so that fragments 180 cm high are obtained. To save paint, it is advisable to process all roughness and irregularities grinder or Bulgarian. Further actions are performed in the following sequence:
- We apply a special antiseptic impregnation to each board, which will protect the material from rotting, damage by insects and the appearance of fungus. You can use a regular paint brush for this.
- After complete drying, it is necessary to paint the ribs with moisture-resistant paint or an oil-based composition. When the layer is completely dry, you can begin installing the house on the frame.
- To fix the boards to the joists, you will need self-tapping screws with a drill at the end, the length of which will be 41 mm. For one board you will need 2 screws. The work is done using a screwdriver.
- If the holes are made with great difficulty, you must first make the grooves using a drill, and then tighten the screw.
- We attach wooden boards to the veins at a distance of 5-8 cm from each other. We check the height and location using a hydraulic level. We carry out the process along the entire length of the fence.
- Finally, you need to prepare a nylon thread, which should be secured with a stapler on the last board of the fence.
- We align all the fence boards according to its height. This completes the process of constructing the fence.
If desired, you can decorate the fence by placing bright flower pots or country-style elements (cart wheel, ropes, bench, etc.) around the perimeter.

Caring for a wooden fence
In order for a wicker fence made of boards to last for over ten years, it is necessary to properly care for it. Expert recommendations boil down to the following aspects:
- The boards must be coated with an antiseptic compound or fire retardant, after which regular paint, varnish or stain is applied. Such solutions guarantee protection from harmful microorganisms, precipitation, rotting and other undesirable phenomena.
- You can also treat the fence with fire-retardant impregnation, which creates a protective barrier against wood fire.
- It is advisable to use galvanized fasteners, which should also be immersed in drying oil before fastening.
- If affected areas are still found on the boards, they must be carefully cut off. After removal, the edges must be treated with a wood strengthening agent. After the treated fragment has completely dried, it must be puttied with a special compound for natural wood, which is based on fiberglass.
- Impregnation with protective compounds is carried out every 2 years.
A fence made of boards. Video:
It is a mistake to believe that modern wooden fences do not gain a second life and do not gain widespread popularity. Since wood is a practical and relatively inexpensive material, the decision to fence residential buildings and summer cottages with it has always been quite common. There are many options for such fencing, and most of them can be built yourself from commercially available timber.
Beautiful wooden fence made of horizontally installed boards
Types of wooden fences
All wooden fences used for the area around a private house or cottage are built from two parts - supports (otherwise known as pillars) and spans (sections) installed between them. When they talk about some kind of fencing, they mean exactly the method of filling the spans, because the supports can be made of different materials.
To choose suitable design, and then build a wooden fence with your own hands, you should familiarize yourself with the most popular options:
- A regular or figured picket fence, assembled from slats on two crossbars attached to posts.
- Traditional wickerwork that came to us from time immemorial.
- A solid wooden fence made from small logs with ends pointed at 45° (picket fence).
- The so-called checkerboard, where boards are nailed to both sides of the crossbars in a checkerboard pattern so that there are no openings.
- Sections of boards nailed vertically or horizontally overlapping each other. The design resembles blinds.
- Ranch wood fences. They are a fence made of horizontal poles nailed to posts at a great distance.
In addition to the listed types of home fencing, which have to be assembled from individual parts, ready-made ones are used in the form of frames with various fillings - gratings, slats, wicker.
When choosing a type of fence, you should consider what role the wooden fence should play and where it is planned to be installed. In practice, for the front side of a private house, a decorative, solid picket fence and “blinds” are most often used, less often “” and wattle fence. Ranch post fences, originally designed to enclose livestock, are used to enclose plots of land or gardens at the rear.
Preparation of materials for the fence
Before you make a wooden fence, you need to select and purchase timber for it. If you are planning to build a picket fence, then the following wood products will be suitable for its installation:
- edged boards of the same width;
- croakers;
- figured pickets cut on a machine;
- small diameter logs.
The dimensions of the picket fences do not have to be the same in height. Planks of various lengths are selected in such an order that the lower ends are on the same horizontal line, and the upper ends form bulges or depressions, creating a wave effect. During the flight you can make several such waves.
 A wooden picket fence designed in the shape of a wave
 Long trunks with a diameter of up to 150 mm, completely cleared of bark, are suitable for a stockade. This measure is extremely necessary, because various tree pests live in the bark, which will quickly bring your new fence to a state of rottenness. If the bottom of the palisade rests on the ground, the lower ends of the logs should be treated with bitumen.
 Fence palisade on a stone foundation
 For a double-sided fence for a private house (checkerboard), wide boards, possibly uncut, will be used. It is advisable to select them approximately the same width and completely remove the bark. Fences resembling vertical or horizontal blinds are made from the same timber.
 Checkerboard fence with horizontal boards
 You need to make a wattle fence from vines or flexible rods of small diameter (up to 4 cm). There is no need to clear them of bark; this is too labor-intensive an operation. The twigs are prepared by cutting in the cold period of the year, when the movement of juices inside the tree has not yet begun
 Wooden fence - wattle fence made of branches
 For a fence on metal poles, you need to select rolled steel of the appropriate sizes in advance. It is most convenient to work with profile pipes with a cross section of 60x60 mm, there is no point in taking more. Ordinary round pipes purchased at the nearest scrap metal collection point are also used.
Selection of wood species and its processing
What it is not recommended to build wooden fences from is birch. This breed under the influence of weather conditions it begins to rot quite quickly, which is why the fence around the house will not last even 10 years. Of the most common and affordable species for fences, the following are used:
- pine;
- aspen;
- alder;
- larch.
Coniferous trees are characterized by a high resin content, due to which they successfully resist the effects of moisture, subject to proper processing and constant care. The best option is to build a fence made of larch, which is not afraid of either rain or cold. If you wish and have the funds, you can make a fence from valuable types of wood - oak or ash; their dense structure also tolerates precipitation well.
Wicker wooden fences are made from flexible rods and branches of various species, including fruit trees:
- nut;
- willow, willow;
- maple, poplar;
- mulberry;
- Apple tree;
- cherry.
When buying wood for building a fence, you should make sure that it is well dried, otherwise your structure will lose its appearance after 2-3 cold seasons. Drying out naturally, the timber will begin to crack, warp and deform. Drying the wood can be done at home under a canopy, which will take at least 1 year. This condition does not apply to wicker fences, where, on the contrary, good flexibility of the branches is required.
In addition to drying, timber requires antiseptic treatment from rotting and destruction by various insects - pests. An excellent way is to apply a continuous layer of resin or special bitumen impregnation to the wood. But you cannot cover the entire fence with bitumen, which is why the technique is used only to protect the underground parts of wooden posts.
For antiseptic treatment, colorless commercially available compounds are used (Biosept, Novotex), as well as Swedish paint, made at home using the following algorithm:
- Cook a paste from 550 g of flour dissolved in 3 liters of water.
- Strain the paste so that there are no lumps left, put on low heat.
- Add 240 g of copper sulfate and table salt, mix thoroughly.
- While stirring, pour 220 ml of drying oil and 230 g of red lead into the solution.
- Bring the volume of water to 4.5 liters and let the paint cool.
Construction of the supporting part of the fence
The first thing you need to do is mark the area for the wooden fence with your own hands. Having retreated the required distance from the house, you should stretch the cord along the installation line of the future fence. Then, in the places where the pillars are installed, you need to drive stakes into the ground with the following calculation:
- the optimal distance between supports is 2.5 m with a fence height of up to 200 cm;
- if you plan to install a fence higher than 200 cm, then to contain the high wind load on the posts, it is better to reduce the distance between them to 2 m;
- The posts of low fences (up to 120 cm) can be spaced up to 3 m apart.
If you are not using ready-made sections standard size, then divide the entire length into equal intervals, taking into account the listed recommendations. Then proceed with the installation of the supporting part made of wood or using metal elements (pipes, channels, corners). You can combine wood with metal by fixing a steel pipe in the ground and attaching a 100x100 mm timber post to it.
There are 4 ways to install support posts in the ground:
- Driving a post into the ground to a depth of at least 0.8 m and then compacting the soil around it.
- Digging or drilling a hole 40 cm deep and driving a post another 40 cm below its level. After compacting the bottom, the hole is filled with concrete. The name of the technique is the construction of a concrete collar.
- Zabutovka. The hole is dug to its full depth (0.8 m), then compacted, a stand is installed and backfilled with stones with compaction. The gaps between them are filled with a liquid clay solution.
- Full concreting. The same pit with the installed support is filled with concrete from bottom to top.
 Installation methods metal poles
 Since wooden fences are not very heavy, but experience lateral loads from the wind, the most reliable methods are concreting and backfilling. Simple hammering and posts with a concrete collar are appropriate for small fence heights or low windage, when there are many gaps between the elements.
Frame assembly
At this stage, the installation of horizontal crossbars is carried out, connecting the pillars with each other and serving as the basis for fastening the span filling elements. The frame is assembled using the following methods:
- A beam of 40x60 mm or larger is nailed directly to the wooden posts. The joints of adjacent bars should be located in the center of the support.
- The same, only for the horizontal beam in the column, a sample is made, and fastening is carried out using both nails and self-tapping screws.
- The simplest way to attach a jumper to iron pipe– drill a through hole in both parts and pass a bolt through them. The beam is securely attached to the rack with a nut.
- TO steel pipes pieces of metal corners or strips are welded. Holes are drilled in them and the timber is again bolted.


If you decide to install a fence with horizontal elements in the form of unedged boards, slats or logs near a private house, then you will need one lintel - at the top of the posts. To attach a picket fence you need 2 crossbars, to install a “checkerboard” - three. It is assumed that a wooden fence has a standard height of 2 m; with other parameters, the number of cross members may vary.
The construction of a fence with elements in the form of slightly open blinds is somewhat different. The supports should be tied together with one beam on top, and the visor will then be attached to it. And to install wooden planks at an angle on poles, you will have to vertically install 2 wide boards on each side.
Final installation of spans
This is the final stage of assembly, during which the installation of filling parts is carried out - pickets, palisade logs or checkerboard boards. Traditionally, 2 types of fasteners are used - nails and galvanized screws. To ensure that a wooden fence near a private house is reliable and lasts for many years, follow these recommendations when installing it:
- Attach the picket fence strips to the lintels from the outside, driving 2 nails at each point for rigidity;
- when assembling a double-sided fence, nail the front boards first, and then the back ones;
- use a building level, checking each plank;
- the logs of the palisade should be nailed on the reverse side;
- Attach fencing slats in the form of slightly open blinds from the ends through boards secured to posts;
- horizontally oriented boards must be attached directly to the posts.
Finished wooden fences are often protected on top with a canopy, which at the same time plays a decorative role. The easiest way is to make it from thin metal with polymer coating or remnants of metal tiles. The construction of the fence is being completed by painting all wooden parts in the desired color or varnished.
The hut is strong with constipation, and the yard is fenced. It’s good when the neighbor is close and the fence is low. Without a fence and lock, you cannot protect yourself from a thief. A fence doesn't even stand without posts. The higher the fences, the better the neighbors.


Just a few proverbs indicate that great attention has been paid to fences since ancient times. Time passes, technologies and building materials change, but the desire to fence off your site does not go away wooden material. What is the reason for such love for wooden fences, how to make a beautiful wooden fence with your own hands - let's try to figure it out.


Peculiarities
IN middle lane In Russia, wood has always been considered the most popular building material. Its availability allowed even very poor people to build huts and baths, make furniture and dishes. Another thing is places where wood is a luxury. In this case, a wooden fence is a sign of the wealth of the home owner:
- Thus, the first feature of using wood when creating a fence can be called a tradition based on accessibility.
- The second feature is a demonstration of wealth or one’s own skills and abilities.
- An important factor in the use of such fences is practicality: for example, you can install the simplest fence to protect livestock, and if necessary, dismantle it and move it to a new pasture.
- Eco-friendliness is another feature. A bench placed under the fence will allow you to enjoy the aroma essential oils emanating from boards or slats. Wood will never be hot or cold like metal. It will perfectly absorb, unlike stone, most of the street sounds.
- If necessary, in most cases you can replace a fragment of the fence or repair the existing one.
- Limiting a large perimeter (for example, a private house with a vegetable garden) is a costly matter if you install stone or metal fence. But a do-it-yourself braid can cost free.


Summarizing all of the above, we can name two main functions of a wooden fence:
- protection of territory and households;
- decorative design.


At the same time, he can protect:
- the house and the whole personal plot;
- only courtyard buildings with a pen for animals;
- front garden only;
- flowerbed or flower garden.


According to the degree of penetration of the gaze, a wooden fence can be:
- deaf;
- translucent;
- transparent.


Advantages and disadvantages
Indeed, such a fence has many advantages compared to other materials:
- comfortable temperature of wooden elements at any time of the year and day;
- the possibility of self-production and installation without invited craftsmen and complex tools;
- huge space for decoration;
- the choice of color depends solely on the wishes of the owner, and not the manufacturer;
- the ability to apply unusual geometry and shape in general;
- goes well with stone and brick, metal and concrete, mesh and waste material.


It would seem that there are no shortcomings. But this is not so: a wooden fence requires constant maintenance. But if you do this regularly, it will delight you with its beauty for many years.
The service life will depend on the climate zone and soil quality.


Kinds
Before starting construction of a fence for the required area, the owner must answer several questions:
- what function should the fence perform;
- what height will it have;
- will it be dull or transparent;
- how it will open;
- will they be used Additional materials(brick, stone, etc.);
- what the pillars will be made of (metal, logs, brick);
- what type of wood will be used for pillars and spans;
- Will you need specialist help?
- what material costs can you expect?

After analyzing all the answers, you can choose one of the types (or combine them):
- Herringbone. Also, such a fence is called a ladder or American. From a distance, the surface resembles blank siding. Upon closer inspection, you will notice that there are gaps between the boards located at an angle. This type of non-standard design will protect the area from roadside dust, but will allow air currents. Strong wind will not damage the fence.


- Classic version - This is a vertical or horizontal tightly fitted canvas. It can be based on a brick or stone foundation or only on wooden, metal, brick or stone pillars. Such a fence is suitable both for a private house or cottage, and for a summer residence, that is, for those who want to leave their private life as such.


- Wattle– the most emotional warm look fence It was invented so long ago that now we can’t even remember exactly when. It is still considered common among Slavic peoples. But recently it is often used as a decorative element for low fences. At the same time, they make blind high fences - wickerwork, which look amazing in combination with other materials.


- Barrage ranch style It has long ceased to be only American. Style is another matter. In its usual design, such a fence also serves to create a barrier for animals. But there are also beautiful options for fencing adjacent areas.
You need to be prepared for the fact that this fence will not hide you from prying eyes. Yes, and it is suitable for a small area of fencing, perhaps a front garden.


- Lattice was once considered an unusual fence. The slats crossed at an angle of 45 degrees make the structure very airy. Liana-like plants and grapes will climb beautifully along it. Over time, a transparent lattice can turn into an opaque living hedge. Such sections, interspersed with wickerwork or a solid fence, look even more unusual.


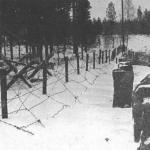
- Palisade It appeared, perhaps, at the same time as the fence, but it was used to protect the entire village. A durable and strong blind fence will reliably protect against uninvited guests. Especially if the vertical stakes or logs have a pointed top edge. The durability of such a fence will be given by the foundation and brick (stone) pillars. But there is more easy option palisade – bamboo. It does not last as long, but it is much easier to install. Moreover, modern manufacturers offer ready-made roll fences.


- Fence- one of the most popular types. So much so that they are now producing a metal picket fence. This is a universal fence of different heights and widths of pickets. They are easy and quick to attach to wood grains. If wooden panels placed close to each other, then people passing by will be visible from the site, but from the street you can only see what is happening in the yard by stopping. For decorative design For such a fence, paint and varnish are used. It is made carved and multi-level, combined with other materials.
A picket fence without supporting posts and crossbars looks completely unusual. Such a fence is also called a picket fence, but the point is not in the name, but in the aesthetic and functional appeal. Recently, horizontal picket fences have been gaining popularity as they are more economical and easier to install.


- Chess- a mixture of picket fence, picket fence and classic fence. Essentially, this is a picket fence, but nailed in two rows (from the street and the yard) in such a way that there are no gaps between the boards and the fence becomes blank. In this case, both sides are front. In order to protect personal space from view and encroachment, it is made of wider pickets.


Color solutions
Once upon a time, wooden fences were not painted at all. Even now, a village picket fence enclosing an ordinary vegetable garden “at the back” is unlikely to be exposed to paint and varnish materials. Nevertheless, they always try to improve the fence in front of the house and the front garden.
A variety of colors are chosen for this. Starting from varnishing, so as not to deprive the wood of the pattern given by nature. This method can give larch the color of cedar, and pine the color of walnut. For the same purpose, as well as to protect against insects, various stains and other impregnating substances are used. This option will bring the color of the fence closer to the color of the pillars, foundation, gate, house.


The wooden picket fence, lattice and even the picket fence are covered with multi-colored paints. The picket fence in the shape of colored pencils looks especially interesting. Such a playground fence will protect from road dust, street debris and strong winds.


If the house has been painted, then it is logical to cover the fence with paint, creating a unified ensemble of the entire estate. To do this, you can use patterns of flowers, animals, and plant patterns. Sometimes two colors are used for this: for the background and the template. Moreover, template drawings are most often painted in White color. In other cases, real pictures are painted on the facade of the house and the fence.


But still, the tree is often left with its appearance. After all, it is for naturalness, warmth and authenticity it is appreciated.

Decor
Except paint and varnish materials, there are many other ways to decorate wooden fences. Before settling on any decor option, you can look at 3D samples on the Internet to see the fence “live” from different angles and in different materials:
- Some types of fencing are themselves decorative elements of the fence. For example, a lattice or wicker, checkerboard or log picket fence.
- Pickets burned over a fire or with a burner will not only get rid of insects and their larvae, but will also become real designer find in the design of a Russian estate, a robber's harbor or the kingdom of Berendey.
- The use of stone and brick will add solidity and durability to the entire structure. But this is also a wonderful decorative technique, since such fences look very beautiful.


- Metal is not only reliable protection for the fence itself, but also a beautiful decorative element. Forged elements will give an aesthetically attractive appearance and reliability to the wooden panel.
- An old fence can be updated and in a non-standard way. If it for a long time If you haven’t varnished it, it will be difficult to do this: it will absorb an incredible amount of paint and varnish materials, but at the same time it will no longer have the proper appearance. Hide this significant drawback can be done by using overhead decorative elements: flower pots, climbing vertical greenery, birdhouses, old waste materials in the form of flat toys, pictures, etc. This, of course, will not save the fence itself, but it will delay its dismantling and installation for some time new fence.
- A photo grid will also help transform an old fence. This modern decorative material will help hide the shortcomings of any fence. You just need to choose the right material and photo grid design.


- Log cuts are very nice option decor. With its help, you can turn a transparent fence into a blank one, and hide holes in the place of damaged pickets.
- A fence can zone a vacation spot in a country house. If you weave climbing plants or artificial sunflowers into it, then such a place will be stylized as a Ukrainian welcoming hut.


Design style
Looking at photos various types fences, you can make sure that modern design gravitates towards minimalism and urban style. Whether this should be applied to a wooden fence is the owner’s decision. But, of course, it is worth paying attention to new trends:
- For example, a combination of wood and gabions with pergons. Metal cages 25-30 cm wide filled with stones and pebbles are pergons. Such cages can act as a support for a tree, a foundation, or a full-fledged section of a fence. A gabion is the same metal mesh with stone, but can have the shape of a parallelepiped larger than a pergone. Or it can, in general, be of any other form. Figures - gabions can be sections of a fence or perform a decorative (and at the same time protective) function at a gate or wicket.

- A modern picket fence is not colored pencils made from slabs at all, but a monumental structure made of timber, made in an urban style. The combination of granite and marble with this type of wood creates a feeling of power and strength.
- Perhaps the mixture of wood, metal and bottle glass can be classified as eclecticism. This fence has a minimum of wood and a maximum of transparency. A vintage door reminds the owner of the time when such material was collected for his fence. Unusual way The combination of wood and glass made this fence exclusive.


- If you want to have a solid wooden fence, then you can think about combining wood with stone or brick. A fence in a rustic style is natural, massive, and reliable. American country style is less rough, but no less reliable. Solid fence using brick pillars will serve its owners for a long time.
- The combination of metal and wood will make the fence durable. Such a modern fence can only be performed protective function or be a real product


Wood is such a comfortable material that it can withstand combination with any material. The main thing is to use your imagination and choose the style of the future fence.
How to do it yourself?
The quality of the fence also depends on the type of wood. Due to the resins released, pine is less exposed to climatic influences. And Siberian larch is a hard material that can withstand heavy loads. In addition, contact with water improves its qualities.


Oak, aspen, ash, alder, and mulberry are also used. It is not recommended to make fences from birch: it is short-lived and quickly cracks. There are also original tree species designed for a large pocket or reliable bank card. To name just a few: abashi, akaju, bangkirai, kasai, kekatong, merbau, tiger tree.


The next point after choosing the style and type of wood will be the calculation of the material. It is clear that for this you need to accurately represent the project according to the drawing. But still, let’s try to calculate the number of pickets for a solid or translucent fence.
For this:
- Measure the length of the future fence. For example, 50 m (5000 cm) when using 10 cm wide boards.
- Calculate the amount of picket fence for a blind fence: 5000 cm/10 cm = 500 boards.
- Calculation for a translucent fence: the width of the gap between the boards is added to the width of the picket fence. For example: 10 cm (picket) + 10 cm (gap) = 20 cm. Therefore, for such a fence you will need: 5000 cm/20 cm = 250 boards.


If in a store the price is indicated per cubic meter, then in this case the thickness of one board is multiplied by the length and width. The result is multiplied by the number of boards. This will be the number of cubic meters.
For example, the thickness of the picket fence is 2 cm, length – 200 cm, width – 10 cm. It is necessary to convert the dimensions into meters: 0.02x2x0.10 = 0.004. Multiply the result obtained by the number of boards needed for the fence: 0.004x500 = 2 cubic meters a picket fence must be purchased for such a fence.
The number of boards per cubic meter is counted in reverse order. At the same time, in all cases of calculation it is necessary to provide a reserve for an unforeseen event.

For crossbars and posts, the material must be selected especially carefully. If the fence is translucent, then the distance between the posts is 2 m. For a solid fence, the distance is 1.5 m. The digging depth depends on the soil, usually 1-1.5 m.
As a rule, the fence has 2 crossbars. Therefore, the length of the fence needs to be multiplied by 2 plus up to 5 m of reserve - this will be the need for crossbars for a picket fence.

All other options for installing wooden fencing are so individual that you need to calculate them yourself. Having decided on the total amount of everything building material, you need to take care of the tools. Depending on the type of fence, this set will also be different. You will most likely need the following tools:
- saw, hacksaw;
- jigsaw;
- axe;
- shovel;
- roulette;
- hammer;
- level;
- rope, twine;
- earth drill;
- screwdriver;
- electric drill;


In addition, you will need building materials:
- picket fence, boards (it is better to impregnate them with a protective compound before installation);
- cross bars, crossbars;
- support pillars;
- pegs for marking;
- sand, gravel;
- cement;
- galvanized fasteners (nails, screws, hinges are also covered with drying oil before installation).


The entire sequence of work will consist of several stages:
- installation of support;
- fastening the crossbars (if the fence is vertical);
- frame covering.

Installation
There are 2 fundamentally different installation options: with and without installing a foundation. The first option is more labor-intensive, but more durable. The fence according to the second option is much faster and easier to do. Let's take a look at it:
- Preparing the area. Since the bottom edge of the boards will touch the ground, the area must be cleared of grass, stones and uneven surfaces.
- Using sharpened wooden pegs 60 cm long, the territory is marked out according to a pre-drawn plan. The distance between the pegs is the distance between future supports. The pegs are looped with a rope, which is pulled quite tightly. At this point, you need to check how smoothly the markings are made.
- The pegs are removed one by one, and in their place they drill holes for supports with a depth of 50 cm (for a flower bed or low picket fence) to 1.5 m (for a solid solid fence).
- The supports are dug into the ground. There are several installation methods: driving, backfilling, concreting. But before using any you need to take care wooden support, namely: treated with a special compound, wrapped in roofing material, cemented into a metal cylinder. All this will protect the pillar from rotting. Install the supports using a plumb line. Usually the bottom of the pit is sprinkled with sand and compacted tightly, then a pole is installed, covered with crushed stone and compacted again. The sequence is repeated, with each layer of sand moistened with water.


- A nail is driven into the top of each post, after which all the nails are tied together with rope. This is how the pillars are aligned.
- The veins are fastened with nails to the supports. Mounting height may vary. Most often it is done as follows: the height of the picket fence is divided into 3 parts. The lower crossbar is nailed at a height of 1/3, the top – at a height of 2/3. It is important to choose the right nails: too short ones will not hold the crossbar, too large diameter will lead to cracking of the wood.
- Fastening the picket fence in a blind or translucent way. Align the top edge. Giving it a decorative design using a saw and jigsaw.
- Protection of support pillars using caps (plastic, metal, wood, glass).
- Impregnation and painting. If the boards were installed without pre-treatment, then they should be impregnated with drying oil or a protective compound. This needs to be done in 2 layers.
After which the fence is painted.
Paint should be chosen for exterior use. Or, to preserve the naturalness of the wood, prefer varnish.


Fastening methods
If conventional fastening methods do not suit you, then you can find more interesting solutions:
- Instead of picket fences, use a slab. This material will decorate the fence in a rustic antique style. A rounded log, on the contrary, looks very modern.
- You can bend the boards in such a way that you get an Austrian wicker - a double-sided fence with minimal gaps.
- You can use planken. This is a type of facade boards made of larch, in which all corners are beveled or rounded shape. Due to this, the boards are not attached closely to each other, but with a micro-distance. This method of fastening planks prevents the boards from swelling from moisture and deforming.


- Creation wood siding. To do this, the boards are fastened horizontally, starting from the bottom, overlapping by about 25 mm.
- Creation horizontal blinds. To do this, notches are made in the supports into which boards are inserted at a slight angle. This method will practically block the view, but will significantly save the amount of material. In addition, this is an ideal option for places with strong winds, since the fence will not be subject to wind loads.
- The picket fence can be mounted diagonally. The difficulty with this method is the constant measurement of the angle at the beginning of installation. But such a fence will look great, especially if its upper edge is left in the form of a picket fence. With the diagonal method, the fence can also be solid or translucent.


- You can use the checkerboard method, which was already mentioned above. Such a fence can be vertical or horizontal. In this case, the length of the pickets can be the same or different (a more complex option, but also more interesting).
If thin untreated birch branches and trunks are passed very tightly through the crossbars, then such a fence will be cheap, but will protect no worse.


In addition, there are fastening methods where the boards are fastened between support posts or hiding the posts. The first case will require more time and accuracy.
If the pillars are brick or stone, then other methods are used. Here it is possible sectional installation spans between pillars. This work is done with an assistant. It is more labor intensive, but the fence will last a long time.

To wooden fence I've been pleased with my appearance for a long time, I need:
- Before installation, soak the wood with an antiseptic;
- check the absence of anthills at the site of the future fence;
- install a protective canopy not only on the support posts, but also over the spans (if this does not fit into the chosen style, then you can try to protect the fence with a glass or polycarbonate canopy);
- get rid of grass along the fence in a timely manner, this will reduce the humidity level;
- after installation, cover the entire tree with a primer; this is done only in dry weather on dry wood;
- paint it once every 2-3 years.


It is good to protect a wooden fence from fungus and cracking with Swedish paint or yacht varnish.
Many people water the boards with hot drying oil before installation.


Since untreated boards lose moisture under the influence of ultraviolet rays, impregnation neutralizes this deficiency. Many people use special UV hardeners as impregnation, which are sold in construction stores. They treat the boards several times with a primer so that the impregnation penetrates as deeply as possible into the wood. After this, the wood is coated with paint or varnish.

Unlike drying oil and varnish, Swedish paint is a homemade composition of:
- 250 g of copper sulfate;
- 250 g of red lead;
- 250 g table salt;
- 230 ml drying oil or linseed oil;
- 570 g rye flour;
- 4.5 liters of water.

According to these proportions, you can prepare any amount of paint, but remember: the paint thickens very quickly, so you either need to prepare in small portions, or paint in several hands. Mixture consumption: 210-270 ml per square meter.
This recipe will give the wood a golden color. To obtain a different color, red lead is replaced with ocher, hydrogen peroxide or another color component.


Prepare the paint this way:
- cook a paste of flour and 3 liters of water;
- to remove lumps, the substance is passed through a sieve;
- the strained glue is put back on the fire, adding salt and vitriol;
- you need to constantly stir the mixture, waiting until the vitriol is completely dissolved;
- Continuing stirring, gradually add drying oil, then water (you should get liquid composition homogeneous consistency).


Paint is applied in two layers. Don't forget about the fasteners metal elements. They also need to be coated with special anti-rust solutions. Loose metal parts are strengthened using dowels.
But during operation, the fence may require not only preventive painting, but also repairs. If preventative work against rye does not help, then the metal parts are simply replaced. If we are talking about wooden elements, then it is necessary to determine the degree of wear.

If the support post is loose but not rotted, then it is carefully dug up to about 20 cm in depth and the same width. Aligning the support vertically, the hole is filled with broken bricks and filled with cement. Props are placed for several days. The reason for this play of the support is the insufficient depth of the pit during installation and violation of the installation technology.
If the post has rotted in its lower part, then the entire post or its lower part can be replaced. It might be easier to replace the entire pole. But if this is not possible, proceed as follows: dig up the pillar from the side and saw off the rotten part. A concrete support is prepared in advance to replace the rotted part. Holes for bolts are drilled in its upper part.
The concrete pile is installed in the hole, and galvanized bolts are inserted into the holes. The entire structure is coated with an antiseptic. Put on the bolts wooden post, aligned along the slope and fixed with spacers. Crushed stone is poured into the hole or broken brick, and all this is compacted tightly. After a few days, the spacers are removed.

If the pickets have rotted or become unusable, they need to be replaced. After dismantling, the repair site is treated with an antiseptic and dried, only after that a new board is installed.
The climate of any region of the world will affect wooden fences: somewhere there is too much precipitation, causing the wood to rot; the hot sun dries it out and leads to cracking. Dust sandstorms strip paint.
All this warns owners of wooden fences: only timely maintenance will extend its service life.

Beautiful examples
Above there were many examples of how using various types of wooden fences you can decorate your summer cottage or Vacation home, front garden or flower bed. But there are so many beautiful examples that It’s worth paying attention to at least a few more:
- You don't need a lot of money to put up such a wonderful fence. Just a jigsaw, sandpaper, a wood carving knife and the desire of the master to make a real masterpiece out of a simple fence. And even if the fence seems worn out by time, only a true craftsman knows that a fairy tale lives behind it.

- Croaker is a substandard board, which is why it costs very little. The more valuable such a fence is. After sanding and processing, an ordinary croaker turned not only into a place of rest, but also into a kind of entrance to another interesting and unusual world.


- Such a fence will require painstaking work. A board that, at first glance, seems unedged, is unlikely to be. Careful work with a jigsaw and grinding machine, coupled with the work of a mason, makes this fence an exclusive product worthy of the highest praise.

- A wooden fence combined with a stone and metal gabion makes you stop not only to look at this unusual sight, but also to think about deep philosophical topics. In our life, everything juxtaposes in a strange way: warm wood with cold metal, soft board with hard stone.

- This fence, like the house on the site, is protected for a long time from all misfortunes: strong stone supports, a stone foundation, Swedish checkerboard paint. A very caring owner took care not only of his property, but also of his own time. After all, such a fence will not require repairs for a long time.

- But if the previous option is very expensive, then this one is very budget-friendly. Such a fence cannot be fully called wooden, but rather a combined one. And it is subject to every lazy owner. With a large number of inserted branches, you can achieve good protection for your site.


- The article mentioned many various options fence, but this one is special. It looks so organic and soft on the site. At the same time, it perfectly zones the entire territory. Here you can drink tea with company or hide from everyone and sit in silence. The unusual shape of the spiral makes the desire to get to the center even greater.


- To make such a horizontal non-standard checkerboard, you need to think completely outside the box. Different widths and lengths of boards, gaps where, it would seem, there shouldn’t be any. Beautiful, unexpected, interesting.

- Even if you look very closely, it is still difficult for a simple viewer to understand how this fence is made. It is convex, as if woven. The cross beam seems to pass the boards through itself. Moreover, the appearance of burnt wood makes the fence completely unusual.

- And this combined fence again breaks stereotypes: a rounded, familiar top and a completely unusual form of joining two materials. It's definitely beautiful. Also such interesting colors.


- The value of this fence is that it is not an elite decoration cottage village on Rublevka, but an ordinary rural street. And if the owners of this non-standard house and Austrian wickerwork created such beauty in an ordinary village, it means that there are still many men on Russian soil.