The word split actually means “cleft,” but in technical English it has several meanings. IN in this case We will talk about the air conditioning system using an air conditioner with spaced units. We will tell you how to install a split system with your own hands in a city apartment and a private house.
How does an air conditioner work?
Installing an air conditioner is a difficult task. In order not to screw up, you need to know exactly what is being done. Therefore, let us briefly recall the principle of operation of the air conditioner:
- A refrigerant enters the evaporator through a narrow opening - a die, or nozzle - under pressure: a low-boiling liquid with a high heat of evaporation. In the evaporator chamber, the refrigerant expands, boils, evaporates and absorbs a lot of heat.
- In this case, water condensation forms on the evaporator radiator (dew falls). The condensate flows into the tank, and from it through the drainage tube to the outside.
- A compressor designed according to the principle vacuum pump, continuously pumps out refrigerant vapor from the evaporator chamber. As the pressure behind the pump increases, the refrigerant heats up and goes into a supercritical state: neither a gas nor a liquid, something like a very dense fog.
- Next, the refrigerant enters the condensation chamber, also equipped with a radiator, which is blown by a fan. Its temperature drops below critical and the refrigerant condenses into liquid.
- The liquid refrigerant is blown into the evaporator through a die; the work cycle repeats.
What an air conditioner does and doesn't need
From the principle of operation of the air conditioner it is clear that for it successful work and economical consumption of electricity during installation, the following must be taken into account:
- Any thermal contact between the cold and hot zones sharply increases energy consumption: the compressor, in addition to pumping the agent, now has to drive heat inside the system - at the owner’s expense.
- Dust and debris in the system are unacceptable: the vacuum pump is a high-precision device; one piece of metal can damage it.
- The system must be completely sealed: low-boiling liquids tend to evaporate even through a micron gap.
- The outdoor unit should be located below the indoor one: in this case, the thermosiphon effect (the heated liquid tends to rise) facilitates the operation of the compressor. Otherwise, the compressor, in addition to additional expense electricity to raise the agent, you will still have to overcome the thermosiphon effect.
- The outdoor unit should be located in as cool a place as possible. Any additional heating is paid by the owner.
- The drainage tube should not bend upward anywhere. Any “U” quickly becomes a source of infection: condensation - clean water, in which microbes and fungi are free and at ease, and their spores are always in the air.
What is an air split
Air conditioners for split systems are made with separate units: evaporative (internal) and compressor-condensing (external). The names, however, are conditional, because Most modern air conditioners can both cool and heat a room; When heating, the refrigerant condenses in the indoor unit and evaporates in the outdoor unit. Therefore, they often say simply: outdoor and indoor units.
In some (rather expensive) air conditioner models, several indoor units are connected to one outdoor unit, which can operate separately for cooling and heating. Such a split system, although initially expensive to operate, turns out to be more economical: in this case, interroom heat exchange does not interfere with, but helps the air conditioner. How a split system is installed in an apartment is shown in the figure:

When is the best time to take a split?
It is better to coincide with the installation of a split system in an apartment during renovation. The work ahead is serious: to install the electrics you will have to walk along more than one wall. If the walls are already lined, include new cladding in advance.
Tool
In order for the split to work and not break down in a day or a week, you need to purchase or rent the following tool:
- A hammer drill with a set of chisels - you will have to make a hole 100 mm in diameter in the main wall.
- Reinforcement detector, if the wall is concrete, if you hit the reinforcement during chiselling, you will have to punch a new hole.
- Pipe cutter Under no circumstances should you cut the refrigerant pipes with a hacksaw! There will definitely be copper chips left in the gap, which will quickly destroy the compressor.
- Tube flaring kit. When flaring using improvised means, tightness cannot be achieved. Special mention will be made about tube flaring. Good flaring kits also include a pipe cutter and scraper.
- A scraper (reamer) is a tool for cleaning the ends of pipes. A needle file or file is not suitable because of the same sawdust.
- Bicycle hand pump– to check the tightness of the system.
- Vacuum pump – to evacuate the system before filling. Flushing with refrigerant, which is often recommended, does not remove moisture, and it ruins the compressor no worse than metal filings.
- Phase indicator and tester for electrical installation work.
- Pressure gauge.
About pipelines
Buying pipes
It is better to buy a copper tube in a whole coil: it is better to spend money on some stock, which will then go somewhere else, than to risk the compressor: sawdust may remain in the tube from which it was cut. Also make sure that the ends of the tube in the coil are factory-rolled, and that the tube itself does not have dents or cracks. Long pipelines will allow lowering outdoor unit lower, so that some overexpenditure when purchasing is then compensated by a good thermosiphon.
Cutting, scraping and flaring of tubes
Before you begin installation, you need to practice flaring the tubes: for an air conditioner this is a vital issue. Flaring is done with a special tool; how it works, what it looks like, what defects are possible, and what the final result should be can be seen in the figure:

For training, you need to immediately buy some kind of scrap of the same tube along with the coil; We do not touch the bay before installation. At the same time, let's practice cutting and scraping: the tube is cut in a circular motion, and when scraping, the tube must be held with the end down so that the scraped burrs do not fall into its lumen.
Installation of the outdoor unit
 It is strongly not recommended to install the outdoor unit on the wall yourself, starting from the second floor. Why? See statistics from the Ministry of Emergency Situations and the Ministry of Health in the sections: “Resuscitation” and “Urgent surgery”. Fortunately, the upper floors have balconies or loggias.
On the balcony, the outdoor unit is installed very well on homemade shallow (i.e. shallow) brackets, see fig. On any balcony, no matter how you turn it, there will always be a north or east side, just suitable for air conditioning. But even when installed in a loggia facing south, the canopy will protect the outdoor unit from direct rays of the sun during the hottest part of the day, when the air conditioner is working.
With this installation method, installation and maintenance of the air conditioner is easy and does not pose any danger. The only inconvenient operation is attaching the block to the brackets; it will have to be done leaning over the railing.
To install the brackets, the glazing will have to be removed temporarily, and the root parts of the brackets will have to be cut into the lower frame frame. If the “roots” of the brackets are bent down in the form of horizontally located “Us,” then you can do without struts and not touch the balcony lining.
Split system installation
Installation of a split system in an apartment is carried out in next order:

Now let’s describe some features of each stage of work. The permissible distances from the walls and ceiling for indoor and outdoor units are shown in the figure on the right.
Spaces for indoor units
Indoor units cannot be installed:
- Above radiators and other heat sources.
- Behind curtains, curtains, screens and other obstructions to air flow.
- In rooms with sources of electrical interference: workshops with power tools, induction and microwave ovens, electric ovens - interference can damage the unit’s processor.
The question immediately arises: what about the kitchen? It turns out that you can’t install air conditioning in it at all. Right. The flow of conditioned air into the kitchen is ensured.
Wiring
The lowest-power air conditioner consumes 1.5 kW of electricity. Therefore, you need to lay separate wiring for it with a cross-section of at least 1.5 square meters. mm and install an automatic switch - like for a boiler or washing machine.
When connecting wires to the input panel, connect the yellow wire with a longitudinal green stripe to the neutral (neutral wire). Phase and zero are determined by the phase indicator. If the wiring is made from insulated wires custom colors, zero and phase must be marked at both ends.

Outdoor unit
Installation of the outdoor unit has already been described above.
Hole in the wall
Firstly, if the house is block-built, you need to determine in advance the locations of the reinforcement. It is impossible to cut off the reinforcement that is in the hole: outer wall always load-bearing, and violation of the reinforcement is unacceptable.
Secondly, a second person is needed: he must stand below and warn passers-by. An accidentally dropped piece of concrete or brick can cost the owner a long prison sentence.
The diameter of the hole must be at least 80 mm. Recommendations of 60 and even 50 mm clearly do not take into account thermal insulation.
Pipelines
We cut the tubes to size with a margin of 1 m for bends. The tubes must be bent carefully to avoid kinks or wrinkles. Wrinkles create resistance to the flow of the agent, and this entails increased electricity consumption. The permissible bending radius of the tubes is at least 100 mm.
Then we put threaded flanges (“nuts”) on the tubes and flare the ends of the tubes. Make sure that the flanges are put on correctly - with the thread towards the end of the tube.
Finally, we connect the pipelines to the fittings. This must be done one at a time so that the cold fitting of the indoor unit is not connected to the hot fitting of the outdoor one. The matter is made easier by the fact that in most air conditioners the hot and cold fittings are of different diameters.
We tighten the flanges on the fittings tightly, but not too tightly: the copper can be easily pinched. Reach out threaded connections We will do it later, during sealing.
For drainage you need a piece of reinforced plastic tube. We connect it to the drain pipe either with a threaded flange, if provided, or using a piece of heat-shrinkable tubing. You can heat the heat shrink with a soldering iron using light circular movements, slightly touching the tube with the tip.

Electrical connections
Multi-core wires in insulation with a cross-section of at least 1.5 square meters. mm we connect the same terminals of the indoor and outdoor units. If the names of some terminals do not match, we figure it out according to the instructions and consult a specialist. Of course, we run both pipelines and wires through the hole in the wall.
Sealing
When sealing, we use a method proven by generations of gas workers: a soap solution. We buy 0.5 liters of distilled water at the pharmacy, heat it “to steam” and, stirring carefully, dissolve a spoonful of laundry soap shavings in it.
All more people Lately people have been thinking about purchasing and installing devices to control the microclimate in their home. In urban environments, especially if the apartment is entirely on the sunny side, air conditioning is the only option for creating comfort during the hot summer months. The considerable cost of this useful device makes you want to save money by installing the split system yourself. Is this procedure as complicated as air conditioning installation companies claim? And how to install an air conditioner yourself according to all the rules to ensure its uninterrupted operation for as long as possible?
Types of air conditioners
To create comfortable conditions The following types of air conditioners are used in apartments:
Monoblock systems
All air conditioner units are placed in one housing. This reduces the cost of the device, but also leads to certain inconveniences: the bulkiness of the system and rather high noise from the operation of the compressor even at full power. They, in turn, are divided into two types:
- Window air conditioners. Pioneers among apartment systems. Main disadvantage: the device block occupies a significant part of the window opening. This prevents sunlight from entering the room, and it is extremely difficult to fit the interior harmoniously. Therefore, air conditioners of this type are becoming increasingly rare.
- . Much more attractive in design than window ones. In addition to the tempting possibility of movement, they have another undeniable advantage: the block practically does not require installation. It is enough to simply equip with your own hands an exhaust hood from the room to the outside, to which the system is connected. But the cost of such air conditioners is quite high.
Two-block systems
In devices of this type, refrigerant circulates between the outdoor and indoor units of the air conditioner. The main advantage of such systems is noiselessness. The main “troublemaker” – the compressor – is located behind the wall. Indoor units have different design and can be placed in the most convenient location. Divided into 3 types:
- Wall split systems. The most affordable and widespread currently have a power from 2 to 7 kW. They are perfect for maintaining the desired microclimate: they create coolness in the summer, but it is also possible to operate the air conditioner for heating in the winter. It is for such systems that the most pressing question is: how to install an air conditioner without resorting to the help of professionals?
- Duct air conditioners. They are installed under a suspended ceiling structure and have a high power of 12–25 kW. This is enough for a fairly spacious apartment. What complicates the task is necessity correct calculation air exchange in the room. By installing thermostats and special electric valves, you can set the system to its own temperature for each room in the apartment. Naturally, this complicates the installation of system units and significantly increases its cost.
- Cassette air conditioners. The main system is also hidden suspended ceiling. Cassette split systems are made so as not to stand out. As a rule, the dimensions of the cassette air conditioner grille coincide with the dimensions ceiling tiles: 600 by 600 mm, and with higher power - 600 by 1200 mm. The dimensions of the indoor unit allow you to easily place it and all the necessary communications inside a standard grille made of metal profile, used in the installation of suspended structures.
Preparing to install an air conditioner with your own hands: choosing a location
Since wall-mounted split systems are the most popular, we will describe how to install an air conditioner with your own hands in relation to them.
Choosing a location for the outdoor unit of the air conditioner in apartment building may cause some difficulties:
- The external unit of the system cools the refrigerant, so it should be placed in such a way as to avoid heating as much as possible sun rays. The north or east side of the house or balcony works well.
- The massive outdoor unit of the air conditioner should be placed so as not to disturb the neighbors.
- It is unacceptable for condensation from drainage pipe flowed down the wall of the house. It needs to be taken out as far as possible.
- Like any device, the outdoor unit of the air conditioner requires periodic maintenance. Therefore, it must be located so that it can be approached without special effort and risk.
When choosing a location for the internal part of the system, there are also a number of conditions:
- It should not be placed near heating system elements.
- It is unacceptable that inner part Split systems were covered with curtains or other objects that prevented the free movement of air.
- The processor of the air conditioner unit may fail if it is placed in an area of intense electrical noise generated by household appliances. Therefore, for example, it cannot be placed in the kitchen.
Tools
Selection the necessary tool It won't be easy either. To work you will need:
- Pumps: vacuum and bicycle.
- Pipe flaring kit. It's better to come with a pipe cutter. You cannot cut copper tubes with any other tool - sawdust will certainly get inside them, which will damage the vacuum pump.
- Reamer for finishing of flared pipes.
- Pressure gauge for measuring pressure in the air conditioning system.
- Indicator screwdriver and installation tester electrical wiring blocks.
- Hammer.
- Copper tube coil.
It is better to take a whole coil of tubes, with the ends rolled at the factory. You can never guess which tool was used to cut the tube if you purchase only part of the coil. Copper tubes should not have dents, cracks or other defects.
Installation of the external air conditioner unit
You should immediately take into account that the outdoor unit of the air conditioner should be located lower than the indoor one.
- After marking the mounting locations for the brackets, a hole for communications is drilled. Of course, in this case it is necessary to avoid the drill from getting into other communications or fittings, so the location for the hole must be chosen carefully. IN brick wall It is better to lay it along the masonry seam. If concrete slab has frequent fittings, the only way out is to drill a separate small hole for each wire or tube of the system.
- The brackets are secured to the wall with anchor bolts. You can fix the outdoor unit of the air conditioner directly on the balcony by slightly changing the mounting pattern. But in any case, it is important to maintain the level: at the slightest distortion of the system, problems with condensate drainage will arise.
- The most difficult stage of the operation is the actual installation. external unit with your own hands. It weighs at least 60 kg, which is why this work must be done by at least two people. To securely secure the air conditioner to the brackets, you may need the help of industrial climbers or special equipment.
For normal operation of the system, it is necessary to leave a gap of at least 100 mm between the air conditioner housing and the wall.
Installation of the indoor unit and necessary communications
Work progress:
- The indoor unit is attached with your own hands to mounting plate using a latch system. The plate is securely attached to the wall at a distance of at least 10 cm from the ceiling and at least 5 cm from the corner of the room. Having lifted the inner part together, it is fixed with latches.
- Copper air conditioner pipes for supplying refrigerant are cut with a meter margin for the expected bends. The minimum length of these communications is at least 1.5 meters. Having carefully bent them, put on the nuts and flare the ends. The nuts are tightened tightly on the fittings, but without much force.
- The drainage tube is attached to the block with a threaded flange or using a piece of heat-shrinkable hose.
- The power supply to the air conditioner must be done through an automatic machine. For a split system, its own wiring with a cross-section of at least 1.5 square meters is laid. mm. A yellow wire with a green stripe is usually zero. This is where an indicator and a tester come in handy.
- Both parts of the air conditioner are connected stranded wires according to the diagram from the instructions. If you have the slightest doubt, it is better to consult a specialist; repairing the system in case of incorrect connection will cost more.
Checking the tightness and filling the system
Performed in the following sequence:
- A bicycle pump is connected to the nipple, and all joints and tubes are covered with soapy water. If bubbles appear when air is supplied, the nuts on the fittings should be tightened.
- After checking the tightness, the air is pumped out from the air conditioner. A vacuum pump is connected to the nipple and runs for at least an hour. This is necessary to completely remove moisture from the system.
- By connecting a freon cylinder to the unit using an adapter with a pressure gauge, the system is filled until the pressure specified in the instructions is reached. Then turn on the power supply through the machine.
If the air conditioner went into system testing mode on its own, then everything worked out. If not, then perhaps starting from the remote control will help. Otherwise, you will have to call a specialist.
If the result is positive, all that remains is to insulate the communication harness between the blocks with foil and waterproof tape, after which the hole in the wall is blown out with foam. That's it, you can enjoy the operation of the air conditioner.
It is perhaps quite difficult to imagine a modern office without air conditioning. And private consumers are increasingly installing split systems in their houses and apartments. If you also decide to follow their example, you can probably handle the installation process yourself. However, first you need to familiarize yourself with the technology and some installation principles, which will be discussed below.
Installation Features
Before you begin installing a split system, you should familiarize yourself with some of the nuances of carrying out such work. When purchasing the appropriate equipment, you will spend a lot of money, so you should be interested in the question of how to save while operating the system. For example, if thermal contact is maintained between the hot and cold zones, this will increase energy consumption, because the compressor will need to drive heat inside the system and also pump the refrigerant.
Rubbish and dust inside are not allowed. The vacuum pump is a high-tech device. If a piece of metal gets there, it will damage the equipment. Installation of a split system must be accompanied by ensuring complete tightness. Even if the smallest cracks remain, low-boiling liquids will be ready to evaporate.
The outdoor unit is located below the indoor unit. This will make the work of the compressor easier, because the thermosiphon effect will work. It is explained by the fact that the heated liquid will rush upward. If this requirement is not taken into account, the compressor will overcome physical forces, and electricity consumption will again increase. You can dismantle and install the split system yourself. But for this, the outdoor unit must be located in a convenient place. In addition, it should be in the shade. If it is subjected to additional heating, then the costs will again fall on the owner.
Installation of the drainage tube is also accompanied by compliance with certain rules. It should not have an upward bend. If the position of this node is similar to U, then this will become a source of infection, because the condensate will be a place for the emergence and development of fungus and microbes whose spores are in the air.
Types and installation options

Installation of a split system in Azov and other cities can be carried out. Prices for such work are presented below. But if you are planning to do it yourself, you should know that air conditioners are made with separate units, one of them will be external, while the other will be internal. The latter is an evaporator, but the first is a compressor-condenser. These names are conditional, because modern models can cool and heat the room. In the latter case, the refrigerant condenses inside the unit in the apartment and evaporates outside. Therefore, there are indoor and outdoor units.
When considering expensive models, you should pay attention to the fact that there is a possibility of connecting several indoor units to one outdoor unit. Each of them can work separately for heating and cooling. Such a system, although expensive at the time of purchase, will be more economical to operate, because heat exchange between rooms does not interfere with, but rather helps the air conditioner.
Reviews about when is the best time to start installation. Opinions of home craftsmen about the features of preparation for work

According to home craftsmen, it is better to time the installation of a split system to coincide with repairs. This is due to the fact that installing such equipment is quite a serious task. In order to conduct electrical wiring, you will have to walk along many walls. If they already have cladding, then it is necessary to budget for the cost of a new finish in advance.
When home craftsmen are asked what preparation needs to be made before installing a split system, they answer that at the first stage it is necessary to ensure that the appropriate tools are available. Using improvised devices is not only not always convenient, but also unsafe, because in this case the air conditioner can break down within a week.
For installation you should prepare:
- perforator;
- reinforcement detector;
- pipe cutter;
- tube flaring kit;
- scraping;
- hand pump;
- vacuum pump;
- phase indicator;
- pressure gauge
Consumers emphasize that a set of chisels should be included with the hammer drill. You will have to make holes in the main wall. Their diameter should be 100 mm. Home craftsmen claim that you will also need a rebar detector. If the wall is concrete, then you may get caught in the bars, so you will have to look for a new hole.
You should not cut refrigerant pipes with a hacksaw. To do this, consumers are advised to purchase or borrow a pipe cutter. If you do not follow this rule, then copper chips will remain in the gap, which will quickly damage the compressor.
Flaring the tubes using improvised means is also not worth it. To do this, you should prepare a special kit. Otherwise, you will not be able to achieve tightness. A good kit includes a pipe cutter and scraper. To check the tightness of the system, it is better to use a bicycle pump. But for vacuuming, a pump of the same name is suitable.
Schemes and types of installation

Installation of air conditioners/split systems is usually carried out according to standard schemes, which are suitable for apartments, offices and residential premises. Preliminary placement of blocks and installation calculations are carried out after the specialist’s visit. However, when self-installation you can choose the scheme at your discretion. The first of them involves mounting the indoor unit on a wall perpendicular to the window. But at the bottom of the latter, a corresponding block is installed outside.
The second scheme provides for the location of the external block on the left side of the window when looking at it from the outside. The indoor unit remains in the same place. This installation of a multi-split system is suitable for the first and second floors. The distance between the windows must be sufficient for the location of the external unit. Otherwise, it will need to be positioned as in the first diagram.
If the window has an opening sash on the balcony, then the block can be placed to the left of the latter. The air conditioner from the inside remains in the same place. After this, you can begin installing double-glazed windows and glazing the balcony. But if glazing is already available, then installation work can be complicated.
If there is a balcony, the external unit can also be located on its side. This is true if the width of the surface allows the connection of the freon line. The sash at the installation site of the external unit must open if the balcony is glazed. Such a scheme is possible if the balcony parapet is made of capital materials, including:
- concrete;
- brick;
- foam block.
The outside surface must be smooth and clean.
Instructions for installing the outdoor unit

You can install a split system yourself. Installation must be carried out according to a certain algorithm. Work should begin with the installation of the outdoor unit. You can use homemade brackets for this. It is only important to make sure that the structure will be protected from direct rays of the sun during the hot season. In this case, installation and maintenance will not be difficult.
To install the brackets, the glazing (if any) will have to be temporarily removed. The root parts of the brackets cut into the frame frame. If you bend them down, you can do without struts, and you won’t have to touch the balcony trim.
Installation of the indoor unit

Installation of the system in an apartment is carried out in the following order. First you need to determine the location of the structure. Next, electrical wiring is laid, a hole is punched in the wall for laying communications. Installing a split system with your own hands, instructions for implementation of which are presented in the article, can be done by you.
Work methodology

At the next stage, the technology involves preparing and laying the pipeline. The blocks must be connected to each other. The system should be checked for leaks. It is vacuumed, filled, and then the power supply is connected. The split system must be tested. The interblock harness is insulated. The hole in the main wall is sealed.
For reference
If you don’t feel strong enough to do the installation yourself, you can use the services of professionals. If you want to save money, you can purchase an air conditioner from the company that installs it. Quite often, such companies provide a discount on installation work.
Cost of work
The cost of installing a split system will cost 4,000 rubles if you purchase an air conditioner with a power of up to 3.5 kW. When the power increases to 7 kW, the cost rises to 4,500 rubles. You can install a split system from 7 kW in power and higher for 8,000 rubles. The price of installing a split system usually includes the installation of external and internal units, connecting the structures to each other, as well as control communication. By paying the price mentioned above, you will also get one of the holes punched in concrete or brick.
Conclusion
Of course, you can do the installation yourself. But in this case, many suppliers remove the warranty. Therefore, it is better to entrust the matter to professionals.
What you need to know about installing a split system
Problem: The main difficulty faced by the buyer of a split system is the problem correct installation. Installation determines 90% of the quality and service life of the air conditioner. If errors are made during installation, it is very difficult to correct them later.
- Solution: Installation must be carried out by specialists licensed to install air conditioners, in compliance with the instructions and using special equipment. After installation, there should be no debris, dust, or boxes left in the room. The word “air conditioning” has taken root only in our country. This is actually a piece of the phrase air-condition, which translated from English means “condition of the air.” The air conditioner serves to maintain the desired temperature and humidity in the room. By ventilating the air, the air conditioner purifies it by passing air flow through special filters.
Today we will talk about installing more modern look air conditioning systems - about the split system. What are the advantages of a split system over a “regular” air conditioner? The split system does not block natural light, like a “window” that is cut into window frame. This is the first difference. In addition, it does not depend on the general air conditioning system of the house, if there is one (this is when one hefty unit stands somewhere in the basement and circulates air throughout the house). And it differs from a “regular” air conditioner in that it consists of two blocks - external and internal. If there are more than two indoor units, then this is already called a “multi-split system”.
But let’s agree: for simplicity of presentation, I will talk about the split system, calling it the word “air conditioner” that is more familiar to our ears.
First - repair, then - split
So, split system (from English word split – “split, split”) consists of two separate blocks: internal (evaporator) and external or external (condenser). The blocks are connected to each other by electrical wires and two copper tubes through which refrigerant (freon) flows. A thin plastic tube (drainage) also extends out from the indoor unit to remove condensed moisture. Ideally, it should be connected to a drain (sewer) pipe or to a special tank, but often it is simply taken out into the street, and then drops of water fall on the heads of passers-by (see below for information on how to properly make drainage).
The operating principle of a split system is as follows. If the room needs to be cooled, freon flows from the heat exchanger of the outdoor unit through one copper tube to the heat exchanger of the indoor unit. There it is blown by a fan, as a result of which cold air comes out of the indoor unit. If the air in the room needs to be heated, then using heat pump the external condenser becomes an evaporator, and the evaporator becomes a condenser. In addition to the condenser and evaporator, the split system includes a compressor, which is installed in the external unit. The main function of the compressor is to compress freon to give this gas properties that significantly increase the efficiency of the air conditioner.
The indoor unit operates almost silently (for Daikin models, the noise level of some indoor units is 28 - 31 dB, and for Mitsubishi, when the engine is turned on at the lowest speed, it is 26 dB; the same noise level is created by a flying butterfly). But the fan and compressor of the external device can “buzz” and become louder.
Depending on the method of fastening, indoor units can be wall-mounted or floor-ceiling (floor-ceiling are so called because they can be attached to both the ceiling and the floor). There are also cassette and multi-zone indoor units, but we will talk about them next time.
In apartments, wall-mounted indoor units are most often installed. With movable blinds wall block you can change the direction of air flow. But the power of wall-mounted units is specially limited - otherwise a strong stream of cold air will simply “blow away” everything in its path. But if a more powerful air conditioner is required in a room (for example, in an office), a floor-ceiling unit is installed. It will allow you to direct a strong jet along the wall or ceiling and thus ensure uniform temperature distribution in the room.
Our advice: if the length of the room significantly exceeds its width, it is much more effective to install a floor-ceiling air conditioner!
Split systems vary in power (cooling capacity) and design. The choice of design is at the discretion of the buyer. But about power, you should definitely consult with a specialist. In doing so, you need to know:
- 1. The area (volume) of your premises.
- 2. The size of the window, the direction of the world it faces.
- 3. Presence (absence) of blinds on the windows.
- 4. The amount of constantly running equipment that generates heat (TV, computer, etc.).
- 5. Number of radiators in rooms.
- 6. The number of people constantly present in the room.
- 7. Is there forced ventilation?
Another piece of advice: if the company where you want to buy an air conditioner didn’t ask you anything about it, then it’s better not to buy from them. Because there is a danger that you are being offered something that is “not typical.” In reputable companies, before selling an air conditioner, a consultant, as a rule, goes to the site where the device is supposed to be installed, takes measurements and finds out all the necessary details. Then all this data is entered into the program, and only after that the computer selects the optimal model. For example, they work at the Aeroprof company, which specializes in Carrier air conditioners (USA), at the Meteomarket company (Daikin air conditioners) and at the KlimatSS company (Hitachi air conditioners) ).
What else do you need to know? Experts advise INSTALLING A SPLIT SYSTEM BEFORE or DURING REPAIR, and not after everything renovation work have already been carried out. Then you won’t have to hammer and drill freshly painted and leveled walls to lay electrical wiring for the air conditioner and strengthen the brackets for fastening the indoor unit. You can, of course, hide communications in external boxes, but this will not decorate the interior.
Moreover, installation work in a freshly renovated apartment is much more expensive, especially after European-quality renovation.
Now about other possible “ambushes”. Very often, mistakes begin when purchasing an air conditioner. Wanting to save money, we go to the nearest store (or even to the market) and buy an air conditioner. And what? And that’s it: we’re one on one with him. IN best case scenario After carefully reading the instructions, we begin to install it.
Meanwhile, installing a split system in an apartment is not at all the same as installing a refrigerator or TV: they say, you bring it home, put it in the chosen place, turn it on and - it works! This number will not work with air conditioning. The air conditioner requires proper installation. This is exactly the case when you can’t skimp on installation. The better it is installed, the longer it will last. It is no coincidence that installation work accounts for 18–30% of the cost of the unit.
I remember how one experienced and reserved-looking installer, answering my quite innocent question: where to start installing an air conditioner, suddenly became agitated and shouted: “People! You are all literate! Each air conditioner comes with instructions in Russian, in which both installation and operating rules are described “for fools,” point by point. Read it, damn it, before you stick your hands in! Better yet, call the specialists.” And, alas, he is right.
Installation: where to start?
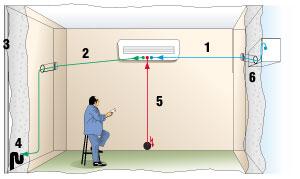
Split system installation diagram
- 1. Communications (in the groove)
- 2. Drainage (in the groove)
- 3. Sewerage
- 4. Siphon
- 5. Electrical wiring - to the panel (in the groove)
- 6. Hole in the wall, punched at an angle of 1–3°
First stage: separate electrical wiring is carried out
Any, even low-power (1.5 kW) air conditioner must have separate electrical wiring and a separate circuit breaker installed in the electrical panel. Because the old wiring may not withstand the load and, God forbid, will catch fire. If specialist installers install separate wiring for the air conditioner, the possibility of a fire is reduced to almost zero.
Be especially vigilant if your house is older than 1990. In old houses, the wiring, alas, is not designed to withstand the loads caused by the use of powerful electrical equipment. Installers remember a case when the owner of an apartment was forced to replace all the wiring because of the air conditioner: the old one simply could not stand it and constantly knocked out the plugs.
Second stage: installation of the outdoor unit
To do this, installers drill holes for brackets, onto which they then install the external unit.
If you put it on open balcony, then there are no problems: they are attached with bolts, the breeze blows through it - and everything is in order (if the balcony is glazed, then the device will not have enough air to work and it will soon break). If you want to attach the block to the wall, then you cannot do without durable brackets. Moreover, they must withstand a weight several times greater than the weight of the block. On high floors"external" is mounted from a machine equipped with sliding stairs. Or they call climbers (if the installation goes above the 5th floor). Such calls are paid separately and cost from 60 to 150 dollars. And sometimes both equipment in the form of a machine with a fire escape-boom and a climber are required.
If you live on upper floors, then the outdoor unit can be placed on the roof. But keep in mind that the difference between the indoor and outdoor units in height should not exceed 3–20 meters (depending on the brand of air conditioner and model).
If your apartment is located on the ground floor, I strongly recommend hanging the external unit higher than 1.8–2 meters above the ground and “hide” it in a cage. Or they might steal it. At one of the companies they told us a story. A man came and ordered only an external unit. The managers were surprised: “Why don’t you want a complete split system.” “Yes, I have an air conditioner inside, but the outer “box” was cut off yesterday. On the first floor, hanging under the window.” Regardless of the height at which the external unit is “screwed”, you need to make a metal canopy over it. This will save the block from snow and icicles, which in the spring tend to fall from the roofs, breaking everything in their path.
In general, installing an external unit is a responsible undertaking. If it is poorly secured, it might fall... on someone. During the warranty period, the company that installed the air conditioner is responsible for the consequences of this. And then you will answer for yourself.
What cannot be done with the external (outdoor) unit?
There are space restrictions for installing an external unit:
- 1. The surface of the wall on which the block will be installed must be strong (otherwise it may collapse under the weight of the block) and smooth (otherwise the block will vibrate and deform).
- 2. Do not bend the tubes with refrigerant (freon) several times in a small area and unscrew their connections (this will lead to refrigerant leakage). If the tubes are twisted into a ring with a radius of less than 100 mm, then it will be more difficult for the compressor to pump freon.
Third stage: installation of the indoor unit
Installers fasten special brackets with screws to the wall (if the block is wall-mounted) or the ceiling (if the block is ceiling-mounted) and install the blocks on them. After this, be sure to check the strength of the fastening (is the structure wobbly? Does it vibrate when the air conditioner is turned on?). Otherwise, sooner or later the entire structure may simply collapse on your head.
But for the floor block, no special fasteners are required. He, as they say, “will stand on foot.” You just need to immediately choose a place for it (when choosing a place, make sure that the unit does not blow on the curtains or the wall and is located away from the heat source). And although the block is not attached to the floor, after all communications have been laid, it can no longer be moved from place to place.
So, the indoor unit cannot be installed:
- 1. ...above a heat source (for example, a radiator). Otherwise, the air conditioner will work to cool “until it loses its pulse” and will very quickly fail. Imagine that you opened the door of the refrigerator, and it will cool not only the camera, but the entire room. It will “work” and fail by the end of the day. The same thing will happen with the air conditioner. In addition, the heat emanating from the room battery can cause the plastic housing of the unit to become deformed.
- 2. ...in rooms where devices with high-frequency electromagnetic oscillations are constantly operating (for example, a drill, drilling machine). High-frequency vibrations can knock down the chip (processor) installed inside the air conditioner.
- 3 . ...directly above the bed or workplace, otherwise there is a danger of constantly catching a cold or, worse, getting pneumonia.
- 4. ...where air circulation will be difficult, for example, behind curtains, etc. The distance to the obstacle should not be less than 3 meters. Otherwise, the air conditioner, which maintains the set temperature automatically, will fail. The cooled (or heated) air flow from the air conditioner will be reflected from the obstacle and will return back at the same temperature with which it “came out”. The air conditioner will decide that the work has been done, the desired climate has been set and will turn off. This is exactly what happened to my friends. Their air conditioner constantly got caught in the curtains and turned off before it could bring the room temperature to the set temperature. I had to call specialists and reinstall the system.
- 5. ...with a skew - then water (condensation) will flow out of it onto the floor, which, according to the installation rules, must be discharged through a drainage pipe into a special tank (see our certificate on drainage).
Stage four: gating walls or floors
In order to connect electrical wires and freon tubes between air conditioning units, installers punch gutters in the walls or ceiling (or, as the installers say, you need to “drill the line”). This is done if you want to make a hidden highway. Sometimes you have to “drill”, for example, not the walls, but the floor of the apartment.
Don't want to dabble? Then you can hide the wires in decorative plastic boxes(sometimes the boxes are removed under the baseboard). But before that, installers will have to connect two copper pipes ki (for refrigerant) and “ends” of electrical wiring between the external and internal units. Make sure the installers do this using the connecting fittings. And into the pre-punched hole in external wall laid a “waterproofing cup” with a connecting hose.
After this, they must carry out the so-called evacuation of communications, and always within 50 minutes (it is during this time that “extra” air and moisture will come out of the communications). This manipulation must be done using special equipment.
And keep in mind that, as a rule, a separate hidden line is made for the drainage pipe (in the wall or under the floor).
Fifth stage: checking the operation of the system using a special program
At this stage, installers must turn on the split system (air conditioner) by setting it to the test program. If everything works and the case does not vibrate, then everything is in order. The work is almost finished. By the way, we recommend that you independently conduct such a check of the system’s operation every year (using the same test program).
Stage six: garbage collection
I must warn you: laying the main line and other installation procedures involve dirt, dust and noise. But good installers (with a license to install air conditioners) will arrive with special tools (including a metal detector to examine walls for fittings and hidden communications).
In addition, installers should have a vacuum cleaner and other cleaning equipment. With their help, after finishing the work, they must remove all the garbage themselves. If installers try to dodge “dirty” work, strictly demand that “cleaning up the area” is included in the payment for installing an air conditioner. In addition, you can enter into an agreement with a reputable company for preventive maintenance of the split system. Then you won’t have to risk your life, leaning waist-deep out of the window, to clean the outdoor unit with a vacuum cleaner or call climbers at your own expense. When concluding such an agreement (it also includes warranty repairs), of course, you will have to pay a certain amount, but believe me, it is worth it. By the way, we hasten to announce a pleasant detail: the Meteomarket company, which sells Japanese Daikin air conditioners, will replace your air conditioner with a new one free of charge after the three-year term of the service contract. However, if you are satisfied with the old unit, you can not change it for 20 years. The company guarantees its uninterrupted operation good job. By the way, in the well-known building on Lubyanka, Daikin air conditioners have been installed since the time of the “corn secretary general” Nikita Khrushchev and are still working properly.
The outdoor unit must be regularly cleaned of dust and dirt. A particularly difficult period for the outdoor unit is the time of flowering of poplars. The fluff instantly clogs the filters, and the air conditioner (if it is not cleaned right away) breaks down. Of course, you can clean it with a vacuum cleaner if you are not afraid of heights. But it’s better not to risk it and call the “air conditioner rescue service” - that is, a service company.
At temperatures below –15°C, the air conditioner may refuse to work “heat”, and then low-temperature equipment (heat pump, compressor heater and even drain tube heater) will be needed. By the way, some models already include these devices (see table).
What did the installers say?
Experienced installers do not recommend buying air conditioners “from anyone,” on the market or second-hand.
“How many times has it happened that some kind of illiterate whiner will carry out the installation, and then people call us and beg us to help,” one experienced installer from a very reputable company told me. “It used to be that such would-be installers would bring with them a copper pipe for freon, but it didn’t have plugs. If there are no plugs, then moist air will get inside. And humidity is unacceptable for an air conditioner: when it combines with the insides of the entire system, it forms an acid that corrodes the air conditioner mechanism from the inside! And instead of serving properly for many years, such an air conditioner, naturally, after three years, is sent to a landfill.
The installers told me that sometimes they come across particularly stubborn customers, saying, “I’m paying, do as I say!” What should I do? There was a case recently. The client ordered that the outdoor unit be installed not from the street side, but inside the apartment, and in the children's room. He motivated this with a strange statement that his children, they say, would live at the dacha for another two months. He ignored all the persuasions and arguments of the installers that the outdoor unit cannot be installed in a closed, and especially in a residential area. It is clear that after two months the stubborn buyer called the installers to reinstall everything.
Or here's a case. The client wanted the indoor unit to blow directly onto the bed and the air temperature to be 18°C. They tried to prove to him that it would be cold, and that a directed flow of cold air could cause a cold. "No! I won't catch a cold! Place it!” There is nothing to do, they set it. The next day they came to install the air conditioner in another room, and they saw that the temperature on yesterday’s split was set to 22°C.
- What's wrong? - they ask.
– It’s true, guys, I froze at night.
In general, when proper operation With an air conditioner, a person should not feel that something is cooling or heating him. Just comfortable – that’s all! One day a friend called the company and asked to come. He says: “I didn’t buy it from you, though.” Okay, let's go. They opened the block, and there was a dead rat.
That's how things are. Hence the conclusion - it’s not enough to buy and install a split system. The main thing is that professionals do this for you.
Our information
The optimal temperature for human life is + 21–23°C.
Optimal air parameters in the residential area
For air conditioning a room of 10 square meters you need a device with a power of 1 kW, provided that the height of the walls is not higher than 3 meters.
There is a formula for calculating cooling capacity (power):
Q(total) (excess heat) = Q1+ Q2+ Q3,
- 1. Excess heat, depending on the volume of the room, is calculated using the following formula: Q1 = S x H x q(spec.), where S is the area of the room (sq.m.), H is the height of the room (m); q(spec.) = 0.03 kW/cub.m. – if the room does not receive direct sunlight; q(spec.) = 0.035 kW/cub.m. – average value; q(spec.) = 0.04 kW/cub.m. – if there is a lot of sun in the room.
- 2. The heat from running Q2 equipment accounts for approximately 30% of its power consumption.
- 3. Heat from people Q3 is 0.1 kW per person for office premises And residential apartments and 0.1 - 0.3 kW for restaurants, gyms, etc. The air conditioner power is selected closest to the obtained value Q(total)
Split system installation procedure
1. Wiring a separate electrical wiring for the air conditioner and installing a separate “automatic machine” in the distribution panel.
2. Installation of the external (outdoor) unit:
- choosing a place to install it (not lower than 1.8–2 meters above the ground, otherwise it may be stolen - there have been cases);
- installation of supporting brackets (with anchor bolts);
- strengthening the external unit on brackets;
- drilling a hole with a diameter of 5.0–6.0 cm in the outer wall for connecting communications (they will connect the external and internal blocks of the split system);
- inserting a “waterproofing glass” into the hole (the material from which the “glass” is made is the know-how of the installers); laying connecting communications into the “glass”.
3. Installation of the indoor unit:
- choice of location (the horizontal distance between the indoor and outdoor units should not exceed more than 7–30 meters - depending on the brand of the system);
- installation of support brackets;
- strengthening the indoor unit on brackets.
4. System wire connection:
- gating a wall or floor (in order to hide communications or laying wires in a plastic casing);
- connecting wires (copper for refrigerant and electrical) coming from the outdoor unit to the indoor unit using connecting fittings;
- carrying out a vacuum procedure (for 50 minutes, to remove air and moisture from communications using special equipment).
5. Test activation of the system:
- checking the operation of the system using a special program.
6. Cleaning the premises (by installers).
How should proper drainage be arranged?
To do this, installers must:
- 1. Groove the highway.
- 2. Turn off the water in the apartment.
- 3. Drill in sewer pipe hole.
- 4. Firmly insert the plastic drainage tube with siphon into the hole. A layer of water in the siphon will trap the smell coming from the sewer.
Attention! The drainage tube, through which accumulated moisture is removed, must be inclined at an angle of 5–10 mm so that there is a natural flow of water. If the tilt cannot be done for some reason, you must install a special pump for “forced suction of moisture.” But! This pump is not included and must be purchased separately. The purchase will cost between 70 and 190 dollars, depending on the pump model you choose.
The main problems that arise when operating an air conditioner
Problem 1: The air conditioner blows directly on you, creating a drafty feeling.
- Solution: You need to enable the auto-oscillation function horizontal blinds(then the draft will turn into a light breeze) or fix the horizontal dampers in a more favorable position. If this does not work, you need to turn the air flow to the left or right using the vertical air flaps. In most air conditioners, this operation is done manually, but in some models it can be done using the remote control.
Problem 2: On hot days, the air conditioner does not create the necessary coolness, despite the fact that it works constantly.
- Solution: In this case, you should check whether the filters are clogged, whether the windows and doors are closed, whether additional heating devices(boilers or toasters). It can be recommended to hang thick white blinds on the windows, which reflect heat and light well, thus reducing the heat gain through the windows by almost half. If this does not help, the model must be replaced with a more powerful one.
Problem 3: Water is dripping from the indoor unit of the split system.
- Solution: Apparently the drainage pipe is clogged. Most often, this situation occurs when an air conditioner with a drainage pipeline connected to the street is turned on for cooling when sub-zero temperature. In this case, condensation can turn into an ice plug. To avoid this, it is necessary to heat the drainage pipeline to +5 °C using a special cable. If ice plug If it does occur, then you should wait for a thaw and not turn on the system for cooling until then.
Problem 4: Reduced air flow.
- Solution: Clean the air filter. This can be done with a vacuum cleaner or washed with a soft sponge. warm water. It is not recommended to operate an air conditioner without a filter, since it protects not only your lungs, but also the heat exchanger of the indoor unit. When the latter becomes dusty, the efficiency of the air conditioner decreases.
Problem 5: Icing of the external unit when the air conditioner is operating for heating in conditions of low negative temperatures and high humidity.
- Solution: If your air conditioner does not have an automatic defrost system, try turning it on in cooling mode. In this case, the external unit begins to give off heat to the street, heats up and gradually thaws.
Problem 6: Premature failure of the air conditioner.
- Solution: To avoid this, you should not operate it at temperatures below – 10-15°C. At lower temperatures, the oil in the compressor thickens and its wear increases many times over.
There are various rumors about the dangers of air conditioners. But at the press center of the capital’s SES they told us that there is nothing to be afraid of: if the filters are replaced in a timely manner and if the operating rules are followed, the split system does not pose any harm. At least there were no complaints to the sanitary and epidemiological inspection.
Courtesy of MATERIAL magazine
Unlike mobile air coolers consisting of a single unit, household split systems require additional financial costs for installation. It is quite possible to reduce costs: study detailed guide, how to install a new air conditioner in an apartment and do the installation yourself.
Preparatory stage
Split systems are most often used for air conditioning private houses and apartments, as they are reliable, convenient and compact. The climate control system consists of two blocks - internal and external, connected to each other by two freon tubes, electric cable and drainage main.
Warning. When buying a new air conditioner, keep in mind important nuance: all freon is pumped into the outer module, but the inner one is empty. Do not open the valves on the side of the machine until you have connected the piping.
Installation of "splits" is much more more difficult to install floor and window air conditioners. Here, 2 separate blocks must be correctly placed outside and inside the room, laid and hermetically connected by lines. The issue of connecting to the electrical network is solved more simply - a line protected by a circuit breaker is laid to the installed indoor module.
What you need to do before you start installing it yourself:
- Buy additional materials.
- Prepare special tools and devices.
- Determine the location of both units and the route for laying lines with freon.
The location of split system blocks is subject to certain rules. The flow of cooled air from the indoor module should not directly blow people, and the maximum distance from the external unit should exceed 5 m. Most often, the unit is placed on the side partition next to the window and external wall. Technological distances from walls and ceilings are indicated in the diagram.

Now some tips on where to install the outdoor unit:

Note. Air conditioners inverter type They are quieter than usual, but the fan noise is still audible at night.
List of tools and materials
The following installation materials are not included in the delivery of the split system; you will need to purchase them yourself:
- metal bracket for suspension of the outdoor module (you can weld it yourself from steel equal-flange angles 35 x 3 mm);
- four-wire copper cable type VVG with a cross section of 1.5 or 2.5 mm² depending on the power of the cooler;
- copper freon pipes with a diameter of 6.35 mm and 9.52 mm of the required length;
- rubber heat-insulating sleeve of the K-Flex type along the length of the pipeline;
- corrugated drainage pipe (metal-plastic Ø16 mm is also suitable);
- winding tape PVA or PVC;
- polyurethane foam – 1 cylinder.
Note. Depending on the conditions for laying inter-unit lines, a plastic cable duct or dry cable may be needed. mortar to seal the furrow.

In addition to a home set of plumbing tools, installing an air conditioner requires the use of special tools and equipment:
- a hammer drill with a long drill or core drill for concrete;
- vacuum pump;
- manifold with pressure gauges and hoses;
- a device for manually flaring copper pipes and scissors that do not form metal shavings.
Often on the Internet you can find instructions on how to install and run a split system without a vacuum pump, where air from the pipelines and evaporative heat exchanger is pushed out by freon pressure. We strongly advise against following such recommendations and strictly following the technology of vacuuming the system before filling. Otherwise, the compressor may fail much earlier than expected.

Advice. There is a way to save on buying or renting a rolling tool and speed up the assembly of freon lines. Ready-made installation kits are available for sale, including factory-flared tubes, insulation and a cable with a drain hose. The price depends on the length of the harness (3, 5 or 7 m).
Air conditioner installation instructions
It is assumed that you have already purchased a split system with the required cooling capacity, you know exactly the dimensions of the devices and have allocated space for them. Installation work is carried out in several stages:
- Marking the route for laying inter-block communications, supplying electricity and sawing a groove in the wall (if necessary).
- Fastening the indoor unit, laying lines through the wall and connecting.
- Installation of the external module, connection of communications.
- Refrigerant charging and startup.
Depending on the conditions of the work, the main harness is laid in two ways: open in cable channel PVC or hidden inside the wall. Use the first option in a residential apartment, the second - in the process of renovating the premises.

Reference. Ninety percent of manufacturers of split systems provide for communications output from the left side of the indoor unit. When hanging to the left of the window and concealed laying of pipelines, the groove in the wall will have to be cut out with a turn, as shown in the photo.
The first stage of work is performed as follows:

He will tell you how to properly make furrows yourself and prepare for installing an air conditioner. experienced master in his video:
Installation of the indoor unit
Before you begin, remove the device from the box and read the accompanying technical documentation, where the manufacturer sets his own requirements for the installation of the product and a diagram is provided. Install the air conditioner yourself according to the step-by-step instructions:

Advice. In order not to tear off the winding tape of the harness, it is better to insert a plastic sleeve into the technological hole. Alternatively, make it from a plastic bottle.
After hanging the indoor unit, straighten the wiring harness and place it inside the furrow. At open method gaskets, immediately install the cable channel and hide the pipelines there. How to accurately connect the highways, watch the video:
Installation of the outdoor module
Mounting the unit on the balcony will not cause any particular difficulties. When installing under a window, secure yourself with insurance and invite an assistant to support you while screwing the bracket and the external unit. The work is carried out in the following sequence:

Advice. In order not to crawl out of the window up to your waist when tightening the nuts under the bracket, buy special plastic clamps or make them yourself. The bolt is inserted into the corner, a lock in the form of a washer is put on the thread and does not allow it to fall out. At the end, the module fastening nuts are screwed with a long socket wrench, as is done in the video.
Startup Instructions
On at this stage It is important to remove air and water vapor from the freon circuit by vacuuming. The lines are then filled with refrigerant pumped into the outdoor unit at the factory. The following technology is used to charge a new air conditioner:

After successfully charging the lines and the indoor module, turn on the split system for cooling, then test it in different operating modes. Make sure that condensation is flowing from the drain and not from the wall under the indoor unit. Don’t forget to close the ends of the service ports with standard plugs and install the cover.
Conclusion
The success of the event greatly depends on the quality of installation work. If you are careless when installing an air conditioner, then at best you will lose freon, and with it the money saved on calling the experts will fly away into the atmosphere. In the worst case, the compressor will “grab” steam or dirt that has entered the pipeline and will fail within just a year. So take your time and pay close attention to all connections.

Design engineer with more than 8 years of experience in construction.
Graduated from Eastern Ukrainian National University them. Vladimir Dal with a degree in Electronics Industry Equipment in 2011.
Related posts:


