During operation, the floor in the garage is subjected to serious tests every day. The duration of its service directly depends on how correctly the arrangement was carried out. Insufficient attention to detail can lead to rapid wear and deterioration in the consumer characteristics of the floor covering. However, by strictly following the work technology, you can make a reliable and durable garage floor with your own hands.
Before installation of the floor base begins, soil studies and assessment of terrain unevenness in the area are carried out. If a high level is detected groundwater, then drainage work is carried out. If the garage is located on a slope and there is a large difference in height, the platform is first leveled and removed upper layer land.
Then the optimal method of installing the floor covering is selected.
For the floor in the garage the following can be used:
- wooden flooring;
- monolithic reinforced concrete slab;
- concrete screed.
Wooden flooring in a garage is rarely done, as it does not meet fire safety requirements and is not highly durable. However, it is quite warm, cozy and helps create a special atmosphere in this room.
For its installation, a flat area is initially prepared. Columns or brick supports are installed on it level. Their number depends on the size of the garage and the planned load on the floor. Alternatively, the base for the floor can be the garage foundation.
Logs made of timber are laid on the support, the cross-section of which must be at least 150 * 150 mm. They are pre-impregnated with liquid bitumen or water-repellent impregnation. Waterproofing and insulation are laid between them. Then boards with a thickness of at least 50 mm, treated with an antiseptic, are nailed on top. The logs must be mounted across the garage, and the boards are fixed along the intended line of movement of the car.
| Thickness floor board, mm | Gap between lags, mm |
|---|---|
| 20 | 300 |
| 24 | 400 |
| 30 | 500 |
| 35 | 600 |
| 40 | 700 |
| 45 | 800 |
| 50 | 1000 |
Precast concrete slab
In areas with a significant slope or high groundwater level, it is advisable to lay a solid base on the garage floor. This significantly reduces the work time and simplifies the installation process itself.
The slab can only be laid on a prepared base. To do this, gravel or crushed stone is poured onto the floor in the garage in a layer of 20 cm, and then sand. All this is carefully compacted. A frame made of metal profiles, onto which the slab itself is already lowered. It is unacceptable to lay it directly on the ground, since the slab may crack due to soil movement and during operation.
You cannot use a hollow slab to install a floor in a garage that is not heated in winter.
A layer is poured on top of the laid base cement screed or finishing self-leveling polymer floor. The result is a durable and reliable coverage. The only drawback of the slab is that to install it you have to use the services of expensive construction equipment.
It’s safer and easier to make a concrete floor in the garage with your own hands. However, first you should consider the question of whether a pit is needed in the garage.
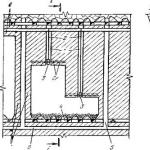
Inspection hole
For the convenience of car repairs, an inspection pit is equipped in the garage.
But it should be borne in mind that in the presence of a high groundwater level, installing underground structures in a garage can become extremely problematic.
For an inspection hole in the garage you should:
- dig a pit in the ground, having a depth of 20 cm greater than the height of the owner of the car, a width of 80-90 cm and a length of about a meter (depending on the dimensions of the car);
- pour a layer of gravel and sand on the floor and place it on top thin layer cement screed (5-10 cm);
- make formwork along the walls and pour cement or lay bricks on the mortar;
- Place a 60 mm welded frame on top of the finished walls iron corner and fix it with cement mortar.
Once the hole is ready, you can begin further work on arranging the floor in the garage.
Concrete floor in garage
Preparing the base
Before starting work, the approximate height of the future floor is calculated. It should be slightly above the threshold. All excess soil is removed from the garage. Then the following is poured onto the surface:
- fine crushed stone in a layer from 30 cm to 85 cm (depending on the type of soil);
- sifted fine sand in a layer of 15 cm to 20 cm.
All this is carefully leveled, compacted, watered and compacted again. For this you can use special equipment or make do with improvised means. The result should be a dense and even base. The deviation of the plane of the prepared floor surface from the level should not be more than 5 mm per meter.
Spilling sand
Waterproofing, insulation and reinforcement
Roofing material, waterproofing material, rubemast or stekloizol are rolled out on compacted sand. Extruded polystyrene foam with a thickness of 5 to 10 cm is laid on it. This insulation will help avoid troubles associated with concrete freezing in winter time of the year. A thick film or waterproofing membrane is spread over polystyrene foam. The film strips must be laid with an overlap of at least 15 cm, and the joints between them are taped with transparent tape.
On the walls, waterproofing material is fixed at a height 5 cm higher than the expected level of the finished floor.
At the next stage, the reinforced frame is installed. For this, reinforcement with a thickness of 8 to 12 mm is used. It must be selected depending on the expected load on the concrete slab. If the garage is large and there will be a lot of heavy cars in it, then the iron bars for reinforcement should be as thick as possible.
The iron rods are connected to each other with wire. The use of welding is not allowed, since the frame structure must have a certain mobility. It is advisable to strengthen the edges, corners and joints as securely as possible. For the transverse posts in the frame, 6 mm thick reinforcement is used. The result should be a strong two-layer lattice with a distance between the rods of 5-10 cm.
Stands 3-5 mm high are placed under the lower reinforcing mesh. The total height of the frame should be slightly less than the planned thickness concrete slab, which is selected based on soil analysis and climatic conditions of the region. On sandy soils in the absence of low temperatures in the winter season, a slab thickness of 25 mm to 35 mm is allowed. On heaving soils in areas with traditionally low winter temperatures the thickness of the concrete base must exceed 45 mm.
The reinforcement frame is separated from the walls by an expansion gap. It is necessary to provide the concrete slab with free space for gradual expansion and contraction in different time of the year. If there is no distance between the floor and the walls of the garage, the entire structure may collapse. Used as cushioning material damper tape, foam or soft insulation.
Installation of beacons
To construct a level concrete slab, beacons are installed on top of the frame on the mortar. They can be metal, aluminum or wood. They are installed so that the upper surfaces of all beacon guides are in the same plane. This is done using a laser or construction level; you can also use a regular construction cord for these purposes. To do this, it is stretched along the diagonals of the room and adjusted according to level.
First, the beacons are fixed along the walls, the next ones are installed at a distance of the length of the rule that will be used to level the concrete solution. Concrete can be poured only after the cement mixture on the lighthouses has completely hardened.
When installing the guides, be sure to provide a slope of at least 2 cm towards the garage door. This will ensure timely drainage of water and other liquids from the finished floor in the future.
As soon as the beacon profiles are securely fastened over the entire surface of the floor, you can begin to directly install the concrete slab.
Video - Installation of beacons
Pouring concrete
To install the floor in the garage, you should use durable frost-resistant concrete of a grade not lower than M300.
| Concrete grade | Mass composition, C:P:SH, kg | Volumetric composition per 10 liters of cement P/Shch, l | |
|---|---|---|---|
| 100 | 1: 4,6: 7,0 | 41/61 | 78 |
| 150 | 1: 3,5: 5,7 | 32/50 | 64 |
| 200 | 1: 2,8: 4,8 | 25/42 | 54 |
| 250 | 1: 2,1: 3,9 | 19/34 | 43 |
| 300 | 1: 1,9: 3,7 | 17/32 | 41 |
| 400 | 1: 1,2: 2,7 | 11/24 | 31 |
| 450 | 1: 1,1: 2,5 | 10/22 | 29 |
| Concrete grade | Mass composition C:P:SH, kg | Volumetric composition per 10 liters of cement P/Shch, l | Amount of concrete from 10 liters of cement, l |
|---|---|---|---|
| 100 | 1: 5,8: 8,1 | 53/71 | 90 |
| 150 | 1: 4,5: 6,6 | 40/58 | 73 |
| 200 | 1: 3,5: 5,6 | 32/49 | 62 |
| 250 | 1: 2,6: 4,5 | 24/39 | 50 |
| 300 | 1: 2,4: 4,3 | 22/37 | 47 |
| 400 | 1: 1,6: 3,2 | 14/28 | 36 |
| 450 | 1: 1,4: 2,9 | 12/25 | 32 |
In areas with difficult climatic conditions It is necessary to add special additives and plasticizers to the cement mixture. Self-cooking the solution will take a long time and will not guarantee the formation of a durable coating.
Concrete for pouring a garage floor should have as uniform a consistency as possible. It is almost impossible to satisfy this requirement in artisanal conditions.
The best option is to order a mixer with concrete mortar. This will allow you to complete all the work in one go, which is also an indispensable factor for the successful completion of floor installation work. Flood concrete mixture in several stages is strictly prohibited. This will lead to rapid destruction of the integrity of the coating.
During pouring, the mixture is distributed as a rule among the beacons, while air is carefully expelled from it. For these purposes, a shovel or a submersible concrete vibrator is used. The main goal of the installation work is to form a continuous and even mass of mortar over the entire surface of the garage floor, without voids inside.
The next day after pouring, the floor over the entire area is covered with thick rags, which are moistened with water daily.
Direct contact must not be allowed sun rays onto the garage floor until it reaches the desired level of strength.
Complete hardening of the concrete slab will occur only after 28 days. After this, it will be possible to begin the final stage and finishing work.
Finish coating
Concrete itself is not a durable coating. It inevitably breaks down and cracks, gradually absorbing oil, gasoline and chemical compounds. Therefore, it makes sense to cover the finished concrete floor with a thin protective layer that has a higher strength threshold.
It could be:

The choice of finishing material depends only on the personal preferences and financial capabilities of the garage owner. The sequence of installation of most of these materials in the garage is no different from the actions during regular renovations in an apartment. Initially, the floor in the garage is dust-free. Then a primer is applied to it. Then the selected material is glued according to the instructions.
In any case, a properly made concrete foundation will serve reliable support for any modern coating.
Video - How to fill a garage floor
Video - How to make a concrete floor in a garage
It’s only at first that it seems that it doesn’t matter what kind of floor the garage has. Once you start to figure it out, a sea of nuances immediately arises. In the article we will talk about the advantages and disadvantages possible options and how to make a garage floor with your own hands.
You can make a concrete floor in your garage with your own hands. It's important to know how
Which garage floors are better?

As you can see, there aren't many options. Let's look at their advantages and disadvantages in more detail.
Advantages and disadvantages
Earthen floors in a garage are very simple to install, require virtually no material investment, and you can replace a damaged section of the earthen floor at any time. These are, perhaps, all the advantages. The downsides are more serious:
- in dry weather they get dusty, in rainy weather they get wet;
- spills can only be removed by replacing part of the coating;
- cold, no possibility of insulation;
A dirt floor in a garage can be made as a temporary option or as a base for wood. Such floors can be found in garages at dachas, where the car is located for a very short period of time. In major garages, they still make a more solid foundation.

A garage floor made of paving slabs can be considered as one of the earthen floor options. It's just more practical. There are more layers when constructing it, as well as more money is required for its installation - more crushed stone and sand are poured onto the ground, into which the tiles are laid. But the functionality of this option is much higher. Cons - possible high humidity, and if the sand-gravel cushion is insufficiently compacted, the floor may “sag” in places of greatest stress, and if the quality of the tiles is poor, it can be destroyed under the influence of aggressive substances, of which there is more than enough in the garage. Another minus is that dirt gets stuck in the seams, it’s not easy to clean, and the problem of absorption remains: paving slabs are hygroscopic.
Not everyone is happy with a wooden garage floor because it is a fire hazard and prone to rot. Although, if the groundwater is low and the floor is made correctly, it will not rot. Fire hazards can be combated by impregnating the boards with fire retardants - agents that reduce the flammability of wood. But these are not all shortcomings. It’s also not very pleasing that the boards absorb dirt and spilled liquids, which do not have the most pleasant smell. A wooden garage floor looks very untidy, and there is no way to remove all of the wood fibers.

The advantages of wooden floors include the fact that they are warmer than the other two options. In addition, when installing a plank floor in a garage on joists, the gap between them can be filled/filled with thermal insulation materials, which will make it even warmer. It’s difficult to talk about the price: in some regions, boards, even thick ones, are inexpensive, in others they cost a lot of money.
Concrete garage floors are the most common and popular. It is durable and can be insulated. And it's simple concrete covering left in last years not so often - many materials have appeared for finishing the floor in the garage, which make its operation much more comfortable.

The disadvantages of a concrete floor in a garage have already been mentioned: it is a large amount of work, a long period of time required to install it, and a fairly high price, even if you make a concrete floor in the garage with your own hands. If the final coating is the same as concrete, then it also adds absorption of liquids and odors, which are also impossible to remove. The unpleasant thing is that concrete absorbs moisture from both the soil and the air. This is not good for concrete - it only becomes stronger, but for a car it is not good. So when high level groundwater needs to be done good waterproofing, and, possibly, a topcoat that does not allow moisture to pass through. Great option- polymer or rubber covering for the garage.
How to make an earthen floor
First, all construction debris that may accumulate there during construction is removed from the garage. Next, the entire fertile layer is removed. Completely all the way down to “clean” soil without vegetation and roots. The thickness of the layer can be different - somewhere 10-15 cm, and somewhere 50-60 cm. Regardless of this, the entire fertile layer must be removed. It contains a lot of organic matter, microorganisms, and insects. Organic matter will rot, spreading corresponding odors, and microorganisms will contribute to the appearance of mold and fungi; insects are also not the best neighbors.

Having reached clean soil, it is leveled, the same clean soil is poured in layers of about 5 cm (you can dig a hole somewhere nearby or bring it in). Each layer is well compacted. It’s good if there is a vibrating platform, a roller or some other similar device. If you don’t have one, you can make a manual tamper yourself. There are two options:
- thick steel plate, with a T-shaped handle welded in the center:
- a piece of log of considerable diameter with a crossbar-handle nailed at the top.
Each layer is compacted with this tamper. So, tamping in layers, fill the pit to the ground level, maybe even a little higher. The upper layers are molded, creating a slight slope towards the door so that water that gets into the garage drains.

To create a more serviceable floor, the top layers are replaced with clay, but it is very difficult to compact it, and high density must be achieved. Another option is to pour some gravel onto the compacted earthen floor and ram it into the ground with a tamper. Here, most likely, you will need a vibration platform. But it turns out solid foundation, in which even the wheels leave no traces. The advantages of this option also include the fact that there will be much less dirt in the garage.

Paving slabs in the garage
The beginning of the work is exactly the same: remove the fertile layer, level and compact the soil. Next, add gravel. The minimum layer is 10 cm, and what you get depends on the depth of the resulting pit. Just keep in mind that there will still be a 7-10 cm layer of sand on top, and paving slabs, the thickness of which should be more than 6 cm. This is so that you can correctly calculate the height of all layers and bring the floor level to the required level.

Sand, crushed stone and all other materials are poured in layers no more than 5 cm thick, leveled, then compacted to a high density. A layer is considered compacted if no footprints remain on it.
To eliminate or reduce the suction of moisture from the soil, a layer or, better yet, two, of waterproofing must be added to this sequence. This can be roofing felt, other rolled waterproofing material, dense polyethylene film (density of at least 250-300 microns), water vapor barrier membrane. The material is spread out so that one sheet overlaps the other. The strips are glued together. If it is film, you can use Double-sided tape, if roofing felt or other similar material, the edges can be coated bitumen mastic. Where to place the waterproofing? It’s probably better between soil and sand, and also between sand and a dry mixture for laying paving slabs.
In general, for a garage, you can use a layer. This non-woven material, which is used in Europe in road construction. It perfectly redistributes the load, and the floor in your garage will never sag under the wheels if there are geotextiles in the cake. In this embodiment, it is better to lay it between the second layer of sand and the dry mixture.

They put paving slabs both on concrete screed and asphalt, which is also sometimes laid in the garage. Then pour a layer of dry backfill or sand 5 cm thick, level it, lightly compact it, and lay the tiles in it.
To make it easier to navigate the thickness of the existing layer when installing floor layers in the garage, their dimensions can be marked on the walls of the garage. If the distance from wall to wall is small, these marks will be enough. If the area is large, in some places you can drive in pegs, on which you can also mark the thickness of each layer. This makes the process much easier. After all the layers are filled, the pegs are pulled out, the holes are filled with sand and compacted with at least the same peg.
Another trick: so that less dirt gets into the seams between the tiles, mix sand with cement, fill the spaces between the tiles with this mixture, and carefully sweep away the remains. Then you need to take a spray bottle and wet the surface well, leave for a day or two. If you see that there is cement somewhere on the surface of the tile, it is better to immediately wipe it off with a rag. If he catches you, you will suffer for a long time. Why not water the floor with a hose? Because the drops are too large and will leave potholes. The spray bottle produces water dust rather than droplets.
Making a wooden floor in the garage with your own hands
And in the case of a wooden floor in a garage, there will be no differences at the first stage: you need to remove the fertile soil, level and compact the bottom of the resulting pit. Then it is fashionable to lay a layer of waterproofing (roofing felt, waterproofing, film, membrane) on the bottom, and a layer of sand or gravel on it. Sand and gravel need to be compacted, but the density is not so critical, but bringing the bedding “to the horizon” is important - check how evenly the “cushion” lies using a level, but not small, but no less than a meter.
With insulation
Logs are installed on this bedding - large cross-section timber. The step is no more than a meter. It is advisable to arrange it so that the car wheels are above the joist or not far from it, and the rest can be distributed as it turns out.
Before laying, the logs are impregnated with a protective impregnation against rotting (for wood in direct contact with the ground), and then treated with fire retardants (reducing flammability). To prevent rotting, logs can be impregnated with mining, but their flammability will only increase. So this is not a very good option, although it is cheap. You can also use sleepers. They are already impregnated, but have a persistent characteristic odor.

Next, the space between the joists can be filled with insulation. The best option is polystyrene foam. If your budget allows, take extruded with a density of 35 kg/m3. It does not rot, fungi and microorganisms do not multiply on it, and mice do not eat it. In addition, it does not allow or absorb water. Insulation and waterproofing in one fell swoop. Layer thickness is at least 5 cm, but preferably 10 or more. If there is still room, you can fall asleep broken brick, expanded clay. These materials are not the best solution, as they are hygroscopic (absorb moisture). You can use them instead new material— granulated foam glass. It is many times “warmer” than expanded clay, does not absorb water, and is not so expensive. In principle, you can only fill foam glass (in granules or broken glass) between the joists. It will be good too. But in any case, you don’t need to fill the entire space, right under the boards. Required ventilation gap at least 5 cm. Then the boards will not rot.

Boards are laid across the installed joists. This is normal edged board 40-50 mm thick. When laying, do not try to pack them very tightly. It is better if there is a gap of 3-5 mm between the boards. That's all, the insulated wooden floor in the garage with your own hands is finished.
Logs on posts
There is an option for a “cold” wooden floor in the garage - on posts. A layer of gravel is poured onto the leveled soil and compacted. They are placed on gravel with the expectation that logs can be laid on them later. The distance between the posts is about 1 m. That is, if the width of the garage is 4 m, then there are two posts at the edges and two in the middle. Since the distance between the logs is also 1 m, such rows of columns are located every meter. After two weeks, the solution will set and logs can be laid on the posts.

Ruberoid is laid on each column in two layers. It can be replaced by coating with bitumen mastic (twice). If the height of the posts is not the same, pieces of wood, plywood and other similar materials can be laid between the joists and posts. It is important that they are held tightly and that the logs are level. Next is laying the floor boards.
Concrete floor in garage
The most versatile floor is concrete. And we are talking not only about its finishing, but also about how it can be made. If we talk specifically about how to make a concrete floor in a garage with your own hands, you must first of all start from what kind of foundation you have. If this monolithic slab, quite a bit of work. If the surface is not level enough, all that remains is to fill in the leveling screed and then begin laying the finishing coating. If the differences do not exceed 1 cm per square meter, you can immediately lay any of the suitable finishing materials.
Layer order
With any other foundation, the beginning of the work coincides with all those described above: we remove the fertile layer, level it, and tamp it. Further, no news either: pour crushed stone in layers, tamp it, the total thickness of crushed stone is from 10 cm. The next layer is sand.
But then there may be options. If you want an insulated floor in the garage, install thermal insulation material. Better - extruded polystyrene foam with a density of 35 kg/m3. It will support both the weight of the screed and the machine. This cannot be said about all the others. You can use a bulk thermal insulator such as expanded clay, but it is ineffective and also absorbs moisture. Then you need to lay a layer of waterproofing underneath it. Better - granulated foam glass. It has low thermal conductivity and does not absorb water. It is problematic to use ordinary polystyrene foam (foam) and mineral wool - they can wrinkle under the weight, which will lead to a loss of thermal insulation effectiveness.
A film is spread over the thermal insulation layer, and a reinforcing belt is placed on it. Here again there are two options: tie it from reinforcement (8-10 mm in diameter in increments of 20 cm) or lay a ready-made metal mesh (wire from 6 mm with a cage size of 10 cm). If you choose a mesh, lay it overlapping, overlapping at least one cell, and tie it together (with knitting wire or plastic clamps). Fill everything with concrete (more than enough), level it well.

To make leveling concrete in the garage easier, beacons are placed at the required level. These are even strips - special metal ones, metal pipes, as a last resort - wooden planks(they are not always even, and even moisture can lead to them). They are positioned so that their top edge is aligned to the same level. The distance between the slats is 40-60 cm less than the length of the rule. The solution is poured in portions. Supporting the rule on the beacons, it is stretched, leveling the surface. The entire perimeter is gradually filled. Please note that for concrete to set normally, it needs a temperature of about +20°C and sufficient humidity. That is, pouring concrete on the garage floor better in summer. But if it is too dry during this period, you will have to water the screed - a sufficient amount of moisture is also important. To make it evaporate less, the screed is covered with film or burlap. If the film is used, each time you water the screed, it must be removed and spread. If burlap is laid, you can water from above. Under such conditions, the screed will gain its design strength in approximately 28 days. Afterwards, you can move on - laying the finishing coating.
Another option in the video.
The garage serves not only to protect the iron horse from car thieves or weather conditions, but also acts as a kind of storage for “very necessary” things. One way or another, quite a lot of time is spent in it, and therefore car enthusiasts approach its arrangement with special care. Owners select materials for the construction of walls and roofs based on two main criteria: taste preferences and the financial side of the issue. Unfortunately, less attention is paid to the organization of floors. The article will talk about how to make a wooden floor in a garage with your own hands.
Types of flooring
The most common types of flooring are earthen and cement; wood flooring is less common. The first two options are ideal if this room is used under intensive load for its intended purpose. A plank floor is relevant when the vehicle is operated in the warm season or on weekends.
Below is a brief description of the most popular types of material used for garage flooring.
Concrete
- Such floors are made with strict adherence to technology, otherwise through a short time Cracks will appear on the surface, which will render it completely unusable. Well, if you follow all the rules, then such a floor will last at least 20 years.

- Among the disadvantages of a concrete base, one can note low resistance to abrasive wear, which leads to the formation of dust. In addition, spilled liquid penetrates deeply into the pores and remains there forever. A polyurethane coating can act as a savior, but its cost cancels out the affordability of a concrete floor.
Plates
- Ceramic or porcelain tiles are distinguished by both aesthetics and practicality. Their surface is simply unable to absorb liquid substances, and the top layer of glaze is easily washed off even without the use of special cleaning compounds.

- Porcelain tiles are quite an expensive option for furnishing a garage. Preparation of the base, and the installation itself, requires labor-intensive work. It is recommended to lay the material 2-3 years after the completion of the garage, that is, when the structure shrinks.
- Ceramic products also have a significant disadvantage - low resistance to mechanical shock. And, as you know, falling of various pieces of iron, especially in such premises, is not at all uncommon.
Wooden floor in garage
- The lowest price is for a wooden floor in a garage, and besides, such a floor is considered warm. Therefore, it is much more pleasant to repair a car or inspect it while lying on your back.
Wooden floor in garage photo

- Among the disadvantages, high absorbent properties can be noted. Do not forget that wood is classified according to its resistance to decay and is divided into fire hazard classes. But treatment with modern protective agents will extend the life of the flooring and protect it from fire.
- Of course, the floors can also be covered with special rubber tiles, which certainly are not afraid of any loads. As already mentioned, the choice of coverage depends on material capabilities.

- In any case, if the arrangement of floors is carried out on our own, then you can save quite a decent amount on the purchase of, for example, tools, spare parts for a car, wall shelves or racks for storing various equipment.
How to Install a Wooden Garage Floor on an Existing Subfloor
Installation of the material must be carried out on a solid foundation so that the work done and the funds invested are not in vain.
Laying on a concrete base
- A smooth surface with minor defects, such as surface cracks and chips, allows you to install a floorboard on top of it. Fastening of lumber is carried out using screws and plastic dowels or anchor bolts.
- If the floor has large unevenness, then it is recommended to pour a screed, which will ensure not only the same level over the entire surface, but also strengthen the base.

- Before work, make sure that the cement coating is completely dry. To do this, you do not need to have a special-purpose device. You can also determine the humidity using a handy method; to do this, attach a small square of plastic or a piece of film to the surface hermetically with tape.
- After a few days the material is removed, if inside If many large drops are found, then the board cannot be laid yet. In this case, it is necessary to give the base more time to dry or take additional measures to reduce humidity. Minor condensation allows scheduled work to be carried out.
- In any case, polyethylene or roofing felt is first laid out, which will prevent moisture from entering the base. Laying is carried out with spades on the walls and the width of the overlap of the material must be at least 10 cm. The seams are taped with tape or moisture-resistant mastic.

Laying on joists
- If the surface is relatively flat, then the boards can be mounted on pre-installed logs. Here, small cross-section bars (50x50 or 40x50 mm) are fixed to a concrete base around the perimeter of the room. The same lumber is used as cross members. For more reliable fixation, the logs are attached to the beams using metal corners. They are installed parallel to the entrance/exit of the garage in increments of no more than 50 cm.

- It should be remembered here that the floor level will rise by 70-80 mm, depending on the width of the selected lumber, for example, 50 mm timber and 25-30 mm floorboard. Thus, a difference is formed, a step between the floor and the entrance to the room.
Laying on a wooden surface
- Strengthening an existing plank floor by attaching new floorboards is only possible if you are completely confident that the structure can withstand heavy loads. If there is even the slightest doubt, then the old coating must be dismantled.
- Here, logs and other wooden elements are inspected, damaged parts of the frame are replaced. During major works, a layer of waterproofing material is laid. It is advisable to fill the space between the joists with expanded clay or dry sand, the floors will become warmer.

- The satisfactory condition of the old coating allows the boards to be fastened, but only in a perpendicular direction.
Wood processing
It would not be superfluous to mention that wooden elements need to be treated with protective agents. Preparations are selected individually, since some are responsible for uniform shrinkage, reduce cracking, others guarantee protection against rotting, and others prevent ignition.
It is worth noting that it is not advisable to purchase miraculous “5 in 1” solutions, since one product cannot simultaneously protect against all “misfortunes”. Therefore, when going to the store, it is better to have at least basic knowledge about their classification, their purposes, and the best manufacturers.
Protective compounds are divided into 3 types:
- Lucky after drying, they form a transparent film that has bioprotective properties, that is, it protects the surface from premature rotting and woodworm damage. Such coatings prevent cracking of the material and do not lose their original qualities under the influence of temperature changes.

- Paints not only give a decorative appearance, but also protect the painted elements from the short-term influence of moisture (periodically formed condensation). For processing, it is better to select paint based on organic solvents.
- Antiseptics- these are multifunctional products that can protect wood from biodegradation (mold formation, the appearance and spread of house fungus). Combined option antiseptics and has fire-fighting properties.
The lags are coated with water-repellent agents, which are characterized by a deeper degree of penetration, or with solvent-based antiseptic impregnations, which form a thick protective film. Preparations based on borates and fluorides are ideal.
You can use an oil analogue, only here you need to make sure that the lumber being processed is absolutely dry, otherwise it will be wet inner part the material will contribute to the development of fungal spores, which in turn will lead to its complete destruction.
Floorboards are treated with preparations that provide effective fire protection and contain copper hydroxide.
The best manufacturers
The top three included companies that produce the most effective means for the protection of wooden surfaces:
- from domestic producers - "Wood healer", "Bioks", "Biosept";

- foreign brands represent - “ TIKKURILA" (Finland), "Dulux" (England), "ALLICATOR" (Germany).
Folk recipes
Since ancient times, wood has played an important role in national culture, so people have always been concerned about how to protect buildings from the harmful effects of adverse conditions. For so much long term There are many effective ways:
- silicate glue diluted with water, about 1 liter of water takes 400 grams of glue;
- copper sulfate is also known for its bactericidal properties (100 grams of copper sulfate is diluted in 10 liters of water);
- boric acid is a popular "preservative". The solution is prepared as follows: for 5 liters of boiling water, take 50 grams of boric acid and 1 kg of salt.
Installing a wooden floor in a garage from scratch
Wood flooring in a built garage, you can do it yourself in a matter of hours, since logs are usually laid at the stage of constructing the foundation. But, if the construction was carried out in a lightweight version, then more time and effort will have to be put in.
- Determined zero level future gender. As a rule, the “threshold” of the garage is taken as a basis. The soil is selected approximately 50 cm, more accurate calculations are made as follows: 10-15 cm will “go” to sand cushion, 10-15 cm - crushed stone layer, 10 cm - cross-section of timber (logs) and plus the thickness of the floorboard 2.5-3 cm.
- Each layer is moistened and compacted. To do this, it is not at all necessary to use special equipment. Suitable here homemade instrument, where a square piece of board, which will be used as a sole, is attached to the end of a block with a cross-section of 50x50 mm with nails or screws.

- Be sure to line the waterproofing material with an overlap on the walls slightly exceeding the zero mark. The joints of the material for sealing are glued with construction tape or coated with mastic.
- All wooden elements are treated with antiseptic and fire retardant preparations.
- A 100x100 mm beam is installed around the perimeter; this section will help distribute the load of both the flooring itself and the weight of the car. In the corners, lumber is fastened with metal corners. A level is used to check the horizontal position; if necessary, trim plywood or boards are placed.

- Parallel to the entrance, logs from the same timber are installed. The distance between them is maintained within 50 cm, but no more. Fixation is carried out with self-tapping screws and L-shaped metal products.
- Expanded clay or dry sand can be poured into the resulting cells.
- Floorboards are laid on top, located according to the movement of the car. Fastening is carried out with self-tapping screws in two places to each joist.
Wooden floor in the garage step by step video
Material calculation
To install a wooden flooring in a garage of standard size 3x6 m, you will need:
- timber 100x100 mm - 32 m;
- metal corner - 32 pieces;
- floorboards 25x150x6000 mm - 20 pieces;
- wood screws 4.2x65 mm - 570 pieces or 2 kg.
- For a tighter and more reliable fit of the floorboards to the joists, it is recommended to drill holes for hardware using a drill whose diameter is 0.5-1 mm larger than the thickness of the screw. The same applies to corner metal fasteners.
- Before you begin laying the floors, strips of rolled roofing felt should be glued to the edges on both sides of each board, or secured with a construction stapler.
Compliance with all the rules and technology for arranging a wooden floor in the garage will allow you to repair your car in comfortable conditions, even in winter.
Car owners are very particular about the arrangement of their garage. This is due to the fact that the room is used not only to protect the car from external threats, but also for other related purposes. For example, repair work or hanging out with your friends. There are many available in the market. However, not all of them can boast of such comfortable advantage, as the presence of good thermal conductivity properties. And in this regard, the wooden floor in the garage is admirable. Next, we will describe why wooden flooring is so good and how to make it with your own hands.
The share of wooden floors in the total mass of garage floor coverings is steadily growing every year. This is due to the undeniable advantages of wood, which are worth listing:
- The thermal conductivity of the material makes inspecting or repairing a car much more comfortable, especially if it needs to be carried out in a lying position;
- The durability of wood will be significantly higher if the material is pre-treated with protective mastic or special means that protect it from moisture and fire;
Important. Modern wood impregnations allow wood to absorb excess moisture into the room, protecting it from dampness and while maintaining the physical characteristics of the floor covering.
- Ease and speed of replacing damaged floor covering elements;
- A competent approach to choosing the thickness of the floorboard will provide the required strength, which is in no way inferior in this regard to other types of coating;
- Easy to install wooden planks allows you to do it yourself, without the involvement of experienced professionals;
- Wooden garage floors do not generate dust;
- The budget price will pleasantly please car owners.
The disadvantages include the following:
- Attractiveness of wood to insects and some types of rodents;
- The material is susceptible to odors and stains, which are very difficult to get rid of later;
- Susceptibility to the harmful effects of moisture, if the wood has not previously been treated with moisture-resistant agents;
- Depending on the type of wood, the price of the finished coating may vary greatly.
Wood floor protection

Since most of the disadvantages of wooden flooring can be negated if certain rules are followed, it is worth paying special attention to them. We are talking about the use of special varnishes or impregnations, which can significantly increase the service life of wood, making it better performance characteristics. In particular, such as resisting moisture, increasing wear resistance, improving fire safety and many others. All these special means can be classified into the following types:
- Antiseptics are substances that penetrate deep into the wood and protect it from destruction. They are also excellent protection against small rodents and rotting processes. Gives wood coating fire retardant properties;
- Wood varnishes - forming a protective coating on outside wooden boards and preventing it from abrasion and physical damage;
- Paints serve more of a decorative role, however, they also protect the surface of the coating.
The order of protective work must follow a certain sequence of stages. So, first of all, the wood is thoroughly dried, then treated with antiseptics, and only after that can you proceed to applying varnish or paint.
Procedure for laying a wooden floor, surface preparation

Installation work must be carried out on a solid foundation so that you do not have to regret the money spent later. That is, first of all, installing a wooden floor in a garage involves preparing the surface. Order preparatory work in this case it should look like this:
- Purchase required material in the required quantity;
- Cleaning the surface from dirt and unnecessary objects;
- Laying concrete screed with reinforcing mesh;
- Laying a waterproofing film;
- A layer of thermal insulation materials;
- Installation of transverse joists;
- Installation of wood flooring;
- Applying special protective agents to the plank floors in the garage.
To carry out such work you will need the following materials:
- Medium-sized crushed stone for the base of a concrete screed;
- Cement with river sand for solution;
- Metal mesh with wire for reinforcement;
- Roofing material or a special film can act as waterproofing;
- Mineral wool or expanded clay as a heat insulator;
- Wooden beam for installation of transverse joists;
- Wooden boards for flooring.
Note. On the market you can find already tongue-and-groove boards with special grooves provided. Their purchase will help seal the joints.
Wood selection
It is not recommended to use red wood or beautiful walnut for arranging a wooden floor; it is better to use them for other purposes. Strong oak or durable conifers, which are also known for their abrasion resistance, are most suitable. The material of the boards should be free of cracks and taken with some reserve.
Sand-cement screed

Before laying the floor screed, you should remove a half-meter layer of soil and level the surface using a level. Next, you should compact the surface of the subfloor, if it is loose, pour a layer of sand, and on top of the same - crushed stone. A reinforcing mesh of metal rods is installed on the resulting “cushion”. They must be tied evenly with wire to form square cells. The resulting mesh is installed at a certain elevation from the top layer of crushed stone and then poured concrete mortar. The thickness of the liquid layer should be about 10 cm. While possible, carefully level the surface of the solution, and then wait for it to dry.
The degree of humidity is determined by placing a piece of film on the surface and securing it with tape. If after a few days there is still condensation or large drops on the back of the film, then some more time is needed for drying. Next, you need to clean the surface and do the styling. waterproofing materials with a slight overlap on the walls. Roofing material should prevent the penetration of moisture, for which its seams are covered with bitumen mastic.
Cross joists

Bearing beams with an average cross-section are installed at a half-meter distance across the garage room and connected with dowels to the screed. For strong fixation, it is possible to use metal corners with small pitches. It is imperative to leave a gap between the walls and the ends of the joists, since wood tends to become wider or narrower depending on the level of humidity. The beams are connected to each other by boards, and the places of all fastenings are lubricated with bitumen mastic. It is also useful to have a gap between the surface of the screed and the joists, which will ensure free air circulation. Through wooden spacers You can also eliminate unevenness in the cement screed.
Note! Do not forget that depending on the width of the beams and the thickness of the boards, the floor level will rise slightly. This should be provided so that the resulting difference near the entrance to the garage does not come as a surprise.
Thermal insulation

Since the garage is planned to be used during the cold season, the required level of comfort cannot be achieved without this procedure. In order to preserve heat, mineral wool or expanded clay is usually used. Thermal insulation is placed as tightly as possible in the cells between the installed joists so that there is no free space left. The situation is similar with expanded clay, which should be compacted before laying a transparent film over it.
Laying boards

Direct laying of tongue and groove products is much simpler than all previous work. It starts from the far corner and is carried out in a checkerboard pattern so that the ends next to each other do not overlap. The key point here is the density of the seams, to achieve which they are treated with silicone sealant.
Finishing the floor covering

After all work is completed, the dirty wooden floor in the garage should be thoroughly cleaned and treated. To do this, construction debris and dust are removed, then the wood is impregnated with an antiseptic. Then it becomes possible to apply protective paint and varnish materials onto the surface of the boards.
Advice. To increase the service life of the floor covering, it is recommended to additionally lay the rubberized coating (floorboards) in the tracks of the wheels, that is, in the direction of movement of the car. They will be fastened with self-tapping screws in pre-drilled holes.
Conclusion
These recommendations are a universal answer to the question of how to make a wooden floor in a garage with your own hands and are applicable as instructions for laying this flooring. Let installation work and do not look the lightest, however, a competent approach to their implementation will provide a warm and durable flooring. An environmentally friendly floor will become best friend a car owner who likes to tinker with the device of his car. The material has both its advantages and disadvantages, but knowing about them, they can be leveled out. Or maybe choose?
For some car owners, the garage is the place where they spend a very significant part of their free time. And therefore it is quite logical that there is a desire to somewhat ennoble it. You need to start from the floor. Why? Yes, because you walk on it, drive a car, lie under a car, put things and tools. In this article, we will dwell in detail on how to make a wooden floor in a garage with your own hands - quickly, efficiently and inexpensively for the family budget.
Why are we going to make wooden flooring? But because this is the most the best option: wood is relatively inexpensive, easy to work and install. And since this is a room where cars, gasoline and chemicals are stored, the covered floors must be resistant to these factors. To ensure that the wooden floor in your garage serves you for a long time, carefully read the tips below.
Preparation
First, you need to prepare the garage itself: take out everything unnecessary, throw out all the garbage. The room should be covered with plastic film. For purchase wooden covering We also need to be very responsible. The wood should not be too dry or, conversely, too wet. This will affect how and how long it will serve you. When choosing boards to install a garage floor with your own hands, be sure to ensure that the boards do not have (or at least have fewer) various defects - blue discoloration, knots, cracks, rot, etc. Boards must be at least 3 cm thick, but it will be better if you take them with a reserve. If the boards are of decent thickness, then between the joists there should be minimum distance. If you have the opportunity and the means, then it is better to immediately take the material prepared for installation - the so-called tongue and groove boards:

Thanks to special joining elements—protrusions and grooves along the length of the board—you won’t have to deal with cracks during installation and installation. This wooden floor will be easy to process and paint! If you have standard garage, then you will need 6-meter boards.
In order for the flooring to last for a long time, it must be placed on brick or concrete pillars, or on a concrete base. By the way, the last option is the most convenient and fastest - you don’t have to do much leveling. If in the future there is a desire to replace the boards with tiles, then this will not be difficult either!
The last option is most suitable for making a coating with your own hands, since when replacing it you can use boards or tiles.
Laying a wooden floor on concrete
In order to make a garage floor with your own hands, you will also need so-called “logs”.
It is best to use timber with a cross section of 10×10 cm.
I would strongly advise that before installation, be sure to treat the wood with an antiseptic or fire retardant. This will protect it from instant fire and rotting in the future.
Impregnate the boards outdoors using a brush or roller. After impregnation, they also need to be dried.
Tongue-and-groove garage floor
If you have a concrete base, you will first need to lay waterproofing.
To do this, you can spread regular roofing felt in overlapping strips. In this case, the distance between the logs should be 0.4-0.5 m.
If this is not done, the floors will be deformed under the wheels of the car due to its heavy weight.
The first logs are made at opposite walls at the same distance. Then a thread is stretched between them and intermediate logs will be mounted along it. To ensure the surface is smooth and without distortions, be sure to use a building level. If you are faced with the fact that the base itself is crooked, then you will have to place wooden wedges under the logs.
The logs placed according to the level must be firmly attached to concrete base using long dowels.
Then you can start laying the floorboard. They should all be the same thickness - thanks to this, the load will be distributed more or less evenly.
Lay the floorboards tightly and end to end, avoiding gaps.
To ensure that the boards fit together tightly during installation, use spacers. Wedges are perfect for this purpose. The slats are attached to the joists using nails or self-tapping screws.
DIY garage floor made of chipboard or plywood
To make garage floors yourself from sheets of plywood or chipboard, you will still have to first pour a leveling concrete layer. The thicker it is, the longer your coating will last. If a small layer of concrete is expected, then the base should be reinforced with a metal mesh with a rod diameter of at least 1 cm.
To create a long-lasting wooden garage floor, you should buy the thickest plywood, not just plain plywood, but one that does not allow moisture to pass through.
Chipboards are not recommended for use due to the fact that they do not tolerate temperature changes and therefore quickly collapse.
After laying the plywood is completed, cover the joints between the garage walls and the covering with a regular baseboard. It is recommended to first treat the floor with drying oil and then paint it.
If this is not done, then later, when operating the car, it will be difficult for you to remove oil and gasoline from the surface of the garage floor.
Laying the floor on the ground
Another option that owners usually resort to metal garages- This is laying a wooden floor in a garage on the ground.
To do this, you also need to carry out preparation - remove the fertile layer of soil from the inside of the foundation and replace it with sand and gravel mixture and clay. Compact the mound well. The edges wooden beams will rest on the sides of the foundation. Brick columns will need to be made as supports between the beams. To do this, dig holes 40x40 cm deep enough to coincide with the recess of the main foundation.
The first row of supports from the wall is usually done in increments of 50 cm, and subsequent rows at a distance of 100 cm. There should be at least 55 cm between the beams.
A layer of coarse gravel about 20 cm should be poured into each of the holes. Then concrete with a fine fraction should be poured into it to ground level.
After the concrete has hardened, we lay out the brick columns in 3 rows. Make sure they are the same height.
Between the brick and concrete, on top of the supports, it is necessary to lay a waterproofing roofing felt layer. So that the floor covering in the garage does not lead to further damage - open area clay must also be covered with waterproofing made of roofing felt.
For beams, you need to take a beam 20 cm thick. To increase rigidity, you can put it on the edge.
The logs must be made perpendicular to the entrance so that there is a gap of 3 cm between them and the wall. The wooden flooring is laid along the direction of movement of the car. Then they must be securely fastened. The beams are placed on posts so that a little space is left under them for air circulation.
Insulating the floor in the garage
In order to make it comfortable to work in the garage even in the cold season, it would not be superfluous to immediately insulate the future floor. It is not difficult and inexpensive.
First, the subfloor is placed on the beams. Next comes waterproofing made of polyethylene film, on top of which insulation is placed.
For insulation, it is better to take sheet, roll or backfill material. Extruded polystyrene foam is considered the most effective.
It will also need to be covered with waterproofing and sheathed along the joists with a floorboard.
After covering the floor in the garage is completed, it will be necessary to clean it of construction dust and dirt. It might even be better to go over it with detergent.
Good luck!!!