Kitchen renovations should be planned, as they require a significant investment of material costs if you repair it according to all the rules. First of all, you should decide where to start renovating the kitchen, and if you are far from construction, then we will discuss this issue together.
There comes a time when kitchen renovations can no longer be put off for many reasons. This may be due to the replacement of water and sewer pipes, electrical wiring, doors, and windows.
The decoration of the ceiling, walls and floor have lost their attractiveness and require replacement, there are not enough sockets and everything is on extension cords, and other issues.
The kitchen is one of the most visited places in the apartment, since here we not only eat food, but also gather with our household to communicate, drink a cup of coffee or tea. And for a woman, this is a “second home”, since all culinary delights are created with her hands. Therefore, we will approach the repair responsibly and do it efficiently.
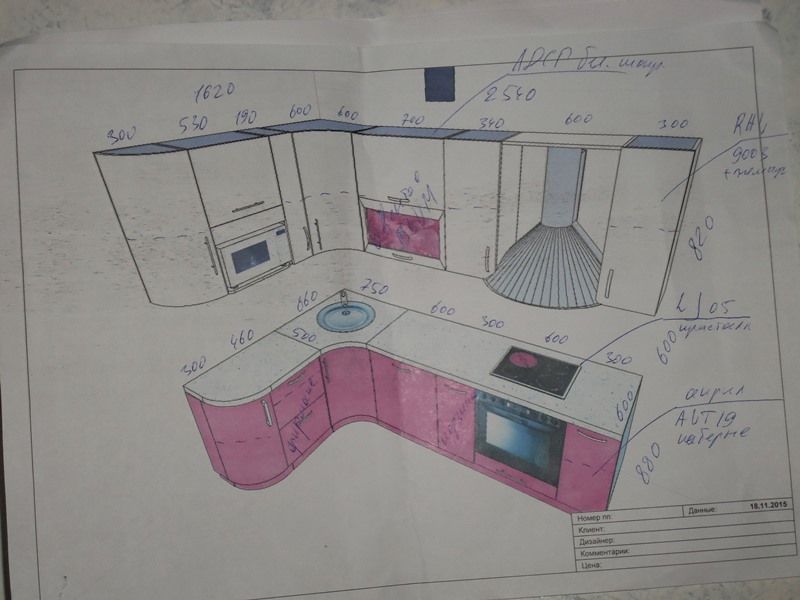
Before deciding where to start renovating the kitchen, you should outline the types of construction work that need to be done. If you plan to arrange your kitchen furniture differently, add kitchen equipment, partially replacing it with a new, more modern one, it is better to draw it all on a scale.
The main thing is that all innovations fit harmoniously into the dimensions of the kitchen. You need to start with a drawing or sketch out a sketch indicating all the dimensions. If you decide to update your kitchen furniture, then everything is simpler - New furniture to order will be tied to the size of your kitchen after renovation.
Kitchen renovation sequence
On preparatory stage you must decide who you will entrust to do the repairs or whether you will do it yourself. A mixed option is also possible - you can do some of the finishing yourself, and entrust the rest to specialists.
If this happens construction firm, then you won’t have to wonder where to start renovating your kitchen. The organization’s specialists will measure everything, draw up an estimate for the kitchen renovation, give it to you for approval, and a contract for signing.
All you have to do is make an advance payment, and upon completion of the repairs, sign a certificate of completion and pay in full. But this option will be somewhat more expensive, since the company will increase its limited costs, overhead costs, profitability, and other costs.
That's why most of us work directly with specialists. This could be a mini team that does the whole range repair work. However, for control, you must calculate the volume of construction work required to complete it in physical terms.
Calculate the ceiling area, the floor area is the same as the ceiling, the area of the walls minus the openings, describe the types of construction work that need to be done - puttying, cladding, painting, wallpapering and the rest in the same vein.
And in order to know what it will cost in monetary terms, then estimate the volumes at the prices agreed upon with the craftsmen plus your materials. Then it will be easier to control the performers. As practice has shown, add another 20 percent to the total amount for unaccounted costs
Where to start a step-by-step kitchen renovation
First of all, you need to clear the room of all furniture and household appliances- this is the first step to start renovating the kitchen. Remove all previous finishing. If you do not change the floor, then protect it reliably. Let's start by looking at all the stages of kitchen renovation work in order.
Electric installation work
 If you have an old aluminum electrical wiring, then be sure to replace the electrical wiring in the kitchen with a three-core copper cable. The specialist who will do this will tell you the cable cross-section based on the expected load from electrical appliances.
Add required amount sockets in those places where you plan to install electrical equipment, provide several extra sockets in case new devices appear.
It would be ideal to display all kitchen electrics on a panel in the hallway, if there is one. I have all the rooms of the apartment connected to a common panel in the corridor and, if necessary, I do not turn off the entire apartment, but only the necessary room.
Plumbing work
This is a “sore issue”, in my opinion, for most of us, since a leak can occur at any moment, you will flood your neighbors, and you yourself will be knee-deep in water. To prevent this from happening, who else has the old version? metal pipes, replace them with new generation pipes.
Install modern valves and water meters. You may have to recess the pipes a little, then you will need to trench the wall. Installation of the sink will be carried out after completion of construction work.
Civil works
If you brick the window between the bathroom and the kitchen (in old-style houses), this increases the functional area of the walls, since then you can order corner furniture for the kitchen, that is, longer.
When replacing old tiles, which came off along with the solution, this area will have to be plastered, just like brickwork blocked window. When you approach the slopes of the openings with plaster, it’s time to install the door frame and change window unit. Protecting a new window plastic film from dust, splashes of primer, putty.
Another point is the hood above the stove. You will need to make a through hole to the street to bring the corrugation there. Look at the layout, but it cannot be vented into the existing ventilation.
Next, proceed to lining the apron; aprons made from glass mosaics look very elegant, or at your discretion, there are plenty of options. We rub it in, you can move on to putty.
Ceilings and walls
First the ceilings. The old layer is cleaned off, we prime the surface and level it with putty. You can paint the ceiling, make a plasterboard version, stretch it, glue tiles - everything is at your discretion.
The same with the walls, we level them with putty, form the slopes of the doors and windows. We glue the baguettes. Finish to suit your taste.
Floors
If you do not plan to leave the old coating, then when dismantling it, evaluate the quality of the base. It may be necessary to perform a leveling screed to eliminate unevenness and eliminate height differences.
The final coating is carried out depending on the type. If this ceramic tile, linoleum, then in front finishing. The only thing is to pay attention when installing the screed to the floor and door threshold marks so that when laying the finishing coating it does not end up higher. There are such incidents.
After installation flooring, finishing the walls, installing skirting boards. If there is a TV in the kitchen, then hide the cable in the cable channel. You hang the door and install the trim.

The most enjoyable work remains - the second cycle of electrical installation and plumbing work– install sockets, a switch, hang lamps, install a sink. When ordering a new one kitchen furniture The craftsmen will install a sink, hide the gas meter and the corrugation from the hood in the cabinets.
Expanding the kitchen with a loggia
The renovation will go a little differently if you have a loggia adjacent to the kitchen, and you want to combine them, thereby expanding usable area eating areas. Where to start renovating the kitchen in this case, you ask. The actions and sequence are the same, except that the loggia should be completely insulated.
This is the line of windows, the space under the windows, the ceiling, floors, heated floors, and end walls. Delete completely balcony block and make a countertop between the kitchen and the loggia. The entire sequence of construction work when connecting the kitchen with the loggia was described by me from my own experience.
Quite recently we were planning where to start renovating the kitchen, but now it’s on paper and has come to the finish line. There were a lot of material costs, but this is not for one year. Now the updated kitchen, with a new design, is ready to welcome all household members for a festive dinner.
Where to start renovating a kitchen when doing it yourself? What is important is the sequence of work, a correctly drawn up project and convenient layout.
neat cozy kitchen, where the pleasant smell of familiar favorite dishes attracts all family members. Making this important room stylish, comfortable and beautiful is a task that sooner or later faces every owner of a house or apartment. Where to start renovating a kitchen with your own hands, what will be needed for this, what work will need to be done and in what order? Having resolved these issues, everyone will be able to more confidently take on making their dreams come true.
It all starts with a project
To have an idea new kitchen began to take on material shape, a three-dimensional drawing is needed. It should depict everything that will be in the kitchen, indicating the volumetric parameters of each item. First of all, we measure the stove, sink and furniture, noting the location and size of pipes, window sill, vent and outlets in the kitchen. Next, you need to measure everything - kitchen appliances that have opening parts are measured both in the closed and open states. Then you need to place it all correctly on the drawing.
If you plan to purchase new kitchen furniture, you must first combine it with the sink, stove and built-in appliances, and then count the number of required sockets and mark their locations.

Common planning mistakes
Any minor mistake made at the kitchen planning stage can cause a lot of inconvenience. As practice shows, the following mistakes are most often made in kitchen projects:
- Excessive length work surface– typical for large kitchens, this ends in “marathons” from one end of the kitchen to the other during the cooking process.
- Protruding handles reduce the movement of the corner cabinet door, which is why the drawers do not extend completely.
- Narrow passages - in order to move freely around the kitchen, you need to take into account the length of the drawers in the design and add space for a person to pass through.
- Marble work surfaces and floors in the kitchen. Marble is a porous material from which deeply embedded dirt cannot be removed.
- Corian is the most durable and durable material, but scratches and stains also remain on it, and it will not be possible to restore it with improvised means.
- Mosaic cladding - this type of finish should not be used for doors and drawers, it makes the structure very heavy.
- Linking the location of the slab to ventilation hole- Now there is an alternative to air ducts - hoods with a carbon filter.
- Glossy facades look beautiful, but they need to be wiped several times a day, otherwise their surface turns into a catalog of fingerprints.
- Wooden floors get dirty quickly and lose their “marketable” appearance.
- Glass countertops are a surface on which it is impossible to quietly place a cup or plate. All sleeping family members will know about your early breakfast by a loud knock.
- Drawers are too wide - they open easily only when empty.

- There are a lot of seams - if the kitchen “apron” is covered with wallpaper, it is better to cover them with glass, and with a single piece, and not several connected end-to-end.
- Sink non-standard shape– pleasing to the eye, but completely impractical for its intended use.
- There is no place for small household appliances - often built-in appliances alone in the kitchen are not enough, so you need space and sockets for such purposes.
- Weighty cabinets on light walls - the storage system should be hung exclusively on solid walls, or it may simply not support its weight.
- Incorrect localization of equipment - ovens, steamers, coffee machines cannot be installed either too low or too high. The ideal location is at waist level.
- Insufficient lighting - required in the kitchen multi-level lighting: lamp above the table, lamps above the work area, overhead light.
- Lack of free space on the countertop between the stove, sink and refrigerator.
- Excessively high plinth in the kitchen - it is worth remembering that today almost all built-in appliances are designed for a plinth of up to 10 cm;
- Shelves instead of drawers - to take something from the depths of a shelf, you need to lay out part of its contents. IN drawer all items are equally accessible.

Deciding on materials
If the preliminary project is finally approved, you can proceed to compiling a list of materials required for its implementation. You will need a lot of them: cement, paint for walls and ceilings, glue, putty, linoleum, facing materials And so on. It is possible that you will have to replace sockets and electrical wiring, plumbing units and ventilation elements.
The list should be very detailed; all the details of the future kitchen should be taken into account. Having found out the current prices, you can proceed to calculating the estimate. Further DIY repairs should only be started if the full calculation of all costs does not exceed the budget that can be spent on repairs.
Let's bring up communications
After clearing the room of old coatings and removing debris, it’s time to move on to connecting the communications. First of all, you should deal with the electrical wiring. Sockets will be needed in the following places:
- in the work area;
- for the refrigerator;
- for hood;
- for electric stove;
- for other household appliances (dishwasher, microwave, etc.);
- additional socket for local lighting.

The next stage is the installation of the ventilation system - we place the hood at a height of 60-70 centimeters above the surface of the slab. Old ventilation pipes also needs to be replaced.
Modern water supply and sewerage systems are, first of all, metal-plastic and polypropylene pipes. They are durable, easy to install with your own hands, and insensitive to temperature changes.
After laying the pipes, taps are installed, after which gas hoses can be connected.
From ceiling to floor
When making repairs with your own hands, it is always correct to do the work in sequence from top to bottom (first the ceiling is done, then the walls and lastly the floor). First, the ceiling needs to be leveled, and it can be painted only after the putty layer has completely dried. If installation is planned stretch ceiling, then it is done after finishing the walls.
Next, you can begin leveling the walls with satengypsum or isogypsum. Wallpaper for the kitchen needs to be washable, since settling fat and soot will need to be removed from it. Work area Sinks and stoves are usually tiled. Then comes the turn of leveling the floor. For this purpose, a self-leveling mixture or a homemade cement-sand mixture, which is used to fill the screed, is suitable. The flooring is laid on top.
For the kitchen, it is better to choose a plastic or metal baseboard, since a wooden one is not practical (it is afraid of moisture and is difficult to clean).
You need to buy as many corner elements as there are corners in the kitchen. Trim plastic skirting board It is recommended to use a miter saw, and it is better to start installation from a corner or from a door.
The kitchen is one of the main rooms in the house, so its design is very important. How can you re-arrange your kitchen, make it more cozy, beautiful, comfortable and functional? Some design tricks will help you achieve what you want and get a more perfect interior.
Arrangement of a luxurious glass apron in the work area
Kitchen apron - important element design that no kitchen can do without. It not only performs a decorative function, but also protects the walls of the work area from hot splashes, hot fat, steam and other adverse influences.


Traditionally for arrangement kitchen apron applies . However, if you want to make your kitchen more attractive, you can replace this material with.


Skinali will become a real decoration of the room and transform it into better side.


The main advantages of this solution:

Installing a TV in the kitchen
It is safe to say that a television is also a household appliance that has become firmly established in the life of every person. And in the kitchen (the room where household members spend a lot of time), you definitely can’t do without it. To enliven the interior with the help of this device, you need to wisely choose the way to place it.


There are several good options:
- Install the TV in a niche, attaching it to the wall.
- Just put the TV on the shelf.
- Hang it high - for example, above the refrigerator.
- Place the TV in the work area at eye level.
- Hang on the wall using a special sliding bracket.
- Place the TV in the corner of the kitchen.
- Place it in the dining nook.


Installing a sink opposite a kitchen window
Sink installed under the window- a technique that European and American designers often resort to. Especially often, such a solution for arranging a kitchen can be found in country mansions.


Even if the house has a modern dishwasher, the sink will still remain the central part of the work area. A sink located directly under the window is also a great opportunity admire nature and listen to birdsong while washing dishes.


Unfortunately, arranging a sink in such a place in urban apartments is associated with some difficulties, but they can be overcome if you follow the advice of designers. Such a solution can completely transform the kitchen interior, making it more interesting and modern.

However, the implementation of such an idea is fraught with some difficulties. It is recommended to entrust such work only to a specialist - that is, a qualified plumber. Extending communications and pipes will be the most critical part of the process.

To organize normal drainage, you will have to raise drain pipe approximately 5 cm - this is the calculation for each additional meter of transfer of the sink.

In some cases, the sink has to be moved over considerable distances - for example, across the entire kitchen, to the opposite wall.

Regardless of what type of sink is installed near the window sill (round, oval, square, recessed, ceramic, composite, etc.), splashes from it will fall on the glass and stain it. This means that you will have to do extra cleaning regularly.

To avoid this situation, it is recommended to install the sink near a deep window sill. If between window frame and the sink there is a distance of about 20 cm, then you can cover this space with tiles, or choose a special sink with a high side.


If the window sill is at the same level as the sink, you can install the faucet on the edge of the frame - then not all splashes will reach the window and you will not have to wash the glass so often.

Placing a bar counter in the kitchen
Such an element modern interior, like , belongs to the culture of America and Western European countries. Essentially, this is a kind of dining table, performing several functions simultaneously.


A bar counter can transform a kitchen beyond recognition, making it original and special. She will become respectable and stylish element premises, and will emphasize the good taste of the owner of the home.


- The kitchen is small and a traditional dining table takes up too much space.
- If the kitchen space needs to be divided into several functional areas - dining and working.
- If you want to arrange a special corner for installing a minibar (the kitchen should be spacious enough for this).
- If you need to combine a balcony and a kitchen (bar counter in in this case can be equipped from the bottom of the wall between these two rooms).
- If the kitchen space needs to be optimized as much as possible, to make it more functional and convenient.
The dimensions of the bar counter will depend primarily on the size of the kitchen itself. The more spacious it is, the more it can be this design. You also need to select special high chairs for the bar counter.


Arranging a kitchen island
A kitchen island is a multifunctional table that is located in the center of the room, forming part of the so-called “working triangle”. makes it easier to move around the kitchen, making it more functional and convenient.


However, it can only be arranged in a spacious room. A similar interior came to us from restaurant business and is gaining more and more popularity every year.


The island includes several household appliances, without which no kitchen can do. You can arrange them at your own discretion - this can be a built-in island countertop hob, sink, dishwasher, oven, etc.


In addition, the island can serve as a bar counter, work surface and dining table. In fact, this design replaces a good part of the headset, freeing up the wall.


Using a transforming table in the kitchen
A transforming table can be a real godsend when it comes to arranging small kitchen. main feature This model is that, if necessary, it can be increased not in width, but also in length, as well as in height.

If necessary, such a table quickly turns into a fairly compact product that can easily fit into even the most modestly sized room. Manufacturers equip such table models with special devices, thanks to which the control process becomes very simple and easy (even a child can handle the task).


With all the undeniable advantages, this model also has some disadvantages: its high cost, inconvenient location legs, some bulkiness and heaviness. However, such massiveness goes well with all traditional kitchen interiors.

Installing a dehumidifier in the kitchen
Special dehumidifier- it's simple and effective method regulating the humidity level in the room. For houses and apartments, manufacturers offer mobile household models, collecting excess moisture.

Such devices improve ventilation functions, increase the service life of the building, eliminate fogging of windows, and save furniture from mold and mildew.
Why do you need a dehumidifier in the kitchen?
- According to research, a person loses approximately 900 g of moisture per day. If the humidity in the room is increased, a person absorbs even more of it and loses less. As a result, excess moisture accumulates in his body, which significantly worsens his health. This leads to an increase in the load on the body - most of all from high humidity the heart suffers.
- High indoor humidity poses a danger to asthma patients - it can cause swelling of the bronchi and spasms, and difficulty breathing. People suffering from arthritis and osteochondrosis also find it difficult to tolerate high levels of humidity. Many types of mold are pathogenic and are sources of increased danger. Installing a dehumidifier in the kitchen helps to avoid many unpleasant diseases.
- In the humid environment that kitchens inevitably create, mold spores thrive. Fungus appears on the walls, which not only spoils appearance interior, but also penetrates into the human lungs. A compact dehumidifier will not take up much space in the kitchen, but it will help maintain the health of your household and also protect the walls from gradual destruction.
Arrangement of an arch in the kitchen instead of the front door
Arch in the kitchen, replacing the usual one front door- this is one of the simplest and most elegant ways to visually enlarge a room, make it more spacious and bright.

Designers offer a huge number of types and shapes of arches: they can be ornate, classic, strict geometric, ellipsoidal and so on.


To make such structures you can use different materials: lightweight drywall, chipboard, brick. An elegant arch will fit perfectly into, it can also be built when arranging a kitchen in any of the modern styles.


An arch will make any room more original and attractive. It is only important to remember that this design has one drawback - it does not prevent odors from the kitchen from penetrating into the rest of the room. To avoid this, you will have to install a good hood above the stove.

Like any other room in the apartment, the kitchen often needs renovation. And sometimes more often than bedrooms, hallways or living rooms. In the kitchen they prepare food, eat, communicate, in general, the kitchen is one of the most popular places in the house. Therefore, the frequency of updating kitchen rooms is increasing.
Surface preparation
Where to start renovating a kitchen? First of all, you need to level the walls and floor. The walls must be leveled with plaster so that the kitchen cabinets hang evenly during installation, without noticeable distortions.
Floors, if they are concrete, are leveled using a screed and a finishing leveler. Subsequently, any covering can be laid on them, for example, tiles.
If the floors are wooden, then small distortions are not very bad; it is enough to fasten the boards with plywood. It is not recommended to lay tiles on a wooden floor; it is better to use linoleum, PVC tiles or laminate.
The final stage of kitchen renovation is the installation of the kitchen unit. But before that it is necessary to carry out a series preparatory work and finishing of the entire room.
Preparation work consists of:
- In the electrical wiring for connecting the hob, oven and microwave oven.
- In the wiring water pipes to connect dishwasher and fine filters.
- In laying tiles between the top and floor cabinets, that is, the so-called apron.
Kitchen renovation step by step
Using one kitchen as an example, the article will talk about all the stages of renovation.
1. First, a kitchen set was ordered. While it was being manufactured, locations for future sockets were marked according to the finished sketch. The dimensions of the future tiled apron were also marked.
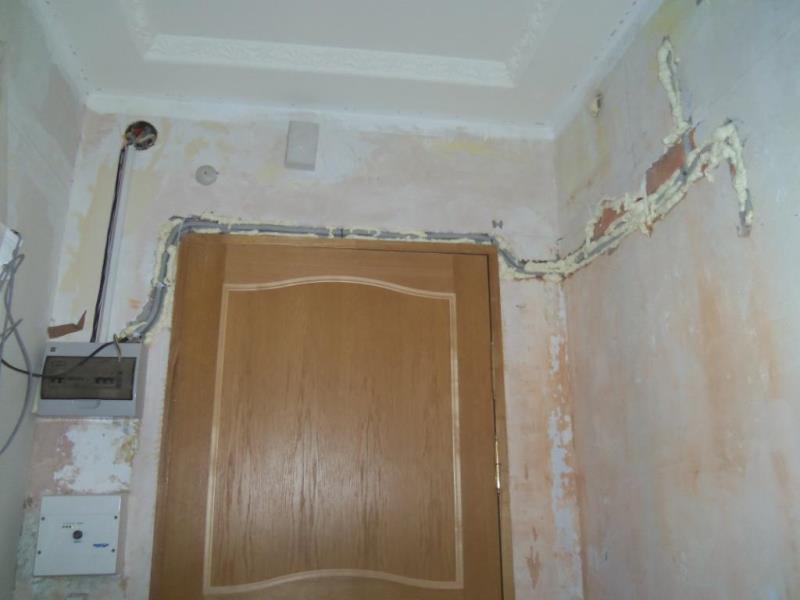
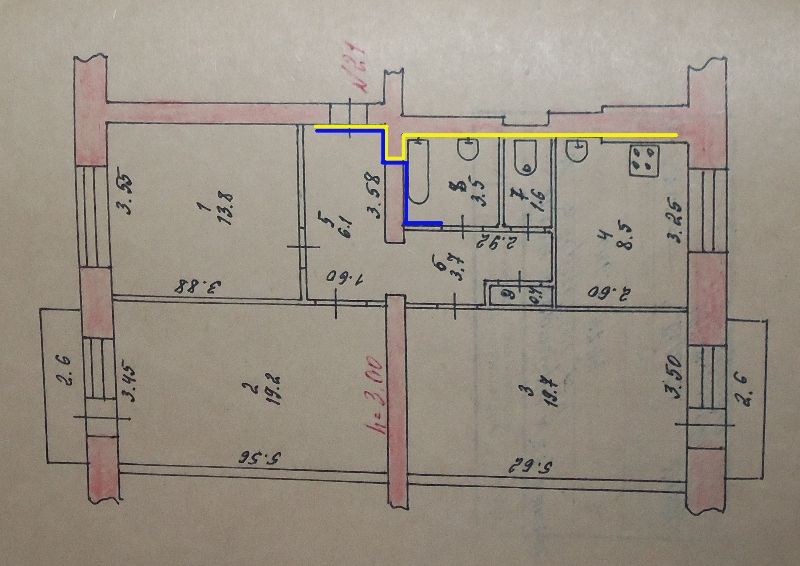
2. Then two power cables were laid from the electrical panel in the hallway. They had to be laid through the bathroom and toilet, making holes in the brick. One of the cables (VVG 3×2.5) was intended to power a hydromassage bath.
3. To connect the hob and oven more powerful was used power cable(VVG 3×6). He walked into the kitchen to the place where the sockets were installed.

4. These cables are shown schematically on the apartment plan. The wire laid to the kitchen is shown with a yellow line, and the cable for the bath is shown with a blue line (Fig. 4).
5. Subsequently, the wires were laid in corrugated plastic pipes and covered with tiles.
6. The sockets for the panel and the oven had to be recessed into the wall so that they would not interfere with the installation of the headset later. I had to ditch, install sockets, plaster and lay old tile back to the old place.

7. Then, on the wall between the kitchen and the bathroom, a branch was made from the outlet for an additional point, to which the microwave oven was then connected.

8. Two new circuit breakers were installed in the apartment electrical panel. Connected to a machine with a nominal value of 32 A hob, and to the 25 A machine there is an oven.

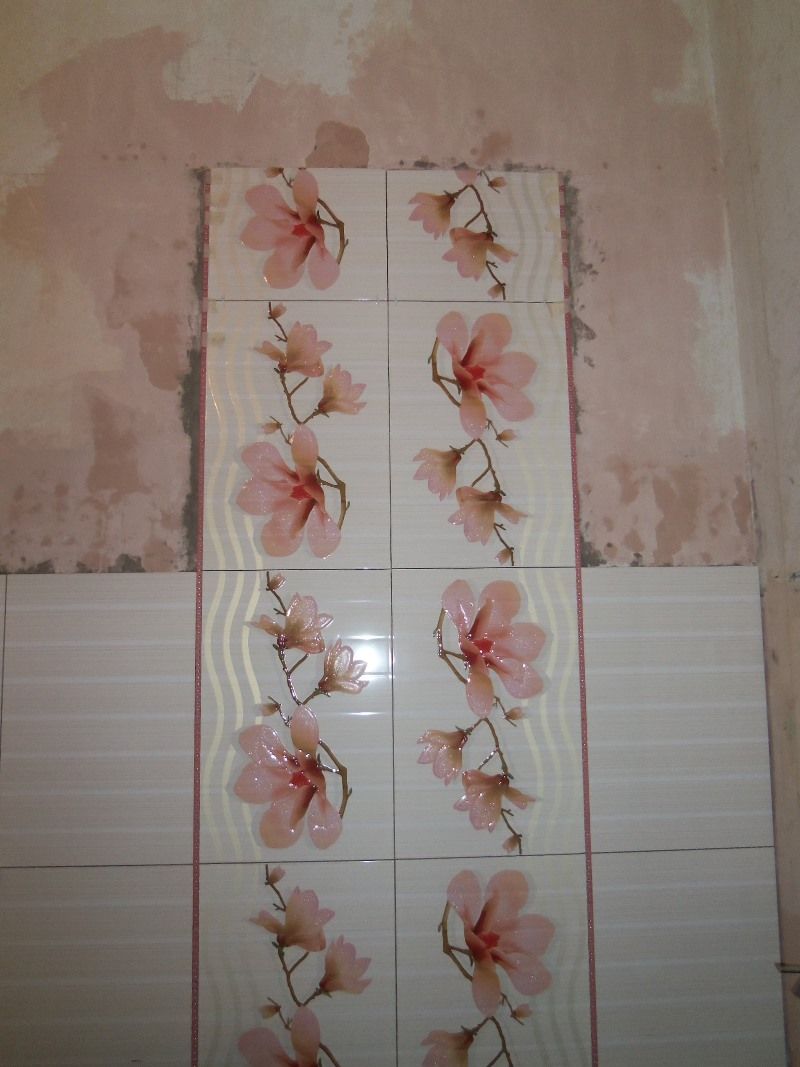
9. After that, tiles were laid along the entire perimeter of the future kitchen unit.

10. A decorative niche was made and also decorated with ceramics.
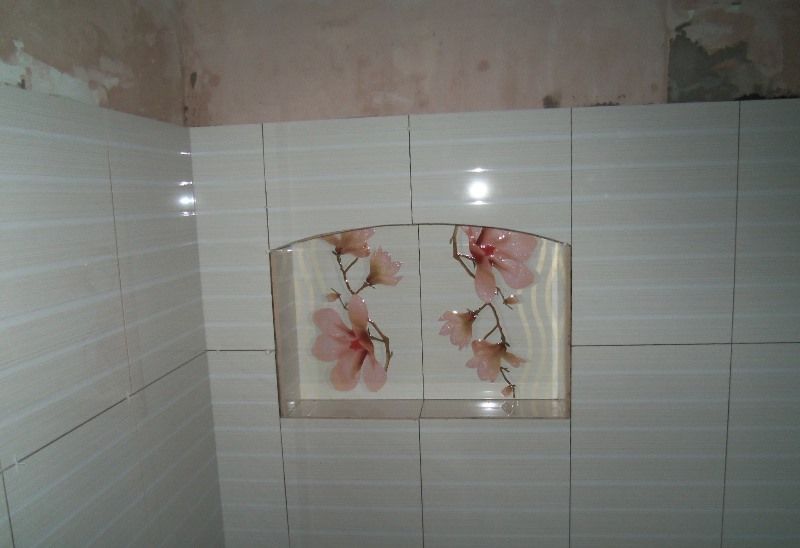
11. The space for the future ventilation hood was laid out separately, according to the sketch.
12. Since the floor in our kitchen was originally made of wood, it was decided to install laminate.

13. A little earlier, the floor was covered with sheets of plywood, and they were secured with self-tapping screws.
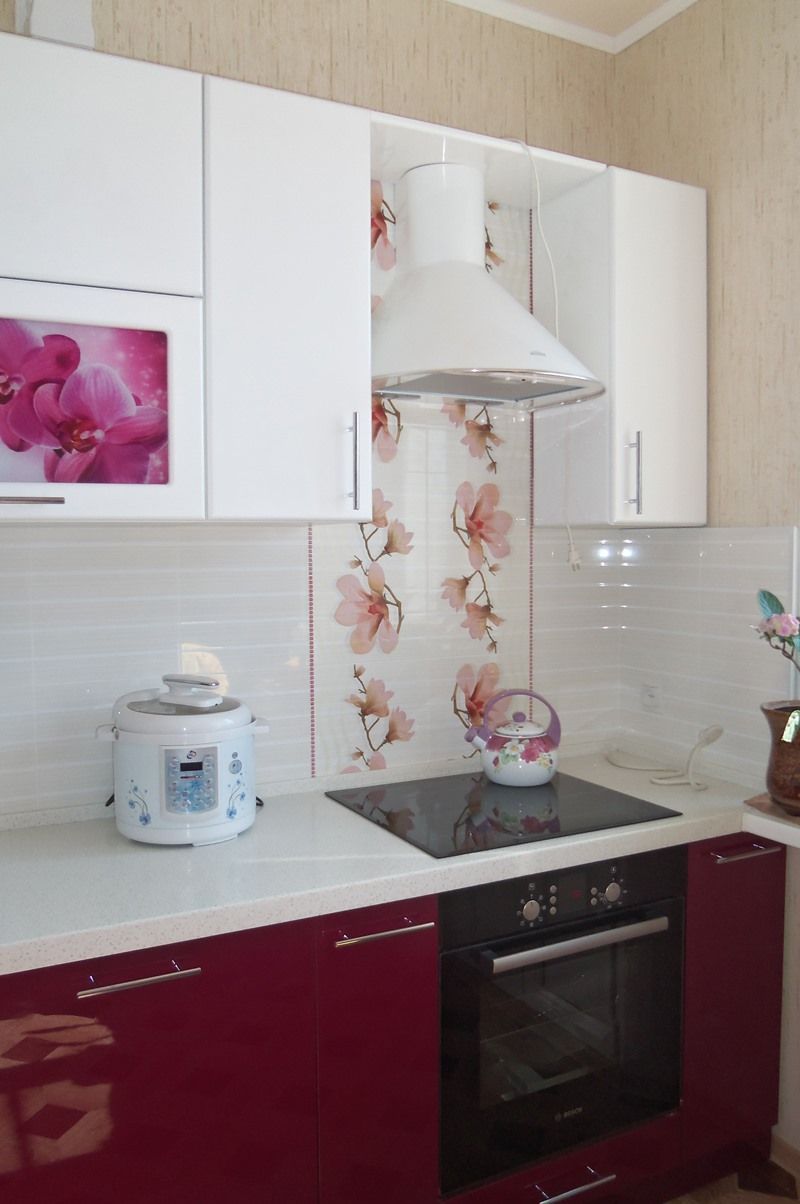
14. After gluing the wallpaper and installing the baseboard, the kitchen set was finally installed.

15. The microwave took its place in the niche intended for it, was connected and checked.

16. When a sink with mixer and tap was installed clean water, it’s time to connect fine filters and a dishwasher. This operation was performed to pre-connected pipelines using tees and adapters.

17. Then we connected and checked the hob and oven.
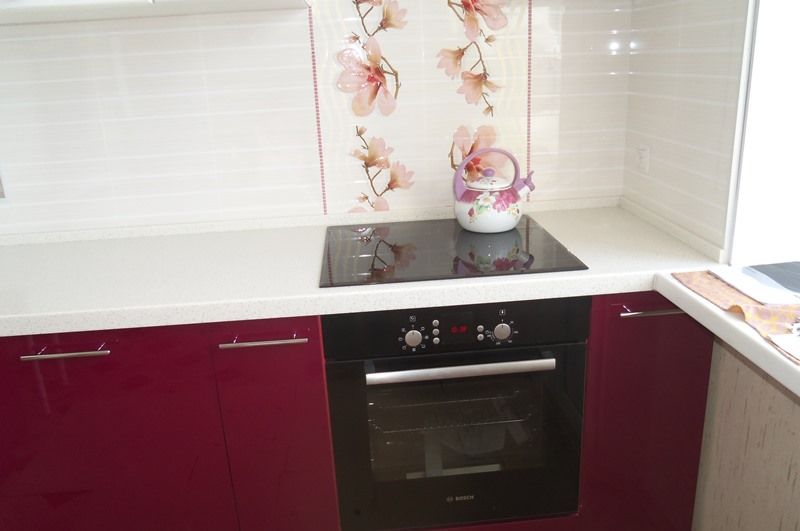
18. The final stage was the installation of ventilation. The hood was connected to the ventilation riser using adapters.
How to do your own kitchen renovation cheaply and beautifully + photos and videos
Inexpensive, but high-quality kitchen renovation work is within the capabilities of each of us. To do this, you will need to draw up a budget plan and purchase all the required Decoration Materials. Any renovation work, regardless of where it is carried out (in an apartment or a house), requires a large investment. Special attention In living quarters, a kitchen deserves a kitchen in which everything should be beautiful, fresh and clean, so it is important to choose only high-quality and practical materials. How to make repairs beautifully and cheaply, without compromising the quality of the coating?
To do this, you need to be smart and opt for simple, inexpensive, safe and functional solutions.
Before starting renovation work, you should carefully consider the overall concept of the room in your mind. To choose a specific style, you should take into account the preferences of all residents of the apartment/house, and then sketch out a list of basic materials and tools that will be required to complete the project. installation work. This will make it possible to significantly save your own money at the procurement stage. When buying inexpensive materials, you will be extremely careful; it is advisable to seek advice from specialists who will help you make the right choice and give answers to any questions that interest you.
To minimize costs, all work can be done yourself. For example, this applies to such steps as getting rid of old coatings, removing or bringing in purchased materials - this is something that everyone can do. And other types of work that are more difficult, in the absence of skills, it is better to delegate to professionals, and they will do it without any problems. short time They will do inexpensive repairs.
Making a list of works
To simplify your actions, it will help you to draw up a list of things that will be required in order to carry out restoration work.
Key points that must be on the list:

Helpful advice: analyzing the list of work makes it possible to assess your strengths and determine what work you can do without outside help, and for what work you will have to hire craftsmen.
Functionality is the main quality of a kitchen, so when you're busy trying to make a renovation cheaper, try not to forget about its main purpose. It should also be remembered that too much simple kitchen in the future it may be completely inconvenient and cause discomfort when used, which will significantly spoil the mood, or even completely discourage the desire to cook something. For this reason inexpensive repair The kitchen must be carefully thought out to make the room original and comfortable.
How to properly plan a renovation
Before you start renovating a room, you should determine one very important point– major repairs or current. The second option involves changing only on the surface, already existing external data, while underneath major repairs This means that a complete transformation of the room will be carried out.
So, you should plan the future cooking area:
- Zoned the room into a work area and a place where the family will eat.
- Remove old coverings, windows, sinks, doors and others.
- Designate future locations for various household appliances, as well as install sockets.
- Determine a place for new kitchen furniture.
- Make markings for the kitchen apron, as well as tiling the work area.
How to budget?
To organize a budget for a kitchen renovation, you will need clear and competent planning of expenses, as well as purchasing everything you need at competitive prices.
How to buy the right materials so that the repair turns out well?

Important! When the list is ready and you have compiled an approximate cost, add another 25 to 40% to it - this will be the final cost of the repair, since unforeseen circumstances or ideas may arise in the process.
Certain types of materials can be seen in the photo of a kitchen renovation that is cheap and beautiful. Attributes should be purchased at color scheme premises. You can make repairs accessible to everyone if you use simple and inexpensive materials for finishing. So, it is not necessary to choose tiles for the floor; inexpensive linoleum will do. After the restoration work is completed, the kitchen can be furnished with furniture and household appliances.
Here's a list of things you really shouldn't save on:
- Plumbing is a long-term investment. High-quality plumbing will serve you for many, many years, but pipes of dubious quality can burst at any moment, which will force you to make repairs for yourself and perhaps even your neighbors.
- Electrical wiring is, first and foremost, a matter of YOUR safety, so choose everything of high quality and hire professionals to do the work.
- On the leveling of the floor and walls - these surfaces are the basis for future work, and it is not difficult to paste wallpaper on a flat wall, while a wall with unevenness will cause a lot of inconvenience, the finish will lie crookedly, the appearance will leave much to be desired, and the service life will be reduced several times .
These points are relevant if you decide to carry out a major overhaul.
Inexpensive building materials for decoration
You can even update the interior decor using inexpensive materials that are optimal for the room being renovated. To finish the ceiling, you can use plastic, plasterboard and putty. Laminate flooring, as well as linoleum and tiles, are perfect for the floor. It is best to decorate the walls with tiles, and the rest of the surface can be covered beautiful wallpaper or putty. The photo in the article shows good options kitchen finishing.
Naturally, inexpensive materials have both strong and weak sides. You can make inexpensive repairs if you use plastic elements. This material is easy to install, has incredible durability and is easy to maintain. But such coatings very quickly become unusable if there is any impact from bulk objects and begin to melt at high temperatures.
- The sheets make it possible to perfectly level the base, but this material not at all practical - due to the high moisture content in the kitchen, the coating will be severely warped.
- It is better to entrust the laying of tiles to a person who is well acquainted with all the intricacies of the work and has been doing this for a long time.
- The easiest way to make repairs is to use laminate or linoleum, but there is no guarantee that the coating will not be damaged during use.
- To reduce the cost of wall renovation it is required self-application plaster, but only if the wall itself is smooth and the person knows at least the basics of the work.
- When choosing wallpaper for the kitchen, it is better to choose vinyl sheets– they are much easier to glue, and this is especially important for beginners.
Do-it-yourself repairs
Repair work in the kitchen, as well as in any other room, should begin from the ceiling. In order to make a kitchen renovation cheaply and beautifully with your own hands, it is better to make the ceiling without additional structures. The base base should be well leveled, cleaned, primed and puttied. As the layers dry out, the procedure can be repeated, and then paint the ceiling with light paint. Use a chandelier or fluorescent lamp as a lighting device during repair work.
 Note, that for wall cladding in the kitchen it is better to choose washable wallpaper in discreet shades that will match general interior. It is best to finish the work area tiles, since it is not afraid of soot and heat, and oil splashes can be easily washed off.
So, first we prepare the surface - clean it, level it, apply a layer of primer, and then a layer of putty. As a rule, glue should be applied to the ceiling and work should begin from the window. You can make repairs cheaper by purchasing discounted varieties of wallpaper or purchasing leftover materials.
When purchasing, be sure to consider the level of wear resistance, as well as its moisture resistance, which is very important for the kitchen. When laying the material, care should be taken to ensure that a high-quality substrate is prepared.
As you can see, organizing inexpensive kitchen renovations without getting into debt is quite possible; you just need to approach the process wisely and choose optimal materials, and also do not forget to take Active participation in updating the premises. Good luck!