Heated electric floor creates a unique comfortable atmosphere in any room of your home. It can be used in various types rooms, for example in bathrooms or children's rooms. In addition, a heated electric floor can be covered with any type of finishing floor covering, for example, laminate, which is extremely popular in our country.
Warm laminate flooring is very suitable, for example, for a children's room. Your child will be able to play on the floor all year round and you will not have to lay down additional rugs or mats.
A heated floor under laminate installed in the bedroom will allow you to start your day with the most pleasant sensations, greeting the morning with a feeling of gentle warmth under your bare feet.
You can easily install a heated floor under a laminate with your own hands, without the involvement of master builders. Let's consider the algorithm for its installation.
Required tools and materials:
For installation we will need:

In the box you will find an instruction manual, a roll of heated electric floor, electrical connection cables, and a bitumen insulation kit to protect the terminals.

You also need to additionally purchase a thermostat

Thermostat - photo
Thermal reflective film for heated floors. It can be distinguished by its characteristic foil layer.

heat-reflecting film for heated floors - photo
Also stock up on polyethylene-based film or laminate backing compatible with heated floors, tape, a mounting knife, pliers and a screwdriver.

We carry out preparatory work
We calculate the surface area of the floor, the part on which we will lay the heating film. Do not place the film under low-standing stationary pieces of furniture.

You can draw up a drawing of your future heated floor on graph paper.
Find out where the thermostat for your heated floor will be located.

Laying heat-reflecting material
To increase the level of thermal insulation of your room, we place heat-reflecting material on the floor.

We fix the heat-reflecting material using a stapler or metallized tape.

In any case, the strips of heat-reflecting material must also be secured together with tape.

This is what the floor surface looks like, covered with heat-reflecting material held together with tape.

Installation of electric heated floors
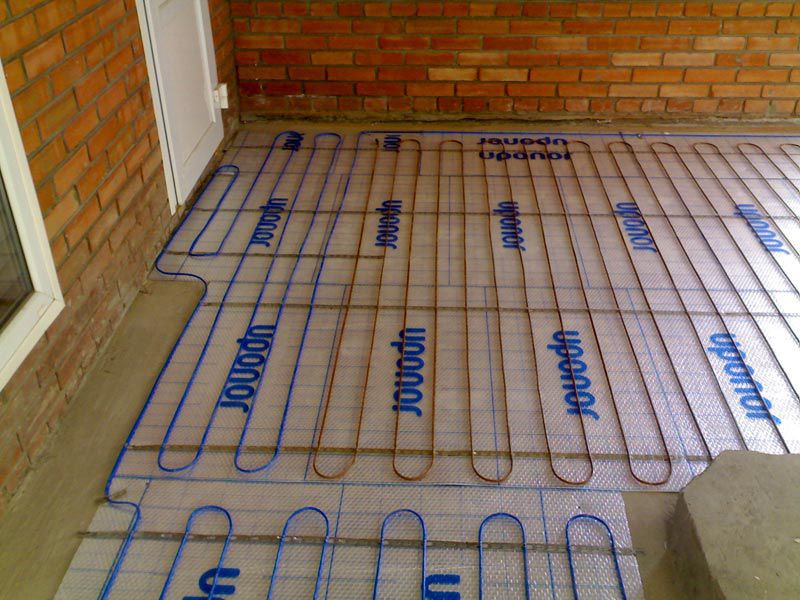
We spread the thermal film according to the developed installation scheme. Please note that the copper strip on the thermal film should be at the bottom.

If necessary, cut off pieces of thermal film in the places specified by the manufacturer.

We place the cut sheets according to the developed laying scheme.

Photo - placement of heated floor heating elements
Connecting the insulation
Now the sheets of thermal film laid out on the floor must be connected to electrical cables and insulated at the locations of the electrical contacts.
The insulation of the contacts of a heated electric heated floor consists of special bitumen stickers that are divided into two parts.

Using a bitumen sticker, we isolate the places where you cut the copper busbar.

Contact insulation - photo
Please note that the applied insulation must cover the entire length of the cut along the copper surface and contacts leading to elements of dark material on the heated electric floor.

We place the contacts in the places where you want to connect the electrical power wires in the future.

We position the contact so that one side of it is inside the layer of heating film. The second side of the contact should be located on top of the copper foil strip.

Using pliers, tightly clamp the contact, ensuring its secure fixation.

We fix the layers of the heated electric floor together with tape, and also attach the strips to the heat-reflecting material. We exclude the possibility of shifting layers.

Insert the stripped end electric cable into the corresponding contact hole.


We fix the wires in the contact hole using pliers.
We fix all the places where the wiring is connected to the heated electric floor using bitumen stickers.

Connecting the temperature controller
With the help of a thermostat, we can significantly save the energy consumed by your heated floor, turning it on only at the time and at the temperature required.
Your heated electric floor usually comes with a temperature sensor. Place it under the film on a black heating element.

Fix the sensor on the film with a piece of bitumen insulating sticker.
To temperature sensor does not disturb the surface of the final floor covering - make a cutout under it in a layer of heat-reflecting material.

Also, in order to ensure the evenness of the laminate, we make cutouts in the layer of heat-reflecting material for contacts and wires.
Cutouts in the insulating layer can also be made for bundles of wires.

Wires placed in recesses must be secured with tape.

We install the temperature controller mounting panel on the wall in the selected location.

According to the connection diagram indicated on the thermostat, we fix the connecting wires.

Connecting the wires - photo
For powerful heated electric floor systems, it is recommended to connect the thermostat to the wiring through a separate circuit breaker.

Checking the functionality and testing the heated floor system.
We turn on the thermostat for the heated floor system.

We check the heating of each strip of installed heated electric floor.

We especially carefully check the connection points. They should not spark or become overheated.
We unroll polyethylene film on the floor surface. You can replace it with any underlay for laminate boards that is approved for use with heated floors.

Proceed with laying the final floor covering, such as laminate boards.

When assembling laminate boards, take special care to avoid damaging the installed heated electric floor.
Video - warm electric floor under laminate
Flooring made from laminated panels is rapidly gaining popularity among homeowners. It is beautifully practical, its prices are affordable even for families with not very high level income. A reliable, almost indistinguishable imitation of natural wood brings additional notes of comfort and coziness to the interior of the room. However, before the natural warmth of wood composite materials still very far away. It doesn’t matter - there is an effective solution to this problem - heated film flooring under laminate.
Of all the types of heated floors, it is infrared film that will be optimal in these conditions - it is as if it was specially created for installation under a laminated coating. If you add the comparative simplicity of its installation, then there is no doubt - feel free to choose this option.
Infrared heated floor - operating principle and main advantages
So, what is an infrared film floor, and why is it optimal for laminate flooring?
Majority existing systems heating systems are based on the principle of direct heat exchange. So, for example, batteries that are familiar to everyone transmit thermal energy air, which, in the process of natural or forced convention, distributes it throughout the room. In this case, infrared thermal radiation is minimized.
Something similar happens in water or electric “warm floor” systems. The only difference is that it is not the radiator that heats up, but the thickness of the screed in which the pipes or heating cable are located. From it, heat is transferred to the floor covering, and only then does the air in the room heat up from its surface.
Such a system is highly inert - a lot of energy resources are spent on pre-heating the floor, however, cooling also does not occur instantly, but over a certain period of time, which makes this heating principle quite economical.
Film infrared heaters operate on a completely different principle. Between two dense transparent polyester layers there are parallel strips of special carbon paste. Each of these strips is connected on both sides to a conductive copper busbar, which is supplied with mains voltage. When an alternating current passes through such an element, it, without heating up much on its own, creates a flow of infrared radiation, quite “hard”, with a wavelength of the order of 5 ÷ 20 microns. This stream of beam energy is capable of heating any surfaces or objects in its path. Thus, the energy consumed is not spent on the process of transferring heat over a certain distance. To make it clearer, we can give a classic example - infrared solar rays act in exactly the same way, heating everything they hit.
A similar heating technique has been used for quite a long time for wall-mounted, ceiling-mounted devices, and has fully proven its effectiveness. highest efficiency. We learned how to place it under the floor covering, having mastered the production of economical and effective film heated floors.
- The total thickness of the film is only about 0.5 mm, which means it can be easily removed under any coating. Unlike water or electric floors, such a system absolutely does not require labor-intensive work on pouring screeds and arranging a powerful thermal insulating layer. In addition, such a heating system will not significantly raise the floor level, which can be a decisive factor in urban apartments.
- Another clear advantage is the uniform heating of the floor surface. It is known that laminate often shows a certain “capriciousness” in matters of temperature changes - sometimes it can react to this by diverging the seams or even swelling of the surface. With an infrared floor, this probability is practically zero - the maximum heating of the film elements (even with a failed thermostat) is never higher than 40 ºС, and this is for a floor made of laminated panels absolutely uncritical.
- In conditions multi-storey building It may be impossible to fill the screed due to the weight of the floor. In principle, there are no such problems with film infrared floors.
- Infrared rays heat not only the surface of the laminate, but, passing through it, transfer heat to other objects and surfaces in the room, which creates the most comfortable microclimate.
- It is important that the energy transfer begins almost instantly - in the evening, upon arriving home, you can quickly and without much energy consumption bring the air temperature in the room to the required level. Moreover, the electronic control system for infrared floors is easily integrated into the systems that are currently gaining popularity “ smart home“- you can program it in advance, warming up your home according to the desired schedule, or even turn it on remotely via the Internet or via mobile communications.
- Infrared floors do not dry the air in the room, and, according to some researchers, they even create a certain ionization background, especially useful for people suffering from chronic respiratory diseases.
Infrared heated floor kit
Film heated floor systems go on sale in almost the complete required set:
- The film themselves heating elements. They are usually produced in standard covering widths of 500 or 1000 mm. The length may vary (it is not recommended to exceed 8 meters). The canvas can be cut into right size, but only strictly along the stripes marked on the surface with a pictographic image of scissors (usually they are located in increments of 25 cm). The fact is that it is in these areas that the silver-plated contact pads are located for connecting terminals with power cables.
- The terminals themselves are also included in the delivery set. The set may contain required quantity cable. You should definitely pay attention to the presence of special insulating materials - bitumen tape.
- The kit should include a temperature sensor with a cable - it is this that is responsible for monitoring the heating level.
- Finally, the buyer can choose one of the types of control unit - thermostat. They come with electromechanical or fully electronic regulation; they may differ in design and display system, but, as a rule, they all have the same connection system to the power supply, heating elements and temperature sensor.
When choosing a heated film floor model specifically for a laminated surface, you should pay special attention to its specific power. Common standards are 150 or 220 W/m², less common are 440 W/m². In our case, more than 150 W is not required - such power leads to heating of the film surface to 40 ºС, and higher temperatures are contraindicated for laminated boards.
To lay the floor, you must also purchase the required amount of underlay with a thickness of at least 3 mm. It is better if one side of it is foil-lined - it will reflect infrared radiation from the concrete base, focusing it in the desired direction - upward. However, it is necessary to take into account that the surface of the substrate should not be conductive. To connect the backing sheets you will need special tape.
A correctly drawn up scheme is the key to successful work
Before, how get down to work, and by and large - even before, how When purchasing a set of infrared film “warm floors”, you need to think through to the smallest detail the plan for installing heating elements, connecting them to the control device and switching with an alternating current source. Which basic principles taken into account when drawing up such a graphical diagram:
- The floor surface is never completely covered with film elements. They are not placed in places where permanent installation of furniture is planned. A closed space leads to disruption of normal heat transfer from the surface of the laminated coating. Not only can such overheating cause deformation of furniture parts or the laminate itself, but the service life of the film elements themselves is reduced and increased absolutely unnecessary electricity consumption.
- For the same reasons, such a coating must be at a certain safe distance from the walls of the room, and necessarily from stationary heating devices - radiators or pipes with coolant. By existing rules an indentation of at least 250-300 mm is required.
- When rolling out, rolls of film heaters should be oriented along the long side of the room - this will minimize the number of contact connections.
- It has already been mentioned that cutting of infrared film should be carried out only in places permitted for this - they are marked graphically.
- The interval between adjacent sheets of infrared film should be about 50 mm. Overlapping of one heating element with another is strictly prohibited.
- To fully warm up a room, it is usually considered sufficient to cover up to 60–70% of the floor area with heating film elements. It is also possible to provide “increased comfort zones” - in traditional places for children’s games or adults’ recreation.
Special attention is given to the cable switching of the infrared floor system.
- First of all, an optimal location must be provided for installing the control unit - the thermostat. It must be placed at a height of at least 500 mm from the floor. A specific location is chosen taking into account the most convenient supply of the 220 V power cable and all wires from the film elements.
- The total power of a “warm floor” can be quite high, so it cannot be connected directly to a regular household outlet. It is better to provide in advance for the laying of a dedicated power line of the appropriate cross-section with the installation of a separate machine. It is even better if, in order to increase safety, an RCD protective device is included in the circuit.
- Most models of thermostats are designed for installation in a wall in a standard socket. To connect the cable part, it can be done to the floor surface groove about 20 × 20 mm, so that a corrugated pipe Ø 16 mm is placed in it, into which the wires will be hidden. Another option could be a decorative plastic box (cable channel) mounted on the wall surface.
Both phase and “zero” are connected to one side of the film element
- When planning the laying of wires on the floor surface, take into account that they should not intersect. The connection diagram may be different. Most often they resort to connecting cables on one side of the film elements (as in the diagram above )
- However, there are situations (for example, a complex room configuration) when it is more profitable to connect the phase and neutral wires to strips on opposite sides of the room. This approach requires special care so as not to connect both contacts to one copper bus - short circuit will be provided!
- Provided on the diagram location temperature sensor. It must be placed in the center of the width of the film element, at a distance of at least 500 mm from the wall. The optimal solution it will be installed in the coldest place in the room, but this possibility may be limited by the length of the standard temperature sensor cable - you cannot extend the wire.
After drawing up the diagram, the required amount of material will be clearly visible - you can purchase a kit and begin further work.
Preparing the surface for installing infrared floors
Since the topic of the publication is the installation of infrared film elements under the laminate, it is assumed that the base subfloor is completely ready for laying laminated panels - it is level, repaired, primed.
- The first stage in this case can be considered a thorough cleaning of the base from even the smallest solid fragments of debris and dust - in order to prevent damage to the substrate and film elements below.
- The next step is to cover the entire floor surface (not just the one where the heating elements are planned to be installed, but the entire room) with a substrate. The foil part should be on the outside. The sheets are laid end to end and fixed to the base of the floor. double-sided tape. The strips of the substrate are fastened together with special tape, which also has a top foil reflective surface.
- The thickness of the substrate is very important. The fact is that grooves will be cut into it for laying cables, terminal connections, places for contact insulation, and a temperature sensor. All these elements of the electrical circuit should neither cause the film coating itself to rise, nor, moreover, interfere with the installation of laminated panels.
Laying and switching of film infrared emitters
When laying infrared film elements, the drawn up diagram should always be “in front of your eyes.”
All work is carried out very carefully. When cutting the film, laying it or laying the finishing coating, the integrity of the elements must not be allowed to be violated. If for some reason there is a rupture or cut on the current-carrying part or on the radiating carbon strip, such a fragment pl The eggs are subject to rejection and mandatory replacement.
- The film elements are laid in such a way that the shiny side of the copper bars is at the bottom. The film can be secured to the substrate with ordinary tape.
- After laying the film elements, you should immediately insulate the cut points of the current-carrying busbars, which will not be used in the future when switching cables. For this purpose, use the bitumen tape included in the delivery package.
It is glued in such a way that reliably protect the contact both above and below, crimp tightly for complete sealing.
- Before laying the canvas under which the temperature sensor is planned to be installed, a groove for it and a channel for laying the cable are cut out in the substrate. The sensor body itself should be located on a black carbon emitting strip, approximately in the center of the canvas. It should be securely fixed in this place with the same insulating bitumen tape.
After laying the sensor and connecting its cable to the thermostat, film the element is laid and fixed on the floor surface.
- The next step is to install terminals at the points where the film elements are connected to the electrical circuit. Most infrared floor models are equipped with clip-type terminals.
The upper plate of the clip is inserted into a special contact cut, so that the second petal is at the bottom films
Then carefully, but as tightly as possible clips crimped with pliers, which ensures their reliable contact with the silver-plated pad of the copper bus.
- Some types of film floors have a different terminal connection system, for example, a rivet type - this is specified in the installation instructions describing the methods for attaching the contact.
The terminal is fully installed - it needs to be insulated
Strips of bitumen tape are glued both above and below film element, so that reliably cover all metal parts. After crimping, a completely sealed “capsule” should be obtained, eliminating any possibility of moisture entering the terminal assembly.
- After switching, the cables and insulated terminals are placed in the grooves made for them in the substrate and fixed in them with adhesive tape.
Connection to the thermostat and features of starting the heating system
- Upon completion of the installation stage, all wires should converge in one place - at the thermostat. An important point should be taken into account - if several sections of the “warm floor” are connected to one control device, then no twisting of the wires is allowed. In this case, you need to resort to installing certified terminal connections.
- The wires are connected to the connectors of the control unit (thermostat) in strict accordance with the instructions specified in technical documentation scheme. It must mark the connection points of the supply voltage (L and N - phase and zero), grounding, load - i.e. the heating elements themselves (usually in this place, together with the resistor icon, the maximum load value in watts or amperes is indicated), and the temperature sensor (“sensor”). After switching the wires, they are removed into the channel provided for this, and the thermostat itself is attached to its regular place.
- After another thorough check of all connections, you can perform a test run of the system. If everything works fine, it is disconnected from the power again, and now the installation of the laminated covering is about to take place.
- To increase the safety of film heaters, additionally protect them from damage when laying laminated panels, and eliminate the possibility of moisture getting on them in the event of a spill. By If there is a large amount of water, it is recommended to lay another layer. For these purposes, a polyethylene film with a thickness of about 200 microns is used - it will not become an obstacle to the passage of infrared radiation. Canvases films spread with an overlap of 150-200 mm, and the resulting overlaps sealed with tape.
- Installation of laminate flooring over an installed infrared film heated floor is, in principle, no different from conventional installation technology - in accordance with the recommendations for a specific panel model. The basic techniques for laying laminated flooring are described in detail in other publications on the portal.
Once the laminate flooring work is completed, the infrared heating system can be turned on. However, here too some caution should be exercised - in order for the laminate to better adapt to these conditions, it would be wiser not to start heating immediately full power. It is better to initially set a value of about 15 - 20 ºС, and then, adding 5º every day, bring the system to the designed operating level. This will also make it possible to experimentally identify most optimal"warm floor" operating mode.
Video: master class on laying infrared film under laminate
Warm floors are a truly necessary system for comfort in a residential building or apartment. Installation has to be done for a variety of floor coverings. An electric heated floor under laminate will be an excellent combination of comfort and quality. How to install it yourself? Which underfloor heating system should I choose? Read more in this article.
Laminate - although a rather beautiful coating, compared to the same parquet, it seems colder and unpleasant if you walk on it barefoot. Therefore, it is recommended to install a heated floor system under the laminate. This is especially true for houses located in the private sector and apartments located on the ground floor, where the cold air from below greatly cools the floor covering. The heated floor system will ensure comfortable living in such premises for all family members.

Note! Laminate is a coating sold in stores at an affordable price, and therefore everyone buys it more owners residential premises. Therefore, the material becomes more popular every year.

Warm floors are a system that provides heating of the floor covering, a kind of heating. Oddly enough, the history of this heating method goes back more than 20 centuries in total. Similarity modern systems It was used for heating rooms back in Ancient Rome and Korea at the beginning of our era. Of course, there was no talk about electricity, but then in some houses the stoves were built in such a way that the smoke and hot air coming out of them passed through special cavities under the floor covering and thereby warmed the room from below.

Now technology has stepped forward - modern methods of underfloor heating have appeared and they all have certain advantages:
- comfortable living conditions in the apartment due to heating of the floor covering and air in the lower part of the room;
- the system is invisible to the eye;
- Possibility of use in any room.

There are practically no disadvantages to heated floors. These include some complexity of installation (it is necessary to lay the systems under the covering, and if it has already been laid before, it will have to be disassembled), as well as an increase in utility bills - electricity or heating, depending on the type of floor.
Some underfloor heating systems (water) cannot be installed in apartments located in old buildings - there is no provision for connecting the heating circuit to the central heating system, and the management company may prohibit the use of such heated floors. There is only one way out - purchase electrical system heating floors.
That is why the article will only talk about electric types of heated floors, the use of which will not be limited by the availability of permission from management company for installation. And their installation is much simpler than water heating systems.

Types of heated electric floor
There are only two types of electric underfloor heating systems - infrared film and cable. Also, cable heated floors have another subtype - floors made of heat mats. Each system has its own characteristics, advantages and disadvantages. To understand how they differ from each other, you should get to know them better.
It is not difficult to guess that this underfloor heating system is a special heating cable laid in a certain way under the floor covering. Everyone can calculate the required cable length independently - it will depend on the size and area of the room. Installation is carried out on a reinforcing mesh or a special tape equipped with special clamps.
Attention! To install a cable heated floor, be sure to lay a concrete screed! Its thickness should be about 4 cm.
The main disadvantages of the system are high energy consumption, taking into account the fact that a lot of heat is spent on heating concrete screed, and the difficulty of adjusting the temperature if necessary. It is also important to know (already at the installation stage) where the furniture will be located - if the floor heating system runs directly under the sofa or cabinets, there will be a risk that it will overheat and fail.


Cable heated flooring is rarely installed under a laminate. The installation method is very similar to laying a water heated floor - cable required length laid out according to a certain pattern into a screed. This is where the problems begin that limit the use of this type of system under laminate. The fact is that if the screed heats up first, and only then everything else, then problems are observed with the substrate on which the laminate is laid. It does not transmit heat well. And if you refuse to use it, then, unfortunately, the noise from the working heating system will be annoying.

Heat mats (thermomats)
This is also a cable version of the underfloor heating system, but here the element that gives off heat, that is, the wire itself, is placed in special mesh mats. And the cable is somewhat thinner than its counterpart used in the previous case. The advantage of this type is that there is no need to calculate the pitch of the wires - they will be immediately fixed at the required distance from each other.

Important! Installation of this type of heating system is quite simple, the thickness of the screed will be smaller - about 5-10 mm, which allows you to save money. And most often the system is simply laid on a ready-made screed, but it is also practically not used under laminate.

Infrared heated floor
Film or infrared heated floor is one of the most modern methods heating the floor covering. The system is a thin material that emits electromagnetic pulses of a certain frequency (5-25 microns), which affect surrounding objects and increase their temperature. This feature of the infrared floor is very reminiscent of the sun's rays, which also heat everything around due to radiation.

The advantages of this heating method are as follows:
- laminate ceases to emit harmful formaldehyde when heated. Unfortunately, this substance is contained in the adhesive components that connect the lamella parts;
- the laminate does not crack or diverge, nor does it delaminate, which usually happens when it is heated by heating coils or cables;
- the thickness of the floor does not increase.
Installation of film heated floors is quite simple, and in operation there are usually no problems with it. Another advantage of this type of heating is savings, since it consumes less electricity than other types.

Devi
Devi electric heated floors are manufactured in Denmark. The company's products are distinguished by high quality, affordable price and versatility. All components of this brand are suitable for any type of heated floors produced by this manufacturer.

- simple installation;
- does not dry out the air;
- manufacturer's warranty;
- service life more than 20 years.
- high energy consumption.
heated floor devi
Caleo
Caleo film infrared heated floor is designed for quick installation of a “warm floor” heating system using the “dry installation” method, without screed and dust. Ideal for cosmetic repairs under laminate, carpet, linoleum and parquet boards.

- good heat dissipation;
- The kit includes everything necessary for installation: high-quality clamps, wires, insulation; possibility of self-installation;
- Installation and assembly instructions are included.
- increased film fragility.
warm floor caleo
Rehau
Rehau electric underfloor heating is a system of two-core self-regulating cables of a fixed length with increased resistance. On the outside they are covered with a double layer of insulation and protective braiding.

- excellent German quality;
- installation under any covering;
- optimal heat distribution;
- relatively high cost.
The products of the Korean company Unimat have proven themselves well in the Russian market. Infrared carbon rods that heat the surface are not afraid high humidity.

- The heating system is quite economical
- low cost;
- The warranty period is 20 years.
- it will not work as the main heating in severe frosts.
heated floor unimat
Electric heated floor "Teplolux" Russian production- environmentally friendly and very effective option for additional or main heating of the room. Models in the form of cables, mats and rugs create the optimal temperature in a room, private home or office.

- good selection of equipment;
- easy installation;
- affordable price.
- rapid failure of the thermostat;
- instability of surface heating if a thick screed is laid and there is no good thermal insulation.
heated floor teplolux
In what cases is installation under laminate possible?
Most often, it is the infrared type of heated floor that is installed under the laminate, less often - using a cable.

Note! Cable floors are best laid under tiles in the bathroom or toilet. There, the floor areas are small, there is no need to constantly turn on the floors, which means that it will be possible to significantly reduce the cost of electricity, which such a system consumes in large quantities.

In general, laying laminate flooring on a heated floor system is quite safe, although there is one “but” that everyone should be aware of. The lamellas are based on an MDF board, which contains a certain concentration of formaldehyde, a substance dangerous to human health. When not heated, laminate emits environment There is a negligible amount of this substance, so this flooring can be laid even in a children's room. However, under the influence of temperatures, the amount of substance released increases. And the more the material heats up, the more formaldehyde ends up in the air.

Attention! Symptoms of formaldehyde poisoning are nausea, headaches, and inflammation of the respiratory system.
The use of high-quality laminate and infrared heated floors will help reduce the risk of poisoning.
Which laminate to choose?
The choice of laminate, which will subsequently be laid on a warm floor, should be approached with all responsibility. The table will help you figure out what to focus on.

Table. Key indicators that you should pay attention to when choosing coverage.
| Factor | Recommendations |
|---|---|
| Thermal resistance coefficient or indicator | This indicator reflects thermal insulation properties floor covering: the higher it is, the better these properties are. The coefficient should not be higher than 0.15 m2 K/W. This value is also influenced to a certain extent by the characteristics of the substrate - the greater its porosity, the lower the coefficient of thermal resistance. |
| Material class | In this case, class is not the most important indicator, but the more expensive the laminate, the higher quality materials were used for its manufacture and the less formaldehyde it will emit. And it will wear out slower. |
| Maximum floor temperature | It is important to know the heating limits of the laminate, at which it will not lose its properties. This is about +30 degrees. It should be remembered that the lower part of the lamella will have a higher temperature than the upper. |
| Method of connecting lamellas | Laminate that is joined with glue should not be taken - the substance will lose its properties when heated. It is better to purchase slats that are connected to each other with special locks. |
| Thickness of one lamella | The thicker the lamellas, the less heat will enter the room - thick laminate flooring transmits heat worse. But thin laminate is quite fragile and has weak connecting elements. It is best to buy material with a thickness of 8 mm. |

Manufacturers offer customers to purchase specially designed types of laminate that demonstrate excellent operational properties when laying on a heated floor system. It is these options that we should focus on. They are not afraid of exposure to temperatures, are easy to install and maintain a beautiful appearance for a long time.
Electric heated floor under laminate: installation features
There are no special tips for laying heated floors under this type of coating. However, it is important to pay attention to the substrate. It is best to purchase extruded perforated polystyrene for these purposes. Penofol and cork are also suitable. However, it is worth remembering that penofol is under no circumstances used if an infrared floor is to be laid. In general, manufacturers suggest purchasing special underlays for heated floors. These are available for sale in specialized stores.


Electric heated floor under laminate - we do it ourselves
Let's consider the installation of two types of heated floors for this type of coating - infrared systems and cable systems.
Warm floors are a serious cost item during renovation, so it is important to accurately calculate how much and what materials will be needed. To make your work easier, we have prepared special instructions, which tells how to calculate a heated floor - water or electric. Online calculators included. And in the article “” you will find full list everything you might need during installation.
Installation of infrared heated floor
In order to install a film heated floor, you will need the following tools and materials:
- the heated floors themselves;
- thermal insulation material without foil surface;
- clamps;
- thermostat;
- pliers;
- scissors;
- scotch;
- bitumen insulation;
- wires;
- screwdriver.
Step 1. The old flooring is being removed, concrete base leveled out. If necessary, a self-leveling mortar is used. The subfloor is thoroughly cleaned of dust, sand, and construction debris.


Step 2. The prepared surface is covered with thermal insulation, the sheets of which are connected to each other with tape.

Step 3. Next, the heated floor is laid. Thermal film is cut into pieces of the required length with scissors. The material is laid on the thermal insulation with the copper busbar facing down. You can cut the film anywhere without touching the heating elements.

Step 4. The pieces of infrared film are connected to each other using tape.


Step 6. Using pliers, contact clamps are attached to the thermal film.


Step 8 Cutouts are made in the thermal insulation for wires and contact clamps. This is necessary so that the floor covering does not rise in these places.

Step 9 The thermostat is installed. Wires are connected to it according to the instructions and connection diagram.


Step 10 Warm floor has been laid. Laminate flooring is being laid.
Video - Installation of film heated floors
Installation technology using the example of cable systems
Step 1. The place where the thermostat and heating sensor will be installed is being prepared. The first is attached to the wall at a height of at least 0.3 m from the floor level. The location of the device and wires is marked on the wall surface.

Step 2. Using a hammer drill and a special attachment (crown), a hole for the thermostat is drilled. A channel is being prepared for laying wires - power line. Its cross section is 20x20 mm.


Step 3. The subfloor is being prepared. Construction debris is carefully removed and a primer is applied.


Step 4. The thermal insulation layer is laid with the foil side out. The layers are connected to each other with special tape.

Step 5. To lay out the cable, a metal tape is installed. If necessary, it is cut into pieces of the required length. It is attached on top of the thermal insulation in increments of 50 to 100 cm. Fastening is done using self-tapping screws. The main thing is not to damage the waterproofing layer.


Step 6. The heating elements are being laid. The cable is laid taking into account the location of the furniture at a distance from the walls of at least 5 cm, from heating devices - at least 10 cm. Laying is carried out taking into account calculations of the laying step (produced according to the formula). The wires are attached between the “antennae” on mounting tape. They are laid in a “snake” pattern.


Attention! The cable must not intersect anywhere or become too taut!
Step 7 A temperature sensor is installed. It should be installed at a distance of 50-60 cm from the wall. The wires leading from the sensor to the thermostat are placed in a special corrugation, which fits into a previously made slot in the wall.

Step 8 The ends of the mounting wires and the temperature sensor are connected to the thermostat. The operation of the system is checked.

Step 9 The channel with the wires is covered with mortar.

Step 10 The heated floor diagram is drawn on paper indicating all the elements in case of repair work.

Step 11 Technological holes of 10x15 cm are made in the thermal insulation every 30-40 cm.

Step 12 The mortar is being prepared and formed cement screed on top of the heating system. The screed should dry with the heating field turned off.

Video - Installation of cable heated floors
Knowing everything described above, you can mount different systems warm floor under the laminate, and additional tips will help you do the work even better:
- Before laying a heated floor, you need to draw up a layout plan for both wires and thermal film;
- in an apartment with low ceilings it is better to use thermal film, as it “eats up” less height;
- for self-installation, it is better to choose a system that does not require the intervention of specialists, that is, the simplest one;
- if a heated floor system is installed in a private house on the ground floor, it is recommended to lay a waterproofing layer;
- to save money on wires, the temperature sensor is installed approximately in the middle of the room;
- the structure must be installed in such a way that it can be repaired in the future;
- Thermal film cannot be used in rooms with high humidity levels;
- if massive furniture will be placed on infrared floors, then it is necessary to equip air pockets;
- Thermal film does not fit close to heating devices, fireplaces, stoves;
- the length of one strip of thermal film should not exceed 15 m;
- at sub-zero temperature air installation of infrared floors is prohibited;
- The film should be installed with the structure grounded.

After the underfloor heating system has been installed and the laminate flooring has been laid, commissioning must be carried out no earlier than the fourth day after completion of the work. At the same time, as soon as the heating season begins, the temperature should be clearly regulated: the floors gradually warm up to optimal temperature(power gradually increases by 5-6 degrees). The reduction should also be made gradually.
The installation of a heated floor under a laminate finish puzzles many with the question: “Will the material change its shape depending on the temperature regime or air humidity? The fears are quite justified, especially since installing such a structure under wood or natural parquet can really lead to undesirable consequences. We offer an overview of video tutorials on installing a heated floor system under a laminate, which will show how to install it correctly in order to avoid common mistakes. This should convince you of absolute practicality and safety.
In the field of construction and finishing materials Three options for underfloor heating are successful: water, electric and film, of which the latter is considered the most suitable in combination with laminate. The article presents three videos with detailed description assembly and adjustment of structures of the Caleo and RexVa brands, as well as the process of connecting the power supply system control unit.
Review of training videos
1. Installation diagram for Caleo heated floor laminate:
In the proposed video instructions, the manager of the Caleo company explains in detail and demonstrates what the necessary set of tools should be for installing the system. Attached is a description of all stages of installation: from preparing materials and marking the position of the main elements to carrying out the final cosmetic work. Step-by-step instructions for laying floor heating film.
After watching, you will get an idea and a clear example of how to determine the dimensions of the floor surface, attach heat-reflecting material and thermal film, find the most convenient place to install the thermostat, correctly connect the system to the electrical network and lay the finishing coating (laminate, linoleum or carpet).
2. Video instructions for installing heated floors under RexVa laminate:
The video review demonstrates all the key stages of installing RexVa infrared film: preparatory activities(measuring the surface area of the room, removing construction waste); key points(laying insulating material and thermal films, power supply connection); conclusion (laminated flooring). The video focuses on safety rules when working with the structure and thermostat.
3. Rodal will tell you how to install a warm film floor with your own hands. The video instructions consist of three parts, each of which discusses in detail the processes of laying heated floors:
In the first part, it is proposed to familiarize yourself with the preparatory work on laying out and cutting infrared thermal film in a room of 19 square meters. m. The viewer is shown visual drawing with diagram image correct connection floor systems to the regulator. During the execution process, the commentator describes in detail all the important actions that must be performed during installation of the film coating.
In the second part, the viewer gets acquainted with the processing of the wireless side of the material. The review describes a method of insulating a conductive busbar with bitumen and reinforced film for the safety of the further operation process. Arguments are given in favor of a cork substrate with useful tips and recommendations for its installation under laminate and heated floors. Also in this video you can learn how to properly attach infrared system using construction tape.
The third video offers recommendations on how to install a warm electric floor under tiles or laminate yourself (this is also true for other types of finishing coating). Particular attention is paid to attaching connecting alligator clips to the film. Advice is given on connecting wires according to basic rules electrical engineering, which helps to understand the principle of a rational diagram of their connection between the buses and output to the regulator. In conclusion, we show how best to hide wires from thermal film using a stationery knife.
If the question of which warm floor is best to put under the laminate does not arise, we suggest that you familiarize yourself with the useful notes on its installation:
- the primary floor covering must be smooth: deviation of no more than 3 mm is allowed, otherwise sand it;
- the block with the thermostat is located at a distance of 10-15 cm from the floor;
- It is prohibited to overlap the film: try to evenly match the edges with each other without overlapping one fragment on another;
- it is not advisable to place it in places where heavy furniture is supposed to be placed;
- The surface of the load-bearing floor slab is dried and cleaned before laying the heated floor.


Cost for labor and materials
Now many people choose laminate as a flooring because it is quite beautiful, durable and easy to install. But this coating has several disadvantages, one of which is that it is very cold. That is why an excellent solution to this problem is to install infrared heated floors under the laminate.

What is infrared flooring?
Infrared heated floors are essentially a method of surface heating, which is carried out by increasing the temperature of heating elements with electricity. An infrared heater has special conductive strips that allow electricity to pass through and heat the surface. Electricity flows through the wiring and heats the floor evenly. It is precisely this system that causes complete sealing of the infrared floor and its resistance to high air humidity.
This design has a thermostat. With its help, you can independently change the temperature in the room and in its individual zones. Infrared heated floors are completely harmless to human health. It emits only negatively charged ions, thereby even having a positive effect.


Another feature of this floor is that it warms the entire room. This is due to the fact that a heat-reflecting lining is installed under it, which gradually heats the objects located on top. Thus, this device will heat the floor, not the ceiling of the neighbors if it is installed in an apartment. The infrared floor does not warm the air, so the heating is gradual and correct.

This design is perfect as a base for laying laminate precisely because it provides uniform heating of the surface, which is gentle on this coating. In addition, such a heated floor system is economical, reducing energy costs for such heating by 20%.

Laminate is an excellent covering for underfloor heating because it is quite thin and uniform. Thus, the heat is correctly distributed over the entire area of the room. A warm floor does not concentrate radiation inside the laminate, but transmits it through. Warm laminate flooring allows you to maintain a comfortable room temperature and makes moving around the house barefoot more enjoyable. This heating system provides owners ability to independently control comfortable temperature conditions in any room. In addition, laminate is perfectly suited to such a heat source, so an infrared heated floor system is indispensable in modern conditions.

Basically, these floors are powered by film heaters. They are transparent polyester sheets with parallel strips of carbon paste between them. When exposed to voltage, it emits infrared energy. The average width of such films is either 50 cm or 100 cm. The length may depend on the size of the room; the film can be easily cut along the cutting line. In other parts, cutting the coverings is prohibited.
Under laminate floors are most often used, the heating power of which is 150 W per square meter. Thus, heating will not exceed 40 degrees, this level will be acceptable for laminate. An infrared heated floor has a special sensor with a cable connected to it, which allows you to control the temperature.


Types, their advantages and disadvantages
Manufacturers now present two main infrared flooring systems. There are:
- film;
- core.

The first option is a model made from rolls of thin film, with heating elements in the form of strips. The second option is a set of carbon rods that are connected to each other using wires. The first type is very popular because it has a number of advantages and is easy to install. In this case, you will not have to carry out any additional or preparatory work. Anyone can cope with this task, even without the relevant skills or experience in this field. This heating system can be installed on any floor, regardless of its texture, and you don’t have to use a screed.
Another important advantage of infrared flooring is that it allows you to regulate the room temperature, creating a feeling of comfort. In addition, temperature changes can occur quite quickly.

If you suddenly decide to turn on and heat the floor, it will warm up in a matter of minutes, and the temperature in the room will noticeably increase. This is a clear advantage of infrared heated floors compared to other coatings.


An important advantage This type of underfloor heating is that it does not harm the finishing floor coverings. That is why this type of heating system is most often used in combination with laminate. A big plus is the very principle of operation of the heating system. It does not warm up the air and does not allow it to rise upward. The system evenly distributes warm currents, and thus the air temperature below will be significantly higher than above.
Infrared radiation is a completely safe and even beneficial phenomenon. It does not affect the level of air humidity in any way, does not dry it out and makes being in the room more comfortable. In addition, many experts indicate that infrared floors have a healing effect and can prevent a number of diseases. Thus, they do not harm at all, but, on the contrary, help improve the conditions in the room.

An infrared film floor will allow you to optimally warm the room. This is one of the most economical heating methods. This heater significantly reduces energy consumption. In addition, it allows you to provide a comfortable level of heating for your feet. Even if any part of the system fails, you do not have to replace the entire system. You can only replace a certain area and enjoy the warm floor.
Manufacturers guarantee a long service life of such heaters even if they operate uninterruptedly. These heating systems do not require special care, they are distinguished by their versatility, simplicity and functionality. That is why they are so widespread and extremely popular among buyers. But such a heating system also has several disadvantages. The first of them is the high cost of the heating system.
Not everyone can afford such a warm floor, especially if you purchase only high-quality, proven heating models. Besides, at improper installation or some mechanical influences, such floors can easily be damaged b and partially disable the system, and some heating elements will have to be replaced.

Many manufacturers also warn: there is a possibility of film heated floors catching fire. That is why it is very important to take into account the operating requirements set by manufacturers and carefully study all instructions. Another disadvantage is that not everyone can connect the necessary contacts correctly, this is especially true for models of the second type.
Some, especially very thin models, also require a flat surface for laying the floor, so you have to additionally level it and smooth out all defects. Another disadvantage is that energy savings can only be achieved if the floor warms the room to at least 21 degrees. In addition, this additional heating cannot replace the main one.

Some people also name other disadvantages of infrared flooring. Thus, buyers complain that its installation and installation is not as simple as manufacturers say. It is quite easy to calculate the size of the film and correctly lay it out on the floor surface, but connecting all the contacts is a very labor-intensive and complex process that only an electrician can handle.
Another disadvantage is the clear requirement for a perfectly flat and smooth surface. This is due to the fact that In some cases, the film is very thin, so there is a possibility of contacts coming off or being damaged.


If the film is deformed, the heating system will fail.
Also, many manufacturers claim that infrared floors do not dry out the air. This statement is only true if they are used separately from common system heating, but together both systems dry the air and lower the humidity level in the room. Although manufacturers often mention such advantages as air ionization and health benefits, this radiation can still lead to allergic reactions. Therefore, the system is not hypoallergenic and may cause some problems.


During installation, it is important to pay attention to the air temperature and floor temperature sensors: they should not be covered. Failure to comply with this requirement can lead to unpleasant consequences - the system will malfunction and work incorrectly.


How to choose?
When choosing warm infrared floors for laminate, make sure that the floor surface is perfectly flat, otherwise the system will not work. Preference should be given to film infrared floor. This is due to the fact that the rod system creates certain difficulties during installation and requires a screed. It is not very suitable for laminate, but is acceptable.
Before choosing, you must make and take all measurements in the room and calculate how many rolls of film you need to buy. An infrared electric floor can be installed in any room, including on a balcony; the choice will depend only on the available space.

In this case, it is important not only to choose the right floor system itself, since in some cases it is identical, but also the laminate for the film-type heated floor. You can buy sustainable vinyl laminate flooring. It is important to pay attention to the labeling.


The packaging must indicate that such a coating is suitable for installation on heated floors. A pack of laminate flooring must be marked accordingly, and some manufacturers even indicate permissible temperature heating (limit value – 27 degrees). It is also important to consider the density of the laminate and its structure. It is better to give preference to models that have a looser structure, since they conduct heat better and warm the room well. A denser laminate, on the contrary, takes a very long time to warm up and practically does not give off heat.

When choosing, it is important to pay attention to the composition of the lamellas. So, if they are made using formaldehyde, which is typical for MDF models that form the base of the laminate, then when heated this component can release harmful substances. If such a laminate heats up to no more than 25 degrees, then the level of emissions is normal, but with more high temperatures their level increases. That is why it is better to give preference to E1 class laminate. It can be heated up to 27 degrees without fear that harmful substances will be released.


Also pay attention to the price of the cover. Many people want to save money on this material, purchasing cheaper slats, but in the case of heated floors this is wrong.


Cheap, low-quality lamellas quickly deteriorate, and therefore you have to re-cover the coating. Thus, by saving on it, you will subsequently spend even more.
Pay more attention to the substrate. Its choice is extremely important when installing a heated floor. It can equalize the pressure on the locks connecting the slats and reduce the load on them when walking. The substrate must be laid on the underfloor heating film. It also allows you to provide uniform heating. The film should also be chosen very responsibly and carefully. Only a certain underlay can be placed on a film floor. So, technical cork, extruded polystyrene foam, materials with reflective surfaces, and liquid composite systems are perfect for this.


Under no circumstances should you purchase a foil backing, as it is unacceptable for laminate and heated floors. It increases the heat, increasing the permissible temperature level.


How to install it yourself?
When installing an infrared floor with your own hands, you need to acquire some tools and comply with a number of requirements. So, you will need:
- substrate with heat-reflecting functions;
- infrared film;
- temperature sensors;
- temperature regulators;
- wiring;
- fastenings – clamps for installing infrared panels;
- insulators;
- polyethylene film protecting against moisture;
- insulating tape;
- knife, scissors;
- ruler;
- roulette;
- pencil.


To properly install laminate and make a heated floor, it is important to follow the technology and check all the components.


This heating system must be removed from other heat sources, such as a radiator, stove, fireplace and others. It is better if the distance is about half a meter. When installing, you should also consider the location of the furniture in the room. It is better if the warm film is placed only in those areas where furniture will not be placed; it is important to calculate this in advance.
During installation, it is necessary to provide the ability to control the functioning of the heated floor, additional access to the system to troubleshoot problems if they occur. Laying the laminate is very important. It must provide necessary ventilation for heated floors and the level of thermal conductivity. It is also necessary to take care about a perfectly flat floor base and get rid of all the bumps and cracks. In addition, you need to install sockets to connect the heated floor to the power supply.


After this, preparation and isolation can be carried out. Initially, you should clean the floor and remove all dirt and debris; even small specks can damage the film surface. To do this, it is better to use a vacuum cleaner. After this, you need to take measurements: floor area excluding floor areas where furniture will be located. Be sure to calculate the material correctly.
Infrared film flooring should never be spread overlay. If such floors are not long or wide enough, it is better to leave a small distance than to put one film on top of another. After this, you need to install a special substrate that reflects heat. The underlay spreads over the entire floor area. It is much easier to shorten or trim.

Then it is necessary to glue all the joints of this protective substrate on the outside, and correctly cut the infrared film based on the measurements taken. Moreover, it can be cut only in areas specially designated by the manufacturer. As a rule, they are marked with white frames. The film can be laid on the floor in the room around the entire perimeter if there is no large furniture standing directly on the floor.
If there is one, then it is better to bypass it. Then you need to insulate the busbars. Copper busbars must be glued with electrical adhesive tape, while twisting along the cut. Try to carry out complete insulation without the possibility of air entry. After this, you need to process the grounding bus. This is the element that is located in the center of each heating surface.


It must be bent on both sides without deforming the remaining sections. To insulate the film in other areas, you need to use electrical adhesive tape. It must be applied in such a way that the fold is on the wrong side. After this, you can insulate the film with tape. It is glued halfway across and folded over a section of the infrared fabric. After insulation and installation, you can proceed to connecting the thermostats and soldering all the wires.


So, it is better to align the film in the place of installation and secure the edge of the substrate with the side that will be opposite to the temperature regulator. Then you need to solder the wires connecting different sections of the infrared film floor. Having folded back the film in the part where the temperature regulator is installed, it needs to be folded inside out. You can temporarily secure it in this position with adhesive tape.
Then, using a heated soldering iron or a utility knife, you need to get rid of the insulation layer. You can also mark points to melt the insulation and then trim the cuts with a knife. After that it is important to make complete isolation. This can be done using electrical adhesive tape.


After this, they proceed to installing the floor temperature sensor. This device must be installed under the film in special recesses. Thermal sensors are installed in the warmest place of the infrared floor, which is the central part of the film. This way you can avoid overheating the entire floor. The temperature sensor has a wire to the thermostat. There it needs to be secured with special tape. Then you should strip the wires and connect them. After this, you need to connect the grounding bars, and it is important to strip them, trim them and connect them with a cable.

Outgoing wires should be placed in a corrugated pipe.


Then you need to fix the film. This can be done by securing it to the substrate using mounting tape. This way you can create a smooth surface and avoid different areas overlapping each other. Next, you can proceed to testing the film infrared heated floor and laying the laminate. Polyethylene film is laid on top of the floors. It allows you to protect the infrared floor from moisture.
The film should be laid overlapping the walls, and thickness polyethylene film must be at least 160 microns. Only after this can you proceed to laying the laminate, correctly fixing all the locking connections and ensuring the necessary ventilation during installation.


At self-installation You should also follow some rules. It is better to place the temperature regulator approximately 20 cm above the floor in accessible area. Also keep in mind that when laying, all outer film elements must have gaps near the walls. It is important not to press them tightly and to retreat approximately 30 cm from each wall.
When decorating the interior of a room where such warm floors are installed under laminate, under no circumstances should you use carpets or other warm floor coverings. Thus, warm air will linger on the surface of the laminate and spoil its structure. The room will not be warm enough, but the coating will overheat.

In addition, if you lay a carpet in the place where the temperature controller is installed, the power relay will constantly turn off, and all heating of the room as a whole will be completely ineffective.


