It's nice when the territory country house or the dacha has been landscaped. To make it convenient to move around, you should make paths and paths. It is important that they fit into the landscape design, i.e. performed not only practical, but also decorative functions. It is important to take into account many points: material, shape and style. A path in a dacha, created with your own hands, can transform several hundred square meters of land.
Types of garden paths
Paths and paths in a summer cottage are made from different materials. Almost everything known materials, used in construction and decoration, can be applied. Let's look at the most popular options.
Natural stone. The main differences are natural beauty and nobility. It is worth noting the high strength, which is, of course, a plus, and the high cost, which is disappointing. Using this material, you can lay out a curved path, since stone elements arranged in a chaotic manner easily form smooth bends.

Tree. If landscape design completed in rustic style Provence or country, then wood is also suitable for decoration. To preserve the material, it is recommended to use special impregnations and varnishes.

Brick. A common material for the construction of houses and outbuildings. But it is also suitable for building paths on dacha area. Ordinary brick has an unattractive appearance, so it is better to give preference special types, which look aesthetically pleasing and are not afraid of moisture and low temperatures.

Paving stones and paving slabs. Thanks to large assortment and a variety of colors of paving slabs, you can lay out a path according to a pattern to result in a specific pattern or ornament.

Budget option. At correct installation the path will last long term. In addition, gravel will look good in the far corner of the garden or near an artificial pond.

Concrete. An original concrete path can be made using special forms. They are made of plastic and are sold in hardware stores. You can make them yourself after first familiarizing yourself with the technology.
To achieve a stylistic match between the paths and the surrounding natural and artificial objects, it is recommended to use a combination of materials and installation techniques. For example, use stone and colored gravel, wood and pebbles, brick and concrete.
If you want to use color schemes, you should be careful: the selected pattern must harmoniously fit into the landscape design being created and be suitable in style.
Features of the location of paths

Once the material has been decided, you should decide how to arrange the paths taking into account the landscape. To make everything look harmonious, you need to take up paper and pencil to draw up a plan and sketch. Makes the process easier computer program for landscape design. There are applications that are designed for designing paths and paths. Hints and tips will help you plot the correct and convenient route, along which you can quickly get to a certain place. At this stage, the following important points should be taken into account:
- the points define the main places to which it will be necessary to get, and then they are connected by straight or curved lines;
- the plan should also indicate all existing objects: gazebo, greenhouse, bathhouse, vegetable garden, garden and flower beds;
- it is not necessary to use the same type of paths: on any site, solid and step-by-step, straight and curved options will be perfectly combined;
- if it rains quite often in the area, then the paths should be planned with thoughtful drainage system and drainage of water from the edges.
When drawing up a diagram, indicate the varieties of plants and shrubs that you plan to plant. This approach will allow you to quickly decide on the material for arranging the paths.
Path made of cement sheets

More popular budget options, which can also be original and attractive, like natural stone. If your garden area has a continuous and neatly trimmed green lawn, then it is not worth dividing it with a large number of tracks. Eat best option in the form of a kind of small path made of cement leaves. Making it yourself is not difficult.
The basis is taken from decorative concrete tiles, which can be shaped not only in the form of sheets, but also:
- human traces;
- geometric shapes;
- animal silhouettes.
List necessary materials and tools are quite simple:
- Cement mortar (cement, water and sand).
- Shape (large burdock leaves are suitable for our version).
- Container for mixing the solution.
- Rubber gloves (for ease of use).
- Trowel.

- Cement mortar is mixed in a container in a small amount, according to the instructions. Mix thoroughly so that no lumps or air bubbles remain.
- The finished thick mass is applied to a pre-washed burdock leaf in a small layer of 2–3 cm.
- Leave the form to dry, preferably in the sun.
- After the mixture has completely set, remove the sheet and get decorative tiles.
- In the process of laying finished tiles, it is necessary to remove top layer sod to form a small hole. The leaf will be placed in it. We repeat similar steps for subsequent elements.
When working, the moment of mixing the cement mortar is very important. The required consistency must be obtained, since a solution that is too thick will not adhere well, and a liquid solution will not retain its desired shape.
Brick or paving slab path

A more solid path can be made from simple brick, which was left after construction and lies idle in a barn or garage, taking up the necessary square meters. No matter how your landscaping is planned, a brick walkway is a great addition.

The entire work process is divided into several stages:
- defining boundaries and removing the top layer of soil;
- preparation of sand and gravel cushion;
- brick laying;
- filling the seams with sand.

The minimum width of a brick path should be 90 cm. The parameter should be calculated based on the size of the brick and the pattern that is planned to be laid out. Pegs are stuck along the edges of the future path and a construction cord is stretched. A shallow trench is dug in the resulting space, and the edges are strengthened with boards so that excess soil does not spill out.

A mixture of sand and gravel is poured into the prepared trench, which is then leveled and compacted. Afterwards, everything must be covered with sand, which is also compacted. In this case, the base will be of better quality and the path will last longer.
The bricks begin to be laid along the boards. Correct the position using a wooden or rubber hammer. To make a border, the outermost rows of bricks are laid on the end. The gap between the edges is filled with bricks according to the chosen pattern. Constantly check the horizontal position of the bricks using a water level or a regular level. At the last stage, all the gaps between the bricks are filled with sand. Afterwards, water the path and repeat the operation.


The path of their wooden cuts
Of course, in terms of durability, wood is inferior to other materials, since it is afraid of moisture, which means it will require additional processing and protection. But still, wood cuts are also popular. With their help you can create a decorative path in a rustic style.

When designing, you should follow a few tips:
- When choosing a tree, you need to pay attention to the diameter of the trunks; it should be from 10 to 20 cm.
- You should not discard small branches, as small round pieces can perfectly fill the voids between large elements.
- You can use flat cuts or hemp.
Arranging the path will not take much time and effort. On the marked area, remove the top layer of turf or dig a shallow trench. The earth should not be taken far, as it will be needed to fill voids.

For the pillow, a sand layer 5 cm thick will be enough, which is compacted. The prepared hemp is laid out on the spot, which will allow you to immediately imagine the final result. The gaps are filled with earth or sand, fine gravel will also work.
When choosing a tree, you can simultaneously solve several problems: designing a site and getting rid of old cut trees.
To decide what material to make the paths from, walk around the area. Undoubtedly, you will find old bricks, leftover cement, and unnecessary trees. Experiment and combine when arranging your site.
Photo


The arrangement and layout of the site involves the creation of paths. Moreover, the requirements for them are quite serious: they must be reliable, comfortable, functional, beautiful and, very preferably, inexpensive. We’ll talk about how to make garden paths with your own hands at low cost in this article.
What to make paths from
The path surface can be hard or loose. To create a hard coating, the following materials are used:
- Concrete. Concrete walkways are more than just plain gray tape. In addition, there are dyes and you can decorate it if desired. There are also forms for filling immediately on site. It turns out homemade paving slabs. Another option is to pour small concrete slabs yourself the right size, then put them on the bedding. See photos for design examples.
And everyone in the household has forms for such a path - cut water bottles into cylinders, place them as needed and fill them with solution: beautiful and cheap

Large pebbles as backfill and colored concrete slabs

Another option for laying homemade concrete slabs down the garden path

And this is a concrete path with expansion joints. If you look closely, you can see that there are stripes across it. This is to ensure that the wet surface is non-slip.

Another one of the ready-made forms for homemade paving slabs

Looks attractive due to the border and non-linear shape

A simple concrete strip can be decorated to your liking

This is how they pave a path in a country house or near a house using ready-made forms into which concrete mortar is poured.
- Flagstone. This is a natural stone that has been cut into plates. It is laid on a prepared base (more on this later), the gaps are filled with backfill. It turns out beautiful, reliable, non-slip. It’s not for nothing that landscape designers love flagstone paths so much.

Backfill is one of the important elements, shaping the appearance

In this form, the flagstone path does not break up the lawn, and it is comfortable to walk

The color of the stone can be any

Quite nice paths made of old brick. And if you do the backfill on the sides and in the seams, it will be absolutely beautiful

These are two types of bricks - ceramic and crushed granite

Path from clinker bricks- beautiful, to say the least... but maybe too beautiful for the garden?
- Tree. Such a seemingly unsuitable material, but correct processing it can serve for a long time. Moreover, many hand-made wooden paths can be classified as low-cost. For example, they came up with the idea of using stumps and tree cuts as borders or coverings. They also make flooring from well-treated boards - better than a terrace, but if not, an old floor will do.

Building a tree can become an excellent path

This type of wooden pavement for a summer residence

Properly treated wood can last for several years.

Combination with pebbles - comfortable to walk

Gorgeous path for the area near the house

And this is how to make a path from boards
- Plastic. There are tiles for garden paths made of plastic - polyethylene or polypropylene. She has square shape and a system of locks that are attached to one another. It can be laid directly on top of the lawn or previously trodden paths in the country or on a plot of land. This is an option - fast and cheap. It can definitely be called “Low Cost”. It is better, of course, to make the filling according to the rules from crushed stone and sand, and lay plastic elements on top. It's a little longer and more expensive. There is also an immodest, but very nice option plastic tiles for paths. There is also “garden parquet”. These are slabs or boards made of wood-polymer composite - WPC (they are in the photo, they look exactly like parquet). This material appeared relatively recently. It looks and feels like wood, but is essentially a mixture of wood flour and polymer. These are very beautiful coatings, but their cost is by no means modest. Although not fabulous.

The good thing about a plastic path in a country house or on a plot is that it can be made in a few minutes

Another type of plastic tiles for paths

This is garden parquet. Gorgeous, but overpriced

And another option for polymer tiles for garden droshky

This is a bunch of plastic garden tiles
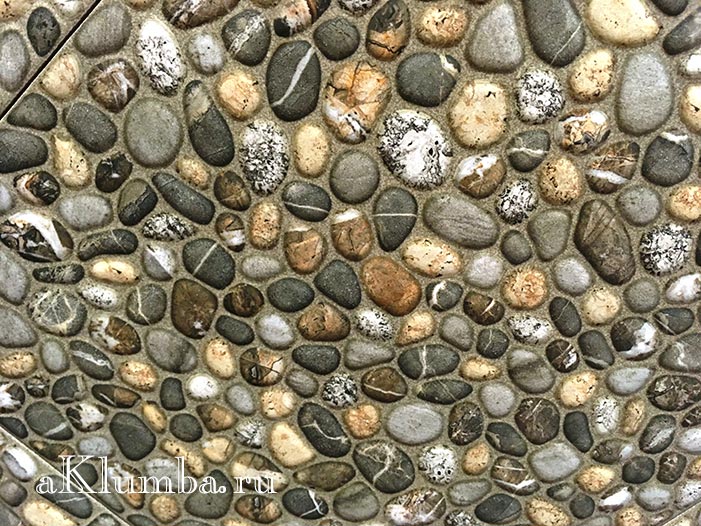
- Pebbles. These are rounded natural stones that can be found on the banks of rivers or lakes. Flatter stones are more suitable for making paths. There are different shades gray, black, white, sometimes you can find burgundy. These stones, laid close to each other, create amazingly beautiful mosaic paths. But this is an activity for the diligent and persistent. Those who lack patience can find large flat boulders or large pebbles and place them in the sand. It's not as luxurious, but no less reliable. You can do the same with granite or other similar stones. It is important that at least one edge is relatively flat. You put this flat part up, and bury the rest. The work is not easy, but you can not only walk on the path, but also drive.

Different types of pebble paths

Large pebbles do not require as much time for installation

Beautiful pebble paths in the garden.

Large natural stones can be used to pave good corners
- Available materials. Country paths are made from old tires and bottles.
Garden paths, elegantly winding among the trees, add to the area well-groomed and complete. And it is not at all necessary to buy paving slabs or hire a designer and builders for their arrangement. You can improve the paths in the garden yourself, putting your soul into their creation, and in return you will receive a durable, well-groomed coating that can delight you for many years. We’ll tell you in more detail how to make a garden path from a variety of materials with your own hands.
Types of garden paths
Garden paths can be classified according to many criteria, ranging from the material of manufacture, size and method of arrangement, to design and compliance with a certain style. Let's consider what garden paths you can arrange on your site with low costs for their production.
Garden path made using a plastic mold
Improving garden paths with plastic molds- relatively new way, which, thanks to its simplicity, has found many fans among owners of summer cottages.
Proof of this are numerous photos from specialized forums where you can see just such garden paths.
Advantages this method are not only simplicity, but also low cost and speed of production, because making garden paths using molds is essentially ordinary concreting.
The cheapness of this method is due to the use of one form, which is sufficient for uninterrupted operation. Of course, the strength of tiles made in this way is inferior to products made by vibration casting in a factory, but for a path in the country they are one of the best options.
Garden path made of paving slabs
The same applies for garden paths. tile, which is laid on sidewalks. The undeniable advantage of this material is strength. Tiles laid in the form of a path in the country will serve you for many years without losing their appearance, and if some elements of the path are damaged under the influence of external factors, they can be easily replaced. IN flaws tile covering we write down labor intensity And high cost. What do you want? Durability doesn't come for free.
Stone garden path
Very often, the stone left over from the construction of a house is used to improve the paths. In this case, we can assume that the price of such a garden path is equal to the cost of your own labor. We won’t talk about the durability of the stone; paths of this type have been known since ancient times. The disadvantages, as in the case of tiles, are labor intensity.

Laying the stone correctly is not a task for the weak, but it will more than pay off in the result. Do-it-yourself stone paths will give the appearance of your garden real nobility and the appearance of unshakable durability, and they will remain for your descendants in their original form.
Garden path made of chocks and wood
If country house built of logs, then your choice is a path made by yourself from wood. This is one of the cheapest options, very easy to repeat, but, nevertheless, one of the most impressive against the backdrop of trees in the garden. Unfortunately, the service life of such paths is limited due to the fragility of the material, so only the hardest types of wood will have to be used.

Garden path made of bulk materials
If you want to build garden paths with your own hands at low cost, then this method is what you need. It is enough to dig a trench of the required width and fill it with suitable material, ranging from pebbles and screenings to crushed stone or marble chips. You can even lay pieces of marble or concrete slabs in a chaotic order, the main thing is to align their upper surface level and fill the gaps between them. Such garden paths are not suitable for heavy loads, but they can provide the necessary cleanliness and excellent appearance of your garden.
Instructions for creating garden paths in photographs
Garden path using a DIY mold. Step by step instructions
To start arranging garden paths using a plastic mold with your own hands, look at photos of such stencils and buy the one you like the most.
Pay attention to the height of the forms and “stones” - they can vary widely.
A lot has been written about how to make paths in your dacha with your own hands. We suggest using the following instructions.
Choosing a place for a garden path and mark it with our own hands. To do this, we hammer in pegs at all the bends of the path, and then tie them with cord around the entire perimeter. The cord is immediately leveled, taking into account the required height of the path above the ground. A water level can make this task a lot easier.


If the soil on your site is soft, then you need to dig a trench 10-12 cm deep, fill it halfway with sand, after which you need to spill everything with water and compact it. If the soil is sufficiently strong, you can do without a trench, but it is necessary to make a sand backfill followed by compaction.
If the paths at the dacha are planned to be used for car passage, then you should dig a trench with your own hands and fill it up sand and gravel mixture, and then lay a reinforcing mesh of steel rod on top of it.


Preparing the solution . To do this, mix grade 400 cement, sand and crushed stone in a ratio of 1:3:4. If you plan to use coloring and plasticizing additives, then add them at the rate of 1-3% dye and plasticizer. You can take 4 parts of sand, but make sure that the cement is as fresh as possible and its grade is not lower than 400 .
We begin the production of garden paths by mixing all the components in dry form, after which we add water (if a concrete mixer is used, then half the volume of water is first poured in, and the rest is added during the mixing process).
We begin to prepare the solution Add concrete dye and liquid plasticizer Mix dry Add water with plasticizer and mix again
Let us immediately note that excess water negatively affects the strength of concrete after setting, so the amount of liquid should be no more than that required for high-quality filling of the form. Application plasticizer will significantly facilitate this process, add strength to concrete and reduce cement consumption by up to 15-20%. Fiber fiber can also be added to the solution, which will prevent shrinkage cracks on the surface and increase the abrasion strength of concrete by 100%.
For ease of use of the stencil, we attach handles to it , using special technological holes in the housing. For those who plan to make garden paths at low cost, let us tell you that the mold can be lubricated with automotive “ working out».
Of course, this is not the most ideal option, because the greasy surface of the tiles can only be painted after some time. The use of a soap solution is no less budget-friendly, but even such an environmentally friendly method also has the disadvantage described above.
We lubricate the molds for the garden path with a special lubricant. Lubricating the mold will allow you to easily remove it from the finished product.
Here's the application special lubricant for forms though it will entail additional costs, but will save you from the need to constantly lubricate the mold for making a garden path with your own hands. A mold greased immediately before work will not leave greasy marks, so you can paint such a path immediately after setting.
If the soil you compacted has dried out , then you must definitely spill it with water. Next, guided by the previously stretched cord, and also controlling the level, we install a form for pouring garden paths, which must be slightly pressed into the sand.
Fill the stencil with the prepared solution , avoiding voids in its corners. Using a small tamper, which we use as a vibrating plate, we try to compact the concrete as much as possible, and then level its surface with a spatula. After the 30-50 minutes required for the concrete to pre-set, the form is carefully removed and placed side by side, repeating the process until the finish line.
We begin to gradually fill the form, do not forget that the concrete should not be very liquid Special attention Pay attention to the corners, you need to fill them as much as possible with concrete mortar. Since we used a plasticizer and made the solution thick, after 15-20 minutes you can remove the mold. Here the first slab is ready! Let it harden for a day, after which we begin to actively use it.
To avoid animal prints , self-made garden paths are covered with plastic film and waited at least 3-4 days before taking a new path and taking a photo as a souvenir. The full load on the concrete product can be given no earlier than after 20 days.

The last stage in the construction of garden paths Do it yourself at low cost by painting and filling the tile joints with river sand.
There are several ways to paint a new path.
- The first is to add dye at the final stage of concrete preparation. . After this, you can lightly mix the concrete, achieving an uneven color, or thoroughly mix the components to obtain a uniform color.
- The second method requires dusting the wet concrete surface with dry dye each time the mold is removed. , however, in this case, only the very top layer will be painted, which will be erased over time. Garden paths with stains wiped off precisely after this type of painting can often be seen in photos on the Internet.

DIY paths video tutorial
Garden paths painted with your own hands look very interesting. dye dissolved in soil deep penetration , which makes it possible to achieve similarity with low cost natural stone. Stone-effect tiles, painted in a variety of colors, will look especially impressive in your garden. And the last piece of advice: after painting, do not forget to treat the surface of the path with a water repellent - it will not allow moisture to penetrate the pores of the concrete, destroying it from the inside.
Pouring a concrete path with your own hands
Monolithic concrete paths laid along summer cottage. Read on to learn how to make concrete garden paths.
Marking the future path , driving pegs along its edges and pulling a cord between them at the required height. We take into account that optimal thickness filling is from 7 to 10 cm.

Let's prepare sand cushion . To do this, we dig a trench up to 20 cm deep, level its bottom, install beacons and lay geotextiles, also covering the slopes of the trench with this material. After this, we fill the hole with 2-3 layers of sand with intermediate pouring and compaction of each layer. You can add a layer of fine crushed stone between two adjacent layers of sand. This will enhance the drainage properties of the pillow.
Laying agrofibre Installation of a sand cushion Leveling the sand cushion
Preparing concrete . You can use the recipe from the instructions for filling the molds. If you need a pavement path of increased strength, for example, for driving or parking a car in the country, then take 1 part of cement (not lower than grade 400), 1.5 parts of sand and 2.5-3 parts of crushed stone or gravel. The ideal volume ratio is 1 part water to 3 parts cement, but to increase the plasticity of the liquid, add a little more. Don't forget what less water will be in the solution, the stronger the concrete coating will be.

Formwork is used for garden paths from wooden planks thickness of at least 20 mm. It is better if the width of the boards is equal to the thickness of the fill, otherwise you will have to dig them into the ground. The boards need to be nailed to the inside of the pegs.

Install dividers at even intervals in order to create expansion joints. When making paths at the dacha, dividers can be used from available material. Smooth, narrow strips of drywall, glass, thin boards, scraps of laminate, siding, etc. are suitable for these purposes. In order to remove the spacers after the concrete has set, they must be lubricated with any suitable lubricant.

We carry out reinforcement of the structure to increase its strength. Chain-link mesh, scraps of reinforcement, pipes, etc. are used as reinforcing mesh. Of course, it is best to use a welded reinforcing belt made of rods with a diameter of up to 8 mm, with a cell of 100x100 mm. The reinforcement is placed at half the height of the path, using fragments of bricks or clamps made from the same rods.

Garden paths are poured up to the top edge of the formwork. . Next, using a tamper, we compact the surface until cement milk appears on the surface of the path, and then level it using the rule. Next, cover the path with plastic film and wait at least 5 days before removing the formwork. Full load on concrete can be given no earlier than after 3 weeks.
Decorate the path possible in several ways.
- Firstly, the surface can be painted or tiled with marble or ceramic tiles.
- Secondly, you can apply a design to it using a shaped spatula, screwdriver or coarse brush.
- Thirdly, you can paint the concrete itself at the preparation stage.
- Fourthly, gravel or pebbles can be pressed into the wet layer, laying out intricate patterns.
In a word, a garden path made of concrete can be original and attractive, as in numerous videos of popular Internet resources.

DIY garden path made of paving slabs
If you are planning to arrange garden paths with your own hands at low cost, then this method will not suit you. Paving slabs cannot be called a cheap material. On the other hand, such paths have a lot of advantages and are practically free of disadvantages. Watch a video in which you can lay such a garden path yourself. Not so difficult, right? At first glance, this is true. In fact, in order for the sidewalk path laid at the dacha to please the eye long time, careful preparation of the base and maximum care and precision in work are required. So, how to make a path from paving slabs with your own hands:
- Choosing a tile . At the same time, we focus not only on design, but also on its operational features. For example, for tiles on which you plan to drive a car, the ability to withstand increased loads is important.
- Stocking up on tools . For work we will need: a trowel, a rubber hammer, a tamper, a level, a cord, pegs, a pipe or I-beam, sand and cement.

- Marking future paths . To do this, we hammer in the pegs and pull the cord to the required height.

- Preparing the base . This work will depend successful operation tracks throughout their entire service life, so we approach this stage in the most responsible way. To do this, we level the base as accurately as possible, removing part of the soil on the hills and adding it in the lowlands. As we work, we constantly compact the soil, wetting its surface with water.
We calculate the depth of the base by calculating the height of the tiles plus the height of the sand layer. To the resulting value add a couple of centimeters for shrinkage. As a rule, the depth is 20-30cm. Do not forget to create the necessary slopes for water drainage from the surface.
- After leveling the base, we lay geotextiles . It will prevent weeds from growing into the tile joints.
- Pour a sand cushion , spill it with water and tamp it down. After this, we level its surface with a profile, relying on pipes or beams installed at the required distance from each other.

- Preparing the mixture from 1 part cement and 3 parts sand, which we lay on the base and screed using an I-beam or channel.
- We start laying the tiles from the curb in the direction “away from us” . We lay out the initial row clearly along the cord installed along the chamfer. In this case, you can use 1-2mm crosses to form seams of the same thickness. To ensure the required height, sand is added or removed with a trowel, compacting it as you work. At the same time, do not forget to constantly monitor the quality of installation using a level and a mallet. If you need to join the tiles to other buildings, then, if necessary, you can trim them with a grinder with a stone-working circle installed.
- After the last row has been laid, fill the seams with a sand-cement mixture and fill them with water.
Border installed along the edges sidewalk path, will prevent the tiles from moving and maintain the integrity of the structure. During operation, sand can be washed out of the seams with water, so it will be necessary to add it periodically.
Wooden garden path
Many summer residents think about how to make garden paths from wood, because this is inexpensive and available material always at hand. In addition, you can use not only classic version in the form of installed cuts, but also to install beautiful and functional paths in the country, for example, from such improvised material as Euro pallets.

The material for the cuts can be either a purchased log house or fallen trees from the grove located next to the site. A chainsaw will help you make wooden garden paths at low cost; you don’t have to buy it if you can ask a friend for help.
To arrange the path, follow the following instructions:
- We mark the place for the path and dig a trench 10-20 cm deep.
- We lay waterproofing taking into account covering not only the bottom, but also the slopes.
- For drainage, fill the bottom of the trench with crushed stone.
- Pour a 10 cm layer of sand as a cushion under the cuts.
- We install the cuts, alternating thick logs with thin branches to fill the space as much as possible.
- We fill the gaps between the cuts with sand.
You can install the cuts in such a way that their upper part will rise 3-5 cm above the surface. A path of this type will be much less dirty in slush and rain.
In the video you can often see how great a garden path made of wooden boards looks. But material such as Euro pallets is excellent for our purposes, and the cost of such material only includes its delivery to the site. At the same time, pallets are made from durable wood, which, when treated with antiseptics, can last a long time.
To prepare the boards, they are cut into 50 cm pieces, sanded, treated with a protective agent and painted or varnished. The flooring itself is performed according to the following algorithm:
- Logs are made from wooden blocks, which are fastened together with the same bars, using “half-wood” knitting.
- Cover the structure bitumen mastic, which will protect the frame from rotting. The same mastic is used to cover the bottom of the boards.
- Lay the boards, leaving a gap of 10-20 mm between them for water drainage.
- Additionally, the path is coated with varnish or paint.
When driving nails, try to bury their heads into the wood as deeply as possible. This will allow you to walk along the path barefoot without fear of getting hurt.
Prices for forms and materials
Everything you need for arranging garden paths can be found in the appropriate sections of the Leroy Merlin store. “Garden paths” and other sections of the catalog contain hundreds of items necessary tools and materials. At the same time, it should be noted that the prices are quite affordable.
Thus, the cost of a mold for a garden path in Leroy is 507 rubles, which, you see, is quite inexpensive, given its reusable use. A concrete mixer, of course, will cost you more - a 120 liter unit costs 5,690 rubles, but it will greatly facilitate concrete work.

Concrete dyes
Dyes for concrete start at 603 rubles. for a 700 g jar, while plasticizers can be purchased for a minimal price - 149 rubles. for a container weighing 600 g. The store’s consultants will be able to answer questions about how to make paths at the dacha with your own hands or tell you about the features of using certain materials. A form for a garden path, purchased from Leroy Merlin, will allow you to save quite a significant amount when arranging paths in your garden.
If you have not yet decided how to make a path in your dacha, look at the gallery of photos located on our website. Interesting solutions using in various ways arrangement of garden paths will help you choose the most best option, make the necessary changes to it and create your own unique design. And maybe soon a photo of your particular site will appear in the first lines of search results.

Walking barefoot on asphalt is less pleasant than walking on seashells, polished cobblestones or sun-warmed logs. Road surface, without which a metropolis is unthinkable, is inappropriate in a country estate. Almost every day, the owners walk around its territory without shoes, and the kids generally crawl on all fours.
When gardening, it is important to pay attention not only quality care for fruit plants, but also remember about the general arrangement and appearance garden Do-it-yourself garden paths not only create ease of movement around the property, but are also a special part general design. In this article we will talk about arranging paths with our own hands.
Garden paths - how to combine beauty and convenience
Country house, private house, a cottage requires not only arrangement of the interior and exterior, but also embellishment of the area around it. Often owners want to combine practicality and aesthetics in one project. You can realize your idea by laying garden paths.
What you need to know and consider during construction
Any design begins with a concept, a thorough study of the area and a plan. The first step is to determine the directions, length, width of future paths, imagine their shape, decoration. Next, you need to analyze the bearing capacity of the soil in order to choose the right type of building material and only then plan.

You need to draw up a drawing on paper, there will be an opportunity to correct, redo, supplement. There are several important factors to pay attention to:
- Components must be resistant to aggressiveness environment- high humidity, fungi, corrosion.
- It is good to tolerate temperature fluctuations of different seasons.
- Provide for a possible increase in loads (car, loaded wheelbarrow).
- The optimal angle of inclination of the canvas to avoid the accumulation of water from precipitation.
Advice from a landscape designer - in compact areas it is better to lay not straight garden paths, but with wavy bends and turns. This visually expands the space and deepens niches for plants.
Each owner decides what to build a path from independently, based on financial capabilities, needs and fantasies. Every coating needs a base. The ideal option would be a compacted earthen embankment or crushed stone cushion.

The most popular materials for DIY garden paths:
- Natural stone. It looks noble, aesthetically pleasing even with unsmoothed corners.
- Artificial substitute. The grace of nature, faceted by man.
- Clinker bricks will add bright colors to the garden.
- Gravel or large polished pebbles will provide originality.
- Wood is an affordable, simple, but short-lived look. Looks impressive separately and in a composition.
- Decking is garden plastic parquet. New material, resistant to ultraviolet radiation, water, mold, rot.
The decorative effect of the structure largely depends on the methods of laying the blanks. The canvas can be solid, smooth, or consist of separately located elements of different geometric shape. By laying out a path of large “leaves”, “butterflies”, “flowers”, it is easy to enjoy the comfort and pleasant walk.

Types of garden paths
Everyone who has a dacha, albeit small, but their own personal plot, will think more than once about ways to decorate and transform it. There is not always enough finance to realize ideas and fantasies. Many will ask: “What should we do then?” The answer is quite simple: if you want to improve your garden paths, but you don’t have the money for a landscape designer or expensive components, then you should pay attention to available and more affordable materials.
Useful for arranging garden paths with your own hands various types stones, boards, wood cuts, river pebbles and even plastic bottle caps. Now a little about each of the options.
Paths made of natural stone
They fit into any site design. They look natural, and if properly installed they can last for ages.
Such paths look very impressive. If there are stones left after the nearest construction, you can use them. Or those left over after installation will do alpine slide. They have uneven shapes, which makes them ideal for a picturesque path.
 Path made of natural stone
 First you need to calculate the number of pebbles. One of the methods is rough placement of stones. This way you can estimate whether the amount of material you have is enough.

Sprinkle the area for the path with sand and compact it well. It turned out to be a kind of “pillow” for the pebbles. They need to be processed, adjusted to shape, and made more uniform. For good joining and grinding, you can use a grinder or other not too powerful species tool. Having prepared the stones, they are placed in a mosaic composition.
Since all the stones are different in size, they are adjusted to each other using a rubber hammer. At least one side of the stone must be flat for the path to turn out as it should.

When the mosaic is ready, you need to start sealing the seams between the stones. Otherwise, they will begin to overgrow. Although some may prefer another option, the most natural one: a cement-sand mortar is used for grouting joints.

Concrete paths
They are very similar to stone ones. First make a bed, the depth of which is approximately 10 cm. Then pour sand on the bottom and compact it. Fill the top with a mixture of concrete and sand, install the formwork around the edges. Before the solution hardens, pour pebbles into it. Lay out your intended pattern from it. A drainage system must be installed next to such a path.
Sometimes a concrete path is made using a ready-made mold. It's easy to buy at hardware store. And then just pour the concrete mixture into the mold in the place you need, level it with a trowel, remove the excess and remove the mold. It is very light and quick way Moreover, you can lay out this form in at least several rows.
 How to make concrete paths with your own hands using ready-made forms
Wooden paths
Wooden paths will last a long time, but at the beginning they require maintenance. They can be laid out from sawn boards or timber, using what remains from the construction of the house.
 Wooden paths
 Prepare boards and blocks; the latter can be replaced with steel corners or pipes. Treat them with protective impregnations or bitumen mastic. Once soaked, nail the boards to the blocks. Mount the path on top using hemp of various calibers. Paint them one or more colors.
But in domestic climatic conditions The most modern impregnations will not protect the boards from deformation, rotting and corrosion, so imitation wood is often used as a material for paths - tiles with a corresponding pattern.

It will be possible to choose so perfect samples that no one can detect the difference from a distance. It is felt only after tactile contact. The tiles reliably depict the natural texture of pine, beech, oak and other species in cross-section - as a result, the ersatz is indistinguishable from the original.
DIY gravel garden paths
Gravel is a simple material that has good flowability, allows moisture to pass through, and is relatively cheap. It can be used to make paths of any width and length, and perhaps even give them different shapes. This path looks neat and fits harmoniously into any landscape. Making it yourself will not be difficult.
 DIY gravel garden paths
 The order of execution of the gravel path
- First you will need to mark the path around the area. Marking is carried out with pre-prepared wooden pegs. You can stretch a string between the pegs if you find it difficult to determine the direction by eye.
- Next, according to the markings, prepare the bed. To do this, dig a trench in the ground. The depth of the trench can be about 14 – 17 cm.
- Prepare the gravel. It is advisable, if possible, to view it and remove unwanted impurities (broken glass, sharp large stones, etc.). Handling gravel should be done with thick gloves.
- Backfill gravel to the depth of the trench. You can level it with a rake or your hands (also use gloves).
- Next, the laid gravel is compacted.
- At the end, a curb stone can be laid along the edge of the path. This will give an even more impressive and finished look. The stone is secured with a cement foundation. It can be laid either flush with the canvas or slightly above it.
This algorithm is also suitable for constructing a sand garden path. Accordingly, gravel is replaced with sand, and then all work is carried out according to the same scheme.
DIY brick garden paths
This is a very fragile type of material. Before laying it is necessary to check for strength. First, mark the path using string and pegs.
Remove the soil (25 cm), place drainage underneath. In this case, it will be simple, but the main thing is that water does not penetrate. It is necessary to pour crushed stone on top of the drainage system. The boards are laid sideways along the edges. Then the brick is laid. You can come up with a wide variety of brick designs.
 Clinker brick path
 A garden path lined with brick chips looks great. It is also permissible to sprinkle it on a concrete path. Beautiful mosaics are made from broken bricks. If the bricks different colors, beautiful patterns are laid out from them. You can leave space between them to fill it with small stones, pebbles or soil, so that later there will be a green island there.
 Homemade path made of brick and stone
 Sandstone path
They are made dry or using cement pouring. This method is similar to laying a stone path, but the first one is more natural and original.

Dig a trench, removing part of the soil. Pour sand in there and compact it. The middle part should be higher than the edges. You need to walk a bit on the slope. This is a dehumidification system. Next comes the processing of the stones.
Sandstone can come in a variety of sizes and shapes. Try on each stone before cutting.
Level the stones, making the gaps as small as possible. The processed stones are laid out as you like. For a classic path you need a bucket of sand and the same amount of mixture with cement. Under each pebble you must first put the first one, then the second one. Moreover, the cement should protrude slightly. You need to press the stone tightly. The completed path must be washed so as not to spoil the aesthetics with cement residues. The seams are filled with soil or sand.
Path made from wood cuts
Such a path will look very beautiful and attractive.
 Path made from wood cuts
 The cuts must be taken of different sizes, laying them so that there is no free space between them. Before laying, round timber must be treated with an antiseptic composition.
 Saw cuts for garden paths
Another option is to use round timber as borders and add a layer of gravel between them.
While staying at the dacha, you want to move away from city life, because all around, if not a forest, then a garden, some lucky ones even have a lake or river. In a word, no matter what the surrounding landscape is, it encourages you to get closer to nature.
An interesting idea is a path stylized as a forest one. It consists of fragments of ordinary tree stumps. Round plates of different sizes are laid along the edge of the pond and concreted.

The side of the artificial reservoir is made from them. It is pleasant to sit on such stumps to sunbathe; touching your feet with them also gives rise to positive sensations.

Plastic garden paths
Such country paths sold as modules, ready-made. Their installation does not require surface preparation or treatment. They are very easy and quick to install, very economical, and characterized by durability and long service life. They can be laid out on any site, in the form of any composition. They are environmentally friendly and aesthetically pleasing.
River pebble paths
Working with these pebbles will be difficult, time-consuming and will not end quickly. They are placed in advance limited space into wet sand and compacted to the required depth. The process takes several days.
 River pebble paths
 It happens that the design of country houses is based on imitation of the styles of past times - the ancient era, British classicism, etc. Then you should choose slabs that are ornamented in accordance with the general concept of the site and the residential building. They may have impressions of Mediterranean pebbles, ancient bricks, etc.
Paths made from plastic bottle caps
The most original and interesting way— line the path or part of it with plastic bottle caps. Due to the fact that the lids have a variety of colors, you can create patterns and mosaics, even creating entire paintings.
The only disadvantage of this improvised material is its collection, because you will need a lot of lids.
Reinforced garden path concrete tiles
Stages of work:

 DIY ready-made garden path made of reinforced concrete tiles
  From lined ceramic tiles mosaic type
  Paving stones, stone path
  The slabs are laid on a layer of sand, with seeds sown in between lawn grass. Mowing is carried out with a conventional electric lawn mower. The photo was taken 3 years after installation.
 These are just the basic materials from which you can make country paths with your own hands. Human imagination is limitless, so to the next summer season They'll probably come up with something else. Paths for dachas are made with your own hands from any, sometimes unexpected, material. For example, from glass bottles. You can create combinations of different types of material in one composition.


Remember that such paths carry not just convenience and benefit, but also beauty, pleasure for the eyes, and harmony. Imagine, invent, create.

Independently choosing materials for garden paths and the driveway to your dacha can sometimes be difficult. Then you just need to set aside time for a scrupulous study of catalogs or the means to consult with specialists. The result will justify all these costs.
Video master classes


