The construction of the roof completes the construction of the house. This stage is important; its organization should be planned in conjunction with all types of construction work. When building a roof with your own hands, it is useful to familiarize yourself with all aspects of this undertaking.
Planning the roof construction
When designing the roof of a house, a structural solution is calculated and materials that meet all requirements are selected. To do this, you need to understand what roof options are available and their structure.
Types of roofs
Flat. When constructing residential buildings, a flat roof is not used; it is traditional for southern European regions. This is due to the peculiarities of the climate: in those places, sunny weather prevails with little precipitation (rain). About the snow load in in this case there is no question.
Constructing a flat roof is not convenient everywhere
In our latitudes, flat roofs are used in the construction of utility buildings and in the construction of standard multi-story buildings. Floor material – reinforced concrete slabs.
Roofs are covered with rolled roofing materials. They are characterized by a short service life due to their characteristics.
Flat roofs can be used. The exit to it is organized like a terrace. It is difficult to create such structures with your own hands.
Sloping. The most common roofs are those with slopes, which are characterized by a variety of shapes and angles of inclination. The simplest option is a roof with one slope, with the supporting walls located at different levels. A frame is installed on them, which serves as a support for the roof. The shape of the rafters depends on the distance between the support points.
To a discerning developer, this design seems too simple, but many of them are inclined to choose this roof shape. This is due to the affordable cost. A gable roof is a popular design option. In addition to its simplicity, it is attractive because when the slope of the slopes changes, the house becomes original in appearance.
An interesting technical solution is asymmetrical roof planes. In this case, the slopes have different sizes and angles of inclination. A roof of this type is called a gable roof. The number of tongs may vary, which complicates the rafter system.
 Types of roofs
 When designing a double-gable roof, you can provide for an attic instead of an attic. In terms of possibility self-construction such a roof is simple and at the same time has a solid appearance.
Roof angle
The correct choice of roof slope allows you to have reliable protection from the effects of atmospheric phenomena and will extend the life of the building. In case of frequent and heavy rainfall in the area of construction, houses take a slope of 45 degrees, which makes it possible to effectively remove snow and water. In windy regions, it is recommended to make the roof more shallow.
The angle of the roof depends on the roofing material. If slate or tiles are used, the angle should be at least 22 degrees to prevent moisture accumulation.
A traditional roof with one slope is located at an angle of 20-30 degrees, while a gable roof has a slope of 25-45 degrees. It should be understood that as the angle increases, the need for roofing materials increases. This increases the cost of building a house.
Structural elements of a house roof
Without knowledge of the structure of the roof and the purpose of the parts, it is difficult to carry out construction work. The main structural elements of the roof are the roof, sheathing, ridge girder, rafters, Mauerlat, diagonal braces, and internal supports.
Roof. The upper part of the roof absorbs the impact of various external factors and protects the house structure from them.
Lathing. Designed for fixing thermal insulation and roofing materials. The sheathing is connected to the rafters.
Ridge run. It is located at the highest point of the roof and is intended for mounting rafters.
Rafters. This design gives rigidity to the entire roof structure. They are located at an angle to the horizon and can be layered or hanging.
The latter of them rest at two points - external load-bearing walls and perceive bending and compressive loads. Hanging rafters are used to create an attic.
The construction of a layered structure of rafters involves support on load-bearing walls along the edges and additional supports between them. It could be internal partitions or special support beams. In this case, the rafters only support bending loads.
When building houses whose design includes several spans, the roof may have a combination of two rafter systems. In areas without intermediate supports, a hanging structure is built, and if there are any, a layered one is built.
Mauerlat. It consists of beams located along the perimeter of the house on the tops of the walls. The Mauerlat serves as a support for the rafters and is rigidly connected to them. Waterproofing is required.
Diagonal connections. Braces connect the rafters, mauerlat and longitudinal beams into a single rigid structure.
Internal supports. Necessary for distributing loads between roof elements and the building. The presence of internal vertical supports provides additional rigidity when connecting rafters with longitudinally located beams.
The roof is connected to the walls of the building through studs called ruffs. To lay the rafters, niches are made in which they are tied with steel wire.
 Elements
 Types of roofing materials
When building a roof with your own hands, it is necessary to select the material for constructing the roof during the design process of the house. The choice must meet not only the personal preferences of the developer, but also correspond building regulations and rules.
Corrugated sheeting is often chosen. This is due to the low cost of the material and ease of installation. The material is produced by longitudinally rolling a steel sheet to give it a specific profile.
To increase the durability of the material, the sheet is coated with a layer of zinc or polymers. Corrugated sheeting is most widespread in the construction of commercial buildings and low-budget construction of private buildings.
 Metal tiles
 Metal tiles are popular among amateur builders. To make it, a galvanized sheet is rolled, onto which it is applied. polymer coating. Visually, this roofing material is similar to traditional tiles with the difference that the weight is much less.
The leader in durability is ceramic tiles. This material is an elite coating with a service life of up to 80 years. The tiles come in a variety of shapes and colors. At the same time, the mass of the material forces the creation of reinforced structures of the rafter system. The disadvantages of tiles include the fragility and high cost of products and their installation.
Replace ceramic tiles maybe bitumen. It is based on fiberglass or fiberglass impregnated with modified bitumen. The material is flexible and comes in a wide range of colors. This tile is good coverage for roofs of any complexity and configuration. The advantages are low weight, little waste during installation and high sound insulation rates.
An unusual tile is produced by rolling a semi-dry mixture of sand, cement and pigment. The product obtained in this way is coated with an acrylic composition. The cost of this material is significantly lower compared to ceramic products with almost identical characteristics.
Until recently, seam roofing was a leader in its field. Modern manufacturers use titanium-zinc, steel and copper for its production, and earlier - tin or galvanization. The material is light in weight and easy to use; it is necessary to create sound insulation.
 Modern materials have a rich range of colors
 The low cost of slate makes it popular among developers. In this case, during the production of the material, the asbestos-cement corrugated sheet is reinforced with asbestos fibers. It is easy to install the material, and the cost is affordable to the consumer. Disadvantages of slate: low aesthetic qualities, fragility and color change over time.
Ondulin - roofing sheets that undergo bituminization. The material is light, flexible, affordable and easy to install. Diversity color solutions distinguishes it favorably from slate.
Main stages of roof construction
Start of roof construction
Do-it-yourself roof construction begins with laying the Mauerlat. Anchors are used for fastening. A waterproofing layer of roofing felt and roofing felt is installed. Next, the rafters are fixed to each other using overlays. The lower parts are connected with staples and screwed with wire.
Lathing
After installing the rafters, the sheathing structure is assembled in accordance with the selected roofing material. For a soft roof, a continuous plywood sheathing is constructed.
When constructing the roof of a house, do not forget: there must be an overhang along the perimeter of the building in the form of a cornice, which prevents atmospheric precipitation.
Thermal and vapor insulation of the roof
 Making an attic
 When using the attic as a living space, install a vapor barrier layer of materials like yutafan or isospan. If the attic is not included in the do-it-yourself roof construction project, then this requirement is desirable, but not necessary.
Insulating the roof will allow you to save money when heating your home. A thermal insulation layer of mineral wool or slab materials is required. The rules are to ensure resistance to moisture, low temperatures and the absence of toxic substances in the composition.
Be sure to leave space between the sheathing and the thermal insulation layer to avoid condensation.
Roof installation
 Roof installation
 When constructing a roof yourself, at the final stage, the roofing material is laid from the bottom up, in the direction opposite to the flow of precipitation. Installation corrugated sheets depends on the wind rose in the construction area.
Each material has specific properties, so the manufacturer's recommendations should be taken into account.
Making an attic
The arrangement of the attic allows you to use the building area to the maximum. There are no particular differences in the construction of the rafter system. At the same time, the requirements for all types of attic insulation are increasing.


The dream of many city residents is to have a summer cottage, which can be immediately equipped in construction site. When drawing up a building project, the construction of the roof of a private house is important. Comfort in the future home depends on the choice of its shape, correct calculations during design and adherence to work technology.

Roof quality and roofing materials directly affect the comfort of living and the service life of the house Source rapidroofs.com
Roof shape
The installed roofing system can have several varieties. The roof structure of a private house is:
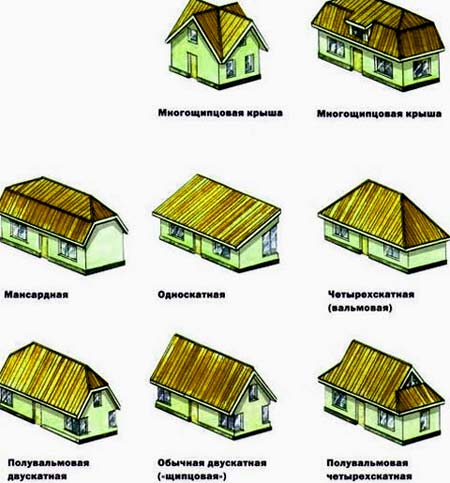
- Single-pitch. Depending on the coating material, it has a slope in one direction of up to 35°. It is rarely used to equip a residential building, since it excludes the possibility of having a full-fledged attic space. Most often installed on secondary country buildings: garage, veranda, greenhouse, shed.
- Gable. Easy to install and withstand significant external loads. It has two side slopes that form triangular pediments at the ends. The length of the slopes can be changed depending on need. At the same time, the shape of the gables and the volume in the attic will also change.
- Gable broken line. The slope of the covering on each side of the ridge consists of two parts that have different angle inclination in relation to each other and the attic floor. The most popular type of coating, which allows you to fully use the attic space or equip attic floor.
- Three or four slopes. The construction of the roof of a private house of this type involves combining the slopes at the top point; they can have different lengths and angles of inclination. The complex shape and originality of the device gave it a second name - asymmetrical.

Common roof shapes for private houses Source socratstroy.ru
- Half-hip. A type of gable design. A hip slope is made on each gable of the rafter system.
- hip. Trapezoid-shaped slopes are located on both sides of the long roof. Triangular slopes are installed on both sides of the short roof.
- Multi-slope or gable. It consists of several types of slopes combined into one structure. It is performed as a single flooring of a rafter system of complex structural shape.
Metal or natural tiles, profiled flooring, ondulin, slate or double-glazed windows can be used as a material for covering the house.
The roof of a house made of glass can have any of the listed varieties. Installation of double-glazed windows is possible along the entire perimeter of the roof or on its individual elements.
The choice of roof type and its covering largely depends on climatic conditions the area in which the house is located, the wishes and financial capabilities of the owner of the house.
Roof elements and their purpose

Each part has its own purpose and technological requirements Source ms-aig.ru
On our website you can find contacts of construction companies that offer roof design and repair services. You can communicate directly with representatives by visiting the “Low-Rise Country” exhibition of houses.
The roof structure of a private house consists of the following elements:
- Reinforcing belt. This is a reinforced concrete form mounted around the perimeter of the wall. Designed for leveling wall surfaces and fastening wooden elements rafter system to the walls of the building.
- Mauerlat. It is the basis for the rafter system of the building and serves to fasten the rafters to uniformly distribute the load on the walls of the building.
- Rafter system . Load-bearing truss for roof installation, heat and waterproofing material, some communication lines. Includes the following elements:
- rafters– the main structural element that makes up the frame of the rafter structure;
- runs- components of the system with which the rafters are connected to each other. Provide additional rigidity to the structure;
- sheathing– performed in two versions: external and internal (necessary for creating a ventilated space, fastening heat and moisture insulators, cladding material);
horse– the upper connection point of the rafters, the point where air exits from the ventilated space;
support posts and struts– structural parts designed to strengthen rafters and increase structural rigidity;

General diagram of the roof structure Source slide-share.ru
- sill- a log located under the ridge on the ceiling, between the gables. Designed for installation of struts and vertical racks, gives rigidity and stability to the rafter system;
- puff – fastener, with the help of which the rafters are attached to the Mauerlat and to each other;
- filly– a beam designed to extend the rafters and roof overhang;
roof overhang- part of the rafter system that extends beyond the walls (the main task of the overhang is to drain rainwater from the base of the building and the walls).
- Insulation and waterproofing filler. Insulation is necessary to retain heat in a building. The waterproofing film serves to prevent moisture from entering the house.
- Roof decking. It is necessary to protect the building from precipitation, giving the house an aesthetic and beautiful appearance.
Calculation of the roof of a house
To facilitate calculations, it is recommended to make a front sectional drawing of the roof. For example, if you cut a broken structure, you will get several geometric shapes. There will be a rectangle in the center of the cut, an equilateral triangle will be above it, and right-angled triangles will be located on the left and right. This will make it possible to calculate the volume of under-roof space.

Complex forms can always be divided into simple ones and calculated separately Source tirez.ru
- Calculation of slope angles. Depending on the type of roof, its angle of inclination will be 30-60°.
- Calculation of the length of ridge and side rafters. Performed according to special formulas. The length depends on the height of the support and the angle of the roof.
Video description
See the video for an example of the calculation:
- Determining the size of the rafter cross-section and the pitch of their installation. The cross-section of the rafters depends on the size of the rafter leg. The longer the leg, the larger the cross-section. The installation step depends on the cross-section of the rafters. The larger the cross-section, the wider the installation step rafter legs. When calculating the pitch, it is necessary to take into account that the rafters are installed first on the gables of the house.
- Coverage area calculation. Conducted according to geometric shapes. For example, a gable roof consists of two rectangles. The area of each of them is calculated, after which the data is summed up. This allows you to calculate required quantity roofing covering.

In the case of hip roof calculate the areas of triangles and trapezoids Source tl.decorexpro.com
- Determining the amount of wood for the sheathing. The thickness of the sheathing and the pitch of its installation depend on the material of the roofing. If a soft roof is used for covering, it is recommended to make a continuous sheathing or lay plywood. If the roof is made of a rigid or semi-rigid covering, then the sheathing can be compacted or sparse.
- Calculation of coating mass, insulation and waterproofing. This value is indicated on the packaging container and is necessary to determine the total load.
- Calculation of the total mass of materials, used for the construction of the roof. The mass of all elements is summed up: wall plate, rafter system, roofing, heat and waterproofing. This figure should not exceed bearing capacity walls of the building taking into account the correction factor. Weight is used to calculate wooden elements cubic meter wood with a moisture content of no more than 20%.
Online roofing calculator
To find out the approximate cost of different types of roofing, use the following calculator:
Preparatory work

Frontal projection of the roof drawing, plus a broken shape option Source legkovmeste.ru
To manufacture a rafter system, it is recommended to choose a base that has high strength, low dead weight, and resistance to moisture and temperature changes. Coniferous trees with a humidity of up to 20%, which do not have cracks, large knots or other defects, are best suited for this. Prepared wooden parts must be treated with fire-resistant mortar. To prevent fungal diseases, rotting or damage by rodents, the wood must be treated with an antiseptic substance.
Construction stages
The principle of constructing a roof structure is the phased construction of its elements. To understand how to properly build the roof of a private house, it is necessary to divide the construction process into several main stages:
- Reinforced belt equipment. The prepared formwork is poured along the entire perimeter of the wall and along its width. concrete mortar. During the process of solidification of the solution, iron pins are installed in it, on which the Mauerlat will subsequently be planted. The process of installing formwork, pouring concrete and hardening it lasts from 5 to 7 days, depending on the size of the building. If the building is built of wood, then there is no need to install a reinforced belt.

Armor belt for roof Source lineyka.net
- Installation and fastening of the Mauerlat. The Mauerlat is laid through the holes on the pins in the reinforced belt. If the metal pins were not installed in advance, then the Mauerlat is fastened to the walls using fastening brackets in increments of no more than 1.0 meter. Laying the Mauerlat is carried out along the entire length of the reinforcing belt and takes no more than 1-2 days.
- Installation of the rafter system. Work begins with the installation of rafters on the front walls. After this, the bed and support posts are installed, onto which the ridge beam is attached. Subsequently, according to the project, internal rafters are installed. In the upper part they are attached to the ridge beam, in the lower part - to the mauerlat with or without a notch. This most labor-intensive amount of work can take from 3 to 5 days.
- Installation of heat and waterproofing. The work is carried out according to the roofing pie scheme, in which the installation of elements, starting from the inside, is carried out in the following sequence:
- internal lining;
- sheathing;
- vapor barrier layer;
- insulation filler;
- waterproofing layer;
- sheathing;
- counter-lattice.
The presence of heat and waterproofing layers is mandatory for any roof. Their installation can take 2-3 days.

Heat and waterproofing on the roof diagram Source stk-prof.ru
- Roofing. Roofing works may take 2-3 days. This depends on the choice of roofing material. The larger its area, the faster its installation will be carried out.
If you don't take into account reinforced belt, then the construction of a house covering can take from 7 to 14 days.
Video description
See the video for a clear overview of the entire roof installation process:
Conclusion
In general, constructing a roofing system is not a very difficult task, but it must be taken into account that the future heat loss of your home will depend on the quality of the selection and installation of all elements. Therefore, it is strongly recommended to entrust the construction to builders, and use the acquired knowledge of the roof structure and installation stages to monitor the progress of work.
Information on the Internet and technical literature on this topic will help the homeowner solve the problem of how to properly make the roof of a house so that it lasts a long time without repair. You need certain skills and knowledge about the individual elements of the roof structure, its components and parts, the types of materials and the technology for carrying out work on arranging the roof covering.
Variety of modern roofs
Modern roofs are made flat and pitched, single-colored and multi-colored, with and without attics, from different roofing materials and even use straw (see: ""). When developing projects, experts classify roofs into inclined (pitched) and those that do not have a slope. Flat roofs require a slight slope of no more than 5 degrees.
In turn pitched roofs according to their form they are divided into:

In reality geometric designs There are more roofs and the choice largely depends on the preferences of the developer. When designing a building, the shape of the pitched roof largely depends on its architectural appearance and the purpose of the under-roof space. It can be either a smooth slope or a broken, fancy design with various curvatures.
The roof frame, regardless of what kind of roof it is, is always a rafter system or a truss. The sheathing necessary for installing the roofing material is attached to the rafters.
Building materials for roof construction
After choosing the shape of the roof, you need to decide on the material from which the roof surface and rafter structure will be created, and calculate its quantity. The most durable covering is considered to be tiles, but compared to metal sheets and slate, they weigh much more due to the fact that they are made from baked clay. The choice of material will subsequently affect the durability of the roof.

To build a rafter system, you will need to purchase lumber from natural wood - timber, boards, slats, and for this you need to know how to calculate the volume of wood. You also need to buy a film for waterproofing, thermal insulation, fasteners, including screws and nails. The consumption of materials also depends on the size of the house, the complexity of the roof’s structural solution and the type of coating.
Elements of the rafter system
The main part of the rafter system is the rafter. In addition, the design contains the following main elements:

Roof slope angle
The slope depends on the parameters of the truss structure (its height) and the width of the building, so roofs are:
- with a slight slope;
- with an average slope;
- with a strong slope.

The slope of the slopes is also affected by:
- design solution regarding the design of the building and its appearance;
- type of roofing material, since for each of them there is a recommended angle of inclination;
- the ability of the roof structure to withstand wind loads and precipitation. The stronger the wind in a given area, the smaller the slope of the slopes should be. Otherwise, as the angle of inclination increases, wind resistance decreases and windage increases - as a result of which the roof can simply be blown away. On the other hand, on a steep slope, snow and rain do not linger for a long time, unlike a roof that has a minimum angle of inclination.
How to measure roof slope
IN technical documentation(in drawings and diagrams) the slope of the roof is usually denoted by the letter “i”. As already mentioned, it is measured as a percentage or in degrees. You can find out the angle of inclination either by mathematical calculation or by using a geodetic instrument called an inclinometer. Electronic and drop levels with inclinometers are also used for measurements.

When such a device does not exist, they produce mathematical calculations. To do this, you will need to know the vertical distance from the ridge to the roof eaves (H) and the horizontal length of the segment between the top and bottom points of the slope (L). The formula for calculating the slope angle is as follows: i = H:L. The result obtained as a percentage is found by multiplying it by 100.
Minimum slopes and roof coverings
Before making the roof correctly, the roofing covering is selected based on the slope of the roof slope.
According to regulatory documentation, the minimum slope should be:
- for bitumen surfaces roll materials, laid in 3 or 4 layers - from 0 to 3 degrees or 5 percent;
- for roofs made of bitumen 2-layer roll coverings, no more than 15%;
- if slate is used - 9 degrees or 16%;
- for ondulin coating - at least 5 degrees;
- when ceramic or bitumen tiles are used, the minimum slope should be 11 degrees;
- in the case of using metal tiles - about 14 degrees.
Truss roofing system

The elements of the truss system are divided into parts, which include:
Construction of a roof with thermal insulation
The standards that determine how to properly make a roof provide for the creation of insulating layers to ensure reliable protection interior spaces of the building.
The roofing “pie” looks like this:
- the first layer, the lowest one, is a vapor barrier, it is necessary to protect the insulation;
- the second layer is thermal insulation material;
- third layer - waterproofing film;
- the fourth layer (finishing) is the roofing.

Experts advise placing insulation between the rafters before installing the roof. Most often used mineral wool because it is durable, environmental safety, lightness, wear resistance. On the contrary, polystyrene foam is not recommended for use due to its high toxicity and flammability. Layer of laid thermal insulation material depending on climatic conditions should be from 5 to 10 centimeters.
Creating a ventilated roof
When creating warm roof It is necessary to ensure ventilation of the under-roof space, between the insulation and the roof. This is primarily due to the need:
- preventing the formation of condensation on the sheathing from the cold attic side;
- ensuring the natural movement of air masses in the attic by creating ventilation holes, exhaust shafts, special ventilation windows, etc.;
- removing moisture from the thermal insulation layer and wooden elements of the roof structure;
- reducing the possibility of ice formation on the roof surface.
To ensure air entry, gaps are made on the lower surface of the cornice, the total width of which cannot be less than 20 millimeters if the lining is made of wood. When it is made of plastic siding or aluminum, perforated materials must be used for filing.
The height of the ventilation ducts and the size of the inlet openings for ventilation are made depending on the angle of inclination of the slope and the humidity of the internal roofing layers. If the roof slope does not exceed 5 degrees, then the height of the ventilation duct should be equal to 100 millimeters, when it is from 5 to 25 degrees - 60 millimeters. In the event that the tilt size is 25-40 degrees - 50 millimeters, when the angle exceeds 45 degrees - more than 40 millimeters. The given values are valid for slope lengths up to 10 meters. If this parameter is greater, then the height ventilation gap it is necessary to increase by 10% or provide for the installation of aeration pipes. The height of the ventilation gap is at the same time the size of the block for the counter rail. The standard length of the bars is 3 meters.In order for the air, which is helped to circulate by the difference in pressure, to leave the under-roof space, an exhaust ventilation outlet is installed in the direction from the ridge to the eaves. It is done at a distance of about one meter from the ridge.
Before installing the entire roof on the house, a counter batten is mounted on top of the waterproofing installed on the rafters using 90 mm rough nails, they are driven in at a distance of approximately 5 centimeters from the edge, keeping a gap of no more than 50 centimeters.
How to arrange roof overhangs, details in the video:
Arrangement of pipe junctions
Arrangement of bypass of pipe locations for different roofing coverings different. It is performed using roofing components. Making the connection of roofing materials to pipes correctly and aesthetically is a particularly important undertaking. It is not difficult to trim slate or tiles, more problems causes installation of the junction, because leaks cannot be allowed to occur in the future.

For example, for metal tiles or metal profiles and similar materials, metal junction strips are used in accordance with the color of the coating. For roofs made from slate sheets, cheaper galvanized components are used.
In case of installation on the roof bitumen shingles the connection to the pipe is provided by a valley carpet. For natural tiles, a special adhesive tape is used along with a metal apron in accordance with the color of the roof covering.
DIY gable roofA do-it-yourself gable roof will become the tinned pride of the home owner and will fully comply with his desires. In order for it to be not only a decoration, but also a reliable, durable, building protection, you need to think very carefully about its design, compose detailed plan works We will share experience and information on how to make the roof of a house with your own hands.
Do-it-yourself rafter system for a gable roof
Choosing a gable roof design is the most important part of the preparation. The strength of the frame determines not only its resistance to the weight of snow and wind pressure, but also affects the durability of roofing materials.
Steep roof
The steeper the slope, the more free space the attic or attic space will have. In addition, when the slope is more than 50°, snow will not accumulate on the roof.
Accordingly, the strength of the rafters may be less, and this will allow for good savings on the volume of lumber used. On the other hand, a roof that is too high experiences a lot of wind pressure and may be destroyed during a hurricane.
DIY flat roof
A low gable roof easily withstands strong winds, but has a reduced load capacity and is critical to the large weight of a thick layer of wet snow. The most ideal slope is considered to be 30°. This is the angle that provides:
- sufficient strength,
- balance between wind pressure and lift,
- good illumination of the roof plane winter time year.
Selection of the angle of inclination taking into account the weight of the roof
The weight of the roof can be a significant portion of the overall weight of the roof. Therefore, when designing the frame structure, we also take into account the weight of the roof material.
Advantages of using modern roofing materials
When planning how to build the roof of a house with your own hands, you should keep in mind that modern gable roofing is lightweight and easy to install. Covering a roof with metal tiles is much easier and faster than doing the same with outdated slate. And laying self-adhesive soft rolled bitumen shingles is not only much faster, but also within the power of the most inexperienced person. In addition, it very effectively dampens the noise of falling rain and hail.
Features of preparing the base for various types of roofing
The pitch of the sheathing under the metal tiles should correspond to the width of one sheet. Under soft roof fits sheet material. As a rule, waterproof chipboard is used for this.
It is not recommended to use solid plank flooring, since their size and shape can vary significantly depending on the level of air humidity, which can lead to premature destruction soft tiles at the seams. The use of thick plywood is also not recommended. It is less durable than good chipboard and does not allow the use of nails.
Frame materials
To build the roof frame, only coniferous wood is used. Coniferous timber and boards are very strong, elastic, practically do not absorb moisture, are not subject to rotting and are not to the taste of tree-eating beetles. To increase the fire safety of the roof, wood should be treated with appropriate fire retardants (special OZL-SK varnish, VD-545 wood paint and fire retardants or biopyrenes).
Dimensions of timber and boards for various elements of the gable roof frame
The minimum cross-section of timber and boards for frame elements is determined from the table below.
The cross-section of the rafters depends on the pitch and maximum length rafter leg.
Tools and accessories
To build a gable roof with your own hands, you will need the following tool:
- axe;
- hammer;
- universal or cross-cut saw;
- open-end wrench the right size under nuts and tie rods;
- pliers;
- construction stapler;
- screwdriver;
- nail puller;
- drill.
Usually a hand tool is used, but using an electric one instead will speed up the work and simplify the task. It is very useful to have a plumb line and water level on hand. The role of a plumb line can be played by any small weight on the twine. Instead of a water level, you can use a spirit level, but this is less convenient, and the accuracy of setting the horizontal line over extended areas is much lower.
In addition to the tool itself, you will also need the following devices:
- ladder or stepladder;
- winch, homemade or collapsible platform.
A little about security
If the height of the work site exceeds three human heights, you must take care of your safety before building a roof. All structural elements roofs have considerable weight and, combined with their height, pose a potential danger to humans.
When lifting wooden beams, boards, or finished rafter structures from the ground to the top, you need to use a winch rather than pull them by hand. When laying the roof, be sure to use safety ropes or ropes securely attached to a solid base. A first aid kit must be available at the construction site.
Roofing a house with your own hands: the procedure for constructing the roof
A gable roof can have a different design. Let's consider the simplest implementation.
Laying the Mauerlat
Along the upper edge of the walls we lay the mauerlat - the basis for the roof frame. The Mauerlat is made from timber with a section of 100x100 mm or 150x150 mm. The timber is attached to wooden walls with nails, bolts or staples.
IN stone walls fastenings in the idea of anchors or threaded rods are provided during their construction. Separate wooden blocks in masonry - not the best best option for attaching the Mauerlat. As a last resort, the wooden liners need to be duplicated with fastening brackets or metal plates that tighten the mauerlat and the stone base.
To prevent the roof of the house from being demolished strong wind, rods or anchors must be at least 10 mm in diameter. Between the masonry and the mauerlat a layer of waterproofing is laid - roofing felt or other durable material.
Installation of ridge beams
We install ridge beams on the gables of the building. This will allow you to assemble the roof skeleton right on site. Installing the rafters of a gable roof with your own hands can be done even alone. The rafters are laid alternately from the ridge to the mauerlat, fastened together at the top, cut in place and attached to the ridge. The design with a load-bearing ridge beam allows you to assemble the roof yourself or with one assistant. An overhang is a part of the roof extending beyond the walls of a building, formed by protruding parts of the rafter legs or additional extension boards - fillies. The boards for them must withstand the weight of the overhanging part of the roof and the gutter filled with water.
If the building design does not include capital gables, the rafters will need to be connected to each other on the ground and supplied to the roof in the form of ready-made rafter corners. Moreover, their installation will require the coordinated action of several people. The upper part of the rafters is fastened with a ridge, which is tapped from below.
Depending on the roof structure, nails, metal flashings, angles or studs may be used for fastening. The design of such rafters usually includes a transverse tie - a crossbar, and all the necessary cuts and cuts. From the ground, finished rafter structures are fed along inclined boards using ropes or a winch. The location of the rafter legs is marked in advance on the mauerlat and the ridge, taking into account the selected step.
How to make a house roof: installing sheathing
To increase the rigidity of the structure and reduce the thrust load on the walls, the rafters are tied with ties. When building a roof with your own hands, the easiest way is to use long boards or stacked beams.
- After installing the frame, the sheathing is installed. In this case, they are guided by the rule: for a hard roof, the pitch of the sheathing must correspond to the size of the roofing sheets, and for a roof made of soft materials, a solid base will be required.
- A vapor barrier membrane is stretched along the inside of the rafters. She protects interior space home from atmospheric humidity. Insulation is laid on top of the vapor barrier, and vapor-permeable waterproofing is placed on top of it.
- The numerous pores of such a membrane are impermeable to water, but allow water vapor to pass through, so the insulation “breathes” and does not suffer from condensation. The gable roof, photo of which is shown in this section, ensures minimal leakage of internal heat.
- Gutters and other drainage elements are installed on the roof overhangs. The final stage of construction is laying the roof and sealing all technological gaps and cracks. After this, the roof installation is considered complete.
Bottom line
A do-it-yourself gable roof is a guarantee of high-quality roofing. By strictly following all the recommendations of specialists and following the step-by-step instructions with photos, you will cope with assembly and installation without any problems. If you decide to entrust the work construction company, then you will be able to supervise any process, you will select it yourself required material and make an accurate calculation of expenses.
Before we talk about how to build the roof of a house with your own hands, let’s dwell a little on existing types roofs
Scheme of a gable roof design for a house
All roofs of private buildings are divided into two large groups: and pitched. The latter, in turn, are divided into single-, double- and four-slope, as well as broken and multi-gable. Let's look at each one separately.
Flat roof
Its undeniable advantages include the following:
- It can be built quite simply and quickly;
- Reliability and strength of the structure;
- Long service life;
- Original appearance (although many ordinary people try to argue with this statement made by experts);
- Possibility of additional functional load on the roof (arrangement of an observation deck, places for rest and taking sunbathing, summer mini-garden, etc.).
However, despite all the advantages flat roofs, there are also several significant disadvantages. Firstly, precipitation in the form of snow accumulates on such roofs, which requires regular cleaning.
 Existing roof options for a private house
 And, secondly, moisture from precipitation accumulated on the roof often finds cracks in the roof and forms leaks, so the covering of such roofs must be without flaws.
Shed roofs
This is the simplest option for arranging the roof of a private house. Although this type of roof is used extremely rarely for residential buildings, it is more often in demand for covering outbuildings.
A pitched roof has such advantages as simplicity of design, as well as cost-effectiveness during construction. But the appearance of the roof is not particularly attractive, and also the fact that the slope here is directed in one direction, which is required by the construction reliable system drainage, makes such roofs not in demand for residential buildings.
 Design and installation of a pitched roof for a cottage
 In addition, it is almost impossible to create an attic space on such roofs.
Gable roofs
Very often used to cover private houses. It is especially relevant for small country houses. This is due to its advantages, which include the following:

Among the disadvantages of such roofs, one can highlight the need to install a ridge, as well as two drainage lines. Moreover, if you compare gable roofs with single-pitched ones, their weight will be greater, which requires adjustment. In addition, making such a roof with your own hands is much more difficult than a pitched roof.
Hip roofs
It is not found as often as the gable one, although it has a more attractive appearance. This is due to the fact that such a roof structure is very complex in execution and its weight is very large.
But such roofs allow you to create a more spacious and bright attic space inside, which will always be warm due to the fact that it will be heated on four sides.
 Rafter system of a hipped roof
 broken roofs
Broken roofs are the most popular type of roofing in private construction. This is due to the fact that, if built correctly, such a roof is practically free of disadvantages. But it has a lot of advantages:
- Possibility of expanding the living space of the room due to the attic, equipped with a sloping roof;
- Reduced level of heat loss through the roof;
- Gives originality appearance Houses;
- Under the arch of such a roof you can...
Read also
Insulation thickness for the attic
There are also disadvantages that can be easily eliminated with proper arrangement roofs. These “disadvantages” include:

Multi-gable roofs
Houses with a multi-gable roof are original in their design and are suitable for private houses of any architectural form. But besides this, they also have the following advantages:
- Reliability and durability, which is ensured by a special rafter structure;
- Under the arch of such a roof it is possible to equip a spacious comfortable attic, which will significantly increase the living space in the house;
- Atmospheric precipitation does not accumulate on the roof, but flows down from it complex system gutters due to the steep angle of the roof slopes.
However, such a roof also has disadvantages, which boil down to the complexity of erecting a rafter system under a gable roof, an increased number building material, as well as the complexity of arranging drainage systems.
 Ready project two-story house with multi-gable roof
 You are unlikely to be able to build this type of roof on your own, and therefore in our article we will not dwell on it, as, in fact, on the rarely in demand - hipped roof.
Let us consider in detail the technology for constructing roofs such as single-pitched and gable roofs, since they are the most popular in private construction.
DIY pitched roof
Before you start building a pitched roof, you need to decide on several points.
Features of installation of pitched roofs
First, you need to understand where the only slope of the roof will be directed. Experts recommend that the non-windy side be considered a guideline for the direction of the roof slope. Secondly, you need to decide on the angle of the roof. Here it is worth adhering to the following pattern: the more precipitation falls in your area, the steeper the pitched roof needs to be made.
 Installation of joists for a pitched roof frame
 But you shouldn’t overdo it, because by increasing the angle of the roof, you increase the windage of the structure. Thirdly, depending on the chosen angle of inclination of the roof, it is necessary to decide on the type of roofing material. Thus, for different roof inclination angles, a variety of roofing materials are recommended:
Having decided on all the above parameters, you can begin building a pitched roof.
Materials and tools needed for construction
Construction of a pitched roof will require you to purchase the following building materials. First, you need to stock up wooden beam for the rafter system, boards and nails for installation of the structure. 
Secondly, do not forget to purchase a wood preservative that protects it from insects, moisture, mold and mildew. Thirdly, purchase the required number of rolls of steam, hydro and thermal insulation, roofing material, as well as fasteners in order to install the roof.
As for tools, you don’t need any specialized tools; all you need is a hammer, a hacksaw, an axe, a stapler, a measuring tape, and building level. In addition, you will need a knife, a pencil and a brush for working with wood.
Stages of construction of a pitched roof
The construction of a pitched roof comes down to several stages.
Stage 1 - Attaching the Mauerlat
Mauerlat is a beam that is the lowest part of the roof structure. It is mounted on the wall of the house and serves as a support for the rafters.
 An example of fastening the Mauerlat of a pitched roof
 It can be made from 10 x 15 cm timber, which is attached to the wall in one of the following ways: using wire, using construction pins or anchors. The sequence of installation of the Mauerlat is as follows. First of all, to ensure the durability of the roof, the Mauerlat must be waterproofed from the wall of the house using a sheet of roofing material or polyethylene, which is laid between them.
Further steps will vary depending on the fastening method you choose. If you decide to use anchors or studs, then you need to make holes in the wall and in the Mauerlat, matching each other in pitch.
To facilitate this process, use a board with marks for the holes. Alternatively, the studs can be fixed into the wall while laying the last row of bricks (blocks).
You need to insert bolts into the holes in the wall, and then simply place the Mauerlat on them.
 Name of structural elements of a pitched roof
 All that remains is to tighten it using nuts and washers for fastening the Mauerlat.
If the Mauerlat is planned to be mounted using wire, prudently installed in the top row of the wall masonry, then the process is greatly facilitated. Then in the Mauerlat at a distance of at least 25 mm from the edge it is necessary to drill a through hole parallel to the edge of the beam. The ends of the wire are passed through it and tightened tightly.
Stage 2 - Installation of the rafter system
The pitched roof has a fairly simple rafter system in design.
 Rafter system of a pitched roof
 As rafters, either a beam of a smaller cross-section (up to 50 mm) or a board (5 x 15 cm) is used. It is necessary to take into account the nuance that the rafters must protrude beyond the wall level by at least 30 cm. This is necessary in order to protect the walls of a private house from rain and other precipitation.
To ensure a tight fit of the rafter legs to the mauerlat, it is necessary to make cutouts in the rafters for the base beam. The pitch for placing the rafters is selected based on the width of the insulation roll. The rafters are secured with nails (10 cm).
Stage 3 - Installation of sheathing
Now you need to fill the sheathing boards across the rafters. As a rule, small cross-section beams (up to 5 cm) are used for it. The sheathing pitch depends on. For example, when using rolled roofing materials, it is recommended to make the sheathing continuous. Installation of the sheathing is also carried out using nails (10 cm).
Stage 4 - Creating a roofing pie
At this stage, the main thing is to correctly follow the sequence of laying hydro-, steam- and heat-insulating materials. So, a waterproofing layer is laid on the sheathing, and steam and heat insulators are mounted with inside roof (thermal insulation is adjacent to the sheathing, which is covered with waterproofing material on top). It turns out that the thermal insulation is closed between layers of vapor and water insulators.
 Scheme of waterproofing and insulation of a pitched roof
 The sequence of work performed is recommended as follows. First of all, insulation is laid, which is most often used mineral wool. The insulation is laid between the rafters. Sometimes it is advisable to use a two-layer insulation layer, creating a heat-insulating layer about 10 cm thick. This will make the degree of heat and sound insulation of the attic space greater. At the second stage, the vapor barrier film is installed.
Place it from the side interior space and, pulling, fasten with construction staples to the rafters using a stapler.
Such a layer will prevent steam from penetrating the thermal insulation layer, while keeping it always dry. This will help extend the life of the insulation and will not change it thermal insulation characteristics. Further, all roofing work will be carried out on the outside of a private house.
 Installation of corrugated sheeting on a pitched roof
 Let's start laying the waterproofing membrane. The peculiarities of its structure are such that it will not allow moisture from the outside to get onto the insulation layer, but at the same time, vapors from the heat-insulating layer will escape outside. The waterproofing is attached in the same way as a vapor barrier film. Finally, a pitched roof requires the installation of a finishing coating and drainage.


