Russian bathhouse is very good for health. The fundamental point in its construction is well-equipped ventilation in the bathhouse in the steam room. This room usually has very high temperature and humidity. Properly organized air circulation is a necessary condition.
Often, many homeowners doubt whether ventilation is needed in a steam room. The proposed material will allow you to correctly answer this question and solve all problems with arranging ventilation without much difficulty and without significant material costs.
Ventilation in the steam room is necessary for air circulation
Why is ventilation needed in a steam room?
Proper ventilation of a steam room helps solve the following problems:
- maintaining a comfortable indoor temperature;
- health safety;
- preservation of wood used for interior decoration steam room
 Ventilation vents in the steam room help regulate the temperature and keep the wood from dampness and fungus longer.
 If the ventilation of the steam room in a Russian bath is not arranged correctly, the appearance of such negative factors as:
- rapid cooling of heated air;
- accumulation of gases during procedures;
- premature rotting of finishing materials;
- the appearance of harmful microbes, bacteria, mold, fungi;
- bad smell.
The proposed material will describe in detail what properly organized ventilation should be like in a steam room in a bathhouse; video and photo materials will clearly illustrate all the key points.
Basic principles of steam room ventilation
A specific ventilation arrangement scheme is usually selected taking into account the architectural features of the building itself, size, number of rooms, etc. In this case, it is necessary to strictly observe the basic principles of arranging ventilation systems for steam rooms in Russian baths. If they are violated, various negative phenomena may arise that pose a serious threat to the health and life of vacationers.

The inlet for supplying fresh air is located slightly above floor level. To ensure that the incoming air is immediately warmed up, the inlet is located in close proximity to the furnace.
The outlet for used air is located under the ceiling. The main thing is that the air inlet and outlet be arranged on opposite walls.
Important! Under no circumstances should these holes be placed at the same level! Air in internal space will not circulate fully. There will be a temperature difference that poses a serious health hazard.
The dimensions of the inlet and outlet holes must be identical. They are selected depending on the dimensions of the internal space of the steam room. For 1 cu. m of air, a pipe diameter of 24 cm is required. If necessary, additional air vents may be installed.
The ventilation of the steam room is arranged in such a way that the exhaust air is completely replaced every 3-4 hours. This is required by sanitary and fire safety standards.
 The ventilation hole in the bathhouse is equipped with valves to regulate the air flow
 The ventilation device in the steam room of the bath requires the mandatory placement of a valve system. You can use special blinds for this. This will allow you to regulate the volume of air in and out. If necessary, the bath can be heated or cooled very quickly and without much difficulty.
You need to think about how to make ventilation in the steam room of a bathhouse when drawing up a project. This will allow you to correctly place all ventilation pipes, openings, etc. during construction. This will allow you to properly equip the mines, lay pipes and perform all other work. Set up an air circulation system after completion construction work it will be much more difficult.
 Before building a bathhouse, it is necessary to consider the location of the ventilation ducts in the bathhouse.
 Types of ventilation systems for steam rooms
Ventilation in the bathhouse in the steam room (see photo) is used in 3 types - natural, forced (i.e. mechanical) and combined. The choice of a specific system is made taking into account factors such as:
- the size of the steam room and the dimensions of the building as a whole;
- it is possible to correctly place exhaust pipes;
- the material from which the bathhouse is built;
- use of the sauna all year round or only during the summer season.
Warm air lighter than cold. Therefore, with properly equipped ventilation in the bathhouse in the steam room, the heated flows rise to the ceiling and are gradually drawn out through vent. Air coming from outside is immediately heated by the stove and passes into the room without creating a temperature difference. This is the basic principle by which ventilation works in a steam room.
Natural ventilation
The natural ventilation system provides air exchange due to different levels of pressure and temperature in the internal space (in the steam room) and outside, i.e. on the street. When exhaust air exits through the outlet, the internal atmosphere in the room is discharged, creating conditions for drawing in cold air through the lower inlet. In this case, you need to pay special attention to the insulation of the bath. Otherwise, high-quality heating will not work.

Natural ventilation in the steam room in frame bath used most often for small buildings built from breathable material, i.e. wood. Additional elements ventilation system in this case, small gaps appear in the log walls. The main advantage of natural ventilation is its low cost.
Forced and combined ventilation
Mechanical or coercive system ventilation in a steam room may be necessary if:
- the total area of the bathhouse is large;
- the structure was erected from brick, cinder blocks, stone;
- the steam compartment is very large;
- exhaust pipes cannot be placed correctly;
- increased power oven.
Forced ventilation Do-it-yourself steam baths can be installed without any problems. The following are used:
- fans;
- supply valves;
- deflectors.
 Forced ventilation in the bathhouse is suitable for large rooms
 Nuance! The ventilation system in a bathhouse in a steam room heated by a gas water heater requires the installation of a separate ventilation duct.
The combined ventilation system is equipped using elements of both systems described above. Fresh air comes in naturally, i.e. through the lower input. Extraction of exhaust air masses is ensured by mechanical devices.

How to choose a fan for a steam room
Classic fan channel type Not suitable for a steam room. High temperatures and humidity are detrimental to such devices. Special fans are used in the steam room. The material for their manufacture is glass-filled polyamide. Such models are resistant to moisture and can withstand temperatures up to 130°C.
 Glass-filled polyamide is an ideal material for making steam room fans
 The fan model is selected in accordance with the technical characteristics.
Something to remember! Ordinary room fans can only be used for final drying and ventilation of the steam room after taking procedures and subsequent cleaning.
If you have the funds, you can install a self-regulating system for ventilation in the steam room. This device will automatically provide air inflow and outflow, temperature, and humidity level. It is advisable to purchase such systems only from trusted manufacturers.

Basic schemes
What ventilation can be like in a steam room in a bathhouse, the diagram, video and other materials attached below will clearly show. You just need to choose 1 of the 4 attached options and correctly complete all the necessary work.
According to diagram A, the inlet for fresh air is located below the stove. The outlet channel is mounted on the directly opposite wall under the ceiling.
The exhaust pipe is installed vertically. Its length is calculated so that the upper edge of the pipe rises slightly above the ridge of the roof. This will ensure normal functioning of the ventilation system during periods of strong winds.
 Diagram A of the location of ventilation in the bathhouse
 Properly selected dimensions of air exhaust pipes will ensure natural circulation of air masses. Additional adjustment is provided by installing dampers.
The use of scheme B is intended only if only 1 of the walls of the steam room can be used for ventilation. Air openings are located opposite the heater. The inlet hole is raised 30 cm from the finished floor. The exit window is lowered 20 cm from the ceiling covering.
 Diagram B Location of ventilation ducts opposite the heater
 The air passing through the lower inlet is heated by the furnace and rises upward in the direction of the air outlet. Mechanical pulling devices are required for the system to function properly.
According to scheme C, it is possible to provide ventilation not only for the steam room, but also for the underground space. The inlet hole is installed in the wall behind the heater. It needs to be raised above the finished floor by 20 cm.
 Diagram C with air flow under the bathhouse floor
 The heated supply air passes into the base through the cracks of the leaking floor. Then it returns to the steam room and moves towards the exhaust hole. From here the exhaust air masses come out.
For a constantly used bathhouse, you can use ventilation according to scheme D. In this case, the inlet hole is located at the bottom, but opposite the stove, and not behind it, as in other options. The height above the floor is 20 cm. Exhaust air is extracted using a blower and a chimney.
In order for the ventilation in the steam room to work effectively, it is necessary to choose the right location for the heater. It is most convenient to arrange it inside the paired compartment. If the stove is placed in an adjacent room, the efficiency of using the ventilation system and the heater itself will be noticeably lower.

Preparatory work
To install ventilation in the steam room, you need to prepare the following materials:
- brick and/or stone;
- cement and sand;
- ventilation ducts;
- ready-made valves or material for their manufacture;
- metal sheet;
- lining for lining the box;
- fastening materials - nails, screws, self-tapping screws.
To work you will need the following tools:
- hacksaw;
- Bulgarian;
- hammer;
- screwdriver;
- tape measure, level, plumb line;
- construction mixer;
- drill or hammer drill;
- set of spatulas;
- container for mixing the solution;
- technical knife;
It is better to carry out the work in special clothing. If necessary, use gloves and a respirator.
Installation of supply ventilation
The inlet channel for supplying fresh air is located in close proximity to the firebox of the sauna stove. It is advisable that the inlet hole be located above a sheet of metal sheathing that protects the wood from accidental ingress of small coals.

First, you need to make a box from a suitable material. Its dimensions should exceed the dimensions of the chimney by about 20%. The outer opening of the box is located on external wall. It is not advisable to place it in the base.
If the firebox is located in the steam room itself, a convection box is additionally installed. Near the wall in which the air inlet is located, you need to lay out a podium of bricks placed “on edge”. They are laid out in 3 rows - under the wall, in the middle and on the edge.
The masonry for the stove is built to a height of 25 cm. It must be brought up to the brick screen and must be covered. To ensure that the newly incoming air passes directly into the oven, it is better not to lay the last 2 bricks. The end is lined with brick.
The convection box is installed completely. A blower is equipped at the end. A protective underlay is placed underneath to protect the floor covering.

When the podium is completely ready, you can start installing the stove. To distribute the load evenly, it is advisable to use a metal corner.
After final installation, a stone or brickwork. To form a gap, it is moved 5-6 cm from the stove. Next, a special screen is installed. You need to form holes in it for the passage of hot air.
Installation of exhaust ventilation
The outflow box is installed diametrically opposite to the inlet hole. It is raised above the finished floor by 30 cm. The internal area of the box is approximately 1.25 m².
The outflow box is led through the wall to the ceiling and an external outlet is arranged for it. You can exhaust exhaust air into an adjacent room. In this way it will be possible to warm it up without extra costs.
 Exhaust ventilation can be placed on top of the ceiling
 To avoid accidental burns, the chimney duct must be lined with a brick or stone casing. In this case, a special hole with a door must be left at the bottom, which will serve as an ash pit. An additional hole equipped on top will allow the chimney to be used as a heat pump, this will create both heating of the room and proper air circulation.
How to ventilate a Russian bathhouse
Correct ventilation in the steam room of a Russian bath does not involve the use of any mechanical devices. Otherwise, the heated air will be vented outside very quickly. Efficiency and pleasure bath procedures will decrease significantly.
 Used in a Russian bath natural ventilation, where the air outflow is through the window
 Therefore, the Russian bathhouse must be thoroughly cleaned, ventilated and dried after each use. For ventilation, a special window is installed in the wall located opposite the door. You can use a mechanical hood. The door must be kept open when ventilating.
Leaves from brooms and random objects must be removed from the floors. Then you need to wash all surfaces and dry them with towels and/or a special absorbent cloth. This will protect against the formation of mold and the proliferation of harmful microorganisms. After cleaning, airing and drying, the steam room is ready for further use.
 The steam room in the Russian bath is combined with a washing room, so it needs to be dried after each use
 How to warm up a Russian bath
First you need to light the oven. The outlet openings must be kept closed. Only the input is opened.
Having warmed the room to the desired temperature, you need to open the valve of the lower air outlet pipe. This will ensure proper air circulation. The temperature will not drop.
 In order to warm up the oven, you need to open the valve in the Russian bath oven
 Passing into the box from below, the heated air will gradually displace cool air masses to the outlet. When passing through the box they will provide additional heating of the room. At the same time, ventilation of the steam room will also take place.
If the ventilation is not working properly
When using the steam room, it is necessary to periodically check the serviceability of the ventilation system. With good air circulation in the steam room, it is always easy to breathe, the body is heated evenly, the temperature and humidity are maintained at the required level.
If the ventilation in the steam room was installed incorrectly or became unusable over time, signs such as:
- abundant condensation on vertical surfaces;
- mold, especially in the corners;
- noxious odor;
- uneven air heating;
- drafts;
- slow setting of the required temperature;
- excessively rapid heat loss;
- an unpleasant internal atmosphere that makes breathing difficult.
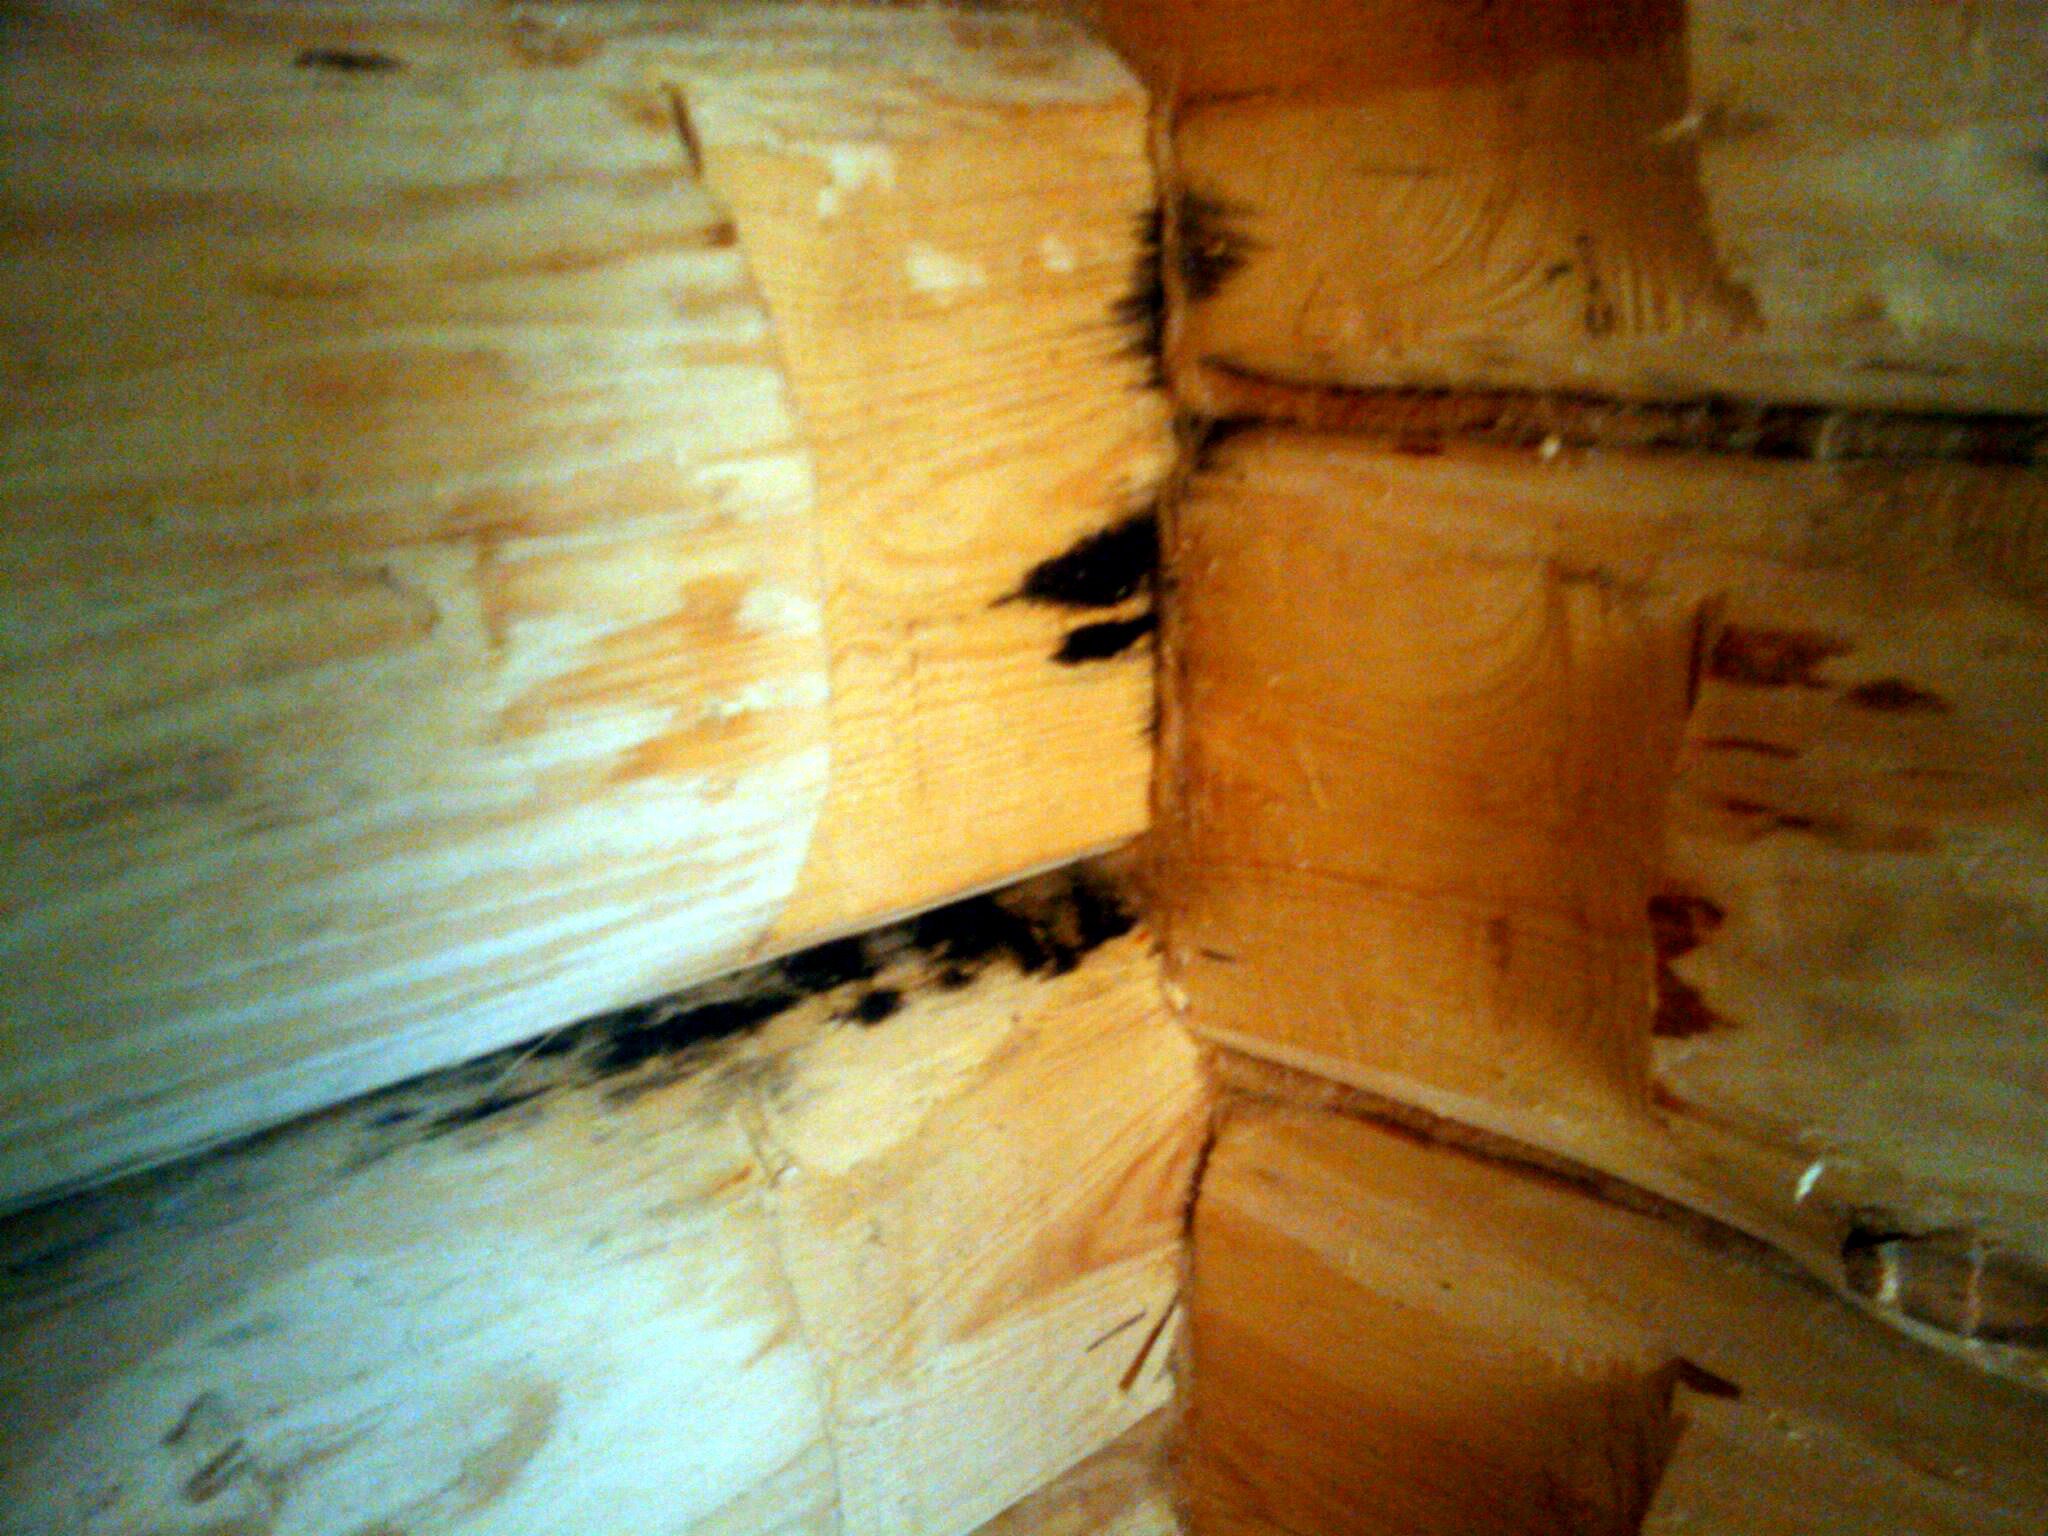 Mold in the steam room indicates a lack of ventilation
 If at least 1 or 2 of the above factors are present, it means that the ventilation in the steam room is not arranged correctly. Another option is clogging and/or damage to the system, the need for urgent repairs and/or thorough cleaning of individual elements or the ventilation system as a whole.
 Clogged ventilation ducts interfere with its operation
 From all of the above, it becomes clear that properly ventilating a steam room in a bathhouse is inexpensive and not very difficult. However, this requires careful adherence to all technologies. The attached video “How to make ventilation in a steam room in a bathhouse” will help you avoid mistakes.
The operating temperature of bath rooms is very different from the microclimate of ordinary living rooms. Accordingly, more stringent requirements are put forward for air exchange inside the steam room. This guide discusses the traditional method of how to properly make ventilation in a bathhouse built with your own hands from any materials - timber, logs or foam blocks.
Why do you need ventilation in bath rooms?
During the washing process, the air inside the sauna is heated and saturated with moisture. The higher the temperature in the steam room and washing room, the more water vapor the air can absorb. At the end of the bath procedures, the building cools down and the contained moisture begins to condense on everyone wooden surfaces, provoking the formation of mold and mildew.
The inflow and exhaust in the bath are designed to solve 3 problems:
- Renewal of the air environment during washing in accordance with the requirements of sanitary standards.
- Removal excess moisture from premises, drying wood.
- Creating a circulation of moist air in the steam room.
The last point requires clarification. When you steam in a heated Russian bathhouse and add a parka, hot, humidified air rises to the ceiling. A properly designed hood removes cooling air masses, resulting in circular flows that equalize the temperature throughout the entire height of the room. Without ventilation, the lower zone of the steam room will remain cold.
Reference. The physical processes occurring in the Russian and Finnish baths are almost the same. The difference lies in the temperature and degree of air humidification. In the first case, the temperature reaches 70-80 degrees, humidity - up to 70%, in the second - 100 ° C and 30%, respectively (the so-called dry steam).
In the washing room, rest room and dressing room, regular ventilation is needed to renew air environment. For gas operation, an additional inflow is provided to ensure combustion.
Universal air exchange scheme
The classic option is considered the most economical and efficient - natural ventilation in the steam room, shown in the diagram. The main system for washing operates as follows:
- The inflow is organized through a gap of 2-3 cm under the entrance door, into which heated air penetrates from the adjacent room.
- Receiving a dose of heat from the stove and becoming saturated with steam, the hot air mass rises to the ceiling.
- Cooling from contact with surfaces and people, the air descends into lower zone, from where it is removed through an exhaust grille and a separate channel located in the opposite corner.
- The inflow volume is regulated by a valve installed on the exhaust outlet.

An important nuance. Hot humid air is much lighter than cold dry air, so exhaust is provided from the bottom of the steam room. If you make a ventilation hole near the ceiling, the lion's share of the heat will go outside, making the microclimate in the area of the shelves uncomfortable.
An expert will tell you how a bathhouse ventilation system should work in his video:
An auxiliary hood located near the ceiling is designed to ventilate and dry the steam room at the end of the bathing procedures. During washing, the hole is tightly closed with a valve. Instead of an exhaust opening, it is allowed to use ceiling diffusers or a regular swinging window.
Let's consider several alternative steam room ventilation schemes presented in the picture below:
- The inflow is supplied directly from the street through a hole made near the stove. From contact with a hot surface, the air instantly warms up, circulates through the steam room and escapes through a vertical box to the outside.
- A similar scheme with heating the influent at the stove, the exhaust is organized through a hidden channel under wooden flooring. In a steam room with a concrete floor, such a solution is difficult to implement.
- Role exhaust duct plays stove chimney, which a priori has good traction.

Note. The indicated schemes are used in certain conditions - when air is supplied from the street, exhausted through the floors, or when the firebox is placed inside the steam room.
In other rooms, the ventilation arrangement is simpler - the exhaust is provided in the upper zone, the inflow is supplied to the lower zone. Moreover, in winter, fresh air must be heated or first passed through the dressing room so that the steam room does not feel cold. To clean and heat the street flow, it is advisable to use local air supply units with forced air injection.

Option for returning air to the shower room through a vertical duct and an overflow grille
Selecting suitable materials
The very idea of a Russian or Finnish bath involves the use of environmentally friendly pure materials and corresponding heating equipment. If you, application polymer insulation, glass wool and various plastic elements are not allowed.
To install ventilation in a bathhouse (especially in a steam room) with your own hands, it is recommended to purchase the following materials:
- air ducts made of galvanized steel or wooden boxes;
- grilles, valves and diffusers - made of wood or painted metal;
- sealing pipes leading into the wall - tow, moss, jute;
- fans are made of special plastic, with an increased degree of electrical protection from moisture.

Advice. Try to use as little as possible in the steam room. metal elements. If you reach a temperature of 80-100 °C, the parts will become very hot and can burn you if you accidentally touch them.
It is strictly not recommended to make ventilation from a plastic pipe inside the steam room. When heated to 100 degrees, the polymer begins to lose stability and releases harmful substances. In a good way, you can’t install fans in the steam room either, and there’s no reason to.
Forced exhaust creates a powerful flow of air, entraining a large amount of heat; the oven will run idle. For drying a bath, a fan is also not a panacea - just open the window and front door, organizing a draft. Injection is appropriate in one case - when it works air supply unit heated.
Ideally, ventilation is designed and installed at the construction stage of the bathhouse. The placement of air ducts is thought out in advance, the furnace model and air exchange scheme are selected. The best option for the main hood is through the floors into a side vertical channel; a more economical option is a grille or diffuser in the wall.

Important point. A common mistake occurs when the owner properly arranges the hood, forgets about the inflow and gets a disastrous result - mold in the corners. Remember: no replacement with fresh air exhaust ventilation won't work. Installing a suction fan will not solve the problem either.
When installing ventilation, we suggest following simple recommendations:

If a sauna with a steam room has already been built, the ventilation duct can be brought outside through the wall and raised to a height of 3-4 m next to the chimney. It is advisable to insulate the pipe, otherwise you will have to deal with condensation. How best to organize the ventilation of bath rooms, watch the video:
Related posts:

In order for bath procedures to bring only benefit and pleasure, two conditions are necessary:
- high level of temperature and humidity in the steam room;
- the presence of sufficient oxygen.
These seemingly mutually exclusive tasks are solved by ventilation in the bathhouse in general and in the steam room in particular. Despite the fact that high humidity and temperature must be maintained in the steam room of a Russian bath, it is impossible to do without access to fresh (cold) air: oxygen is processed by our lungs, partially burned out by the stove, and also gradually accumulates in the steam room carbon monoxide(CO - chemical formula carbon monoxide).
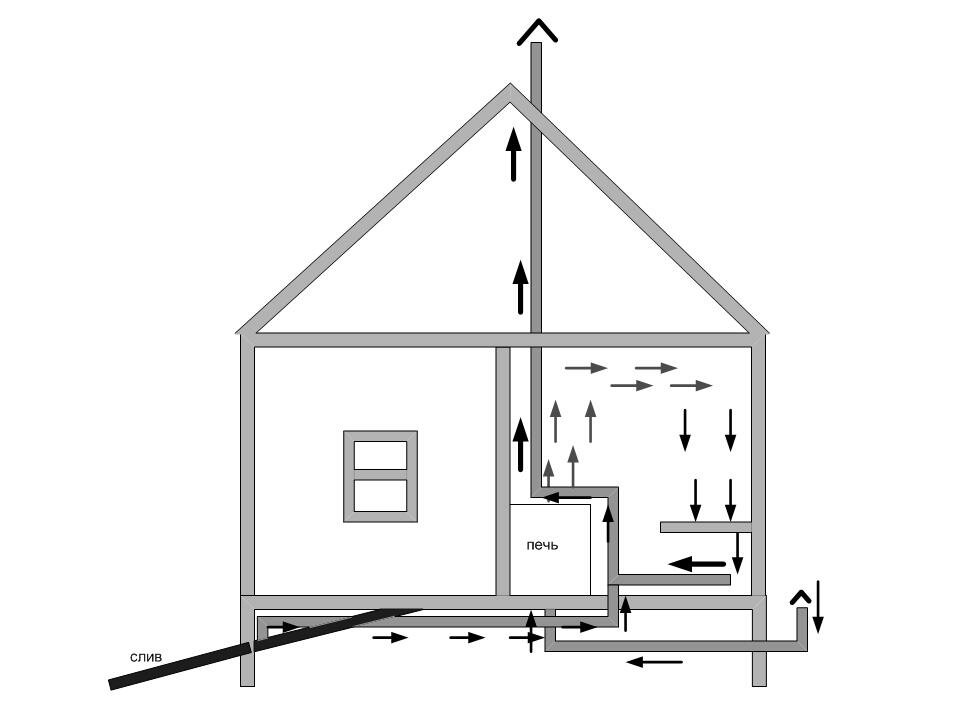
How to properly ventilate a bathhouse. In the figure, red arrows show the movement of hot air, blue arrows show cold air.
If you do not organize the replacement of “exhausted” air with fresh air, instead of improving health and increasing efficiency (this is what we go to the bathhouse for), you can get best case scenario lethargy, weakness and headache, and in the worst case – a hospital bed or even a place in a cemetery.
Properly arranged ventilation ensures air circulation, while oxygen is supplied in sufficient quantities, and carbon monoxide and carbon monoxide are released into the atmosphere. After completing the bath procedures, with good ventilation, the vapor is actively removed outside the building, and rooms that previously had high humidity dry out. If this aspect has not been given enough attention, after a couple of years in the steam room, and then in other rooms, the lining rots, the smell of mustiness and sweat appears and gradually intensifies, and the wood turns into dust. Now, I hope, it is clear whether ventilation is needed in the bathhouse...
 Warming up and ventilating the bath. Please note that the exhaust hole is located at a small height from the floor - as a rule, no higher than 50 cm. With this scheme, exhaust steam is released into the atmosphere. Moreover, the floor in the steam room warms up well
 Ventilation in a bathhouse is not needed only in one case: if it is all built of wood and has not been insulated anywhere - neither from the inside nor from the outside. In this case, air exchange occurs due to the fact that the wood “breathes”. In this case, they also talk about the presence of natural ventilation in the bathhouse: any wood has pores and cracks through which air flows out/flows and temperature and humidity are regulated. But if the bathhouse is made of rounded logs or has insulation or moisture/steam insulation, then the creation of additional ventilation holes is necessary.
There are three types of ventilation:
- Mechanical ventilation. In this case, the inflow and outflow of air masses occurs due to artificially created air movement. Air parameters are controlled by technical means.
- Natural ventilation: circulation occurs due to the difference in pressure inside and outside the room. This method is only possible if there are “breathing” walls or thoughtfully arranged ventilation vents.
- Combined ventilation: simultaneous use of the natural movement of air masses and technical devices (in the simplest case, fans).
The video below shows the combined ventilation option.
In a specific case, during construction ventilation duct 100 micron thick aluminum foil was used.
Ventilation device in baths
In the very simple version, the ventilation system of a steam room or bathhouse consists of two (sometimes more) openings in the walls and/or foundation: supply and exhaust. The trick is in choosing the location of these holes and their sizes. Sometimes, to ensure more active air exchange, fans can be installed.
 Warming up and ventilating the bath. In the simplest case, the exhaust vent is located near the ceiling
 There is no single ventilation scheme for a bathhouse: they are too different, depending on design features, and the materials from which they are made. But there are general rules and several of the most common schemes, following which you can choose the optimal ventilation specifically for your case.
The size of the ventilation holes is calculated based on the volume of the steam room: per cubic meter of ventilated area, the size of the holes should be 24 cm 2.
Despite the fact that the main task in the bathhouse is to maintain high humidity in the steam room and a sufficient temperature level, you cannot make the ventilation holes too small: they will not provide the necessary level of air exchange. Exhaust ventilation openings must correspond to the size of the supply ventilation openings: if the proportions are not correct, the air exchange will also be insufficient. In some cases, to speed up the removal of exhaust air and speed up the drying of the bath, you can make two exhaust holes.

To ensure the required air conditions when heating the steam room, special covers/plugs are made on the ventilation ducts, which can be opened/closed from the steam room, thereby regulating the humidity/temperature/air exchange. Generally speaking, the presence of plugs or covers on any ventilation hole facing the street is mandatory: in winter, cold air actively tends to warm room and the presence of covers or regulators to delay it is necessary.
Where can there be supply and exhaust openings?
Most often, it is at least partially located in the steam room. In this case, the supply hole is made near the stove at a distance no higher than 30 cm from the floor. The incoming cold air quickly heats up from the stove and rises. It's quite popular, but not the most best way organizing ventilation for the bathhouse. Ventilation is much more effective when the supply openings are located in the foundation under the floor (to prevent rodents from entering through them, the openings are equipped with metal gratings). This option solves two problems at once: it delivers fresh air to the bathhouse, and also effectively dries the floors and walls after completing the procedures. The floor boards, in this case, are not laid closely, but with a small gap for free passage of air. If you don’t want to leave gaps in the floor (although this is very good for a bathhouse), you can make several ventilation holes in the floor, closed wooden gratings. In this case, the air movement will not be so active; more powerful fans may be needed, but the circuit will remain operational.

When planning supply ventilation holes in the foundation, keep in mind that air into the bathhouse should come from the street, and not from the underground, otherwise it will have a musty smell. To organize air intake from the street, a box made of wood (often homemade), plastic or metal (ready-made) is placed in the hole, and it is also taken out near the stove. Typically, the inlet openings are located in an area that is protected by a metal or asbestos sheet from coals and firebrands.
Ventilation holes in the foundation are provided at the planning stage. If the foundation is already ready, but there are no holes for ventilation, you can ventilate the floor in the steam room differently: lay the floor boards on the joists, but not close to each other, but with a gap of 0.5-1 cm. In the gap between the rough (earth/concrete) floor and the finishing floor, an outlet is arranged, which goes into a ventilation pipe that discharges exhaust air to the roof (but not to the attic). This option provides for the presence of only one supply hole, which is usually located below the heater. The exhaust pipe under the floor is installed on the opposite side of the room (but not opposite, but diagonally).
Making an exhaust pipe in a steam room from plastic boxes for ventilation it is not possible - they cannot withstand high temperatures, but it is permissible to use them in the locker room or washing department.
With this ventilation scheme in the steam room, cold air warms up near the stove, rises, then, cooling, falls down, seeps under the floor through cracks in the floor and is discharged through the outlet pipe. These two options effectively remove moisture after a bath; they can also be considered floor ventilation schemes in a bath.

The exhaust openings can be located on the wall opposite the supply opening (if both of these walls face the street) or on the same wall, but in the opposite corner. There is a scheme in which they are located at the top on the wall opposite (30 cm from the ceiling), sometimes they are located at the bottom (30 cm from the floor). If the exhaust vent is located below or on the same wall as the supply vent, a fan is needed to create air flow.
To ensure that ventilation in the bathhouse remains effective, you must not:
- make ventilation vents smaller than the calculated ones;
- place the supply and exhaust openings one opposite the other - this way the incoming air is removed almost immediately without giving up oxygen, a draft is formed, which is contraindicated for a bath.
Steam room ventilation schemes
Let's consider several of the most common ventilation options in a steam room:


These are the most commonly used ventilation schemes for steam rooms in a bath; there are many more variations and combinations of them. Based on these four options for organizing ventilation, you can develop a scheme for your steam room.
Ventilation in the washing compartment of the bathhouse
In a washing room, high humidity is common, and to prevent the lining from rotting or creating an unpleasant odor, it is necessary to provide ventilation for the floors. It is arranged similarly to floor ventilation in a steam room: an exhaust hole is made between the rough and finished floors, which can be equipped with a fan. The exhaust pipe leads to the roof.
With this floor ventilation scheme in the washing compartment, the coldest exhaust air is removed, and warmer air from the upper layers is lowered in its place. Thus, an increase in the comfort of the people staying here is also achieved.

The principle of ventilation in all other rooms of the bathhouse is the same. We need to decide on optimal system ventilation specifically for your conditions and select/develop the most suitable scheme. Ventilation in the washing compartment differs only in that due to more low temperatures air, you can use plastic ventilation ducts here (which you cannot do in a steam room) and you can install fans that are not heat-resistant, but only those that can withstand high humidity (moisture-proof).
Ventilation of brick and Turkish baths
When planning a ventilation system for brick bath It must be taken into account that its efficiency should be several times higher than that of wood. Indeed, in this case, you will have to dry not only the inner lining of the steam room/washing room/locker room, but also the walls: brick is a very hygroscopic material. To remove all moisture, it is necessary that the inflow/outflow of air during drying be very active, and the vents have reliable dampers that allow you to regulate the intensity of air movement.
When installing ventilation with its 100% humidity, exhaust ventilation must also be very effective: in an hour of operation it is necessary to ensure a six-fold change of air in the room. In addition, it is necessary to provide for the possibility of removing condensate, which forms during cooling in large quantities. This problem can be solved in two ways: install an air dryer in the pipe, which discharges condensate into the sewer system, or provide ventilation pipe a channel for draining condensate (it also goes into the sewer).
Conclusion: it is necessary to plan ventilation at the bathhouse design stage, placing inlet vents in the foundation. If necessary, you can make vents in finished walls, but this is quite troublesome and complicated.
Ventilation is needed in all rooms; the rules for its installation are prescribed in SNiP 41–01–2003. But they apply only to residential, public and industrial premises in which conditions favorable for humans are created. It is taken into account that people stay in such premises for a long period of time and the same standard microclimate and air quality indicators must be created for everyone.
Baths have completely different tasks; they create a microclimate that is stressful for the body - high temperatures (in Russian baths up to +60°C, in saunas more than +100°C) and high air humidity (up to 90%). Moreover, in one room, temperature and humidity indicators should vary within wide limits depending on the wishes of those being washed. Changes in microclimate parameters should be carried out as quickly as possible, and the achieved values should be maintained for a relatively long period of time. And another very important difference between a bathhouse and ordinary premises. If, secondly, people have the opportunity to “protect themselves” from temporary inconveniences with clothing, then this is impossible to do in bathhouses.


Illustration of the microclimate in a steam room - high temperature and hot steam
Based on these features, the ventilation of baths must fulfill individual tasks, and this affects the principles of its design and operating features. Ventilation in a bathhouse can be natural or forced; each type has its own characteristics, characteristics, advantages and disadvantages. In this article we will talk in detail about only one type of ventilation – natural.

We have already found out the tasks of bathhouse ventilation and how it differs from the ventilation of other rooms; now it’s time to tell you how they can be achieved. The methods depend on the architectural features of the room and your preferences.
First you need to remember your physics lessons from school. Ventilation of rooms occurs due to the difference in air density outside and indoors. Heated air has less weight and rises, cold air is heavier and sinks down, so-called convection occurs. Accordingly, in order for the room to be ventilated, hot air must be able to leave and cold air must be able to enter; inlet and outlet openings are needed. These can be ordinary cracks in windows and doors or specially made ventilation holes.


On the Internet you can find statements that these holes must have the same dimensions, otherwise the ventilation does not work or “blows in the wrong direction.” Only those who skipped classes can say that. The ratio of the sizes of air inlet and outlet does not affect the performance of ventilation in any way.

Square ventilation window
If the outlet, for example, can release only 1 m3 of warm air per hour, then exactly the same amount of cold air will enter the room, no matter what the size of the inlet, and vice versa. And the reverse draft effect occurs in the case of wind pressure or in the complete absence of fresh air. In the first case, a strong external wind “drives” the air into the room; in the second case, after the air leaves the room, a small vacuum is formed, which draws the air back into the room. This is not to say that ventilation is completely absent, it just becomes cyclical and works on a “back and forth” principle. Of course, the efficiency of such ventilation approaches zero; the air moves a little only near the holes.

And these phenomena are clear, now let’s look at specific types of natural ventilation of the bathhouse. Let's start with the simplest ones and end with the more complex ones.
The simplest, but also the least effective way ventilation.

In the steam room, a door opens or a door and a window open at the same time - ventilation occurs quickly, but not as we would like. Why?
Steam is removed from the bath, and this has negative consequences.
- Firstly, if you open the door, the steam does not escape to the street, but to other rooms. The humidity in them increases sharply, the heated steam immediately condenses on all surfaces. There is no need to explain what can happen next.

- Secondly. A decrease in temperature in a steam room is only a subjective phenomenon. There are two concepts of temperature - actual and perceived. Actual temperature is a physical indicator, perceived temperature is subjective. We feel the same actual temperature differently depending on surrounding factors. High humidity “increases” the temperature we feel, while strong wind lowers it. So, through simple ventilation it is possible to remove only excess steam, and the actual air temperature returns to its previous values within a few minutes.

- Thirdly, ventilation will never be able to establish stable microclimate indicators in the room. As soon as the doors close, the temperature and humidity rise sharply; as soon as the doors open, the humidity and temperature also drop sharply.

The result is that ventilation is not a ventilation method that should be used constantly. This is a last resort; it is recommended to resort to it only in case of urgent need.

This method can be considered more successful, but it is only possible in one case - the firebox of the sauna stove is located in the steam room. Warm air is removed through the firebox and chimney; entry can occur through floor cracks, a slightly open window or door. Sometimes at the bottom door leaf a special hole is made, to improve the design it is covered with a decorative lattice.

Advantages of ventilating a bathhouse with a stove.
- Ease of execution. There is no need to make special vents in the log house. Any additional hole in wooden wall doesn't improve it performance characteristics, and that's putting it mildly. If mistakes were made during the process of making vents and installing decorative grilles, then the risk of moisture getting on the crowns of the log house increases. It will take a very long time for moisture to dry out, and prolonged exposure of wooden structures in a wet state has an extremely negative effect on their strength and durability of use.

- Possibility of adjusting the frequency of air exchange in the room. Ventilation is “controlled” by a damper and stove doors. You need to speed it up - the gate and the firebox door open all the way, the temperature has become favorable - the gate closes a little. You can easily find the optimal position of the damper, the microclimate in the steam room is stabilized, the ventilation rate of the room has stable values.

Furnace with gate - photo
- Versatility of use. It doesn’t matter what materials the bathhouse is built from, what its dimensions and architectural features. In addition, this system allows for simple upgrades. For example, it is worth making an inlet hole behind the stove and the air entering the bathhouse will be slightly warmed up. The chimney still serves as the hood.

There are, of course, disadvantages, let’s name the main ones.
- Insufficient performance. It will not be possible to quickly change the temperature or humidity in the steam room.
- Presence of “dead” zones. Air mixing throughout the entire volume does not occur; zones with drafts and zones with standing air appear.
- Dependence of draft (ventilation) on weather conditions.
Despite some disadvantages, this method of ventilation in combination with ordinary ventilation is very often used in “budget” options for baths.

For a budget steam room best option– oven ventilation and ventilation

Ventilating a bathhouse with a stove - diagram
The optimal ventilation device for most baths.

Advantages:

Important. It is advisable to consider the ventilation device before starting the construction of the bathhouse. Solve issues with specific hole placement and their overall dimensions. We advise you to make the height of the vents no more than the height of the beam, and adjust the holes to make them smaller by length.


Prices for bath fans
bath fan
Why is it best to provide ventilation at the construction stage?
- Firstly, making holes in an already finished building is much more physically difficult.

Drilling a hole in a log house is a labor-intensive process
- Secondly, there is a risk that the hole will hit the dowel, especially for the upper outlet vent. It is located in close proximity to the Mauerlats rafter system, and they are fixed more often than ordinary crowns and only metal rods or pieces of building reinforcement are used as dowels.

- Thirdly, if you make a hole with a metal crown, then the expensive tool will fail after “meeting” the dowel. And it will not always be possible to “reanimate” a chisel or chisel after attempts to cut through metal.

- Fourthly, the metal dowel in this place is almost impossible to cut off. You can’t get close with a grinder, you can’t use a hacksaw for metal, and you wouldn’t wish it on your enemy to cut with a file. We'll have to blow the air in another place. And who needs an extra hole in the wall of the bathhouse or an increase in its size? Moreover, if you have already made holes in the outer and inner cladding to fit its “planned” dimensions and bought ventilation grilles. A “meeting” with a metal dowel is a very unpleasant situation from all points of view.
Ventilation duct placement options and sizes
For all natural ventilation products there are several general rules. First, in order to improve the efficiency of the system, the cold air supply openings should be located below about 20 centimeters from the floor level. Exit openings should be located on maximum height- under the ceiling or on the ceiling. Secondly, the mixing of different layers of air in the volume of the steam room is improved if the inlet and outlet openings are located at the maximum distance from each other, preferably along the diagonal of the room. In what places is it recommended to install them?

It can be done at the bottom of the steam room door leaf.


Advantages - there is no need to make an extra hole in the wall of the bathhouse. This saves time and effort, and also eliminates the possibility of getting wet. lower crowns log house Disadvantage - in most cases, the doors are located opposite the shelves for bathing procedures; cold air flows appear, creating a number of inconveniences.
Under the shelf.

Advantages - the inlet is invisible, the flow of cold air mixes well with warm air throughout the entire volume. Disadvantage: Access to the grille for opening/closing the damper becomes more difficult. If during washing you can regulate the intensity of ventilation only using the top grill, then after ventilating the baths you need to close both. This means that after some time you will have to visit the steam room specifically to close the vent.
Important. The dampers on the ventilation openings must be installed, two per each - outside and inside the steam room. After ventilation, both baths should be closed. Choose a technology for installing grilles that guarantees complete tightness of the external dampers. It is strictly forbidden to enter atmospheric moisture on the crowns of the log house.
Behind the stove.

Inlet opening behind the stove - diagram
Most best option. Cold air from the street hits the stove, warms up a little and breaks into several separate flows with low speed. Drafts are completely eliminated. Disadvantages - it is not always possible to install decorative grilles in this place. If the stove is close to the wall, then the high temperature negatively affects plastic or wooden materials decorative lattice. In addition, according to safety regulations, such places behind the stove must be insulated with sheet iron using thermal insulation.
No option is suitable for your specific case? No problem, make a hole where you see fit.
As for the outlet, there are fewer problems with its placement. Our only advice is don’t do it in the ceiling. Over-humidified air cannot be discharged into the attic; it will cause constant moisture in the wooden elements of the rafter system, and its premature repair always costs a pretty penny. To protect the rafters, moist air will have to be vented onto the roof. Why make an additional hole in the covering, why worsen the tightness of the roof covering with your own hands and at your own expense?


Opening sizes for natural ventilation
The technology for calculating the size of ventilation holes is specified in the current regulations. Determining the size of vents for natural ventilation is much more difficult than for forced ventilation - there are too many factors beyond the control of people. The main performance parameter of the ventilation system is the frequency of air changes. For residential premises, the minimum multiplicity value is regulated, taking into account both the temperature in the rooms and the temperature outside. The temperature in residential premises fluctuates within small limits, this simplifies the work of designers.

In steam rooms the situation is much more complicated - temperature and humidity indicators vary over a very wide range. In addition, the speed of air arrival/entry into different situations may differ significantly. Such preconditions make it almost impossible to accurately calculate the optimal air exchange rate for natural ventilation.

Some bathhouse owners are afraid of suffocating during bathing procedures due to lack of oxygen. We bring to their attention that one cubic meter There is enough air for one person to breathe for an hour and a half. Calculate the cubic capacity of the steam room and find out how long you can safely steam; the count goes into tens of hours.

Carbon monoxide can cause problems. If you close the stove gate until the wood is completely burned out, then no amount of ventilation will help. It can ventilate the room only if carbon monoxide no longer enters. Heat the stove correctly and never burn out, do not rely in vain on ventilation.
How to make a ventilation hole in the wall of a bathhouse
For example, we will take the most complex option - the external and internal cladding of the walls of the bathhouse has already been done. The hole can be round, square or rectangular.
Step 1. Mark the location of the vent on the inner lining of the steam room. Before starting work, you must not only know the location of the hole, but also its size and configuration. It is advisable that air ducts and decorative grilles be available; this will make it possible to accurately control the size of the opening and not do unnecessary work.
Step 2. Prepare a long wood drill, the working length should exceed the thickness of the wall of the bathhouse together with the outer and internal lining. In the center of the drawn outline of the vent, drill a through hole from inside the steam room. The drill outlet outside the steam room will be the center of the air flow. Draw around it the dimensions of the hole, similarly made in the steam room.

Step 3. Remove interior and outer skin in the circuit. If your bathhouse is lined with natural clapboard on both sides, then the process is simplified, just carefully cut out the boards. If with outside metal sheets were used - use a grinder.

Step 4. Carefully inspect the supporting structures of the sheathing; if they are damaged, repair them. Along the contour ventilation duct drill through holes as close to each other as possible, constantly check where they come out outside walls. The drill must always be perpendicular to the plane. Drill the same holes throughout the entire area of the vent; the more there are, the easier it is to make a hole in the wall.

Video - How to drill a large hole in wood
Step 5. Next you need to work with a chisel and chisel, gradually removing the wooden bridges between the holes. It will not be possible to completely hollow out a hole on one side of the wall - it is too difficult to reach with a tool. Do half the work from the inside of the steam room, and the other half from the outside. There is no need to carefully level the surfaces of the holes, the main thing is that the air duct fits easily into the channel.

The most difficult physical work is done, you can begin installing the air duct and grilles. Don't be discouraged if it takes a lot of time to make holes; even experienced builders can rarely prepare more than two holes per day.
How to install ducts and grilles
For air ducts, you can use galvanized metal or plastic pipes; the length is determined by the length of the passage. Select the grille according to the size of the opening; to regulate the ventilation efficiency, it must have dampers.

Air duct prices
air duct
Step 1. Mineral wool insulate the planes of the hole, carefully insert the air duct into place. In order to firmly fix the pipe in the desired position, use foam. Excess foam that appears should be cut off after hardening.
Step 2. If there is waterproofing between the sheathing and the wall, treat the gap between the wall and the hole in the sheathing with foam, it will seal the cut and prevent water from getting into the wooden structures.

Step 3. Fasten the gratings; the method of fastening depends on the material of the wall cladding and sheathing.

We fix the ventilation grilles. In the photo there is a grate on the outside of the bathhouse

Prices for mineral wool
mineral wool
Check the operation of the ventilation using a smoldering firebrand or other source of smoke. Bring it to the inlet and observe how and at what speed the air currents move in the steam room.

The photo shows the air supply valve and checking its functionality
Experiment with natural ventilation at different damper positions, from maximum to minimum.
Video - Installation of the KPV 125 valve
Video - Ventilation in a bathhouse with a Termofor stove-conditioner
Kirill Sysoev
Calloused hands never get bored!
Content
Creating an oasis of harmony among hot steam, water flowing like a river from showers or mini-pools is not easy. The operation of the bathhouse requires compliance with some subtleties even at the construction stage. To ensure that high humidity does not spoil the structure, and stale air does not interfere with bath procedures, it is necessary to choose and install ventilation correctly.
Ventilation in the bathhouse - diagram and device
Air inflow and outflow – the most important condition, since air exchange is based on balance supply ventilation(fresh air) and exhaust - exhaust outlet. The movement of air flow can occur in a natural, forced or combined way. The level of air humidity, flow circulation, and heat exchange will depend on the correct choice of ventilation system. If the ventilation scheme and arrangement in the bathhouse is disrupted, the microclimate will be disrupted, it will be difficult to breathe, and mold will appear on the walls. Expert advice will help you avoid this:
- The exhaust vent should be higher than the supply vent because cold air is heavier than warm air.
- It is not recommended to make an exhaust vent on the ceiling, since this place warms up more slowly than others.
- The classic location of the inlet is near the stove and close to the floor.
- The ventilation of the bath should be built according to the principle: the supply openings are located on the opposite wall from the exhaust ones, and dampers should be installed on the latter.

Ventilation in the steam room
To pick up the right system, prolonging the life of the structure and finishing materials, you should understand the characteristics of each type, and steam room ventilation can be following types:
|
According to the operating principle |
Peculiarities |
Is it suitable for a bath? |
|
Natural |
The convection flow is formed due to the pressure difference between the street and the room, and the location of the supply and exhaust openings will interfere with normal heating. |
|
|
Combined |
Using air extraction devices; the absence of strict recommendations for the placement of vents makes this method one of the best. |
|
|
Mechanical |
The supply of fresh air and temperature are maintained by special devices, but despite all the convenience, the disadvantage of this method is considered to be high cost. |
Ventilation in the waiting room
The steam room, with its high temperature, is often surrounded by functional rooms. To dry the furnishings, maintain comfortable conditions, and ensure the flow of oxygen-enriched air - these are the main functions of ventilation in the dressing room. If the steam room is used all year round, then you need to take care of installing a fan; the ideal option is a forced (mechanical) system with exhaust air exhausted through the toilet or washing compartment. The natural way - keeping doors and windows wide open - is an unreliable way to ventilate the dressing room.
Ventilation in the bathhouse sink
Installing the stove correctly and distributing the flow of cold and warm air is just as important as taking care of other bath procedures. The desire to wash yourself by rinsing with water will require a careful approach to the arrangement of this place. To prevent moisture from accumulating under the floor or in the walls, ventilation is needed in the washing compartment of the bathhouse. The simplest option is to make a combined steam room and sink, and if these rooms are separate, then you will need special equipment to remove condensate.

Ventilation in the relaxation room of the bathhouse
After active bath procedures, when the superheated steam air relaxes the muscles, you want to relax. The ventilation device in the relaxation room of the bathhouse is almost no different from general principles. If the room is small, where there are a couple of shelves, and there is no contact with water, you can periodically create a draft. If the room is large, then ventilation for the bath is necessary. combined type. Among the newest technical developments It is better to give preference to compact devices - ventilators.
Ventilation in a frame bath
Wooden floors will rot within a couple of years if you do not take care of the ventilation system and drying. Even antiseptic treatment will not cope with this as well as ventilation in a frame bath, providing an influx of fresh air. The design of a natural ventilation system includes: ducts, a pipe from the stove, a through recess, vents, and doors. The vent in the bathhouse is located at the top, closer to the roof, and to regulate the flow it must be equipped with a valve or damper. Forced ventilation in a frame bath is used where only one of the walls is external.
Exhaust hood in a log bathhouse
From wooden beam it turns out to be a traditional Russian steam room, and if the vents are positioned correctly, the direction of the air flow will create comfortable conditions. To ensure complete ventilation, the hood in the log bathhouse will still have to be equipped. Classic version assumes device natural scheme air exchange. The special feature of the stove-heater vent, a damper with a valve for the chimney, mounting fans to speed up air exchange - all this is necessary to prevent the formation of a layer of condensation and drafts.

How to make ventilation in a bathhouse
Even at the construction stage, it will be necessary to provide for the creation of a ventilation system. How to make a hood in a bathhouse to maintain the microclimate? The logs of a traditional steam room are laid with a gap, so the cracks of the log house allow fresh air to pass through, and ventilation can be done using a draft. Ventilation system in a bathhouse made of brick, foam block or other modern building materials, will require the installation of a ventilation system with the required number of supply and exhaust openings before the construction of the building begins. Preference should be given to a combined or mechanical scheme.
Ventilation bastu
So that dry steam gives a warm embrace, heats floors and protects walls from rot, installation of ventilation is done as follows:
- No special holes are needed in the foundation of the building; you can make a wooden floor with slots. Equip the room with a glass door with three hinges, a good seal, and a magnetic latch.
- Install an electric convection oven that will provide circulation mode air flow according to the principle of an inverted glass.
- Make an inflow under the stove, and an exhaust hole under the shelf 30 cm from the floor. Warm air will rise up the box under the lining and be discharged out through a hole, which should be made on the opposite wall from the inflow (diagonally and as far as possible).
- The heated air will fill the steam room, pushing the cold air to the bottom. If you make a channel with an adjacent room, the steam room will transfer some of the heat to it.
Sauna ventilation
It is necessary to lay the foundations of the ventilation system at the construction stage, because remodeling finished building will cost more. Brief instructions according to the design of the bathhouse ventilation system it looks like this:
- Free placement of vents is allowed, so a combined or mechanical system, including bath hoods, is suitable.
- For a continuous flow of fresh air, make an vent at the level of half a meter from the floor near the stove, and an exhaust hole on the opposite wall.
- Be sure to install adjustable dampers (gate, gate) on the inflow and outlet to maintain the microclimate.

Ventilation in a Russian bath
In order for natural ventilation in the steam room of a Russian bath to contribute to a healing effect, when arranging it, you must adhere to the following scheme:
- Take care of the possibility of ventilation: window, door, vents.
- The upper levels of the window and door should coincide, and above this is a place for a heat pocket. For burst ventilation of small steam rooms, simple ventilation is enough to quickly renew the air.
- A stove with a chimney is a natural exhaust hood for a bathhouse: exhaust air will flow upward through the duct, and the inflow will be through the cracks at the bottom of the door.
- For air exchange, arrange vents: an exhaust hole under the ceiling, equip it with a door (damper), and make an inflow next to the stove and install a ventilation grille.