March 31, 2017 No comments
Parquet flooring is rightfully considered the best covering. Well polished, smooth, with the texture of noble wood, it is able to create a special atmosphere of comfort and home comfort, emphasize the taste of the owners and their status. But time is merciless and over time, scratches and scrapes appear on its surface, cracks appear between the boards, which begin to dry out or swell. And although its attractive appearance The parquet lasts for many years, but, unfortunately, the time comes when the owners consider replacing it. And only because they don’t know how to repair a parquet floor. After all, like any other flooring, parquet can be restored, after which it can still for a long time delight the eyes of the owners and guests of the house.
Return former beauty parquet boards and get their tarnished surfaces to shine with a beautiful shine again, you can do it yourself using some tricks. How to repair old parquet new floor? Let’s try to consider all the recommendations that parquet specialists willingly share.
Most often, owners of parquet flooring are concerned about how to get rid of scratches that can form as a result of a heavy object falling or due to unsuccessful movement of furniture around the room.
How to repair scratches and gouges on parquet flooring
Dealing with this problem is easy, especially if the scratches are not deep. Modern industry offers its consumers special permanent markers. So, how to paint shallow scratches on parquet? We will prepare the following materials:
1. Permanent felt-tip pen or wood pencil.
2. Two brushes.
3. Varnish for parquet.
To “paint” scratches, you first need to clean them from dust and dirt with a dry brush. Then “sketch” the scratch with a pencil and apply thin layer parquet varnish with a brush. After the varnish has dried, the parquet surface will shine like new again.

In order to get rid of deeper scratches or gouges on the parquet, you will need to purchase wood putty to match the color of the parquet in the apartment.
First, the area with potholes must be sanded with sandpaper, cleaned of dust and rubbed with putty. When the putty has dried, sand the surface again with fine-grained sandpaper, remove dust and wipe with a soft cloth. Apply a thin layer of varnish and wait for it to dry.
Creak of parquet boards
Parquet has another not very pleasant property - over the years it begins to creak underfoot. These unpleasant sounds may occur due to the fact that some of its elements have lost the tightness of the installation and, under pressure, create friction, which manifests itself in the form of squeaking. How to repair an old parquet floor and remove squeaks?
To properly deal with such a problem, you first need to accurately determine the cause of the friction of the elements.
1. The ideal temperature for parquet flooring is +20°C, while the humidity in the room should not exceed 60%. Changes in such indicators can cause unpleasant sounds from the parquet.
2. Parquet should not be wet. Penetration of moisture causes the elements to swell, which destroys their tightness.
3. When cleaning, use only by special means for cleaning parquet.
4. The varnish coating of parquet boards must be renewed every 5 years.

There are 5 main reasons that can cause parquet floors to creak. Let's find out in more detail how you can cope with such an unpleasant sound.
1. Improper preparation of the base for the parquet board - uneven screed or wooden floor.
In this case, eliminating the squeak will be quite difficult. The parquet will have to be completely dismantled and the base of the floor covered with plywood. Then re-lay the parquet board, sand it and apply varnish.
2. There is no gap between the wall and the parquet.
The lack of a gap between the parquet flooring and the wall does not allow it to fit correctly. As a result of non-compliance simple rule When laying parquet, squeaking occurs over time. How to properly repair such a parquet floor and remove squeaks? In this case, dealing with the problem is simple. It is enough to cut the canvas around the entire perimeter of the room and ensure a gap between the covering and the wall of at least 10 mm.
3. Lag deformation.
Logs can become deformed as a result of improperly installed vapor and thermal insulation. Over time, such logs begin to sag, and the parquet boards begin to rub against each other, causing unpleasant sounds.
In this case, you will also have to dismantle the entire parquet flooring and partially replace the damaged joists. Maintain a distance between them of at least 25 cm. Attach the logs to the base with dowels. If you decide to repair such a parquet floor with your own hands, then experts do not recommend solving the issue without involving professionals. This is a rather difficult task that requires not only skills, but also certain knowledge.
4. Partial detachment of parquet from the base.
This defect occurs as a result of using low-quality glue or improper installation floor. Creaking areas of the flooring should be marked with a marker and pieces of masking tape should be glued to it at a distance of 20 cm from each other. Afterwards, make a small hole in the parquet through the masking tape, and insert high-quality glue into the resulting hole. Allow the glue to dry for 24 hours, then remove the masking tape with any remaining glue. In the future, bulky items should not be placed in such areas.
5. Changes in temperature and humidity levels in the room.
Eliminating squeaking for this reason is not difficult. Enough to provide normal level humidity in the room. It can be noted that the creaking in the room appears at the beginning heating season. This indicates that the cause of the squeaking is indeed a violation of the humidity level.
How to repair parquet with your own hands
Heavily damaged parquet boards should not be masked with wood putty. Knowing how to repair a parquet floor with your own hands, you can more easily cope with this problem - partially dismantle the parquet elements and replace them with new ones.

Attention! After removing the parquet elements, be sure to clean the base of the base floor from dust and glue residues.
1. To attach a new element in this case, experts do not recommend using glue, but nailing the parquet with thin nails to the base and adjacent elements diagonally at an angle.
2. To provide flat surface, remove the protruding part of the new plank with a plane, after wetting the plank with water.
3. After two days, sand the new elements with fine sandpaper.
4. Remove dust with a brush and wipe with a soft towel.
5. Apply varnish.
conclusions
Knowing how to properly repair an old parquet floor, you will be able to cope with the task yourself and correct errors in a timely manner. In this case, you do not have to resort to professional help and will always enjoy the beauty of parquet, its smooth and shiny surface.
Video - Do-it-yourself parquet repair:
What's good about parquet is its ability to acquire the new kind after repair. Restoring parquet is possible even after decades of use and even if the repair is not the first. To do this, you don’t even have to contact a professional – you can do all the steps yourself!
How to restore old parquet with your own hands - stages of work
You should think about parquet restoration as soon as the first creaks, cracks, or drying or swelling of individual planks appear. In a word, there is no need to bring the flooring to a state where there is no turning back. However, the most important sign of upcoming renovation is usually the shabby appearance of the floor: scuffs, peeling, dirty spots.
In any case, no matter what condition the floor is in, restoring it is often much preferable to completely replacing the floor. It's cheaper and faster! Restoration work traditionally includes the following stages:
- identification of problem, creaky areas;
- dismantling individual parquet planks or the entire floor;
- replacing damaged strips or modules with new ones;
- repairing cracks, filling cracks;
- scraping and (or) grinding;
- coating with varnish, oil or wax.
What list of restoration work you make depends only on the condition of your parquet. It may be enough to sand the floor and cover it with a new layer of varnish, or you will have to use the entire arsenal of techniques to return the coating to its former novelty.
Do-it-yourself parquet restoration - cosmetic repairs
So, the floor covering has worn out, squeaks have appeared in places, and several cracks spoil the overall appearance. In this case, it will be enough to carry out cosmetic repairs! You should start with the cracks - first, clean them of debris. This should be done using a vacuum cleaner with a special narrow attachment, but you should not pick it out using improvised means - you can damage the parquet floorboards even more. Using a special wood putty and a spatula, the cracks should be covered, moving the spatula both along and across. In this way, only small cracks, up to 2 mm wide, can be repaired. If the die has a larger defect, it should be completely replaced.
When all the cracks are covered, we'll deal with the squeaky floorboards. If it is one or two “parquet floors”, then the problem can be solved with the help of screws and dowels. If the parquet is laid on concrete or cement-sand screed, then the creaking means that the floorboard has come unstuck from the base and is rubbing against adjacent planks. Since it is almost impossible to remove it without damaging it, we will solve the problem without “surgical” intervention.
To begin with, you should drill a hole in the creaky plank, capturing a few centimeters of the base, just along the length of the dowel. Insert the dowel into the hole and screw in the self-tapping screw. By expanding the insert, the self-tapping screw will create a strong adhesion of the plank to the floor and eliminate friction. Having sunk the head into the wood, cover the place where the fasteners are screwed in with the same wood putty.
Having solved the problems with squeaks and cracks, it’s time to take on the main stage of cosmetic repairs - scraping or grinding. - This is the removal of several millimeters of wood along with the varnish coating. That is, problematic potholes and scratches will be removed along with the layer of wood. The parquet will indeed be like new after such treatment, but its thickness will be significantly reduced. Taking into account the fact that the coating has an average thickness of about 10 mm, it is possible to repair parquet in this way in best case scenario 3 times.
The last time will be final and irrevocable - when the parquet again loses its decorative appearance, it can no longer be repaired.
Sanding removes a minimum layer of wood, a maximum of a millimeter. Deep scratches, gouges and chips may remain, but they can be repaired with putty or a special wax pencil. In any case, you will remove the layer of old varnish, especially if you first soften it with a special solvent and remove the base layer with a spatula. This process will take you more time, but it’s worth it - you’ll save the required few millimeters of parquet thickness.
If you are concerned about the future of the coating, and you would not like to change it for another for many years, then the varnish should be replaced oil impregnation. It was with the help of oils that parquet floors were treated in ancient times, thanks to which many have survived to this day. If the varnish creates a rather fragile membrane on the surface of the parquet, then the oil impregnates the wood itself, making it stronger and harder. In addition, colored oils also tint the surface.
The advantage of an oil coating is that you will be able to carry out repairs on small areas at times, returning worn slats decorative look. This will not work with varnish - if you apply it, it will be applied to the entire surface. Main disadvantage oils - no way back. That is, it will no longer be possible to coat the surface with varnish in the foreseeable future, and even sanding will not help - the oil saturates the wood to a depth of several millimeters.
Major parquet repairs - step-by-step instructions
When not just a few floorboards are creaking, but almost the entire floor, a lot of “parquet flooring” is cracked and deformed, then cosmetic repairs will not help. The parquet needs to be completely renovated! By the way, if it suddenly turns out that your parquet is assembled not from individual planks, but from panels with glued floorboards, then, most likely, it can no longer be repaired. This method was used back in the Soviet Union to speed up installation, but repairing such parquet is very difficult, almost impossible.
How to overhaul parquet flooring - step-by-step diagram
Step 1: Dismantle the coating
A major restoration of old parquet begins with dismantling in order to sort through the entire parquet and reassemble it, properly gluing it to the base. Therefore, dismantling should be carried out carefully, trying not to damage the planks.
Step 2: Leveling the Base
If the parquet is more than 10 years old, then, for sure, the base underneath is quite uneven - at that time there were no self-leveling floors. But today their range is extremely large, and you can correct the mistakes of bygone days. For the base under the parquet you will need a finishing cement-polymer self-leveling floor, which is applied only a few millimeters thick. Spreading over the surface, it fills all the unevenness and evens out the slope of the floor. By the way, if the slope turns out to be large, and the difference in floor height between different angles the room turned out to be a few centimeters, it is better to first level the floor using a base self-leveling floor, and only then apply the finishing mixture.
Parquet floors look very beautiful and stylish. Even despite the high cost, as well as the variety of floor coverings on the market, many try to install just such a floor in their apartment. The parquet is of the highest quality and long term service, however, even on it, over time, some defects may appear, including creaks, deformation and loss of slats. You can fix most of these problems yourself, as described in detail in our article.
Reasons for repair - why parquet needs to be restored
After several years of use, the parquet will in any case require repairs. This is due to the formation of cracks, drying out, loosening or falling out of some planks. There are many factors that contribute to the occurrence of defects on the floor covering, among which I would especially like to highlight:
- Natural wear and tear or aging – due to constant long-term use;
- Mechanical damage caused by careless use, for example, walking on the floor in shoes with sharp heels or heels. Moving heavy furniture, even on wheels, also negatively affects the external condition of the parquet;
- Penetration of moisture under the floor or between the tiles, which is often observed during constant wet cleaning of the room. The liquid does not physically have time to evaporate, resulting in swelling of the boards and the appearance of fungi and mold.
You can examine some problem areas on your parquet floor yourself. This primarily concerns mechanical defects. Thus, chips and scratches stand out against the general background, so identifying them is not difficult. The same cannot be said about defective and rotten dies. In some cases, it will even be necessary to tap the floor to identify areas where the floor is peeling away from the base due to rotting or swelling.
Depending on the degree of complexity, repair of parquet boards is divided into the following categories:
- 1. Current repairs. Must be performed regularly, and its frequency ranges from 3 to 5 years, depending on the degree of wear of the floor. If you follow the advice of specialists, and also constantly monitor your condition flooring, then the parquet floor will serve you for decades, and the need for large-scale repairs will constantly disappear.
- 2. Partial repair. If you notice any signs of damage to the floor, be it movement of individual planks, squeaks, stains or darkening, decisive action must be taken to correct the situation. Renovate an apartment in in this case Any person can do it, since no special difficulties are foreseen. You just need to do everything carefully and accurately in accordance with the instructions below.
- 3. Major repairs. The most difficult case, since such repairs are carried out in case of sudden damage to the parquet, for example, flooding by neighbors. A major overhaul involves the complete replacement of all boards, which is associated with numerous difficulties. It is problematic to do this with your own hands, so residents usually turn to the help of craftsmen.
High-quality floor installation is a guarantee long term parquet services. If you don’t forget to constantly check the floor and correct minor flaws, then the parquet surface will look perfect even after many years. It should be well remembered that even a small scratch over time can lead to the most global consequences. And if at first it is very easy to repair such a defect using ordinary paste or a cosmetic pencil, which will be discussed below, then in the future you will have to spend a lot of time, effort and money to do it. high-quality repairs parquet
Cosmetic repairs - features of the work
First, we'll tell you how the restoration is carried out. parquet boards in case of minor damage. Scratches and chips are the most common occurrences. Fixing this problem is quite simple, especially if only the top varnished layer has been damaged, while the wood of the board remains intact. There are many special retouching pencils on sale that are made from stains.
For example, Italian-made Profix products deserve attention, differing high quality and wear resistance. Another advantage of such pencils is the variety of colors and shades, which makes it possible without unnecessary difficulties to choose the ideal tone that will harmonize with the color of the parquet board. After treatment with a similar product, the old floor becomes resistant to liquids and sunlight.
Owners who require a more precise and accurate drawing of wood texture can be advised to purchase a ProfixPen pencil. Distinctive feature The product lies in its thin core. Thanks to this, scratches of any width can be retouched, even in hard-to-reach places.

Falling heavy sharp objects can cause significant damage not only to the varnished surface, but also to the interior of the wood. Repairing the parquet in this case is somewhat more difficult, but this can be done at home. We will need to carefully sand the damaged area with 220 grit abrasive paper. In the store we buy wax for restoration work, which must be melted and poured into a scratch or crack in the floor. After hardening, we clean the board from wax using a spatula, and also carefully sand it with slightly coarser sandpaper.
If we talk about wax, products produced by Hartwachs are extremely popular. By analogy with retouching pencils, wax of this brand has a wide color scheme, which includes over a hundred shades. In addition, wax has high level adhesion to wood and ductility.
Regardless of the means and devices used, after all work has been completed, the repaired planks must be coated with a layer of varnish. It is recommended to choose high-quality products; only in this case can you expect that the restored area will be invisible to the eye. Shake the can of varnish and apply it to the surface of the parquet from a distance of approximately 30 cm. All you have to do is wait about 15 minutes, after which the floor will be completely ready for use. further exploitation.
Parquet scraping – how it is required and when it is performed
One of the most common ways to repair an old floor is to sand it. This process is performed with a special scraping machine. At its core, this device replaces sandpaper. Sandpaper is convenient to use if damage to the outer layer of parquet is concentrated in a small area. In this case, coarse-grained paper is used - using circular movements, lightly pressing on the surface, you can achieve desired result. It is recommended to perform such an operation only if there are minor scratches or abrasions. Then you can even do without retouching pencils.
Sanding is required in situations where the floor area where darkening is observed is quite large. Naturally, you can use sandpaper, but it will take a lot of force to sand the entire surface. In addition, such a procedure will take a huge amount of time. It is much easier and faster to do scraping using special equipment. The machine is a kind of scraper equipped with a holder. There are mechanical and electrical devices, which differ in design, cost, as well as speed and quality of work.
The use of the scraper involves preliminary preparation parquet flooring. It is necessary to remove screws and nails from the area being treated, or screw them in to such an extent that they do not stand out above the surface. Otherwise, there is a high risk of damaging or damaging the machine. To make the job easier, you can dampen the floor. Themselves renovation work start from the corner opposite from front door. Movements should be performed along the fibers of the dies, and you should try to apply the same force everywhere.
Depending on the size of the scraper, there may be some problems with the corners of the room. Here you can use sandpaper, since manually looping the area will be faster and easier than fiddling with a machine. After sanding, all that remains is to seal the cracks that appear with putty, and also re-sand the surface. It's best to do this grinder, however, fine-grained sandpaper also performs the job efficiently, albeit with increased labor and time costs.
At the end of the entire process, the cleaned and sanded surface remains to be treated with varnish, having previously removed all dust and debris from the floor. It should be noted that scraping causes a huge amount of debris, especially fine dust. And this is even despite the fabric garbage bags that such units are required to be equipped with. For this reason, it is recommended to work with the scraper only in respirators, otherwise a lot of dust will get into your lungs.
Replacing boards and sealing cracks - eliminating local problems
If conventional repairs, even using scraping devices, cannot be done, you will need to look for another way out of the situation. For example, you can replace individual dies, which often happens when the floor swells, breaks or becomes loose. In fact, this is not the most difficult operation.

- Using a hammer or chisel, carefully break it and remove the damaged strip. In this case, everything must be done very carefully so as not to damage the adjacent dies with a hammer blow;
- We bring a new and whole lamella of the same width and thickness to the treated area and apply with a simple pencil the contour along which we will later cut the board;
- Using a hacksaw or other tools, we saw off the board along the line drawn in advance;
- We coat both the base of the floor and the plank itself with glue in several layers, after which we insert a new lamella in place of the previous one.
Replacing several strips is practically no different from this algorithm. Before installing new boards, craftsmen advise bringing them into the room and leaving them for a while to achieve the same level of humidity. In the future, this will avoid swelling and squeaking when walking. The process of replacing slats when a so-called wave appears has some peculiarities. In this case it is removed whole line boards right up to the wall. The base of the floor is thoroughly cleaned of glue and dirt, after which a new layer of adhesive solution is applied. The outer boards should be trimmed a little, since the cause of the appearance of waves is usually the swelling of the lamellas from the volumetric expansion of the wood.
However, the swelling of parquet and the appearance of waves is far from the only case when individual boards may need to be replaced. The opposite situation is also possible, when gaps appear between the slats, sometimes quite significant. The problem is associated with laying wet, undried parquet, which after drying loses some size. This is another reason why it is recommended to leave parquet in the room for a while before installation.
Wide and large gaps can only be eliminated by re-laying the parquet. If the defects are relatively small, then you can try to make do with local repairs using putties based on certain mixtures:
- 1. Polymer mixtures - for rooms with special sanitary requirements.
- 2. Acrylic mixtures – are characterized by a high level of moisture resistance and elasticity.
- 3. Oil compositions have the advantage of durability, but the drying speed leaves much to be desired.
- 4. Solvent-based putties - they are characterized by a high drying speed.

Having chosen the putty that suits you, all that remains is to seal the cracks. This process is not very complicated; you just need to apply the finished composition to problem areas and carefully fill all chips and cracks, performing circular movements. The remaining mixture must be carefully removed with a spatula. After the putty has dried, we only need to sand the treated areas and also cover the parquet flooring with several layers of varnish.
Creaks when walking - getting rid of unpleasant sounds
Squeaks are a very common problem. Moreover, such sounds are very annoying, especially at night. There are several reasons for the occurrence of squeaks. When laying the boards, they were not secured tightly enough, or the planks dried out after several years of use. The simplest and fast way To get rid of annoying sounds, screwing in screws is considered. This method is reliable, and you don’t even have to go to the store, because everything necessary tools and there are available means in every person’s apartment.

This operation is performed as follows:
- 1. Find boards that make squeaks;
- 2. Having determined the source of the noise, drill a hole and tighten the screw as deeply as possible so that the head does not stick out above the surface of the parquet;
- 3. If several boards located are creaking, then you will first need to find a position in which we will install the screw. We will need a long beam with which we will spread the ceiling and floor. If the squeaks remain after this, install the beam in another place.
- 4. Having found an area where the boards do not make any noise, tighten the screw.
When performing the above steps, you must try not to damage the planks themselves. To be sure of the success of the event, it is best to screw the screw into a hole no more than 5 cm deep. The situation is somewhat simpler with parquet, which was originally laid on a base of bitumen mastic. Using a hair dryer, heat the dies in the creaking area and press down with a heavy object. After the mastic dries, all squeaks should disappear.
Major repairs - when the need for it may arise
Major repairs are, for obvious reasons, the most difficult and time-consuming. The cause is almost always moisture, which accumulates in excess between the flooring boards. Lamellas that are not dried in time lose thermal insulation properties. The result is damage to the parquet over its entire area. The defect can only be corrected by completely redoing the floor. It is necessary to remove all boards, as well as remove thermal and waterproofing. Having identified and eliminated deficiencies associated with moisture, insulation or poor-quality installation, the material in reverse order mounted on the floor base.
Apartment flooding is another reason overhaul. In some situations, it is possible to get by with “little loss” by only drying the boards. But if after this there are numerous waves, swellings and other problems indicating the separation of the planks from the base, the only solution is to re-lay the parquet. After dismantling the planks, you need to dry them thoroughly. The same applies to the base on which they were located. After a few days, you can begin installing the boards in the reverse order of dismantling them.
Finishing – varnishing of parquet
Any repair measures, regardless of their complexity, necessarily require finishing, namely, coating the parquet with varnish. Today the construction market offers a huge number of types of varnish:
- Alkyd - contain white spirit, which promotes high drying speed on the surface of the boards;
- Acid-curing varnishes - consist of formaldehydes, which are characterized by high drying speed and wear resistance;
- Polyurethane - can only be used in residential areas, as they do not tolerate moisture;
- Water-soluble - the highest quality type of varnish, which differs environmental safety, moisture resistance, but at the same time the cost is higher than the cost of other competitors.
To apply varnish to the surface of the parquet, ordinary painting tools are required. Rollers or wide brushes are perfect, but any special requirements They do not apply to the material from which the roller coat is made. The varnish is carefully smeared so that there are no streaks or sagging. To protect the parquet from external irritants, as well as to ensure optimal antiseptic properties, the varnish should be applied in several layers. In this case, the surface is sanded with sandpaper or a grinding machine after each layer of varnish, only after that can you move on to a new layer.
Parquet floors are considered the most the best coatings for the floor. New parquet is always well polished and varnished; it always looks beautiful and solid. But time spares no one. The parquet gradually deteriorates and cracks appear on it. It is cracking and the boards are starting to dry out. Replacing old parquet with new is a very expensive pleasure. It will be much cheaper to restore old parquet. Typically, parquet flooring has to be restored once every many years. It all depends on the conditions in which the parquet was used. Website prepared quick guide for DIY floor repairs.
Beginning of floor restoration
To remove tarnishing and loss of color from parquet, you need to use a sanding machine. Small scratches on parquet can be easily removed by putty or sanding. After the operations have been completed, the parquet must be coated with varnish or wax. If the parquet begins to creak, it needs to be re-laid. Creaking occurs due to poor installation of parquet or the use of incorrect technology.
Swelling of the parquet can occur when moisture gets in. Such damage can only be corrected in one way - by re-laying the parquet. To replace a dried out or broken rivet, it is necessary to replace the broken parquet flooring. To do this, you need to completely remove the adhesive base. Then you need to prepare and adjust the new riveting to size. Fill the area where the riveting is placed with special mastic.
After pouring, you need to install the riveting. It is necessary to place a heavy load on the riveting, having first removed all the protruding mastic. Having completed all the work, it is worth doing the scraping. It will help hide the replaced rivets. After sanding, the floor must be sanded and varnished. The varnish must be applied in several layers. The coating will be durable if several layers of varnish are applied.
To ensure better adhesion of all layers, sanding should be carried out after each applied layer, except the last one. Working with varnish requires not to forget about safety precautions. You must always remember that varnish is flammable. When working with varnish, it is mandatory to use respiratory protection. You must not forget to ventilate the room.
Sanding and sanding old parquet
In the old days, parquet sanding was the name given to removing the surface layer of wood. Nowadays, with the advent of new technology and various grinding machines, parquet sanding has become sanding. This operation is carried out in several steps. Sanding parquet makes it possible to preserve the floor for a much longer time than simply removing the top layer. For the scraping operation, a variety of grinding machines. They can be drum, belt, surface grinding and others. We have already figured out how to do it using loops, check it out if necessary.
 The initial sanding is the roughest. Here, everything greatly depends on the professionalism of the master. This sanding must be done without flaws so that holes and inconsistencies are not discovered later. Floor cycling occurs in the following sequence:
9 stages of repair
1. The parquet is rough sanded. For such grinding, a special drum-type machine or surface grinder is used. Drum-type machines have high productivity, but require high skill. Rough sanding removes all irregularities and removes all old coating.
2. After rough sanding, fine sanding of the old parquet is carried out. Disc surface grinders are used for it. Fine sanding removes any remaining imperfections and blemishes.
3. The third step is to sand the most inaccessible places.
4. After all sanding, you need to fill all the cracks. It is advisable to apply the putty all over, but you can only putty on cracks, chips and potholes. Applying putty to the entire floor will require large financial expenses. With local putty, cracks may not be noticed. Color discrepancy may occur.
5. When the putty dries, fine sanding is carried out. It removes the unnecessary layer of putty, leaving it only in the cracks and pores.
6. Before you start varnishing the surface, do not forget to remove accumulated dust and debris.
 7. When the cleaning is finished, you can begin to varnish the old parquet.
8. After covering the parquet with varnish for the first time, you need to wait for it to dry completely. Then carry out intermediate grinding. It will remove all excess lint and debris. This sanding will improve the adhesion of the layers.
9. When the intermediate sanding is completed, it is necessary to vacuum the parquet and polish it again. Parquet will not require repairs if it is installed correctly. Such parquet will serve for a long time and reliably, restoration will not be needed for the next 10-15 years.
Parquet has always been and remains a reliable, luxurious floor covering. Until quite recently, only truly wealthy people could install parquet floors - for many, the presence of this covering automatically became a model of wealth and well-being. This type of flooring has a long service life, and the parquet care products offered on the market only prolong it.
And yet, over the years, the quality of laying parquet boards deteriorates, and problems appear with the appearance of the flooring. And there are only two ways out of this situation - either carry out a complete replacement of the coating, or try to restore the parquet yourself. And if the choice fell on the second option, then you should know a few basic rules for repairing parquet with your own hands - this will help even an inexperienced person cope with the task.

All other cases of parquet damage are repairable - this means that the work on restoring the parquet can be done on your own.
Note: If parquet repair is intended as a continuation/component of the overall repair of the premises, then it is carried out last.
How to remove cracks and crevices in parquet flooring
Let's make a reservation right away - we will talk about eliminating with your own hands small cracks and crevices that can form due to long-term use of the parquet flooring or impact with a heavy object. Experts believe that do-it-yourself repair can only be done if there are cracks/cracks no larger than one and a half millimeters in size.
First of all, you will need to purchase putty - it is sold in large assortment, so you need to know what type of wood is used in the production of your parquet flooring. The process of restoring parquet with cracks and crevices is carried out in stages.:
- Thoroughly clean the surface to be repaired from dust and dirt. To clean the crack or crevice itself, you can use a vacuum cleaner with a narrow, plastic nozzle. Under no circumstances should you try to remove dirt from the recess with a stick, knitting needle, or knife - this usually leads to expansion of the damage.
- The putty is applied with a narrow spatula or a wide knife exactly into the crack/crack. In this case, you need to try to fill the space with putty as much as possible - until excess material appears on the surface of the coating. These same excesses are removed with the same spatula or knife.

After the putty has completely dried (drying time can be found in the instructions for the material), you can begin sanding. To do this, use fine sandpaper and the cleaning process should last until an absolutely flat/smooth surface is created.

- 2-3 layers of varnish or mastic should be applied to the repair area - these materials play a protective role.
Note:if the gap/crack is more than 1.5 mm wide, then you should not even try to use putty. The result will be a spillage of dried material, despite a competently carried out stage of preparing the surface for repair.
How to remove wide holes in parquet
If the gap in the parquet is too wide and the situation cannot be corrected with putty, then experts recommend going “out of the blue.” This means that the hole needs to be expanded even further - we deepen it with a chisel or an awl, and smooth out the edges.
Then you need to take a pre-prepared wooden block, coat one side with wood glue, not forgetting to treat the sides of the insert, and “embed” it into the damaged floor covering. After this, the repair area is cleaned with fine sandpaper and covered with varnish or mastic.

Note:wide cracks often appear on parquet flooring laid in a room with constant changes in air humidity levels. To prevent such a situation, it is recommended to winter time artificially humidify the air.
How to sand parquet with your own hands?
We recommend reading:– Do-it-yourself parquet scraping: instructions and recommendationsOver the years, parquet inevitably loses its appearance - it becomes dull and covered with scratches. To restore the floor covering, you need to resort to the scraping process. It is carried out in three stages:

note: You can carry out sanding work on your own on the old flooring only if the parquet is not loose and the boards have not moved away from the base. The repaired parquet should be coated with varnish at least 3 times, the last layer of this decorative covering dries in 3 days. When carrying out filling work, it is advisable to mix the putty with sawdust - this will achieve maximum camouflage of the parquet restoration work.
Partial replacement of parquet
If the parquet boards have moved away from the base or are severely damaged, then you will have to carry out partial replacement coverings. First of all, you need to dismantle the hopelessly damaged areas of the parquet flooring. During dismantling, you need to be extremely careful not to damage the remaining parts of the parquet. After dismantling, you should clean the base from old glue, get rid of dust and dirt - this will ensure excellent adhesion of the adhesive composition and the base of the floor.
All that remains is to apply wood glue to the prepared new parquet elements and insert them in place of the damaged ones. Sometimes it happens that new boards literally stick out on the general surface of the floor - in this case, you will need a plane, which simply removes extra millimeters of wood along the grain from the underside of the parquet board.

If it is necessary to replace several parquet boards at once, they must be knocked down/fastened before installation begins. This can be done with glue or small nails. By the way, you can attach new parquet elements to existing ones on the floor not with wood glue, but with nails - in this case, the nails are driven in at an angle, fastening one element to another.
Note:If the replacement of parquet boards is carried out using wood glue, then a load must be placed in the location of the new boards for several days.
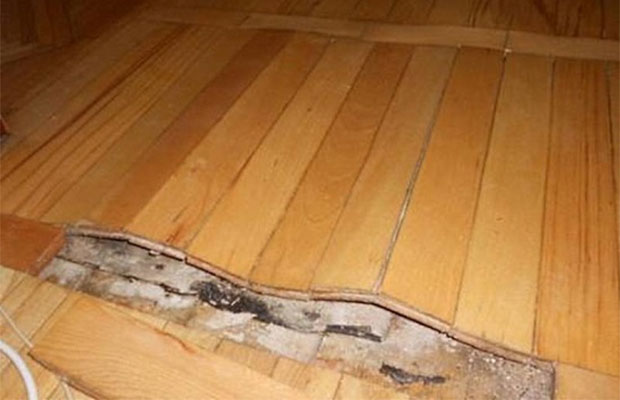
How to restore parquet after flooding?
Everyone knows that wood absorbs water well and expands at the same time. And if the parquet floor is flooded with water, then before your eyes you can see two scenarios for the development of events:
- a swollen parquet board torn from the base;
- deformed parquet elements that have not come off the base.
In the first case, you will have to replace damaged parquet elements - you can do this yourself, but only if small areas of the flooring are damaged. If the parquet boards are deformed, while maintaining the strength of the fastening on the base, restoration work can be carried out without replacement.
What can you do about swollen parquet flooring?:

Note:if the parquet floor was flooded with water not today/yesterday, but the swelling happened a week ago, then it is not worth carrying out the described operation - fungal colonies have already awakened, multiplying and actively living in the thickness of the wood.
Step-by-step video instructions for repairing parquet with your own hands are presented in the video review:
How to fix squeaky parquet floors
At first, the creaking of parquet boards is perceived absolutely calmly - there is even a certain amount of romance and mystery in it. But over time, this fact begins to irritate greatly, interfere with sleep, and therefore something will have to be solved with this problem. Most likely, you will need to pull the parquet away from the edges.
Stages of work:

If an individual floorboard creaks, you can fix the problem in a matter of minutes, without dismantling the baseboard. Look detailed video instructions To eliminate squeaking parquet floors:
Now you need to knock out the wedges every day and control the strength/loudness of the squeak. If after 5-7 days the creaking has not disappeared anywhere, and the wedges “sit” tightly in the crack, then this means only one thing - it’s time to change the floor covering.
It is quite possible to carry out minor parquet repairs with your own hands - there is nothing complicated about it. It is only important to adhere to the described recommendations and then the luxurious, cozy, practical parquet will last for many years.


