Plastic double glazed windows have gained popularity due to their performance qualities. But can they be used in construction and renovation? wooden buildings? Of course, it is possible and necessary.
Installation plastic windows V wooden house has a lot of differences and features. The process includes a number of preparatory manipulations, primarily related to the fact that the structure tends to sag over time.
We install a PVC window in a private house
The technology features for installing PVC windows in a wooden house of new or old construction are not very different. In any case, experts recommend technology using casing - time-tested, this technology allows you to avoid deformation, regardless of the material from which it is made.
Installing a plastic window in a wooden house or cottage with your own hands will require the performer to have some knowledge and skills. Of course, if there are none, then it is more advisable to turn to specialists. Complexity self-installation PVC systems in a wooden house is that the frame is fastened using a tongue-and-groove mechanism. This design makes it possible to create operating conditions in which deformation and subsidence of wood does not affect direct impact on a double glazed window.
The system allows you to install a plastic window yourself, so that the window is fixed independently of the main structure of the wall and has a floating character. Window system It is secured with grooves on the side, which are placed on spikes protruding from the end of the logs and beams.
To fix and seal the casing, only tow, flax batting or fiber insulation are used. No way polyurethane foam.
Attention! A gap is left at the top based on the wood's settlement.
Thus, wall shrinkage wooden structure does not affect the window in any way, much less damage it. Depending on the fastenings, casings can be classified into the following types:
- into a thorn This design is characterized by the presence of a tenon, which is mounted on the side parts of the casing, and a groove, which is located in the logs of the opening;
- in the embedded beam. The basis of the fastening is considered to be a block, which is placed in a groove at the ends of the opening and passes through the casing posts;
- into the deck. The tenon is located at the ends of the window opening logs, but the groove is in the casing posts.
The box is a floating mechanism, which prevents deformation of the plastic window during operation, regardless of the type of installation of the casing.
Calculations should be made with high accuracy, since even a minor mistake can lead to deformation of the window frame or leakage of the structure. Besides, correct installation- this is the key to the quality of the plastic window itself.
How to make a pigtail (casing)
The design can be of two types: complex and simple. A simple window frame is the system described above, with bars and grooves. Complex design It is performed somewhat differently: a ridge is cut out in the window opening, onto which a carriage with grooves is placed. This option is more reliable. When the walls shrink, the ridge can slide and does not allow vertical deviations, eliminating pressure on the window frame.
The casing is usually made of timber. Using a wood chisel, a 0.5 cm groove is knocked out in the center of the beam, and a tenon (0.5x0.5x.25 cm) is cut out from one end. A ridge with 0.5x0.5 cm spikes is cut out from the end of the opening logs. You can use a saw or chisel for this.
Important! Ridge markings - important point. The quality and reliability of the design depends on the accuracy of the markings.
After the ridge is ready, we proceed to install the risers and form the structure of the opening between them. The beams are installed level, taking into account the gaps for wall shrinkage (1 cm on the sides and 0.5 cm on top). The frame made of beams is strengthened with the help of grooves with the main fabric of the walls and dowels between them. The gaps left are sealed with tow or other fiber. That's all, now you can start installation directly plastic frame. You can watch the process in more detail in this video:
Stage No. 3. Installation in the prepared opening
After carrying out the necessary preparatory work and installation of the frame, you can begin installing the window.
Attention! Installing plastic windows in a wooden house without casing is the wrong option.
To begin with, we check the dimensions and location of parallels, the gaps between the casing structure and the frame. The margin for foaming should be: 4-5 cm at the top, 2-3 cm in width and height, 3-4 cm in the window sill area. Having made sure that the stock corresponds to these indicators, we proceed directly to installing the plastic frame.
The window is secured using special fasteners, which are sold in any hardware store. They are metal plates with holes.
Installation of a plastic window should be done level. If you neglect this factor, then you risk getting a structure with a slope, which significantly reduces the operational and aesthetic objectives of the window.
Advice! Before installing windows, the sashes are removed. This simplifies the design and makes it much more convenient to install it in the opening.
After the window is secured in the opening, it is necessary to fill the gap with foam. To avoid displacement of the structure during foaming, blocks are placed that will maintain the position of the frame without deviation. After drying, do not forget to remove it.
Fastening the window to the casing is done with care. In this case, you must select correct location tightening screws. Under no circumstances should a window be secured in the ridge area!
That's all, we finish the process by completely foaming the opening. We put the sashes on and let the foam dry.
We presented the right way installation of a plastic window in a wooden house. This process can be difficult, so if you are unsure of your abilities, it is better to turn to professionals.
However, installing a plastic window yourself is a significant cost savings. We invite you to watch a video tutorial on how to install a window yourself:
In my house, I decided to replace the windows from wooden to plastic windows. Much has already been said about the advantages and disadvantages of these windows, so we will not dwell on this issue.
Introduction
This article will discuss in detail the installation of windows in a wooden house with your own hands, where the basis will be taken personal experience- I installed plastic windows in a wooden house myself. Why? There are two reasons for this:
- If you order the installation of plastic windows from a manufacturer, then on average you will be charged a fee for dismantling old windows and installing a new window in the amount of 40-50% of the cost of the window. Why pay more when installing windows in a wooden house is not at all difficult?
- In most cases (up to 95%), the manufacturer of plastic windows does not provide a guarantee for windows that are installed in wooden houses. So if you install windows in a wooden house yourself, you will not lose anything (I mean the warranty period), but you will only gain money (you will save on payment for installing windows).
Example: A plastic window costs 5,500 rubles ($184), respectively, the fee for dismantling old windows and installing new ones will be (50%) 2,750 rubles ($92). The total cost of the window is 8250 rubles ($275). I needed to install five windows, taking into account that I did the installation myself, it turned out that I saved 13,750 rubles ($459) on this.
Note: I installed the windows myself without any help; on average, it took me no more than 2.5 hours to dismantle and install the windows.
Removing old windows
Removing the old window
Installing plastic windows with your own hands in a wooden house requires a solid foundation - a frame. Since my window frames were installed only five years ago and had no damage: wormholes, rotten formations, cracks and chips, I decided to use them as a frame for new windows.
Note: I took measurements for the windows taking into account that the window frames remain in place.
If the window frames still have sufficient strength and have not rotted, then they can be used, for example, to build a greenhouse. So the work of dismantling them should be carried out carefully and it is advisable to first remove the glass from the bindings wooden windows ny frames
I did not remove the glass, since the frame bindings were of sufficient strength and could be easily removed (there were no distortions).
Preparing the site for installing a plastic window

Preparing the opening for window installation
With a clean, dry rag (you can use a brush), you wiped the surface of the window frame and removed the debris remaining after dismantling.
Installation of a plastic window sill

Installation of a plastic window sill
The window sill (PVC) is the base of the window when it is installed, so it is worth paying special attention to ensure that the installed window sill has the most accurate horizontal horizontal surface of the longitudinal and transverse location.
To ensure the installation strength of the window sill, I made notches on the sides of the window frame, about 8 mm deep.

Installing adjusting plates under the window sill
To level the window sill I used adjusting plastic plates, you can also use backing plates made of fiberboard or thin wooden planks, pre-treated with an antiseptic.

Controlling the horizontalness of the window sill
Control of the horizontalness of the window sill during its final installation and fastening was carried out using a building level.
The window sill was attached to the bottom trim of the window frame using self-tapping screws, stepping back 2 cm from the outer end of the window sill, and placing washers under the screw head so that when tightened, the screw head would not break the surface of the window sill (PVC window sill has cavities). After installing the window, the mounting points for the window sill will be hidden underneath it.
Preparing the window for installation

Preparing the window for installation
The first thing you need to do before installing the window is to install the handle. It is not necessary to remove the entire protective film of the window surface in order to exclude the possibility of mechanical damage to the window.
The protective film must be removed only at the location where the handle is installed. When installing it, the handle handle should be in a horizontal position (as can be seen in the photo) - this position of the handle means that the window sash opens to the side; if you lower the handle down, the window sash will be closed; if you turn the handle up, the window sash opens in ventilation mode .
I fixed the handle to the window with two bolts and moved the handle down (to the “closed” position).

Preparing for installation of the window frame
At the ends of the side window posts I made markings for drilling holes through which the window will be attached to window block. Two holes - top and bottom in the left window post and the same holes in the right window post. The distance from the holes to the bottom and top of the window is 25-35 cm.

Holes in the side frame posts
After marking, I drilled through holes in the side window pillars using an electric drill. Drill diameter 6mm (screw diameter 5mm).

Mounting holes
In order for the head of the self-tapping screw to have a rigid stop in the metal frame of the window, with inside side posts, drilled the mounting holes with a drill of larger diameter - 10 mm, up to metal frame. The diameter of the hole should allow the head of the screw to pass freely into the cavity of the window post.
Installation of a plastic window

Installation of a plastic window
After preparation, we install windows in a wooden house. To do this, install it in the window opening. The center of the window installation was checked by measuring with a tape measure from the edge of the window to the surface of the window frame on each side, the distance turned out to be the same - 1 cm. The window was installed on the surface of the window sill, and since the window sill was already installed exactly relative to the horizon line, the window could not be checked for horizontal installation required.

Installing a level between siding and window
In order to install the window parallel to the wall of the house, I installed it as a stop between the siding and the wall of the house. building level. If your house is lined with clapboard or other finishing material, which fits tightly to the wall of the house, and there is no way to carry out control in the same way as I did, then you will need to use a plumb line.

Installing a spacer bar
Between the window and the window frame I installed a spacer block 1 cm wide (it is necessary that the block fits tightly between the window and the window frame). This block is necessary as a stop when attaching the window to the window opening using self-tapping screws. Otherwise, the window post, when fastened, may simply be pulled away and the opening and closing mechanism of the window will work poorly or the window sash will not open at all.

Securing the window with self-tapping screws
When the stop bars are installed and the window is aligned parallel to the wall of the house, I secured it with self-tapping screws. The window was fixed to the window frame only at the top and bottom of the side posts so that the self-tapping screw was free in the space between the window and the frame.
Such window fastening provides not only reliable fastening, but such a mount turns out to be “floating”. In case of seasonal movements of the house and possible distortion window openings the window, not having a rigid connection to the window frame, practically does not warp, since most of the screw is in free space and the screw moves arbitrarily from the window towards the warp of the window frame.
Installation of double-glazed windows
Before installing double-glazed windows, it is necessary to install adjusting plastic plates between the drain holes. This is necessary so that the glass unit does not cover the openings and does not interfere with the drainage of condensate through these openings.

Installation of double-glazed windows into the frame
Carefully installed the glass unit into the window opening. The glass unit should not fit tightly between the window posts, since in the event of a possible skew of the window frame, the glass may crack, without having free space to move inside the window frame.
So if your double-glazed window fits tightly, and there is no necessary gap between it and the window mullions (at least 5 mm), contact the company where you placed the order for the manufacture of windows and demand that this deficiency be eliminated.
Note: The gaps between the glass unit and the frame must be checked immediately before dismantling the old windows.

Fixing the glass unit with plastic beads
After installation, the double-glazed window was secured with plastic beads. The glazing bead has a profile tenon, which is inserted into the groove of the window frame; when you lightly tap the glazing bead, the tenon goes deeper into the groove; if you hear a click, this means that the glazing bead is securely installed.

Filling the space between the window and the opening with foam
After installing the window, I filled the space between the window and the window frame with foam - from the inside and outside of the house.

Removing excess polyurethane foam using a knife
When the polyurethane foam had hardened, I trimmed off the excess with a knife.
That's it, the window is installed and you can start finishing with fittings, trim and drainage.
Attention: Prices are as of 2011.
Greetings, dear readers!
I decided to replace the old windows in a wooden house myself. This is not at all easy, so before that I looked at a bunch of sites and forums, talked with friends who were doing the installation. And I outlined for myself the basic rules for installation.
First you need to take measurements of the windows in order to know the exact dimensions and order the window correctly.
Next, you need to dismantle the old windows. Then he prepares the installation site for the window; to do this, you need to remove the dust and debris that accumulated during dismantling. Next, we install the window sill and prepare the plastic window for installation. Then we install the window itself.
At first it seems very simple, but there are small nuances, taking into account which you can easily do it. I want to tell you more about the installation later in this article.
Installing plastic windows with your own hands in a wooden house. Installation technology. Instructions, photos
Do-it-yourself installation of plastic windows in a prepared frame wooden house, like other construction and installation work, is carried out using a building level and plumb line.
It is very important that the plastic windows in the house are strictly level, otherwise an open window sash, for example, will close itself or, conversely, open under its own weight. Thus, the technology for installing plastic windows in the frame of a wooden house includes setting it level and plumb before fixing the window.
Here are our instructions, developed by our own experience, for installing plastic windows in a log house.
 First, I would like to note one point that you will need to remember when purchasing plastic windows: When you buy windows, it would be good to immediately buy mounting fasteners for them, ideally 6 pieces per window.
These are iron plates (see photo) which, with the help of little effort, are fixed in special technical slides on the sides of the window frame. Thus, the frame is attached to the frame using self-tapping screws through these mounting fasteners.
When installing, many installers of plastic windows fasten the window by drilling right through the frame, but this is a violation of technology, and the tightness of special air chambers in the profile of the plastic window is thus violated, so this is not our method.
Plastic windows in a wooden house are generally a very capricious thing, but if followed the right technology installation, then such windows in your home will last a long time, without upsetting their owners with all sorts of distortions and other problems.
 To ensure that installing windows yourself does not turn into torture, we advise you to remove the window sashes from the window frame. To remove them, you need to pull the pins out of the loops. Without window sashes, the frame weighs little, and it will be much more convenient to tilt it, which will greatly facilitate the installation of windows.
The instructions for installing plastic windows in a prepared frame of a wooden house are as follows:
Align the window. We place the window on the lower part of the opening on wood chips about 2 cm thick and adjust it horizontally. To set the horizontal level the best tool in our opinion is the water level.
 You can’t fool the water; it always levels out with the horizon.
Thus, installing the window exactly at the horizon level, placing wood chips for this required thickness under the frame, will leave about a two-centimeter gap at the bottom for foaming with mounting foam, we proceed to setting the vertical level so that the window sashes do not live their own lives.
I don’t think it’s worth explaining in detail how the vertical level is set when installing a plastic, or any other window, everything is clearly visible in the photograph.
 After we have placed the window level, we attach it to the frame with self-tapping screws through the above-mentioned mounting fasteners.
There is one technological point here - do not hit the ridge of the log on which the pigtail sits with a self-tapping screw.
It is better to screw in the self-tapping screw slightly obliquely than to deprive the frame structure of its independence from the frame in terms of the free movement of the carriages along the ridges of the logs.
The next step in our instructions for installing plastic windows in a wooden house will be attaching the window sashes. It is necessary to hang the sashes on the window before foaming, but if you foam the frame without sashes, the mounting foam may slightly bend the frame, and the sashes will not close/open well.
 Thus, if the technology is followed correctly and the installation of the frame and the plastic window is carried out smoothly, your window should be positioned in such a way that there will be approximately 2 cm of space for the mounting foam on all sides from the frame to the frame.
And above the upper part of the frame there will be a gap of 5-10 cm to the log for shrinkage of the log house, so that when it is completely dry, the upper logs do not put pressure on the windows.
Foaming the window. Control check– On a window that is already fixed, but not yet foamed, with the sashes inserted, open the window and look.
 If the half-open sash of a plastic window does not try to open further or, on the contrary, close, then our window is installed correctly and you can foam the frame with polyurethane foam.
This is our DIY technology for installing plastic windows. We hope you find it useful in building your wooden house! Happy construction!
http://dachaclub.rf/
How to install plastic windows in a wooden house with your own hands
In our wooden house, we decided to replace the old wooden windows with modern plastic ones. This article discusses in detail the installation of double-glazed windows with your own hands in a wooden house. The article is based on personal experience. Why is it profitable to install windows yourself:
When installing double-glazed windows in a wooden house by a supplier or manufacturer, the cost of the window including installation will cost 40-50% more than its original cost.
As a rule, about 95% of companies that install windows do not guarantee the quality of installation in a wooden house. Therefore, when self-installation In a wooden house with plastic windows, you do not lose the warranty period, but only save for your own benefit.
Window installation is shown using the example of self-installation of a double-glazed window, without the help of others, which takes an average of two and a half hours (for one window). The following describes step by step the process of inserting a plastic window into the window opening of a wooden house.
Removing old windows
Self-installation of double-glazed windows in a wooden house is carried out at solid foundation(frame). Since in our example, the window boxes were installed quite recently (about 5 years ago) and were without damage (cracks, chips, rotten formations and wormholes), we decided to use them instead of a frame for installing new windows.
Old window frames that are in good condition and strong enough can be reused, for example, to install a greenhouse.
Therefore, in order not to damage the wood of the frame, they must be dismantled carefully; it also does not hurt to remove the glass from them before doing this. In our case, we did not remove the glass from the frame, since the durable frames did not warp when removing them and were dismantled quite easily.
Preparing a site for installing double-glazed windows
With a dry and clean rag (or soft brush) you need to wipe the window frame and remove the waste and debris that has accumulated after dismantling.
 The PVC window sill is installed first, as it is the base of the double-glazed window when it is installed. In this regard, the window sill should be installed as level as possible (ideally horizontal). We check the exact horizontal installation of the window sill with a level, both longitudinally and transversely.
To ensure that the window sill stands firmly, we make cuts up to 8 mm deep on the sides of the window frame. To adjust the evenness of the window sill, we use special plates made of plastic or fiberboard, or thin wooden planks treated in advance with an antiseptic. After the final installation of the window sill, we measure the evenness of the window sill with a building level.
We fasten the window sill with self-tapping screws to the bottom of the window frame, while making a 2 cm indent from the outer end of the window sill. When tightening the screws, we place washers under their heads in order to protect the surface of the window sill from damage that is possible if it is broken through by the self-tapping head (at PVC window sills have cavities). After the window is completely installed, the window sill attachment points will not be visible, since they will be hidden from view.
Preparing a plastic window for installation
At the very beginning, even before installing the window, you need to install the handle. All protective film There is no need to remove the window surface yet, as it protects the window from possible mechanical damage.
Pay attention!
The protective film is removed only in the place where the handles need to be installed. The handle handles must be in a horizontal position when installed.
This position means that the window opens on its side, and if the handle is turned down, the window will be locked in the closed state, but if the handle handle is turned up, the window will open in the crank mode.
We fix the handle to the window with two bolts and move the handle handle down. On the side posts of the window (at the ends) we make markings for making holes on which the window will be fixed to the block.
Next, using an electric drill, we drill two through holes (lower and upper) along this marking in the right pillar of the double-glazed window and in the lower pillar (4 holes in total). The distance between the bottom and top parts of the glass unit to the hole should be from 25 to 35 cm. The diameter of the drill for this work should be 6 mm, while the diameter of the screw is 5 mm.
To ensure that the head of the screw rests firmly on the window frame, we drill holes on the inside of the side posts for fastening with a drill with a large diameter of 10 mm, right up to the metal frame itself. The hole should be such that the head of the screw fits freely into the cavity of the window post.
Window installation
We install the assembled window into the window opening. We control the center using measurements taken with a tape measure starting from the edge of the window and ending with the surface of the window frame on both sides; the distance should be the same (about 1 cm).
We install the window on the surface earlier installed window sill. Since we have already checked the window sill for levelness using a building level, there is no need to check the window itself for horizontalness.
To install a window parallel to the wall of the house, we install a building level between the wall and the siding for support. If the house was sheathed with another finishing material, for example, clapboard, which fits tightly to the wall and does not allow placing a level, then you need to use a plumb line for control.
We install a spacer bar 1 cm wide between the window frame and the window. It is necessary that this block fits tightly enough between the window frame and the window. This block is needed as a stop at the moment when the window is attached to window opening using self-tapping screws.
If this is not done, then the window may move to the side when it is fastened (it will simply be pulled away) and at the same time the mechanism for opening and closing the window will not function well, or the window sash will not open at all.
When the installation of the stop bars is completed and the window is aligned with a level or slope parallel to the wall of the house, then we fix the double-glazed window with self-tapping screws. We fix the window to the window frame from the bottom and top of its side posts, so that the self-tapping screw is in the free space between the frame and the window.
Such fastening is not only reliable, but also provides a floating effect. If seasonal shifts in the structure of the house occur, warping the window openings, then windows that are not rigidly attached to the frame are almost not subject to warping, due to the fact that the self-tapping screw can arbitrarily move in the direction of the window frame’s skew.
Installation of double-glazed windows in a wooden house
First, install adjusting plates between the drain holes. This is necessary so that the glass unit does not cover the openings through which condensation is drained from the window.
Carefully install the double-glazed window into the window opening. We make sure that it does not fit tightly between the window posts, since if seasonal changes occur and, accordingly, distortions of the window frame, the glass may burst.
Pay attention!
If your glass unit fits tightly, and there is no gap between the window mullions and the glass unit (at least 5 mm), then you should contact the company that made the windows for you for an explanation, so that the company’s employees can eliminate this disadvantage. It is necessary to check the gaps between the frame and the glass unit before removing the old window.
We install the double-glazed window evenly and fix it with plastic beads, which have profile spikes that are inserted into the grooves of the window frame with with the help of the lung tapping on the glazing beads, during which the tenon goes into the groove and a click is heard. A click means the staple is securely fastened.
After the window is installed, we fill the void between the window frame and the window with installation foam, both from the inside and from the outside. outside Houses. Excess frozen polyurethane foam is cut off with a sharp knife.
After this, you can begin finishing with platbands, fittings and drainage.
source: http://stroykaportal.ru/
How to properly install plastic windows in a wooden house
The relevance of the question: “How to install plastic windows in a wooden house” (and not only plastic ones) lies in the fact that wooden houses have great instability. Moreover, unlike a stone or reinforced concrete house, this instability manifests itself throughout the entire service life of a wooden house.
If these factors are not taken into account when installing plastic windows or doors in a wooden house, very unpleasant (to put it mildly) problems may arise!
 What is special about a wooden house? And the fact is that wood tends to “shrink,” especially in the first years after construction. Those who claim that the log house shrinks within a year after its installation are mistaken.
Yes, in the first year the most noticeable shrinkage occurs, but the process continues for at least 5 years, and in some climatic zones- all my life! As the logs or beams dry, the height of the wall can decrease to 1.5 cm per meter of masonry. This means that the height of the wall can “shrink” up to 6 cm.
And imagine now what will happen to the plastic window if, as always, you left a gap of 2 - 2.5 cm for the foam?! So, is installing plastic windows in a wooden house generally unrealistic? Quite the opposite!
But only if a special structure, called a casing or casing, is installed in the opening.
The purpose of this design is to give windows (and not only plastic ones) complete independence from load-bearing walls at home, eliminate even the slightest load on the window during shrinkage or curvature of the walls:
- The casing prevents the logs from moving from the vertical in the window opening.
- Does not interfere with vertical shrinkage.
- Takes on all the load.
- Strengthens the wall of the house in the area of the opening.
Let's take a closer look at this system. The simplest casing option is when a vertical groove of 50x50 mm is cut at the ends of the opening logs and a beam of the same size is inserted into it.
But this method of framing is ONLY suitable for wooden windows. Therefore, we will not dwell on it. More reliable option casing is when a ridge is made at the ends of the logs, and a window carriage with a groove is put on it.
 Now the logs, when shrinking (due to the ridge), will slide inside the groove without deviating from the vertical and without pressing down on the window.
It happens that a groove is made in logs, but the tenon is on the gun carriage, the main meaning, I think, is clear.
Window carriages are vertical bars 150x100 mm, at the ends of which there are 50x50 cutouts for insertion horizontal jumpers— boards 150x50 mm with spikes at the ends.
Casing in assembled form less is done window opening by 7 - 8 cm in height. This gap is left in anticipation of wall shrinkage. When assembling the frame in the opening, we cover the ridges with rolled tow and stuff the carriages onto it. This will save us from squeaks during shrinkage and insulate the opening.
Pay attention!
Next, the procedure is as follows: we lay the lower jumper, stuff carriages onto the comb with tow, insert the upper jumper into the upper gap and lower it into the grooves. We fasten the entire structure with self-tapping screws, trying not to grab the ridge, otherwise the whole point of installing the casing will be lost. We also stuff tow into the gap between the sapling and the logs.
But now you can install plastic windows into a wooden house without fear of the consequences. We carry out installation in compliance with all technologies: steam - noise - moisture protection. The gap between the casing and the frame is filled with thin boards wrapped in tow.
As the house shrinks, they have to be knocked out and replaced with others. To do this, the upper casing (attached only to the casing) is carefully removed and, after replacing the filling, put back in place.
At seminars I was often asked the question: why does a window installer need to know the technology of building a wooden house? And then, so that you can determine whether it is possible to install a window in this opening.
And, if necessary, equip it with a classic casing. Of course for a fee. In my practice there have been such cases.
Now such an important moment. You install a plastic window in a wooden house where there are wooden windows. The platbands were removed for accurate measurements, but there was no casing. That is, the old window box acts as a window frame.
This is where the owner has to make a choice (but with your help): redo window opening under casing or very significantly reduce the size of the future window. After all, on each side you need to add casing thickness + window frame+ gap for foam. And what will remain there?!
And in conclusion, I want to warn you:
Useful advice!
Under no circumstances agree to install windows without casing in the opening. Even if the owner proves that the house is 300 years old and “all the shrinkage has already settled.” The tree “breathes” all its life with all the consequences, as they say.
Well, as a last resort, you can give in to the client, under his responsibility. But do not forget to put a dash in the “Guarantee” column in the contract!!!
Still, installing plastic windows in a wooden house requires very serious attention.
Installation of plastic windows in an old wooden house can be done using standard instructions for such work. However, old houses have one feature that can be considered big advantage in front of newly built houses - old house no longer shrinks. In this case, there is no need for large gaps that are left for shrinkage of new houses.
Sequence of work:
- Preparatory stage - dismantling the old window, adjusting the size of the opening for the new window;
- Manufacturing of casing
- Window installation
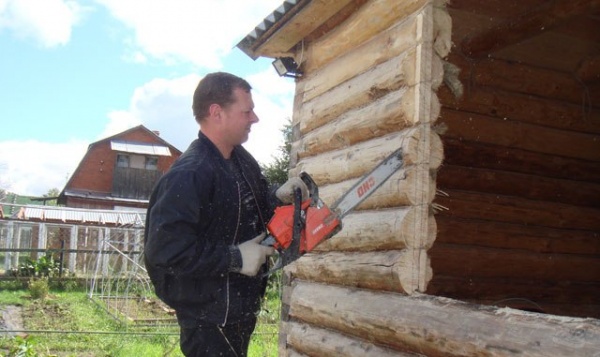
Preparatory work
If the house is old, then most likely the old windows were made of wood. Such windows are dismantled using a crowbar. If necessary, the old window is sawn. The doorway is completely cleared and inspected to determine the condition of the logs.
Important! If the house is old, then when windows were first installed, most likely, the window opening was not treated with antiseptic impregnations, which protect the wood from rot and bugs.
Old casing in doorway usually not suitable for a new window - it is either damaged or does not correspond to the size of a new window of the desired size - about 2 cm are left between the window frame and the casing on each side. If you use old casing, the window may turn out to be too small. Therefore, the old opening is expanded taking into account the size of the new plastic window.
New opening dimensions:
- Width – 220 mm is added to the width of the plastic window, which takes into account the thickness of the new casing beams (2 * 100 mm), the gaps between the frame and casing are 20 mm on each side, 15 mm on each side for jute insulation. The allowance is reduced by 50 mm due to the insertion of the tenons of the side openings of the window into the casing beams;
- Height - 245 mm is added to the height of the window for installation gaps under the frame and above the window frame, the thickness of the casing beams is taken into account. For an old house, they do not make a gap for shrinkage above the top beam of the casing.
Attention! If there are even slight doubts about the possibility of shrinkage of the house, then it is better to leave a small gap of about 45 mm above the upper beam of casing to compensate for possible shrinkage.
Manufacturing of casing
The casing must be installed even if the house no longer shrinks at all. The casing is needed to fix the linear dimensions of the opening.
Attention! For casing, use only well-dried wood that will not shrink.
Tenons are cut out at the end of the logs on the side parts of the window opening, and recesses are cut out in the side beams of the casing, the size of which exactly matches the size of the tenon.

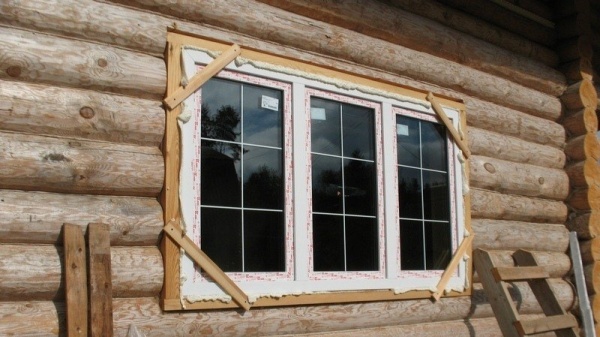
After trying on the beams, the opening is treated with an antiseptic impregnation and before laying the casing beams, a jute seal is secured with a stapler.

The casing beam is laid on the lower part of the opening with a sealant, then on the upper part of the opening. The side casing bars are installed last.

Before installing the side bars, sealant is applied to the joint. All gaps that were left above and below the casing are sealed with tow.

While studying self-repair, many are interested in:
“Is it possible to install PVC windows with your own hands?”
“How difficult is it?”
This event can be classified as medium-complex work.
In terms of time, it may take about five hours for a person without experience to replace an average window, including its dismantling.
Permanently practicing employees of specialized companies spend much less time on this.
The upper and side parts from the inside and outside of the room are sealed with slopes. They can be made from a similar material or using a different technology.
Do-it-yourself installation of plastic windows
Metering
To order plastic windows, you need to do important things. These are six mandatory indicators: the width and length of the window sill and slope, the width and height of the window.
In order for the measurements to be taken correctly, you need to determine the type of window opening you have - with or without a quarter.
The opening is inspected: he and a quarter if inner part The windows are wider, but the outside one is narrower. Measurements in in this case carried out in the narrowest place, and in several different points. You need to determine the smallest indicator and add three centimeters to it. This is a measure of width. The height is set as it is.
In the case of a flat opening, without a quarter, the calculation is carried out differently. The height and width are measured, and five cm are subtracted from the first value, and three from the second. This is the height and width of the future window. The side three cm are removed because under the mounting foam, one and a half cm gaps are required on both sides. Five cm of height are distributed as follows: the same one and a half cm on top, and 3.5 cm below will be required for installing the window sill.
The length of the window sill is considered to be five to ten centimeters larger than the width of the opening inside the room. The length of the ebb is also calculated, but from the outside. For some distance they go deeper into the wall. The window sill is measured based on the fact that it should deviate slightly from.
Its width can be different - at the discretion of the owners. More often it ends a little further than the battery. Before ordering, you need to decide what components will be in your window and how many of them there will be: is there a capercaillie, if so, where is it located, the number of sashes, how they open, in what positions. The type of fittings used is also thought out in advance.
Preparation for installation
Removing old windows
When replacing windows with new ones, the old ones must be dismantled. This is not difficult to do, but it will take some effort. Then an inspection of the opening is carried out, during which everything that may later fall off is removed. All protruding parts are removed with a chisel, hammer or even power tools.
All debris generated during the dismantling process must be thoroughly removed, including construction dust. If there are large cavities or potholes, it is advisable to cover them with a solution. The fact is that installation is easier, the smoother the window opening is. If the walls are made of too loose material, they should be treated with special ones.
Choosing a method for installing metal-plastic windows
There are various installation methods: with and without disassembling the window (unpacking).
 When unpacking, holes are drilled through the frame through which anchors are driven into the wall. This method is more complicated, but more reliable.
With another method, metal plates are attached to the outside of the frame, and then they are fixed to the wall with them. This is much faster, but this mount is not the most reliable. The frame may sag or become skewed when significant loads, for example, from strong winds.
If you don’t want to disassemble the window, then for installation it is better to use wide and thick plates used when installing the system. If you install small windows on just such windows, they will stand normally in the absence of strong wind loads.
If your region is characterized by frequent and strong winds, which blow mainly through the windows, and the apartment is located on high floor, then installation and disassembly will be required.
Window installation technology
Let's consider both methods in more detail. After all, it is often the plate mounting method that is required.
It is preferable in buildings built from low bearing capacity when you have to distribute the load from windows over a large surface.
 This method is also necessary if the building is constructed using a special “layered” technology: for example, there are layers of concrete behind and in front, between which a layer of insulation is placed.
If you plan to install a window in a soft layer, then it should be secured with plates. It is better to install PVC windows in a panel or cinder block house using anchors.
After installation all that remains is plastic profile in three planes and in two axes of rotation.
Installation and unpacking
At this method Only the frame is installed in the opening.
First, the window opening and the frame itself are measured to make sure they are compatible. Only after this they begin to work.
The process begins by unpacking the window. Actions are carried out according to the following algorithm:
The window sash is removed
- the window is placed in closed position, its handle is directed downwards;
- pry it up with a screwdriver and remove the plastic lining from the hinges;
- The pin on the top hinge serves as a movable connection; it is located in the center and protrudes slightly. While pressing, you need to push it down slightly so that it comes out at the bottom. Then it is grabbed with pliers (or side cutters) and pulled down;
- We hold the sash at the top, turn the handle, opening the lock. The upper part tilts slightly towards itself, the sash rises and is removed from the pin at the bottom.
The double-glazed window is also removable on the wood grouse. It is held in place by glazing beads that can be removed, after which it can be easily removed.
The glazing beads are removed
- something strong and narrow is inserted between the frame and the bead, for which it is convenient to use a spatula. Disassembly usually starts from the long side;
- The corner of the spatula is inserted into the gap and they begin to carefully move the glazing bead away from the frame, moving along the entire length. The separated glazing bead is removed;
- with the short side it is even simpler: the freed edge is pryed up and removed from the groove by turning the spatula. By pulling it up, the glazing bead is removed.
After all the above measures, you can try to remove the double-glazed window. You have to be careful that it doesn't fall out: it's quite heavy.
The glass unit is pulled out
- Along the outer perimeter, the freed frame is covered with self-adhesive tape, as recommended by GOST, so that the future window does not dry out;
- remove the protective tape;
- the prepared frame is inserted into the opening. To position it, you will need mounting wedges, which are placed under the impost and in the corners, as well as in places where it is necessary. They are gradually placed, while the window is aligned in three planes, strictly level. The position of the window is fixed using mounting plates;
- drill with drill bit the right size make mounting holes, retreating 15-18 cm from the top edge for the first of them. At approximately the same distance from bottom corner there will be a place for the lower fastener. IN standard window another anchor is placed between them: the distance between adjacent fastenings should not exceed 70 cm;
- Having made holes for the fastenings, check the position of the frame in all three planes to see if it has moved. After this, carefully hammer in the anchor, tighten it, but do not overtighten it. The profile must not bend;
Arrangement of ebb tides on the street side
- self-adhesive vapor-permeable insulation is glued to the outside of the frame. Neat grooves are made on the sides of the opening: later the edges of the ebbs will be led into them;
- on outer part of the opening, where the ebb rests on the wall, apply polyurethane foam. In some cases (with large differences in height), a lining profile is first installed, to which the ebb is attached. The ebb of the required size is attached with self-tapping screws to the frame under its protrusion;
- The tide also foams along the lower edge;
- the opening is also foamed. In summer, for better adhesion of the foam, the space between the opening and the frame is sprayed with water;
- a heat-insulating, vapor-permeable strip is glued along the contour of the window frame;
- all gaps are filled to two-thirds of the volume with foam. At large gap this must be done in several stages, with an interval of at least ten minutes between applications. After the first layer has dried, it is sprayed with water, then the next one is applied;
- until complete polymerization has occurred, the edge of the tape is glued to the window opening. It is important to remember that when using heat-insulating tape, the slopes must be made of plastic. Mortar and plaster do not stick to it;
- all parts of the window are assembled;
- vapor barrier tape is also installed under the window sill, in the lower part. Support pads made of solid material are also mounted there.


