The most difficult and time-consuming part of laying laminate flooring is the stage of preparing the base. The installation itself, in most cases, is carried out using the glueless, floating method, and due to the well-thought-out design of the interlocking connections, it is not particularly difficult.
But there are a number of rules and nuances that need to be taken into account in order to lay the laminate correctly and not encounter a shortage of materials during installation or deformation of the floor covering during its operation.
Tool set
The main operations in the process of laying laminate are cutting it into pieces of the required size and adjusting the panels to each other. You will need:
- tape measure, long wide ruler, large square, a pencil with a soft lead to measure the required segments
- a tool for sawing panels, most often it is a jigsaw, a hacksaw can also be used for metal (but not a saw for wood, it will not provide an even cut), a special machine
- preferably a drill with a crown attachment for drilling holes for pipes and risers
- a light hammer, preferably wooden or rubber, for a tight fit of the panels with a tongue-and-groove joint, as well as a spacer through which you need to tap the panel. It could be wooden block or just a piece of laminate
- for installation using the adhesive method - special glue; you also need to stock up on rags to immediately wipe off excess
- for laminate with Lock locks - a clamp that allows you to tamp the last row
- for maximum convenience, you can purchase a special set of spacer wedges, tamping spacers and staples to facilitate laying the last row
Before laying the first panel
 Before you begin laying the laminate, you may need to perform waterproofing and install spacer wedges.
Waterproofing is carried out if the moisture level of the base is too high, most often this is typical for concrete bases. Roll waterproofing made of polyethylene construction film or membrane is laid with an overlap of 20 cm and a slight overlap on the walls, the strips are fastened with plumbing tape.
Substrate. You can do without a substrate only if it is integrated into the structure of the laminate or if a dry screed was made on top of the subfloor. sheet materials. The thickness of the substrate should be proportional to the thickness of the panels, usually 3 mm is sufficient. Material of greater thickness can be used only on the recommendation of manufacturers of specific brands of laminate. It is advisable to choose a laminated coating and a substrate of the same price category. It is laid end-to-end, with a slight overlap on the walls; the excess is then cut off.
Spacer wedges can be made from scrap materials or scraps of wood. They are installed around the perimeter of the room in increments of 25 cm. The thickness of the wedges, which determines the width of the compensation gap, depends on the area of the room. For an area of less than 12 m², a gap of 8-10 mm is sufficient; for a larger area it increases to 15 mm, and in any case should not exceed 20 mm.
Selecting the laying direction and offset amount
The seams between the linoleum panels will not be noticeable if their long side is parallel to the incident light. Typically, laminate is laid along a longer wall, but a narrow windowless room, such as a corridor, can be visually expanded by laying the panels perpendicularly. For rooms whose shape is close to square, the best solution There will be a diagonal laying. It is more complex, requires more skill, and leaves more waste. 
If the room has a door that opens inward, and you don’t want to remove it from its hinges while laying the flooring, installation will have to start from the door. In other cases, it usually starts from a corner far from the door.
When laying directly, it is necessary to measure how many whole panels will lie between the walls (more precisely, spacer wedges), and what will be the length of the last segment. Similar measurements are taken along the width.
If the length of the last fragment in a row is less than 30 cm, then you will have to start laying from the third part or half of the panel, and perform a symmetrical offset in other rows.
If the width of the last row is less than 5 cm, you need to reduce the number of whole panels that fit in width by 1, and cut off identical strips from two panels for the first and last row.

The panels can be laid offset by ½ or ⅓ of the length, creating a symmetrical pattern that is repeated in every second or every third row.
But quite often they resort to asymmetrical laying, when the amount of displacement in each row changes. This is done if, when cutting the last panel in a row, the resulting piece is at least 30-40 cm long. You can start the next row with it, and the cut from the last panel in this row will go to the beginning of the next row, and so on. This method is considered the most economical and waste-free, but cannot be used if the cuttings are too short. For each specific room, you need to make calculations to determine the appropriate type of displacement.
A nuance: if calculations show that the last row will have to be cut to width, and the furniture will be placed against the wall from which the installation begins, then it is better to cut not the last, but the first row; it will be less noticeable under the furniture.
Features of laying laminate flooring with different locks
The simplest and most convenient glue-free installation laminate with click locks. The likelihood of damaging them during installation or operation is minimal; they are collapsible and allow the possibility of dismantling and reassembling the coating.
The Lock locking system is more vulnerable, and connecting panels with such locks is a little more complicated and requires more skill and accuracy. Therefore, it is better to opt for the more expensive Click system.
Laminate with adhesive joints is used quite rarely; such a covering cannot be installed over a heated floor system; it cannot be dismantled or individual panels replaced. The installation process itself is more painstaking and time-consuming.
Click locks
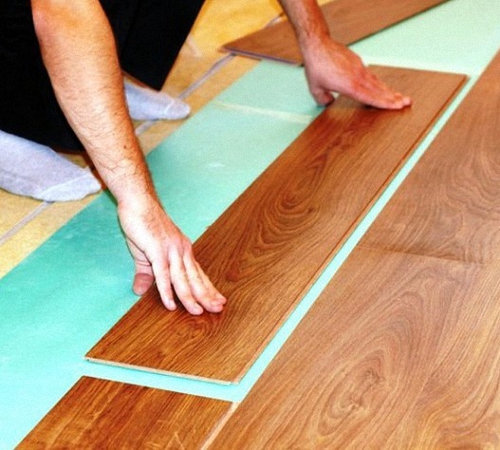
 The laminate should begin to be laid from the far corner, directing the panel with its protruding upper part towards the wall. New panel is brought to the previous one at an angle of 45⁰, the protrusion is inserted into the mating part, then you need to press the panel so that the lock snaps into place. The second row is assembled similarly to the first, but with an offset.
The system involves assembly in rows - first you need to assemble a whole series, connecting the panels at the ends, and then lift it, aligning the protrusion with the groove on the long side of the laid row and snap it into place with light pressure. You can lightly tap the panels for maximum closure.
Locks
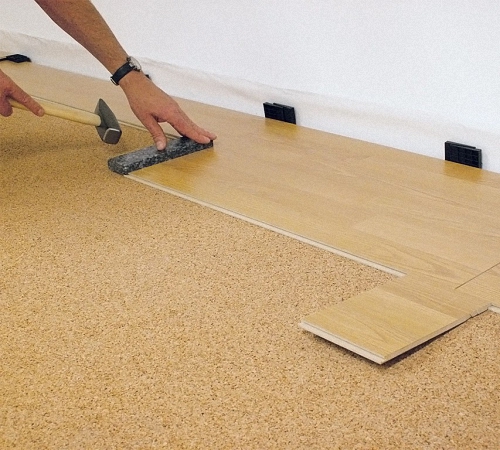
 When laying laminate flooring with this system, the panels are placed side by side, parallel to the floor. The first panel is directed with a ridge (tenon) towards the wall, the second tenon is brought to its groove. On the opposite end you need to carefully tap with a hammer through the spacer bar until the gap between the panels disappears.
When assembling the next rows, you need to try how it will be more convenient to dock new panels to already laid ones - individually or as a whole row. The most difficult parts to trim are the last panels in a row and the last row, as there is virtually no room to maneuver. A special clamp will come in handy here.
Adhesive connection
 Panels (lamellas) with an adhesive lock are also connected according to the tongue-and-groove principle, only the locks are pre-coated with glue. It is recommended to lay such a laminate in stages: assemble 3-4 rows, wait a couple of hours until the glue completely hardens and the joint becomes monolithic, then continue working. Excess glue squeezed out between the joints should be wiped off immediately with a cloth.
After the last row has been laid, you can remove the spacer wedges and install a plinth that hides expansion joints(it is attached to the wall, not the floor). If the flooring has already been laid in the adjacent room and you need to disguise the transition, install a threshold in the doorway.
Video instructions
How to lay laminate flooring correctly, video:
Bottom line
The technique of laying laminate flooring, especially with the Click locking system, is quite simple. All calculations must be performed before cutting the material, choosing the optimal layout scheme and offset amount.
The most difficult part is the calculations, cutting and the laying process itself with the diagonal method; if you do not have sufficient experience, it is better to entrust this work to professionals. When laying directly, the most important thing is to perfectly align the first row with the wall, otherwise the unnoticeable distortion will increase at first.
Laminate has gained immense popularity for its practicality, aesthetics and simplicity. Technology for installing floors with this coating quite simple: lay the underlay and carefully lay the laminate tiles - and the attractive “parquet” is ready. The question is how to lay laminate flooring with your own hands - this is rather a problem of choosing a material, the range of which is huge, both color scheme both technical characteristics and quality.
Features of material selection
Laminate flooring structurally involves 2 main layers - underlay and laminate
Laminate flooring structurally implies 2 main layers - backing and laminate. The choice of material for these elements is determined by the type of room. Any living space is conventionally divided into several zones: living room, bedroom, work area(kitchen, office), relaxation area (bath, toilet, balcony) and passage area (hallway, corridor).
Choosing a laminate
Laminate is a multilayer tile based on fiberboard with protective and decorative layers of paper and polymers; A top layer made of polymer resin that provides protection against abrasion and mechanical stress. Material varies according to the following main parameters: degree of resistance to abrasion and mechanical loads; thickness; temperature regime; moisture resistance; connection method during installation.
These characteristics are included in the product labeling and are fundamental when choosing tiles.
Selection by strength
Laminate divided by strength(abrasion, shock loads) into 6 main classes 21-23 and 31-33. Recently, material of categories 21-23 is practically not produced, and preference is given to classes 31-33.
The strength of the laminate increases with increasing numbers, but it should be taken into account that its price also increases.
The kitchen floor is exposed significant loads Therefore, it is advisable to use a slab of class 23 or 33. In this area, cost savings can lead to rapid wear and damage to the coating. A similar approach should be used when choosing coverage for the corridor and hallway. The lowest loads can be expected in a bedroom or closet - there is no point in buying laminate with a class higher than 21 or 31. In children's and living rooms, the planned loads must be taken into account, but, usually, a class 22 or 32 is sufficient (read also the article about installing linoleum).
Selection by thickness
Laminate boards are sold in thicknesses of 6-8, 10 and 12 mm. Increasing the thickness of the coating increases its strength, thermal insulation and sound insulation characteristics, but at the same time the price of the material increases significantly. To the advantage thicker tiles The simplification of their installation when installing the floor should also be included. Based on this alternative, in residential premises it is recommended to use slabs of medium thickness - 7 and 8 mm.
Connection method

The simplest are boards for adhesive installation.
Standard laminate boards have 3 main ways to connect them when laying: adhesive, Click-lock and Lock-lock. The simplest are boards for adhesive installation. They have the following advantages: they do not require perfection and are cheap. In addition, the glue ensures the tightness of the joints and eliminates the squeaking effect when walking on the floor. The main disadvantages are the non-disassembly of the structure, which excludes the repair of a separate section; increased labor intensity of installation and duration of work due to the drying period.
Interlocking connections are made directly at the ends of the slabs and do not require adhesive connections, which increases installation productivity. The Lock-lock system (tongue and groove) is simpler and somewhat cheaper than the second type, but the tiles at the joint can diverge under load, which causes gaps to appear. The Click lock is a more complex connection (latch) and provides reliable fixation of the tiles to each other, but has the main drawback - it requires ideal preparation of the subfloor; and also such tiles are the most expensive.
What is the asking price?
Laminate is sold in a wide range and in a variety of colors to suit every taste. We can recommend some brands: domestic manufacturers - Kronospan, Kronostar, Sinteros; foreign manufacturers - Classen (Germany), Praktik (China), QuickSter (Belgium), Kronotex (Germany), Alloc (Belgium), Egger, Meister (Germany), Pergo (Sweden), Maxwood (Germany). Prices mainly depend on the strength class and thickness of the slab. For example, the recommended 7 mm thick laminate of the Kronospan brand has the following cost: class 31 – 313-319 rubles/m², class 32 – 347 rubles/m², class 33 – 700 rubles/m². The change in cost by tile thickness can be shown at average prices: 6-7 mm – 300-500 rub/m² (depending on the strength class), 8 mm – 500-800 rub/m², 9-10 mm – 800-1000 rub/ m², 12 mm – 1000-1500 rub/m².
Selecting a substrate
Underlay for laminate board plays the role thermal insulation, sound insulation, waterproofing, shock-absorbing element. Most often, it is made of polyethylene foam, polystyrene foam and cork.
- Polyethylene foam. The simplest and cheapest backing is made from rolled polyethylene foam. Most often, you will not have to incur additional costs for such material, since it is applied to the laminate as an attachment. Main advantages – good thermal insulation and waterproofing. Disadvantage – low durability, insufficient shock-absorbing properties; During use, it quickly loses its shape and begins to crumble. At their cost, polyethylene foam films are much more economical than other substrates. Thus, a film with an area of 1 m² and a thickness of 5 mm will cost, on average, 26 rubles, and a film with a thickness of 10 mm will cost 60 rubles.
- Cork film. A backing made of rolled cork film has excellent sound and heat insulation, high shock absorption characteristics, is durable, and well levels out uneven subfloors. Disadvantages – low moisture resistance, which limits use in the bathroom; and high price. The cheapest films cost 350 rubles/m² without a base (2 mm thick) and with a base 750 rubles/m²; and films from the famous companies Granorte, Wicanders - more than 1020 rubles/m².
- Expanded polystyrene. Expanded polystyrene film with a layer of foil is the most common backing option. In terms of price, it occupies an intermediate position between previous materials, but has high durability and good waterproofing properties, while also having the positive properties of other substrates. The main disadvantage is lower resistance to indentation compared to cork film. The average cost of film (PPT type), depending on the thickness, ranges from 130 (2 mm) to 400 (10 mm) rubles/m².
How to lay laminate flooring
Installation includes next steps: marking the area, laying the substrate, applying laminate and finishing activities.

Necessary tool
To lay laminate flooring, you will need the following tools:
- electric jigsaw or hacksaw for cutting laminate;
- scissors for cutting the substrate;
- brush for applying glue;
- a clamp or vice for fastening tiles when cutting;
- mallet for adjusting slabs;
- tape measure and metal ruler for marking;
- level to control horizontality.
Budgeting
The manufacture of flooring should begin with calculating the required amount of materials and drawing up cost estimates. First of all, we need to calculate amount of laminate, which is estimated by area. The consumption of laminate tiles, on average, is equal to the floor area of the room with the addition of waste of about 7%. The substrate should be selected with a roll width that is a multiple of the width of the room - then its overuse will not exceed 5% of the room area.
For example, it is necessary to lay the floor in a room 4x6 m, i.e. 24 m². Choosing a substrate expanded polystyrene at a price of 320 rubles/m². Film consumption – 24x1.05=25.2 m². Cost – 320x25.2=8064 rubles. Laminate - class 32, 7 mm thick, priced at 347 rubles/m². Laminate consumption – 24x1.07=25.7 m². Cost – 347x25.7=8918 rubles. Thus, the total costs will be about 17 thousand rubles. The average time that will have to be spent on cutting and installing the covering is about 8 hours. If you still want to invite a specialist to carry out the work, then you need to prepare an additional 250 rubles per 1 m² of covering ( average cost works); those. for the room taken as an example, the savings will be minimum 6 thousand rubles
Video instructions
Laminate is one of the most popular floor coverings for installation in apartments. Installing it yourself at home is difficult, but quite possible. It’s quite possible to install it yourself, and the result will be an environmentally friendly, aesthetic, practical, durable floor. Naturally, not everyone can turn to construction teams who professionally install floors. How to install it correctly and quickly with your own hands will be described below.
There are several technologies used to lay out laminate boards. Each of them has positive aspects during operation and its own nuances when installing on a floor surface.
The most popular methods:
- Traditional;
- Diagonal;
- Herringbone.

The herringbone layout is very complex and requires special skills and a lot of labor, so they usually prefer to lay laminate flooring in the traditional way or diagonally. Laying diagonally makes it possible to visually increase the footage of a room, but this method will require a large number of panels, since a lot of building material will be wasted. With the traditional method, the boards are laid parallel to the wall in the direction from the window. This scheme makes it possible to visually hide the joints.
It is forbidden to lay the laminate across the window - then the lighting, falling at an angle to the joints, will focus on them.
With the diagonal method, the lamellas are laid at an angle of 45ᵒ relative to the wall. IN in this case the light from the window will not affect visual perception in any way - the junction points will be invisible. If we talk about the types of board connections, then glue and lock connections are popular among craftsmen. The advantages of connecting with a lock are ease of assembly and speed of installation. In this case, the laminate has grooves and tenons that fit into each other, creating a lock. There are 2 types of laminate board locks used in practice: “click” and “lock”. Advantages glue method assembly is that it makes the floors more moisture resistant, since the risk of water penetrating into the grooves and gaps is eliminated. In this case, it becomes more difficult to assemble the floor, but this is advantageous in a number of rooms, especially in the kitchen space, where the likelihood of water spillage is quite high.
Laminate layout: material calculation
Before laying laminate flooring, you need to calculate how much of it will be needed for the room. It should be laid out in such a way that you don’t have to buy additional boards. To do this, first of all you need to measure the area of the room, taking into account each protrusion. It is necessary to take into account expansion joints, understanding that on each side vertical surface There should not be a tight-fitting laminate board (at a distance of 1.5 cm from it). Further calculations will require knowledge of the dimensions of the laminate. The area of the room must be divided by the area of the lamella, and the number of canvases that need to be purchased will be obtained.
It is important to note that the resulting numbers must always be rounded up.

The required number of panels depends on the installation technology chosen. There are usually 8 slabs per package. So, we divide the number of required canvases by the number of panels in the package, we get the number of packages that will be required. This calculation is correct if home handyman wants to assemble the floor the traditional way.
In this case, the resulting surface can be:
- Flat;
- Durable;
- Long-lasting.
If the master wants to make the floor on his own and prefers a diagonal installation method, then the calculated number required material it is necessary to boldly increase by 20%. It is best to purchase a laminate board for any chosen method with a reserve, since during operation there is a risk of damaging the slats. A consultant from a specialized store will help you choose.
Laminate laying scheme: tools and materials
A person who is going to lay laminate flooring must take care of the preparation the necessary tool, so as not to be distracted from work, and to lay out the board yourself without mistakes.
You should prepare:
- Electric jigsaw for cutting boards;
- Wedges that will maintain an expansion joint between the vertical surfaces and the laminate board;
- Clamp for mounting end parts;
- Construction tape;
- Scissors;
- Simple pencil;
- Scotch;
- Mallet;
- Wood block.

Naturally, a laminate board and a substrate (thermal and vapor barrier), as well as a water-repellent sealant, must be purchased. It should be noted that if we place the material on an existing covering in the room, such as linoleum, then it is not necessary to install a backing; linoleum will perfectly cope with this role.
Sealant is needed to properly join the panels.
Select a tool and finishing material You can do it yourself or turn to professionals. If you turn to a professional, you don’t have to resolve the conflict in a dispute between household members; an experienced professional will select exact quantity material, will tell you how to lay out the panels correctly.
Preparation and how to lay laminate correctly
Before you start making repairs, you need to let the building material sit in the room at room temperature, this is always written in the instructions. The rules state that the material should be stored at a temperature of no less than 18 ᵒC and a relative humidity of no more than 70%. The installation work assumes that it rests on a flat base.
Before installing the slabs, you need to level the base, and if necessary, then additionally:
- Fill potholes;
- Grind irregularities and bulges;
- Fill the seams.
If there is a wooden floor, it is leveled grinder. Laminate is laid on tiles and linoleum without special preparation of the coating, but only when the tiles are without chips and there are no cuts on the linoleum.

Leveling options include the use of a self-leveling screed or screed.
If the coating is damaged, it will be necessary to remove it and prepare the surface. The concrete base is primed to remove dust. Before installation, using a building level, check the horizontalness of the surface.
Smooth laminate flooring: how to lay the underlay correctly
The substrate should be laid out on the prepared base. It's not difficult to do this yourself. The size of the substrate should be the same as the size of the floor surface (we place it everywhere and under the battery). Lay the material without overlap, end-to-end, no need to retreat from the corner. If the material is sheets, then it is laid with an offset, just like laying bricks in the walls. The joining points are secured with tape so that it does not move out. You need to carefully cover the entire floor and then you can begin installing the boards.
Substrate:
- Necessary for final leveling of the floor for installation of slabs;
- Acts as a heat insulator;
- Serves as sound insulation.

If the master preferred adhesive connection, then before laying on the locks, sealant should be applied. If the slats have “lock” locks, then each panel is connected separately, and the joint is made with the adjacent board and the row of boards on top.
If the connection is “click”, then first the slabs are fastened at the ends, and then row to row.
Improper installation can cause displacement to occur. The packages come with an explanation of how the work is performed; it is recommended that you study it. An online calculator program will help you calculate how much material will be required for installation.
The traditional way: how to lay laminate flooring yourself
This method is the easiest and you can do it yourself without any problems. Step-by-step instructions for installing laminate boards state that installation should begin from the wall and perpendicular to the window.
Installation by traditional technology done like this:
- The first row must be assembled tightly to the wall, be sure not to forget about the compensation gap of 1.5 cm. To ensure that the gap remains unchanged, wedges made of wood are used. In this case, the tiles are laid so that the grooves are located towards the vertical surface.
- Next, you need to lay the panels in the first row - the second board is attached to the first lamella at the end side. Immediately you need to use a level to level the slats so that they are perfectly straight. The boards should be placed in a straight line, strictly perpendicular to the window opening, to the opposite wall. We don't change sides.
- The last board fits perfectly into the size of the wall, and it needs to be cut, so initially you need to measure the distance along the floor to the vertical surface from the already installed sheet, taking into account the gap. Then you need to apply markings and cut off the excess with a jigsaw.
- The second row is mounted in the same way. The installation can begin with an already cut piece of slab to save building materials. The spikes fit into the grooves and snap into place.
- After installing the row, the boards are arranged closely together - for this you should use a mallet and a block. The block is placed against the board, and it is tapped with a wooden hammer - then the lock closes tightly, and the gaps between the plates will not be visible. This is how row after row is laid out. The latter may not stand up entirely, then you should saw off the excess and finish the installation.

The traditional method is not difficult, but laying it out with a pattern, or, for example, writing a word or phrase, is difficult. Also, if checkerboard masonry is used, problems may arise. If you have no experience, as the school of life shows, it is better to start with something simple; drawing requires perseverance and experience.
Laying diagonally: how to assemble laminate
Diagonal technology is not difficult to perform. The first board is placed at the far corner of the room. To orient the panels and mark them correctly, you will need a square with sides of 45ᵒ. After cutting the board, you need to put 1.5 cm wedges on the walls and place the lamella in the corner.
Nuances:
- The first row includes 1 board.
- The second row already consists of 2 boards.
- It is important that the ends of the elements fall on the central part of the first board.
Having measured the length of the panels, it is necessary to cut the corners again at 45ᵒ - they will be adjacent to the vertical surface. The rows are connected to each other. In order for the floor to look aesthetically pleasing, it is important that there is a distance of 200-400 mm between the ends of the panels of adjacent rows. This is how row after row is arranged, not forgetting to strengthen the rows of material with a mallet in order to make the gaps less noticeable and eliminate cracks.

When installed diagonally, laminate boards are laid at an angle of 30-45°.
Installing a laminate board is not difficult, it is quite possible to do it yourself, following the instructions, the whole process will take no more than 1 day. Deck boards are difficult to install and require the use of glue, so it is better to start with a simple laminate.
Which direction is the best way to lay laminate flooring?
Where and in what direction should the laminate be laid? The direction of installation of the laminate in a private house should be oriented towards the source of daylight or artificial light in a room where there is no window (corridor, hallway or storage room). This is due to the fact that natural or artificial light, falling on a floor surface laid out perpendicularly, illuminates the joints of the panels, and the floor does not look aesthetically pleasing.
All connections of the boards will be visible, so the answer to the question of how to correctly lay the laminate, lengthwise or crosswise, will be this - the slats should be arranged parallel to the light source in the room. We can draw an unambiguous conclusion - installing laminate along or across depends on where the light source is located, so that the joints between the boards are not noticeable, and the finishing coating looks stylish and beautiful. If the boards are very dark, they can be lightened using special compounds.
Proper installation of laminate flooring with your own hands: step-by-step instructions (video)
So, as it became clear from the article, laying a laminate board is quite possible, the main thing is to follow the instructions and take your time, then everything will definitely work out.
Laying laminate flooring with your own hands is probably within the power of every person, even those who are doing it for the first time. Thanks to the step-by-step instructions and the simplest tongue-and-groove design, you can confidently lay the boards on the base and the quality of work will be the same if all the work was done by a specialist.
If we draw an analogy with other popular floor coverings, it should be noted that laminate is the most popular and modern material. Variety of textures and beauty are not its only positive qualities.
In its structure, laminate is a four-layer material, where each layer plays an important function. The topmost layer is aimed at protecting against all kinds of mechanical stress and damage. Improves light resistance and heat resistance, resists electrification of the laminate.
The decorative layer consists of special impregnated paper, onto which a pattern is applied that imitates the structure of wood or other materials.
The middle layer is the main one, since it will be the supporting base of the laminate. This layer is made from wood dust, which is impregnated with resins when high pressures. This procedure makes this layer extremely durable. The layer can be HDF - high-density board and MDF - medium-density board. Also, the main supporting layer can be made of plastic - this makes the laminate moisture resistant.
The stabilizing layer prevents the slab from deforming, increases sound insulation, and slightly protects against moisture.
Conditions for laying laminate flooring


Before you decide to install laminate flooring, please make sure that it is suitable for the conditions under which it will be used. . This will directly increase its service life.
Of course, laminate is a very beautiful floor covering and it looks great throughout the apartment. But you should not install it in the bathroom; installation on the balcony is not advisable. If you plan to put heated floors under the laminate, then they are best suited, since they will not deform it. In general, it is prohibited to lay laminate flooring in areas where there is high humidity.
Laminate flooring must be installed in rooms that are heated or do not have sharp temperature fluctuations. The floor will last a long time at a room temperature of 15 to 30 degrees and a humidity of 50 to 70 percent.
Laminate is an excellent flooring option. It is relatively cheap and easy to install yourself. Below I will tell you step by step how to do it correctly.
Methods for joining laminate boards
Currently, several methods have been developed for installing laminate flooring. Each of them is unique and has a certain right to its existence.

“Click” - this installation method is the most popular, as it is easy and convenient. Having laid the entire first row completely, insert the tenon of the next row into its groove at a slight angle. After inserting, we align the row horizontally and snap the parts into the lock. You can use a mallet or hammer. We splice adjacent parts until there is a characteristic click, and until the seam becomes almost invisible.

“Lok” - differs from the “Click” method in that we place the next board strictly horizontally and drive it into the lock to the previous one using a hammer or mallet. Do not use the hammer too hard, as you may damage the joining edges. Do everything strictly carefully.


The glue method is less common. All work is identical to the first “Click” method, but all joining edges are additionally coated with glue. This will make the seams more durable and moisture resistant. But this method will not allow you to disassemble the floor covering if necessary, and the glue may also dry out over time.
Preparing the room
First of all, it should be noted that competent and proper preparation the base for laying laminate flooring is 50 percent of its quality installation. Carry out this stage of work most carefully and responsibly, since the durability of your flooring will depend on this.
Considering all the little things for installation, you will need the following materials:
- primer;
- glue;
- laminate;
- baseboard;
- fastenings intended for baseboards;
- foamed polyethylene or film;
- wedges for technological gaps.
Glue is used only to adhere the boards in the place where the edges and hooks are provided.
Laminate flooring is purchased with a small supply. After all, with a simple installation technique, few will be immune from mistakes that could result in a couple of boards being damaged when cutting or sawing out a bend in a wall or a pipe outlet.

The styling tool is quite simple:
- roulette;
- corner;
- pencil;
- wooden block;
- hammer;
- electric jigsaw or hacksaw.
Step 1 Allow the laminate to acclimate


Place undamaged packages of laminate flooring in the rooms where it will be installed. This must be done at least 48 hours before installation, this time will be enough to adapt to the temperature in which it will be used. This will minimize the deformation that occurs from heating or cooling the wood.
Step 2 Clean the floor

You will need to remove dust from the screed or other surface on which you will be laying the laminate. You can sweep the floor or vacuum. We prime the surface so that the primer fills all the depressions and uneven areas that are invisible to the eye.
Any base is suitable for installation; it can be a regular wooden flat floor or a concrete screed, which do not have differences in height up to two millimeters per square meter. If the floor, nevertheless, has unevenness, then it must be leveled. Fill all cracks and depressions with putty or special mixtures. If the base is a concrete screed that has many cracks, then it is necessary. If you don't do this, the flooring will quickly deteriorate.
If the room where you are going to lay the laminate has a plank floor, then first of all check for fungus and dampness under the boards. If there are unevenness on the boards, this can be eliminated by scraping. If your boards squeak, then you need to go through it additionally. Wooden floors included.
Step 3 Install waterproofing


Lay waterproofing material on the floor, you can use plastic film.
Before laying on the concrete floor, lay the base plastic film, the thickness of which must be at least 200 microns. Lay the film strips on top of each other with an overlap of approximately 15 cm and seal the joints with tape. It is recommended to extend the film onto the wall a little, about 4 cm, so that it will be covered by the baseboard.
Step 4 Substrate under the laminate


A substrate is laid on top of the waterproofing, which will significantly increase heat and sound insulation. The most commonly used underlay is 3 mm thick polyethylene foam; it removes minor unevenness in the floor, such as small pebbles or dimples, and makes the floor perfectly flat. This type of underlay can help soften impacts on the laminate, which significantly extends its service life. decorative covering. The backing is laid end to end and secured with tape.
IMPORTANT! There is a laminate whose base already has a soundproof backing. In this case, the polyethylene lining does not lie down under any circumstances. If installation is done on concrete base, then we just form the waterproofing.
Step 5 Lay down the first board


Laying the laminate begins from the left corner, in this case the locks are correctly positioned for further fastening of the boards.
Step 6 Place Spacers


A wedge is inserted between the laminate boards and the wall. You can buy wedges, but it's easier to make your own. The width should be approximately 1 cm. You can saw it off the laminate or cut a piece of plywood. 5 - 6 pieces should be enough for you.
For wedges, you can use pieces of drywall, pieces of laminate - anything, as long as the size is the same in thickness. But you can also buy them - they cost pennies.
Wedges are a must! Laminate flooring uses wood; it is affected by changes in temperature and humidity, and if you place it close to the wall, the floor may warp and stand on end.
Step 7 Lay down the next board

Insert the next board into the lock of the previous one at a 45 degree angle and lower it. We begin to mount all the boards in a row that support the wall. At the same time, make sure that the laminate is connected correctly. If the whole board does not fit at the end, then we cut it off, taking into account the gap to the wall of 15 millimeters and the remaining piece will go to the beginning of the new row.
Step 8 Laying the second row

Trim a laminate board and use that piece in the second row so that the boards are staggered relative to the first row. It is necessary to lay a new row from the remaining pieces from the previous row. This will significantly strengthen the adhesion of the boards to each other.
We place all the elements in the second row near the first row, touching only the edge of its end, without snapping it into the groove. Only after you have completely assembled the second row, carefully lift it and insert it into the groove, snapping the lock.

If the row fits into the groove, but there are still some inaccuracies, then we apply a block to the edge and carefully drive the entire row into the lock with a hammer. And we continue like this until we have covered all the necessary space. The most careful attention is required in places where there are protrusions or multiple bends in the walls, where there are outlets for heating pipes and communications.
Step 9 Continue laying boards


One by one until the entire floor is finished. Be sure to make sure there are no gaps or breaks between the rows.
Step 10 Trimming the boards at the end of the room


When you have filled the entire area in the room, and there is only one row left to lay along the wall, then you will need to saw off every detail. When sawing, be sure to take into account that the walls may be uneven, and make all calculations, including one and a half centimeters for the defragmentation seam.
Step 11 Don't forget to remove your spacers


We remove the pegs around the entire perimeter when the entire floor is ready. Let the laminate sit overnight. Do not wet clean immediately after installation. If you decide to continue further work on improving the room, then be sure to place the remains of the backing under the legs of the chair or table so as not to scratch the laminate.
Step 12 Installing skirting boards

To complete your floor you will need to nail down baseboards, install thresholds and other small details. Small holes or rough spots can be covered with special construction chalks, which are available in any color at hardware stores.
Skirting boards can be mounted either with glue or with screws. All fastenings are made directly to the wall. If you start screwing the baseboard to the floor through the laminate, this can lead to swelling due to thermal expansion.

Therefore, regardless of installation methods, the plinth is fixed to the walls - this is very important. Also this method fasteners will allow you to easily remove the entire structure of the skirting boards and, if necessary, easily disassemble the required section of the floor to carry out partial repairs.
The adhesive fastening method is used if you do not intend to change the floor covering in the future and do not carry out any repair work.
Considering that the plinth follows the contour of the wall around the perimeter and that walls are often uneven, it is better to use plastic skirting boards. When laying wires, do not allow the wire to lie between the laminate and the wall.
Several laying schemes
When laying laminate boards, be sure to follow the method of orienting the pieces towards the light. This is required by designers and aesthetic considerations. There are several installation schemes according to light orientation: diagonally to the light, perpendicular to the light and parallel to the light flux:
- Classic styling scheme;
- Diagonal pattern;
- Chess or brick scheme styling;


More popular. In this scheme you can use all the material economically. The parts must be placed parallel to the light streams and laying the laminate must begin from the wall that is closer to the windows. The next row begins with a cut board from the previous row. This will reduce the amount of trimming and increase material savings.
Diagonal pattern


The most sophisticated and fancy. Designers use it to create spaciousness, airiness and lightness in a room. Consumption increases by 15 percent with this installation scheme. The consumption may increase even more if the laminate is installed in long and narrow rooms.
Many flooring professionals install laminate flooring only diagonally. It gives effect visual increase rooms, which are subsequently used for non-standard implementation of design solutions. Main disadvantage– this increases the consumption of boards and labor intensity.
All preparatory process has no differences. Select a corner from the window, stretch the fishing line from the corner to the opposite wall at an angle of 45 degrees. The fishing line will be your guide during installation.
On the first strip, we cut off the edge at 45 degrees and place it in a corner, making sure to install wedges for the gap. Next, we take several laminate boards and measure them so that the joints are in the middle of the first row, and the cut edges lie against the wall with a small gap for the wedges. We fill the entire space in this way, focusing on the fishing line and the joints of the already laid out rows. And only after that we cut and fill the areas near the walls. This will save you from the situation when in the apartment uneven walls. If you start laying from the walls, you will constantly have a gap between the joints in adjacent rows.
Checkerboard layout


Named due to the fact that all the laid parts according to the drawing will resemble chessboard. The whole principle is quite simple: each new row is placed offset by half of the previous board. Here, the material consumption will also be increased to 15 percent, but at the same time the structural strength will be the highest.
Proper care of laminate flooring
Of course, every owner wants the floor in the house to look like new and therefore it requires some care. Laminate is no exception.
- Before entering, be sure to place a dirt-catching mat, which will reduce the ingress of sand onto the floor by 80 percent, which inexorably scratches it.
- All legs of standing furniture must be covered with felt pads to prevent scratching.
- Do not allow water to accumulate on the surface. Carry out wet cleaning using a well-wrung out cloth.
- You can use special cleaning products for laminate flooring, but do not exceed the concentration. Do everything according to the instructions detergent. After using special products, you need to wipe the floor dry so that no traces remain of them.
Cutting out the pipes
It happens that problems arise with installation in hard-to-reach places: protrusions and recesses of walls, heating pipes, radiators. Make all pipe cuts correctly and slowly, otherwise you will ruin the entire appearance of your floor. The pictures show in detail how you can bypass the pipes when laying laminate and how to do it all correctly.
We lay the board turned diagonally, resting it against the pipes. Using a corner, we mark the location of the pipe(s) along their width. Next, we rest the board against a construction peg and mark the distance on the side of the pipe. And we see the locations of the pipes, which we carefully drill out first.
This is done using drills called ballerinas. You can make two options here: in the first one, we simply cut it, place the part and the piece near the walls and coat the cut with glue and glue the part together, or we buy plastic covers, which are also common in all stores; The second option is to make the holes strictly according to the size of the inserts.
Decorative contours for heating pipes also look nice and will hide all your mistakes and irregularities when drilling or sawing out holes. I think everything was clear to you here, because in fact it’s not difficult to get around the pipes.
We go around the ledges on the walls
When laying laminate boards, it may happen that the edge will rest against unevenness on the wall or in its rotation. In such a situation, we cut directly into the parts the required form electric jigsaw.
There are situations when elements covered with plastic or plasterboard become an obstacle. Here is a solution to this problem - we carefully trim the bottom of the sheathing and push the part along it to the wall, taking into account a gap of about two centimeters. To do all this correctly, adjust the lock on the adjacent part and you won’t have to lift half of the flooring to snap the lock, but the strength of the connection will suffer. In this case, before connecting, coat all joints with glue and press firmly.
Installing laminate flooring in several rooms
If you are going to lay laminate flooring over a large area, be sure to form expansion joints between the rooms. Thresholds are used here, which are fixed to the floor between two sections laid laminate, which are not related to each other.
This is all done in order to allow the floor to “breathe”, since temperature changes in the room lead to the expansion or contraction of the laminate flooring. Although the coefficient is small, increasing the scale of the floor can lead to divergence of the laminate or swelling.
In conclusion, I want to say that the entire process of laying laminate flooring is not complicated. Anyone can do this with their own hands. The main thing is not to make mistakes in the installation process and your floor will delight you with its beauty for many years.
Tweet
Stammer
Among the wide selection of modern floor coverings, laminate firmly holds its position in popularity. This relatively inexpensive type of floor covering has a number of undeniable advantages. In addition to the abundance of colors and textures, this material, if the installation and operation rules are followed, is durable, looks great and does not require special measures care Installing it is very simple, just follow the instructions and correctly follow the recommendations for working with laminate.
Basic requirements for laying laminate flooring
The laminate panel is a multi-layer structure, equipped on all four sides with a special locking device. With its help, the floating system of this flooring is firmly connected into a single whole. There are several fundamental conditions, failure to comply with which can lead to rapid deterioration of the coating, the appearance of creaks and cracks.
- The base for the laminate should not have level differences of more than 2 mm at a distance of 2 sq.m. That is, a hole or hump in such an area will lead to damage to the locks and, accordingly, to the destruction of the entire coating.
- On the same 2 sq.m. There should not be a uniform deviation from the horizontal level of more than 4 mm. Furniture in such areas will not have stability, and cabinet doors will warp.
- When laying laminate flooring, it is imperative to lay an underlay. Its thickness should be selected according to the thickness of the panel. So for a 9 mm laminate, the thickness of the substrate should be at least 3 mm.
- In addition to a special substrate, when laying laminate flooring on a concrete screed, it is necessary to lay a layer of vapor barrier (or polyethylene). This is necessary so that the concrete base does not transfer to the laminate made from pressed waste from the woodworking industry (or impregnated paper).
Next, we will consider the procedure for laying laminate in more detail. What tools are needed? What are the features of installation on different bases? How to install underfloor heating for this floor covering? We will also consider some additional aspects of working with this material.

Where to start?
The primary task that must be resolved before proceeding with the installation of the laminate is leveling the base. However, there are several ways to solve this issue.
1. Concrete floor
Preparing a concrete base with your own hands consists of three stages:
- The rough concrete base should be checked for strength and compliance with the required plane requirements. For this purpose, the master will need a large building level(more than 1.5 m). Using this tool it is very convenient to identify all surface irregularities.
- Irregularities, cracks, chips and other defects concrete screed leveled with mortar. When the leveled base or new cement floor has hardened, it is recommended to cover its surface with a finishing layer of screed or sand it.
- To prevent accidentally exfoliated particles from creaking under the laminate boards, the concrete floor must be treated with a primer mixture. It will hold the top layers together and the floor will not become dusty.
To level the floor over the screed, it is convenient to use gypsum fiber sheets. Additionally, they will serve as heat and sound insulation.

2. Wooden floor
Laying laminate flooring on a wooden floor does not differ significantly in technology from laying it on a concrete screed.
- Damaged parts must be replaced.
- The next stage is checking the level and evenness of the floor. If there are large defects, they must be corrected. Great way level the old board floor - cover it with sheets of plywood or OSB.
It is important to remember that the sheets must be laid with small expansion gaps (up to 3 mm), and the heads of the screws or nails must be well recessed.
- Fixed plywood (or OSB) should not “walk” much underfoot, otherwise the floor will begin to creak over time. The fastening step along the perimeter should not exceed 10 - 15 cm.
- Irregularities at the joints must be smoothed out with a grinder and shavings and dust must be carefully removed.
Experienced builders recommend treating the wooden base (both old and new) with antiseptic agents before laying the laminate flooring. This will help prevent the formation of fungal mold or damage to the wooden base by wood-eating insects.
Laminate is an almost universal covering. It can be laid anywhere in the house or apartment, as well as on any base. Even on tiles or old linoleum. However, do not forget to check the evenness of the surface and clean the old coating. Having given the base required quality, we prepare materials and tools for laying laminate flooring.

Buying laminate
Having decided to cover your floors with laminate, you need to take a responsible approach to choosing it. When purchasing you should pay attention special attention on wear resistance, coating strength (scratch resistance), and attitude to moisture. Price, country of origin and design are naturally also important. Floor boards should last for more than one year, so their quality should best match the characteristics of the room, including from a visual point of view.
1. How to determine the purpose of the laminate class?
There are two main categories of laminate: “20” and “30”. The first ones are intended for use in residential premises with a relatively small technical load. The second ones are for commercial or public premises with high traffic and complex operational features.
In turn, each of these categories is divided into three classes:
- 21 - has the weakest characteristics, as it is intended for dry, poorly trafficked rooms such as a bedroom or living room. A large amount of moisture can be detrimental to such a laminate.
- 22 and 23, respectively, have higher moisture and wear resistance characteristics. 23 can be used in the kitchen or hallway.
The maximum warranty for this category does not exceed six years. Due to their rather low technical characteristics, having a lower cost, such laminate is becoming less and less popular.
- 31 - 32 can be used in office premises;
- 33 -34 are the most durable classes that will last more than 10 - 20 years, resistant to humidity and mechanical damage.
It is worth remembering that the thicker the board and the lower the level of moisture resistance (up to 20%), the longer it will last, and the less trouble such a floor covering will bring to the owners.
2. Buying a substrate for the laminate
Laminate flooring is installed using floating floor technology. This means that it is not firmly attached to the base at any point. To ensure that this flooring lasts a long time, it is not enough to choose high-quality material. In addition to the laminate, you must select the appropriate underlay. It will not only provide additional heat and sound insulation, but will smooth out small unevenness and roughness of the base and soften the sound of steps.

The choice of substrates is quite varied. It is worth proceeding from the need to use one or another type. For even surfaces, a thickness of 2 mm will be sufficient, but it is better to use a thicker one. There are several types of substrate:
- Polyethylene foam.
The most popular, sold in rolls, has quite affordable price. Moisture resistance, thermal insulation and unattractiveness to rodents and mold are its positive aspects. One of the options for such a substrate is foil. This material, thanks to its thin aluminum layer, perfectly reflects the infrared spectrum, that is, heat.
But such a substrate also has negative sides. Polyethylene does not hold its shape well, so it sags over time. It is also possible for an electrostatic charge to form, so in very dry rooms the floor may shock.
A higher quality version of this material is foamed polyethylene. Its price is higher.
- Cork.
This material of natural origin perfectly insulates heat and is not susceptible to mold fungi. It does not deform and can serve for quite a long time. However, the high price and water permeability are disadvantages of cork substrates.
- Cork-bitumen.
While retaining all the positive qualities of a cork substrate, this type has no disadvantages in the form of moisture permeability, because its basis is bitumen and kraft paper, and the cork is distributed over the base in a layer of 2 - 3 mm. The high price of this material will be justified if it is laid under expensive types of laminate.
- Expanded polystyrene.
This material is currently the most optimal for use as a substrate for laminate flooring in rooms where a high load on the flooring is expected. Expanded polystyrene is the most effective. Because it contains air bubbles. It perfectly levels out uneven surfaces, but does not change the overall shape, absorbs the sounds of steps well and prevents the passage of moisture to the laminate boards. The polystyrene foam backing under the laminate will provide comfortable conditions even for bare children's feet.
- Combined polystyrene foam and polyethylene.
This is an interesting combination of several layers of polyethylene, between which there is thin layer polystyrene foam balls. In addition to positive qualities, obtained by combining these two materials, this substrate perfectly allows air to pass through, which provides the floor surface with “breathing”.
3. Warm floor
In addition to the flooring substrate, which is a necessary condition for laying laminate flooring, a “warm floor” system is used for additional comfort. Let's look at the features of installing heating under laminate.
One of the most rational ways to arrange floor heating under laminate is infrared film systems. You can install such a warm floor quite simply with your own hands, without resorting to the help of specialists. The cost of such a system is quite affordable, and allows you to avoid bulky pipes and pouring screed.
The thickness of the film is less than a millimeter, which means it will not affect the overall level of the floor covering. It is completely safe to use.
Under the film covering of the heated floor, you need to lay foil insulation to provide thermal insulation and reflect the infrared rays of the heating elements.

Important: Foil insulating material Can only be laid under a film heated floor system. For other systems, the use of aluminum components in the substrate is not permissible.
Features of using thermal film:
- in places where it is planned to place heavy equipment or furniture, the film cannot be placed;
- in the event that thermal film is the only source of heating in the room, then it can cover up to 80% of the floor area, and if it acts as additional heating, then up to a maximum of 40%.
- the distance from the walls must be at least 10 cm;
Thermal film must be installed in strict accordance with the manufacturer's instructions. Laminate flooring should only be laid after a complete check of the system.
In addition to the laminate itself, the substrate and heating, we should not forget about the final decorative element. Therefore, we choose a plinth for the laminate that matches the color and texture.
Laying laminate
A big part of success at work is being properly prepared. workplace. To install laminate you will need:
- electric jigsaw (with appropriate blade) or fine-tooth hacksaw;
- construction square, tape measure, pencil or marker;
- hammer or wooden mallet;
- a special clamp for securing the last row of laminate boards;
- backing for laminate, tape, construction knife;
- household vacuum cleaner.
You can seal the gaps between the slats using scraps of material. They are also used to create expansion joints along the walls.
1. Preparation of material
Before starting work, you should carry out calculations and choose the order of layout of the boards. The do-it-yourself laminate installation scheme is as follows: each next row must be started with a board that is not the same size as the first board of the previous row. This means that there should be no cross-shaped joints in the design. Ideally, the principle of placing seams between the slats should be similar brickwork- the butt seam is located exactly in the middle of the element in the previous row. But to save material, you can start a new row from the trimmed part of the last board of the previous row. This way, intersections of joining seams can be easily avoided.
You can lay laminate flooring either lengthwise, across, or diagonally in a room, but you need to take into account that when placing it on plank floorboards, the slats must be laid perpendicularly.
The laminate is laid depending on the manufacturer's recommendations using adhesive or using the lock method. Floor assembly can take place either by attaching each plank individually or in rows. Professional builders prefer the second option more, as it optimizes the entire work process.
There is no need to apply any force when closing the locks, and the gap can be “finished off” only through a piece of laminate board or a block.
If repairs and flooring are carried out during the cold season or the air conditioner is constantly running in the room, it is necessary to allow the material to adapt to the temperature conditions within 48 hours.
2. Installation instructions
Having prepared everything you need, you can begin laying the flooring. The following provides step-by-step instructions for installing laminate flooring.

1. Cover the entire surface of the floor with underlay. To prevent the sheets from moving, the joints are taped.
2. When laying the first row, the ridge protrusion of the board, oriented towards the wall, is cut off. Gaps should not exceed the distance that the baseboard can cover. But laminate boards should not be placed close to the wall. Minimum distance 8 mm.
3. We assemble the second line of panels and connect them to the first row.
4. We place the initial elements at the required distance from the wall and install spacer wedges that determine the distance between the wall and the slats of the first row. We place them at a distance of 25 - 30 cm
5. Laying the floor continues in this manner until the end. The last row is tightened with a clamp or using improvised means.
6. There should be no gap between the laminate and the frame near the door. Ideally, you need to place the slats closely under door jambs, having previously made small cuts in them.
7. Near the pipes coming out of the floor, it is necessary to leave a compensation thermal gap of up to 1 cm. To do this, drill a hole in the right place required diameter and saw the board in the middle of the holes. The board is installed up to the pipes, and the remaining part is attached with glue along the end seam and tightened with a clamp.
8. After laying the laminate slats, we attach the baseboard.
A visual aid on how to lay laminate flooring is in the video at the end of the article.
On the packaging of the laminate, the manufacturer indicates instructions for its installation. Follow it and the recommendations given in this article, and the installed floor covering will delight its owners for many years.