We will send the material to you by e-mail
For rational use of space, communications and do-it-yourself garage accessories from scrap materials are used. It is necessary to involve walls, an underground level in the process, place it indoors, and organize normal lighting.
Homemade gadgets for the garage
For comfortable operation of a room intended for car storage, you should adhere to certain recommendations:
Depending on the dimensions of the building, the area occupied by equipment, fixtures, and communications should not be more than 10–20% of the size of the garage floor.
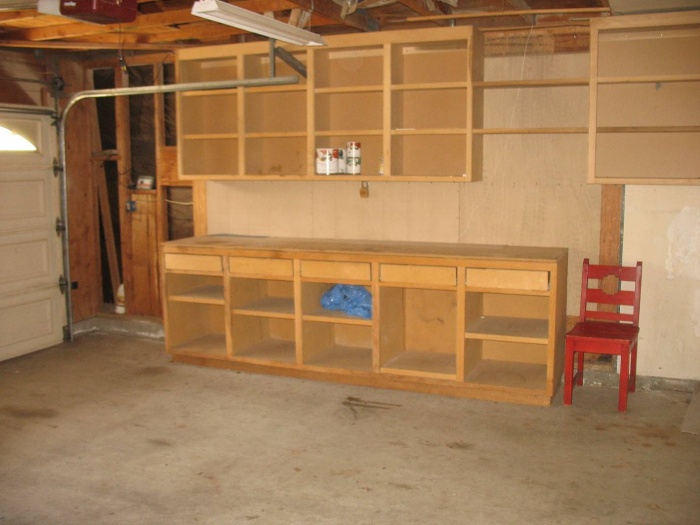
Storage areas, racks, workbenches
In 80% of cases, do-it-yourself garage fixtures are built to store accessories, tools, and vehicle components. It should be taken into account that the most bulky parts of the car are sets of winter/summer tires, depending on the season.

The main nuances of these designs are:

The width of the pit should allow the driver to enter it without lighting.
Lighting and ventilation
More often used in garages parallel circuits lighting fixtures. One lamp allows you to use a specific area, several devices are turned on during a major renovation or a visit to the cellar. Minimum consumption electricity is provided. Daylighting devices have a great resource.

Cars use toxic, harmful fuels and lubricants, so do-it-yourself garage ventilation devices that allow you to create air exchange are becoming relevant. The influx is organized from below:
- garage - vents in the masonry, protected by bars;
- cellar - pipe from the garage or from the street.

The hood is mounted under the ceiling of the cellar, the roof of the garage, or has the form of vents in the main walls at the highest points.
Related article:
Other useful ideas
Useful accessories for the garage with your own hands can be made from used dishes, equipment, and materials left over from construction. For example, by gluing the lids of plastic cans horizontally/vertically, the owner receives convenient transparent containers for equipment or hardware, which are always at hand.


Homemade machines
You can also assemble accessories for the garage from power tools:
- drilling - a drill fixed with clamps in a device that moves with a gear along a rack;

- cutting - an angle grinder clamped in a similar way with equipment for metal or wood;


The advantage of the machines is more accurate positioning of the equipment relative to the workpiece. The equipment turns out to be dismountable, the drill and angle grinder can be removed and used for their intended purpose.
Related article:
Hydropress
The simplest design is obtained from a car hydraulic jack. To press out/press in bearings and press/compress parts, you will need to build a frame and a removable movable stop. The frame consists of 4 channels welded to each other. At the top, the structure is reinforced with stiffening ribs (kerchiefs), and at the bottom, transverse corners are added, giving the frame stability.

The stop is pulled in the normal position to the top crossbar of the frame by powerful springs. A hydraulic jack is installed between them, pressing the stop against the lower crossbar of the frame as necessary. The press force is regulated by a jack, dimensions working area are selected depending on the size of the workpieces.
And finally, a few more examples of useful things for the garage.
Manufacturing electronic homemade products Do it yourself gained popularity back in the last century, when semiconductor devices appeared. With their help, it was quite easy to assemble devices needed for everyday life from old equipment. Today, repair and assembly of equipment for the home or cottage, for a car or garage can also be solved at home.
[Hide]
Homemade devices for home and garden
Electrical homemade products for home and garden that use the power of electricity can be made by every electrician. Most devices are created from factory components and require only school knowledge of electricity.
Electric kebab maker
The electric kebab maker can be either horizontal or vertical. Stores usually sell vertical ones, and they do their job well after some modification.
To create a horizontal kebab maker you will need heating element and a frame resembling a barbecue. The heating element can be made from a ceramic tube and a nichrome spiral wound around it. The tube is secured through an insulating material in a metal casing. Drawings will be required to assemble the case.
Barbecue grill
An equally interesting idea is a kebab grill with an electric drive for rotating skewers. By adding to regular grill electric motor, you can get an excellent device that will cook kebab in offline mode. To organize the skewer drive, you can use a motor from the wipers, from washing machine or any other 12 Volt. Using a system of pulleys and a belt or gear drive, the rotation of the shaft is transmitted to the skewers, and the meat is slowly turned over the coals.
Homemade WI-FI antenna
This antenna will improve the reception quality and Wi-Fi speed in your home. According to reviews, after connecting it, the signal level rises from 5 to 27 Mbit.
For production you need:
- a small metal sieve or colander;
- Wi-Fi adapter (USB);
- USB cable;
- drill;
- epoxy resin;
- camera tripod;
- plastic clamps.
Manufacturing process:
- We drill a small hole (14 mm) in the center of the sieve and insert a metal pin into it to secure the adapter.
- Insert the connector from the USB cable into the prepared hole and secure it with epoxy resin. The USB connector after gluing must be strictly perpendicular to the plane of the sieve, then the device will work more efficiently.
- Then, using two zip ties, “ears” are made through which the cable is attached.
- We fix the product on a camera tripod. We drill a hole with a diameter of 12 mm in the antenna and tighten it with a nut.
Required materials  Insert the pin into the drilled hole
  Glue the USB cable
  Securing the cable
  Tripod
  Installing the antenna using a tripod
Electrical homemade products for the garage
Let's look at a few projects useful homemade products for the garage.
Homemade chandelier
If you have poor lighting in your garage, then a makeshift chandelier will be very useful. To make a bifurcating chuck, you will need a pair of angular chucks, which are sold at a regular hardware store.
Sequence of actions:
- We remove the wires from the sockets and fasten them with a plastic tie. We get a socket for two lamps. All that remains is to connect them to the electrical network.
- To do this, we use the base of a fluorescent lamp. Carefully break out the lamp, then solder the wires from our design to the contacts of the base.
- We insulate them well and attach the base on top of the cartridges.
The use of ordinary light bulbs in this design is undesirable - the sockets may melt from heating.
LED device
Another lighting option could be a homemade LED lighting device.
To make it you will need:
- old fluorescent lamp;
- LED strip;
- connecting wires.
The manufacturing sequence is as follows:
- An LED strip is glued to the lamp body in one or several rows.
- The connecting wires are connected and brought to the lamp switch.
- The assembled device is tested.
Spot welding machine
A necessary device in the garage will be a homemade device for spot welding, the basis of which is a transformer from an old microwave oven. A necessary condition is that the transformer must be working in order not to rewind all the windings.
The process of assembling the welder is quite simple:
- The transformer is dismantled.
- Carefully remove the secondary winding.
- Two shunts are removed.
- A secondary winding of two or three turns is made of thick wire (with a diameter of at least 10 mm).
- Electrodes for resistance welding are made from a copper rod with a diameter larger than the wires.
Homemade spot welding tool
Useful DIY items for fishing
Among the homemade products you can find many interesting ideas for use in hiking conditions, as well as hunting and fishing.
Electronic alarm
An example would be an electronic signaling device for fishing with a regular fishing rod or other equipment. A simple biting device can be assembled in just half an hour. For it you will need an old beeper keychain and a strip of plastic 1-2 mm thick.
Alarm assembly:
- The keychain is attached to the rod.
- A strip of plastic is glued to the fishing line and inserted between the contacts of the key fob.
Now when the fish bites, the fish will pull the line, the plastic will fly out, the contacts will close and the key fob will work.
Underwater camera for ice fishing
Using a homemade underwater camera to winter fishing you can see if there is fish under the hole. And this simplifies the fishing process.
To make it you will need:
- small camera;
- sealed camera box;
- small TV;
- car battery to power the camera;
- extension;
- inverter;
- lead for cargo;
- ultraviolet diodes for illumination during underwater shooting;
- superglue, electrical tape, sealant.
Build process:
- Two holes are made in the upper part of the box. An extension cable is inserted through one. Through the second is the wire that connects the camera to the TV.
- Several more holes are made in the box into which light bulbs are inserted for illumination. The wires from the light bulbs are soldered into one circuit (for example, with a parallel arrangement), which is connected to a cable that provides power.
- The holes are sealed with glue and tape for a tight seal.
- Lead is melted and small elongated bars are poured out of it. They are placed at the bottom of the box.
- Set up the camera and connect it to the cable. After which it is carefully placed in the box so that it has a clear forward and horizontal direction and transmits a high-quality image. For stability, the chamber is surrounded by soft material.
- A torso (rope, belt) is attached to the box, which will be used to lower the camera to depth. For convenience, you can combine it, the power cable and the communication wire between the video camera and the TV into one core, secured with electrical tape.
- Connect the power cable of the video camera to the battery and test the device.
Homemade fish bait
You can make a good bait for fishing yourself. This will be a device assembled on the basis of a simple multivibrator.
You will need:
- sound emitter, for example, from a children's toy;
- wires;
- a small plastic jar, for example, for medicinal tablets;
- electronic board;
- regulator with plastic rod;
- a piece of foam;
- batteries;
- weights for the float;
- volume control.
The bait is assembled as follows:
- You need to solder the circuit and check it.
- Two wires are soldered to the sound emitter. Then they are carried inside the case and connected to the board.
- A regulator with a plastic rod is placed in the lid of the jar.
- A dense circle cut out of foam plastic is installed on top of the board, which separates the board from the battery.
- Weights are attached to the bottom of the jar so that the container floats on the water like a float.
- The regulator sets the frequency and changes the sound.
 Bait scheme - 1
  Bait scheme - 2
Electronic homemade products for cars
Car enthusiasts create homemade products with their own hands to improve the appearance and ease of use of the car.
Electrical auto tester
A simple homemade electrical probe is perfect for a car. It can show the presence in electrical circuit voltage of 12 volts. It is used to check the serviceability of relays, as well as light bulbs and other equipment. You can make such a device from a syringe and LEDs.
Assembly diagram:
- Two LEDs are soldered with opposite terminals (plus one to the minus of the other and vice versa).
- A steel probe is connected to one of the solders through a resistance of 300 Ohms. To the other solder there is a contact for batteries.
- The design is inserted into the syringe so that the probe comes out of the hole for the needles. Most of the probe is insulated with a PVC pipe.
- 4 LR44 batteries are inserted into the syringe so that one of the poles is connected to the LED contact.
- The other pole of the batteries is connected to a flexible wire with an alligator clip.
The video explains how to make a syringe tester. Filmed by ILYANOV channel.
Light switch
The scheme for smoothly turning off the lights in the car interior is quite simple to make. Such electronics are suitable for any car. A small board consisting of a capacitor and diodes is soldered parallel to the interior lamp terminals. The drop in electricity voltage will occur gradually and create the effect of gradually fading light.
Car subwoofer
To make a car subwoofer with your own hands, you must first purchase a speaker. You need to start from its dimensions when calculating the size of the case.
The simplest and most suitable form of a subwoofer for the trunk is a truncated pyramid with a slope similar to that of the rear seats.
LED fog lights
You can make LED car foglights with your own hands.
For creativity you will need:
- two ten-watt LEDs;
- 2 lenses from an old projector;
- gaskets from plastic pipes;
- LM317T microcircuits;
- resistors.
Instructions for assembling the craft:
- LEDs are installed on pre-prepared aluminum radiators.
- The structure is assembled from headlight housings, lenses from projectors, gaskets and diodes on radiators.
- The fog lights are powered through current stabilizers on LM317T microcircuits and resistors.
Car carrying
A very convenient car carrier is made from a computer USB lamp. It is compact and you can connect the device to any place in the car wiring.
Manufacturing scheme:
- Remove the contacts from the USB plug.
- In the plug body we connect the wires of the lamp and the car alligator clips.
- To mount it in the right place (even horizontally), a magnet is placed on the plug.
Order in the house depends not only on whether every thing is in its place. Every home needs periodic maintenance. If every mechanism in the house works like a clock, then we can say that the owner is fully fulfilling his duties. To maintain order, you cannot do without a workshop and tools. Some of them you can make yourself. The article will talk about the process of assembling tools that will allow you to equip your workshop.
What you can collect with your own hands
With proper skill, you can assemble almost any machine that is needed for processing wood or metal. They will differ from the factory ones in the assembly method, as well as in dimensions. Most often for home use no large units required. There is no problem in building your own milling machine, with which you can beautifully design various slats. Another necessary machine that can be assembled at home is a drilling machine. You can’t do without it if there is a need to drill precise holes in small workpieces. In some cases, assembling a machine involves making a holder for a hand tool, in others it can be assembled from scratch using motors from other devices.

Before you begin assembling any products for your home workshop, you need to clearly define what tasks are assigned to the workshop and what scope of work will be performed. On the one hand, this will allow you to decide what machines will be needed, and on the other hand, it will make it possible to find out whether the available space is enough or whether the workshop needs to be located in another room. It’s good if it’s a separate room, because the noise from working machines can irritate the residents. The easiest way to build a workshop is in a private house, where you can use a basement or garage. A good craftsman has everything organized and in its place, so it is important to take care of practical shelving.
Storage items

Almost any surface in a home workshop can be used to store tools. Based on the location of organizers, the following types can be distinguished:
- wall shelves;
- racks;
- shields;
- floor organizers;
- ceiling shelves.
They can all be located in one workshop, which will make it possible to significantly expand the total area of the room.
Wall shelves

This home workshop design is the most common and frequently used. Building wall shelves is not difficult. The first step is to determine the wall where their placement will be most practical. For example, it could be a wall near which it would be impossible to place a shelving unit. You should not place a wall-mounted shelf in the workshop where you plan to build a shield for hanging hand tools. In some cases, a wall shelf can be placed right under the ceiling. Since shelves in a home workshop are designed to store heavy objects, and not soft toys, the structural strength should be higher than those used at home. For assembly you will need:
- corner 40×20 mm;
- board or chipboard;
- Bulgarian;
- welding machine;
- roulette;
- marking tool.

The first step is to draw up a sketch-drawing indicating the exact dimensions of the structure for the workshop, which are determined based on the free space on the wall. The sketch also indicates the number of tiers that one shelf will have. The next step is to prepare the corner pieces for assembling the frame. A shelf for a home workshop in which the ends of the racks will be cut at 45 degrees will look neater. This can be achieved by using a square or a special holder for an angle grinder. The first step is to assemble the side faces of the workshop shelf, which can be represented by rectangles or squares. It all depends on the chosen shape of the shelf.

The elements must be absolutely identical so that the design of the shelf for the home workshop is without distortion. After this, the sidewalls are connected to each other by four horizontal crossbars. In this case, the corner must be placed in such a way that the part with a length of 20 mm is at the bottom. It will serve as a support for the board. There is no need to rush to the workshop when welding the shelf frame. It’s worth starting with tacks so that the structure doesn’t move, and then weld it with a solid seam. An excellent assistant when assembling the frame will be corner clamps, which will keep the angle straight.
When the frame is ready, you need to determine how it will be attached to the wall in your home workshop. This can be done by drilling holes in the corner or welding special ears. The first option is more reliable. Next, the seams of the structure are cleaned in the workshop and the metal base is painted to prevent corrosion damage. The last step is to cut out wooden coasters, which are placed inside. The shelf is fixed in place in the workshop and is ready for use.
Shelving

Workshop shelving can be assembled in several ways. It all depends on the material used, and this could be:
- metal;
- wood.

Each of these materials is practical in its own way. At the right approach Wood can withstand significant pressure and weight, but the dimensions of such a rack in the workshop will be larger than that of a similar one made of metal. Assembling the entire structure into a home workshop begins with a drawing. In this case, it is necessary to correctly determine the depth of the rack. A comfortable depth is considered to be such that it is possible to reach the edge of the shelf in the workshop by simply extending your arm. Typically, this size does not exceed 50 cm. If the shelving in the workshop will have a ceiling height, then it would be appropriate to have a small stepladder that will allow you to safely get the necessary tools from the upper shelves.
Pay attention! On sale you can find ready-made shelving for the workshop that has a modular design.
This means that the number of shelves can be varied depending on needs. Often their purchase is cheaper if you take into account not only the cost of materials for self-assembly, but also the time that will be spent on this.

The number and height of shelves in a home workshop are determined by what will be stored on them. Each shelf can have its own purpose. For example, on the lower ones you can place devices or workpieces with a large weight. If it is a power tool, then it makes sense to make the height higher than the highest element that will be stored on the shelf. The assembly principle is similar to that used for wall shelves to the workshop. In this case, it is better to use a corner with large sizes for greater strength. At the same time, it is important to correctly calculate the width of the rack for a home workshop, so that when using corners with smaller dimensions for shelves, they do not sag.
Shields
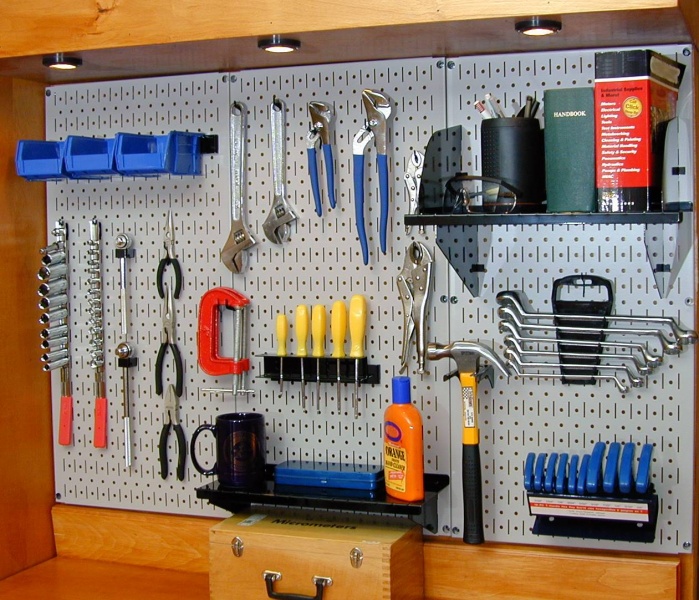
Shields are one of the most convenient items you can use in your home workshop. The advantage over other storage methods is that each element has its own place and is in plain sight. The only disadvantage of such a system is the inefficient use of space. Compared to shelves, more of it is required, and fewer tools fit. This is why shields are best suited for storing the tools that are used most often. The advantage of shields for the workshop can be considered their certain versatility. On the shield you can place not only hooks for hanging, but also various small drawers for storage.

There are ready-made shields for sale for the workshop, based on which you can assemble your own version. For this you can use:
- sheet metal;
- plywood.

The assembly principle in each of these cases is similar, only the way of working with the material is different. If plywood was chosen as the base, then there are several ways to proceed. The first step is to mark the sheets that will be used in the home workshop. After that, they are laid out on the surface and the tool is laid out, which will hang on the shield. A fastening in the form of a self-tapping screw is screwed under each tool or it is outlined along the contour to make it easier to navigate later. Next, the sheet is fixed to the wall using self-tapping screws. For fastening, it is better to use bolts with hexagon heads and clamp the sheets through washers.

There is another version of the shield for the home workshop, which uses hooks instead of screws. This design can be considered more universal, since its configuration can be changed depending on needs. The best solution would be to purchase metal hooks in advance, which are used for shields in workshops. Depending on the distance at which the fixing tendrils are located on the hooks, the sheet is marked. Holes are drilled at the marked points. The shield is fixed on the wall in the home workshop at a short distance from the wall so that you can freely remove and put the hooks in their place.

The metal shield is assembled according to the model of the second wooden version. In this case, the work also comes down to drilling holes at the indicated points. In this case, it is better to use metal with a wall thickness of 0.8 mm. The weight of the tool can cause the metal to bend. There are several ways to solve the problem. One of them is to install additional spacers in the form of corners on the back side of the rack. You can also assemble several separate smaller panels and install them side by side.
Ceiling shelves

Certain areas in home workshops are practically not used, or the ceiling height exceeds 2.5 meters, which will allow free placement of storage items on the ceiling. The easiest and most convenient way is to secure containers in which you can put small things. This is quite easy to do. To implement the entire project in the workshop, you will need to make wooden boxes of any size. The easiest way would be to purchase plastic containers that are perfect for these purposes. In addition to plastic containers, you will need metal I-beams. If these are not available, then a U-shaped profile can be used for the workshop. As a last resort, you can remove one wall from square pipe to achieve the required result.

Plastic containers for the home workshop have special edges along the edges, which can be used for fixing. Therefore, it is enough to simply attach the prepared profile to the ceiling in the workshop at such a distance that the containers fit between them. This design is not suitable for storing heavy objects, but a lot of material or tools that are rarely used can be placed there, freeing up space on shelves and racks.
Pay attention! Floor organizers for the workshop can be represented by ordinary boxes, which will have inserts divided into a certain number of cells. It is convenient to store fasteners in such inserts. But if there are enough shelves and racks in the workshop, floor organizers will not be needed.
Workbench

This design is essential for any home workshop. It is on the workbench that all the magic of repairing and constructing any products happens. It is better to make a workbench for a workshop universal, since it will require processing not only wood, but also metal, but if the workshop area allows, then you can make two separate workbenches, which will be more convenient, since wood requires the most careful handling, and metal often requires force. The process of making a wooden workbench for a home workshop will be described in detail in several videos below. It is worth noting right away that to assemble such a structure for a home workshop, you will need some skill in working with power tools. The finished workshop workbench will support a variety of mounting systems.
A simpler, but no less functional design for a home workshop can be assembled from metal. At the same time, it is easier to build additional holders for shelves and drawers on it. Above is a drawing that can be taken as a basis. Dimensions are adjusted depending on how much space is available in the workshop. The height of a workbench for a home workshop is selected individually, but most often 80 cm is enough, which allows you to work with objects at waist level. It is better if the workbench is securely fixed to the floor. It is also worth setting it according to level. If wood processing is planned on a metal workbench in the workshop, then a special carpentry vice is additionally mounted where it will be convenient. You can use a portable version of the vice, which is fixed with clamping clamps.

Advice! Great option It will be possible to make a wooden tabletop for a home workshop, but metal can damage it.
To protect the wooden surface of the workbench, a metal sheet can be laid on top through an OSB pad. The thickness of the metal that will be used as an overlay should not be less than 1 mm.
Workshop machines
It will be described below general principle assembling machines for the workshop, which can be taken as a basis, and assembly can be done from available materials.
Wood and metal lathe

It is worth saying right away that on such a lathe in a home workshop it will be possible to process only small metal workpieces. An important part of the machine for the workshop, which will ensure stability of processing, is the bed. You can make it yourself or use a factory one. For self-production, you can use a profiled pipe or a durable corner. The two elements are placed at a suitable distance and securely secured to each other by transverse elements. Examples of machine designs for a home workshop are visible in the photos above and below.

As a motor that will rotate the part, you can use a unit from an old washing machine, pump or some kind of machine. A powerful drill chuck can be used as a tailstock. In this case, it will be possible to insert a cone or drill into it, if required during processing. The headstock can be purchased factory-made or made according to the model in the photo.

In this case, a metal axle will be required, it is better if it is made of hardened steel. You need two holders with bearings for the axle. On one side, a pulley is fixed, and on the other, a chuck into which the workpiece will be clamped. The engine on such a workshop machine is installed next to the headstock, and the force is transmitted through a belt. The speed can be varied by using a frequency module or by moving the belt over the pulley. You will also need a support element, which is made according to the schematic drawing below.

A video about self-assembly of a wood lathe is below.
Milling machine
A milling machine for a home workshop is also quite easy to assemble. One option is to use ready-made hand router, which is indispensable for the owner who likes to make something out of wood in his workshop.

For manual machine You can make a special workbench for your home workshop. The photo shows an example of such a table. At its core it is small table, in which there is a hole for the cutter and a mount for the router itself. If you wish, you can do this in the workshop and on a ready-made workbench. It is important to choose the most convenient place to fix the router. During fastening, it is necessary to correctly calculate the maximum overhang of the cutter. When working this way, you will need to lift the factory support completely on a hand router. Switching on and off can be done via an extension cord with a switch. The disadvantage of this method is the need to manually adjust the speed directly on the router itself. There is a video about a homemade milling machine below.
Advice! If there is an engine of the required power and frequency converter you can build a stationary milling machine in the workshop.
To do this, the motor is attached to the bottom of the table. A cutter chuck is mounted on the motor shaft. The connection is made through a frequency converter, which will vary the speed.
Drilling machine

A drill can be used as a drilling machine in the workshop. But for this it needs to be properly fixed. This can be done using a holder, which can be stationary for the workshop or portable. There are many various options assembly of such a drill holder for the workshop. One of them is shown in the video below. Assembly will require materials that are within walking distance in every hardware store.
Circular saw

A stationary circular saw for a workshop can be made in a similar way as a holder for a hand router. It is enough to make a slot in the countertop for the slab sheet and mount it when required. The only drawback of this solution is the reduction in cutting depth. This can be corrected by installing it on a metal tabletop that is smaller in thickness. A video of the assembly of such a structure is below.
Resume
Any owner of a workshop, even if it does not have a separate room and is simply organized in a garage, strives to equip it with everything necessary for comfortable, productive and, most importantly, high-quality work. But nowadays you can’t “get far” with a hand tool. A great variety of power tools, various multifunctional or narrow-profile machines, and auxiliary equipment comes to the rescue. There are no problems with the offer - the main difficulty is that quality products costs a lot of money, and not everyone can afford it.
But craftsmen find a way out of the situation by making such machines and devices on their own, some of which may well compete with factory models. Moreover, to create such equipment, they use quite available materials, often just collecting dust in the barn. And running power tools, usually found in any workshop, are widely used as drives.
This publication will discuss only some homemade machines and devices for the home workshop. It should be correctly understood that it is simply impossible to cover all the available variety of such equipment within the framework of one article. It’s time to give this topic a separate site altogether. So this will mostly be a general overview. But the production of two models, very important, probably, for any workshop - a pendulum saw and sharpening machine for a cutting tool, we will consider it step by step, with all the nuances, from the first outlines to testing.
The basics are a convenient workbench and organized storage of tools and accessories.
The comfort of working in the workshop depends on many important conditions. If we take the issues of heating, ventilation and lighting out of the picture (these are topics for separate consideration), then the rational, convenient organization of the main workplace always comes to the fore.
We are talking about a workbench and a well-thought-out storage system for tools, accessories, consumables and other small items necessary for work.
The workbench is selected or made independently, depending on the main direction of work in the workshop.
“Classic” carpentry workbench
If the owner is more focused on wood processing, then he will need a carpentry workbench. There is a long-used and extensively tested general concept for such a workplace. It probably makes sense to stick to it when making your own workbench.
The workbench is based on powerful wooden legs(pos. 1), which from below, at the base, are usually connected in pairs by bridge supports (pos. 2). There is a cover on top - a workbench board (item 3). As a rule, a recessed area is provided - the so-called tray (item 4) so that during work the tools or components necessary at hand do not fall on the floor.
Usually on the right side there is a side or rear clamp (item 5). In essence, this is a screw vice, which has a wedge that extends upward (item 6). Along the line of this wedge along the bench board there is a row of slots (item 7) for similar wedges (they can be hidden in these slots or stored separately and inserted as needed). This allows you to rigidly fasten a wooden workpiece for processing between the wedges of the table and the side vice.
To secure a long part that cannot be secured between the outer wedges, use the front clamp (item 8). This is also a screw vice that is capable of clamping the workpiece between the front end of the workbench and a movable wooden jaw. And in order for the long part to have the necessary support points from below, fingers or retractable supports hidden there in the grooves extend from the end of the workbench (item 9).
The lower area of the workbench is called the underbench (item 10). As a rule, there are powerful crossbars (legs) that connect the legs of the layout in pairs in the longitudinal direction. These crossbars often contain shelves for storing tools or workpieces, or even, as shown in the diagram shown, a closed cabinet.
Below is a drawing of the workbench. Anyone who knows how to read diagrams and has carpentry skills will be able to make such a model on their own.
To begin with - general wiring diagram carpentry workbench with dimensions.
Now - a series of drawings for individual parts and components of the structure.
As a rule, high-quality wood is used to make parts of the underbench (base) coniferous species with residual humidity no more than 12%.
The bench board (cover) is mainly made from hardwood - it can be beech or oak, ash or maple. Making such a massive dimensional panel yourself is an extremely difficult task, so often a ready-made laminated board is ordered or purchased from a carpentry workshop. This is unlikely to seem like an overly expensive solution, given the cost of the material and the complexity of the process. So it’s more profitable to purchase a finished product, and then modify it for a workbench.
By the way, when performing various processing operations, one way or another, the surface of the desktop will be damaged. To maximize the life of the workbench, the lid is often covered with a plywood or fiberboard sheet (naturally, according to the size of the table and with all the necessary grooves and sockets). As this coating wears out, it can be replaced with a new one - this is not so difficult and inexpensive.
Particular difficulty usually arises from the installation of the front and rear (side) clamps. To get really efficient and convenient devices, myself screw mechanism It is better to purchase a vice ready-made, assembled form. There are many models suitable for this purpose on sale.
To assemble these clamping units, you can use the following drawing as a guide:
Vise jaws must be made exclusively from hardwood, the dimensions and location of the holes are shown in the drawing. (It should be correctly understood that the location and diameter of the holes must correspond to the purchased screw mechanism).
And finally, the last diagram shows how to attach the rear fixed jaws of both vices to the workbench lid.
Of course, an example is shown here, and it may suit many in its “pure form,” that is, without changes. But if other dimensions are required (based, for example, on the available space), then you can draw up your own drawing, taking the demonstrated diagrams as a sample for assembling certain components. The principle still remains the same. If necessary, no one bothers to make improvements, which, of course, should not negatively affect the strength of the structure.
Video: mechanic's workbench with his farts
If the master plans to mainly engage in metalworking operations, then he will need a completely different workbench, designed specifically for such purposes. Here, in contrast to the carpentry “classics”, there is an innumerable amount possible options. As a rule, steel profiles (angles, channels, profile pipes) and sheets are used for production. One of the quite worthy options is shown in the video below:
An important component of comfortable work in the workshop is always an optimized arrangement and storage system for tools and accessories. But we will not dwell on this, since a separate article is devoted to this topic on the pages of our portal.
How to make the workshop as comfortable as possible for work?
It’s convenient when you know where everything is and when necessary tool- always at hand. So you should pay close attention to the system of cabinets, racks, cabinets, wisely organized places storage of consumables. This is especially important in cases where the size of the room does not allow for “clearance”. There is a special publication dedicated to questions on our portal.
Homemade machines and equipment
As already mentioned, the variety of homemade machines is extremely large, and it is simply impossible to talk about them all. Therefore, in this section of the article the reader will be offered several video reviews. And, in addition, the manufacture of two models of machines will be considered in detail, step by step.
Video - miniature wood lathe based on an electric drill
On the farm, there is often a need to turn one or another wooden piece with a round cross-section. If you don’t do this professionally, then purchasing a real lathe is completely unprofitable. And it will take up a lot of space. But having at your disposal a miniature machine that can be stored in a closet and assembled as needed will never hurt. Moreover, its manufacture is not such a difficult matter.
You can verify this by watching the proposed video. Despite the fact that the author speaks English, all his actions are shown in detail and are quite understandable. And such a machine, guided by this video tip, is within the power of anyone to make.
Video - a circular saw based on a manual vertical electric saw
If there is a need to prepare a considerable number of wooden parts of the same size, then nothing is better than a stationary circular saw can't imagine. And it is quite possible to make such a machine, and, again, in a collapsible version, which, due to its uselessness, takes up practically no space at all.
All you need is a sheet of plywood, a few blocks and screws. And the main element of the design is a hand-held vertical saw
In the shown scene, the master removes part of the protective fence manual circular saw. This is not always necessary. It is quite possible that the free exit of the saw will be enough if you plan to cut not too thick workpieces.
Pendulum saw from an angle grinder - self-production step by step
When cutting workpieces or wood or metal, including profile or round pipes, high precision is often required. Moreover, the accuracy is not only in linear dimensions, but also in the cutting angle. A typical example is when it is necessary to accurately cut blanks for a frame in which the joining of parts is either strictly perpendicular or at an angle of 45 degrees.
A pendulum saw allows you to perform this operation. The diagram above shows in a simplified form the principle of its structure and operation.
In any case, there is a reliable base (bed, frame) that ensures the stability of the machine (item 1). In many models, a work table with a system of guides, stops and clamps is organized on top of the bed, allowing you to accurately align the workpiece. There must be a slot (item 2), exactly into which the rotating circle or saw is lowered.
The support (item 3) of the swinging part of the machine is rigidly attached to the frame. It is equipped with a bearing block and an axis (pos. 4), relative to which the swinging platform-rocker arm (pos. 5) rotates. An electric drive (pos. 6) is located on this platform, transmitting rotation directly or through a transmission system (pos. 7) to a cutting tool - a cutting wheel or circular saw (pos. 8). A lever (pos. 9) or handle is provided, with which the master can smoothly lower the cutting disk down onto the workpiece mounted on the work table above the slot.
But the capabilities of this tool will become immeasurably wider if a special one is made for it. milling table. One of the options for such a homemade machine is in the proposed video.
Homemade machine for sharpening cutting tools - step by step
In the workshop, in the kitchen, and just around the house, a lot of cutting tools are used that need regular sharpening. Walking disc knife sharpeners provide a very short-term effect of sharpening the cutting edge, since they remove metal along the edge of the blade, and according to all the rules it is required - perpendicular to it. When sharpening by hand using whetstones or on a rotating sharpener, it is very difficult to accurately maintain optimal angle, especially so that it is equal along the entire length of the blade. By the way, this full sharpening angle is different for different types of cutting tools - there are many separate publications on this topic on the Internet.
This means that in order to qualitatively sharpen, for example, a knife, a device is required that would allow applying force with the translational direction of a flat abrasive perpendicular to the cutting edge consistently along its entire length with a single, pre-set angle of inclination. And to provide visual control over the progress of the formation and sharpening of this cutting edge.
There are many such devices available for sale. But if there is a desire, then a similar machine can be made independently, using materials that may be found in a workshop or garage. Yes, if you buy what you need, it will be quite inexpensive. An example is shown step by step in the table below.
| Illustration | Brief description of the operation performed |
|---|---|
| The entire structure of the machine, all its parts and components will be attached in one way or another to the base - the bed (frame). A profile pipe with a square section of 20×20 mm is well suited for its manufacture... |
|
| ...with a wall thickness of 2 mm. As will be clear later, there are no strict proportions of sizes - they are based on considerations common sense, the strength of the structure being created, the availability of certain materials. |
|
| From profile pipe A grinder is used to cut blanks for the frame: two pieces 250 mm long, and two more - 130 mm. | |
| In this example, the master will adjust the joining sides of the frame at an angle of 45 degrees. This requires a precise cut, so it is best to do it using a cutting machine. If it is not there, nothing prevents you from making the frame simpler, that is, placing its sides end-to-end. Then, instead of 130 mm, the small parts will be only 90 mm, since they will fit between the large ones. This will not affect the functionality of the sharpening machine in any way - the only thing is that there will be some loss of aesthetics. |
|
| This is the frame we got after preparing the parts. | |
| The cut edges can be slightly adjusted, deburred, and a small chamfer for the weld seam can be cleaned. | |
| Then the frame is assembled on one side and welded along short vertical joints with a continuous seam. The seams are cleaned of slag and sanded with a grinder. |
|
| Welded frame corner after cleaning. You can, of course, immediately boil it on both sides, but the master simply decided to supplement the frame with height-adjustable legs and stands. The operation is optional - it is quite acceptable to install the machine simply with a frame on flat surface. But with stands, of course, it’s more interesting. |
|
| This adjustable leg with a nut is easy to find in any furniture hardware store. The nuts will just be welded into the corners of the frame. |
|
| Holes are drilled in the corners into which the nuts will be placed before they are welded. | |
| The nuts are inserted into the holes - this operation is carried out at all four corners of the frame. | |
| Now on one side of the frame (on its small side) you need to weld nuts into which the vertical stand of the machine will be screwed. To do this, at an equal distance from the corners, initially thin (3÷4 mm)… |
|
| - and then the upper wall of the frame is drilled with a drill of 10 mm diameter. | |
| What is important here is stability, the stability of the assembly’s fastening, that is, you can’t get away with just a few turns of thread. Therefore, extended M8 nuts will be welded into the holes made. It is advisable to first machine their lower edge under the cylinder so that it fits tightly into the drilled holes. |
|
| In fact, only one such socket is required to install the machine. But it is better to provide two symmetrical ones - who knows, perhaps in some cases it will be more convenient for the user to move the stand to a different position. This will take no more than a couple of minutes. | |
| After this, all the nuts are scalded. When tacking, you must ensure that the nuts do not move and are level. To do this, they can be held with a temporarily screwed-in long pin, controlling its position perpendicular to the plane of the frame. In addition, this measure reliably protects the thread of the nut from splashes of metal. |
|
| Here's what happened: with top side frames - two welded nuts for the posts... | |
| ...from the bottom there are four welded nuts in the corners for screwing in the adjustable supports. By the way, if the master has threaded rivets at his disposal required diameter(M6 for the supports, and M8 for the rack), then you can get by with them, that is, avoid the operation of welding the nuts. |
|
| The next step is to make a shelf on which the cutting tools will be fixed with a pressure plate. It can be made from a thick steel plate. But the master decided to give it a slight reverse slope, so he cuts it out from a corner with a 63 mm shelf. The length of the part is the width of the frame, that is, 130 mm. |
|
| First, the required piece of corner is cut off. Then it is clamped in a vice to cut one shelf evenly with a grinder. |
|
| This is how this platform will be welded to the frame. | |
| After welding, the seam is thoroughly cleaned. | |
| Knives and other cutting tools will be fixed to this area with a pressure plate. And for this you need to prepare two holes with M8 threads. It is advisable to space them wider so that you can, for example, clamp planer knives and other similar cutting parts between them. First, holes are drilled with a small diameter drill - 3 or 4 mm. |
|
| Then - with a drill for M8 thread, that is, with a diameter of 6.7 mm. | |
| After this, the thread is cut with a tap. | |
| The next operation is the manufacture of the pressure plate. For it, it is better to take thick, 3÷4 mm, stainless steel. It is less susceptible to deformation than conventional carbon steel. The size of the plate must correspond to the dimensions of the supporting platform. |
|
| The edge that will face the cutting edge of the tool is ground beveled to prevent it from being touched by the abrasive during sharpening. Next, two holes are drilled on the plate for M8 screws - strictly aligned along the axes with the threaded holes in the support pad. These screw holes can be modified to be countersunk. |
|
| The bed is completely ready, and after cleaning and degreasing it can be coated with paint from an aerosol can. While the paint dries, you can work on other components and parts of the machine. |
|
| A steel rod with a diameter of 8 mm will be used for the stand and working rod of the machine. First you need to clean it thoroughly - polish it with sandpaper. The master suggested this option - with clamping the rod into the drill chuck and holding the paper in your hand. Let's be honest - it's not a completely safe way. |
|
| Rod after polishing. It is divided into two sections - one 450÷500 mm long, the second - 250÷300 mm. |
|
| An M8 thread is cut from one end of each rod. On a short rod there is a threaded section approximately 20 mm long - this is for screwing into the welded nut of the frame. |
|
| On a long rod there is a thread 40÷50 mm long. It is necessary for screwing the handle. | |
| The next step is to make clamps that will hold the abrasive bar on the rod. They are made from extended M10 nuts. First, you need to use a core to mark the center of the through hole, with a distance of 12 mm from the edge. |
|
| Then, very carefully, strictly perpendicular to the nut axis, a through hole with a diameter of 8 mm is drilled. | |
| You need to cut a quarter off the other edge of the nut. This is done with a hacksaw for metal in two steps. First, a transverse cut is made to the center... |
|
| ...and then - longitudinal. You need to prepare two of these nuts. |
|
| Short M10 locking bolts are screwed into the nuts - and the clamps are ready. This is what they will look like. |
|
| After this, the clamps are put on the bar. Between them, a sharpening stone is placed in the cut-out quarters, and this entire assembly is secured with clamping bolts. That's it, the rod is assembled, you can move on to the next unit of the machine. |
|
| There should be a unit on the rack that provides an upper point of support for the rod. In this case, the translational movement of the rod back and forth, and a degree of freedom left and right, should be ensured. In a word, this is a kind of hinge, the height of which on the stand will precisely set the sharpening angle of the cutting edge. This unit will again be manufactured on the basis of an extended M10 nut. To begin with, a through hole with a diameter of 8 mm is drilled in it - exactly the same as on the nuts that were used for the clamps. |
|
| Then comes a rather complicated operation. It is necessary to first drill a hole with a diameter of 6.7 mm through the head of the M10 bolt, and then cut an M8 thread in it. The bolt itself will be screwed into the nut, and the ring from the anchor will be screwed into the hole. This ring will act as a hinge. |
|
| This is what the unit looks like assembled. From the side of the through hole, an M10 bolt is screwed into the nut, with the help of which the unit will be fixed to the vertical stand. |
|
| It must be said that such a hinge in the “light version” is not the most successful, and is justified only by the availability of parts. But the working rod produces quite a significant amount of play, which can affect the accuracy of maintaining a single sharpening angle along the entire cutting edge of the knife. A more advanced solution would be to use a ready-made fish-eye joint - such details in large assortment are presented in online stores, and their cost is not so high. It is probably quite possible to do without the complicated operation of drilling a hole in the head of the bolt and then cutting the thread - if you are lucky enough to purchase a hinge with a suitable threaded part. Then for the connection it will be possible to get by with a short hairpin. But for now we are considering it as the master suggested. |
|
| All parts are ready - you can proceed to assembling the machine. | |
| Support legs are screwed to the bottom of the frame. Their height is immediately adjusted so that the machine stands stable - on all four points. |
|
| The vertical stand is screwed in. | |
| A hinge assembly is put on the stand and fixed at a certain height with a clamping bolt. | |
| A pressure plate is placed on the support platform. Two screws are attached that will secure the cutting tool in this clamp. | |
| All that remains is to thread the free end of the working rod into the hinge ring - and we can assume that the machine is ready. | |
| The master decided to immediately try it at work. To begin with, sharpen this knife with a completely “dead” cutting edge. |
|
| The knife is placed between the support platform and the pressure plate. The cutting edge is approximately parallel to the short side of the bed. Fixation is carried out by tightening two screws. |
|
| The working rod is inserted into the hinge. The hinge itself is adjusted in height to ensure the required sharpening angle. The sharpening process begins - first with the first, large block. As you work, you can observe how a uniform cutting edge is formed along the entire length of the blade. |
|
| Then the block can be replaced with another one, with a fine abrasive, to bring the sharpening to the maximum sharpness of the cutting edge. | |
| The result of the work is first visual... | |
| ...and now with a demonstration of the degree of sharpening of the cutting edge. A loose sheet of paper can be easily cut into strips. |
|
| By changing the height of the hinge unit, you can sharpen the plane iron in the same way... | |
| ...or even an ax blade. If it is temporarily not needed, the machine itself can be easily disassembled by removing the bar and unscrewing the stand. In this form, it will take up very little space in the closet or on the shelf. |
It makes sense to add a few more touches.
- Many factory-made models are equipped with a scale on which the required sharpening angle of the cutting edge is set. It’s not difficult to come up with a similar device yourself, for example, like the one shown in the illustration. Perpendicular to plane a supporting platform plate, and a removable ruler with a protractor screwed to it.
After clamping the knife in the clamp, it is enough to apply a ruler to the cutting edge and to the hinge point, align the central mark of the protractor with the platinum, and take the angle readings using the same platinum, counting it from 90 degrees.
Important - the full sharpening angle is made up of the angles on both sides of the blade. That is, if an angle of 30 is required°, then sharpening on one side should be carried out at an angle of 15°.
They do it differently - instead of a protractor, you can fix a sector on which signed marks have been made in advance, for example, “ kitchen knife", "table knife", "chisel", " ", etc. That is, it will be enough to select the height of the hinge so that the bar coincides with the applied mark.
Another option is marks on the vertical post. True, in this case, uniformity in the placement of knives in the clamp is required - so that the cutting edge always protrudes at the same distance from the edge. Not quite convenient.
And the simplest option is to make several templates from thick cardboard or thin plywood, labeling them which cutting tool this corner is intended for.
In a word, by showing intelligence it is not difficult to significantly simplify bringing the machine into the desired working position.
- You can also make a note about fastening the bars. If they are supposed to be changed during sharpening, then they must have the same thickness, otherwise the angle will change. Many masters advise other approaches. Instead of bars, they have several steel plates of the same size prepared. Abrasive paper is glued to the plates. Two sides are already two different levels graininess. That is, you can prepare a kit for all stages of sharpening: from rough shaping of the cutting edge to polishing it.
One more interesting idea in this regard - not a plate, but a section of a profile square pipe 20x20 mm. The four sides are four different abrasives. As you work, just turn it over to the right side...
- One more nuance: it doesn’t hurt to ensure your safety at work. It will be very unpleasant if, during a forward movement, your hand falls off - and carefully with your fingers along the cutting edge. So some kind of protective guard will not hurt here, which you can come up with to your taste.
A home-made tool sharpening machine will certainly be very useful in any household.
* * * * * * *
We can say that in this article we have only scratched the surface of the topic of homemade machines and devices. We will be glad if readers send their wishes: whichever tool they would like to see in detail - we will try to satisfy their requests. And it’s even better if one of the amateur craftsmen shares their secrets on the pages of our portal. Published reviews from visitors are required to be paid.
Many car owners use their garage as a workshop, gradually filling it with practical devices that make car repair and maintenance easier. Many of them can be made independently using the recommendations presented in this article.
Many accessories for a garage workshop can be made independently; the video below demonstrates some of them.
Garage homemade products are devices that make garage life much easier; in addition, they work no worse than factory machines. By equipping your workshop with such devices, you can independently produce the necessary parts for your car, as well as various crafts for your home or garden.
Video of homemade tools and accessories for the garage
It is difficult to predict in advance what devices may be needed when repairing a car, however, there are some homemade products, some of which are used most often. Some of them can be seen in the video below.
Drawings of homemade devices
Pipe bender - useful in household a device that allows you to bend metal or polymer pipe at a certain degree. Bent pipes often used in the construction of greenhouses and greenhouses, installation of heating and other needs. Using the presented drawing, you can make a manual pipe bender yourself.

A vice is a practical device used when performing plumbing work. With its help, it is possible to reliably fix a part requiring metalworking in a certain position.
This device consists of several parts:
- base plate;
- 2nd lips – movable and non-movable;
- lever;
- chassis screw.
Using a small-sized bench vice, the drawing of which is presented above, it is convenient to sharpen and otherwise process small parts.

Having a CNC milling machine in your home workshop allows you to perform a whole series wood machining works.
A homemade milling machine consists of several components and parts:
- bed;
- calipers designed to move cutters;
- caliper guides;
- spindle with installed cutter;
- microcontroller or switching board with microcircuits that provide automation of the machine;
- electric motor with power supply;
- drivers responsible for transmitting commands from the controller to the electric motor;
- a vacuum cleaner for collecting sawdust generated as a result of the operation of the machine.
A DIY CNC milling machine allows you to perform engraving and milling work.
Homemade tools for car repairs
 Windshield wiper arm remover – special tool, facilitating the process of removing the wiper arms. You can make it yourself from a piece of reinforcement, a six-channel channel and a ten-bolt. To do this, use a drilling machine to make 14 holes and weld 2 nuts on both sides of the hole and a handle from the fittings, screw the bolt into the workpiece and, putting on heat shrink, screw in the threaded rivet. The tool is ready.
Another version of the device for shooting windshield wiper arms is shown in the photo below.

 Another useful homemade device with which you can manually re-align your wheels yourself. Another version of this device can be seen in the photo below.

 When carrying out major car repairs, you usually cannot do without a lift. A factory-made device is not cheap, and is not needed very often, so it can easily be replaced with a device made at home.

Homemade machines and devices for the garage
By making devices for mounting and balancing tires, you can carry out this work yourself, significantly saving money on car maintenance. In addition, such devices will come to the rescue if it is not possible to come to a specialized tire shop.
 In your garage workshop you can equip universal machine for tire fitting using scrap materials - metal pipes and the hub.
 When performing various crafts for the home, it often becomes necessary to drill a straight hole. This is difficult to accomplish a regular drill, but if you make a stand for a drill, like the one shown in the photo, then it will be much easier to drill without distortions. This design can be made from various materials. For example:
- made of metal;

- made of wood.

Using the diagram presented below, you can make your own drilling machine from a drill.

Usage homemade press will allow the garage workshop to produce products using the pressing method. A similar device can be made from a hydraulic jack fixed to the top of the frame, which in turn is welded from scrap materials. The pressure in this case is directed downward.

Another version of a homemade press, the design of which involves attaching a jack at the base of the bed. In this case, the pressure process is carried out upward.

Using a homemade press, you can straighten, bend sheets of metal, compress cardboard, and fasten individual elements. The video below demonstrates how to make such a necessary device yourself.
Tool storage devices in the garage
Having order is the key to comfortable use of workspaces in the garage. Special organizers are designed to ensure this order in the workplace, allowing you to conveniently store and easily find the necessary tools. You can make such devices yourself, using available tools.
 An easy and affordable way to store hand tool, is a wall organizer made from tin cans attached to a plywood sheet. Additionally, you can nail several hooks or nails to it to conveniently hang measuring and electrical tools. In the absence of tin cans, PVC pipes of various diameters can be used as holders, cut into pieces and screwed to a sheet of plywood or chipboard.
 It’s even easier to make a special device for storing screwdrivers. To do this, you need to take a wooden block and drill holes in it. the right size. Mount the finished holder on the wall. On the same holder you can organize a storage system for chisels and chisels. It is enough to cut out special holes in a wooden blank. In the same way, you can make a holder for power tools by cutting out the corresponding holes in a wooden shelf.
 Interesting way Tool storage is suggested in the photo above. Its principle is based on the use of magnetic tapes attached to metal strips. Using such a system, it is convenient to store drills, keys and other metal tools.
Convenient and practical organizers for storing screws, bolts, nails and other small items can be made with your own hands from transparent plastic jars with lids. To prevent them from taking up space, you should attach them by the cover from below to the shelf. This and other ways to store tools allow you to efficiently use space in the garage and have everything you need at hand.
The video below demonstrates how to set up a simple and convenient tool storage system in your workshop or garage.
Homemade woodworking tools for the home workshop

Homemade milling machines can perform one or more operations. Preference, of course, is given to multifunctional devices that save space in the garage workshop. With their help you can:
make indentations of a certain shape;
drill holes
make grooves;
process the workpieces.
The simplest milling machine can be made on the basis of a drill. To do this, it is fixed to a steel profile or to a plywood body, and a rotating clamp is placed opposite it. Parts are processed using special cutters held by hand.

Homemade lathe
Creating a lathe with your own hands allows you to make dishes, interior decor and furniture from wooden blanks. Such a device will become an affordable alternative to industrial production and will help realize your creative potential. A homemade lathe can be made from individual components and parts:
- an electric motor used as an electric drive for the machine;
- a headstock, which can serve as an electric sharpener;
- tailstock made from a drill;
- stop for cutters;
- transverse guides;
- a frame made of metal profiles or beams.
Front and tailstock lathe are the main working elements, between which a wooden blank is placed. The rotating movement from the electric motor is transmitted to the workpiece through the front headstock, while the rear headstock remains static, responsible for holding the workpiece. If you equip a homemade lathe with additional devices - a baluster, a trident, a copier and others, then its functionality will increase significantly.
The video below demonstrates how to make a lathe with your own hands.

If necessary, drill precise holes in metal, plastic or wooden parts, experienced craftsmen It is recommended to use a drilling machine. Unlike a drill, which vibrates strongly during operation, this device provides high-quality results, regardless of the material and thickness of the workpiece. You can make a simple drilling machine yourself by using the same home drill, but installing it in a vertical position on a frame made of furniture board and attaching it to a metal stand. If necessary, such a machine can be equipped with an asynchronous motor.
As a rule, home craftsmen do not stop at making the machines themselves. Very often they work to improve existing equipment.
The video below demonstrates useful accessories for a lathe that expand its functionality.
Homemade metal tools for the home workshop
These do-it-yourself devices for the home workshop are designed to facilitate the metalworking process. They are usually made from scrap materials and tools.
Among the most popular devices are:
- pipe benders;
- press;
- vice;
- milling, metalworking, turning, drilling and thicknessing machines;
- devices for drill sharpening, knives and other tools.
With their help, a home craftsman can make practical devices for a summer house, garage, and also equip a comfortable home. Examples of useful machines and devices in the household can be seen in the photo below.

Homemade metal cutting machine
The video demonstrates how to make some useful household devices.
Taking into account the presented recommendations and drawings, any home handyman will be able to make useful devices for the garage and machines for his workshop, arrange an ergonomic space in it, and realize his creative abilities.


