A diagnostic pit is always a welcome attribute of a garage. It allows you to conveniently inspect the underside of the car. A handy car enthusiast can use it to independently replace oil or a torn cuff. This is where you should start arranging your garage. After spending a certain amount, a pit can be built using hired labor. The article tells you how to do this work yourself.
What to build a viewing hole from

An inspection pit in a garage is usually constructed of brick or monolithic reinforced concrete. Both options have their advantages and disadvantages. Brickwork is less labor-intensive, but not as durable and requires additional grouting of external masonry joints before applying waterproofing.

Iron concrete walls stronger and more durable. Disadvantages include increased manufacturing complexity. To pour the concrete solution, it is necessary to construct a formwork, inside of which reinforcement is knitted. A large amount of solution is required. You can make both brick and concrete walls with your own hands.
Dimensions and position of the inspection hole

It is more rational to tear off the inspection trench at the same time as laying the foundation of the garage. The width of the ditch is usually 70–80 cm. If you take it less than 70 cm, the trench will be cramped; wider than 80 cm, there is a greater risk of falling into the hole, which often happens. It’s good if there are a few strong guys nearby. The height of the trench is made approximately 180 cm, so that there is about 15 cm of clearance from the head to the bottom of the car. The length must be at least two meters, and better - the length of the car plus 1 meter.

The position of the ditch can be different: in the center of the gate or offset. In this case, the car stands away from the underground with its damp air. To inspect or perform any work, you will have to maneuver to enter the ditch. For more convenient entry, the inspection pit in the garage can have an L-shaped configuration. You can go up and down the stairs without rolling over the car.

Going down into the pit using the ladder is inconvenient and dangerous. The staircase must be stationary, at the same time comfortable and safe. The best option is to manufacture the steps simultaneously with the construction of the enclosing structure. With brick walls, it is advisable to make the steps from brick. When pouring walls made of monolithic reinforced concrete, steps should be cast at the same time. If for some reason they were not made at this stage, then the stairs can be made later with your own hands, when the inspection ditch is being constructed. The staircase is made of wood - with the steps fastened on bowstrings or stringers, as well as metal - with treads made of corrugated iron.
How to illuminate a viewing hole

Carrying out arrangement garage box, lighting of the inspection hole in the garage should be provided. According to the rules for lighting installations in repair pits, the use of 220 V incandescent lamps is prohibited. It is allowed to use light sources with lamps of no more than 36 V. A step-down transformer is used to power them. A good option are fluorescent lamps in a sealed housing. If a 24V carrier is used, the cable must be at least four meters long for safety reasons.
Underground ventilation

In the repair trench, due to the temperature difference, increased humidity occurs and condensation forms and settles on the bottom of the car. To avoid this unpleasant phenomenon, the inspection pit in the garage must have good ventilation. Exhaust duct made from asbestos-cement or plastic sewer pipe embedded in crushed stone floor preparation. This pipe must be connected by a transition elbow to a vertical exhaust riser. The hoods from under the ceiling of the garage box and trench must be independent. If you combine them into one, the efficiency of ventilation of the technical underground will sharply decrease.
Pit contours
Before marking a place in the garage for a future trench, it is necessary to draw a drawing of its cross section. The clear size of the trench should be taken as a basis. For example, the width will be 70 cm. To this value you need to add twice the wall thickness. If the latter is 20 cm, it will be: 70 + (2 × 20) = 110 cm. Add another margin - 5 cm on each side. Ultimately, the width of the trench at the bottom will be: 110 + (2 × 5) = 120 cm. In order to facilitate the subsequent application of coating waterproofing, the walls of the trench should be inclined. To do this, it is enough to increase the width of the trench on the garage floor by 60 cm (30 per side). That is, at the top the width of the ditch will be 180 cm. Trenches for the foundation are dug using the same principle.

Bucket or shovel
If the inspection hole in the garage is made at the same time as the foundation is being poured, it makes sense to resort to the services of an excavator. All work will be completed in half a day. The costs will be of the same order as if you hire diggers. Sometimes it happens that during the season you still won’t find them. Well, what if the idea came to build a technical trench when the garage was already built? There is only one way out - to dig a pit with your own hands. In order not to do unnecessary work, a certain amount of excavated soil should be stored near the construction site, since the earth will be needed for backfilling the sinuses.

The base of the trench should be protected from penetrating moisture by waterproofing. A 10-centimeter footing of concrete is first poured onto the compacted bottom of the pit. For preparation, a solution of grade M 150 is sufficient. The width of the preparatory layer is made flush with the outer surface of the future walls of the trench. To insulate the sole, any type of rolled insulating material is used - roofing felt, Bikrost, Aquaizol, polymer membranes. The canvas should be cut to overlap the walls.
A concrete floor is poured on top of the insulating layer. The brand used is stronger - M 200. A thickness of 7–8 cm is sufficient, but it is better to reinforce the poured surface with a 150 × 150 road mesh with a wire thickness of 4 (3) mm.
Rules for wall construction
To paraphrase Henry Ford, we can say - the design of the trench walls can be anything, provided that it is rigid and durable. To prevent the walls from bulging and cracking in the near future, you should know how not to do them:
- put brick walls one spoon (120 mm thick);
- make brickwork without reinforcement;
- use silicate products for masonry;
- pour the concrete mixture directly into the ground (from the outside of the ditch);
- pour concrete without reinforcement;
- use rubble concrete.
Combined wall
Below is one of the possible options building a building envelope with your own hands. The outer walls of the pit are dug inclined, with a margin of width, to ensure future access for waterproofing work. Lay out 4–5 rows brickwork half a brick throughout inner contour future building. This partition will serve as internal formwork. The outer one is installed, retreating 130 mm from the folded wall immediately to the entire height of the trench, using old boards, sheets of plywood, chipboard, OSB and other similar materials. They support it with spacers and jibs, after which they fill it concrete mortar with the top edge of the masonry.
Lay a reinforcing masonry mesh 250 mm wide with a cell size of 50 × 50 and a wire thickness of 4 or 5 mm. Lay out the next section and install the reinforcement again. For better adhesion to concrete, the outer surface of the brickwork is made “into a wasteland”. The rigidity of the structure will be provided by closed belts made of reinforcement bars with a diameter of 10 mm, laid at the bottom and top of the fence. In order to subsequently equip the lighting of the inspection pit in the garage, niches are provided for installing lamps. Waterproofing, if provided for by the project, is carried out after removing the external formwork.
Sightseeing ditch and groundwater

Unfortunately, it is not always possible to make a viewing ditch in the garage. If groundwater (GW) is located under the garage at a depth of less than two meters, it is not worth starting construction. Life shows that in this case no amount of waterproofing of walls will help. When the hot water is below 2.5 meters, a trench can be built provided that high-quality waterproofing of the outer walls of the inspection ditch is carried out. It can be done with your own hands from several layers of adhesive material: roofing felt, TechnoNIKOL, Stekloizol, Gidrostekloizol and others. Cover the surfaces with molten bitumen. There are penetrating materials: Hydrotex, Aquatron-6, Penetron. They are convenient because they are applied to wet concrete and reduce waiting time. A good clay castle is oily, crumpled clay.
Global warming
To prevent the inspection pit in the garage from becoming covered with frost in winter, it can be insulated. To do this, the external walls on which waterproofing is applied must be covered with insulation boards - polystyrene foam 5 cm thick. If such insulation is laid in 2 layers under the blind area around the perimeter of the entire garage, the floor in the garage and the trench will be even warmer.
Trench in full roll
To avoid accidentally falling into a hole, you need to make a protective deck over it. The simplest design is thick transverse boards laid inside a edging of corners, installed using embedded elements or secured with anchor bolts. Woodworking waste - slabs laid with the convex side down - are well suited for this purpose. The inspection hole in the garage, covered by them, when viewed from below, resembles a front-line dugout.
In conclusion
The construction of an inspection trench is reminiscent of pouring a foundation and goes through the same stages:
- marking;
- earthworks;
- making soles;
- walling;
- waterproofing;
- insulation.
Having completed the construction of a trench made of reinforced concrete or brick, it is arranged. The inside of the pit can be plastered or tiled. Such an “underground”, built with your own hands, will allow you to drive a car with complete confidence in its technical condition. After all, by connecting the lighting of the inspection pit in the garage, you can regularly assess the condition of the chassis of your car.
The garage basement floor is one of the most important stages of decorating this space. If the flooring is not done correctly, moisture can seep into the basement. The presence of moisture leads to condensation, which can settle on walls, parts or the car, resulting in mold and rust.
Choosing the type of floor in the inspection pit and basement

The basement in the garage can be used both as a viewing hole and for various things, objects and tools. If the basement in the garage is equipped with an inspection hole, this will be an additional advantage for car owners.
Professionals recommend arranging the garage basement floor taking into account the groundwater level. Since the amount of moisture in the pit directly depends on this. In fact, there are quite a lot of ways to arrange the floor of an inspection pit and cellar.
Let's look at the most famous and available methods, which each owner can do independently. There are the following types of flooring in the basement:
- ground;
- concrete (most common);
- adobe;
- wooden.
What features distinguish each of them? The fact is that depending on the coating method, the procedure for carrying out the work may differ significantly.
Dirt floor
This type of arrangement of the floor of the inspection pit and basement has been used for many years. Making a dirt floor is the easiest way, and the cost of materials will be minimal. The construction of such a surface in the cellar and inspection hole involves leveling the base, then constructing a sand and gravel cushion (about 10-12 cm), on top of which soil is poured and compacted.
The disadvantages of this type of coating include:
- Unreliability of the structure; if there are racks in the basement, they can sag under the influence of stored items;
- Such a floor arrangement is only suitable in cases where the groundwater level is sufficiently low. Otherwise, in the spring, water may accumulate in the basement and inspection hole.
Clay floor
Clay covering is one of the best options, especially when it comes to a cellar for storing products. You just need to get it required quantity good quality clay.
You should not resort to using low quality material, as this will directly affect the reliability of the floor. Due to the fact that it is quite difficult to determine the quality of clay on your own, it is best to use the help of specialists.
The work order is as follows:
- The surface of the base is leveled;
- A pillow 10-13 cm thick is constructed. It is best made from materials such as crushed stone and clay. To arrange the base, you can use bitumen; it should be used to cover the crushed stone;
- Vapor barrier is installed. Ruberoid or other material is suitable for this. It is necessary to lay the vapor barrier with an overlap onto the wall;
- Clay with a thickness of 5 cm or more is again laid on the vapor barrier. Just as when laying the first clay layer, crushed stone can be added here;
- After drying, cracks may appear; they are covered with a mixed solution of clay and lime.
This type of coating is one of the most environmentally friendly.
Wooden floor

This type of floor covering for the inspection pit and cellar is suitable in cases where the basement is dry and there is no groundwater flow in the spring. This floor arrangement is quite simple and environmentally friendly. Wood is great when it comes to a cellar intended for storing produce.
Let's consider the sequence of work:
- Surface leveling;
- Construction of a cushion made of crushed stone with the addition of clay or bitumen. This will provide protection from excess moisture and groundwater flow;
- Waterproofing flooring. Suitable for these purposes roll material, or thick construction film;
- Laying lags. It is best to use 100X100 mm logs. Here you should pay attention to leveling the level of the future floor;
- The final stage will be laying the wooden floor. The boards should be secured with self-tapping screws.
In the basement, you can also make the floor and walls from planks. In this case, the room is suitable not only for storing products, but also for other purposes.
Brick floor
This solid red brick floor is also a common option for arranging the floor of an inspection pit or cellar in a garage. It should immediately be noted that sand-lime brick should not be chosen. Thanks to bricks, you can create a stable and durable surface. The floor can be installed in one of two ways.

The first method is distinguished by its breathability. It is as follows:
- The surface of the base is leveled;
- A cushion is formed, the thickness of which is approximately 10-15 cm. Materials such as gravel or crushed stone are suitable for it. The pillow must be thoroughly compacted;
- It is necessary to prepare a clay solution with the consistency of dough. The solution is laid approximately 20 cm thick;
- The next step in constructing the floor of the inspection pit will be laying bricks. It should be recessed a little. The bricks are stacked as tightly as possible among themselves. Sagging and bulges on bricks are unacceptable; if they are detected, they must be knocked down.
This flooring technique is quite simple. After drying, the basement is ready for use.
If there are leaks nearby groundwater, then another method of arranging the floor in the basement of the garage is suitable. The order of work is as follows:
- A cushion 10-15 cm thick is laid and compacted. Sand and gravel are suitable for its formation;
- Next, a clay layer is laid. The clay layer can be replaced by coating with bitumen and gluing with roofing felt;
- Laying bricks using cement mortar. The brick, as in the previous case, must be recessed;
- After a few days it is necessary to wet the surface. Then, using a broom or brush, fill the joints with solution.
Concrete floor

It is best to fill the floor of the inspection pit and cellar in the garage with concrete. This material will be used for many years, and its repair is quite simple.
That is why pouring the surface with concrete will be the best option for arranging the floor in an inspection pit or garage cellar.
If the basement is planned to be used for storing products and doubts arise about the advisability of concreting, it should be noted that in most cases the floor in agricultural premises is concrete. At the same time, all products are perfectly preserved.
Preparatory work
Before pouring the concrete floor of the inspection pit and basement, the surface should be prepared. Concreting is best done on the ground. In this case, the work process is simplified and you can handle it without special skills.
Preparation of the base is divided into several main stages:
- Measuring the base using a level;
- The soil should be compacted. To fill a floor that will not crack during use, you need to prepare a hard surface. For this purpose, you can use crushed stone or other small stone;
- A special cushion must be placed on the ground. It can be formed from sand. Initially, the thickness of the pillow can be from 50 to 100 cm. Over time, it will be compacted by a quarter.
- The preparatory stage ends with compacting the sand.
How to pour new concrete over old one?

In some cases, it is possible to pour new concrete onto the surface of the old one. To do this, thoroughly clean the surface and, if necessary, repair it. If chips and cracks are detected, they should be widened, after which they are repaired either cement mortar, or a polymer mixture. It is advisable to get rid of the differences old surface. If it is impossible to make the old coating even, you can use a special concrete coating.
Step-by-step instructions for concreting a floor
The concreting procedure is carried out in several stages. If concrete is poured correctly, it can last much longer without requiring repairs.
- Waterproofing. After preparing the base, it is necessary to make waterproofing. This will prevent moisture from penetrating into the room and will also protect against fungus. For these purposes, you can use roll or polymer materials. It is allowed to use thick polyethylene film. The waterproofing process involves laying the material overlapping. To fasten the individual parts you will need construction tape. The waterproofing material is applied to the walls at about 20-25. This will protect the joints of the floor and wall from moisture. Excess waterproofing material should be removed when the floor installation is completed.
- Insulation. It is necessary to insulate the floor on top of the waterproofing. The best option there will be polystyrene foam with a thickness of 10 mm and a density of 35 kg/m3. Thermal insulation material is laid on the waterproofing. Since polystyrene foam is sold in sheets, the process may take a little longer. To insulate the surface faster, you can use roll insulation, for example, mineral wool. Suitable for insulating inspection pits and basements using glass wool. The top of the insulation must be covered with a layer of waterproofing, for example, film. This will avoid moisture accumulation.

- Reinforcement. Next, you can proceed to the reinforcement stage. This is necessary to strengthen the concrete floor of the inspection pit and basement. In the cellar where products are supposed to be stored, it is highly advisable to make reinforcement. To do this, you will need a special mesh with rods with a diameter of about 5 mm.
- Pouring concrete. After this, you can begin concreting. The prepared solution is leveled using a rule or a vibrating screed along the beacons. They should be placed at a distance of no more than 2 m. After the concrete is poured, you must wait until it dries. This process takes about 3 weeks, only then can the surface be grouted.
- Grout. Grouting begins with the more hardened areas, these are the areas near the walls. After which the process moves across the rest of the floor surface.
Many people try to do maintenance or minor car repairs themselves. To avoid lying on your back under the car, you need an inspection hole in the garage.
The wiring must be installed before you start laying/pouring the walls.
Dimensions of the inspection hole in the garage

This is far from dogma. Everyone does as they see fit. Some find deep holes inconvenient and they make them almost exactly tall, and sometimes even lower - 1.5 meters. If you take into account the car's ground clearance, from the floor of the pit to the bottom of the car it will be about 1.7-1.8 meters. You can do it this way.
Another point about length. Sometimes it is not possible to make a long hole. Then it is made approximately half the length of the car, driving it in front or back, depending on which part of the car needs inspection or repair.
Now about where to place the pit in the garage. Usually it is shifted slightly towards one of the walls, leaving a wide side for installing equipment, storing spare parts, etc. In this case, there must be at least 1 meter from the edge of the pit to the near wall.
That's all the parameters. Just note that we were talking about the final dimensions of the pit. When marking the pit, you will need to add thickness to the walls, and dig deeper to the height of the floor screed (if you make one).
What materials are they made from?
The inspection pit in the garage (its walls) is lined with bricks, heavy building blocks, made from monolithic concrete. If we talk about brick, it is better to use ceramic brick: it is not afraid of humidity. The walls are made of half a brick or brick. The wall thickness, depending on the laying method, is 12 cm or 25 cm. This must be taken into account when marking the pit.
Brick can be used on dry, dense soils. The groundwater level must be low. If the water comes up high, it is better to make the walls of the pit from reinforced concrete.

Brick inspection hole in the garage
Building blocks also need to be chosen those that are not afraid high humidity. This concrete blocks. The rest, if used, must require external waterproofing, and this is not a guarantee that they will not crumble, especially if groundwater is located close.
With a concrete inspection hole, everything is simpler: concrete is not afraid of moisture, it only makes it stronger. To fill the walls, concrete grade M 250 is used; for the floor, M 200 is sufficient. Why is this so? Because during winter heaving the main load falls on the walls. To prevent them from “collapsing”, a margin of safety is required, which is achieved by reinforcement and the use of high-strength concrete. By the way, to avoid heaving of the soil under the garage, you need to make a good blind area so that the water leaves and does not soak into the soil.
The wall thickness when filling the inspection hole with concrete is from 15 cm. Stacks must be reinforced. To do this, use a ready-made mesh with a wire thickness of 5-6 mm and a pitch of 150 mm (if groundwater deep) or knit a frame from reinforcement with a diameter of 10-12 mm. The reinforcement installation step is 20 cm. For greater strength, you can make a single rod for the bottom and walls, bending it accordingly.
Waterproofing methods
An inspection pit in a garage can be protected from moisture penetration in two ways: with the help of external waterproofing, which is carried out exclusively during the construction process, and internal, which can be done during operation.
External protection
If in the place where the garage is being built the groundwater is deep, lower than 2.5 meters, and even in the spring or after heavy rains it does not rise higher, you can do without waterproofing. On the other hand, the hydrological situation is constantly changing, and where it was previously dry, water may appear. If the inspection hole in the garage has already been built, external waterproofing cannot be done. All that remains is to use impregnation deep penetration to reduce the hygroscopicity of the walls. Therefore, if possible, do external insulation in any case.

The second method of external waterproofing
How to prevent moisture from entering the inspection hole in the garage? Most often used waterproofing films or membranes (butyl rubber, aquaizol, etc.). They are laid in sheets, covering the pit from one edge to the other, with 10-15 cm released from each side of the pit onto the garage floor. The panels are laid overlapping. They must overlap by at least 15 cm. To obtain a more airtight joint, they are glued together double-sided tape, maybe in two stripes - at the beginning and end of the “overlap”. The film is well straightened so that it fits tightly to the walls of the pit. At further work It is important not to damage the membrane.
Internal waterproofing
Internal waterproofing- This is usually the impregnation of walls with coating waterproofing. If possible, use a composition for swimming pools. It creates a waterproof, dense film that closely resembles rubber. It is blue in color and washes well after hardening. It is better to treat the walls with this composition twice, or more.

Deep penetration impregnation significantly reduces the hygroscopicity of the material
Another option is a cement-based deep penetration primer. The polymer particles contained in it block the capillaries through which moisture penetrates through the thickness of the material. One such treatment significantly reduces the hygroscopicity of the material. In the case of water in a garage pit, at least twice the treatment is required (and preferably more).
Caisson device
There is another option to escape from the ground - to make a metal caisson. A box of appropriate dimensions is made from sheet metal, treated with anti-corrosion compounds, and then installed in a pit. If the welds are made airtight, there will be no water, but another problem may arise. If there is a large amount of water, it can squeeze out the caisson. They say it "pops up".
To avoid such a situation, corners and rods are welded to the sides of the caisson from the outside, which go 1-1.5 meters into the ground. So that the volume of excavation work is not very large (the foundation pit, taking into account these spacers, turns out to be large), you can cheat. Before installing the caisson, drive corners or metal rods into the ground, letting their ends out. You can weld them to the caisson body after installation. The pit will still have to be made larger (you need to cook it from the outside), but its dimensions will still be smaller. The second advantage of this method is that the rods will be driven into dense soil, which means they will hold the caisson better.
Another way to prevent the caisson from “floating up” is to make a hole in the wall at a certain height. If the water rises to its level, it will begin to pour inside. The water can subsequently be pumped out, the main thing is that everything remains in place. An inspection hole in the garage, built according to this principle, stood for more than 20 years - until the metal rusted.
Water collection pit
If the pit has already been built, and coating waterproofing or impregnation did not give the required result, it is necessary either to arrange drainage system around the garage, or collect water in one place. To do this, a pit is made in the garage inspection pit, at one of its ends. Water accumulates in it, from where it is pumped out. In order for the system to operate in automatic mode, a water presence sensor is installed, which, when triggered, turns on the pump.
Formwork is made under the pit and filled with concrete. Then they waterproof the pit along with waterproofing the entire pit. For reliability, you can also put a metal caisson inside.
We concreted it, pressed the caisson down with a weight. Now there is water in the caisson. This is a metal caisson for the pit. We have made waterproofing, and we pump water out of the pit with a submersible pump. At the same time, we assemble a reinforcing frame for the concrete walls of the inspection pit. A pit is dug and formwork is installed.
Since it is not possible to completely get rid of dampness in this case, a boardwalk is knocked down onto the floor of the pit. To prevent the boards from rotting, they can be soaked in waste. If you don’t like its smell, take a special impregnation for wood that has direct contact with the ground (Senezh Ultra, for example).
Insulation of the inspection pit in the garage
If you spend a lot of time in the garage, then you will most likely have heating. In order to warm up faster, it makes sense to insulate the pit. EPS (extruded polystyrene foam) is best suited for these purposes. He endures significant loads, is not afraid of dampness, does not rot, and fungi and bacteria do not multiply on it.
The thickness of the EPS to create a noticeable effect is from 50 mm. Place it between the soil and the wall of the pit. Then from the outside to the inside the pit will look like this:

Expanded polystyrene can also be placed under the screed at the bottom of the inspection hole. A reinforcing mesh is usually laid on top of it, and then concrete is poured.
Once you have decided on the dimensions and what material you will make the walls from and how thick they will be, you can begin marking the pit. This can be done using pegs driven around the perimeter. The second option is to stretch a twine/rope between the stakes driven into the corners. According to the markings, we begin to dig a pit. The earth is usually taken out and temporarily stored near the gate.
Made of brick: step-by-step photo report

We started digging a pit
Along with earthworks monitor soil moisture. If you have reached the design depth (required + thickness of the floor screed), but there is still no moisture, you can do without waterproofing. Those who do not want to take risks can be advised to immediately lay down the film.
We level the walls. There is no need to achieve ideal geometry, but there should be no noticeable humps or holes. We also level the bottom of the pit and tamp it, compacting the soil well. A hand tamper is usually used. A layer of crushed stone is poured onto the bottom (twice 5 cm each), each layer is also carefully compacted. Next comes a layer of sand. 5 cm is enough. The sand is moistened and compacted to a high density so that the foot does not leave imprints. Next we lay the waterproofing film.

Line the bottom and walls with waterproofing film
We even it out well, tucking it into the corners. We lay the panels with an overlap of 15 cm, which we glue with double-sided tape. To prevent the edges from rolling, we press with available materials - boards, stones.
We lay a layer of insulation on the bottom, and a reinforcing mesh of wire on it. We fill all this with concrete grade M 200. The layer thickness is at least 5 cm. To make it easier to navigate when laying, we make marks on the film by which you can control the thickness of the layer.
If you use Portland cement M 400, the proportions will be as follows: 1 part cement, 3 parts sand, 5 parts medium and fine crushed stone.

An inspection hole is being built in the garage: the floor is filled with concrete
We wait several days until the concrete gains 50% strength. The exact period depends on the temperature. If it is around +20°C, you will have to wait 5-6 days. If +17°C is already two weeks.
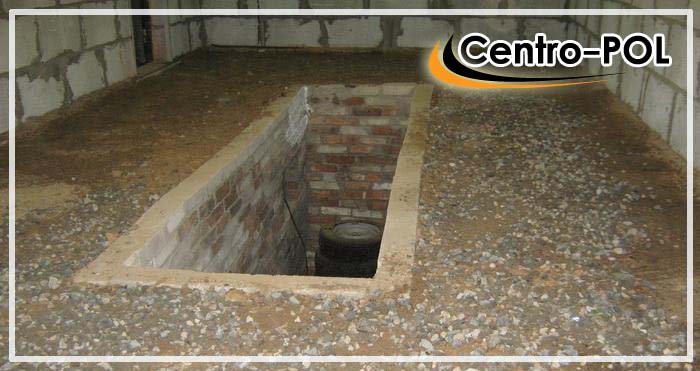
Let's start laying out the walls. It was decided to make it in half a brick. We used used bricks, about 850 pieces were used (pit size 4.2 * 0.8 * 1.7 m). The walls were laid out in a circle up to the level of the elbow.

We build walls in block bricks
It was decided to make a niche for the tool at a level of 1.2 meters from the floor. Its height is 3 rows of bricks, the top is covered with a treated board.

How a beggar in a pit is made
To avoid having to lay out a brick niche, a metal liner is inserted. A box is welded to suit the size.

Metal box
Next, the walls were driven almost level with the garage floor. Part of the walls was replaced with two sections of channels. If necessary, jacks rest on the bottom. A metal corner with a 50 mm shelf, steel thickness 5 mm, is placed on the top row.

Channels on both sides of the inspection hole in the garage
The corner is unfolded so that one of its shelves hangs down, the second covers part of the upper surface of the brick. To prevent the wall from collapsing under load, embeds are welded to this corner, which are then connected to the reinforcing belt of the concrete floor in the garage.

The corner is laid, the embeds are welded

Pouring the floor in the garage - concrete level along the upper edge of the corner

The second side is concreted
Features of making concrete walls
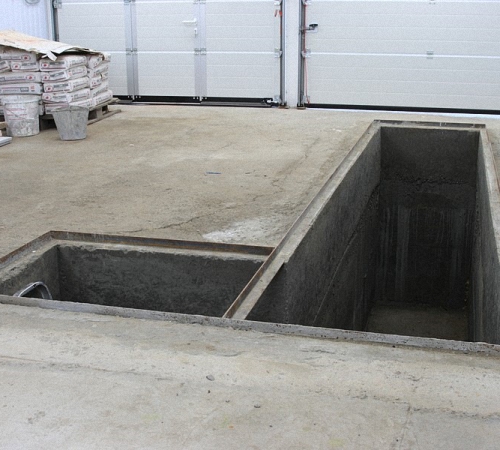
When casting concrete walls, it is necessary to make formwork. It is easier to make it from sheet material - construction moisture-resistant plywood with a thickness of 16 mm or more, OSB. Shields of the required size are knocked down, reinforced with bars according to outside. They are necessary to prevent plywood or OSB from bending under the pressure of concrete. First, the outer parts of the formwork are installed. If the walls of the pit are smooth, there will be no problems. You just lean them against them and place them level.
Then the internal formwork panels are installed. There should be a distance of at least 15 cm between them. To prevent the walls from deforming during the pouring process, spacers are placed between them.

An example of formwork for a concrete inspection pit in a garage
It is advisable to fill the filling at one time. The poured portions must be bayoneted or treated with a submersible vibrator for concrete. The formwork is removed after two to three days. Afterwards, you can install a corner with welded embedded rods (strips) and begin pouring the floor.
stroychik.ru
How to make a viewing hole in the garage with your own hands - instructions with photos and videos
Functions and necessity of a viewing and vegetable pit in the garage
The need for an inspection hole in the garage is obvious, since in cases of oil changes, minor repairs to the bottom of the body or a routine inspection, you have to set aside several hours to travel to the station maintenance and pay for expensive services.
The pit for technical inspection of a car can also be used as a cellar or vegetable storage. For this purpose, niches and shelves are constructed inside it.
The condition for high-quality use of the inspection pit is: technical structure and places for storing products is compliance with all construction standards and the presence of reliable waterproofing of the floor and walls.
Even such a simple design requires careful planning. An important point in this regard is the determination of soil quality and groundwater levels. The most suitable foundation for such structures is clay soil. Its peculiarity is that it does not allow moisture to pass through, which means it can become a kind of waterproofing layer.
With a large accumulation of groundwater and high level their location, the inspection pit is additionally equipped with a drainage system to remove excess moisture, as well as submersible pumps so that the room can be quickly dried.

The staircase will provide a convenient and safe descent
Step-by-step guide to making a viewing hole
You can install the inspection pit yourself. There is nothing complicated about this if you follow the detailed instructions.
How to determine the size
To calculate the area of the future inspection pit, you need to take into account the thickness of the walls and base. For such calculations, it is necessary to remember the geometry course and resort to a simple formula that determines the area - S = ah, where a is the length, h is the width of the pit. The finished inspection pit will have dimensions of 75x185x300 cm. The thickness of the concrete walls and floor is usually about 10 cm. The calculations will be as follows: 0.85x3 = 2.55 m² - this is the area of the pit for the inspection pit.
Comfortable work in the inspection pit is created by a correctly calculated space, namely, its parameters should be convenient for the build of the person in it. Typically, the width of the pit is built in the range from 70 to 75 cm. This width is enough for you to move freely inside. The same distance between the walls makes the observation structure convenient for a passenger car to enter.
The pit may be wider if the inspection pit is intended for large vehicles or trucks. Distance between internal parties The wheels of such vehicles are much larger (from 80 to 90 cm).
The inspection pit is arranged in such a way that the walls are slightly narrower towards the floor. Schematically, in cross-section, its design resembles an inverted trapezoid. This shape provides convenient access to tools in niches and free movement.
The length of the inspection hole is selected based on the size of the garage. If the space of the room allows, then a staircase can be provided in the pit. To do this, the length of the pit is increased by 100–120 cm.

Depth of the pit “with reserve” for installing the floor
The height of the pit is at least 170–180 cm. These dimensions are relative, since the depth is made in accordance with the height of the car owner. While in the inspection hole, a person should not touch the bottom of the car with his head.
For additional safety of the car and its owner, the inspection hole is equipped with metal limiters. They usually consist of four pillars fixed at the corners of a niche. They rise 10–15 cm above it. Sometimes for technical inspection, not four pillars, but two metal corners are used. They are fastened against each other along the edges of the length of the pit.
The depth should be 25–30 cm greater than the owner’s height. With this distance from the base to the body, the arms will not get tired quickly, as this makes it possible for them to be in a bent position.
Materials and tools
Most often, concrete, wood, metal or brick are used for manufacturing.
To calculate the required amount of concrete, you must use a formula that determines the volume. To do this, you need to multiply the length, width and height of the wall. Similar calculations are carried out for the floor.
If brick is used in the construction of the pit, then, knowing its parameters, it is easy to calculate the required amount of this material in pieces. The dimensions of the red brick are 250x120x60 mm.
When building a viewing hole, you cannot do without the following tools:
- shovel and bayonet shovel;
- buckets for excavated earth and concrete mixture;
- trowels;
- welding machine;
- hacksaws.
The following materials are also required:
- bricks;
- cement, sand, crushed stone;
- M200 concrete for the base;
- boards with a section of 400x50 mm;
- reinforcing bars;
- metal corner 50 mm wide;
- waterproofing material.
Instructions for making an inspection pit from bricks, boards, concrete and iron
All work must be done in a strict sequence of steps:

Features of installation of partitions depend on the material used.
Concrete inspection pit
Before pouring the mixture, it is necessary to make formwork. For this, it is best to use OSB boards. This material does not allow the poured mixture to pass through and does not deform over time. The plates are fastened together using boards and screws so that the distance between them is at least 15 cm.
To maintain shape wooden structure it must be secured with spacers. Gaps in the joints of the slabs should be absent or minimal. A reinforcing mesh should be installed inside the finished formwork.
There is an option for pouring concrete with one-sided formwork. To do this, it is necessary to cover the walls of the pit with waterproofing material. Next, OSB boards are installed along the inner perimeter of the pit. A metal mesh is placed between them and the waterproofing. Concrete is poured inside this structure.

After the concrete hardens, it turns out monolithic design
Brick inspection pit
A waterproofing sheet is placed in the finished pit. It should completely cover the floor and walls. The canvas must be laid with an overlap. To prevent the edges of the material from lifting up, they are pressed down with boards. A half-brick masonry is made on top of the waterproofing. When the wall reaches a height of 135 cm, you can make niches and then continue laying to the top edge of the pit. It is recommended to install a metal frame from a corner on the last row, and it should be welded in such a way that one shelf on each side is parallel to the floor. Thick boards will be laid on it to cover the pit. Next, they pour the concrete floor in the garage.

This method of masonry makes the walls more durable
Inspection pit made of metal sheets (caisson)
This design resembles a large box. During its manufacture, the sheets must be joined by continuous welding. The finished structure must be carefully treated with anti-corrosion coatings. The box should be equipped with fasteners. They are welded metal corners that rest 100–150 cm into the ground. They are attached to the body on four sides. They will hold the box in place. If this is not done, the entire structure will simply float when the groundwater level rises.

The staircase is made of the same material
Inspection hole from wooden planks
Wood without proper treatment quickly rots. Therefore, the material must be impregnated with special antifungal substances and additionally waterproofed. It is better to take thick boards for walls. The material is installed horizontally. Spacers are secured along the edges of the narrow sides of the inspection hole.

For reliability, the bottom of the pit is made of concrete
Waterproofing device
This process is carried out both before the construction of the structure (external insulation) and after its construction (internal insulation).
If the garage is located in an area with a low groundwater level, then many owners are in no hurry to isolate the inspection pit from moisture. However, the hydrological situation of any area changes every year, so it is recommended to take care of insulation at the construction stage. For this purpose, special films or membranes are used, for example, butyl rubber, aquaizol. They need to be laid in a pit. The edges of the material should be laid with an overlap of 10–15 cm. To obtain a sealed seam at the overlap, use double-sided tape.
When installing a film or membrane, it is important not to damage its integrity. Otherwise, moisture from the soil will enter the hole.
The laid waterproofing layer is melted using blowtorch. As a result, the film straightens, fitting more tightly to the walls and bottom of the inspection pit.

The overlap of the material will prevent moisture from seeping into the pit
Do-it-yourself internal waterproofing of an inspection pit in a garage involves treating the surface of the finished inspection structure with liquid substances, which, when dry, form a dense water-repellent layer. The composition for treating swimming pools has proven itself well. It is applied with a thick, wide brush, and when it hardens, the substance forms a waterproof material resembling rubber. For greater reliability, more than two layers should be applied.

Insulating material can be applied using a spray gun
There is another way of internal insulation from moisture - this is the use of special cement-based primers, which tend to be deeply absorbed into the applied material. This effect is achieved thanks to the polymer particles that are in the mixture. They block capillaries that allow moisture to penetrate through the base material.
How to close a finished inspection hole
A covered inspection hole will not only protect the car from accidental failure, but will also serve as an additional waterproofing layer. In the absence of a cover, evaporated moisture settles on the lower parts of the car body, thereby creating favorable conditions for the formation of metal corrosion. To avoid such problems, the inspection hole is covered. For this purpose, sheets of metal or boards are used.
Wood is a relatively inexpensive and lightweight material. If necessary, the boards are easy to replace. They are selected from hard woods, such as oak and larch. Before use, the boards are coated with antifungal impregnations and antiseptic substances. They are placed in the openings of metal corners fixed at the top of the inspection hole. The thickness of each board must be more than 40 mm.

Most suitable option boards are for this purpose
Using metal is less convenient, since this material is heavy, it is not cheap and is not resistant to corrosion. During use, its surface bends.
Video: DIY inspection hole in the garage
Step-by-step guide to building an insulated vegetable pit
The construction of a vegetable pit has its own characteristics.
Drawing
For a vegetable pit, both the presence of waterproofing and depth are important.
The place for storing vegetables must be below the freezing point. Otherwise, the point of storing food is lost, since it will be spoiled by low temperatures.
The freezing point depends on the region where the garage is located, for example, in the northern regions the ground freezes up to 150 cm. Taking this fact into account, you should dig a pit with a depth of at least 190 cm. From 10 to 15 cm must be allocated for the drainage layer under the base, about another 10 cm is required to install the ceiling. 170–175 cm remains for placing shelves, racks and niches for vegetables and lighting. The depth also depends on the height of the owner.

Option with optimal dimensions for this structure
Optimal width the pit for vegetables is 150 cm. This size allows you to optimally place shelves and racks, while a person will not be constrained in movement inside the pit. To select the length, you need to follow the rule - the pit should not reach closer than 50 cm to the walls of the garage.
Required materials and tools
To make a vegetable pit in the garage you will need the following materials:
- waterproofing sheet;
- reinforcing bars;
- sand;
- gravel;
- boards for formwork;
- metal corners;
- wire;
- bricks, metal sheets, boards or concrete M 250.
When building this structure, you cannot do without the following tools:
- bayonet and shovel;
- concrete mixers;
- containers for concrete mixture and water;
- blowtorch;
- double-sided tape;
- screwdriver.
Calculations of materials for the construction of a vegetable pit are similar to the inspection pit.
Manufacturing instructions
Having prepared all the necessary tools and materials, you can begin building a vegetable pit:

Waterproofing device
The issue of insulating the inner surface of the cellar from moisture should be treated with particular care. This is important, since the slightest hole in the waterproofing will become a source of dampness and cause spoilage of vegetables.
You can proceed to this stage only if the concrete is completely dry. You will need a waterproofing sheet or aquaizol. This material must be used to cover the walls and floor of the vegetable pit. The canvas must be laid with an overlap of at least 15 cm. The joints are secured using a blowtorch or double-sided tape. All actions with the lamp should be carried out very carefully so as not to damage the canvas, otherwise moisture will get inside the vegetable pit. The same materials cover the outer part of the ceiling of the pit.

Continuous coating prevents moisture penetration
How to insulate a cellar in a garage
Solving the issue of insulating a cellar in a garage is as important as installing waterproofing. The insulation will help maintain a stable temperature inside the pit. For this you can use mineral wool or polystyrene foam.
To install foam panels, you will need plastic umbrella dowels. The installation process is as follows:
- Using a drill or hammer drill, five holes are drilled in the plate attached to the wall (in the corners and in the middle of the material).
- Plastic dowels are driven into them and screws are screwed into them.
- The joints of the slabs are filled with polyurethane foam.
In the northern regions, where the air temperature drops below 25–30ºС, it is also necessary to insulate the ceiling of the vegetable pit. To prevent the foam from crumbling over time, you can cover it with any finishing material. This will create an additional thermal insulation effect.

Polyurethane foam will qualitatively fill the joints of the slabs
Video: how to make a dry pit, cellar, basement in a garage of the required width
Make an observation room in the garage or vegetable pit It’s not at all difficult to do it yourself. It is enough to listen to the recommendations of specialists and follow step-by-step instructions. If desired, these two rooms can be combined.
postroika.biz
Do-it-yourself inspection hole in the garage: how to do it correctly? 78 photos of pit arrangement
Setting up an inspection hole in the garage with your own hands will help speed up and reduce the cost of auto repair; its presence will allow you to carry out regular independent technical inspections. Correct arrangement inspection hole gives a whole list of advantages, and your main task during its construction, all the subtleties of technology must be observed.

How to make a viewing hole yourself will be discussed below.

Calculation of the inspection hole size
The size of the inspection pit directly depends on the number of people who are planned to be placed there at the same time, as well as on the dimensions of your car and the size of the garage.

The standard version offers the following sizes: width – 80-100 cm; depth – 170-200 cm; length – from 160 to 200 cm. 


When planning the size of the inspection pit, it is also necessary to take into account the features of the building itself, which can influence its size.

Initial stage
After the pit for the inspection hole has been dug, you can proceed to the construction of the floor. First, you will need to equip the ventilation of the inspection pit, as shown in the photo.

Before arranging the floor, take care of the hole through which the air duct hose will pass. The hose is closed with a cap and inserted approximately 20 cm.

Then you need to prepare a two-layer concrete pad. The first layer, 10 cm thick, is gravel, the second, 6 cm thick, is sand; this drainage system will ensure the removal of moisture. Each layer is leveled and compacted, the pit is lubricated with clay.

Next, you need to lay the reinforcement and fill the surface with concrete. After the concrete has dried, another waterproofing layer is laid, then final finishing and treating the pit with materials for thermal insulation.

Waterproofing and insulation
The main requirements for waterproofing materials are their cost-effectiveness and efficiency. Based on these criteria, the following options can be used:
- single-layer polymer membrane - its thickness is 2 mm, the material is durable and strong, but is high in cost. In addition, special equipment will be needed to install the membrane;
- bitumen-based materials (roofing felt or bitumen lubricant) are widely available in terms of cost, very easy to install, and their service life will be at least fifteen years;
- waterproofing lubricant - easy to apply and has a relatively low price.


The main task of insulation is to reduce the amount of electricity required to heat the garage. The insulation is glued to the walls and floor of the garage pit before final finishing.

- long service life;
- resistance to heat loss;
- moisture resistance;
- affordable price;
- compliance with fire safety requirements.

The material used to insulate the floor of the pit must be more dense than the material used to insulate its walls.

Walling
To build the walls of the inspection pit, you will have two options for carrying out the work: either concreting or brickwork, then finishing work. 


First, do a little preparation, which consists of applying clay to the wall surface, laying a film for waterproofing and installing formwork 12 cm thick.

As mentioned above, the walls of the pit are built either from concrete or brick.

Concreting is much less expensive, although it will take more time. Concrete walls are highly durable and reliable, which is why most people resort to this method of constructing an inspection pit.

First, compact the crushed stone, after which you need to carry out reinforcement using a wire mesh with cells measuring 15x15 cm.

To prepare one cubic meter of concrete you will need:
- 300 kg of cement;
- 700 kg of sand;
- 200 l of water;
- 1200 kg of crushed stone.


When manually mixing water, you need to add more using a concrete mixer; leave the given proportions unchanged.

The walls are erected 15 cm thick, concrete is laid in layers. You will also need reinforcement using a mesh similar to the one you used to reinforce the floor.

The mesh is installed in strips, the concrete is laid in the same way. After three days from the end of concreting, the formwork is removed.

Photo of the inspection pit in the garage


landscapeportal.ru
Do-it-yourself pit in the garage - how to make it?

A diagnostic pit is always a welcome attribute of a garage. It allows you to conveniently inspect the underside of the car. A handy car enthusiast can use it to independently replace oil or a torn cuff. This is where you should start arranging your garage. After spending a certain amount, a pit can be built using hired labor. The article tells you how to do this work yourself.
What to build a viewing hole from

An inspection pit in a garage is usually constructed of brick or monolithic reinforced concrete. Both options have their advantages and disadvantages. Brickwork is less labor-intensive, but not as durable and requires additional grouting of external masonry joints before applying waterproofing.
 Reinforced concrete inspection pit
 Reinforced concrete walls are stronger and more durable. Disadvantages include increased manufacturing complexity. To pour the concrete solution, it is necessary to construct a formwork, inside of which reinforcement is knitted. A large amount of solution is required. You can make both brick and concrete walls with your own hands.
Dimensions and position of the inspection hole

It is more rational to tear off the inspection trench at the same time as laying the foundation of the garage. The width of the ditch is usually 70–80 cm. If you take it less than 70 cm, the trench will be cramped; wider than 80 cm, there is a greater risk of falling into the hole, which often happens. It’s good if there are a few strong guys nearby. The height of the trench is made approximately 180 cm, so that there is about 15 cm of clearance from the head to the bottom of the car. The length must be at least two meters, and better - the length of the car plus 1 meter.

The position of the ditch can be different: in the center of the gate or offset. In this case, the car stands away from the underground with its damp air. To inspect or perform any work, you will have to maneuver to enter the ditch. For more convenient entry, the inspection pit in the garage can have an L-shaped configuration. You can go up and down the stairs without rolling over the car.
Ladder for inspection pit
 Ladder for inspection pit
 Going down into the pit using the ladder is inconvenient and dangerous. The staircase must be stationary, at the same time comfortable and safe. The best option is to manufacture the steps simultaneously with the construction of the enclosing structure. With brick walls, it is advisable to make the steps from brick. When pouring walls made of monolithic reinforced concrete, steps should be cast at the same time. If for some reason they were not made at this stage, then the stairs can be made later with your own hands, when the inspection ditch is being constructed. The staircase is made of wood - with the steps fastened on bowstrings or stringers, as well as metal - with treads made of corrugated iron.
How to illuminate a viewing hole
When arranging a garage box, you should provide lighting for the inspection hole in the garage. According to the rules for lighting installations in repair pits, the use of 220 V incandescent lamps is prohibited. It is allowed to use light sources with lamps of no more than 36 V. A step-down transformer is used to power them. A good option are fluorescent lamps in a sealed housing. If a 24V carrier is used, the cable must be at least four meters long for safety reasons.
Underground ventilation
In the repair trench, due to the temperature difference, increased humidity occurs and condensation forms and settles on the bottom of the car. To avoid this unpleasant phenomenon, the inspection pit in the garage must have good ventilation. The exhaust duct is made of asbestos-cement or plastic sewer pipe embedded in the crushed stone preparation of the floor. This pipe must be connected by a transition elbow to a vertical exhaust riser. The hoods from under the ceiling of the garage box and trench must be independent. If you combine them into one, the efficiency of ventilation of the technical underground will sharply decrease.
Pit contours
Before marking a place in the garage for a future trench, it is necessary to draw a drawing of its cross section. The clear size of the trench should be taken as a basis. For example, the width will be 70 cm. To this value you need to add twice the wall thickness. If the latter is 20 cm, it will be: 70 + (2 × 20) = 110 cm. Add another margin - 5 cm on each side. Ultimately, the width of the trench at the bottom will be: 110 + (2 × 5) = 120 cm. In order to facilitate the subsequent application of coating waterproofing, the walls of the trench should be inclined. To do this, it is enough to increase the width of the trench on the garage floor by 60 cm (30 per side). That is, at the top the width of the ditch will be 180 cm. Trenches for the foundation are dug using the same principle.

Bucket or shovel
If the inspection hole in the garage is made at the same time as the foundation is being poured, it makes sense to resort to the services of an excavator. All work will be completed in half a day. The costs will be of the same order as if you hire diggers. Sometimes it happens that during the season you still won’t find them. Well, what if the idea came to build a technical trench when the garage was already built? There is only one way out - to dig a pit with your own hands. In order not to do unnecessary work, a certain amount of excavated soil should be stored near the construction site, since the earth will be needed for backfilling the sinuses.
Filling the pit floor

The base of the trench should be protected from penetrating moisture by waterproofing. A 10-centimeter footing of concrete is first poured onto the compacted bottom of the pit. For preparation, a solution of grade M 150 is sufficient. The width of the preparatory layer is made flush with the outer surface of the future walls of the trench. To insulate the sole, any type of rolled insulating material is used - roofing felt, Bikrost, Aquaizol, polymer membranes. The canvas should be cut to overlap the walls.
A concrete floor is poured on top of the insulating layer. The brand used is stronger - M 200. A thickness of 7–8 cm is sufficient, but it is better to reinforce the poured surface with a 150 × 150 road mesh with a wire thickness of 4 (3) mm.
Rules for wall construction
To paraphrase Henry Ford, we can say - the design of the trench walls can be anything, provided that it is rigid and durable. To prevent the walls from bulging and cracking in the near future, you should know how not to do them:
- lay brick walls in one spoon (120 mm thick);
- make brickwork without reinforcement;
- use silicate products for masonry;
- pour the concrete mixture directly into the ground (from the outside of the ditch);
- pour concrete without reinforcement;
- use rubble concrete.
Combined wall
Below we describe one of the possible options for constructing a building envelope with your own hands. The outer walls of the pit are dug inclined, with a margin of width, to ensure future access for waterproofing work. Lay out 4–5 rows of half-brick brickwork along the entire internal contour of the future structure. This partition will serve as internal formwork. The outer one is installed, retreating 130 mm from the folded wall immediately to the entire height of the trench, using old boards, sheets of plywood, chipboard, OSB and other similar materials. They support it with spacers and jibs, after which concrete mortar is poured with the top edge of the masonry.
 Reinforcing masonry mesh
 Lay a reinforcing masonry mesh 250 mm wide with a cell size of 50 × 50 and a wire thickness of 4 or 5 mm. Lay out the next section and install the reinforcement again. For better adhesion to concrete, the outer surface of the brickwork is made “into a wasteland”. The rigidity of the structure will be provided by closed belts made of reinforcement bars with a diameter of 10 mm, laid at the bottom and top of the fence. In order to subsequently equip the lighting of the inspection pit in the garage, niches are provided for installing lamps. Waterproofing, if provided for by the project, is carried out after removing the external formwork.
Sightseeing ditch and groundwater
 Inspection pit and groundwater
 Unfortunately, it is not always possible to make a viewing ditch in the garage. If groundwater (GW) is located under the garage at a depth of less than two meters, it is not worth starting construction. Life shows that in this case no amount of waterproofing of walls will help. When the hot water is below 2.5 meters, a trench can be built provided that high-quality waterproofing of the outer walls of the inspection ditch is carried out. It can be done with your own hands from several layers of adhesive material: roofing felt, TechnoNIKOL, Stekloizol, Gidrostekloizol and others. Cover the surfaces with molten bitumen. There are penetrating materials: Hydrotex, Aquatron-6, Penetron. They are convenient because they are applied to wet concrete and reduce waiting time. A good clay castle is oily, crumpled clay.
Global warming
To prevent the inspection pit in the garage from becoming covered with frost in winter, it can be insulated. To do this, the external walls on which waterproofing is applied must be covered with insulation boards - polystyrene foam 5 cm thick. If such insulation is laid in 2 layers under the blind area around the perimeter of the entire garage, the floor in the garage and the trench will be even warmer.
Trench in full roll
To avoid accidentally falling into a hole, you need to make a protective deck over it. The simplest design is thick transverse boards laid inside a edging of corners, installed using embedded elements or secured with anchor bolts. Woodworking waste - slabs laid with the convex side down - are well suited for this purpose. The inspection hole in the garage, covered by them, when viewed from below, resembles a front-line dugout.
In conclusion
The construction of an inspection trench is reminiscent of pouring a foundation and goes through the same stages:
- marking;
- earthworks;
- making soles;
- walling;
- waterproofing;
- insulation.
Having completed the construction of a trench made of reinforced concrete or brick, it is arranged. The inside of the pit can be plastered or tiled. Such an “underground”, built with your own hands, will allow you to drive a car with complete confidence in its technical condition. After all, by connecting the lighting of the inspection pit in the garage, you can regularly assess the condition of the chassis of your car.
Arranging an inspection pit in the garage helps to carry out independent car repairs much faster and cheaper, without the involvement of specialists. In addition, it is used to carry out periodic technical inspections of various types of equipment. Proper arrangement of the inspection pit has many advantages, but its implementation requires adherence to a certain technology, which we will discuss later.
Advantages and disadvantages of arranging a viewing hole in the garage
Arranging a viewing hole in the garage has both positive and negative sides. At a time when the network of service stations was poorly developed, inspection pits were in almost every garage. When a large number of service stations appear, many car enthusiasts refuse to build an inspection pit, primarily due to factors such as lack of time to repair the car, accumulation of excess moisture in the pit, and additional time and material costs for constructing a pit.

In addition, increased humidity in the pit contributes to faster deterioration of the car, since moisture evaporates from the pit and falls on the lower part of the body, thereby accelerating its corrosion.
Despite this, the inspection pit has a number of advantages in favor of its arrangement in the garage. Firstly, the ability self-repair or vehicle checks. This fact allows you to save on a trip to a service station. In addition, for some men, checking a car is a kind of hobby. Periodic oil changes in a garage with an inspection hole become quite possible at home.
Arrangement of the correct inspection hole in the garage
If you nevertheless decide to build an inspection hole in the garage, this is not always possible, primarily due to the height of the groundwater. If the water is located at a distance of about 200 cm from the garage, then constructing a pit is unacceptable, since you will have to constantly pump water out of it.
Although when carrying out proper waterproofing and installing a drainage system, this problem is completely solvable.
Arrangement and installation of drainage requires consultation with specialists, since even the slightest mistake will lead to improper functioning of the entire system. If the drainage system is laid during the construction of the house, then it is quite possible to build an inspection hole. Otherwise, this procedure will be too costly and troublesome.
If the groundwater is too high, then the only option would be to equip an inspection pit with a recumbent direction.
To check the level of groundwater, you will need to consult with specialists, although it is quite possible to cope without them. To do this, you should dig a small pit at the location of the inspection hole and measure the level at which the water begins to rise. The water will begin to rise during heavy rains, so until this period the pit is not concreted.

Dimensions of the inspection hole in the garage: features of calculations
In relation to design features the inspection hole can be:
- complex, consisting of a pit and a cellar;
- narrow, in this case, a small staircase is enough to go down into it;
- the recumbent option involves staying in a pit, exclusively in a supine position.
In addition, these options differ in various modifications of the pits. The size of a standard inspection hole in a garage depends, first of all, on the number of people who will be in it, on the size of the garage itself, on the type of car or other equipment that will be in the garage.
If you have several cars, it is better to use the classic version, which assumes the following dimensions:
- the width of the inspection hole in the garage is from 80 to 100 cm;
- the depth of the inspection hole in the garage is about 170-200 cm;
- the length of the inspection hole depends on the length of the garage and is at least 160-200 cm.
Before planning the inspection pit, you should take into account the individual characteristics of the structure, which will affect the determination of the size and configuration of the pit. The hole is dug with allowances that are about forty centimeters in length and width, and about twenty in height. If it is necessary to insulate the walls, the size of the pit should be increased by the size of the material from which the insulation will be made.

How to make a viewing hole in the garage: the initial stage
After constructing the necessary pit and after setting it up before the first rain, an important process follows - the construction of the floor of the inspection pit. If you adhere to all the technological aspects associated with this process, then problems with the accumulation of excess moisture will not appear.
First of all, the inspection hole needs natural ventilation, therefore, when arranging the floor, you should worry about the presence of a hole through which the hose will pass in the form of an air duct.
This hose is closed with a lid and inserted at least twenty centimeters. Next, the concrete pad is prepared, which consists of two layers. First, gravel is poured, at least ten centimeters thick, and then sand, about six centimeters thick. Thanks to this, a drainage system is installed, which is responsible for removing moisture from the pit.
Each of the previously filled layers requires careful compaction and leveling. For these purposes, a special tool and water are used.
After this, metal reinforcement is laid on it, and the surface is filled with concrete mortar. When the concrete has dried, another waterproofing layer is laid, and only after that, the pit passes finishing or treatment with thermal insulation materials.
If the groundwater is too deep, it is possible to lay the floor in the inspection hole with bricks.
Waterproofing an inspection pit in a garage: features of implementation
The modern building materials market offers a huge amount of waterproofing materials different shapes, size and purpose. The main requirements for material for waterproofing inspection pits are efficiency and high quality work at a reasonable cost.
Therefore, based on these criteria, we suggest that you familiarize yourself with the main options that help to waterproof the inspection pit:
- polymer single-layer membrane - thickness of this material is about two millimeters, it is durable and highly resistant, but at the same time, this option has the highest cost, in addition, installing the membrane will require special equipment and tools to work with it;
- materials based on bitumen in the form of roofing material or bitumen lubricant - are affordable and easy to install, the service life of this waterproofing option is at least 15 years, but at the same time, you do not need to hire specialists, the material has a roll form, is easy to lay and cut, for gluing joints it is heated or a bitumen solvent is used;
- lubricant for waterproofing inspection pits is low-cost, easy to apply; to install it, you must first moisten the surface with water.

Choosing insulation for an inspection hole in the garage
The procedure for insulating the inspection pit is not a common option, which needs to be carried out only if additional material resources are available and when working in a heated garage room.
Insulation will reduce the amount of electricity required to heat the garage space. The material in the form of insulation is glued to the wall and floor of the pit. After its installation, the walls undergo final finishing.
Among the large number of insulation materials, it is best to give preference to expanded polystyrene, which has the following advantages:
- duration of operation;
- high resistance to heat losses;
- moisture resistance;
- affordable price;
- fire safety.
Please note that the material chosen for floor insulation is denser than for the walls of the inspection pit.

How to build a viewing hole in a garage: technology for working with walls
In the process of erecting the walls of the inspection pit, there are two options for further actions:
- concreting;
- brick.
After this, tiles or other finishing materials are laid on the walls.
Before laying brick or pouring concrete, a series of preparatory work should be carried out, which consists of applying clay to the surface of the walls, laying a dense film in the form of waterproofing, and installing formwork, the thickness of which is about 12 cm.
Please note the technological nuances associated with carrying out this work:
- in order to prevent the car wheel from accidentally falling into the inspection hole, you should make sure that there is a safety rail in it; in addition, it will prevent moisture and dirt from entering from the car wheels;
- the inspection rail has a T-shape; its manufacture requires metal, which is fixed on the surface of the formwork and is a supporting element on which the lid is placed;
- In addition, it will not be superfluous to arrange ledges and niches in the wall, on which various types of accessories will be conveniently located.
Do-it-yourself inspection hole in the garage - arrangement of lighting and cover
Lighting in the inspection hole is not necessary, since using a portable flashlight or light bulb is sufficient. However, if the inspection hole is used too often, then it is better to foresee this moment in advance.
The maximum voltage of the socket that is installed in the inspection hole should be 35V. In addition, due to the high humidity, it must be of high quality and moisture resistant. The use of standard two hundred and twenty volt lamps in the inspection pit is prohibited, as they pose a threat to the life of the person working in the pit.
When choosing a lighting device, you should proceed from the power of the outlet, for which special types of lamps have been developed.
The work of arranging the inspection pit is completed by installing a cover, which is most often made of wood. The minimum thickness of the material is 3 cm, as it is too solid boards It will be difficult to get up.
There are several options for making a cover for the inspection pit:
- when using a metal corner, to make the lid you will need several shields on small rollers; it is with their help that the shields move together. For each shield there is a wooden plank, the width of which is about 25 mm;
- if there are only two corners fixed along the contour, two shields are used to make the lid, which are located in different areas, rollers are installed on the movable shield, and limiters are installed on the extreme parts of the planks, thus, when the shield is moved, the pit opens halfway;
- the lids, which open according to the roller shutter principle, are made of wood, about 4 cm thick, and the length, depending on the width of the pit, each board is processed in such a way as to construct a grooved hole on it, a metal cable is installed in them, between which the installation is carried out springs, with light pressure on the handle the pit opens, this cover is convenient, but during its manufacture it should be treated with an anti-corrosion compound and a waterproofing solution.

How to fill a viewing hole in a garage
As mentioned earlier, the walls of the inspection pit are made of concrete or brick. The first option is less expensive financially, but requires a higher time investment. Concrete walls are characterized by higher strength, durability, and reliability.
Inspection hole in the garage photo:

After compacting the crushed stone, the construction of the concrete floor begins; its height is about six centimeters. The floor first needs reinforcement. For these purposes, a wire mesh with a cell size of 15x15 cm is used.
To prepare one cubic meter of concrete you will need:
- three hundred kilograms of cement, grade more than 400;
- 700 kg of sand;
- 200 liters of water;
- 1200 kg of crushed stone.
If the concrete mixture is mixed manually, then more water should be added. When using a concrete mixer, the proportions are maintained.
If the water content of the concrete mixture increases, a little cement should be added. This concrete option has good strength and durability.
The optimal wall thickness is about fifteen centimeters. To prepare the solution you will need:
- 350 kg of cement;
- 660 kg of sand;
- 1200 kg of crushed stone;
- 210 liters of water.
For concreting walls, layering technology should be followed. That is, the concrete composition is applied in layers. The height of each tier should not exceed thirty centimeters. To compact the composition, use bayonet shovel or deep concrete vibrator.

The arrangement of the walls of the inspection pit requires reinforcement using the same mesh as on the floor. The mesh is installed in strips, just like concrete is laid. After the work is completed, the concrete is left for three days, and then the formwork is removed.
Inspection hole in the garage video:
The need for an inspection pit in the garage is obvious, since in cases of oil changes, minor repairs to the bottom of the body or a routine inspection, you have to set aside several hours to travel to a service station and pay for expensive service.
The pit for technical inspection of a car can also be used as a cellar or vegetable storage. For this purpose, niches and shelves are constructed inside it.
The condition for high-quality use of an inspection pit as a technical structure and a place for storing products is compliance with all construction standards and the presence of reliable waterproofing of the floor and walls.
Even such a simple design requires careful planning. An important point in this regard is the determination of soil quality and groundwater levels. The most suitable foundation for such structures is clay soil. Its peculiarity is that it does not allow moisture to pass through, which means it can become a kind of waterproofing layer.
If there is a large accumulation of groundwater and a high level of its location, the inspection pit is additionally equipped with a drainage system to remove excess moisture, as well as submersible pumps so that the room can be quickly drained.
The staircase will provide a convenient and safe descent
Step-by-step guide to making a viewing hole
You can install the inspection pit yourself. There is nothing complicated about this if you follow.
How to determine the size
To calculate the area of the future inspection pit, you need to take into account the thickness of the walls and base. For such calculations, it is necessary to remember the geometry course and resort to a simple formula that determines the area - S = ah, where a is the length, h is the width of the pit. The finished inspection pit will have dimensions of 75x185x300 cm. The thickness of the concrete walls and floor is usually about 10 cm. The calculations will be as follows: 0.85x3 = 2.55 m² - this is the area of the pit for the inspection pit.
Comfortable work in the inspection pit is created by a correctly calculated space, namely, its parameters should be convenient for the build of the person in it. Typically, the width of the pit is built in the range from 70 to 75 cm. This width is enough for you to move freely inside. The same distance between the walls makes the observation structure convenient for a passenger car to enter.
The pit may be wider if the inspection pit is intended for large vehicles or trucks. The distance between the inner sides of the wheels of such vehicles is much greater (from 80 to 90 cm).
The inspection pit is arranged in such a way that the walls are slightly narrower towards the floor. Schematically, in cross-section, its design resembles an inverted trapezoid. This shape provides convenient access to tools in niches and free movement.
The length of the inspection hole is selected based on the size of the garage. If the space of the room allows, then a staircase can be provided in the pit. To do this, the length of the pit is increased by 100–120 cm.
Depth of the pit “with reserve” for installing the floor
The height of the pit is at least 170–180 cm. These dimensions are relative, since the depth is made in accordance with the height of the car owner. While in the inspection hole, a person should not touch the bottom of the car with his head.
For additional safety of the car and its owner, the inspection hole is equipped with metal limiters. They usually consist of four pillars fixed at the corners of a niche. They rise 10–15 cm above it. Sometimes for technical inspection, not four pillars, but two metal corners are used. They are fastened against each other along the edges of the length of the pit.
The depth should be 25–30 cm greater than the owner’s height. With such a distance from the base to the body, the arms will not get tired quickly, as this makes it possible for them to be in a bent position.
Materials and tools
Most often, concrete, wood, metal or brick are used for manufacturing.
To calculate the required amount of concrete, you must use a formula that determines the volume. To do this, you need to multiply the length, width and height of the wall. Similar calculations are carried out for the floor.
If brick is used in the construction of the pit, then, knowing its parameters, it is easy to calculate the required amount of this material in pieces. The dimensions of the red brick are 250x120x60 mm.
When building a viewing hole, you cannot do without the following tools:
- shovel and bayonet shovel;
- buckets for excavated earth and concrete mixture;
- trowels;
- welding machine;
- hacksaws.
The following materials are also required:
- bricks;
- cement, sand, crushed stone;
- M200 concrete for the base;
- boards with a section of 400x50 mm;
- reinforcing bars;
- metal corner 50 mm wide;
- waterproofing material.
Instructions for making an inspection pit from bricks, boards, concrete and iron
All work must be done in a strict sequence of steps:

Features of installation of partitions depend on the material used.
Concrete inspection pit
Before pouring the mixture, it is necessary to make formwork. For this, it is best to use OSB boards. This material does not allow the poured mixture to pass through and does not deform over time. The plates are fastened together using boards and screws so that the distance between them is at least 15 cm.
To maintain the shape of a wooden structure, it must be secured with spacers. Gaps in the joints of the slabs should be absent or minimal. A reinforcing mesh should be installed inside the finished formwork.
There is an option for pouring concrete with one-sided formwork. To do this, it is necessary to cover the walls of the pit with waterproofing material. Next, OSB boards are installed along the inner perimeter of the pit. A metal mesh is placed between them and the waterproofing. Concrete is poured inside this structure.

After the concrete has hardened, a monolithic structure is obtained.
Brick inspection pit
A waterproofing sheet is placed in the finished pit. It should completely cover the floor and walls. The canvas must be laid with an overlap. To prevent the edges of the material from lifting up, they are pressed down with boards. A half-brick masonry is made on top of the waterproofing. When the wall reaches a height of 135 cm, you can make niches and then continue laying to the top edge of the pit. It is recommended to install a metal frame from a corner on the last row, and it should be welded in such a way that one shelf on each side is parallel to the floor. Thick boards will be laid on it to cover the pit. Next, they pour the concrete floor in the garage.
Inspection pit made of metal sheets (caisson)
This design resembles a large box. During its manufacture, the sheets must be joined by continuous welding. The finished structure must be carefully treated with anti-corrosion coatings. The box should be equipped with fasteners. They are welded metal corners that rest 100–150 cm into the ground. They are attached to the body on four sides. They will hold the box in place. If this is not done, the entire structure will simply float when the groundwater level rises.

The staircase is made of the same material
Inspection pit made of wooden planks
Wood without proper treatment quickly rots. Therefore, the material must be impregnated with special antifungal substances and additionally waterproofed. It is better to take thick boards for walls. The material is installed horizontally. Spacers are secured along the edges of the narrow sides of the inspection hole.

For reliability, the bottom of the pit is made of concrete
Waterproofing device
This process is carried out both before the construction of the structure (external insulation) and after its construction (internal insulation).
If the garage is located in an area with a low groundwater level, then many owners are in no hurry to isolate the inspection pit from moisture. However, the hydrological situation of any area changes every year, so it is recommended to take care of insulation at the construction stage. For this purpose, special films or membranes are used, for example, butyl rubber, aquaizol. They need to be laid in a pit. The edges of the material should be laid with an overlap of 10–15 cm. To obtain a sealed seam at the overlap, use double-sided tape.
When installing a film or membrane, it is important not to damage its integrity. Otherwise, moisture from the soil will enter the hole.
The laid waterproofing layer is melted using a blowtorch. As a result, the film straightens, fitting more tightly to the walls and bottom of the inspection pit.

The overlap of the material will prevent moisture from seeping into the pit
Do-it-yourself internal waterproofing of an inspection pit in a garage involves treating the surface of the finished inspection structure with liquid substances, which, when dry, form a dense water-repellent layer. The composition for treating swimming pools has proven itself well. It is applied with a thick, wide brush, and when it hardens, the substance forms a waterproof material resembling rubber. For greater reliability, more than two layers should be applied.

Insulating material can be applied using a spray gun
There is another way of internal insulation from moisture - this is the use of special cement-based primers, which tend to be deeply absorbed into the applied material. This effect is achieved thanks to the polymer particles that are in the mixture. They block capillaries that allow moisture to penetrate through the base material.
How to close a finished inspection hole
A covered inspection hole will not only protect the car from accidental failure, but will also serve as an additional waterproofing layer. In the absence of a cover, evaporated moisture settles on the lower parts of the car body, thereby creating favorable conditions for the formation of metal corrosion. To avoid such problems, the inspection hole is covered. For this purpose, sheets of metal or boards are used.
Wood is a relatively inexpensive and lightweight material. If necessary, the boards are easy to replace. They are selected from hard woods, such as oak and larch. Before use, the boards are coated with antifungal impregnations and antiseptic substances. They are placed in the openings of metal corners fixed at the top of the inspection hole. The thickness of each board must be more than 40 mm.

The most suitable option for this purpose are boards
Using metal is less convenient, since this material is heavy, it is not cheap and is not resistant to corrosion. During use, its surface bends.
Video: DIY inspection hole in the garage
Step-by-step guide to building an insulated vegetable pit
The construction of a vegetable pit has its own characteristics.
Drawing
For a vegetable pit, both the presence of waterproofing and depth are important.
The place for storing vegetables must be below the freezing point. Otherwise, the point of storing food is lost, since it will be spoiled by low temperatures.
The freezing point depends on the region where the garage is located, for example, Vin the northern regions the ground freezes up to 150 cm. Taking this fact into account, you should dig a pit with a depth of at least 190 cm. From 10 to 15 cm must be allocated for the drainage layer under the base, another 10 cm is required to install the ceiling. 170–175 cm remains for placing shelves, racks and niches for vegetables and lighting. The depth also depends on the height of the owner.

Option with optimal dimensions for this structure
The optimal width of the pit for vegetables is 150 cm. This size allows you to optimally place shelves and racks, while a person will not be constrained in movement inside the pit. To select the length, you need to follow the rule - the pit should not reach closer than 50 cm to the walls of the garage.
Required materials and tools
To make a vegetable pit in the garage you will need the following materials:
- waterproofing sheet;
- reinforcing bars;
- sand;
- gravel;
- boards for formwork;
- metal corners;
- wire;
- bricks, metal sheets, boards or concrete M 250.
When building this structure, you cannot do without the following tools:
- bayonet and shovel;
- concrete mixers;
- containers for concrete mixture and water;
- blowtorch;
- double-sided tape;
- screwdriver.
Calculations of materials for the construction of a vegetable pit are similar to the inspection pit.
Manufacturing instructions
Having prepared all the necessary tools and materials, you can begin building a vegetable pit:

Waterproofing device
The issue of insulating the inner surface of the cellar from moisture should be treated with particular care. This is important, since the slightest hole in the waterproofing will become a source of dampness and cause spoilage of vegetables.
You can proceed to this stage only if the concrete is completely dry. You will need a waterproofing sheet or aquaizol. This material must be used to cover the walls and floor of the vegetable pit. The canvas must be laid with an overlap of at least 15 cm. The joints are secured using a blowtorch or double-sided tape. All actions with the lamp should be carried out very carefully so as not to damage the canvas, otherwise moisture will get inside the vegetable pit. The same materials cover the outer part of the ceiling of the pit.
Making a viewing or vegetable pit in the garage with your own hands is not at all difficult. It is enough to listen to the recommendations of specialists and follow step-by-step instructions. If desired, these two rooms can be combined.
Hello FRIENDS!
As always, while surfing the INTERNET, I came across a very good topic that may be of interest to many.
I really liked this hole, but the problem is... the groundwater is very close, and it’s scary to make such beauty))) but if it helps someone, I will be very glad)))
mainavi.ru/dom/stroitelst…motrovuyu-yamu-v-garazhe/
STROYPORTAL
The presence of an inspection hole in the garage provides the opportunity to carry out independent repairs of your own car. It can be done with minimal knowledge in the field of construction and the availability of detailed instructions. Using a step-by-step master class, it will not be difficult to carefully and efficiently prepare and self-construction pits, regardless of the size and layout of the garage.
🔹 Determining the optimal size and shape of the inspection hole
The finished inspection pit should be both safe and convenient to use. Therefore, before starting work, it is recommended to study geological survey data on the condition of the soil and the location of groundwater under the garage. This will allow you to determine the optimal depth of the hole. If the groundwater is quite deep, then the recommended height from the floor to the “ceiling” may be about 2 m or less (owner’s height + 20-30 cm). The dimensions can be found in the drawing.
An inspection hole is made in the garage with your own hands after drawing up a project plan for the facility. Its width is determined according to the wheelbase of the car: it should be smaller, ensuring the possibility of safe entry of the car. The length should be at least 1 meter longer than the length of the car: this will allow you to work comfortably in the pit.
The installation of an inspection pit allows the presence of small niches. They can be used to store parts, convenient location tools. They should not be made too deep. It is recommended to determine the dimensions of the niches according to the available quantity of auto tools and spare parts.
🔹 Laying out walls and niches in the inspection hole
After digging a pit with predetermined dimensions, you should begin to strengthen the walls, protect them and then lay bricks. The use of brick is optimal due to the ease of working with it and ease of purchase. You can find out how to build a viewing hole in a garage from the most affordable building materials in the following instructions:
1. First, you need to make the floor of the inspection hole in the garage: level the bottom of the pit, lay down roofing material (with an overlap of about 0.5 m on the walls for each of them). Concreting is carried out with the M-200 brand, the thickness of the floor should be about 10 cm. The size of the length and width of the floor should include the sum of the thickness of the two walls, the length/width of the pit itself and an increase of 10 cm. After pouring, leave the concrete to harden for 4 days.
2. The construction of the walls begins with the laying of 4 rows and subsequent waterproofing of the inspection pit from the outside using bitumen mastic. This will prevent the destruction of the walls due to exposure to moisture from the earth cover adjacent to the brick. After laying out the walls, you need to fill in the remaining gap from the ground to the brick.
3. The final stage of work will be the installation of a metal frame around the entrance to the pit. It should protrude slightly above the floor level of the garage box.
The frames of the niches should also be made of metal corners. This will prevent the bricks from subsiding or breaking.
🔹 Features of the ventilation device and choice of stairs
High-quality ventilation in the inspection pit of the garage will prevent the appearance of mold and the gradual destruction of the walls. It can be made exclusively exhaust or supply and exhaust. In the first case, when laying out the last rows of bricks, it is necessary to install a pipe that will allow air to be removed from the pit through the garage box upwards (it will be connected to the garage ventilation pipe or discharged directly to the street). In the second case, an additional pipe is installed, which is diverted outside. Its end should be located at a distance of 15 cm from the floor.
You can make a convenient ladder for the inspection hole from wood and metal corners. For a small block, a repositionable ladder will be much more convenient. In the attached photos you can also see examples of pits in which the steps were laid out of brick or concreted.
🔹 Summing up lighting
In the process of laying niches, you need to connect a 36V wire in an insulating rubber hose. This will allow you to connect the light in the pit and conveniently illuminate the car during repairs. When performing these stages of work, it is advisable to invite a qualified electrician who will help to correctly determine the optimal location of the wire and ensure its protection, and will ensure its correct connection to the power supply.
A diagnostic pit is always a welcome attribute of a garage. It allows you to conveniently inspect the underside of the car. A handy car enthusiast can use it to independently replace oil or a torn cuff. This is where you should start arranging your garage. After spending a certain amount, a pit can be built using hired labor. The article tells you how to do this work yourself.
What to build a viewing hole from

An inspection pit in a garage is usually constructed of brick or monolithic reinforced concrete. Both options have their advantages and disadvantages. Brickwork is less labor-intensive, but not as durable and requires additional grouting of external masonry joints before applying waterproofing.

Reinforced concrete walls are stronger and more durable. Disadvantages include increased manufacturing complexity. To pour the concrete solution, it is necessary to construct a formwork, inside of which reinforcement is knitted. A large amount of solution is required. You can make both brick and concrete walls with your own hands.
Dimensions and position of the inspection hole

It is more rational to tear off the inspection trench at the same time as laying the foundation of the garage. The width of the ditch is usually 70–80 cm. If you take it less than 70 cm, the trench will be cramped; wider than 80 cm, there is a greater risk of falling into the hole, which often happens. It’s good if there are a few strong guys nearby. The height of the trench is made approximately 180 cm, so that there is about 15 cm of clearance from the head to the bottom of the car. The length must be at least two meters, and better - the length of the car plus 1 meter.

The position of the ditch can be different: in the center of the gate or offset. In this case, the car stands away from the underground with its damp air. To inspect or perform any work, you will have to maneuver to enter the ditch. For more convenient entry, the inspection pit in the garage can have an L-shaped configuration. You can go up and down the stairs without rolling over the car.

Going down into the pit using the ladder is inconvenient and dangerous. The staircase must be stationary, at the same time comfortable and safe. The best option is to manufacture the steps simultaneously with the construction of the enclosing structure. With brick walls, it is advisable to make the steps from brick. When pouring walls made of monolithic reinforced concrete, steps should be cast at the same time. If for some reason they were not made at this stage, then the stairs can be made later with your own hands, when the inspection ditch is being constructed. The staircase is made of wood - with the steps fastened on bowstrings or stringers, as well as metal - with treads made of corrugated iron.
How to illuminate a viewing hole

When arranging a garage box, you should provide lighting for the inspection hole in the garage. According to the rules for lighting installations in repair pits, the use of 220 V incandescent lamps is prohibited. It is allowed to use light sources with lamps of no more than 36 V. A step-down transformer is used to power them. A good option are fluorescent lamps in a sealed housing. If a 24V carrier is used, the cable must be at least four meters long for safety reasons.
Underground ventilation

In the repair trench, due to the temperature difference, increased humidity occurs and condensation forms and settles on the bottom of the car. To avoid this unpleasant phenomenon, the inspection pit in the garage must have good ventilation. The exhaust duct is made of asbestos-cement or plastic sewer pipe embedded in the crushed stone preparation of the floor. This pipe must be connected by a transition elbow to a vertical exhaust riser. The hoods from under the ceiling of the garage box and trench must be independent. If you combine them into one, the efficiency of ventilation of the technical underground will sharply decrease.
Pit contours
Before marking a place in the garage for a future trench, you need to make a drawing of its cross section. The clear size of the trench should be taken as a basis. For example, the width will be 70 cm. To this value you need to add twice the wall thickness. If the latter is 20 cm, it will be: 70 + (2 × 20) = 110 cm. Add another margin - 5 cm on each side. Ultimately, the width of the trench at the bottom will be: 110 + (2 × 5) = 120 cm. In order to facilitate the subsequent application of coating waterproofing, the walls of the trench should be inclined. To do this, it is enough to increase the width of the trench on the garage floor by 60 cm (30 per side). That is, at the top the width of the ditch will be 180 cm. Trenches for the foundation are dug using the same principle.

Bucket or shovel
If the inspection hole in the garage is made at the same time as the foundation is being poured, it makes sense to resort to the services of an excavator. All work will be completed in half a day. The costs will be of the same order as if you hire diggers. Sometimes it happens that during the season you still won’t find them. Well, what if the idea came to build a technical trench when the garage was already built? There is only one way out - to dig a pit with your own hands. In order not to do unnecessary work, a certain amount of excavated soil should be stored near the construction site, since the earth will be needed for backfilling the sinuses.

The base of the trench should be protected from penetrating moisture by waterproofing. A 10-centimeter footing of concrete is first poured onto the compacted bottom of the pit. For preparation, a solution of grade M 150 is sufficient. The width of the preparatory layer is made flush with the outer surface of the future walls of the trench. To insulate the sole, any type of rolled insulating material is used - roofing felt, Bikrost, Aquaizol, polymer membranes. The canvas should be cut to overlap the walls.
A concrete floor is poured on top of the insulating layer. The brand used is stronger - M 200. A thickness of 7–8 cm is sufficient, but it is better to reinforce the poured surface with a 150 × 150 road mesh with a wire thickness of 4 (3) mm.
Rules for wall construction
To paraphrase Henry Ford, we can say - the design of the trench walls can be anything, provided that it is rigid and durable. To prevent the walls from bulging and cracking in the near future, you should know how not to do them:
- lay brick walls in one spoon (120 mm thick);
- make brickwork without reinforcement;
- use silicate products for masonry;
- pour the concrete mixture directly into the ground (from the outside of the ditch);
- pour concrete without reinforcement;
- use rubble concrete.
Combined wall
Below we describe one of the possible options for constructing a building envelope with your own hands. The outer walls of the pit are dug inclined, with a margin of width, to ensure future access for waterproofing work. Lay out 4–5 rows of half-brick brickwork along the entire internal contour of the future structure. This partition will serve as internal formwork. The outer one is installed, retreating 130 mm from the folded wall immediately to the entire height of the trench, using old boards, sheets of plywood, chipboard, OSB and other similar materials. They support it with spacers and jibs, after which concrete mortar is poured with the top edge of the masonry.
Lay a reinforcing masonry mesh 250 mm wide with a cell size of 50 × 50 and a wire thickness of 4 or 5 mm. Lay out the next section and install the reinforcement again. For better adhesion to concrete, the outer surface of the brickwork is made “into a wasteland”. The rigidity of the structure will be provided by closed belts made of reinforcement bars with a diameter of 10 mm, laid at the bottom and top of the fence. In order to subsequently equip the lighting of the inspection pit in the garage, niches are provided for installing lamps. Waterproofing, if provided for by the project, is carried out after removing the external formwork.
Sightseeing ditch and groundwater

Unfortunately, it is not always possible to make a viewing ditch in the garage. If groundwater (GW) is located under the garage at a depth of less than two meters, it is not worth starting construction. Life shows that in this case no amount of waterproofing of walls will help. When the hot water is below 2.5 meters, a trench can be built provided that high-quality waterproofing of the outer walls of the inspection ditch is carried out. It can be done with your own hands from several layers of adhesive material: roofing felt, TechnoNIKOL, Stekloizol, Gidrostekloizol and others. Cover the surfaces with molten bitumen. There are penetrating materials: Hydrotex, Aquatron-6, Penetron. They are convenient because they are applied to wet concrete and reduce waiting time. A good clay castle is oily, crumpled clay.
Global warming
To prevent the inspection pit in the garage from becoming covered with frost in winter, it can be insulated. To do this, the external walls on which waterproofing is applied must be covered with insulation boards - polystyrene foam 5 cm thick. If such insulation is laid in 2 layers under the blind area around the perimeter of the entire garage, the floor in the garage and the trench will be even warmer.
Trench in full roll
To avoid accidentally falling into a hole, you need to make a protective deck over it. The simplest design is thick transverse boards laid inside a edging of corners, installed using embedded elements or secured with anchor bolts. Woodworking waste - slabs laid with the convex side down - are well suited for this purpose. The inspection hole in the garage, covered by them, when viewed from below, resembles a front-line dugout.
In conclusion
The construction of an inspection trench is reminiscent of pouring a foundation and goes through the same stages:
- marking;
- earthworks;
- making soles;
- walling;
- waterproofing;
- insulation.
Having completed the construction of a trench made of reinforced concrete or brick, it is arranged. The inside of the pit can be plastered or tiled. Such an “underground”, built with your own hands, will allow you to drive a car with complete confidence in its technical condition. After all, by connecting the lighting of the inspection pit in the garage, you can regularly assess the condition of the chassis of your car.

© 2017 All rights reserved
Classmates
TO any motorist knows how necessary it is sometimes inspection hole in the garage! It happens that there is a nonsense breakdown, it’s a piece of cake to fix, but try, you’ll get there! Or changing the oil - five minutes of work, but you have to drag yourself to the service station and pay an amount that is completely incommensurate with the work!
Content
1.
2.
3.
4.
5.
6.
7.
Perhaps it’s worth shedding a little sweat, working a few weekends and getting rid of such difficulties forever! Find out how to make a viewing hole here.
Let's start work. Marking the inspection hole
As for everyone, even the most simple structures, we begin the construction of our pit with markings, that is, with determining the outlines and dimensions of the future pit. This is necessary, especially since we will be constructing a pit in something that has already been built, or even in operation. Which, you see, complicates our task, if only because of the cramped working conditions.
We will mark the pit based on the fact that the soil forming the walls of the pit will have a certain slope, while the dimensions of the inspection hole must be maintained within limits that make the work convenient.
This is on the one hand. On the other hand, when parking, the driver should not break out in cold sweat for fear that the car will fail. To ensure against slipping, we will take certain steps, but more on that later.
Based on all the mentioned requirements, we determine the width of the pit “cleanly” (that is, according to the width of the working space) at 70 cm. This is enough for comfortable work, and even for a tiny “Daewoo Matiz” (128 cm track) there will be room for maneuver of about 20 centimeters (between the pit and the wheel). And for Zhiguli cars, with their track of 132 cm, the width can be made even larger. Five to ten centimeters, but that’s not bad either.
We determine the length based on personal concepts about ease of work, as well as the size of the garage, but making it less than two meters is hardly justified.
On the floor of the garage we draw (or mark with pegs) a rectangle of our pit, then we add the thickness of the walls on all four sides and, guided by the stability of the soil, we give an approximate margin for the slope of the earthen walls. For dense loams this value is approximately 20-30 cm.
We determine the depth from the requirements of ergonomics, and in relation specifically to our loved one. It is clear that bending over or standing on tiptoes will not work much. Therefore, we calculate our hole in such a way that there is a distance of 25-30 cm from the top of the head to the bottom of the car.
With a ground clearance of about 16 cm (Zhiguli) and a worker’s height of 180 cm, the depth (again, “in the purity”) will be about 1.70 -1.80 m. Here it is better to dig a little than not to dig under your feet if necessary You can always substitute a bench, or make a raised floor at the desired height. All this is clearly shown in Fig. 1.
Do-it-yourself excavation work for an inspection hole
Now we have to imagine ourselves as a mole for a while. After all, you will need to remove about 9 cubic meters of soil, a lot, especially if you dig by hand, and the soil is strong. But let us take comfort in the fact that this is the most labor-intensive part of the work (in extreme cases, diggers can be hired).
Part of the soil must be left, stored next to the garage or inside it. This earth will be useful for filling the sinuses after the walls of our structure are completed. We take out the rest of the land. When calculating the equipment necessary for removal, it is necessary to take into account that the volume of loosened earth will be approximately 20-25% greater than the volume of the pit.
We level the earthen floor of the pit, and then compact it with crushed stone. To do this, pour crushed stone in an even layer, with a thickness equal to one and a half times the size of the largest pieces. After this, we “drive” the crushed stone into the ground using a tamper.
An inspection hole in a garage will be much more convenient for work if there are niches in the walls where you can put tools, spare parts, etc. Places for niches must be provided in advance, at the excavation stage.
How to make the walls and floors of an inspection pit with your own hands
For building walls, there are two most common and proven options: block masonry (brick) and monolithic concrete. Both solutions have their advantages and disadvantages. We recommend and will continue to consider monolithic concrete. The cost of materials (especially if you prepare the concrete yourself) will be cheaper. When installing embedded parts, you can perform their high-quality, durable fastening. And the structure as a whole will be more reliable.
We start by making a concrete floor over the soil compacted with crushed stone. Six to seven centimeters of thickness will be more than enough for him. We reinforce the floor with wire mesh with a mesh size of no more than 150x150 mm and a reinforcement thickness of 4-5 mm.
We will prepare concrete based on the following proportions per 1 cubic meter of concrete: 300 kg (0.28 m 3) PC cement, grade 400; 680 kg (0.47 m 3) sand, 1210 kg (0.9 m 3) crushed stone fraction 5-20 mm and 210 liters of water. When mixing by hand, you will have to add more water to make the mixture more mobile, but when using a concrete mixer, it is better to keep the proportions close to those indicated. If you add noticeably more water than normal, we will increase the amount of cement by ten to fifteen kilograms.
The concrete obtained in this way will have a compressive strength grade of 200, which is more than enough for us.
We will make the walls 15 centimeters thick, this is quite enough for our pit. The composition of concrete is slightly different than for the floor: cement 360 kg (0.33 m3), sand 670 kg (0.46 m3), crushed stone 1168 kg (0.86 m3), water is still the same 210 liters.
We will concrete the walls in layers, in tiers thirty to forty centimeters high, compacting them with bayonets, for which a narrow shovel is well suited. It is impossible to compact a thicker mass manually with high quality, unless you can get a deep vibrator somewhere (say, rent it). But even in this case, you should not make the tier more than 50 cm.
As formwork, we use OSB sheets with a thickness of 10-12 mm. Subsequently, OSB will be useful for various garage needs: making shelves or racks, lining gates for insulation, etc.
When constructing the walls of an inspection pit, reinforcement is sometimes neglected, but it is better not to skimp and still carry out this operation. As reinforcement, you can use the same mesh as for the floor. Let's install it at a distance of 3 cm or a little less from the inner plane of the wall. Installed at once over the entire height of the pit, the mesh will get in the way, so we will install it in strips as the concreting progresses.
 , we immediately install wall niches. We reinforce the “ceiling” of the niches along the entire length with two or three reinforcing bars (A-III reinforcement with a diameter of 8-10 mm will be enough), so that they do not move, we fasten them together with wire.
In the last tier it would be useful to provide inclined cylindrical “glasses”, where we will subsequently install lamps. The construction of such glasses can be achieved by inserting a plastic sewer pipe cut at an angle into the formwork at an angle (see Fig. 2).
We frame the perimeter of the pit with an embedded part welded from corners with a shelf width of 60-70 mm. The “whiskers” (anchors) of the embedded part are made from reinforcement identical to that which we used when reinforcing the niches. We take the length of the anchor to be 50 cm. If, when installing the part, the anchor does not fit the height of the tier, you can bend it as needed.
The frame performs several tasks: it strengthens the corner of the wall, serves as a “clip” for laying the plank flooring, and finally, as already mentioned, it plays the role of a safety curb that prevents a car wheel from sliding into the hole (see Fig. 2).
To prevent our concrete from collapsing when moving the formwork, we need to let it set for two to three days. After installing the last tier, before backfilling begins, let it sit for at least a week.
We backfill with loam, in layers of 15-20 cm, carefully tamping each layer. Ideally, backfilling can be done with so-called “incompressible” soil (crushed stone, gravel). However, it is expensive, and it is not particularly necessary for a passenger car.
You can use a trick. After we do it, don’t immediately concrete the floor, but fill it with crushed stone until required height(if the garage has already had a floor). After a couple of weeks, when driving in and out of the garage, you will compact the soil in the sinus areas with the wheels, after which you can safely concrete the floor, it is guaranteed not to sag.
Additional work on installing an inspection hole in the garage
Making a viewing hole is not enough; you also need to “equip” it. To do this, we install lamps and cover the pit (flooring).
For flooring we use wide boards “forty” (40 mm thick). The boards can be knocked down into several panels, but you should not make them too large and heavy.
If a voltage of 220V is used, the wires must be hidden in a corrugated sleeve (preferably steel). We use semi-sealed, waterproof sockets and switches.
Do-it-yourself waterproofing of an inspection hole
If the groundwater level is high in your area, and there is a danger that the inspection hole will be flooded, high-quality waterproofing is necessary.
We will carry out comprehensive waterproofing and use a barrier made of rolled materials as the first “line of defense”.
We lay a layer of waterproofing film (aquaizol, butyl rubber, etc.) under the concrete floor, so that the edges of the panel extend onto the walls at least 15-20 cm along the entire perimeter. When concreting the walls, we sequentially lay layers of insulation. The installation is carried out with an overlap of at least 15 cm.
If there is a danger of flooding, we make it with greasy clay, compacting it in layers of 15-20 cm.
The final protection measure will be the addition of water-repellent additives to the concrete during its preparation.
In conclusion
A few words about “labor safety”, more precisely, the protection of your health from this very work.
When carrying out excavation work in unstable soils, be sure to secure the walls of the pit, (ensuring their slope along the line of natural slope is obviously a more labor-intensive task). The fact that the soils are unstable and prone to collapse will be evident already at the beginning of excavation work.
We carry out fastening by placing boards on the walls and securing them with spacers. It is advisable to do this when the depth of the pit reaches a meter or a little more.
However, if the soil is unstable, then there is a possibility that without strengthening the walls, further work will become extremely difficult, or even stop altogether.
Carrying out work do not neglect personal protective equipment(canvas mittens, durable work boots). Working with a hammer drill, jackhammer, grinder don't be lazy to wear safety glasses Otherwise, an inspection hole in the garage can be expensive.
And finally, work with a partner. Even if your partner has red pigtails and is twelve years old! The instrument will give or bring water. You don’t need a lot of strength for this and you will get used to work! And if trouble happens, he can call for help.
Experience in constructing an inspection pit (video)
Ask questions either. , photographs, we will publish them on the website. Order work from specialists! Support the project! Good luck to you, good to your home!
Many people try to do maintenance or minor car repairs themselves. To avoid lying on your back under the car, you need an inspection hole in the garage.
Dimensions of the inspection hole in the garage

This is far from dogma. Everyone does as they see fit. Some find deep holes inconvenient and they make them almost exactly tall, and sometimes even lower - 1.5 meters. If you take into account the car's ground clearance, from the floor of the pit to the bottom of the car it will be about 1.7-1.8 meters. You can do it this way.
Another point about length. Sometimes it is not possible to make a long hole. Then it is made approximately half the length of the car, driving it in front or back, depending on which part of the car needs inspection or repair.
Now about where to place the pit in the garage. Usually it is shifted slightly towards one of the walls, leaving a wide side for installing equipment, storing spare parts, etc. In this case, there must be at least 1 meter from the edge of the pit to the near wall.
That's all the parameters. Just note that we were talking about the final dimensions of the pit. When marking the pit, you will need to add thickness to the walls, and dig deeper to the height of the floor screed (if you make one).
What materials are they made from?
The inspection pit in the garage (its walls) is lined with bricks, heavy building blocks, and made of monolithic concrete. If we talk about bricks, it is better to use ceramic bricks: they are not afraid of moisture. The walls are made of half a brick or brick. The wall thickness, depending on the laying method, is 12 cm or 25 cm. This must be taken into account when marking the pit.
Brick can be used on dry, dense soils. The groundwater level must be low. If the water comes up high, it is better to make the walls of the pit from reinforced concrete.

Building blocks also need to be selected those that are not afraid of high humidity. These are concrete blocks. The rest, if used, must require external waterproofing, and this is not a guarantee that they will not crumble, especially if groundwater is located close.
With a concrete inspection hole, everything is simpler: concrete is not afraid of moisture, it only makes it stronger. To fill the walls, concrete grade M 250 is used; for the floor, M 200 is sufficient. Why is this so? Because during winter heaving the main load falls on the walls. To prevent them from “collapsing”, a margin of safety is required, which is achieved by reinforcement and the use of high-strength concrete. By the way, to avoid heaving of the soil under the garage, you need to make a good blind area so that the water leaves and does not soak into the soil.
The wall thickness when filling the inspection hole with concrete is from 15 cm. Stacks must be reinforced. To do this, use a ready-made mesh with a wire thickness of 5-6 mm and a pitch of 150 mm (if the groundwater is deep) or knit a frame from reinforcement with a diameter of 10-12 mm. The reinforcement installation step is 20 cm. For greater strength, you can make a single rod for the bottom and walls, bending it accordingly.
Waterproofing methods
An inspection pit in a garage can be protected from moisture penetration in two ways: with the help of external waterproofing, which is carried out exclusively during the construction process, and internal, which can be done during operation.
External protection
If in the place where the garage is being built the groundwater is deep, lower than 2.5 meters, and even in the spring or after heavy rains it does not rise higher, you can do without waterproofing. On the other hand, the hydrological situation is constantly changing, and where it was previously dry, water may appear. If the inspection hole in the garage has already been built, external waterproofing cannot be done. All that remains is to use deep penetration impregnations to reduce the hygroscopicity of the walls. Therefore, if possible, do external insulation in any case.

How to prevent moisture from entering the inspection hole in the garage? Most often, waterproofing films or membranes are used (butyl rubber, aquaizol, etc.). They are laid in sheets, covering the pit from one edge to the other, with 10-15 cm released from each side of the pit onto the garage floor. The panels are laid overlapping. They must overlap by at least 15 cm. To obtain a more airtight joint, they are glued together with double-sided tape, possibly in two stripes - at the beginning and end of the “overlap.” The film is well straightened so that it fits tightly to the walls of the pit. During further work, it is important not to damage the membrane.
Internal waterproofing
Internal waterproofing is usually the impregnation of walls with coating waterproofing. If possible, use a composition for swimming pools. It creates a waterproof, dense film that closely resembles rubber. It is blue in color and washes well after hardening. It is better to treat the walls with this composition twice, or more.

Another option is a cement-based deep penetration primer. The polymer particles contained in it block the capillaries through which moisture penetrates through the thickness of the material. One such treatment significantly reduces the hygroscopicity of the material. In the case of water in a garage pit, at least twice the treatment is required (and preferably more).
Caisson device
There is another option to escape from the ground - to make a metal caisson. A box of appropriate dimensions is made from sheet metal, treated with anti-corrosion compounds, and then installed in a pit. If the welds are made airtight, there will be no water, but another problem may arise. If there is a large amount of water, it can squeeze out the caisson. They say it "pops up".
To avoid such a situation, corners and rods are welded to the sides of the caisson from the outside, which go 1-1.5 meters into the ground. So that the volume of excavation work is not very large (the foundation pit, taking into account these spacers, turns out to be large), you can cheat. Before installing the caisson, drive corners or metal rods into the ground, letting their ends out. You can weld them to the caisson body after installation. The pit will still have to be made larger (you need to cook it from the outside), but its dimensions will still be smaller. The second advantage of this method is that the rods will be driven into dense soil, which means they will hold the caisson better.
Another way to prevent the caisson from “floating up” is to make a hole in the wall at a certain height. If the water rises to its level, it will begin to pour inside. The water can subsequently be pumped out, the main thing is that everything remains in place. An inspection hole in the garage, built according to this principle, stood for more than 20 years - until the metal rusted.
Water collection pit
If the pit has already been built, and coating waterproofing or impregnation did not give the required result, it is necessary to either install a drainage system around the garage or collect water in one place. To do this, a pit is made in the garage inspection pit, at one of its ends. Water accumulates in it, from where it is pumped out. In order for the system to operate in automatic mode, a water presence sensor is installed, which, when triggered, turns on the pump.
Formwork is made under the pit and filled with concrete. Then they waterproof the pit along with waterproofing the entire pit. For reliability, you can also put a metal caisson inside.
Since it is not possible to completely get rid of dampness in this case, a boardwalk is knocked down onto the floor of the pit. To prevent the boards from rotting, they can be soaked in waste. If you don’t like its smell, take a special impregnation for wood that has direct contact with the ground (Senezh Ultra, for example).
Insulation of the inspection pit in the garage
If you spend a lot of time in the garage, then you will most likely have heating. In order to warm up faster, it makes sense to insulate the pit. EPS (extruded polystyrene foam) is best suited for these purposes. It can withstand significant loads, is not afraid of dampness, does not rot, and fungi and bacteria do not multiply on it.
The thickness of the EPS to create a noticeable effect is from 50 mm. Place it between the soil and the wall of the pit. Then from the outside to the inside the pit will look like this:

Expanded polystyrene can also be placed under the screed at the bottom of the inspection hole. A reinforcing mesh is usually laid on top of it, and then concrete is poured.
How to make a viewing hole in the garage
Once you have decided on the dimensions and what material you will make the walls from and how thick they will be, you can begin marking the pit. This can be done using pegs driven around the perimeter. The second option is to stretch a twine/rope between the stakes driven into the corners. According to the markings, we begin to dig a pit. The earth is usually taken out and temporarily stored near the gate.
Made of brick: step-by-step photo report

While excavating, monitor soil moisture. If you have reached the design depth (required + thickness of the floor screed), but there is still no moisture, you can do without waterproofing. Those who do not want to take risks can be advised to immediately lay down the film.
We level the walls. There is no need to achieve ideal geometry, but there should be no noticeable humps or holes. We also level the bottom of the pit and tamp it, compacting the soil well. A hand tamper is usually used. A layer of crushed stone is poured onto the bottom (twice 5 cm each), each layer is also carefully compacted. Next comes a layer of sand. 5 cm is enough. The sand is moistened and compacted to a high density so that the foot does not leave imprints. Next we lay the waterproofing film.
![]()
We even it out well, tucking it into the corners. We lay the panels with an overlap of 15 cm, which we glue with double-sided tape. To prevent the edges from rolling, we press with available materials - boards, stones.
We lay a layer of insulation on the bottom, and a reinforcing mesh of wire on it. We fill all this with concrete grade M 200. The layer thickness is at least 5 cm. To make it easier to navigate when laying, we make marks on the film by which you can control the thickness of the layer.
If you use Portland cement M 400, the proportions will be as follows: 1 part cement, 3 parts sand, 5 parts medium and fine crushed stone.

An inspection hole is being built in the garage: the floor is filled with concrete
We wait several days until the concrete gains 50% strength. The exact period depends on the temperature. If it is around +20°C, you will have to wait 5-6 days. If +17°C is already two weeks.
Let's start laying out the walls. It was decided to make it in half a brick. We used used bricks, about 850 pieces were used (pit size 4.2 * 0.8 * 1.7 m). The walls were laid out in a circle up to the level of the elbow.

It was decided to make a niche for the tool at a level of 1.2 meters from the floor. Its height is 3 rows of bricks, the top is covered with a treated board.

To avoid having to lay out a brick niche, a metal liner is inserted. A box is welded to suit the size.

Next, the walls were driven almost level with the garage floor. Part of the walls was replaced with two sections of channels. If necessary, jacks rest on the bottom. A metal corner with a 50 mm shelf, steel thickness 5 mm, is placed on the top row.

The corner is unfolded so that one of its shelves hangs down, the second covers part of the upper surface of the brick. To prevent the wall from collapsing under load, embeds are welded to this corner, which are then connected to the concrete reinforcing belt.


Pouring the floor in the garage - concrete level along the upper edge of the corner

Features of making concrete walls
When casting concrete walls, it is necessary to make formwork. It is easier to make it from sheet material - construction moisture-resistant plywood with a thickness of 16 mm or more, OSB. Shields of the required size are knocked down and reinforced with bars on the outside. They are necessary to prevent plywood or OSB from bending under the pressure of concrete. First, the outer parts of the formwork are installed. If the walls of the pit are smooth, there will be no problems. You just lean them against them and place them level.
Then the internal formwork panels are installed. There should be a distance of at least 15 cm between them. To prevent the walls from deforming during the pouring process, spacers are placed between them.

It is advisable to fill the filling at one time. The poured portions must be bayoneted or treated with a submersible vibrator for concrete. The formwork is removed after two to three days. Afterwards, you can install a corner with welded embedded rods (strips) and begin pouring the floor.


