Very often, when changing doors between rooms, we are faced with the question - how to properly install a door handle with a lock? With the help of this article, you will be able to install a lock on your interior door quickly and, most importantly, correctly, avoiding the mistakes made by many inexperienced people. In fact, this is not a complicated process at all; it takes up to half an hour for an experienced master, but an inexperienced person in this matter can suffer for several hours.
In this article we will look at the installation of the most common lock design today. This lock consists of the following parts:
Lock Mortise Tools
 To install an interior lock, you need a minimum set of tools; you most likely already have some of them, but if you have to buy something in addition, you will not incur large financial costs.
- Tape measure and pencil;
- Screwdriver or drill;
- Stationery knife;
- Chisels 10 and 20 mm;
- Spade drill or 23mm forstner drill;
- 2 mm drill;
- Wood crown 54 or 50 mm depending on the thickness of the door;
- Masking tape.
This is a list of the best tools you will need. Special kits for inserting locks are sold; they are relatively inexpensive, but it will be even cheaper to purchase everything separately. Often, such kits include a 22 mm feather drill; it is also suitable, but then you will have to widen the hole for the latch with a chisel. 
Making holes for the handle of the lock mechanism
Like any installation process, the installation of a lock begins with markings. But before that, let’s protect the door leaf from accidental damage. To do this, we use masking tape to cover the end and plane of the door at the intended installation location of the lock, this is a distance of approximately 90 to 110 cm from the floor. Pasted masking tape will not only protect our door from damage, but also make markings on it much more convenient.
First of all, mark the height of the door handle with the lock. Most often, the handle is placed at a height of 1 m from the floor level. We measure this distance with a tape measure and put a mark on the plane of the door with a pencil.
When purchasing this type of lock, it always comes with a template for accurately marking the location of the holes. The cylinder mechanism of the lock may differ in diameter from different manufacturers, so purchase a wood crown after purchasing the lock. If your lock kit did not include a template, you can print them from this article as pictures and use them when installing the lock. 

Gently bend the template along the line of the door ledge and attach it to the door from the end. Depending on the thickness of the door leaf, use a sharp object (a self-tapping screw or the tip of a feather drill) to mark the centers of the holes according to the template from the end and on the plane of the door. 
Using a screwdriver and a wood bit, drill a hole in the plane of the door. 
Advice: When drilling, be careful not to drill through the entire door at once. When, while drilling, the guide drill appears on the back side of the door, stop and start drilling with a crown on the other side, this way you will definitely avoid chips on the plane of the door leaf.
The next step is to drill a hole for the lock latch. Using a previously applied mark using a template on the end of the door, using a 23 mm feather drill, we drill a through hole to the previous one. 
Keep the drill strictly perpendicular to the door, otherwise in the future the latch may become oblique and jam during operation.
The next step is to insert the latch into the end hole, align it with the edge of the door and trace it with a pencil along the contour of the decorative frame.  After this, we take out the latch and, using a stationery knife, make an incision along the marked line in the top layer of the door leaf. And only then, using a chisel, we select the hole for the lock latch. The depth of the opening should be slightly less than the thickness of the latch frame; later, when you tighten the latch with self-tapping screws, it will be pressed into the wood and become flush with the plane of the door.

Advice: Many beginners immediately begin to cut under the latch with a chisel; this is incorrect, since the door leaf is covered with a film that can be damaged beyond the cut line with a chisel, so cut off the film first.
After selecting the groove, insert the latch into place and first, using a 2 mm drill, drill out the holes for the self-tapping screws and tighten the latch into place. If the latch fits into the hole tightly, then use a chisel to cut off the contact points between the latch and the hole. 
Let's start installing the handle. The handle is assembled according to the instructions supplied with it. When installing, pay attention to the location of the closing tongue on the handle; if there is one, it should be located inside the room.
On one of the cylinder mechanisms there is a rotating pin and holders for mounting screws. Remove the decorative rosette from the mechanism using the pin wrench from the kit and mount it in place, screw the second cylinder mechanism on the reverse side. 
When tightening the screws, do not overdo it - pinched cylinder mechanisms will not work as expected.
Install all parts of the handle in place according to the attached instructions, and the work on installing the handle is completed. In fact, this is done much easier than it seems; you can watch a video in which you will clearly see the entire process of installing the lock with your own hands.
Installation of the lock mate
The last step in installing a door lock on an interior door will be installing the counter part on the doorway.
Close the door and make two marks on the doorway based on the width of the lock latch. 
Measure the distance from the corner of the door to the beginning of the latch. 
You should have the same distance from the edge of the doorway to the beginning of the recess of the counter part. It is necessary to maintain this distance so that in the future the closed door does not move back and forth due to air movement in the apartment and does not knock. 
If the answer needs to be recessed into the door jamb, then we place it in place and outline its outer and inner contours with a pencil. If there is no need to recess, then we outline only the inner contour. It all depends on the gap between the door and the jamb. 
Using a drill of a suitable diameter (you can also use a feather drill, if the hole then does not protrude beyond the answer), drill a hole for the lock tongue and fasten the answer in place, having previously drilled 2 mm holes for the screws with a drill. 
Do not forget to widen the holes for the screws to a depth of 2-3 mm, since there are protruding parts in this place on the back side of the answer.
We install the striker in place by tightening it with self-tapping screws and try to close the door; if there is excess play, we eliminate it by bending the tongue on the striker. 
The insertion of the lock into the interior door has been completed, all that remains is to clean up the accumulated debris and enjoy the new handles on the doors.
Lock mortise with cylinder
Very often a situation arises when you need to install a lock on a door that already has a handle. Any lock with a cylinder is suitable for this. 
Such locks have a rectangular shape and therefore the insertion process may seem difficult without the use of special tools. In fact, such locks are installed quite easily and with a minimum set of tools. You can place them at your discretion - above or below the already installed handle.
Lock installation sequence:

Installation of the lock mate:
- On the open door, we pull out the bolt (the retractable part of the lock) of the lock, that is, we close the lock with a key and, leaning it against the doorway, we mark what height we will have the counter part, focusing on the edges of the crossbars;
- Using a tape measure or square, measure the distance from the edge of the door to the middle of the lock and transfer this distance to the jamb of the doorway;
- Using a feather drill, we drill a series of holes according to the markings and then combine the resulting holes with a wood drill;
- Having previously secured the response part to the jamb, use a utility knife to cut along the contour, and then use a chisel to select the countersunk hole for the response;
- We install the counter part in place and check the functionality of the lock again.
Also, such locks often come with handles; the sequence of inserting such a lock does not change, only the operation of drilling a hole for the handle is added.
Well, that's it, the lock is cut in!
Be sure to watch the video on inserting a lock with a cylinder, perhaps in it you will notice some subtleties that you did not understand from the article.
If you have any questions, you can ask them in the comments. Good luck with the renovation!
Of course, the protective properties of locking devices for interior doors are not subject to such high requirements as for entrance locks. The door can be locked with a key on one or both sides, equipped with a turntable or an automatic handle. Whatever configuration you choose, the installation of interior locks should be carried out by professionals who will take into account all the client’s wishes, the condition of the canvas, and the materials used to make the wall. It is these experienced specialists who work in the “World of Keys” workshop, who will be happy to help you install a lock.
For apartment and office
The once popular latch is a thing of the past. Owners of private property and business executives are increasingly using devices with a real key that can protect personal documents or valuables. The service of installing locks on an interior door is performed by a specialist not only taking into account the desired level of privacy, but also taking into account the style of the room. A beautiful handle and a stylish key are elegant components of your home or work interior. When installing, you should remember some rules.
- The most common materials are chrome, brass, steel, bronze.
- When choosing a lock model, you need to correlate the appearance with the design of the room.
- If a child lives in the apartment, it is better to do without an automatic latch.
- Handles, organized separately, are wise to use on doors that open frequently.
- It is better to install rotary handles in places with little traffic.
How much does it cost to install a quality lock on an interior door?
The security cylinder of interior locking mechanisms, which can be symmetrical or asymmetrical, is most often opened from both sides with a key. A pinwheel is not the best invention for a door, especially if there is a small child at home. Installation of interior locks in Moscow is a service that is very popular. The cost of the work depends mainly on the type of locking device. All door mechanisms can be divided into several groups.
- Simple latches are the most economical designs, which consist of a cylinder and a tongue and serve to prevent unwanted opening.
- Locking latches are mechanisms equipped with a device capable of holding the lock in the “always closed” position. Often used for bathrooms or toilets
- Mortise locks are the most popular designs needed in rooms that need to be closed on both sides. Used in residential buildings and offices.
- Overhead devices are common in communal apartments. They are characterized by low cost and high service life.
- Magnetic mechanisms are the most expensive, but the most effective locks, ensuring silent operation and security of the room. Used in children's rooms, offices.
We will install locks quickly and efficiently
Installation of an interior lock, the price of which is affordable for any consumer, is one of the most popular services of the World of Keys company. When choosing reliable devices for entrance doors, do not forget about interior doors: there were often situations when they became an insurmountable barrier for intruders. If you want to install a reliable lock inexpensively and with a guarantee, call our workshop.
- We employ specialists with extensive experience.
- We use only original products from well-known global companies.
- We will arrive promptly if urgent installation is required.
- We travel around Moscow and the region, cooperating with individuals and legal entities.
- All types of work and services are guaranteed.
The cost of installing locks for interior doors in our company is lower than the Moscow average. If you find it difficult to choose a model, you need to take into account additional criteria - contact the World of Keys workshop. Highly qualified specialists, professional tools, advanced technologies - all this will allow us to produce a reliable, aesthetic and silent interior lock.
Putting a latch or a lock on a door is not that difficult. If you have a tool (nothing extra expensive or unusual is needed), you can do it in 30-40 minutes. And this is without experience. We will talk further about how to embed a lock into an interior door and how to install a latch.
Tools for inserting locks and latches
Embedding a lock into an interior door is not that difficult, but you will need the following tools for the job:
Not such an expensive and rare instrument. If you don’t have a drill and a crown, you can buy it at any construction supermarket or market. Since we will not be drilling into stone, there is no need to buy too expensive ones - ordinary crowns or wood drills.

Ready-made set for inserting locks into interior doors (on wood): feather drill, holder, crown
A few words about what is better - a crown or a feather drill. Cutting a hole in a door for a lock is easier and faster with a crown, and there are fewer chips. But working at the end with a crown is not so convenient, and the hole is larger than necessary. Drilling with a pen takes a little longer and there are more chips, but it’s easier to control the process. In general, there is no big difference, but most often, the hole in the canvas is made with a crown, and in the end - with a feather. But you can use a pen everywhere.

Another point: a standard crown has a diameter of 25 mm, and a hole of 22-23 mm is needed for the lock. The extra 2 mm can be easily covered by decorative trims, but with a very narrow door these extra millimeters can become critical.
How to embed a lock into an interior door: step-by-step photos
Before installing a lock or latch, you need to determine the height at which the handles will be located. The recommended height is 90-110 cm. A lock or latch is usually placed in this gap. But when installing a lock into an MDF door, you should not install the lock higher than a meter. The fact is that in budget models the wooden plank into which the lock is installed is 1 meter high. Higher up there will only be emptiness and you will have to re-drill the hole and figure out how to close the resulting hole. Once we have decided on the height, we can begin installation.

Recess for the locking part
Before embedding the lock into the interior door, mark the selected height on the door. Make this more convenient using a tape measure. We place a mark at the end and transfer it using a square or building level to both sides of the door leaf.
- Take the lock/latch and apply it to the end of the door so that the middle of the lock falls on the drawn line. We mark the width of the metal locking part and the level at which the lining ends.

- We take a 16 mm feather drill and apply it to the part of the lock that will be inserted into the door leaf. Using a marker or masking tape, or a piece of electrical tape, make a mark on the drill. This mark should be slightly further than the lock. We will use it to guide us to what depth to make the holes. This is especially important if the lock is installed against glass. Otherwise, you may drill too deep and damage the glass.

We put a mark on the feather drill - this way we will control the drilling depth
- Having installed a feather drill, we make several holes one under the other, forming a recess for the lock. The number of holes depends on the size of the lock. In some models 4-6 are enough, in others you will need 8-10.
- The edges of the holes were uneven, and the wood had lifted in places. We take a chisel and remove the protruding wood fibers from the edges, working lightly and in depth (but don’t get too carried away).

- We take a regular 16 mm drill and put it in the drill. Use it to align the edges of the hole made. To do this, move it up and down, pressing lightly on one side or the other of the notch. This operation is needed to speed up the process, but the drill must be strictly controlled. If you are unsure, it is better to level the notch using a chisel and mallet.

- Insert the lock into the resulting hole. It is usually a little larger, so there are no problems. If necessary, using a chisel or drill it can be increased to the desired size.
- We set the lock to the desired position and attach it to the door leaf using two self-tapping screws (one at the top, the other at the bottom).

- Using a pencil or a utility knife, trace the perimeter of the lock lining. We remove the lock, take a chisel and remove 1-2 mm of wood, MDF or veneer inside the markings made.
The depth of the recess for the locking part depends on the thickness of the decorative strip. Usually they try to make sure that the strip is flush with the end of the door, but it may protrude a little. Shoot little by little as you work—it’s easier to edit it than to try to restore what you shot.
We put the handles
To finish installing the lock on the interior door, you need to make holes for installing handles. The work is much less than what has already been done, but accuracy is required. The mistakes are not too critical, although it is better to try to avoid them.
The handles come complete with self-tapping screws for wooden doors and tie bolts for installation in a metal door. It is better to replace the self-tapping screws from the kit - they are usually made of soft metal. Unless you bought a branded foreign lock, in which the screws are hardened. And so, buy several good screws with a diameter of 1.5-2 mm and a length of about 1 cm.

Some models have decorative overlays. We align them using a square.
Installing the lock latch
Locks for interior doors usually have a rotating latch on one side that locks the lock, and on the other side there is only a lining with a slot. That is, you can’t just open the door from the outside—you need a special key. Installing this part of the lock takes literally a couple of minutes, but there are some nuances.

That's it, inserting the lock into the interior door is almost finished, all that remains is to check the work.
Mate insert
The counter part must be installed clearly so that the doors do not play and there are no problems with closing. Therefore, we try to mark as accurately as possible and take a sharpened pencil.

You know everything about how to fit a lock into an interior door. The description takes up a lot of space, the process itself takes 25-30 minutes if you’re doing it for the first time. It will take more time if you level the holes with a chisel rather than with a drill. But the total duration will still not be more than an hour.
Latch installation features
It is not very often that a full-fledged lock is installed on interior doors. More often you have to install a latch - a handle with a tongue. It is smaller in size and inserting it is much faster and easier.

Installing a latch on an interior door is even faster and easier than a lock. There is very little work. You can do it in 20 minutes. And this is completely without experience.
You can install a latch on an interior door yourself if you have the necessary tools and basic woodworking skills. Installation of the handle with a locking mechanism is carried out according to a similar scheme. The only difference is the recess for the locking plate.
You should prepare tools and materials such as:
- drill;
- drills or crowns;
- hammer and chisel;
- screwdriver;
- pencil or black marker;
- ruler;
- self-tapping screws;
- roulette.
If the screws are not supplied with the handle, they can be purchased separately.
How to install a latch on an interior door
To install the latch, you must follow this action plan:
- mark the door leaf;
- make holes for the latch and square rod;
- insert the mechanism and assemble all the parts.

Everything should be done carefully, since damage is quite difficult to repair. To make it easier to cut out the indentations, make marks with a black marker.
Marking the canvas
Before installing the handle with a lock in the interior door, mark the canvas with your own hands. Mark the height of the lock and its width. The depth of the insertion is determined by the width of the mechanism. It is better to make notes from the inside. The choice of handle height depends on the height of the owners; it should be located at waist level. The standard is 1 m from the floor covering.

Then they apply the lock to the inside of the door and outline it with a pencil. This determines the depth of the holes. The position of the handle and latch is also noted. The latter is installed on the end side of the canvas. It is much more convenient to mark it using a square. The installation location of the strike plate is determined after installing the handle.

Drilling the hole for the handle and latch
The next step is to drill holes for the square rod and locking mechanism. To install the larvae, make a recess in the door leaf using a feather or twisted drill, the diameter of which corresponds to the width of the mechanism. To determine exactly how much to immerse the drill, tape is applied to it. Therefore, when creating a cavity, a mark must be left on top so as not to immerse the tool below the marker.
Now we drill a series of holes next to each other to the required depth. The drill must be held strictly parallel to the floor surface. If this is a difficult task, it is advisable to remove the door leaf from its hinges and lay it down. After this, use a chisel to level the groove. If you have a milling machine, it is more convenient to make the hole with it. The immersion depth of the cutter is set in advance.

The mechanism must fit tightly. If necessary, you need to click on it. Holes for self-tapping screws are prepared in advance. To do this, use a small diameter drill. If you tighten screws without a guide hole, the wood may split. They also drill a hole for the handle with a drill whose diameter corresponds to the size of the square rod.
Installing the mechanism and assembling the handle
The installation is completed by installing the mechanism, the internal lining and the strip on the chest. The handle mechanism is inserted into the recess so that the holes match. After this, the square is threaded and levers or knobs are put on it. The last thing to install is the cover plate on the square rod and secure it with a special screw. The latch is covered with another cover.

After this, you need to correctly install the strike plate on the door frame. Close the door and mark with a pencil the position of the latch and locking mechanism, if present. Using a chisel, make a recess up to 1 cm, which is covered with a plank. If a roller latch is installed, the groove must be up to 5 mm.
Requires a minimum set of tools:
- Drill
- Chisel 19 mm
- Crown diameter 50 mm
- Spade drill 23mm wide
- Drill bit for wood or metal 4 mm
- Hammer
- crosshead screwdriver
- And a pencil
So, let's start cutting into the lock.


Drill a hole in the center with a 4mm drill bit.

We place the lock flush with the door and make a mark according to the fact

We drill through the hole with the same drill, maintaining a right angle.

Using a 50 mm crown we make a cut on one side of the door.
Attention!
Your specific case may require a different size crown.

Let's finish on the other side.


We take a self-tapping screw of a suitable length, close the door along the door frame and through the 50 mm hole, insert the self-tapping screw into the remaining 4 mm hole and, using pressure, make a mark in the door frame.


Using a 23mm feather drill, we cut a hole at the mark to a depth sufficient for the lock latch to engage.

Using the same drill, we drill a hole for the lock along the mark.

We insert the lock and make a mark with a sharp pencil to recess it into the door leaf.


Using a chisel, we make notches strictly according to the marks and make a selection so that the lock sits in the pocket, then we fasten it with self-tapping screws.

We begin to assemble the lock, insert the outer part into the grooves (as a rule, it does not require disassembly).


Then carefully remove the decorative “cup” sitting in the grooves, then press the latch and remove the handle.


We connect the two sides with screws.

We insert the handle so that the latch operates.

Snap the decorative “cup” into place.


We attach the striker, make a mark, use a chisel to remove the excess and screw it on.

Done!))) A correctly embedded lock closes freely by pressing the door leaf until it slams.
Video explanation for installing the lock
Instructions for installing a door lock (knob)
1.Marking the door

Apply markings on the door leaf to install the knob (lock) according to the template. Recommended distance from the floor is 965 mm.
2.Marking holes

After you have made the markings, drill two holes: 50 mm in diameter for the knob (lock) handle and 23 mm in diameter for the latch mechanism.
H. Installing the strike plate

Install the strike plate at the same height as the latch so that the additional tongue of the latch remains recessed into the body of the latch when closing, which is an obstacle when pressing.
4 Disassembling the knob (lock)
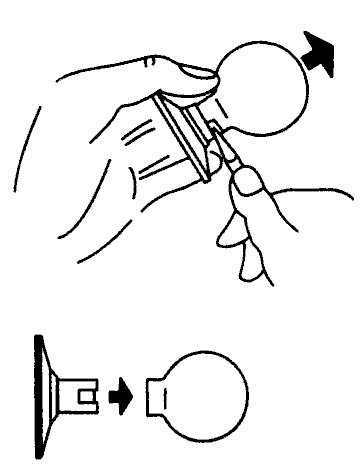
To disassemble the knob (lock), use a special key to press the spring-loaded latch at the place where the handle is attached and remove it.
5. Latch length adjustment

6. Installing the latch

Install the latch into the groove of the door (make sure that the bevel of the latch is directed towards closing the door). Install the cover plate with the rod so that the rod and coupling sleeves fit exactly into the grooves on the latch body.
7. Installing the knob trim(castle)

First, slide the inner jujube cover plate onto the rod and secure it with screws (or screws). Then screw on the outer part of the trim.
8. Handle installation

Install the handle so that the groove on the rod coincides with the groove on the knob handle, press the handle until it “clicks.”
9. Rearranging the mechanism in the halyard handle

For models of latches with a halyard handle (versions 01 and 03), installation is also provided for both left and right doors. To do this, it is necessary to remove the cylinder mechanism and the fixing mechanism from the handle body and swap them (according to the figure), in accordance with the side of the door opening.
Installation procedure.
1. Determine the installation location of the knob and apply markings, following the template and installation instructions.

2. Using the installed latch body, mark the installation location of the strike plate on the door jamb and select a groove for the strike plate.
3.Install the strike plate and secure it with screws.
4. Alternately check the operation of the knob from outside and inside the room.
5. For models of latches with a halyard handle (versions 01.03), installation on left and right doors is also provided. To do this, it is necessary to swap the locking mechanism and the cylinder mechanism from the handle body.

As you can see, fitting a lock into a door is not such a difficult task, the main thing is not to rush.
—————————————-
Photographer: Vladislav Mazitov